A mailing list is an activity of sending letters. Newsletters are the most important tool for interacting with your customers and registered users. By using the newsletter, you provide customers with information to use your account, provide login details for your membership portal, send notifications of webinars, discounts and special offers, and inform them of your account news.
Click on the desired section of the article to go to its description:
How to create a broadcast
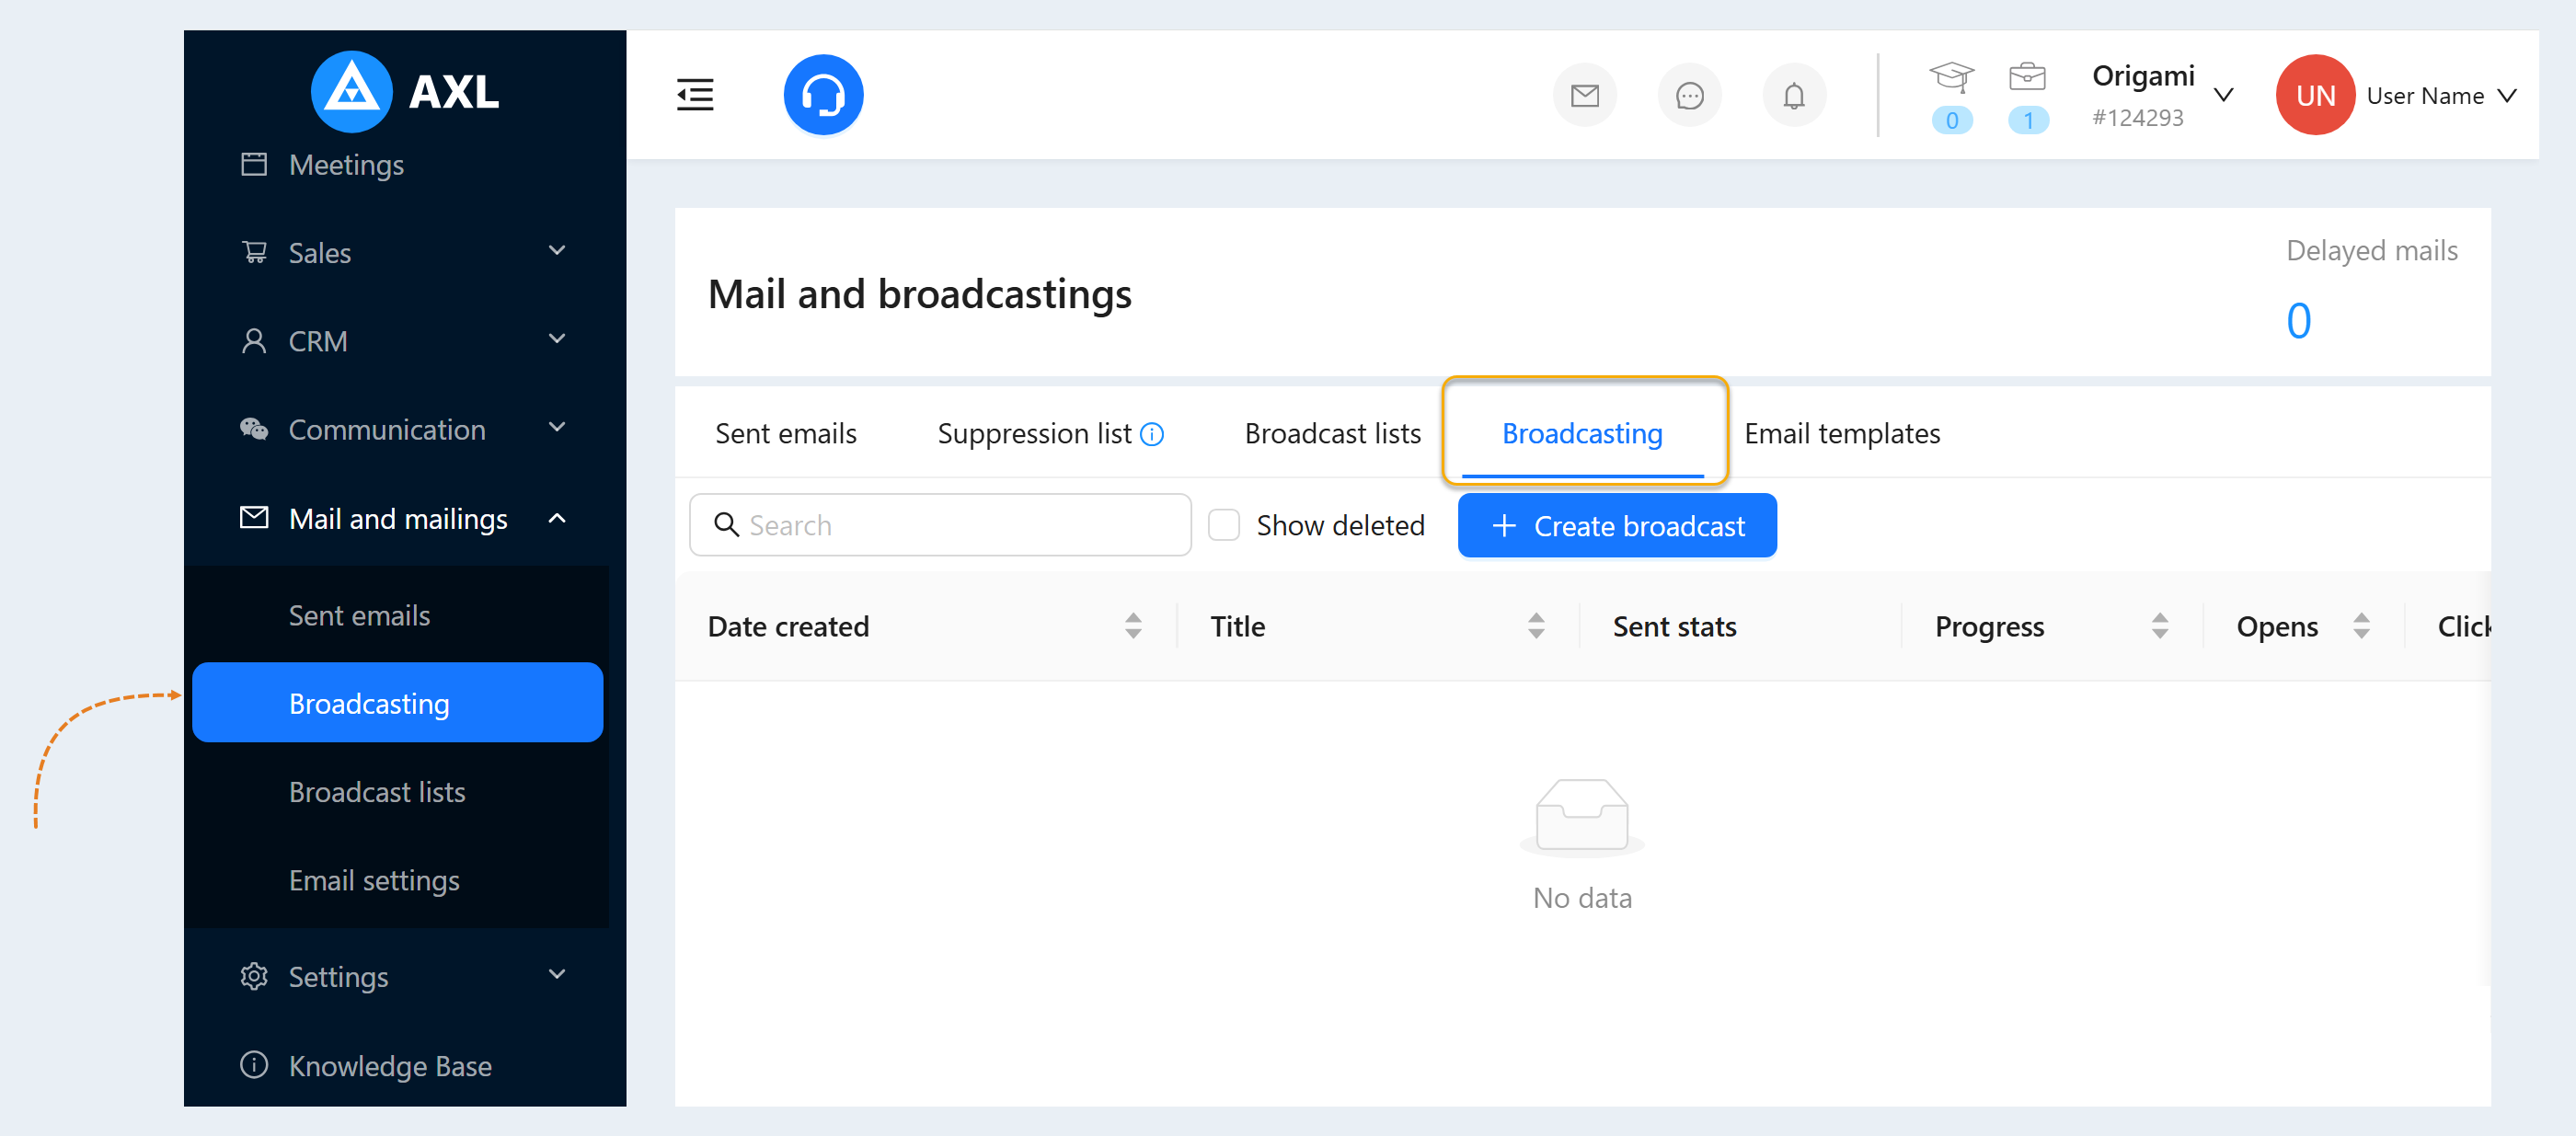
Go to the "Mailings" tab. Here you can create broadcast and manage existing ones. Click the "Create broadcast" button.
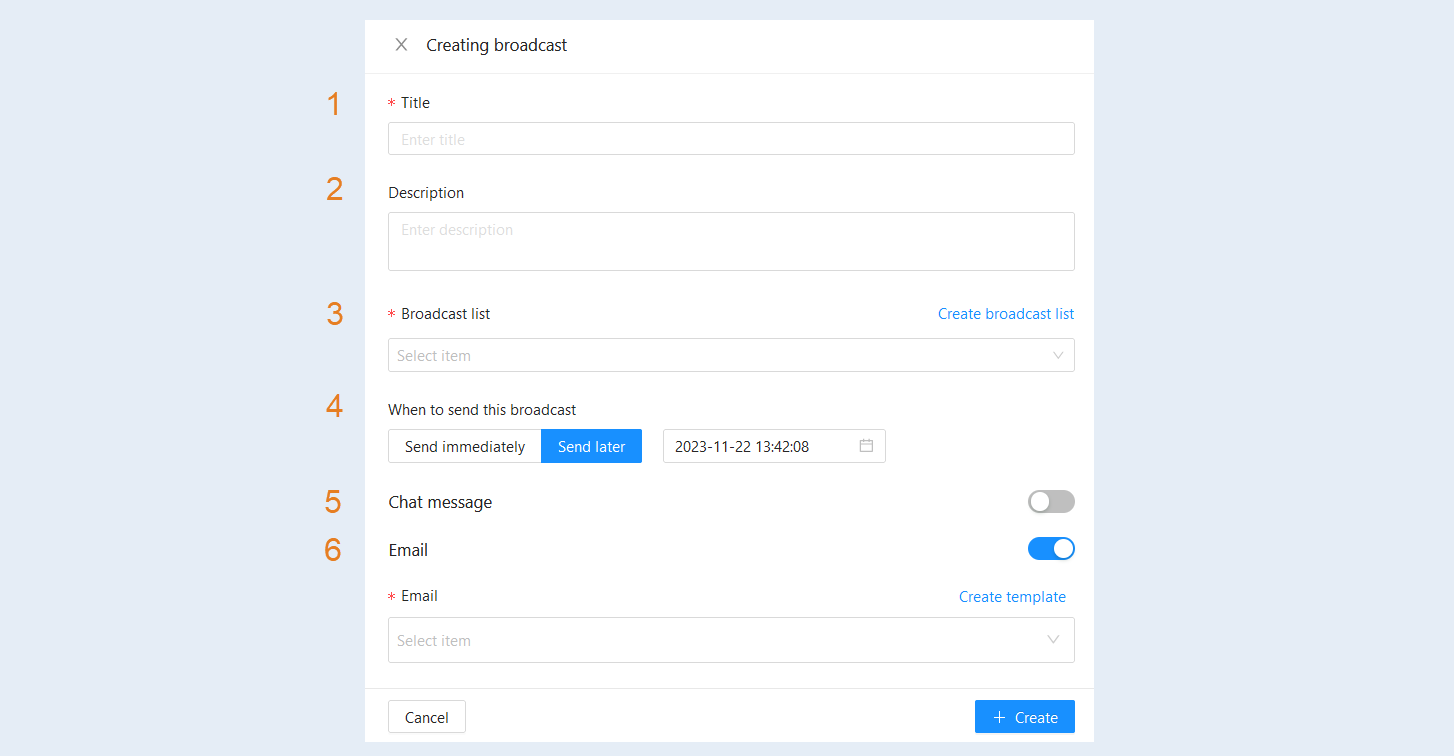
In the window that opens, fill in the fields:
Title. Choose a name by which you will immediately understand what this newsletter is about.
Description. Add a description to the newsletter, by which you can quickly determine what this newsletter is about.
Broadcast list. Select from the list or click the "Create mailing list" button. Read more about how to create a mailing list in the article "Mailing Lists".
When to send this broadcast. Select "Send immediately" - emails will be sent immediately after you click the "Save" button, or "Send later" - emails will be sent at the time you specified. Set the date and time in the field. Click OK.
Chat message. Move the slider to the active position to set up the newsletter via chat channels. The newsletter will be sent to contacts who are subscribed to the selected chat channels. The settings of this block are described in more detail below.
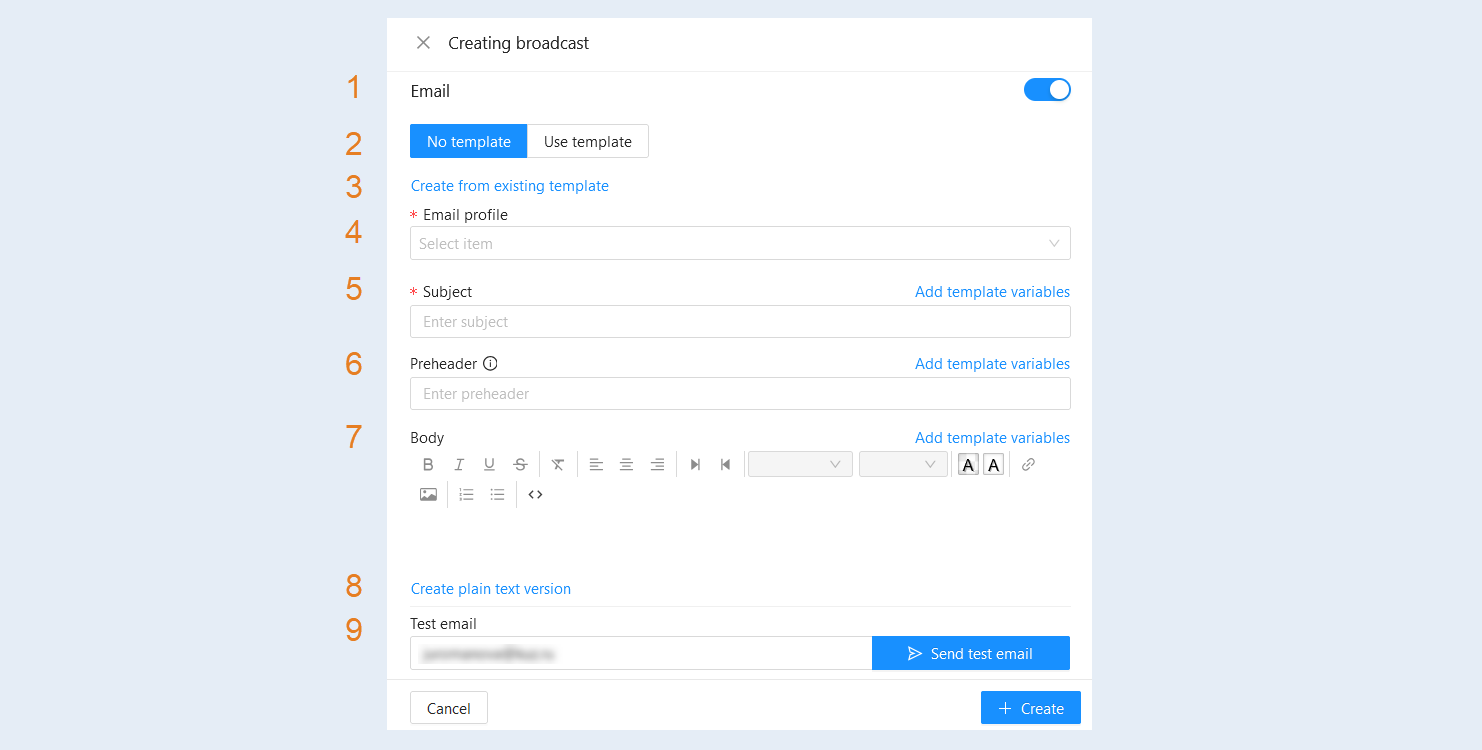
Email. Move the slider to the active position to set up email newsletters. The settings for this block are described in more detail below.
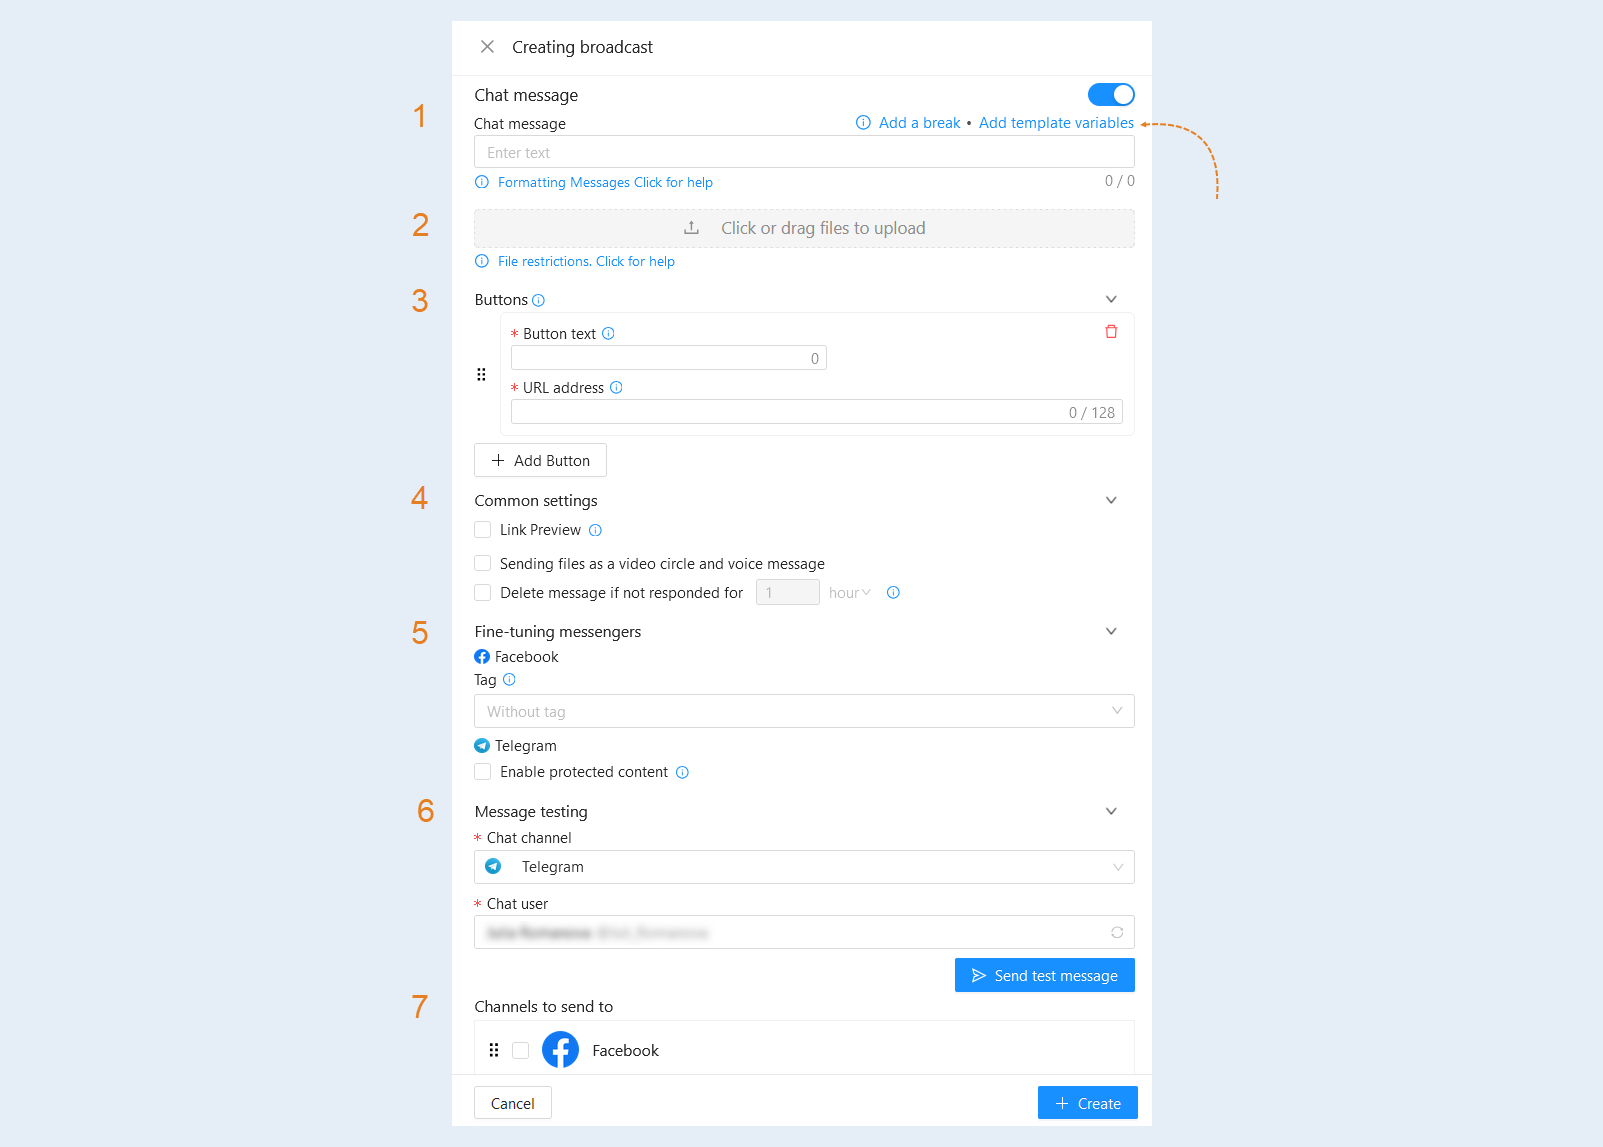
Chat message. Move the slider to the active position to set up the newsletter via chat channels. The newsletter will be sent to contacts who are subscribed to the selected chat channels.
- Chat message. In the field, write the text of the message that users will see.
- Add a break. This option allows you to manually specify where the message should be divided into parts. This is useful if you want to control how the text is split into individual messages, especially if the automatic character separation does not meet your requirements. If your message exceeds the maximum number of characters allowed per message, it is automatically split into parts. However, automatic splitting may not always be optimal, for example, if it breaks a sentence or paragraph. Using the "Add break" button, you can independently specify exactly where the separation should take place in order to preserve the logical structure of the text.
Add template variables. This option allows you to insert special variables into the text of the message, which will be automatically replaced with the corresponding data when sending. For example, you can add a variable for the recipient's name, date, or other personal information. Using variables makes your messages more personalized and adaptive. This is especially useful for mass mailing, where each message must be addressed to a specific person or contain unique data.
Formatting messages. Click on the informational message to open the table for marking chatbot messages. In this table, you will see which chatbots support the necessary message markup (bold, italic, underline, strikethrough, link, spoiler, code).
Click or drag files to upload. You can add files to the mailing list. Click the button and download the files from your device (computer, laptop).
File Restrictions. Click on the informational message to open the table of parameters and limitations for various messengers. Sending a message in the form of a video bubble is available for Telegram. Sending voice messages is possible for Telegram, Facebook, WhatsApp, Instagram.
Buttons. You can add buttons to sent messages via various chat channels. This system works universally for each channel. You set up just one step, and it will function similarly in Telegram, Viber, Facebook and other messengers. The buttons will stop working 6 months after sending the message. The maximum number of buttons for Viber is 7 in one message (buttons cannot be divided into several messages, since when sending a second message with buttons, the first buttons disappear). There are no restrictions on the number of buttons for other messengers. Buttons are not supported in Wazzup24 chat channels (only WhatsApp channel is supported). Click "Add Button" to open additional fields for button settings:
- Button text. Specify the button text that users will see. Facebook Instagram: The maximum length of the button text for different channels: Telegram - 4096 characters, Viber - 7000 characters, Vkontakte - 4000 characters, Facebook - 2000 characters, WhatsApp - 4096 characters, Instagram - 1000 characters, Line: 5000 characters. If the text turns out to be longer than allowed, it will be cut off.
URL address. Specify the link to go to. The maximum link length is 128 characters. Links support variables, as in the message text.
Restrictions for WhatsApp - navigation by direct links is not supported, the link to go will be sent in the next message when the button is clicked.Add Button. Click the button to add another button to the message. Set up the button settings similar to the previous one. You can add up to three buttons to the message.
Common settings.
- Link preview. This feature allows you to preview the content of links before opening them in full format. For example, if you receive a link to a website, the messenger will automatically show you a preview of this content, including the title, image, and a brief description. This can be useful for quickly determining the safety of links before opening them.
Sending files as a video circle and voice message. This setting allows you to change the format of the files you send. Instead of sending files in their original format (e.g., photos in JPEG format), you can choose to send files as a video loop or a voice message. Files can also be automatically converted into the appropriate format to reduce their size and save space on your device or simplify their playback. This can be handy for quickly sending and playing files on mobile devices or adding a special effect to regular messages. The video must be of equal width and height (square) up to 639px, an mp4 file and no longer than 1 minute in length for it to become a video circle. For a voice message, the file must be in ogg format, up to 50 MB. Please note that if you record a voice message on the microphone and attach this file, then in some cases Telegram may not recognize the file as a video circle and a voice message. If you want a message in the form of a video circle and a voice message to always be sent correctly, then you should first talk and send a video circle or a voice message to yourself (or a friend) in Telegram. Then save the video circle from Telegram to your computer and only after that attach this file. The file recorded and saved from Telegram will always be sent correctly and in the right format.
Delete message if not responded for. The message will be deleted if the user does not click on the button or does not respond within the specified time. Please note that this function works in: Telegram and Internal Chat.
Fine-tuning messengers. Messenger settings allow you to set up privacy and security, such as content protection, link preview, etc. These settings allow you to protect your data and adapt the messenger to your needs and preferences.
- Facebook.Tag. A message without a tag will not be sent if more than 24 hours have passed since the last message. A tag is needed if you want to bypass the 24-hour rule. If your messages do not match the selected tag, the account may be blocked.
Select a tag for the Facebook channel:
ACCOUNT_UPDATE - non-periodic update of the user's account. Cannot be used for advertising.
CONFIRMED_EVENT_UPDATE - reminder of an upcoming event or update on an event in progress, for which the client is registered. Cannot be used after the event has passed, or for sales and surveys.
CUSTOMER_FEEDBACK - customer feedback survey. Messages requesting feedback from the customer must be sent within 7 days of the customer's last message.
POST_PURCHASE_UPDATE - notification of order payment. Cannot be used for sales. Telegram. Enable protected content. The “Content Protection” function in Telegram helps prevent forwarding, copying and unauthorized access to text and multimedia.
- Facebook.Tag. A message without a tag will not be sent if more than 24 hours have passed since the last message. A tag is needed if you want to bypass the 24-hour rule. If your messages do not match the selected tag, the account may be blocked.
Message testing. This function allows you to select the desired channel and user, and the system will send him a test message. For the convenience of subsequent testing, the selected user is saved in the system.
- Chat channel. Select a chat channel from the list.
Chat user. Select a user from the list.
Send test message. Click the button to send a test message to a contact from the selected chat channel.
Channels to send to. Below is a list of channels for sending messages. The system will try to send a message through the selected channels in the specified order. If it is not possible to send a message through any channel, an email will be sent. For more information about channel settings, see the article "Chat Channels".
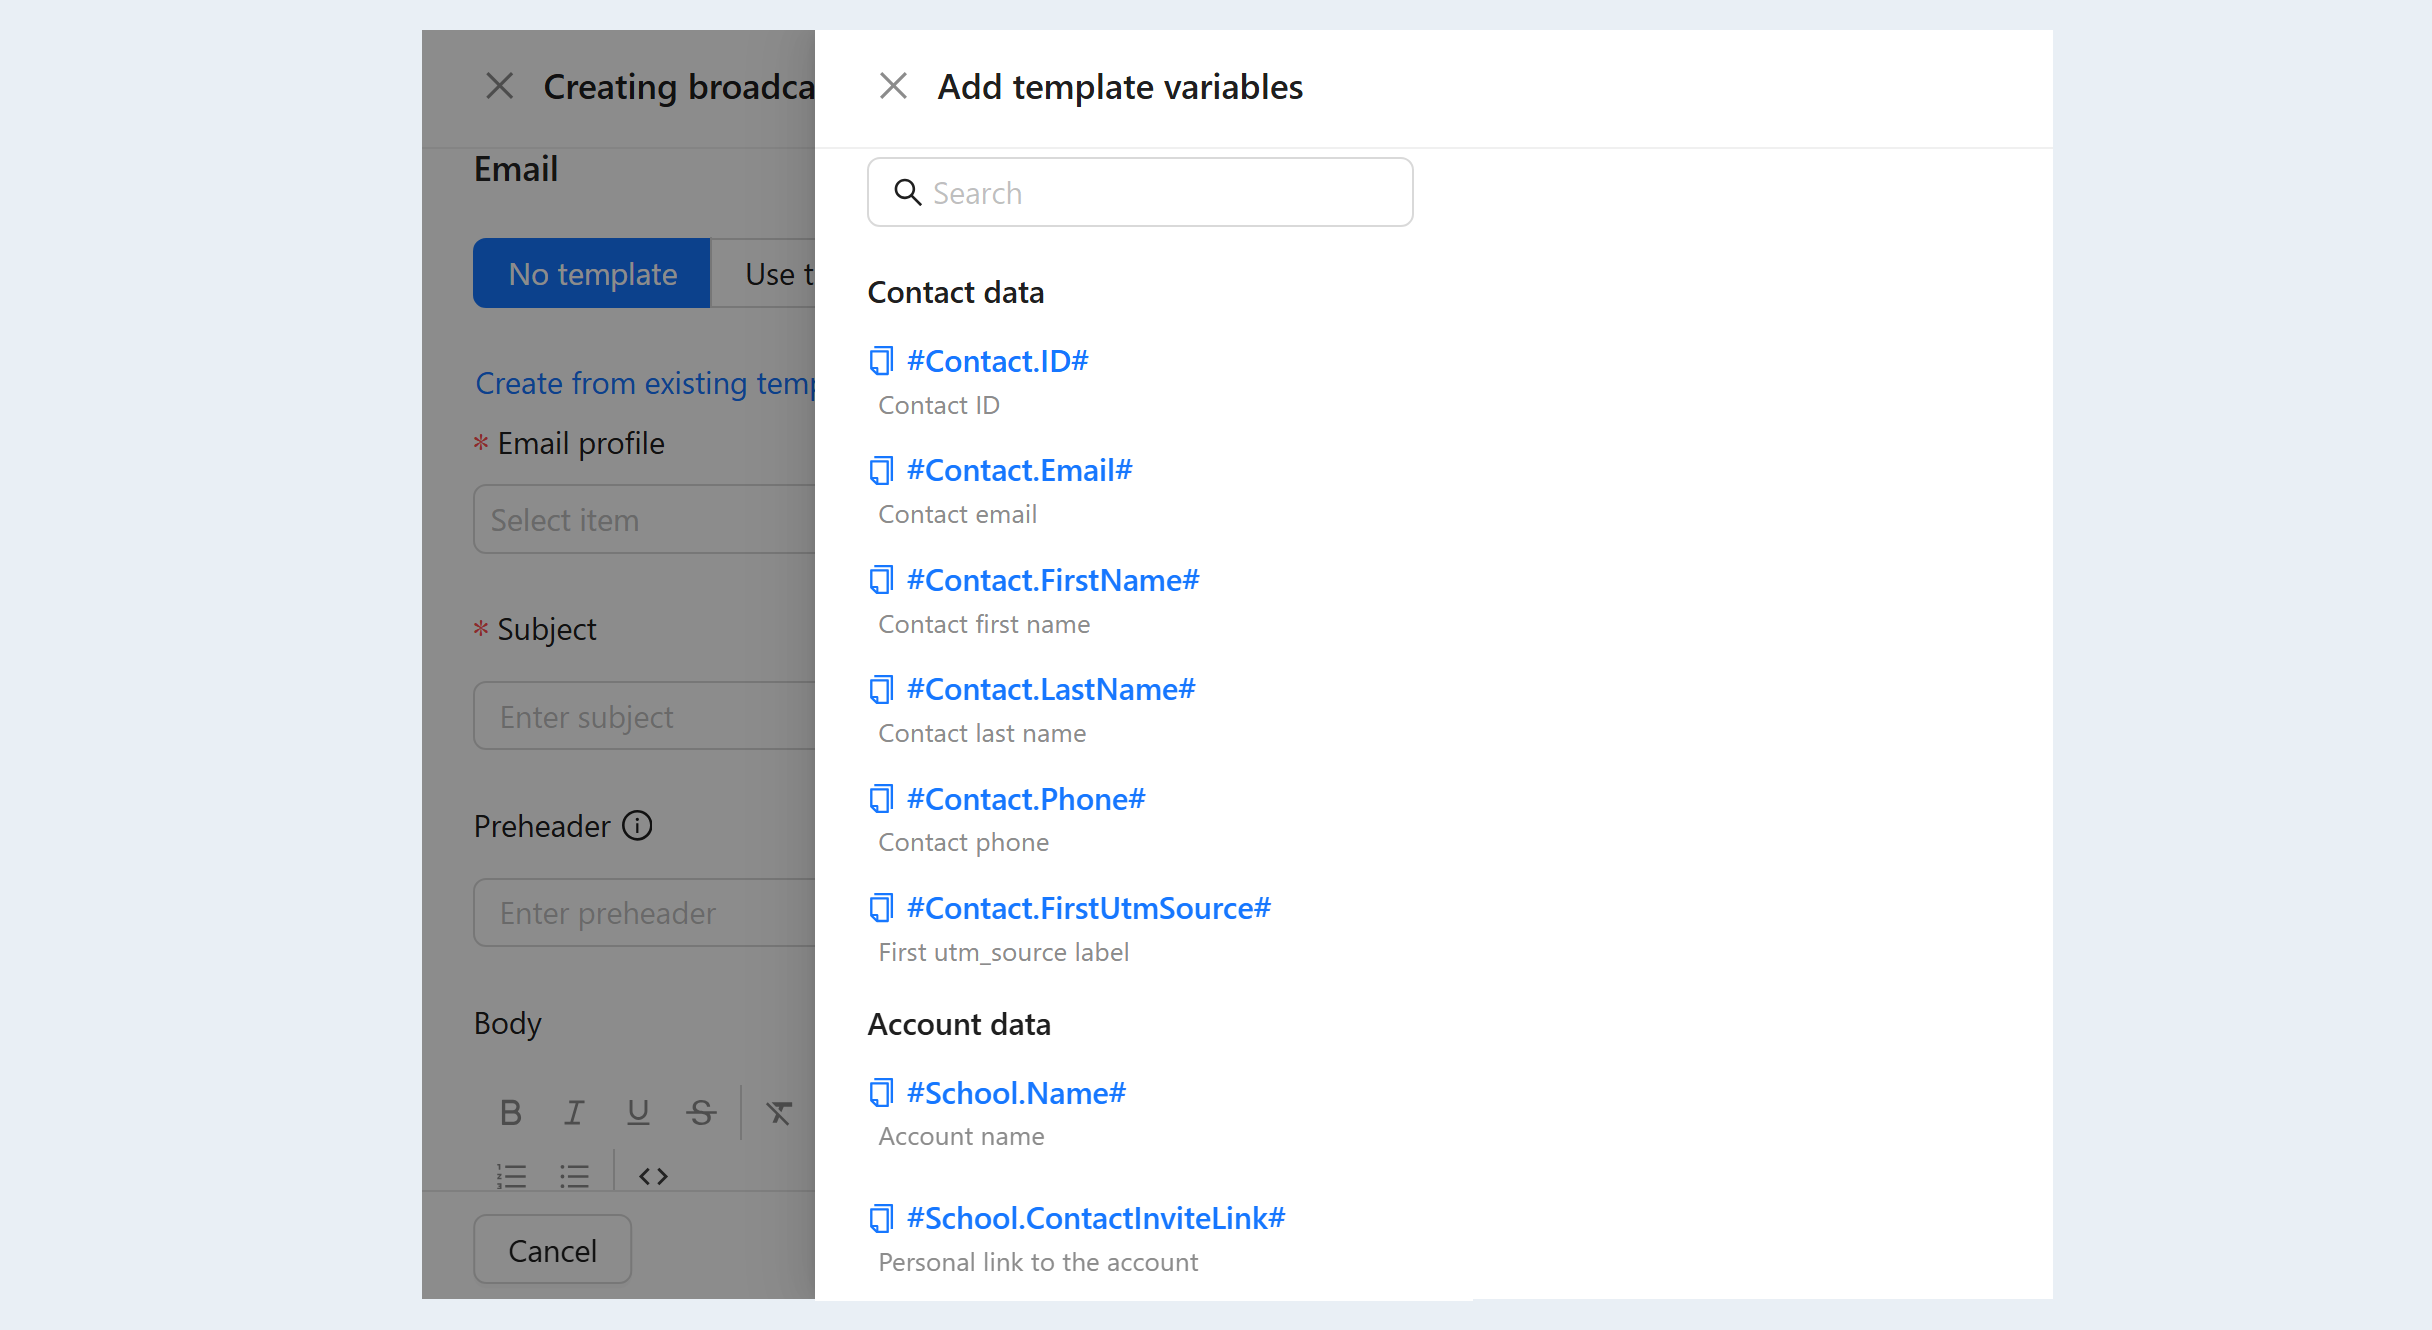
You can add variables to the message text.
A template variable is a value to be automatically replaced with the data you selected. This can be the contact's name, e-mail, account name, personal link to the membership portal, etc. Variables will automatically replace the data in the email. For example, specify the variable “Contact Name” and when sending an email, this variable is replaced with the recipient's name. Or select the variable "Personal link to the membership portal" so that the user can follow the link to the membership portal's personal account..
Click the "Add Template Variables" button. A list will open on the right. Select the necessary variables from the list, they will be added to the message text.
Email.
- Email. Move the slider to active to configure email newsletters.
Template. Choose a letter template or click the "No template" button. You can create a new template for the newsletter. For more information on how to create a template, refer to the article "Email Templates". Choose: create a new template or use an existing template.
Button "Create from existing template". Click to create a letter based on an existing template.
Email profile. Choose from the list the tool that will be used to send the letter. This can be a built-in or integrated tool. Read more in the article "Email Settings".
Subject. Write the subject of the email in the field.
Preheader. This is a snippet of text that appears in the inbox immediately after the sender's name and the subject of the email.
Body. Write the body text of the email.
Button "Create plain text version". The text version of the email is necessary for better deliverability. If you do not create it, it will be generated automatically.
Test email. Specify the email address and click the button to send a test message.
After completing the mailing list settings, click the "Create" button. On the "Mailing Lists" page, you have a newsletter created by you.
Mailing management
After you have created a mailing list, you can manage it: edit, copy, delete. Go to the "Mailings" tab. The following information is available here:
- Date of creation of the mailing list. The exact date and time of the mailing list creation is shown. The employee who created the newsletter is also indicated.
- Name. Click on the title if you want to edit the newsletter. Duplicates the "Edit" button on the right.
- Statistics. The number of emails sent is shown here. Statistics are shown in order: total emails sent, sent with errors, sent by email, sent via chat channels.
- Progress. The column shows the status of sending the newsletter as a percentage.
- Discoveries. Number of message openings. You are comparing two metrics: the number of mailings and the number of openings, in order to understand how many people have opened the letter.
- Clicks. How many people clicked on the link in the email.
- Unsubscribing. How many people unsubscribed from the mailing list when receiving this letter.
- Planned. Dispatch date and time are indicated.
- Status. "Scheduled" - if the letters have not been sent yet, "Sent" - if the delivery has already been completed.
- Actions:
Statistics button. Click to see the mailing statistics.
Edit button. Click to edit the mailing list.
- Copy button. Click to create a copy of this mailing list.
- Delete button. Click to delete this mailing list.
History button. Click to see the mailing history.

A search bar is available at the top of the section. Use it to quickly find the right mailing list.
Check the box "Show deleted". This condition highlights previously deleted mailings.
