The Meetings section is a tool designed to organize appointments for consultations, calls, and face-to-face meetings directly within the AXL platform. This section is fully integrated into the platform's ecosystem, connecting seamlessly with workflows (scenarios), CRM, and the payment system.
Click on a section below to jump directly to its description:
How to Create a Meeting
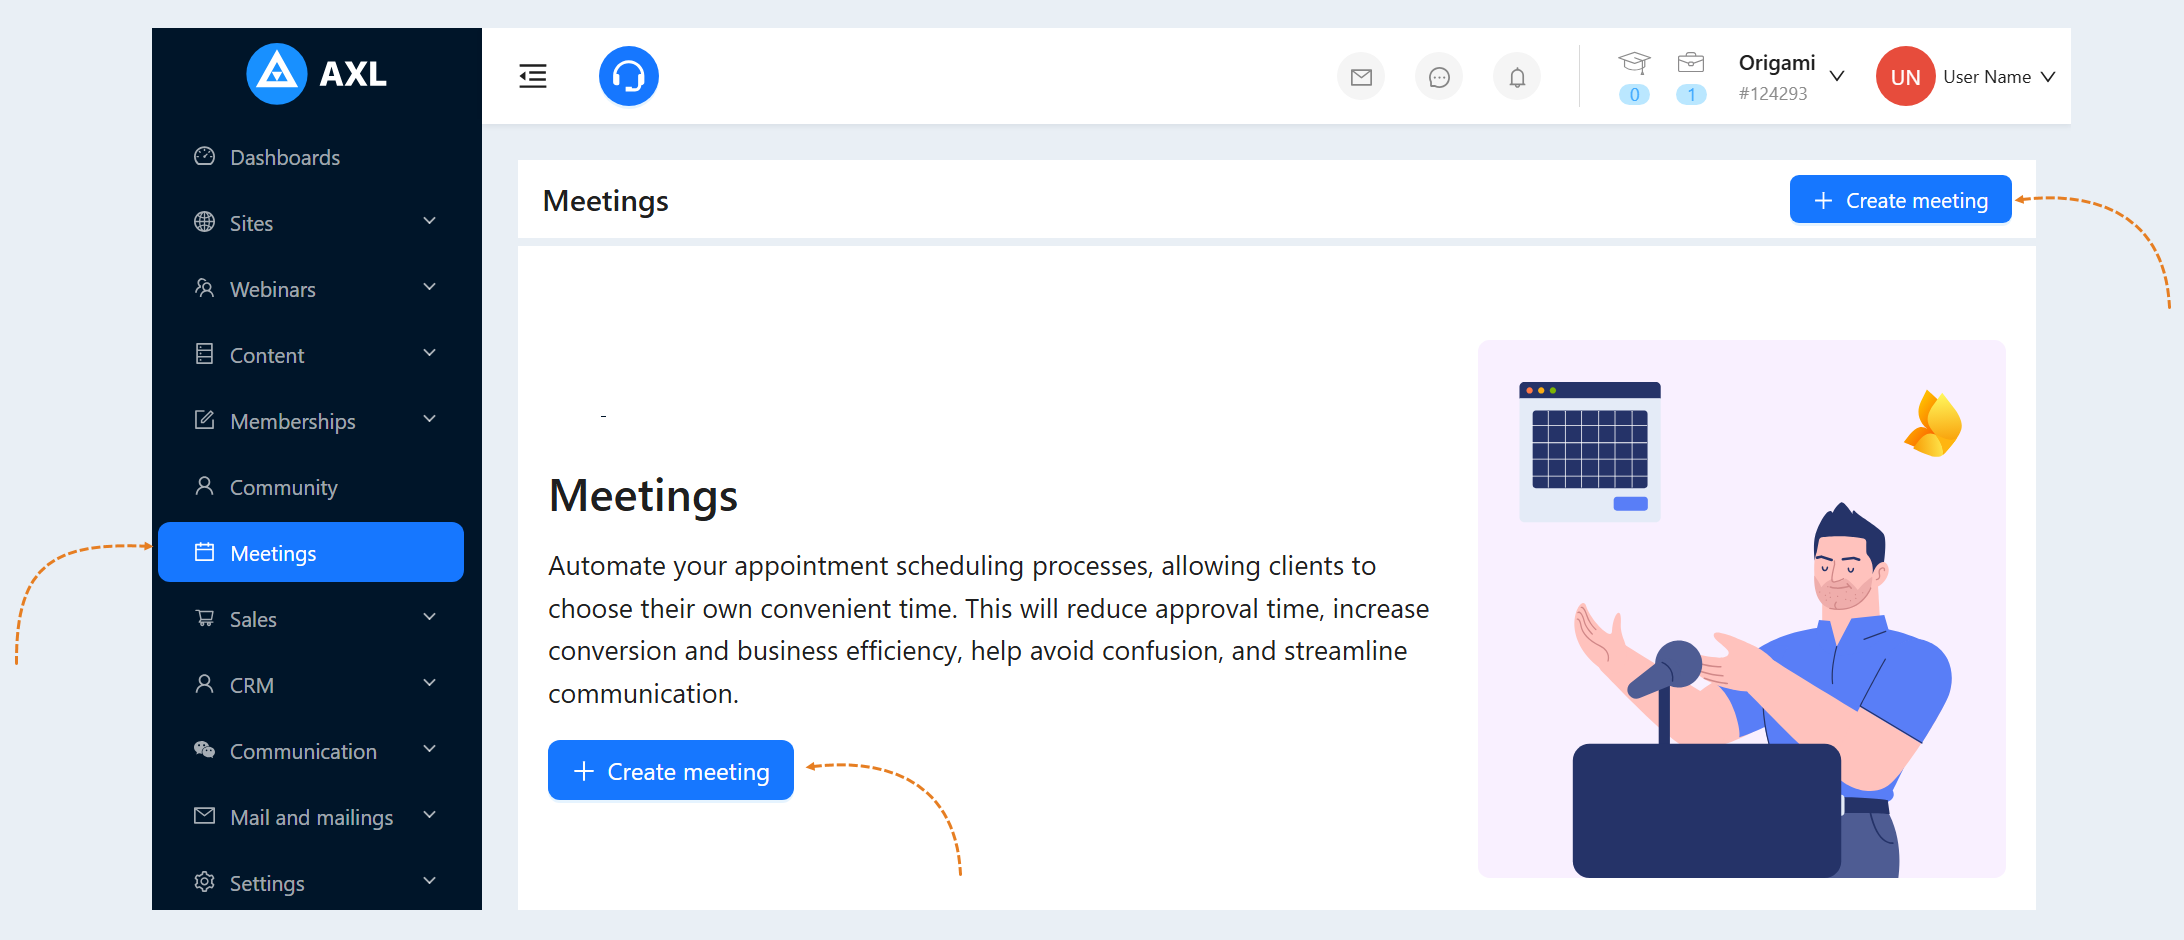
Navigate to the Meetings section and click the "Create meeting" button.
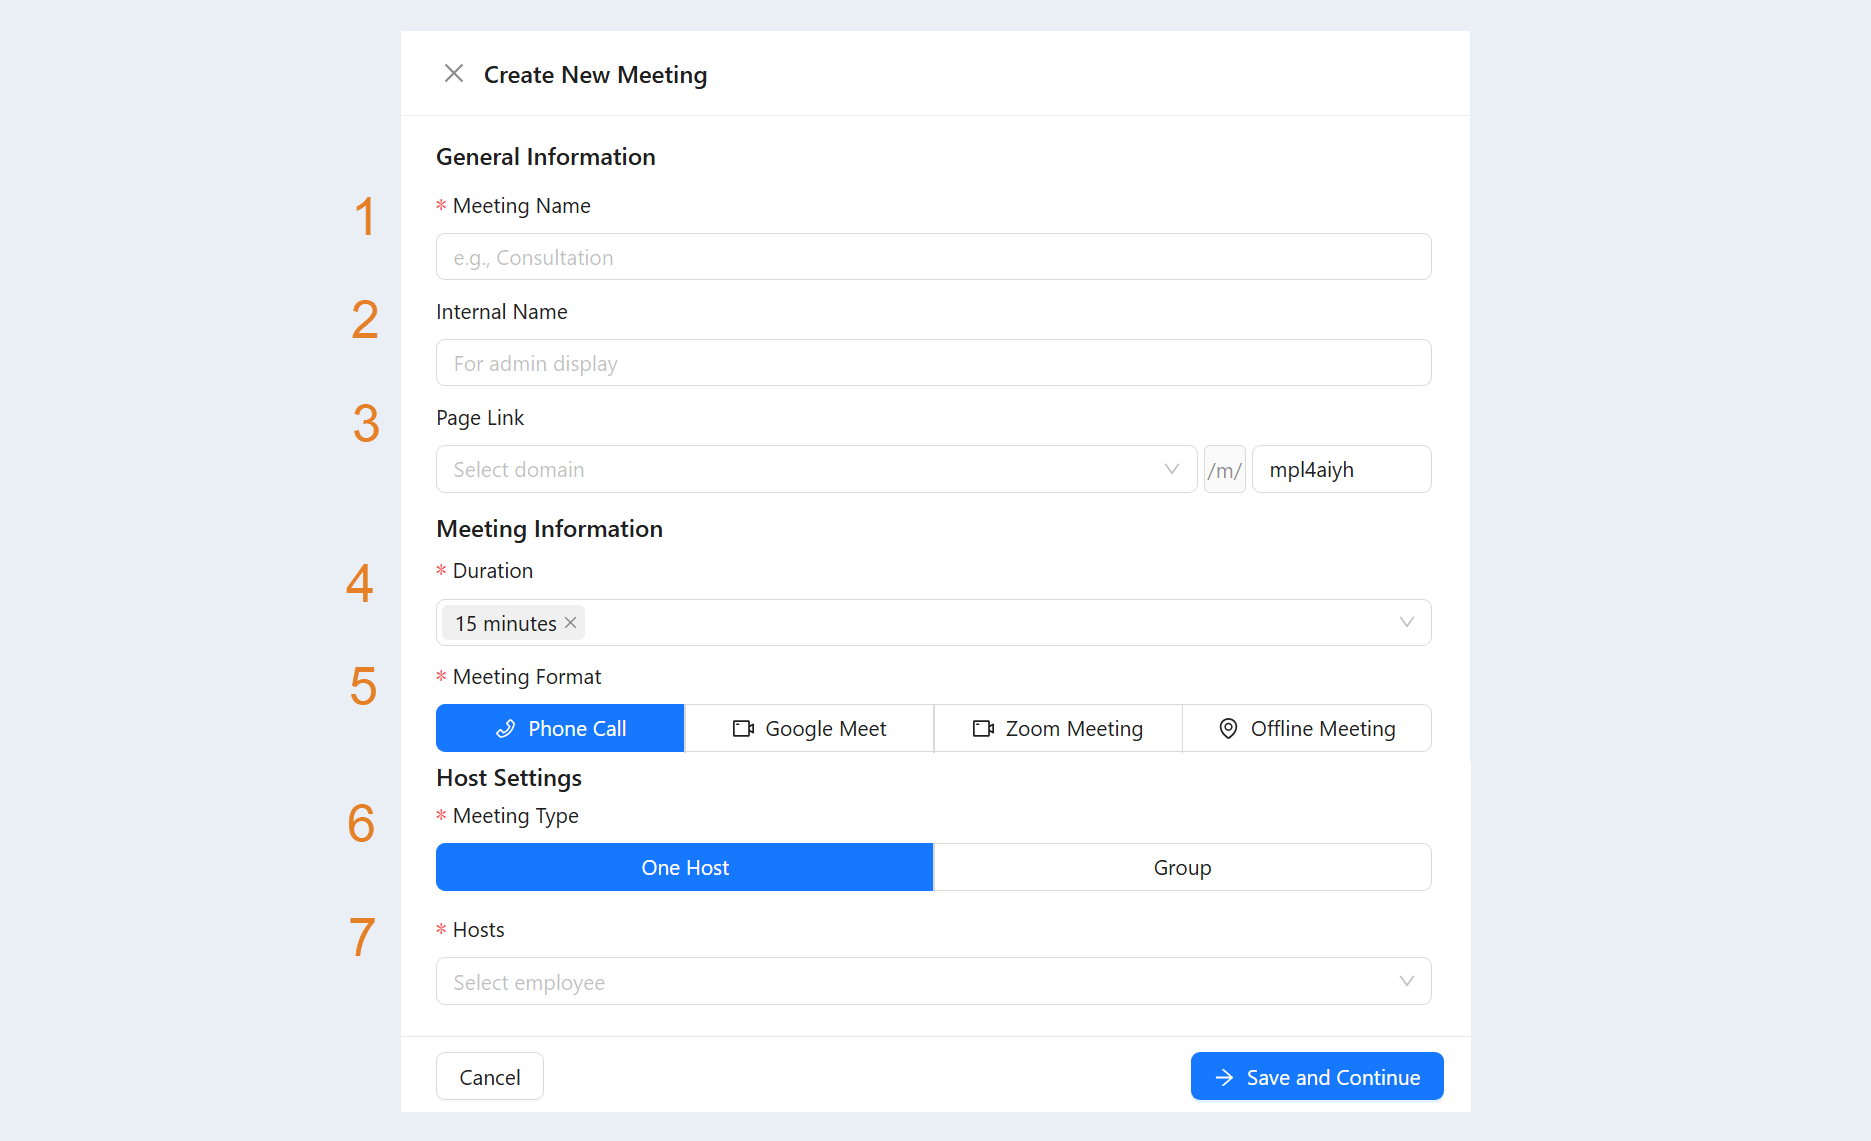
The following meeting settings are available:
- Meeting name. Enter the meeting name that will be visible to everyone.
- Internal name. Enter an internal name for the meeting, visible only to account staff. It will not be shown to users.
- Page link. Select a domain and enter the page path in the field. Below, you will see the full URL of the page.
- Duration. You can offer multiple choices at once (e.g., 15, 30, 45, 60, 90 minutes), allowing the guest to select their preferred duration.
- Meeting format. Choose how the meeting will take place: via Google Meet, Zoom, phone, or offline.
- Meeting type. Choose whether the meeting will be hosted by a single host or multiple hosts.
- Hosts. Select the staff member assigned as the meeting host. If the "round-robin" (sequential) meeting type is chosen, the system will automatically distribute meetings among multiple hosts one by one, factoring in priority and workload.
Meeting Settings
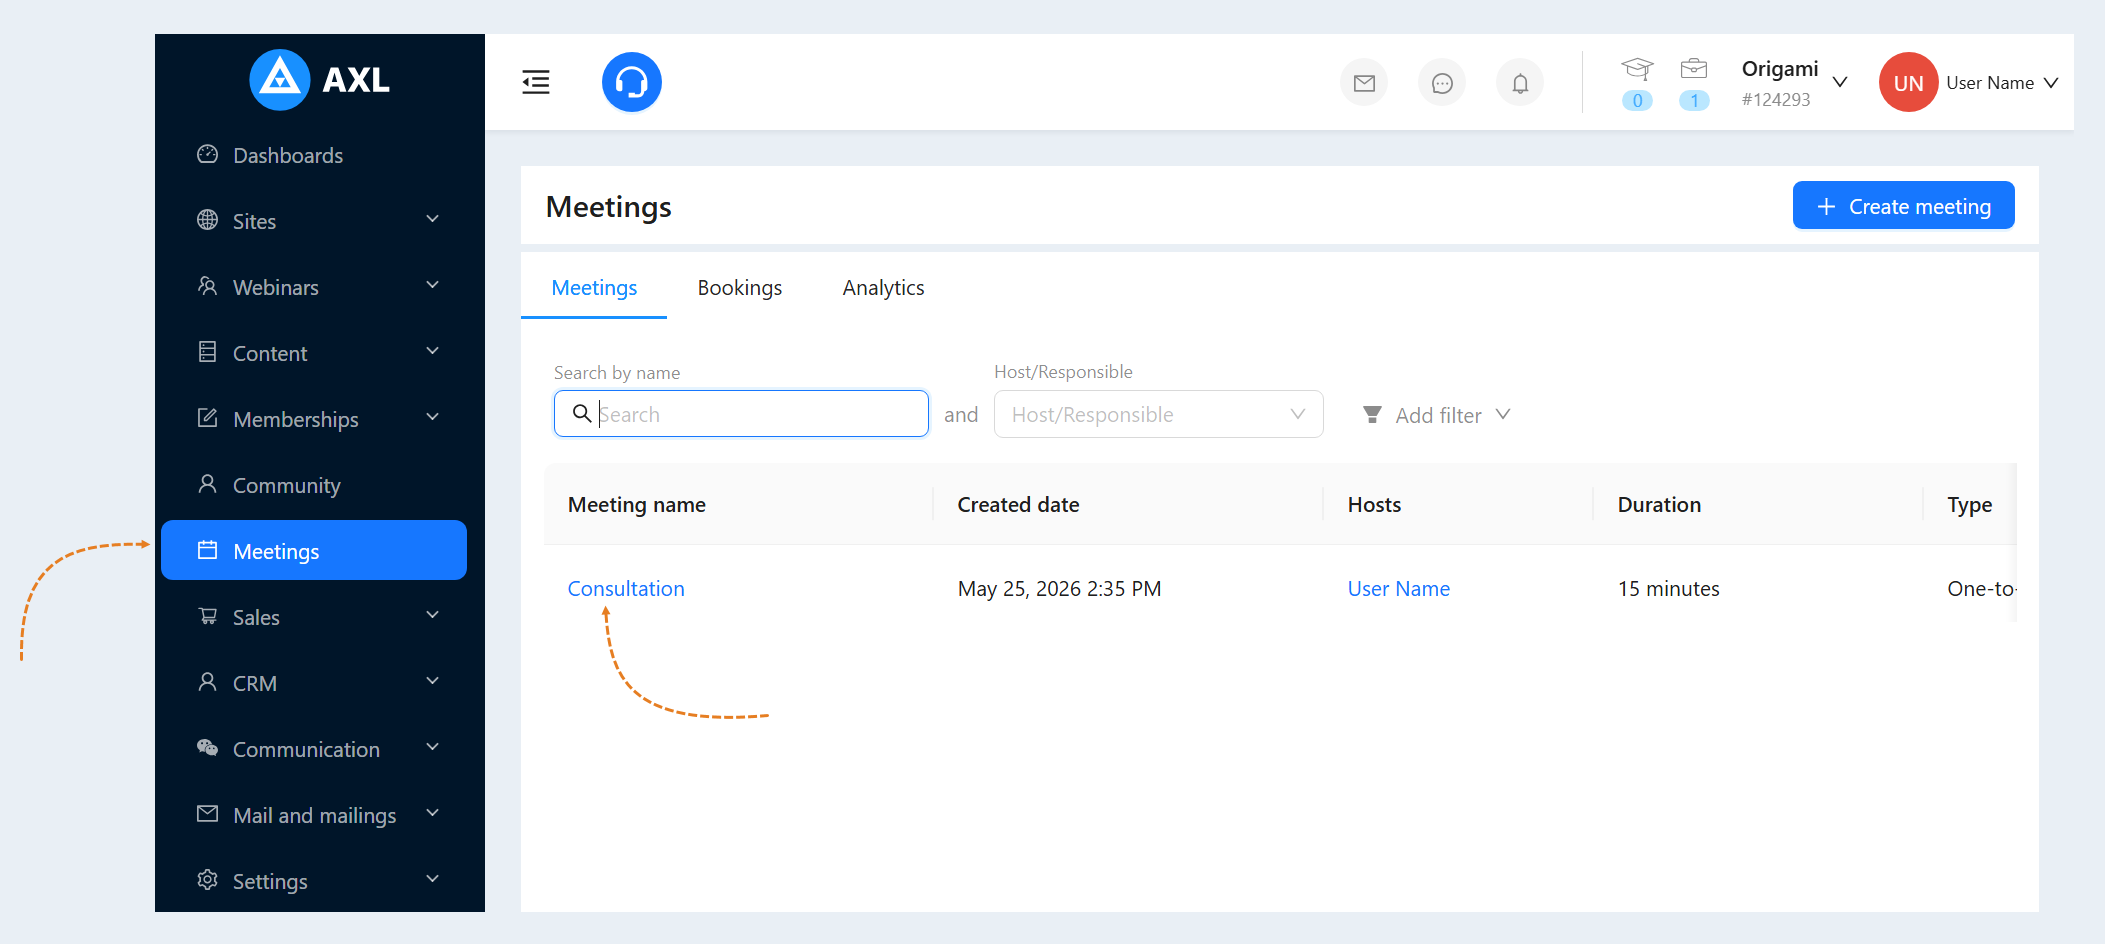
Go to the Meetings section. To open a meeting, click on its title.
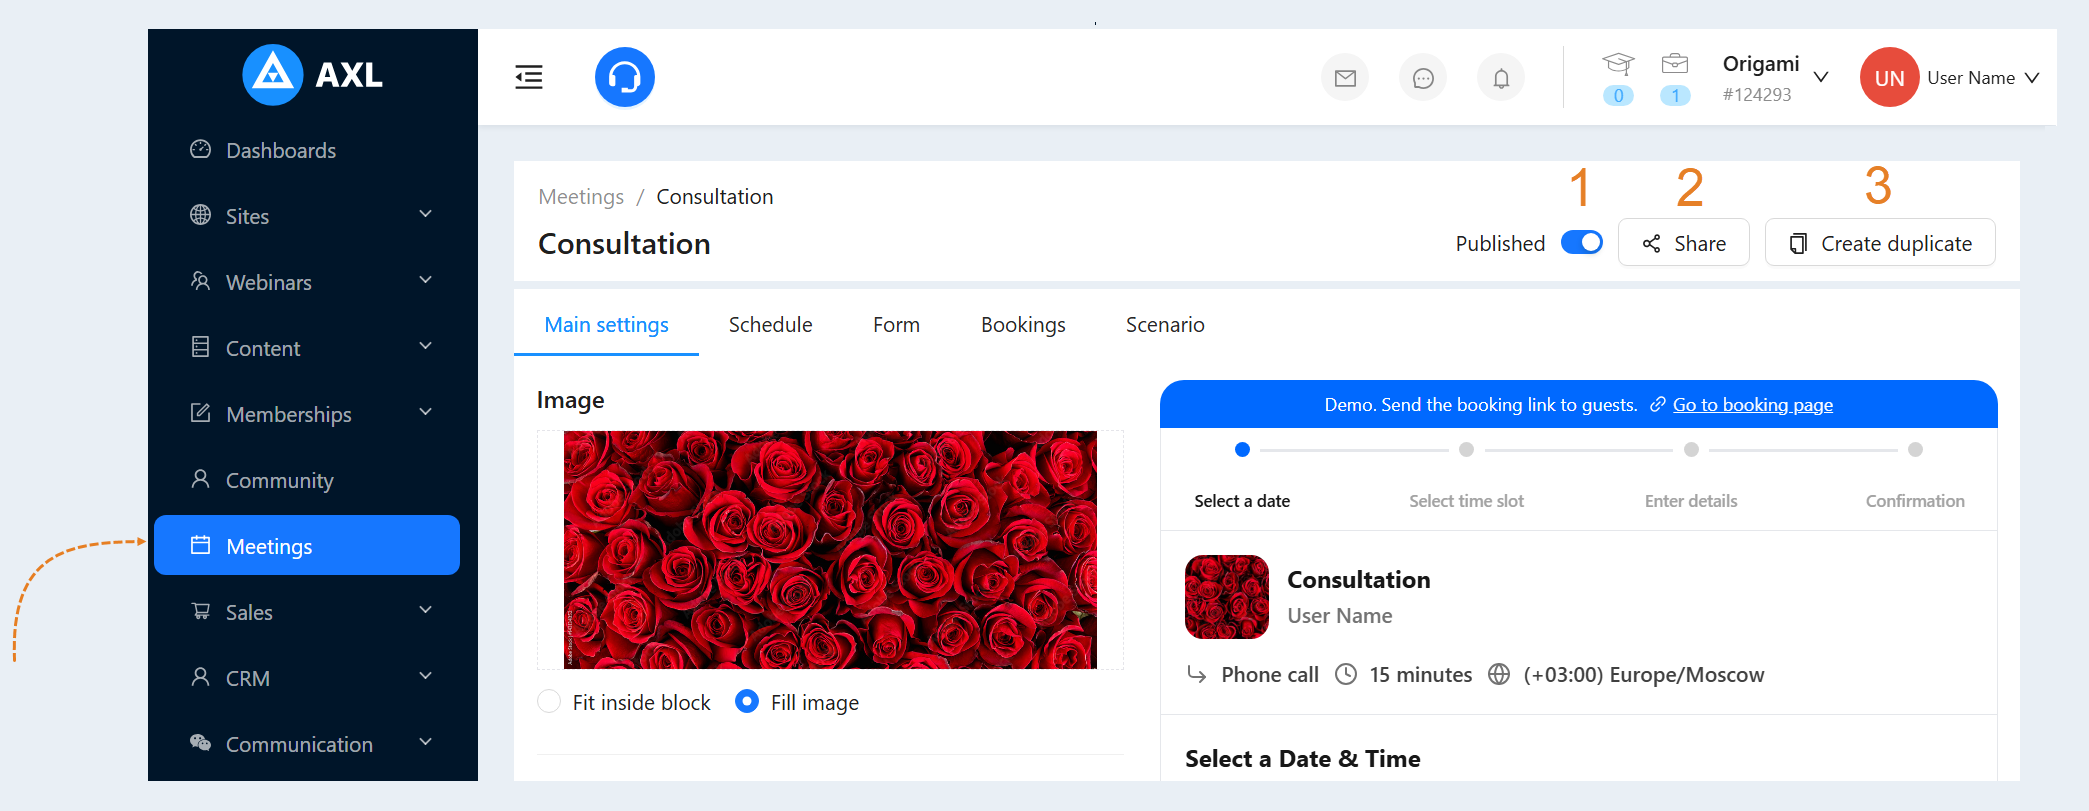
The following features are available in the meeting's top panel:
- Published. This setting determines whether the meeting is visible to users. If a meeting is "published," it can be viewed via the booking page link.
- Share. Here you can find a direct link to the meeting or an HTML embed code for third-party websites. You can also add this meeting to your AXL website page, into a widget, or a course element. Simply enter the website or course editing mode and add the "Meeting" element in the builder.
- Create duplicate. Allows you to create an exact copy of the selected meeting while preserving the configured scenario.
Main settings
Schedule
Form
Bookings
Scenario
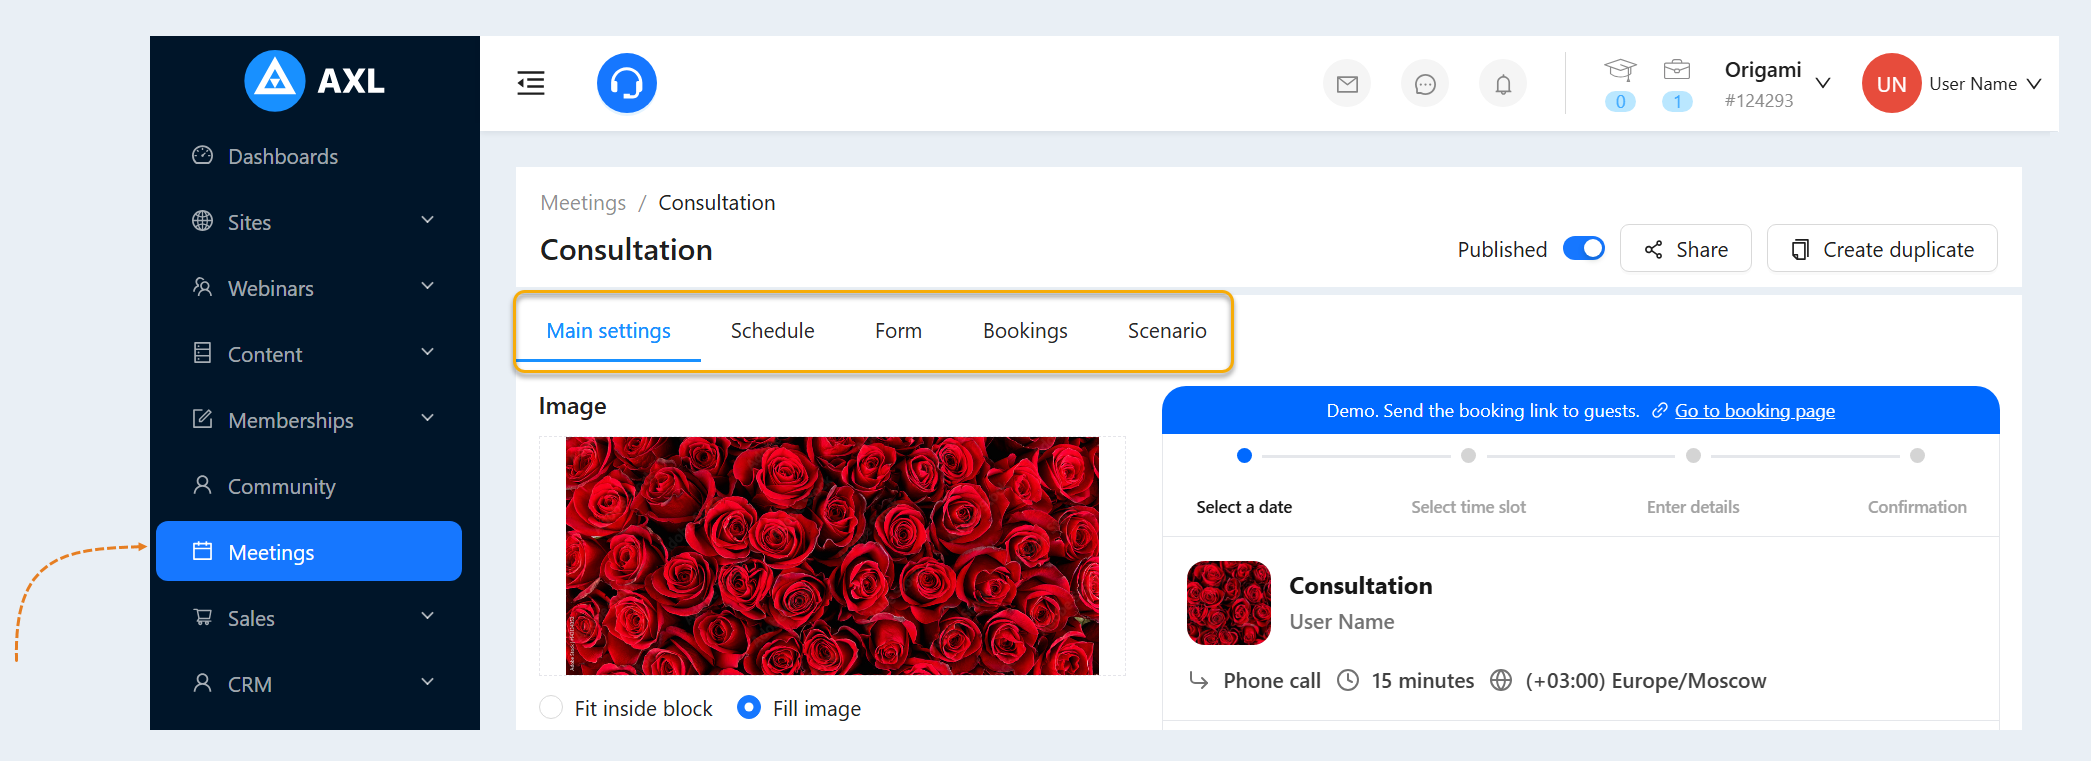
Below is a detailed breakdown of each tab.
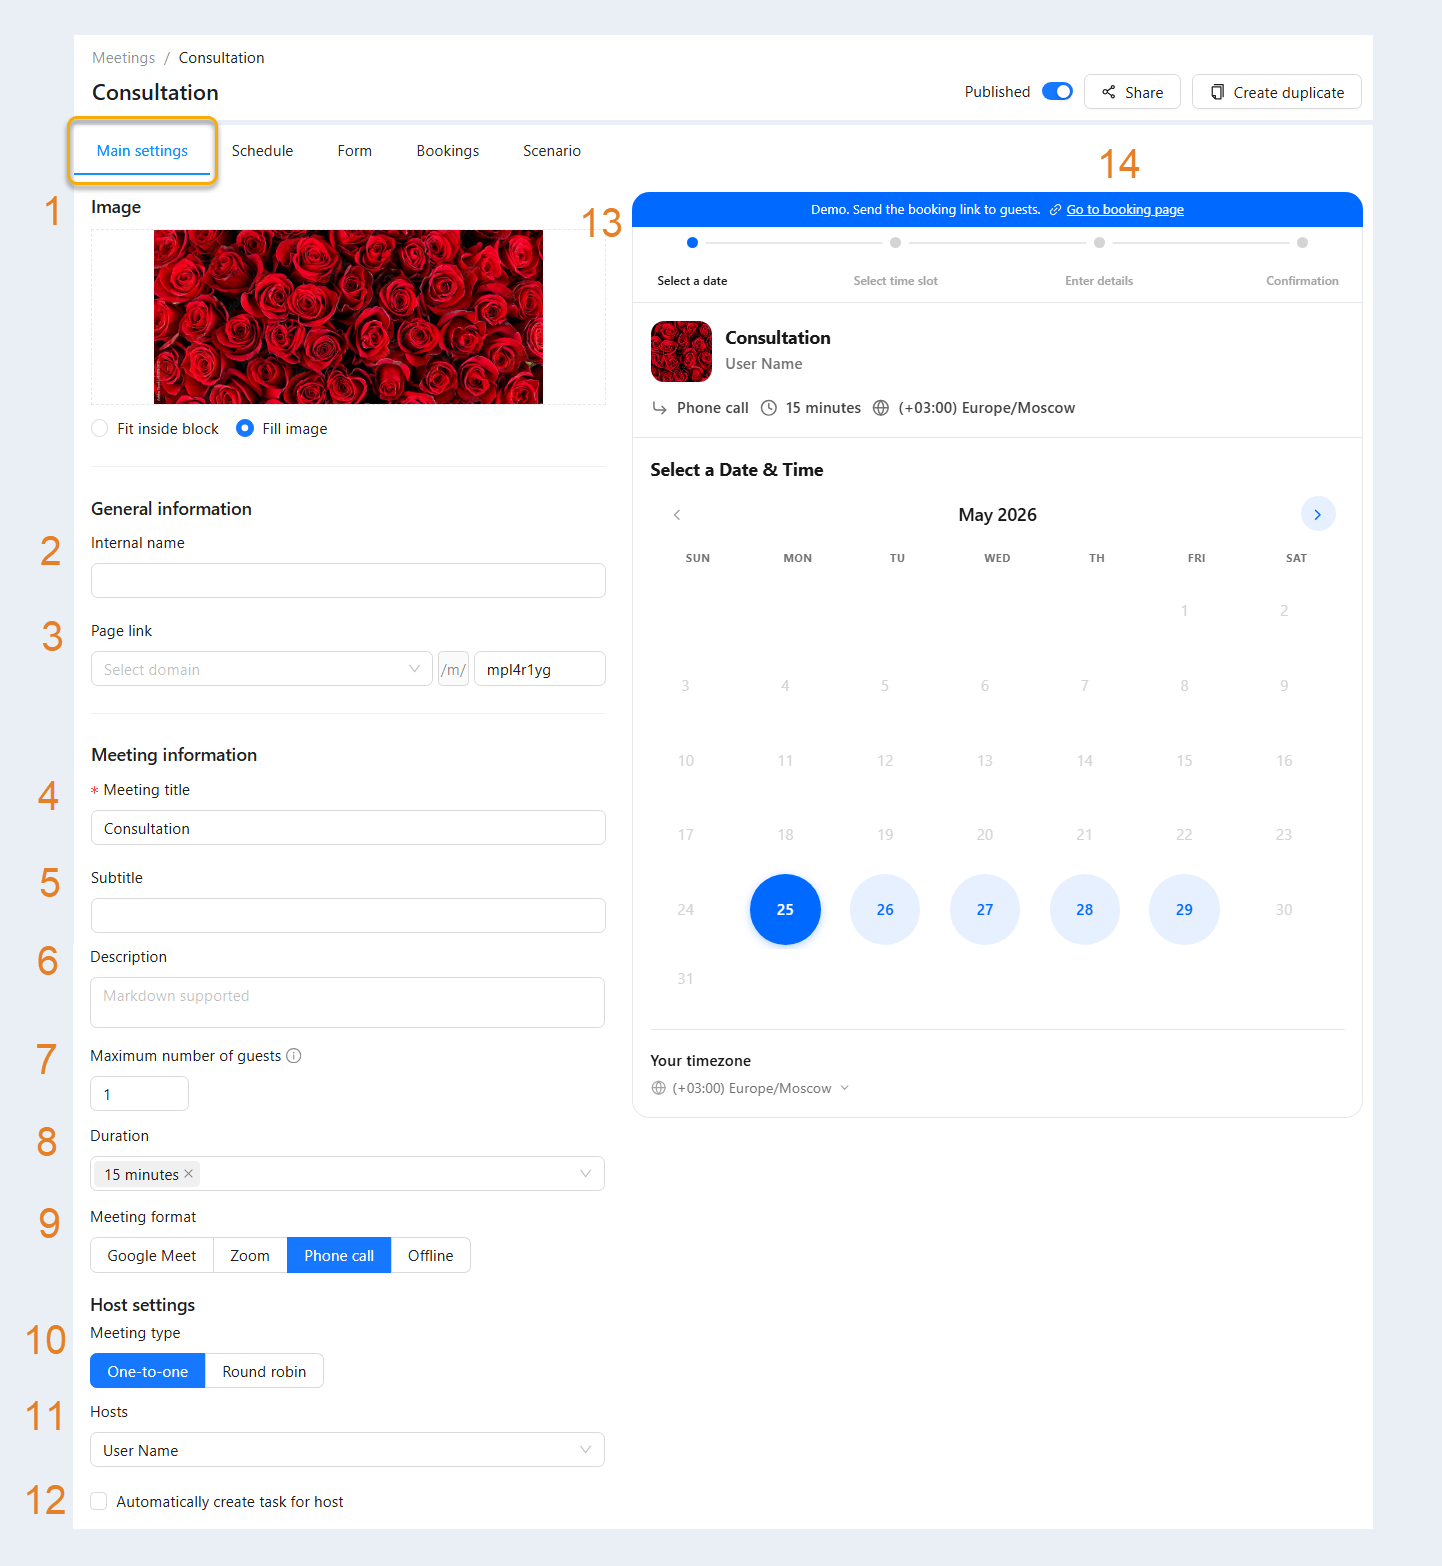
In the "Main settings" tab, the following parameters are available:
- Image. Click on the thumbnail to upload an image from your device. It will be used for the meeting's visual design.
- Internal name. Visible only to you and account staff; it is hidden from meeting participants.
- Page link. Displays the URL of the meeting page. You can modify the link if necessary.
- Meeting title. Displays the meeting name. You can edit it to better match the event context.
- Subtitle. Add a subtitle to clarify the meeting topic. This field is optional.
- Description. Enter a detailed description of the meeting to help participants understand its purpose and content.
- Maximum number of guests. Specify how many participants can join the meeting.
- Duration. Select the duration of the meeting in hours or minutes.
- Meeting format. Choose how the meeting will take place: via Google Meet, Zoom, a phone, or offline.
- Meeting type. Change whether the meeting will have a single host or multiple hosts.
- Hosts. You can change the meeting host.
- Automatically create a task for the host. When checked, a new task will be generated for the responsible administrator whenever a new booking occurs.
- Meeting form demo. Preview a live demo of the meeting form.
- Go to booking page. Click this button to open the live booking page and quickly view what participants see when signing up.
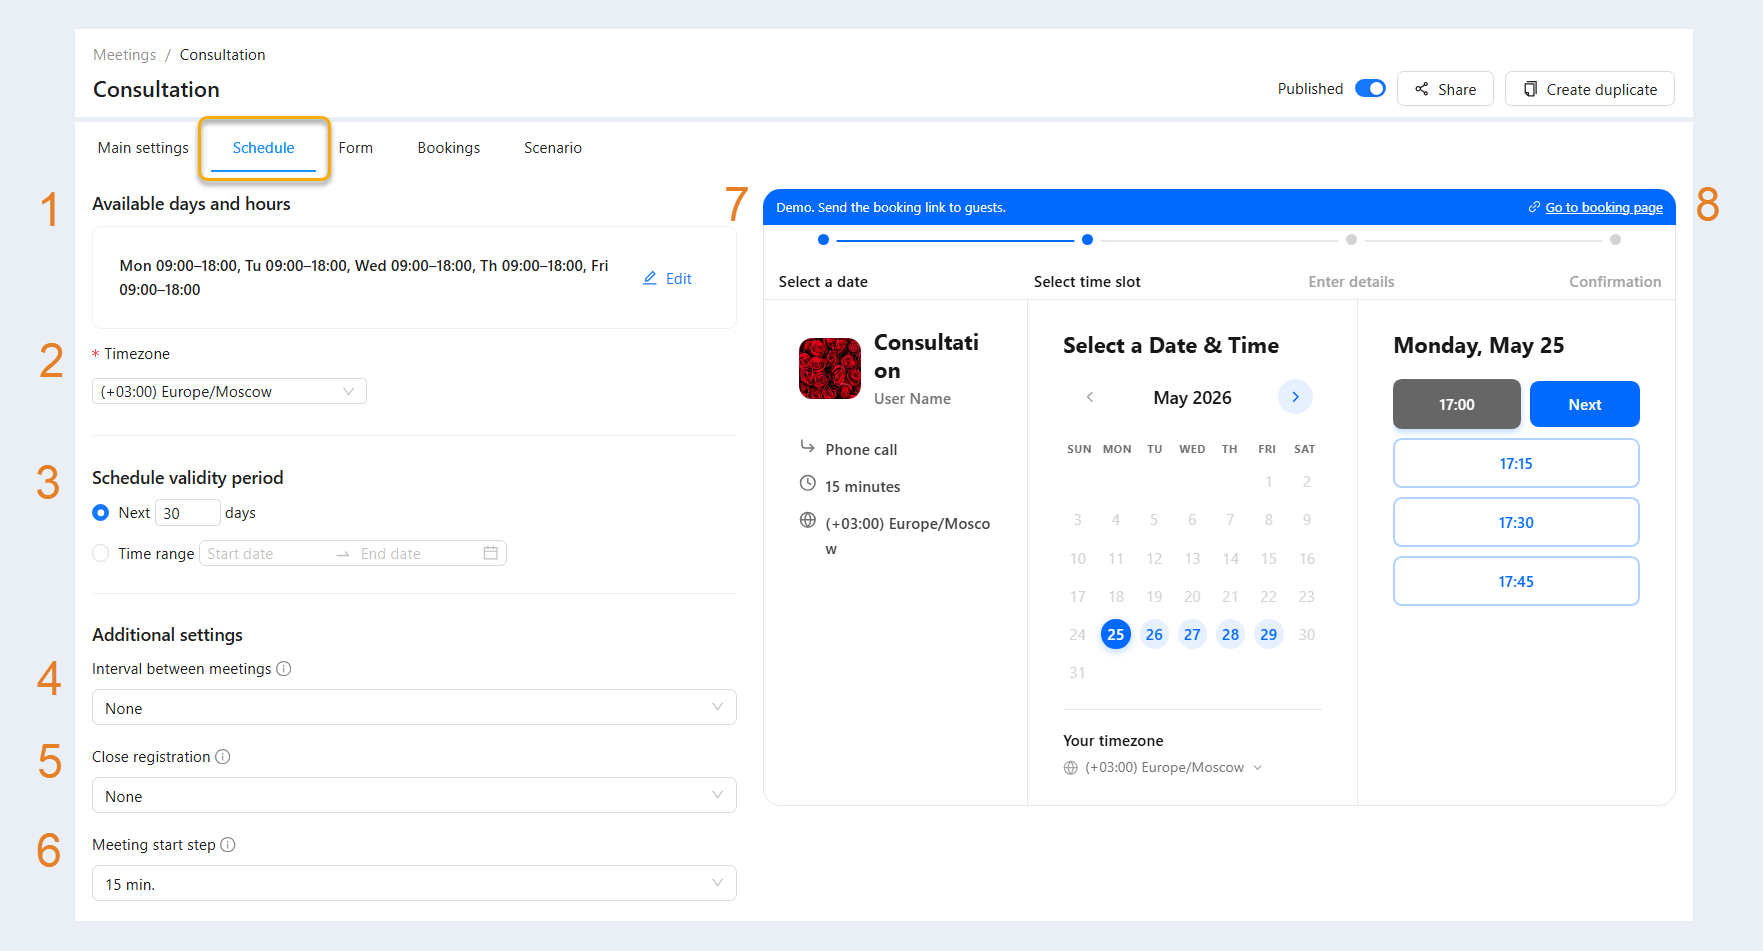
In the "Schedule" tab, the following parameters are available:
- Available days and hours. Select the days of the week and time intervals when clients can book a meeting.
- Timezone. Set the timezone in which available slots will be displayed and meetings will be scheduled.
- Schedule validity period. Set the expiration or active date range for this specific schedule.
- Interval between meetings. Buffer time prevents appointments from being scheduled too close to each other.
- Close registration. Choose the minimum amount of time required before someone can book a meeting with you.
- Meeting start step. The intervals at which meetings can begin. For example, if you are available from 10:00 to 12:00 and the increment is set to 15 minutes, clients can book slots at 10:00, 10:15, 10:30, 10:45, and so on.
Meeting form demo. Preview a live demo of the meeting form.
Go to booking page. Click to quickly open the client-facing registration page.
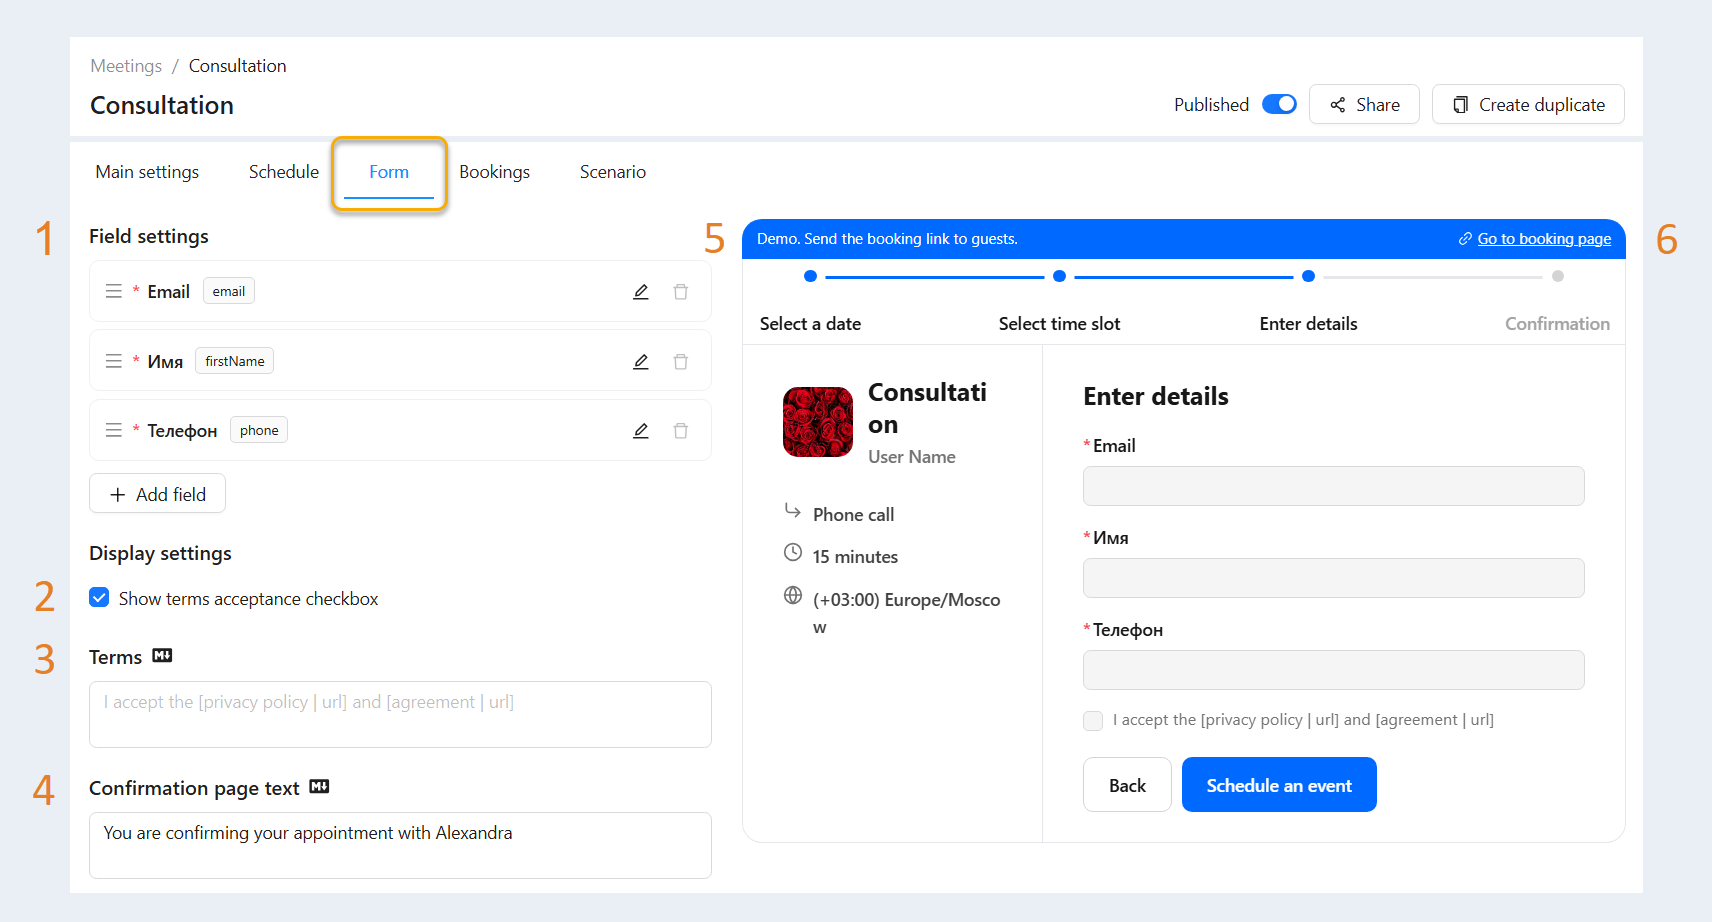
- Field settings. Customize the field names, placeholders, and attributes as needed.
- Show terms acceptance checkbox. Enable this to require clients to agree to your terms before booking a meeting.
- Terms. Displays the rules and requirements text the client agrees to upon booking (e.g., Privacy Policy or Terms of Service).
- Confirmation page text. Create a custom message that the client will see after successfully booking a meeting.
- Meeting form demo. You can view a demo version of the meeting form.
- Go to booking page. Click the button to go to the meeting booking page. This feature allows you to quickly open the registration page for participants.
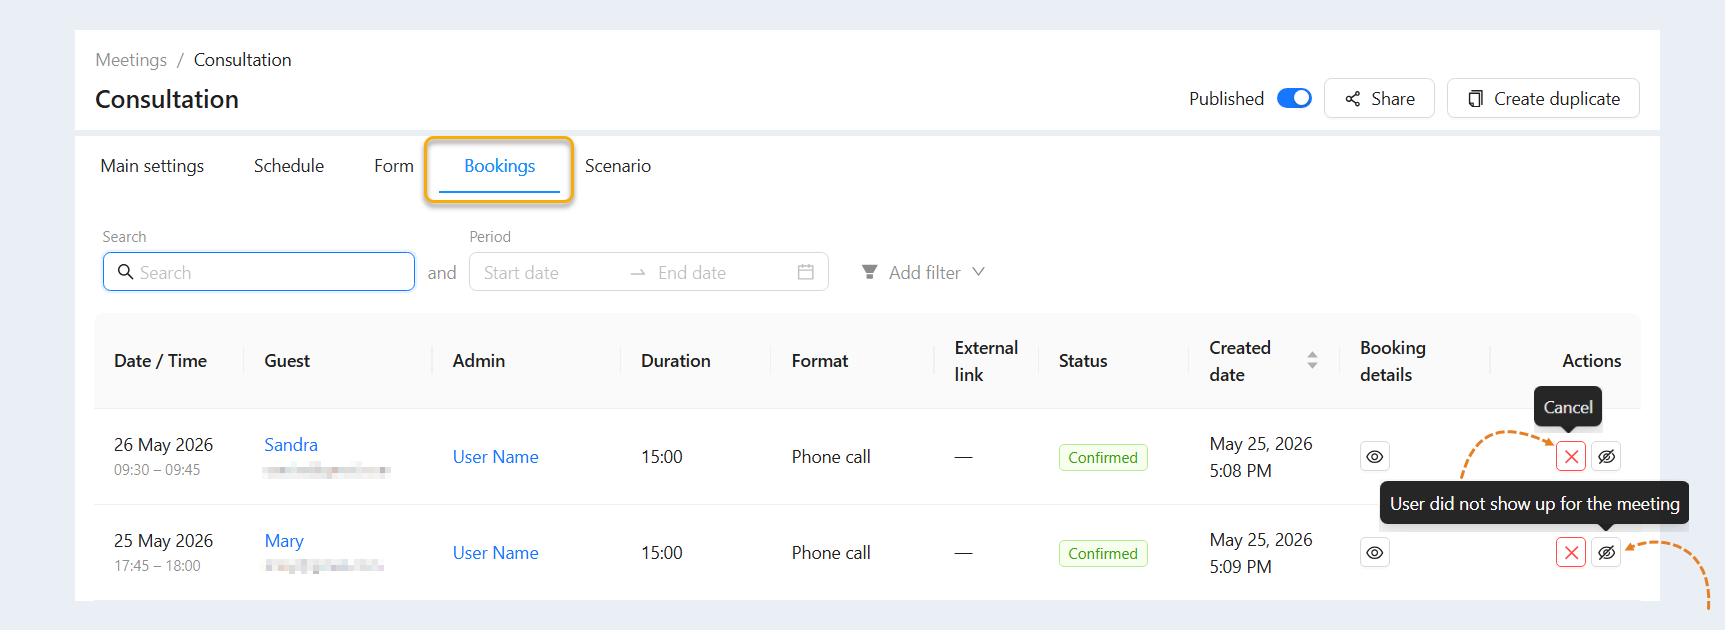
You can cancel the meeting
You can mark the user as a no-show for the meeting
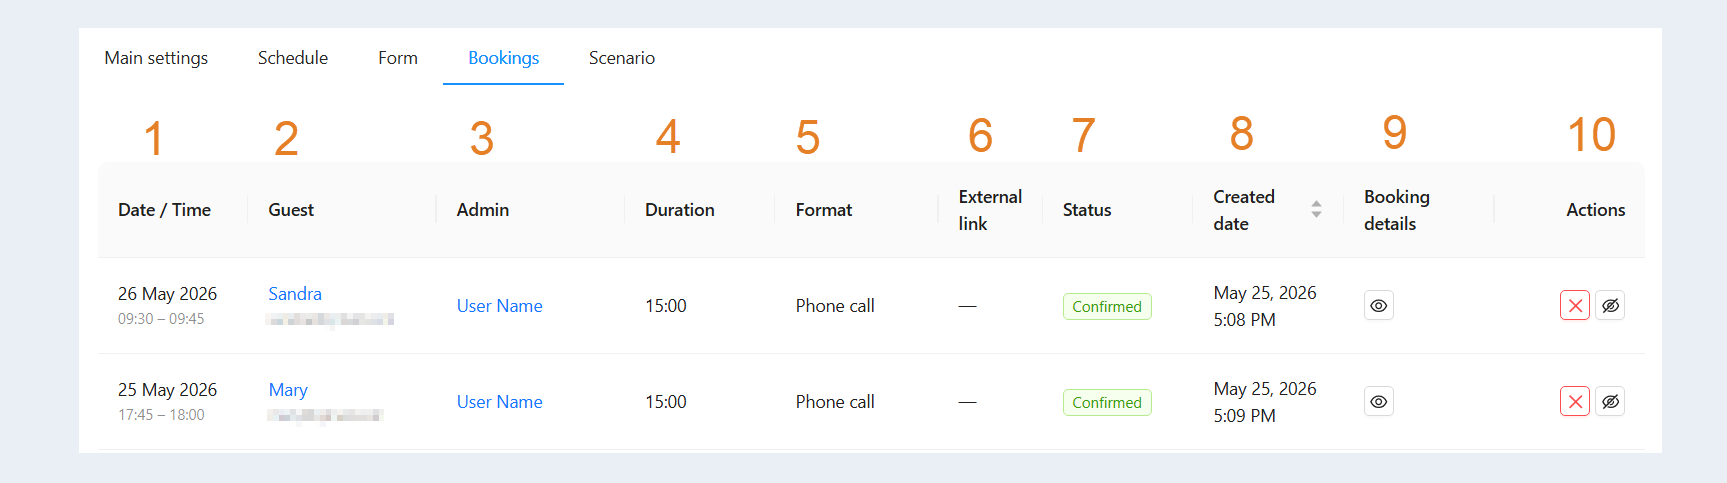
The Bookings section provides the following details:
- Date/Time. Displays the exact date and time of the scheduled meeting.
- Guest. Displays the details of the user who booked the meeting.
- Admin. Displays the account staff member hosting the meeting.
- Duration. Shows the time allocated for the meeting.
- Format. Shows how the meeting will be conducted (via Google Meet, Zoom, phone, or offline).
- External link. Links to online meetings will be displayed here.
- Status. Displays the meeting status: "Confirmed", "No-show", or "Canceled".
- Created date. The date and time when the booking record was created.
- Booking details. Provides a full overview, including date/time, status, name, email, phone number, meeting title, administrator, format, timezone, and form submission data.
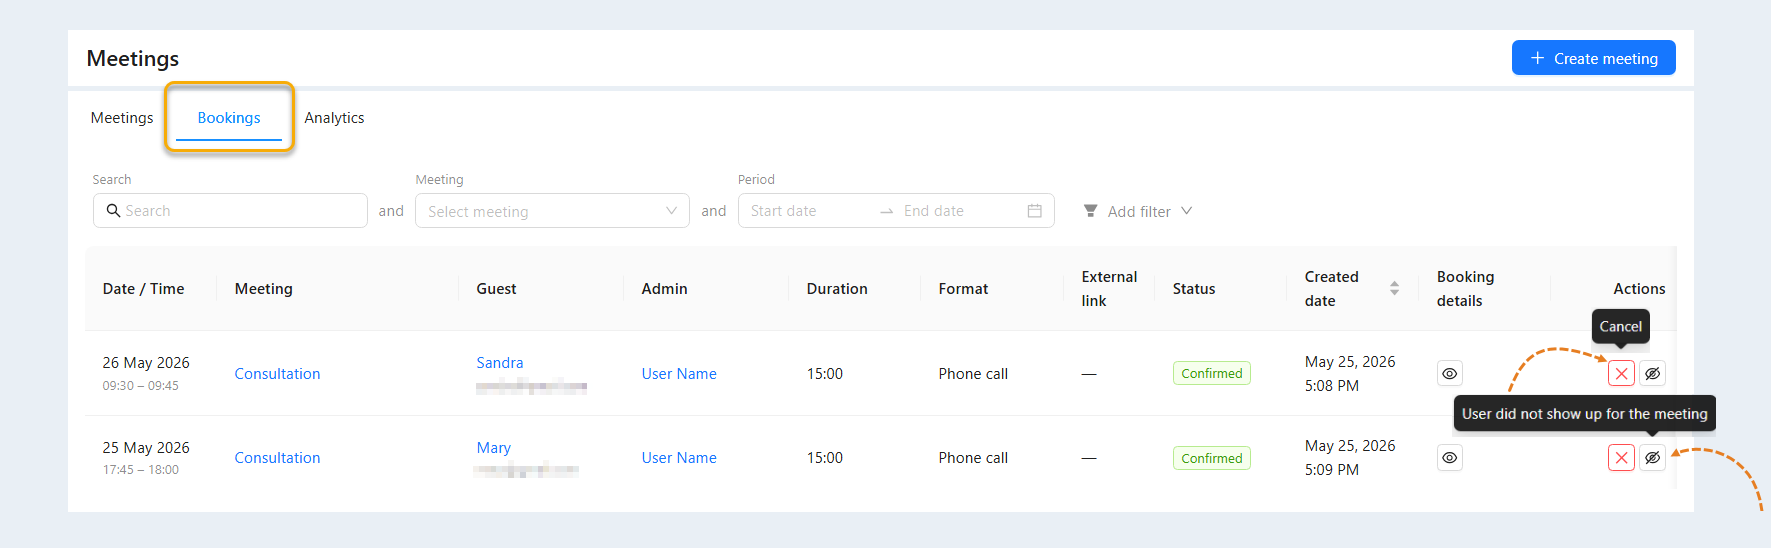
- Actions. Quick buttons to cancel the meeting or mark the user as a no-show.
In the Scenario section, you can create a chain of events that will be triggered when a specific event occurs. The following system events are available:
Meeting created — Launches actions as soon as a new booking is registered.
Meeting canceled — Triggers actions when a meeting is canceled, with the option to include the cancellation reason.
- Meeting reminder — Fires a specified number of minutes before the meeting starts.
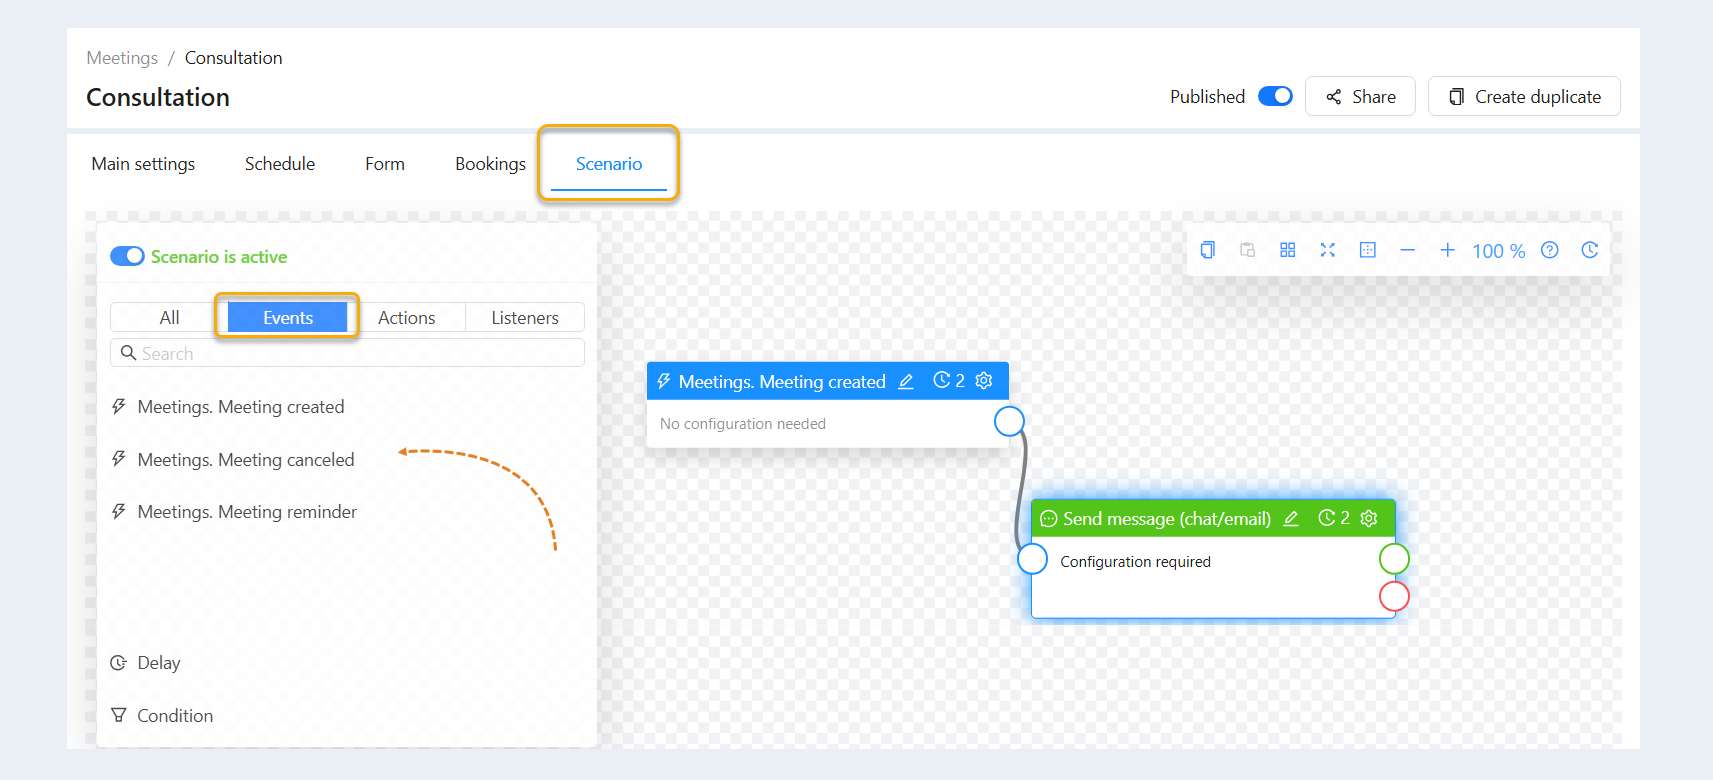
In the scenario editor, all data (link, time, answers in the form) is moved to a separate group of variables "Meeting". To add a variable to an email, message, or webhook, connect the node with the "Meetings" event to the "Send message/email/webhook" node. In the node settings, click "Add variables".
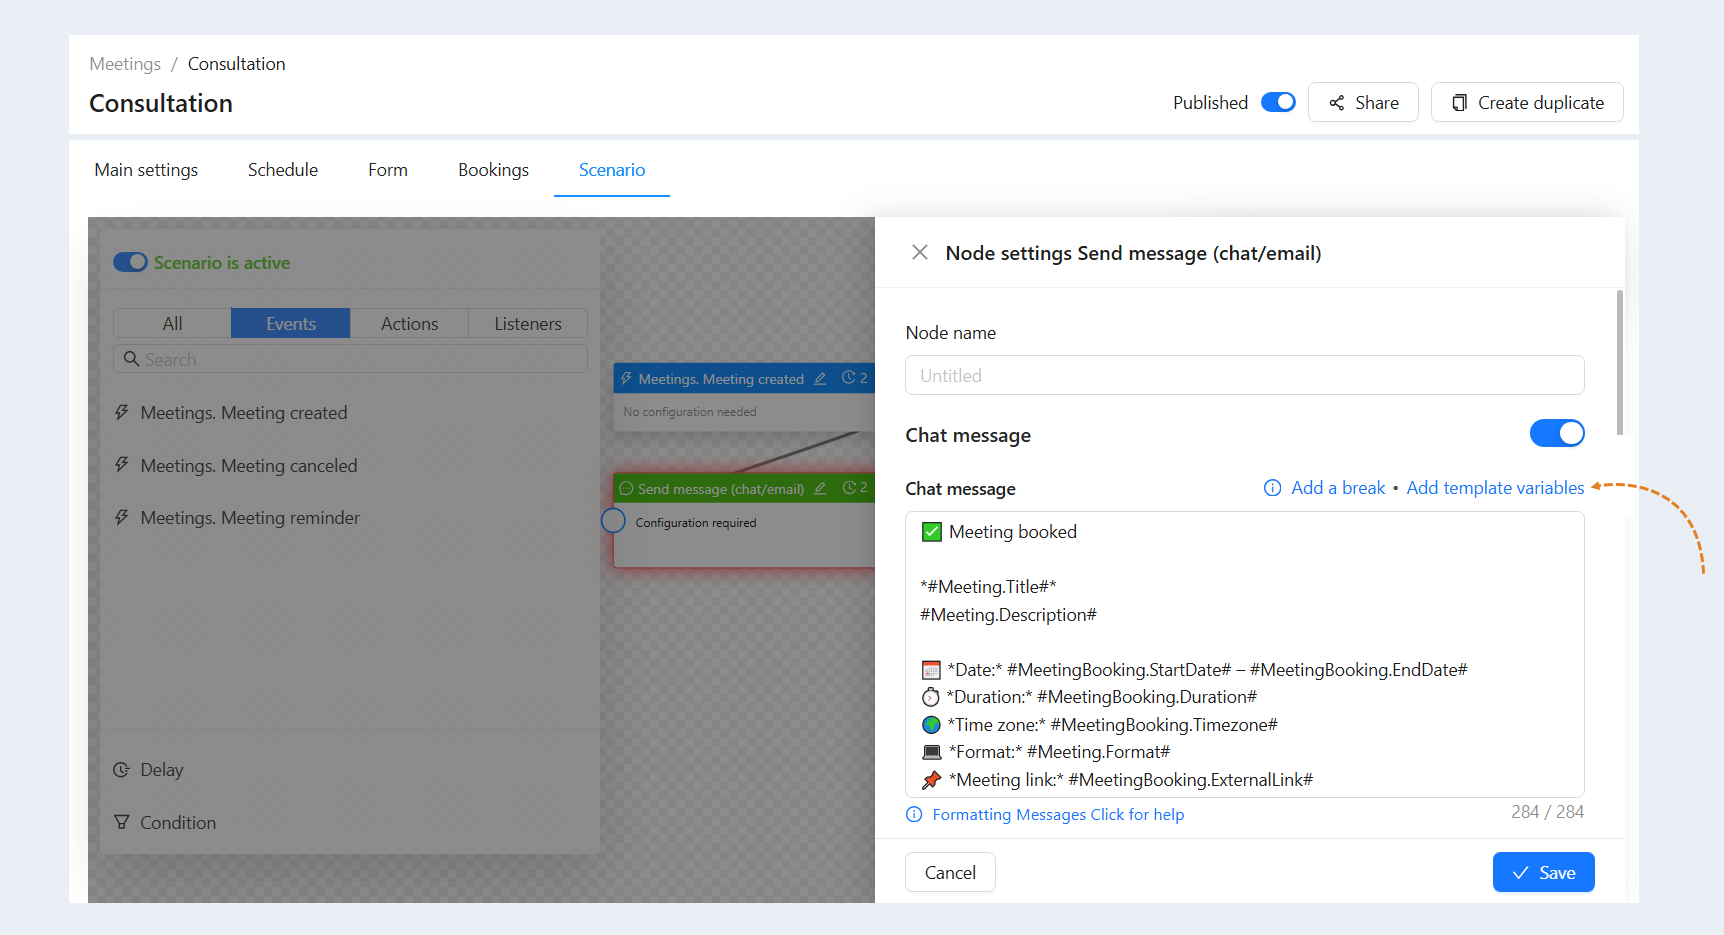
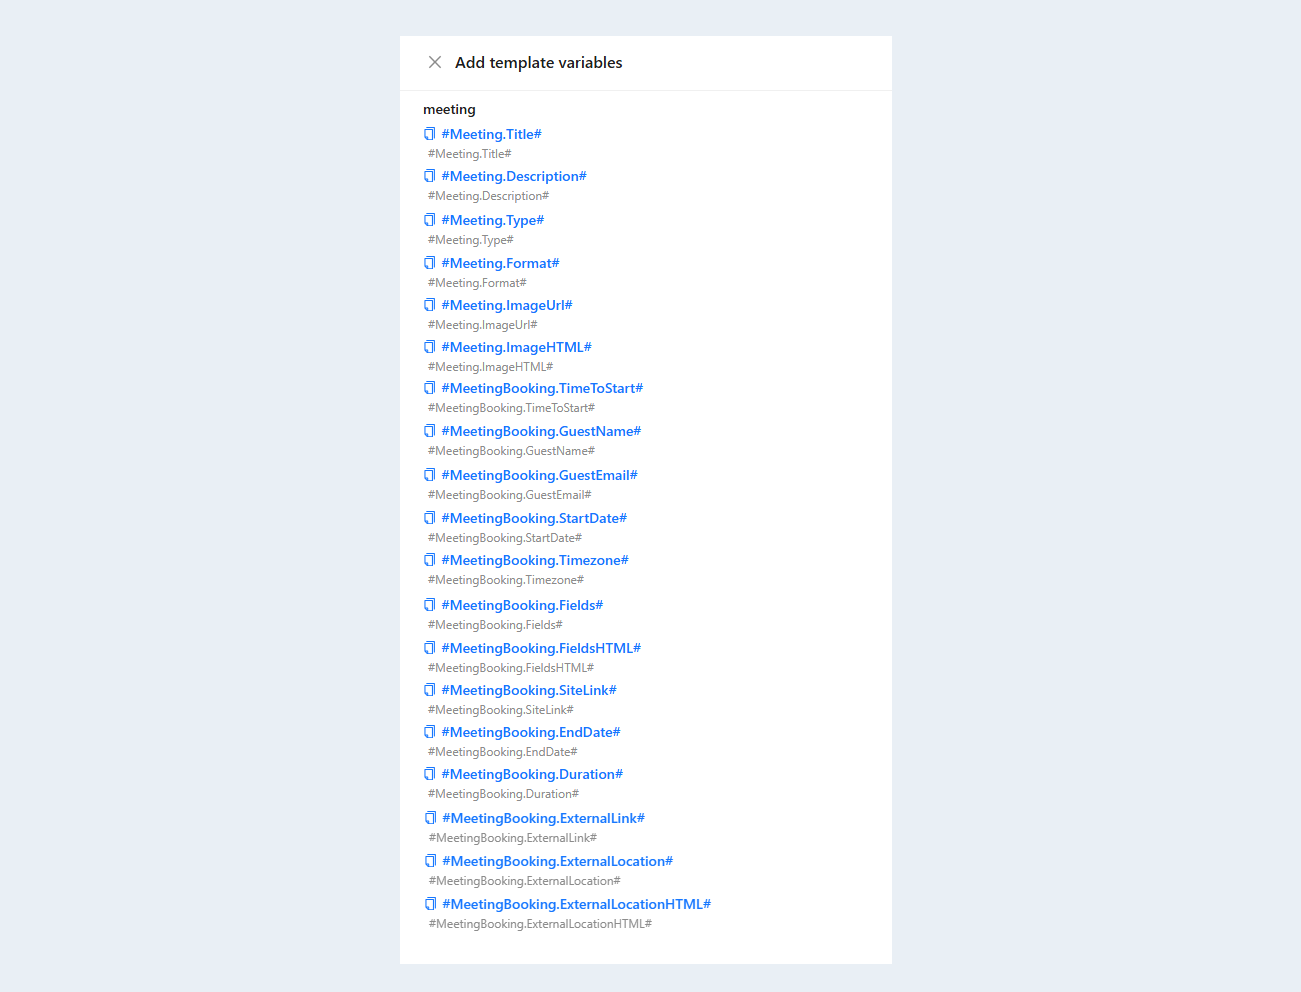
After clicking, a list of all variables will appear, as well as the variables of the "Meetings" section:
System Logic
The registration process is automated for both sides of the interaction.
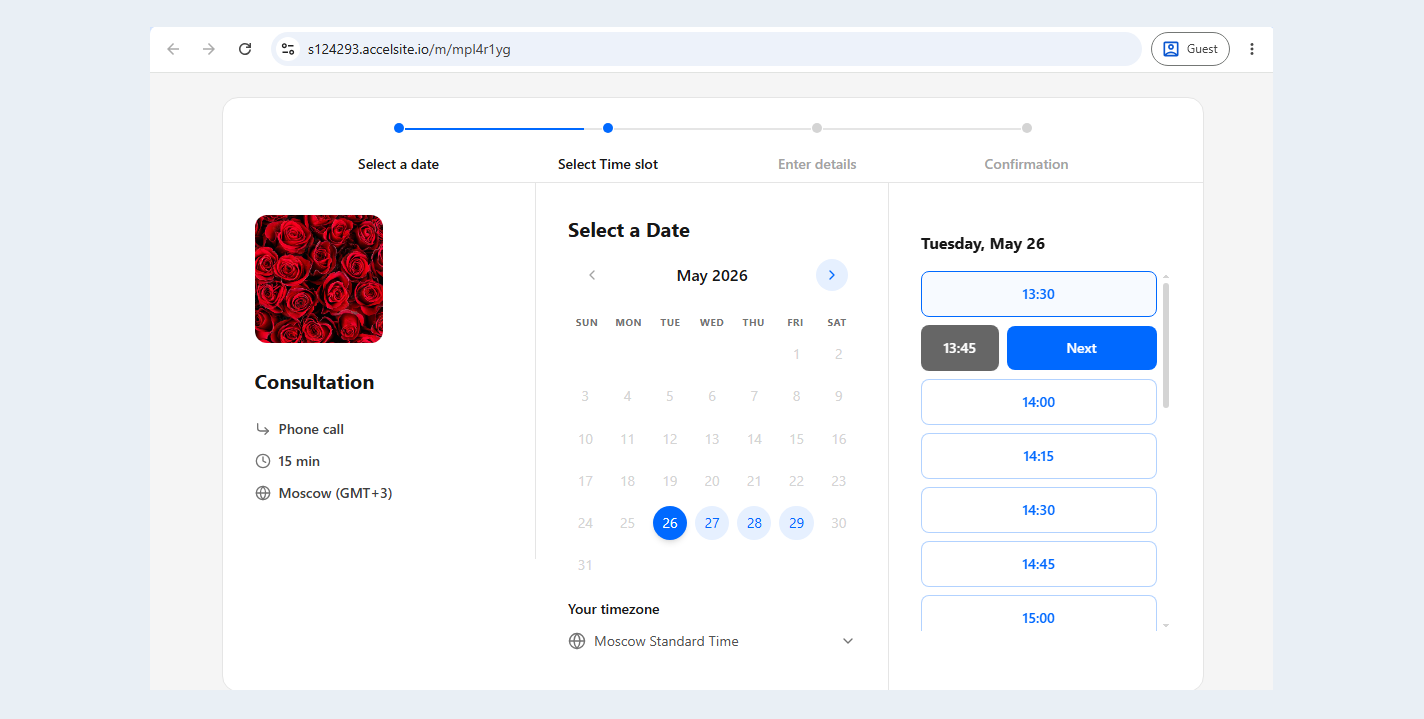
- From the guest's side: the user opens the public meeting page via the link. Chooses an available slot (the time is displayed in the guest's timezone). Fills out the registration form and receives a confirmation with a link to the meeting.
- From the account's side: the booking is instantly displayed in the administrator panel. A link to Google Meet or Zoom is created automatically in the connected account. Platform scenarios automatically send emails and reminders, or assign tasks to employees.
Bookings
To work with the list of all bookings, go to the "Bookings" tab in the "Meetings" section.
You can cancel the meeting
You can mark the user as a no-show for the meeting
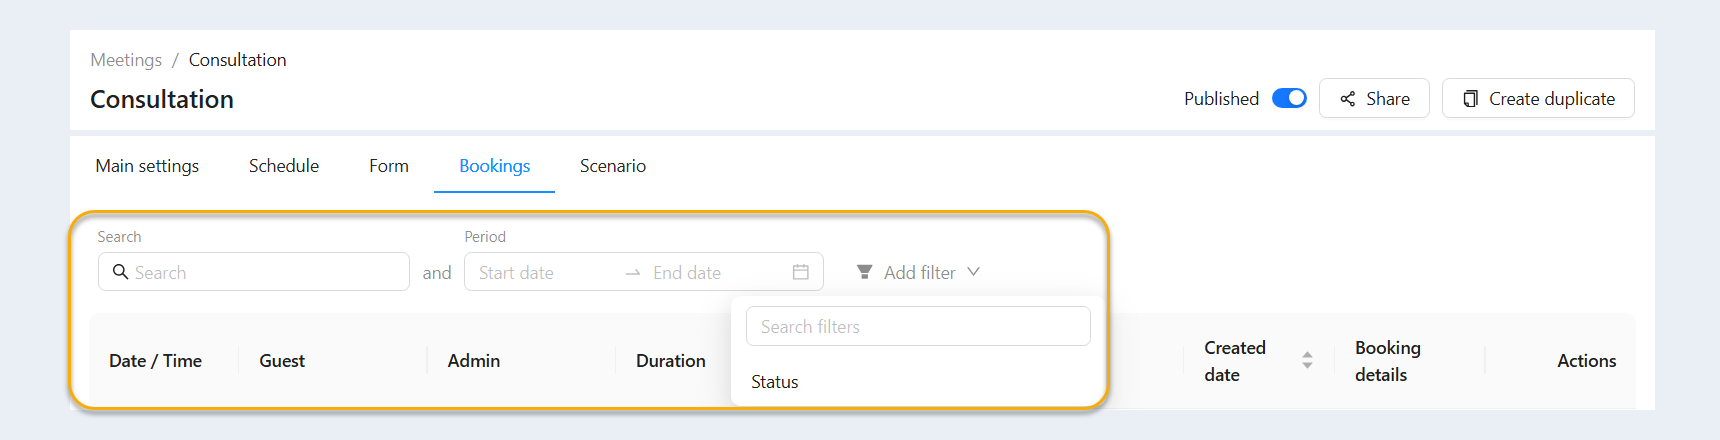
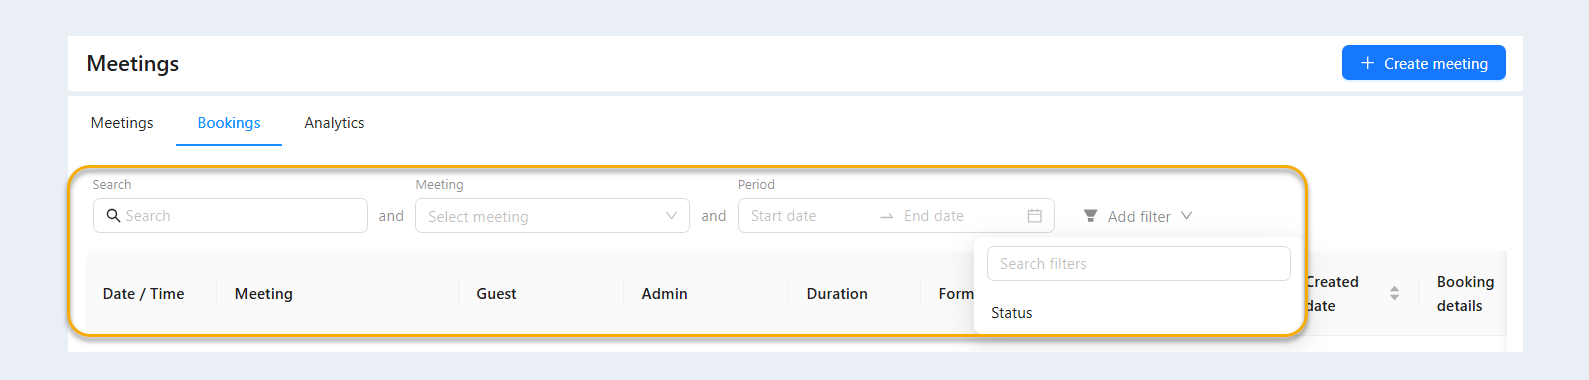
You can filter meetings by period, meeting title, and status, or search for a contact in the CRM.
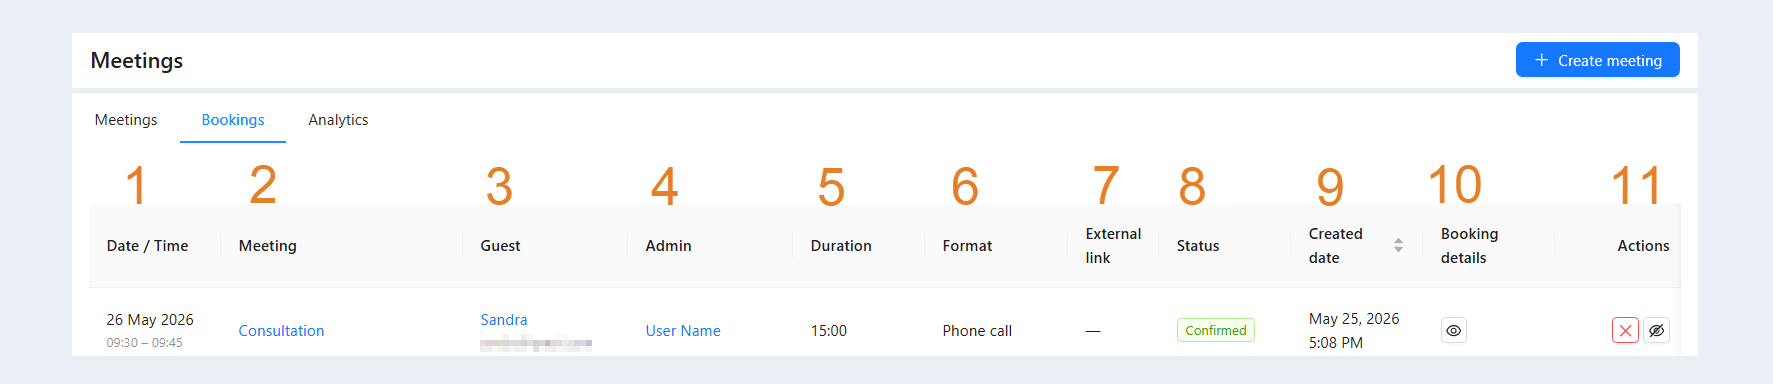
In the "Bookings" section, you can see the following information:
- Date/Time. Displays the exact date and time of the scheduled meeting.
- Meeting. The title of the booked meeting is displayed here.
- Guest. Displays the details of the user who booked the meeting.
- Admin. Displays the account staff member hosting the meeting.
- Duration. Shows the time allocated for the meeting.
- Format. Shows how the meeting will be conducted (via Google Meet, Zoom, phone, or offline).
- External link. Links to online meetings will be displayed here.
- Status. Displays the meeting status: "Confirmed", "No-show", or "Canceled".
- Created date. The date and time when the meeting record was created.
- Booking details. Provides a full overview, including date/time, status, name, email, phone number, meeting title, administrator, format, timezone, and form submission data.
- Actions. Quick buttons to cancel the meeting or mark the user as a no-show.
Analytics
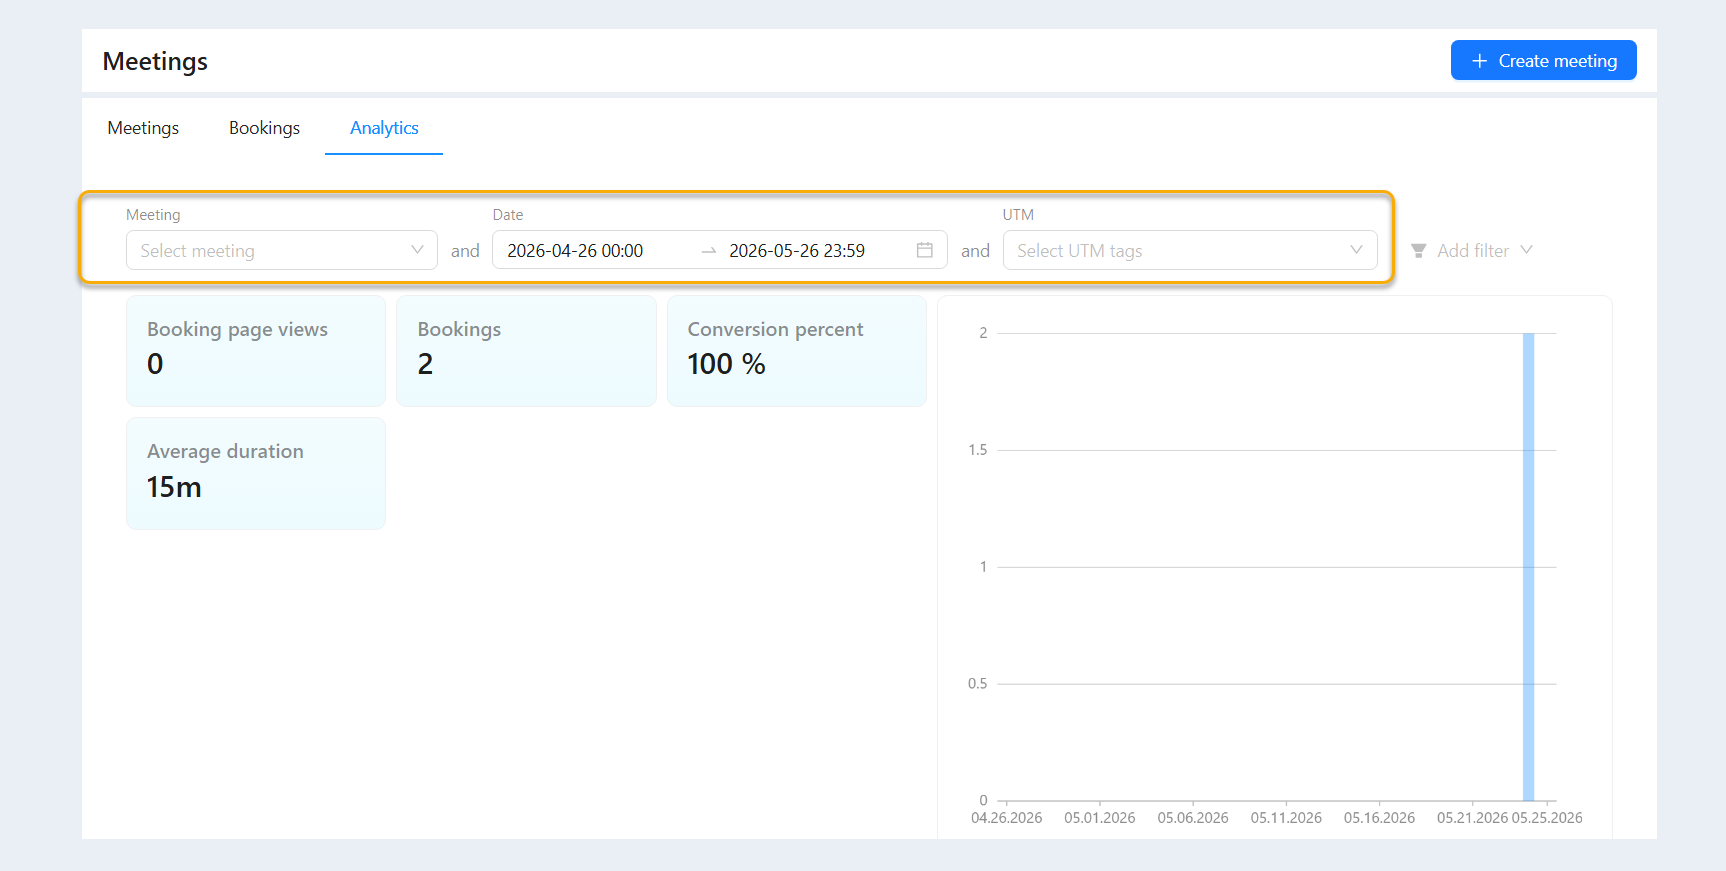
The "Analytics" section is intended for analyzing the effectiveness of meetings and bookings. It allows tracking key metrics for a selected period of time and filtering data by meetings and UTM tags.
To view statistics, you need to go to the "Analytics" tab in the "Meetings" section.
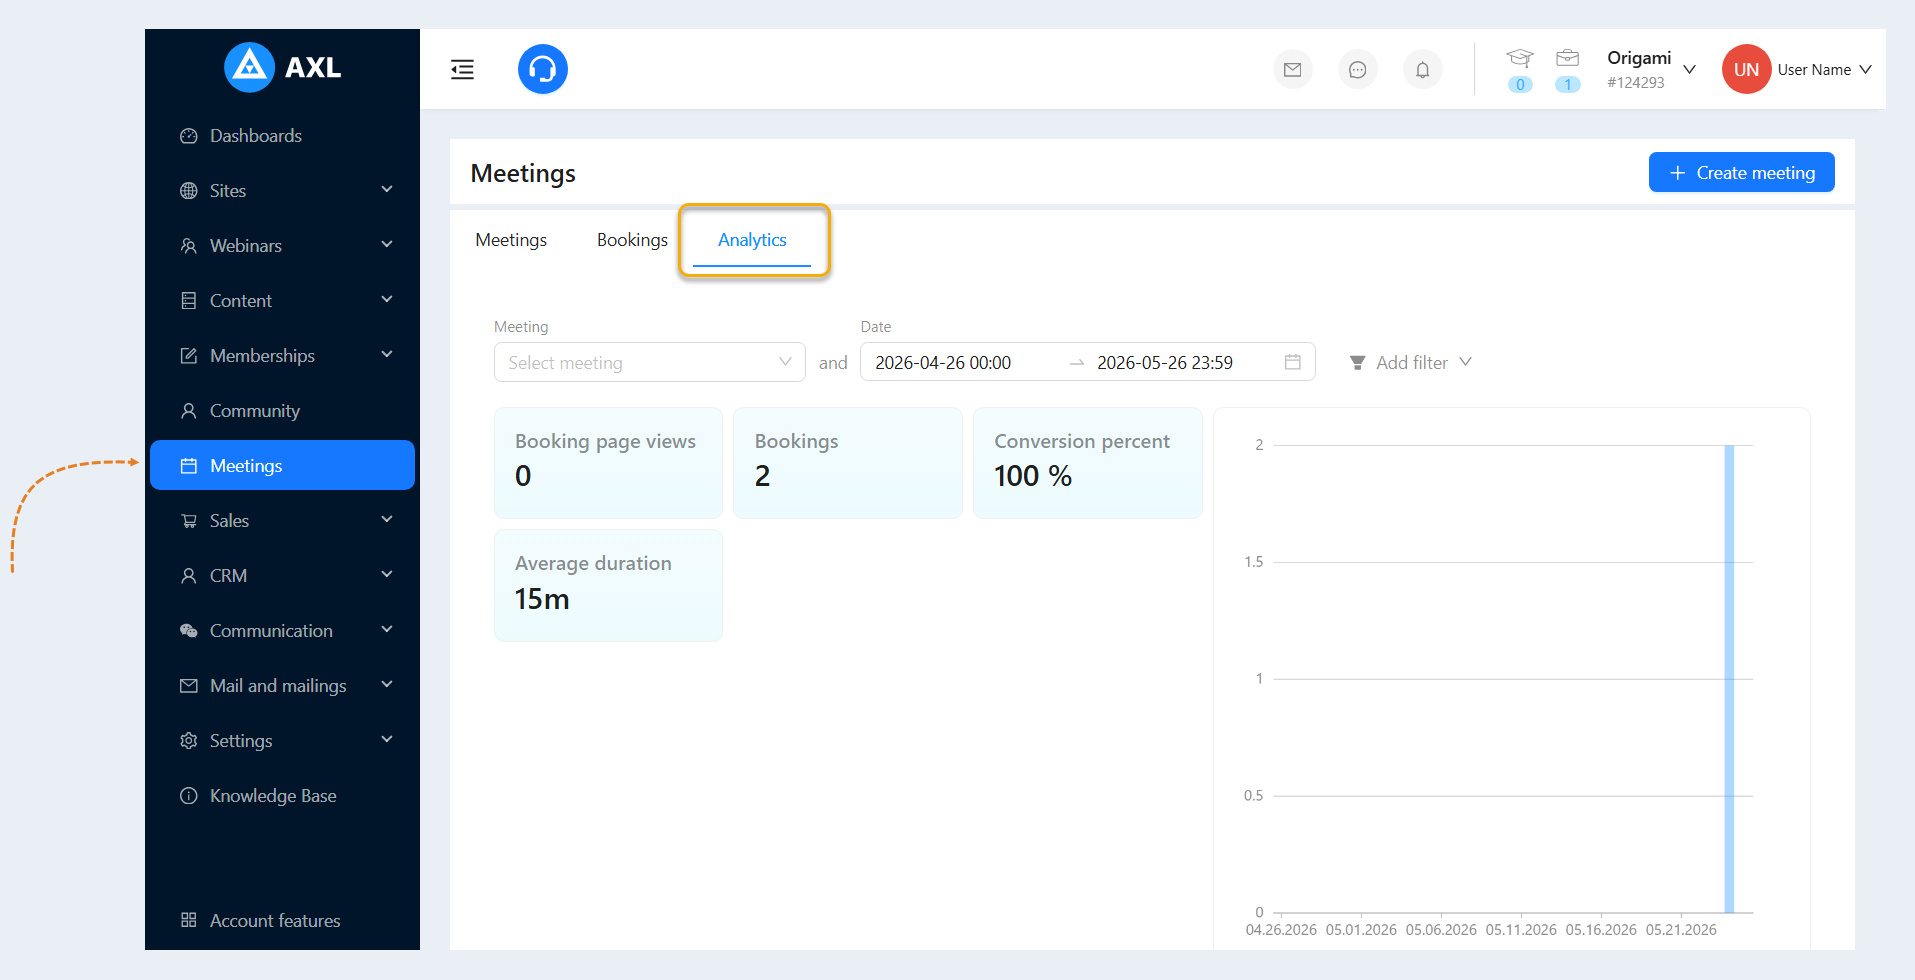
Here you can apply the following filters:
- Meeting. You can select a specific meeting for analysis.
- Date range. You can set a time period for the report (for example, from 20.04.2026 00:00 to 20.05.2026 23:59).
- UTM tags. You can choose filtering by UTM tags to evaluate traffic sources.