Calling a scenario via API is the process of transmitting data using a software interface (API) by sending an HTTP request using the POST or GET method to the platform's controlling server.
An example can be the transmission of a contact through API. When you send contact information through an API request, the AXL platform server receives this information and performs specific tasks according to the configured scenario. This may include sending notifications, adding the contact to a database, triggering an automatic response, or other actions.
This procedure is useful for automation purposes. It allows software or web applications to interact with the platform and perform specific tasks without the need for manual data entry or management. This simplifies the process of information exchange and automates the execution of actions, which can save time and reduce the likelihood of errors.
Click on the desired section to go to the procedure descenarioion:
1
Creating a scenario
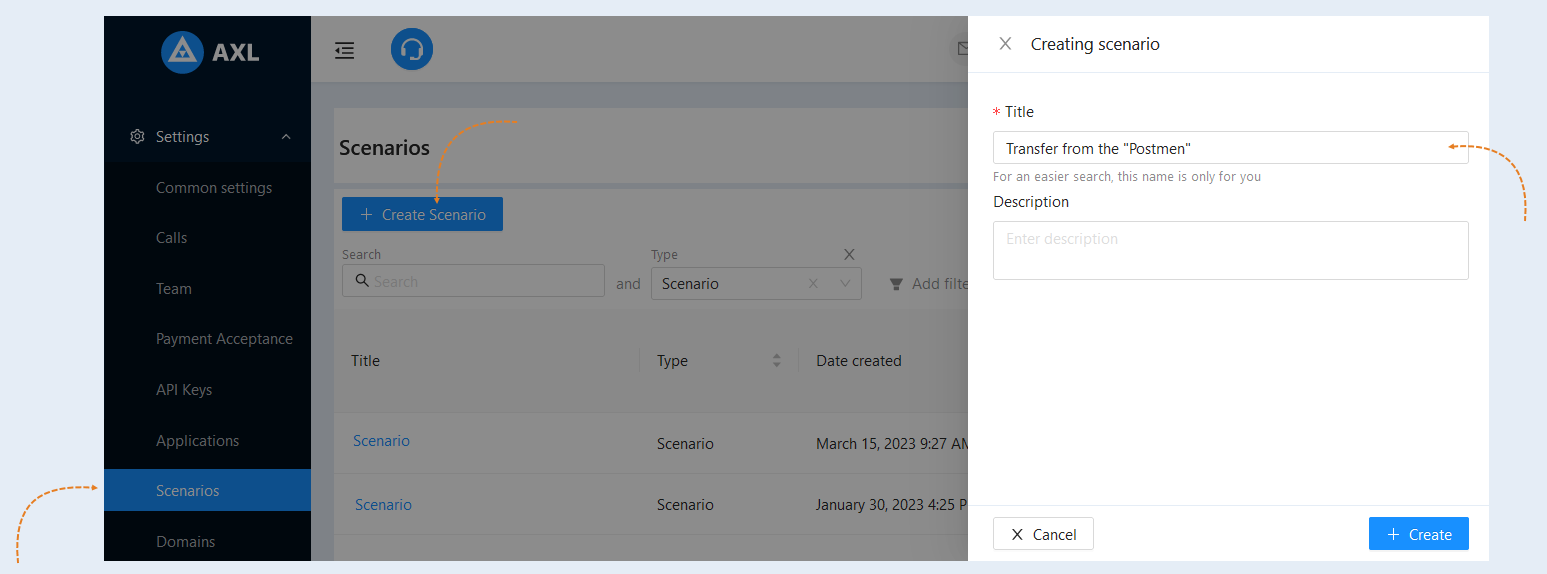
To create a new scenario for your account, go to the "Settings" section and select the "scenarios" tab. Click on the "Create scenario" button. In the opened window, specify the scenario name and add a descenarioion.
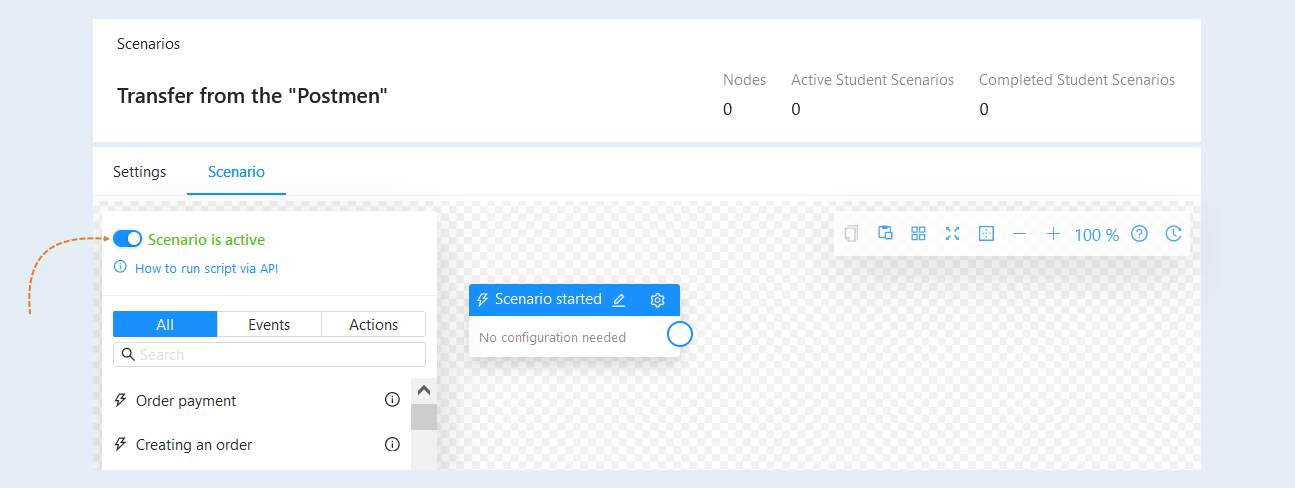
To activate the scenario, move the slider to the active position.
Click on the info icon and copy the scenario ID. This will be needed for steps №6 and №7 of this article.
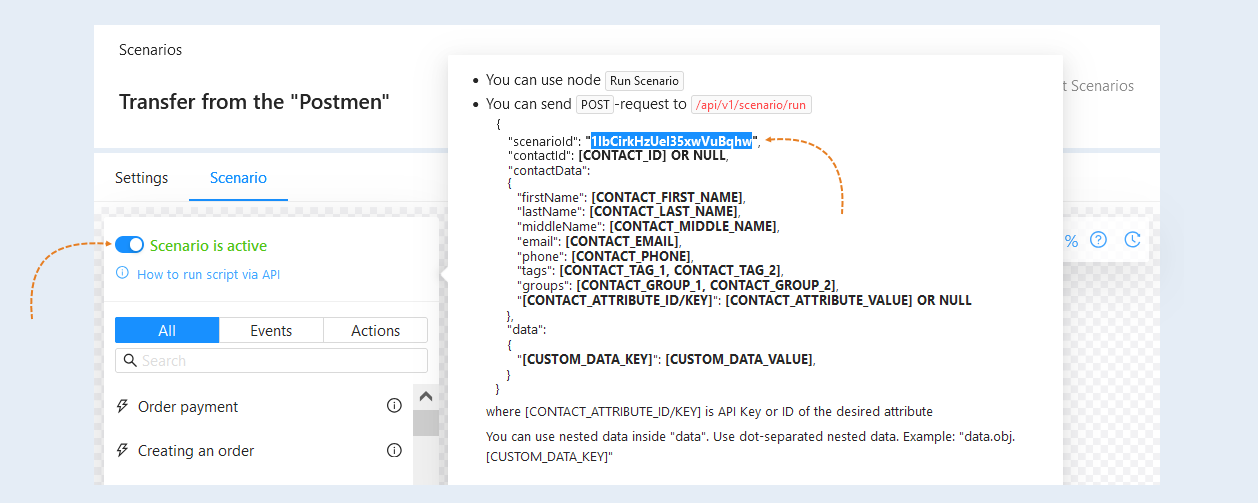
The current window shows the parameters that you can use to create a request.
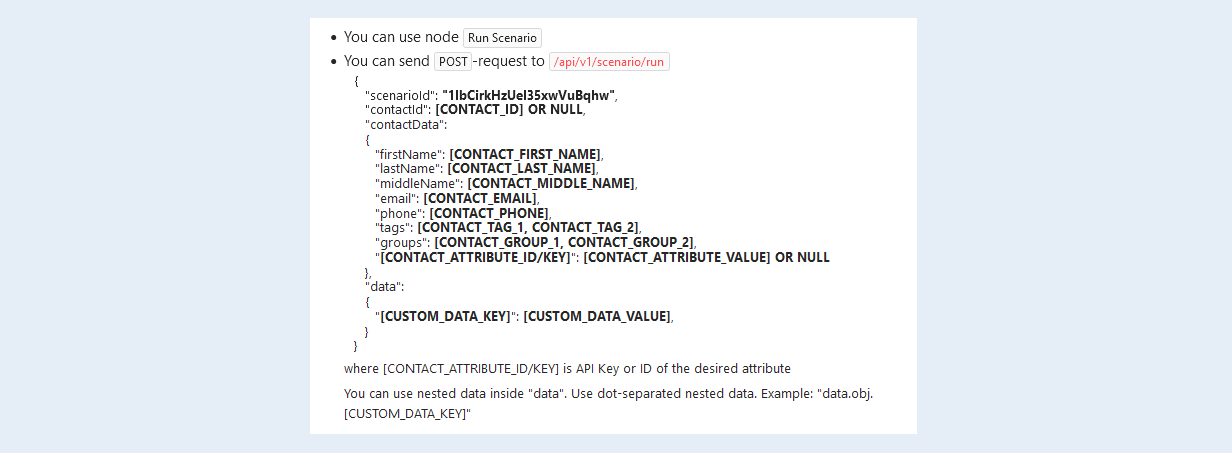
Note: The line "contactId": [CONTACT_ID] OR NULL, - is needed if contact IDs are stored on the AXL platform. If the contacts are not saved on the AXL platform, this line should be deleted. This example considers the transfer of contacts to the AXL platform, so this line is not used.
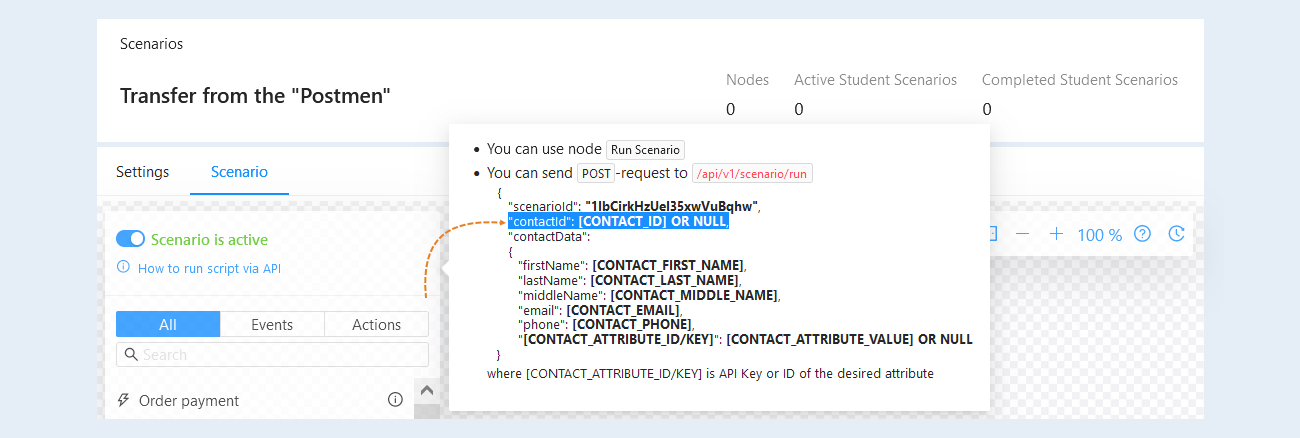
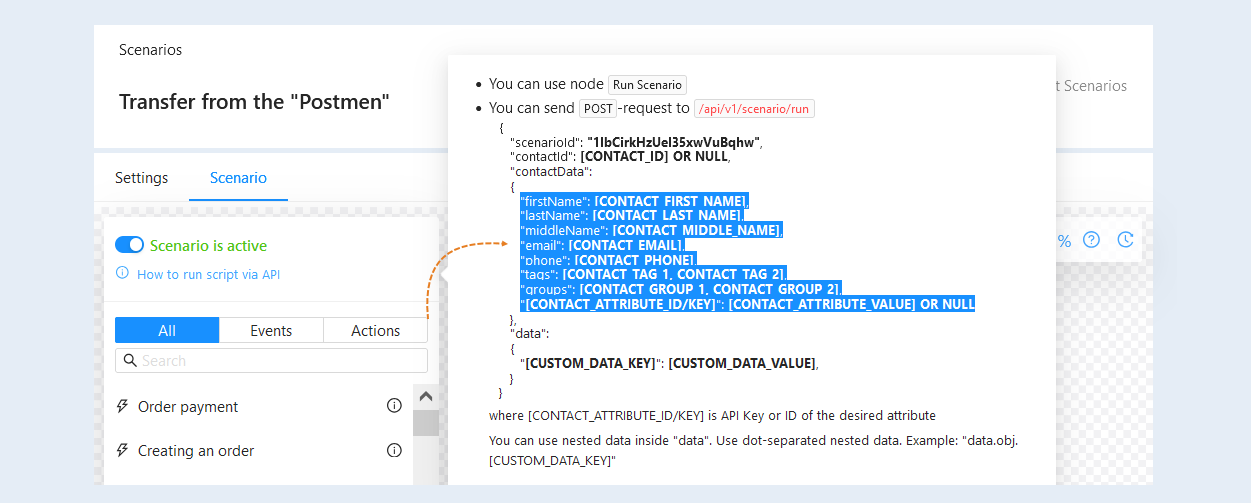
Below are the parameters of contact attributes for the request:
"firstName": [CONTACT_FIRST_NAME],
"lastName": [CONTACT_LAST_NAME],
"middleName": [CONTACT_MIDDLE_NAME],
"email": [CONTACT_EMAIL],
"phone": [CONTACT_PHONE],
"tags": [CONTACT_TAG_1, CONTACT_TAG_2],
"groups": [CONTACT_GROUP_1, CONTACT_GROUP_2],
"[CONTACT_ATTRIBUTE_ID/KEY]": [CONTACT_ATTRIBUTE_VALUE] OR NULL
You can use these parameters or add your own. Variables are indicated next to each parameter after a colon. These variables are substituted on your side, and you can configure them on the server from which the request will be sent.
2
Scenario settings
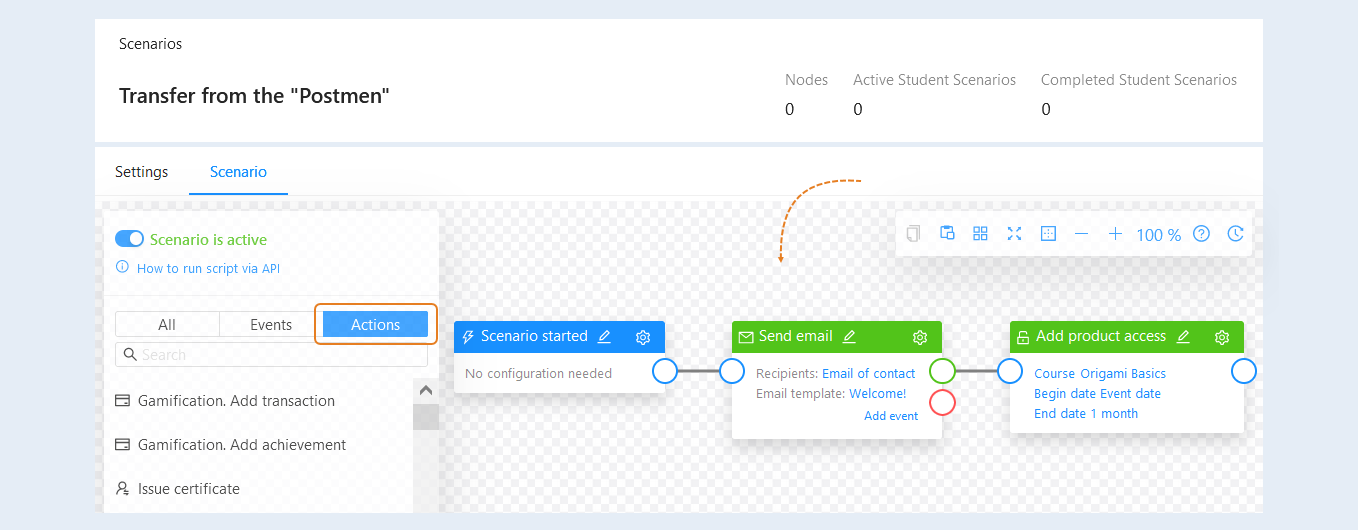
After transferring the contact to the AXL platform, the "Start scenario" action will be triggered, and the subsequent chain of scenario actions will be launched. For example, by starting a scenario via API, you can transfer a client to the AXL platform, configure sending email messages, provide access to products, and perform any other actions with the contact using only scenario triggering.
Add the necessary actions to the scenario, configure their configuration settings, and connect the cards together - draw a line between one event or action to another.
For example, after the scenario starts, a welcome message will be sent to the user, and access to the product will be granted.
For more information on scenario settings, refer to the "Scenario" article. For more information on other scenario actions, refer to the "Types of actions in the scenario and their configurations" article.
3
Creating an API key
Go to the "Settings" section, then the "API Keys" tab. Click on the "Create API Key" button.
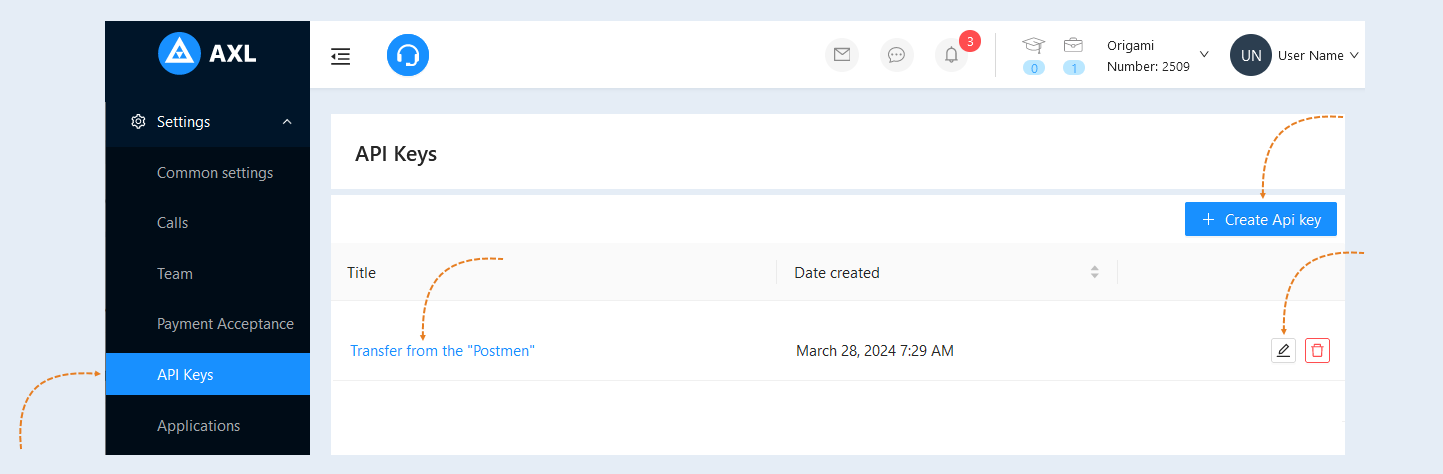
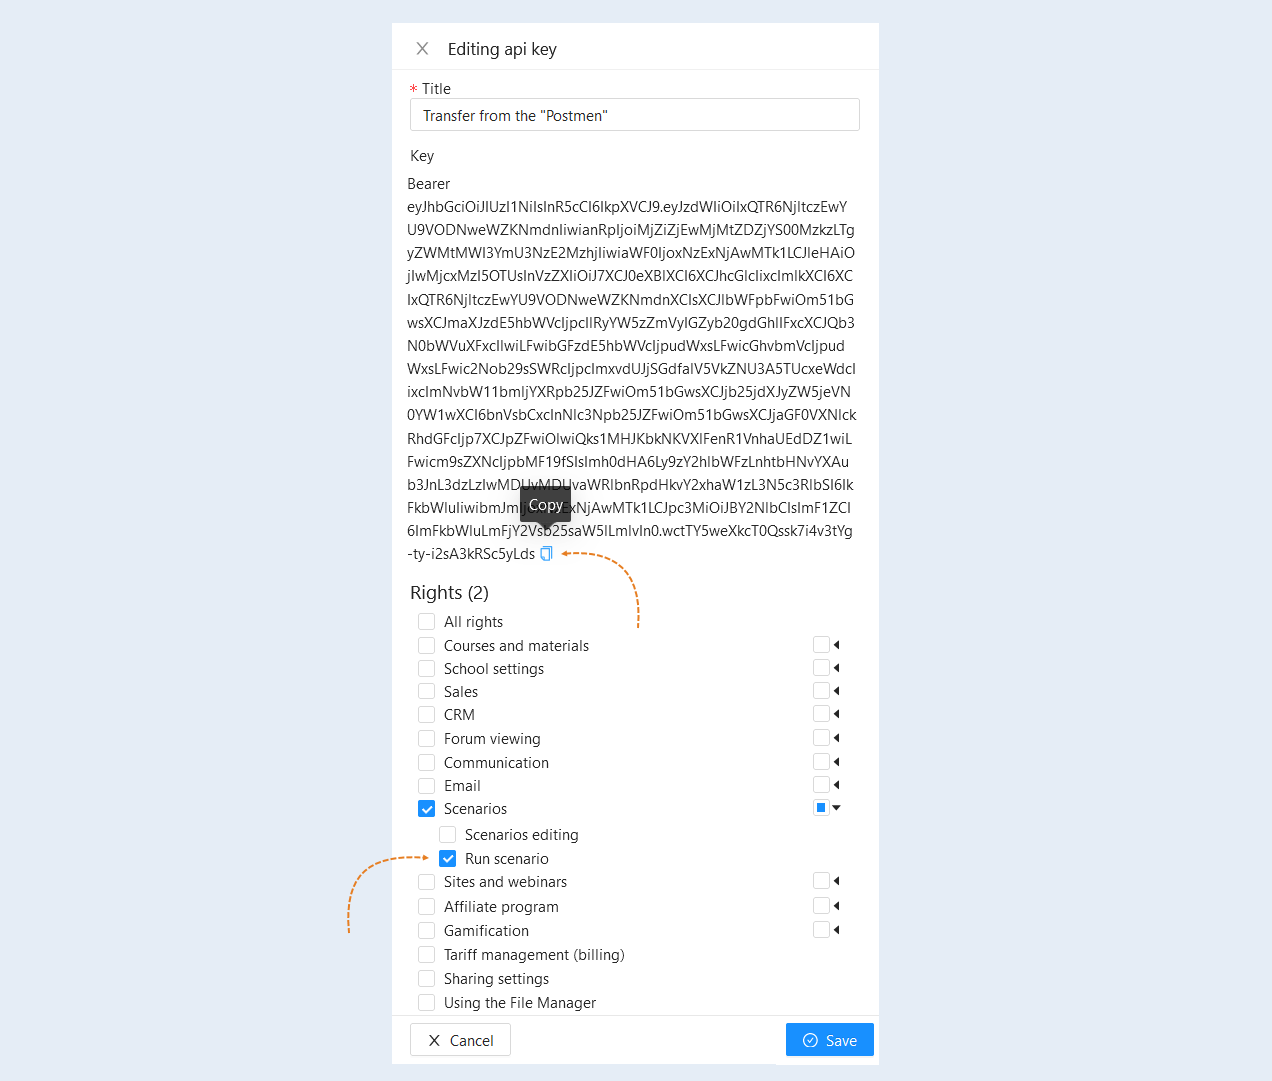
In the opened window, enter a name for your API key and click "Create". After you have created the API key, open it by clicking on its name or the "Edit" button.
In the API key editing window, set the access rights for this key - Run scenario.
Then, click the "Copy" button and use it on step №6 of this article.
4
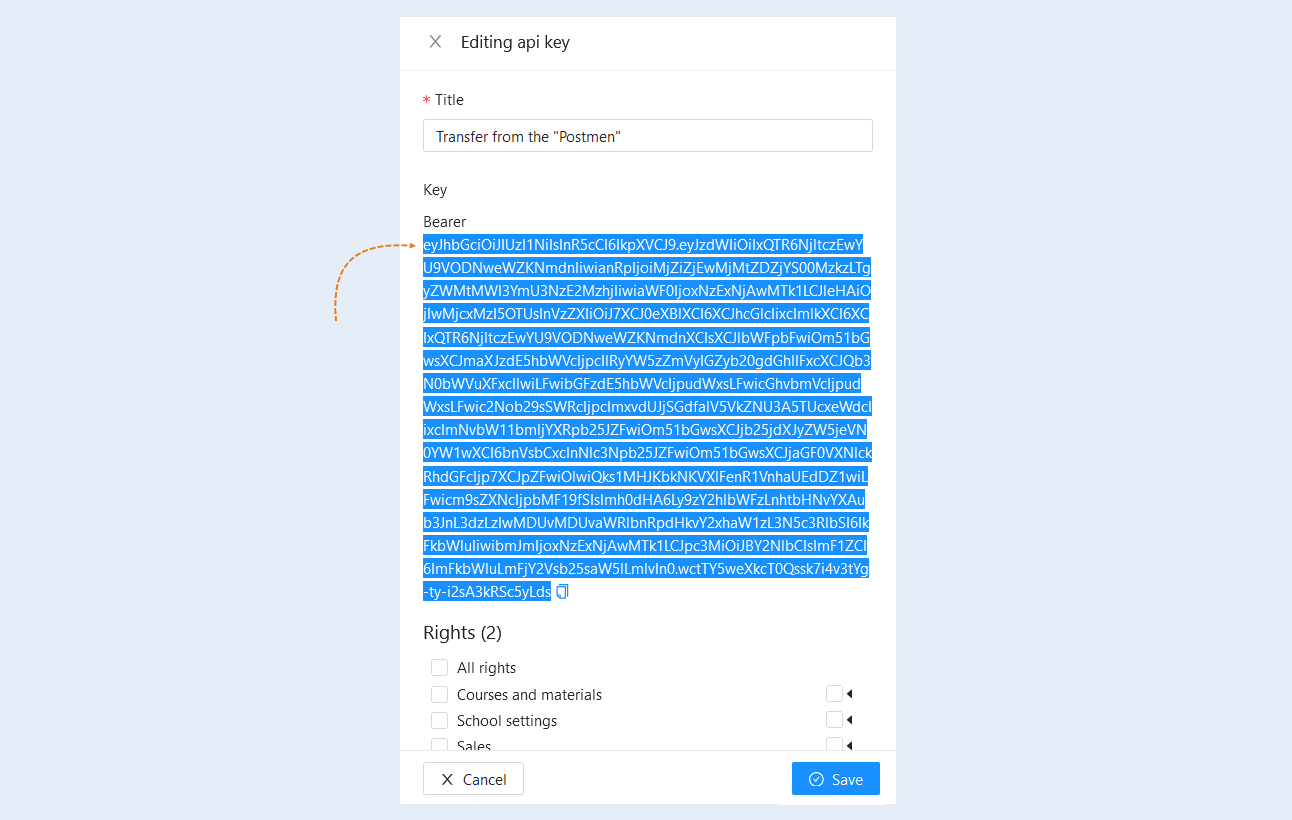
To configure the GET request, you will need an API key without the "Bearer" text and the space after it.
Highlight the API key as shown in the image below and copy it. This key will be needed for step №7 of this article.
5
Setting up a request in Postman
Let's go through the process of calling a scenario using the Postman service as an example.
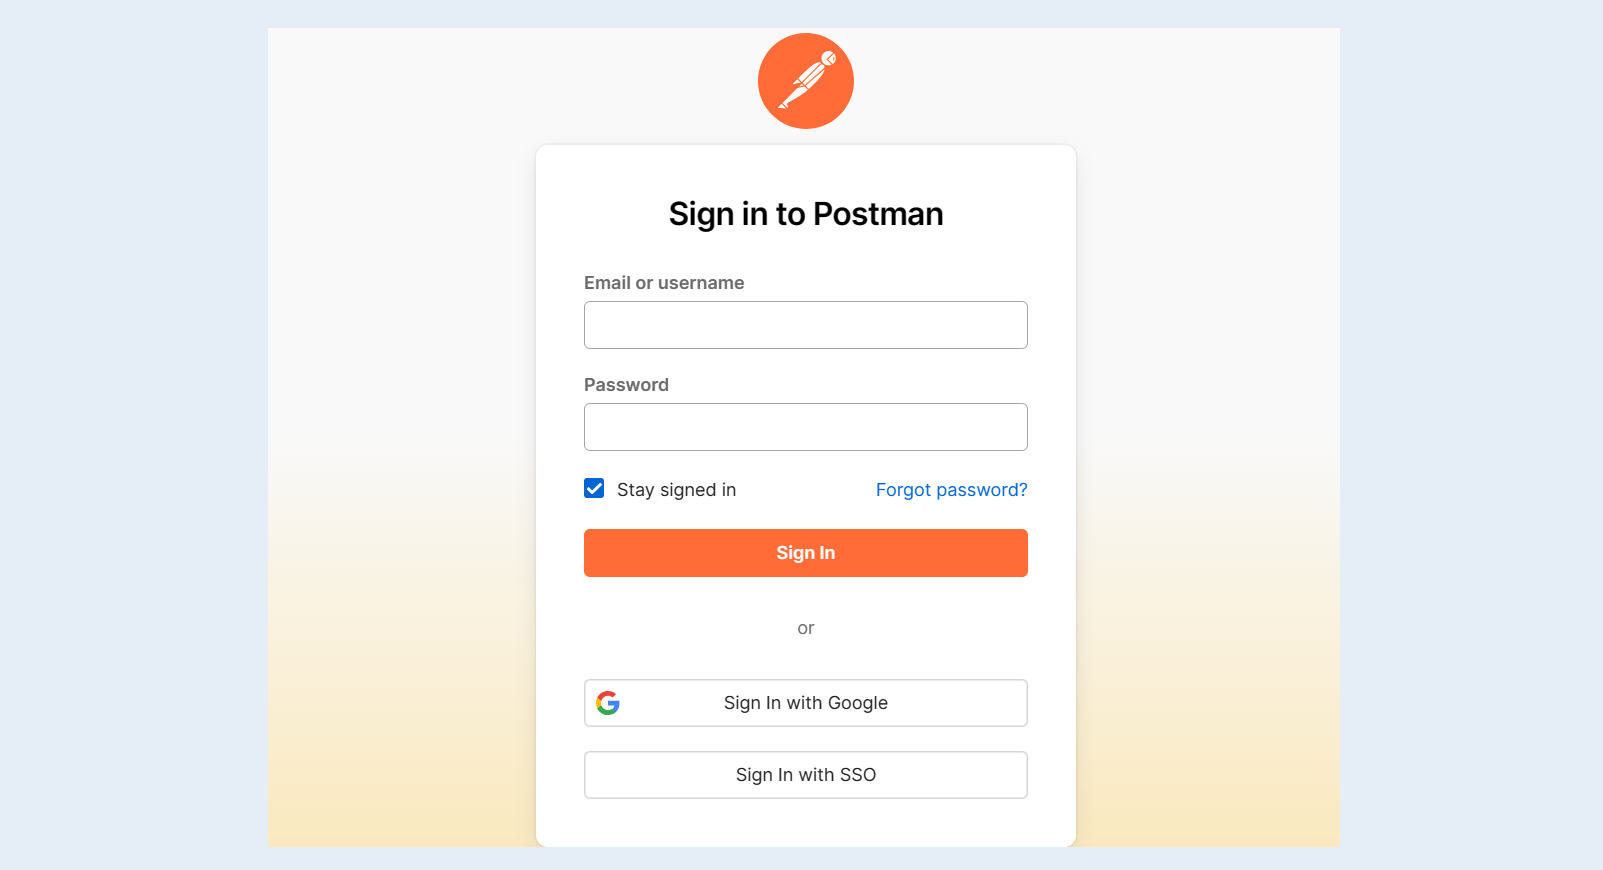
Proceed with the registration process on the Postman website by following the link or sign in to your account.
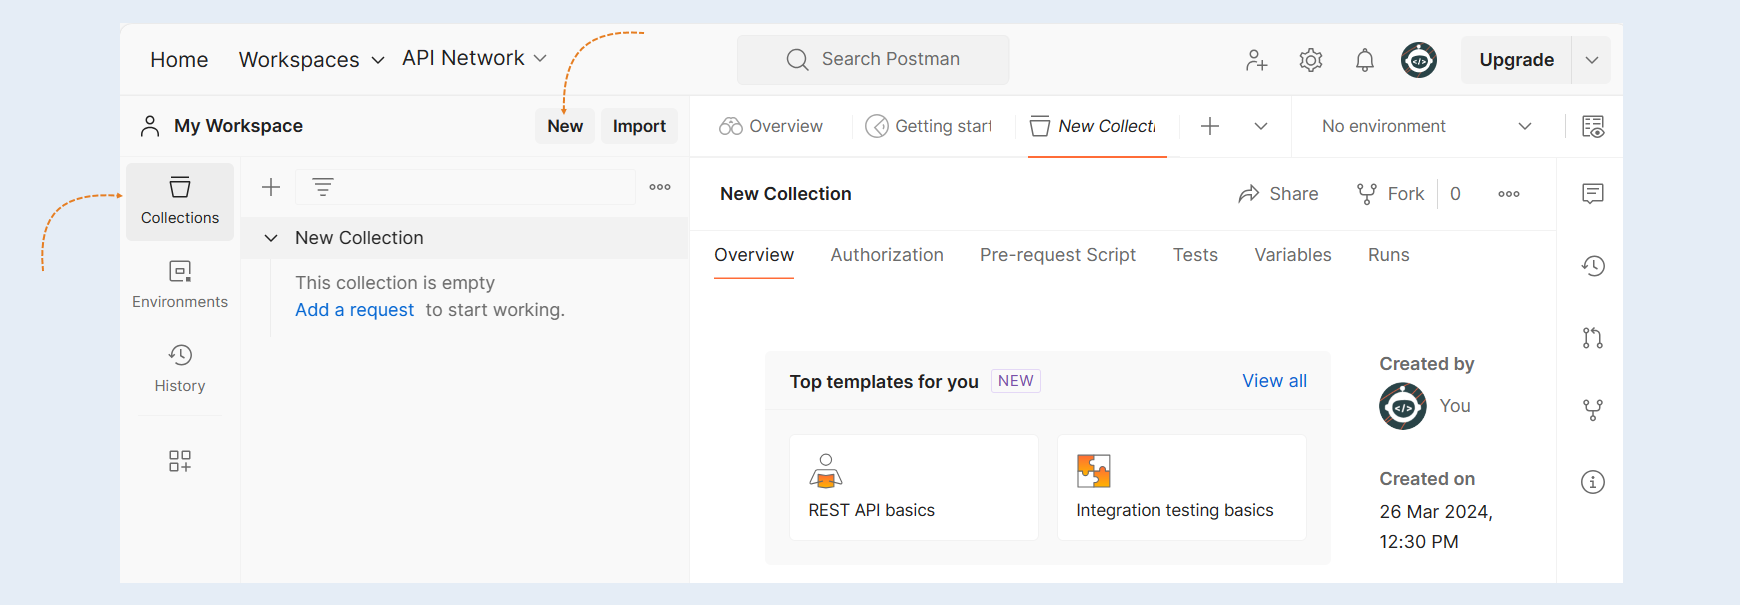
Open the "Collection" section and click on the "New" button.
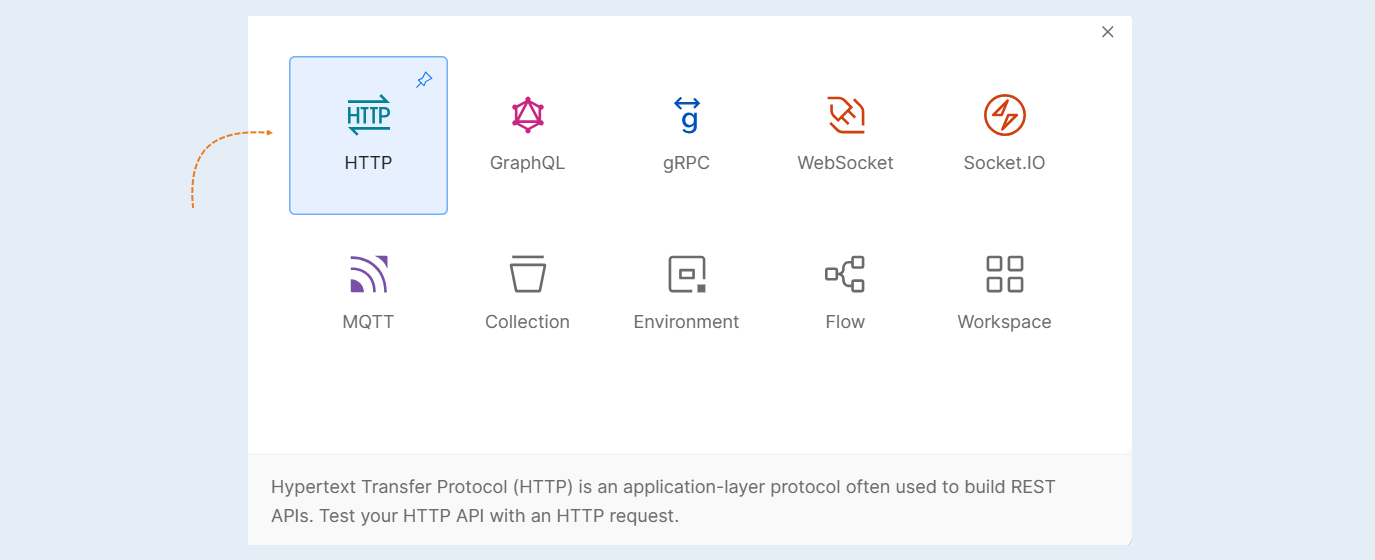
Select "HTTP" from the list.
6
The POST method
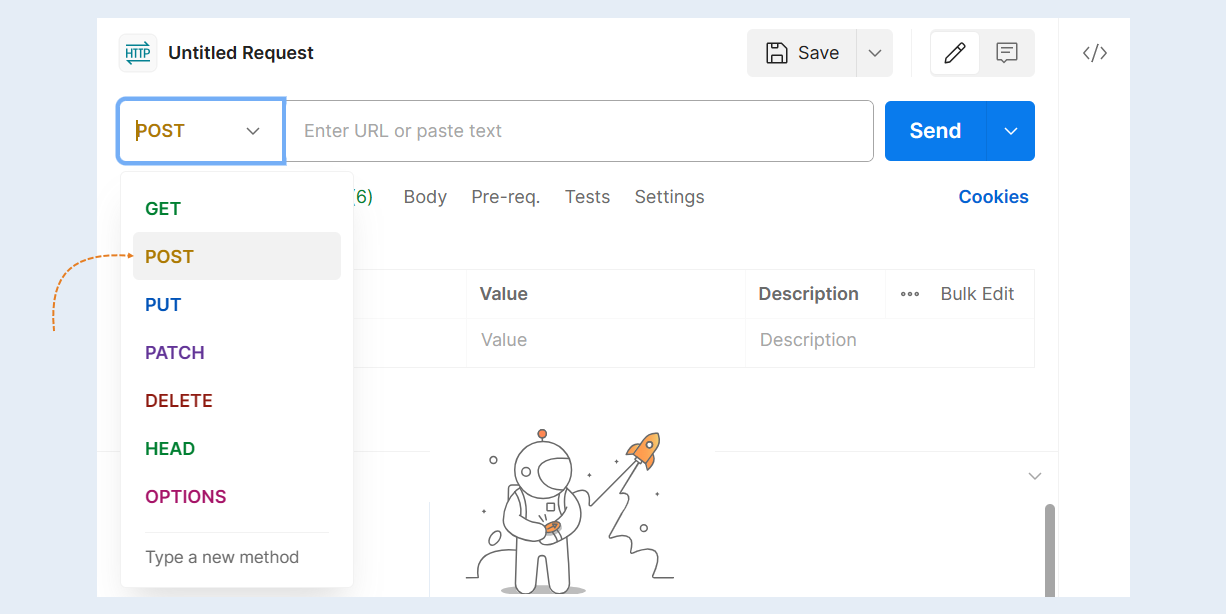
In the settings, select "POST" from the list.
Copy the scenario call URL and paste it into the URL field: https://admin.accelonline.io/api/v1/scenario/run
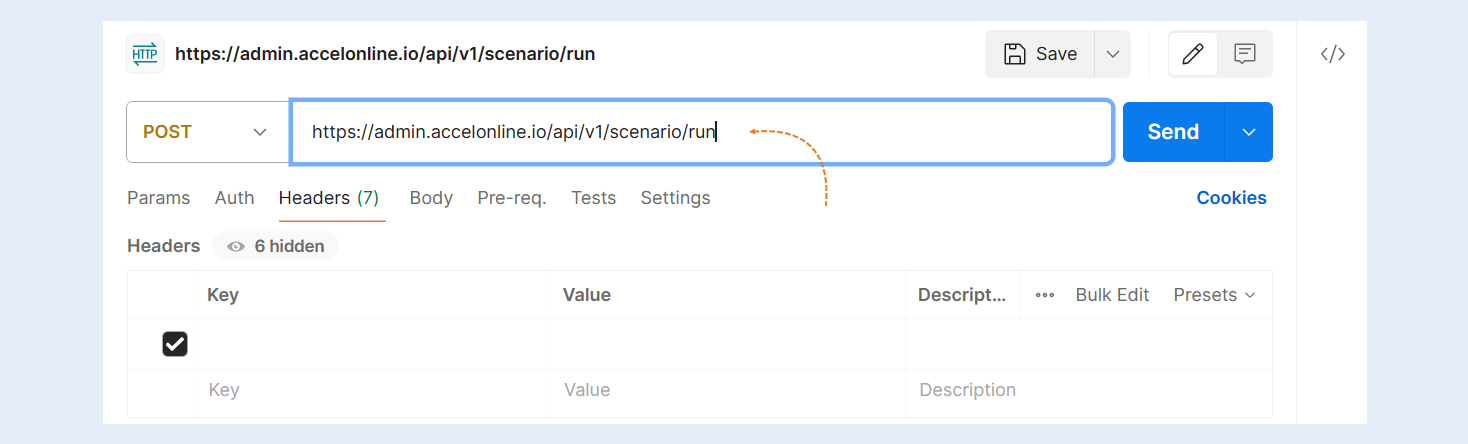
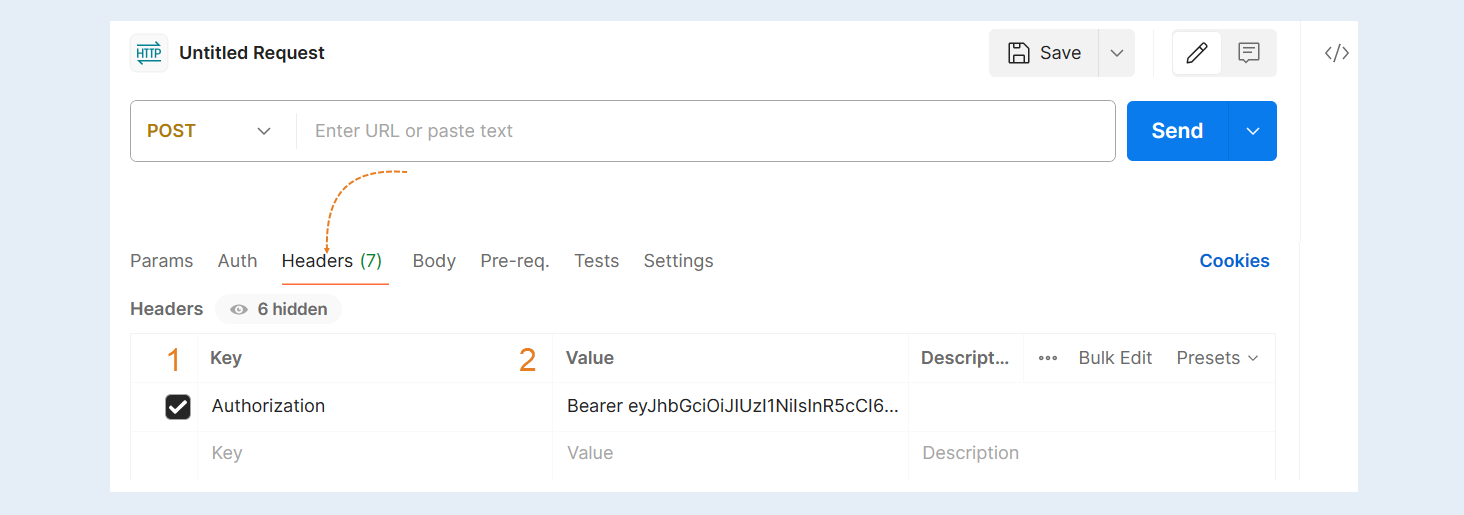
Next, go to the "Headers" tab. Fill in the fields:
- Key. Enter "Authorization".
Value. Paste the API key copied in Step №3 of this article.
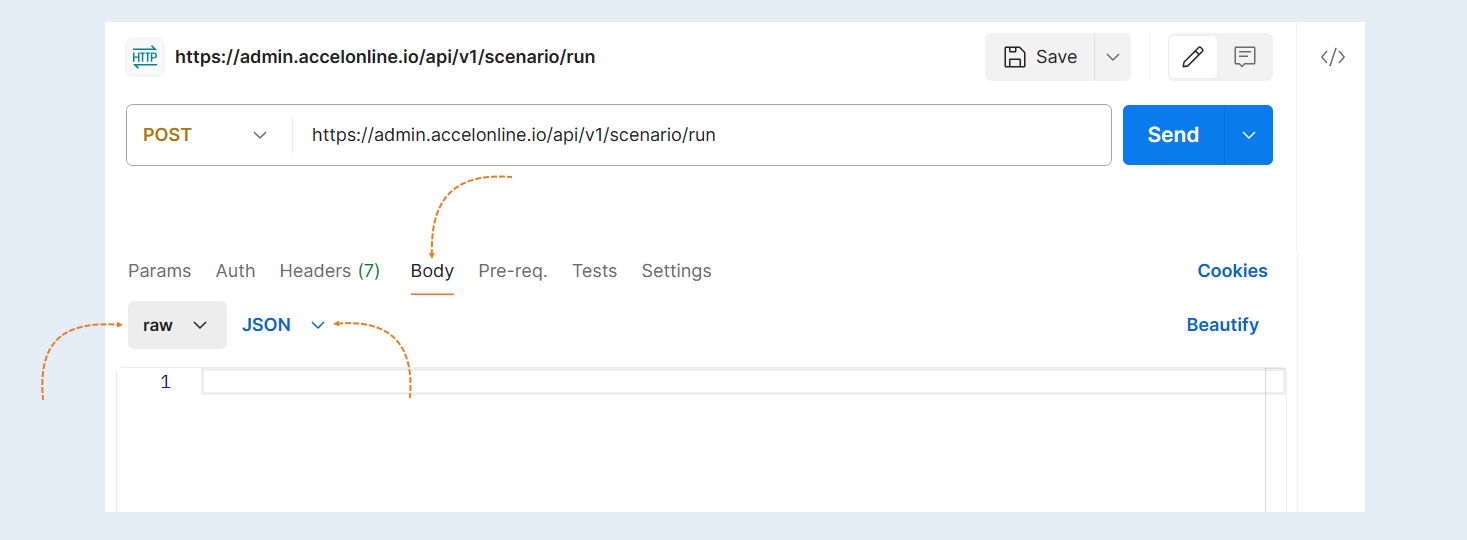
Switch to the "Body" tab and select "Raw" and "JSON" from the list.
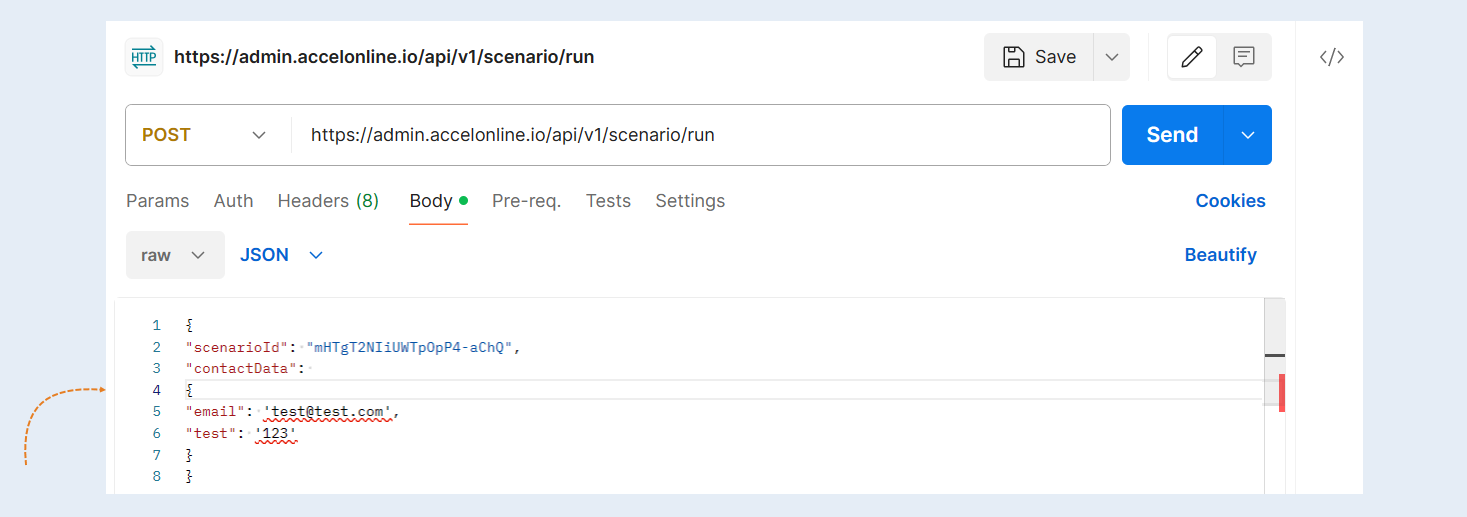
In the field below, paste the code.
Example code:
{
"scenarioId": "ID_SCENARIO",
"contactData":
{
"email": 'test@test.com',
"firstName": 'test',
"phone": '1234567890',
}
}
Replace the ID_SCENARIO in the code with the actual scenario ID copied in Step №1 of this article.
Attribute Parameters:
In this example code, the "email" parameter is specified, which is mandatory. The rest of the parameters (such as firstName, lastName, middleName, phone, etc.), are optional. You can add your own parameters or modify the code accordingly. Examples of parameter attribute values can be found in Step №1 of this article.
After the colon, you will find variables (in this example, 'test@test.com'). You can configure these variables on the server from which the request will be sent.
The process of creating additional contact attributes is described in the article below.
If you want to add additional contact attributes to include them in the code parameters, create new attributes on the AXL platform.
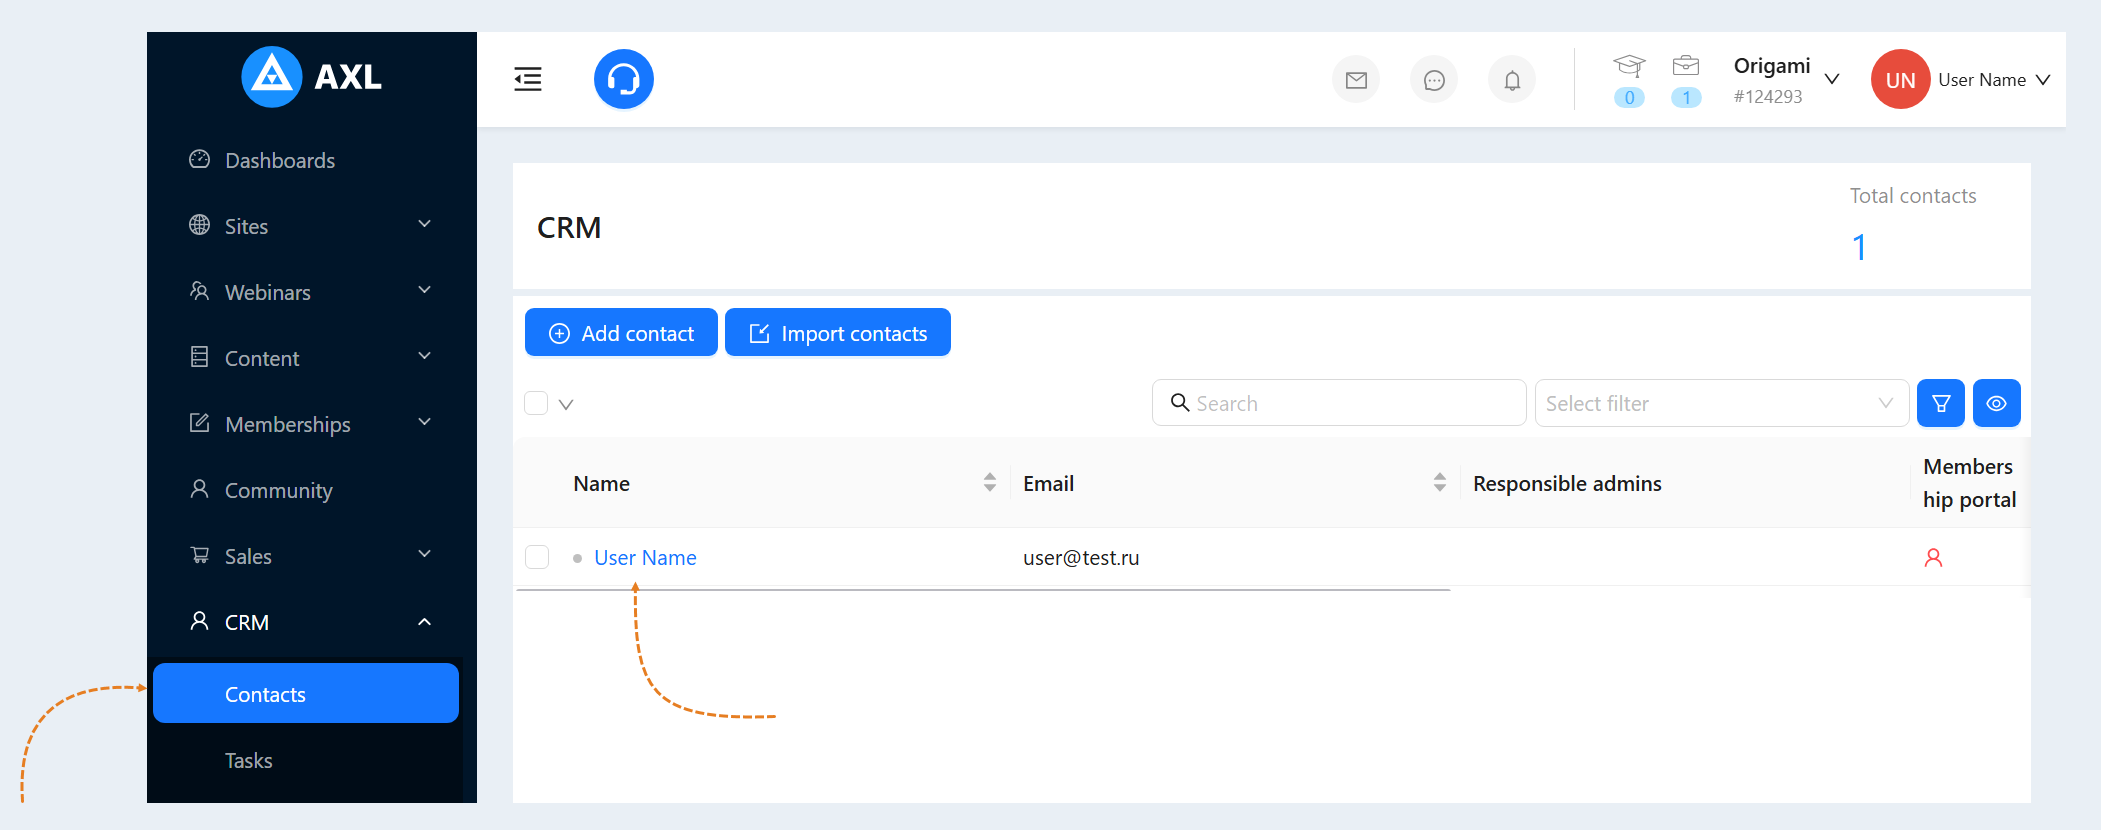
On the AXL platform, go to the "CRM" section, then to the "Contacts" tab. Open the card of any contact by clicking on the contact's name.
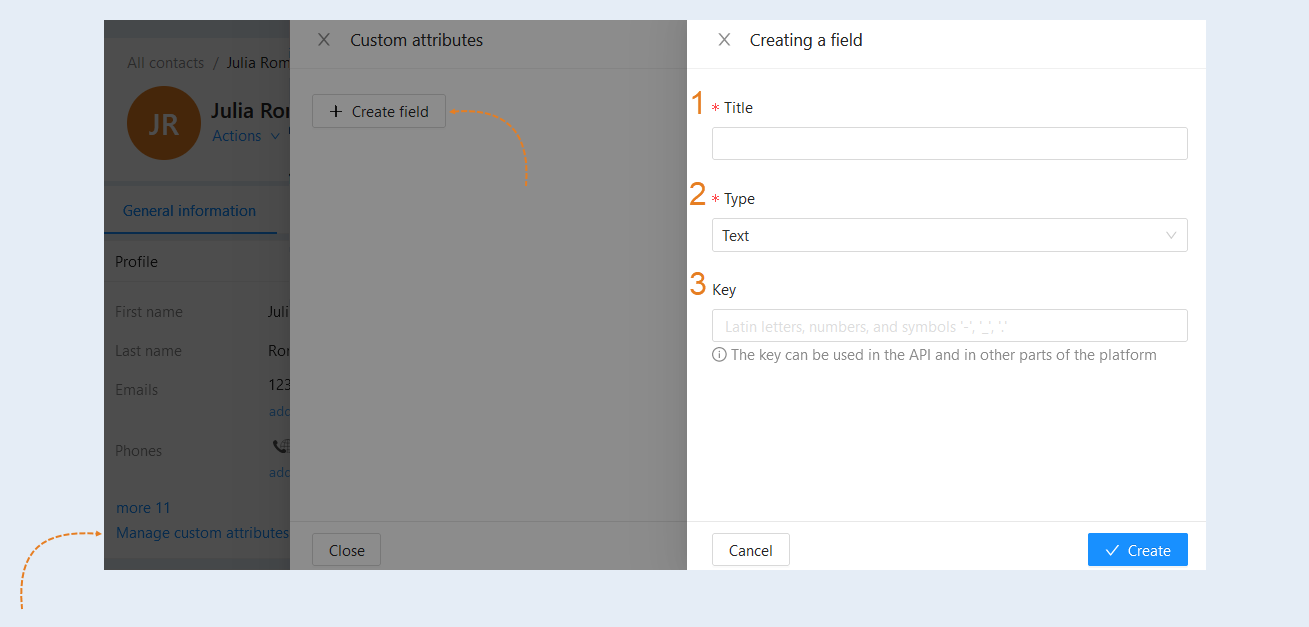
Click on the "Manage Custom Attributes" button, then click "Create Field". In the window that appears, specify:
- Title. Specify the name of the contact attribute that will be displayed on the contact card.
Type. Choose the type of attribute from the list. For a detailed description of contact attribute types, read the "Contact Profile" article.
Key. Add a key that you will use in the API. The key should consist of Latin letters, and spaces can be replaced with underscores. For example, "just_test".
Click "Create". The new attribute will appear on the contact card.
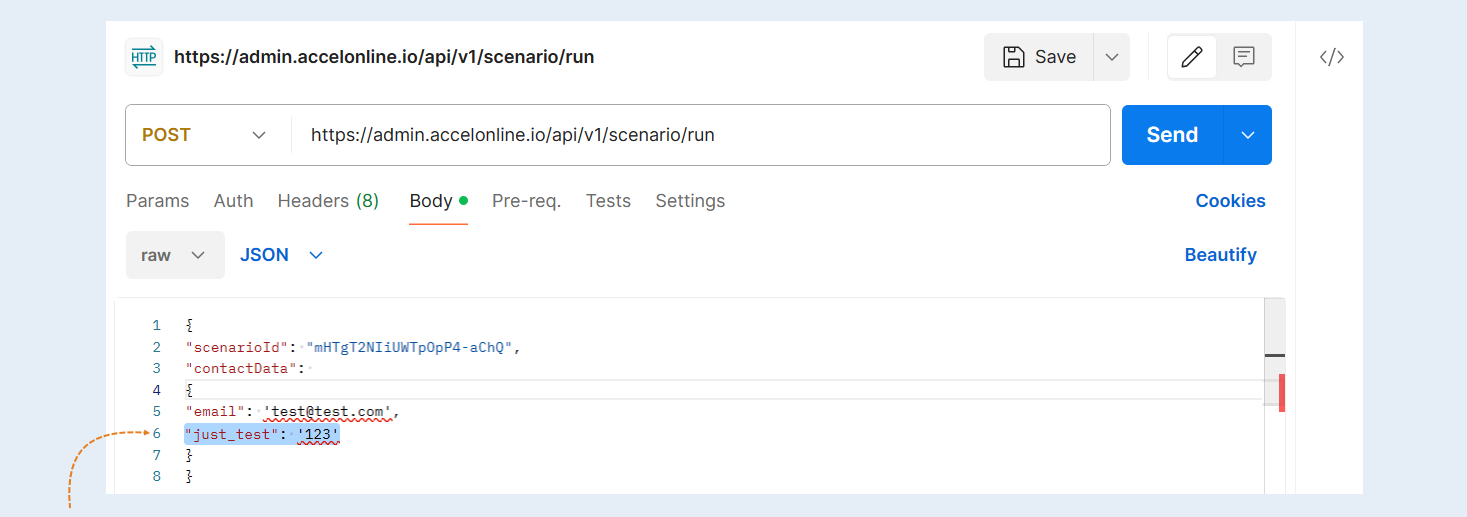
Return to the Postman request creation page. In the field, add a new contact attribute parameter. Inside the quotes, insert the contact attribute key added when creating a new attribute on the AXL platform. After the colon, specify the variables in quotes.
Example parameter: "just_test": '123'
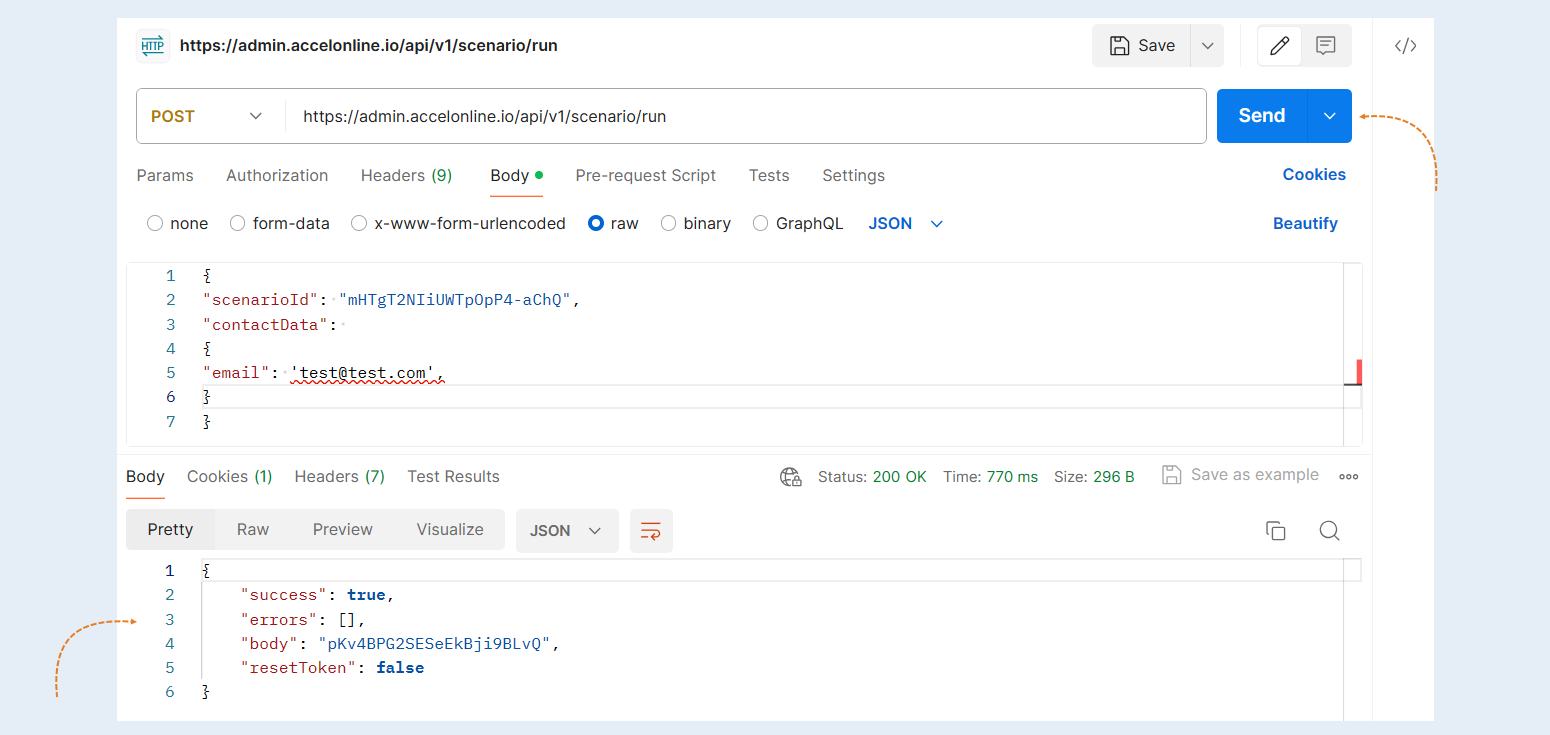
After finishing the code parameter settings in Postman, click the "Send" button to test sending the data to the AXL platform. When the data is sent, the scenario will be executed and further actions will be performed in the scenario.
For example, after transferring the client to the AXL platform, a welcome message with a link to access the platform and open access to the product can be sent to the client's email. This way, you can configure the transfer of a client to the AXL platform and perform any further actions with the user without using other methods, only by running the scenario.
7
The GET method
In the Postman service settings, open the "Collection" section and click on the "New" button - "HTTP" (as described in Step №5 of this article).
Select "GET" from the list.
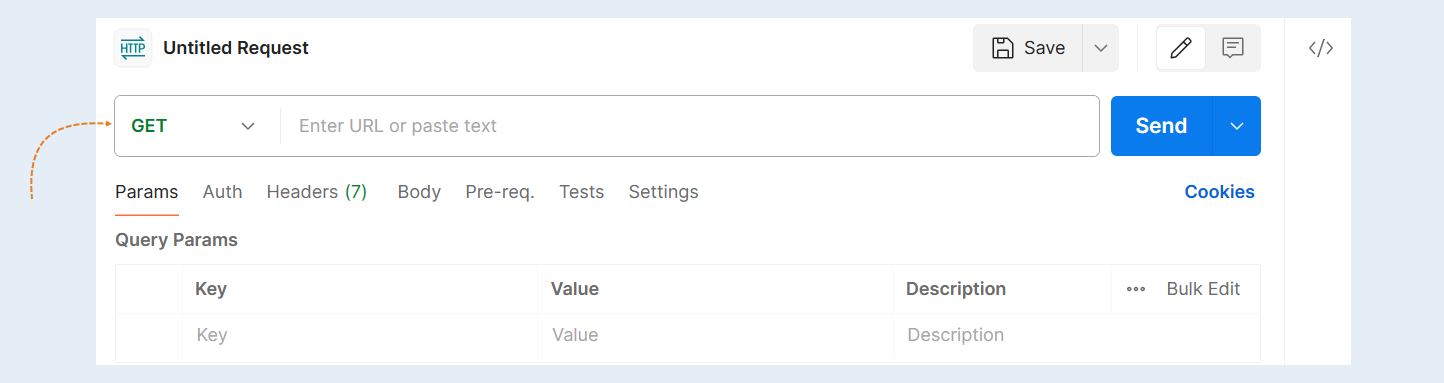
In the URL field, paste the scenario call address:
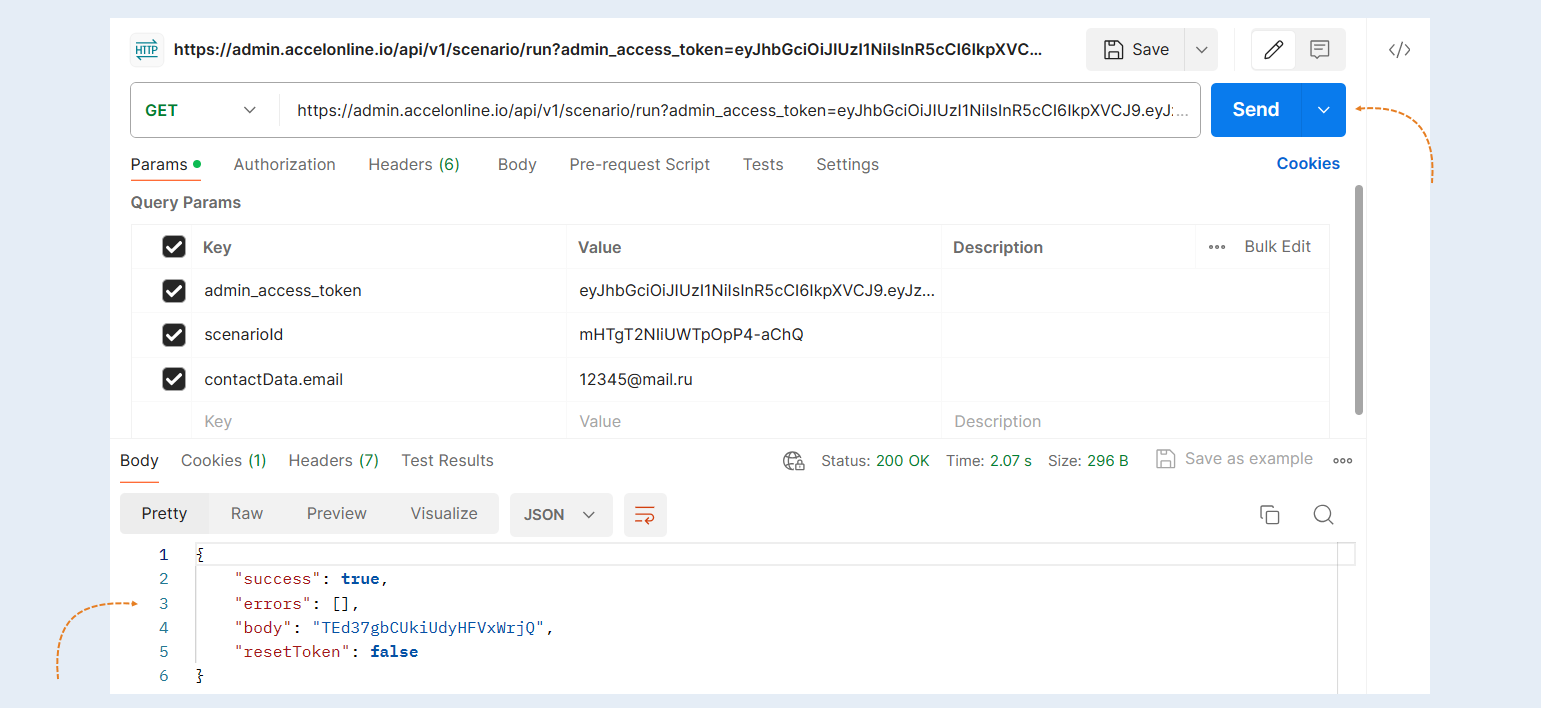
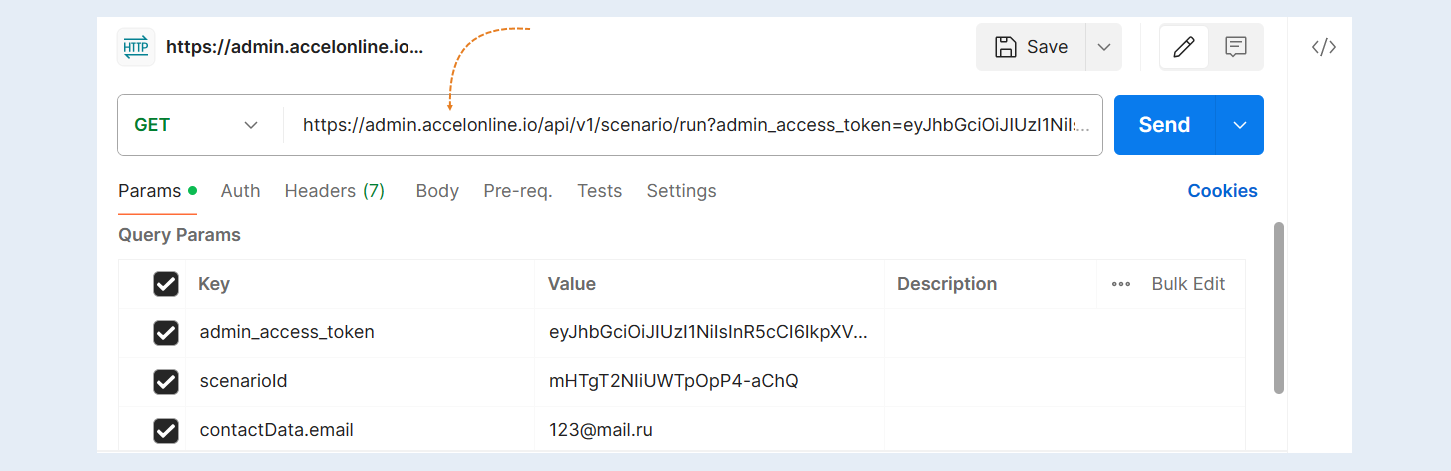
https://admin.accelonline.io/api/v1/scenario/run?admin_access_token=API_KEY&scenarioId=ID_SCENARIO&contactData.email={object.email}&contactData.firstName={object.first_name}&contactData.lastName={object.last_name}&contactData.phone={object.phone}
The contactdata.email parameter is mandatory, while the other parameters (contactdata.firstname, contactdata.lastname, and contactdata.phone) are optional. You can remove these parameters from the address or add your own parameters.
The variables in curly braces (such as {object.email}, {object.first_name}, {object.last_name}, {object.phone}) can be configured on the server from which the request will be sent.
Replace the API_KEY with the API key copied in Step №4 of this article.Please note that to set up a request via GET, you will need an API key without the text "Bearer" and the space following it.
Replace the ID_SCENARIO in the address with the actual scenario ID copied in Step №1 of this article.
Address Parameters:
The contactData.email parameter is mandatory, while the other parameters (contactData.firstName, contactData.lastName и contactData.phone) are optional. You can delete these parameters from the address or add your own parameters.
The variables in curly braces (such as: {object.email}, {object.first_name}, {object.last_name}, {object.phone}) can be configured on the server from which the request will be sent.
Example of an address for calling a scenario with filling in user attributes:
https://admin.accelonline.io/api/v1/scenario/run?admin_access_token=eyJhbGciOiJIUzI1NiIsInR5cCI6IkpXVCJ9.eyJzdWIiOiJac2R3ZkdPWlUwZTltNFpBN0U2S3pR2376anRpIjoiNTQxZjczNzYtNWM3NS00YjI4LTk2ZWMtYWRiMGJmNTliMTA5IiwiaWF0IjoxNzExNDQ0MDYyLCJleHAiOjIwMjY5NzY4NjIsInVzZXIiOiJ7XCJ0eXBlXCI6XCJhcGlcIixcImlkXCI6XCJac2R3ZkdPWlUwZTltNFpBN0U2S3pRXCIsXCJlbWFpbFwiOm51bGwsXCJmaXJzdE5hbWVcIjpcItCf0LXRgNC10LTQsNGH0LAg0YEg0J_QvtGB0YLQvNC10L1456xcImxhc3ROYW1lXCI6bnVsbCxcInBob25lXCI6bnVsbCxcInNjaG9vbElkXCI6XCJsb3VCY0hnX2pVeVZGTVNwOU1HMXlnXCIsXCJjb21tdW5pY2F0aW9uSWRcIjpudWxsLFwiY29uY3VycmVuY3lTdGFtcFwiOm51bGwsXCJzZXNzaghSWRcIjpudWxsLFwiY2hhdFVzZXJEYXRhXCI6e1wiaWRcIjpcIkhKQ25VYUxjTDBxNFF6NzFqUHJFNUFcIixcInJvbGVzXCI6WzBdfX0iLCJodHRwOi8vc2NoZW1hcy54bWxzb2FwLm9yZy93cy8yMDA1LzA1L2lkZW50aXR5L2NsYWltcy9zeXN0ZW0iOiJBZG1pbiIsIm5iZiI6MTcxMTQ0NDA2MiwiaXNzIjoiQWNjZWwiLCJhdWQiOiJhZG1pbi5hY2NlbG9ubGluZS5pbyJ9.h6cS85UXBrztUxRuFtmjsIoboBvUl_kn5oj5FccY8QQ&scenarioId=mHTgT6NIiUWTp1pP4-aChQ&contactData.email=1234@mail.ru&contactData.firstName=Julia&contactData.lastName=Roman&contactData.phone=1234567890
If you want to add additional contact attributes to include them in the code parameters, create new attributes on the AXL platform.
On the AXL platform, go to the "CRM" section, then to the "Contacts" tab. Open the card of any contact by clicking on the contact's name.
Click on the "Manage Custom Attributes" button, then click "Create Field". In the window that appears, specify:
- Title. Specify the name of the contact attribute that will be displayed on the contact card.
Type. Choose the type of attribute from the list. For a detailed description of contact attribute types, read the "Contact Profile" article.
Key. Add a key that you will use in the API. The key should consist of Latin letters, and spaces can be replaced with underscores. For example, "just_test".
Click "Create". The new attribute will appear on the contact card.
Return to the request creation page in Postman.
In the URL field, add a new parameter for the contact attribute. After &contactData. insert the key of the contact attribute added when creating a new attribute in the AXL platform. After the equal sign, specify the variables.
Example parameter: &contactData.just_test=123
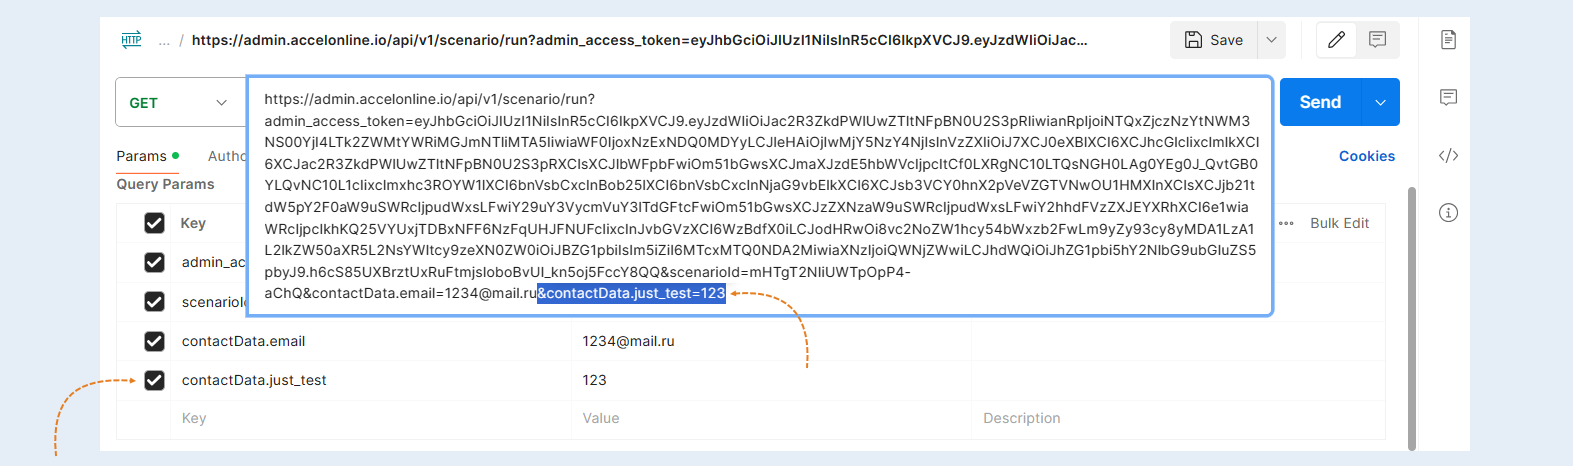
After finishing the code parameter settings in Postman, click the "Send" button to test sending the data to the AXL platform. When the data is sent, the scenario will be executed, and further actions will be performed in the scenario.
For example, after transferring the client to the AXL platform, a welcome message with a link to access the platform and open access to the product can be sent to the client's email. This way, you can configure the transfer of a client to the AXL platform and perform any further actions with the user without using other methods, only by running the scenario.