Each of your tutorials has steps. A step is a course element, a unit of learning content. A step can be a video tutorial, article, test, assignment, etc. You add the required number of steps to the training course in your membership portal.
Click on the desired section of the article to go to its description:
How to add steps to a course
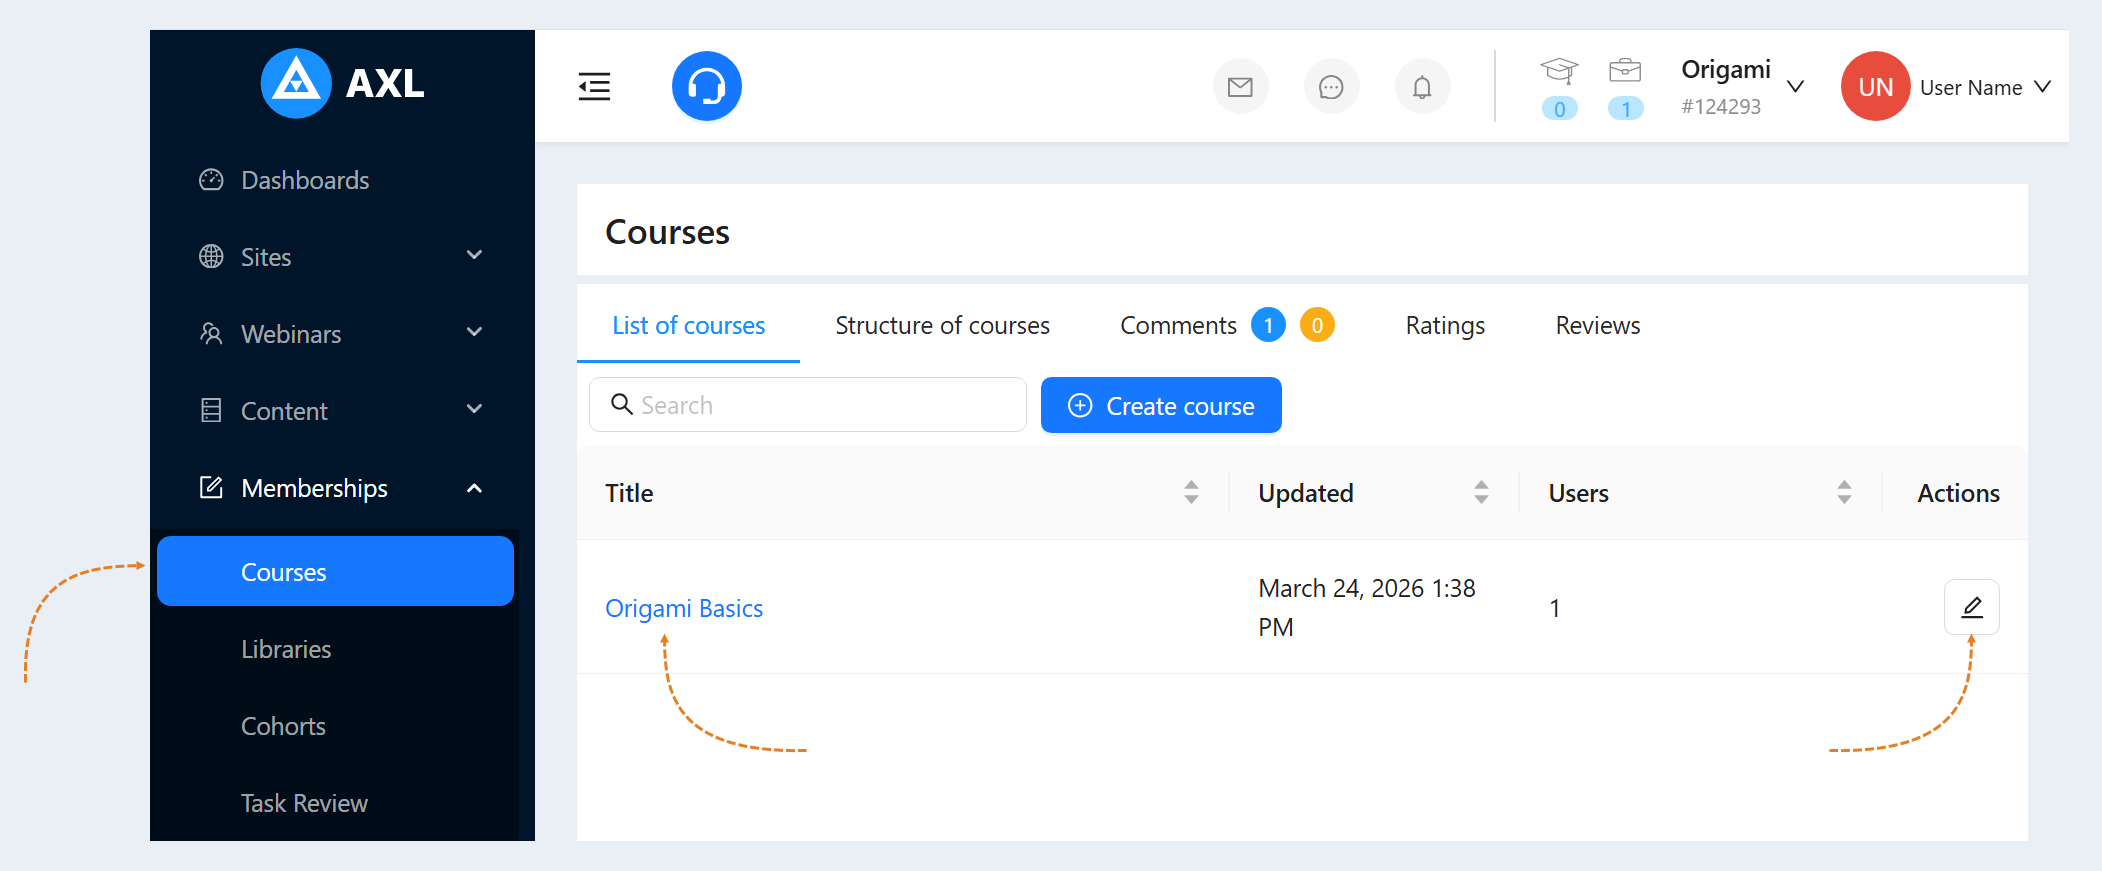
To add steps to a course, go to the Courses and Training section, Courses tab. Then click on the name of the course or the "Edit" button.
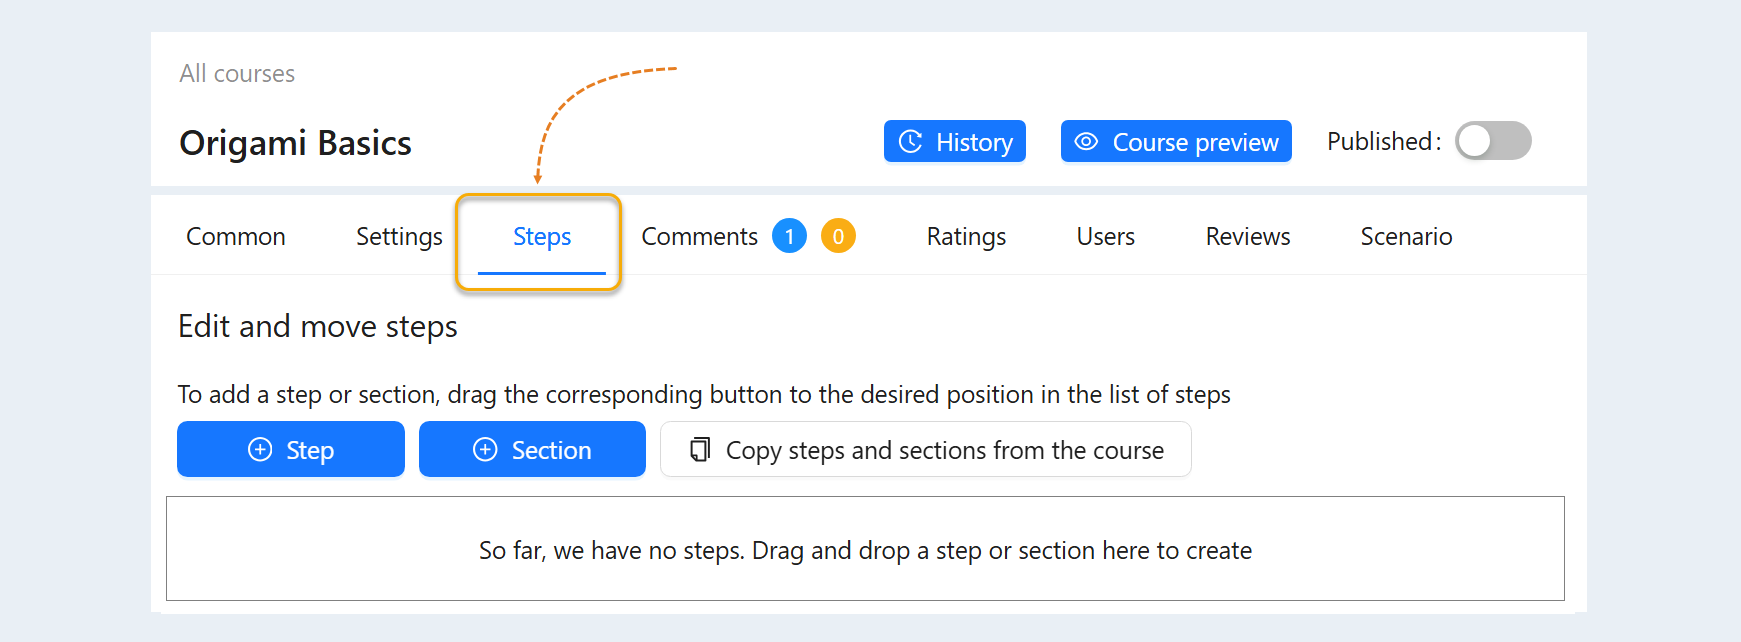
Go to the "Steps" tab.
In this tab, you create a sequence of steps within the course for the user to study. You can create, delete, change the sequence of steps, add new steps. Any changes to the course can be made at any stage, even if you have already published the course and it is available to users. This means that at any time you can update the course, make changes, correct information, change videos, etc.
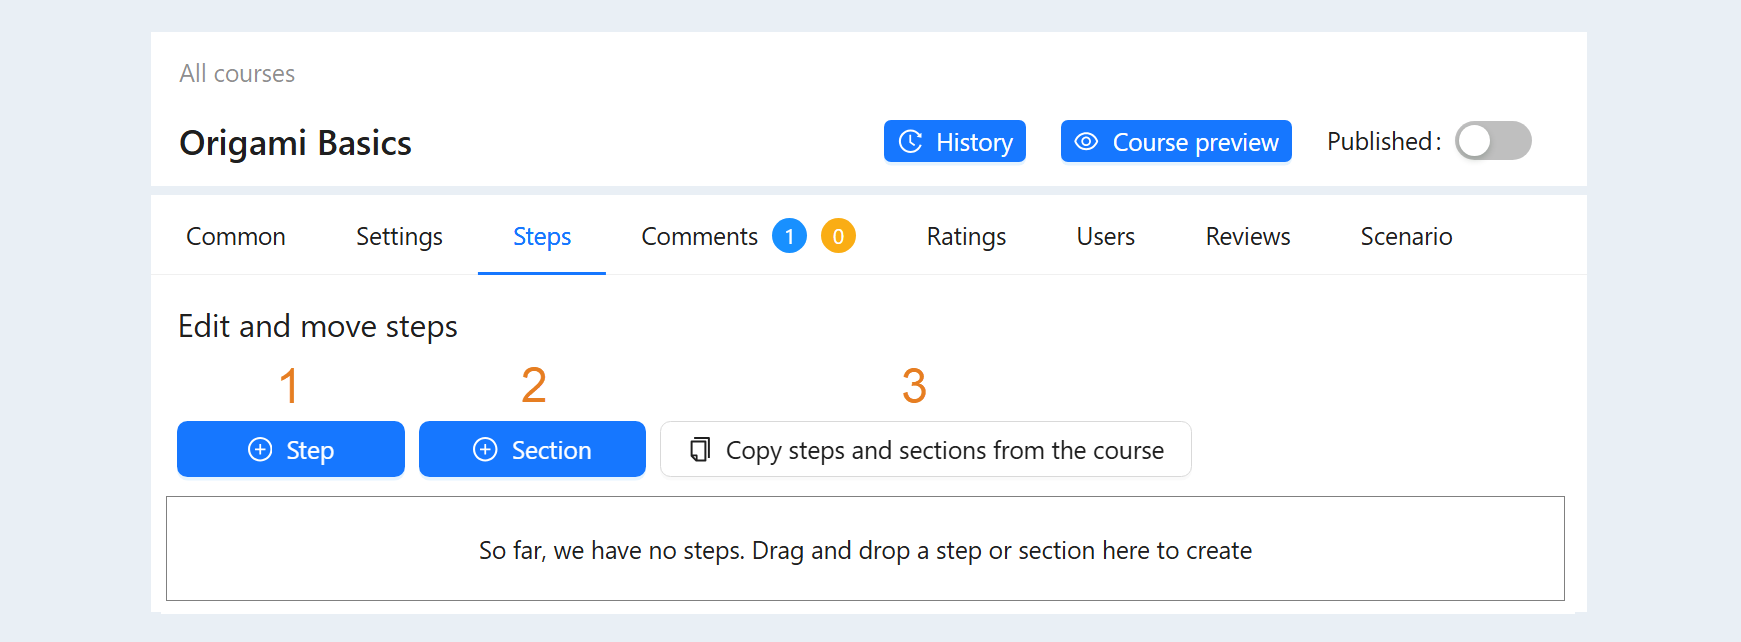
"Step" button. A step is a component of a course, a unit of learning content. A step can be text, video, picture, table, list, task, test, and the like. To add a step to the course, click on the “Step” button and drag it into the field.
- "Section" button. Needed in order to group the steps of the course if you want to divide it into parts. To add a section to the course, click on the "Section" button and drag it into the field.
"Copy steps and sections from the course" button. Use this button to copy the steps from one course to another.
Please note, that when copying the steps, the course scenario will also be copied and transferred to another course.
Click the "Copy steps and sections from the course" button. An additional window will open. Select a course from the list. Next, you will be prompted to select steps from a list of an existing course. Check the box next to the required steps for copying. Click the Create button. The steps appear in the course with a Copy.
Add steps to the course.
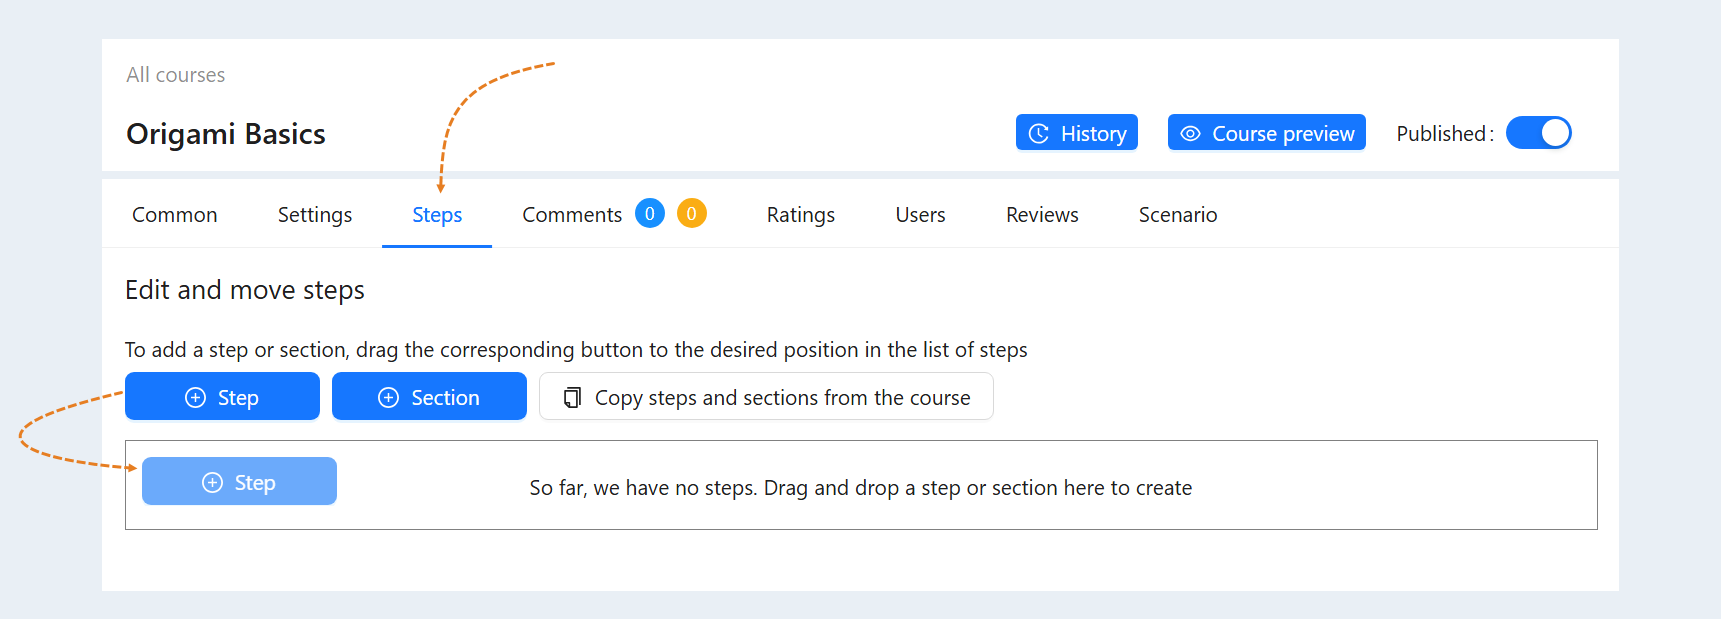
After you have added steps and sections, you can fill the course with content (text, video, assignments, and so on). To do this, use the step settings.
Step settings
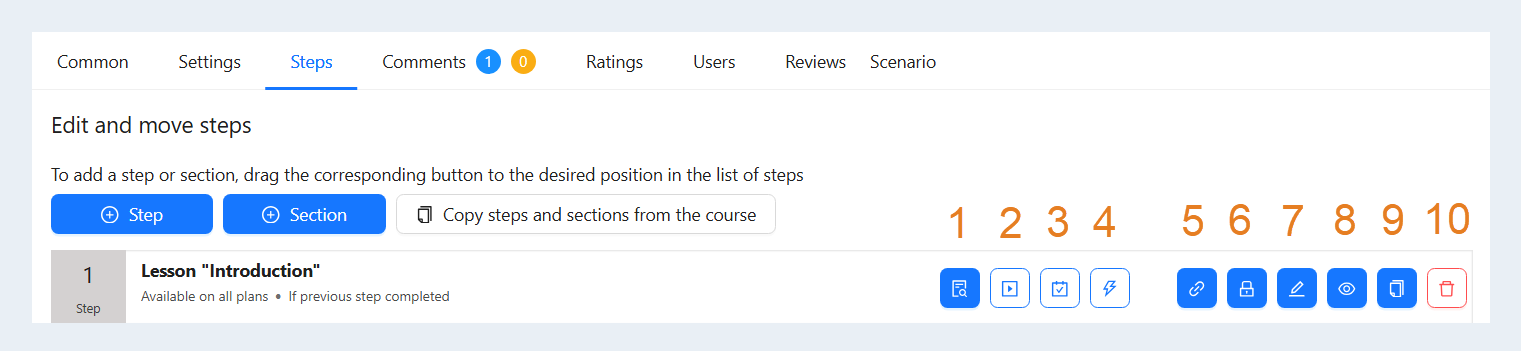
Each "Step" has a settings panel:
- Theory button. Here you can add text blocks, videos, images for training. Lessons are created in the page editor. For details on how to work in the editor, see the article "Page editor overview".
- Tests button. In this section, you can create test assignments for users. Tests contain a question and several answer options, of which at least one is correct. The number of questions, answer options and correct answers is not limited. Read more about how to create tests in the "Tests" article.
- Tasks button. In this section, you can create assignments for users. Tasks differ from tests in that the user must write the answer to the question in a special field. No answer options are offered. You can add an unlimited number of questions in this section. Read more in the "Tasks" article.
- Script button. A script is a sequence of events and actions within your course on AXL. Here you can set up the sequence of actions in case the user started the course or completed the course. Read more in the article “Course scenario”.
Copy Link button. This button allows you to instantly copy a direct link to this course step. This is useful for quickly sharing the link with colleagues or other users, or for use in course promotional materials.
- Accessibility button. You can set access rights for this step. You can make a step availability at all tariffs or selectively. Set the accessibility of a step in the sequence - to access the step immediately or after completing the previous steps (step). You can block a step if you have not followed the previous steps. And also you can set the accessibility of the step by time - access to the step will open with a time delay.
- Edit button. In this section, you will see a window for complete editing of this step. Read more in the article below.
- Visibility button. Click the button to make the step visible to users or hide the step.
- Copy button. This button creates a copy of the step.
- Delete button. Click on the button to delete the step.
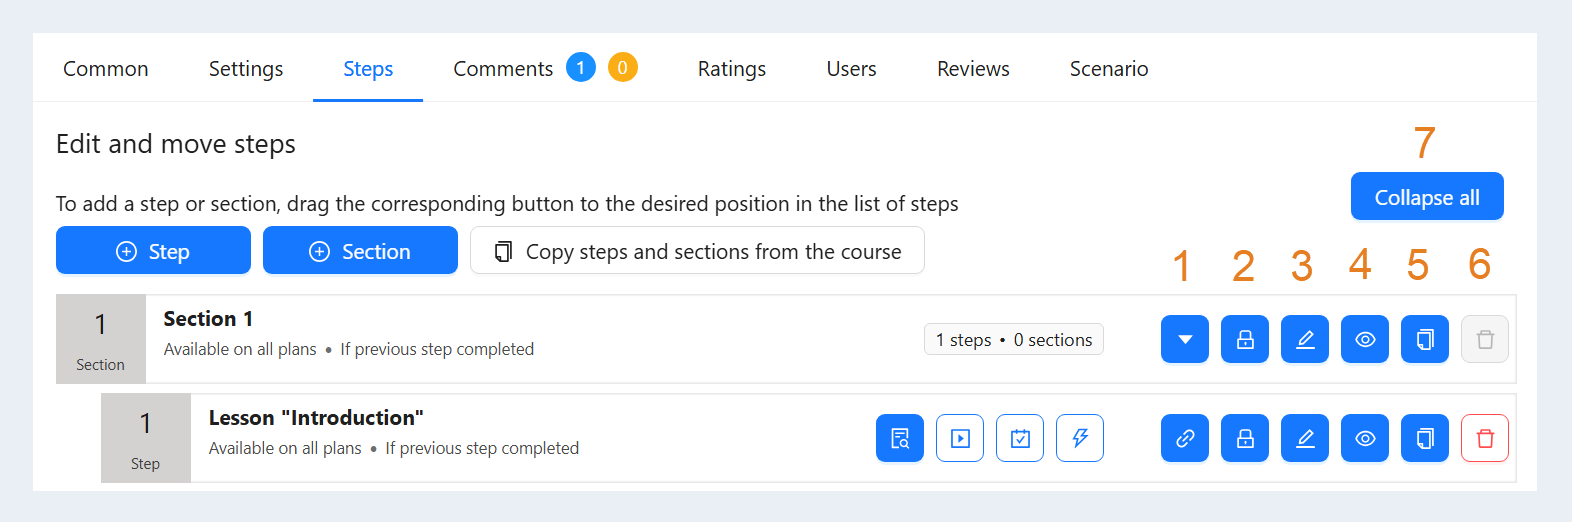
The “Section” has the following settings:
- Hide / Show button. This button hides the contents of the section. In case your course has many sections and steps, you can collapse the contents of the section for comfortable work.
- Accessibility button. You can set access rights to this section. You can make the section available on all tariffs or selectively. Set the accessibility of a step in the sequence - to access the step immediately or after completing the previous steps (step). You can block a step if you have not followed the previous steps. And also you can set the accessibility of the step by time - access to the step will open with a time delay.
- Edit button. Here you can change the name of the section, add comments for the curator, set access rights for users (choose tariffs on which this section will be available, set the sequence of access to a step and set a time delay). Also, include step comments and step ratings.
- Visibility button. Click the button to make the section visible to users or hide it.
- Copy button. You can copy the entire section, with all the steps.
- Delete button. This button deletes the entire section.
- And also the button "Collapse all sections". By clicking on this button, the course steps inside each section will be hidden and only the sections will be visible in the list of steps.
Editing a step
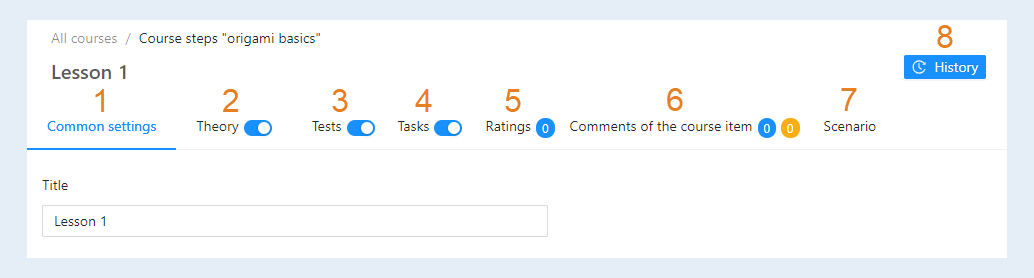
Click the "Edit" button. This will open the step editing section. In the window that opens, fill in the data about the course step:
- General settings. Write the name of the course step, add a comment for the curator. Check the Allow comments for a step and include a period if you want users in your membership portal to be able to comment and rate this course step. And define the access settings for this step for users.
- Theory. Here you can add text blocks, videos, images. For more information on how to work in this section, see the article "Page Editor Overview".
- Tests. In this section, you can create test assignments for users. For more information on how to create tests, see the "Tests" article.
- Tasks. In this section, you can create assignments for users. Read more in the "Tasks" article.
- Ratings. In this section, you can see the users' grades for a step, if you have grades enabled. Read more about grades in the article “Ratings”.
- Comments. In this section, you can see users' comments on a step, if you have comments enabled. Read more in the article "Comments".
- Scenario. In this section, you create a script of events and actions for this step. For more information on scenarios, see the "Course Scenario" article.
- History. Here you can see a detailed history of changes for this step: the date and time of the changes, the name of the user who made the changes, as well as what changes were made to this step.