In this article, we will look in detail at how to add and configure buttons in a webinar.
Click on the desired section to go to its description:
1
Adding a button in a webinar room
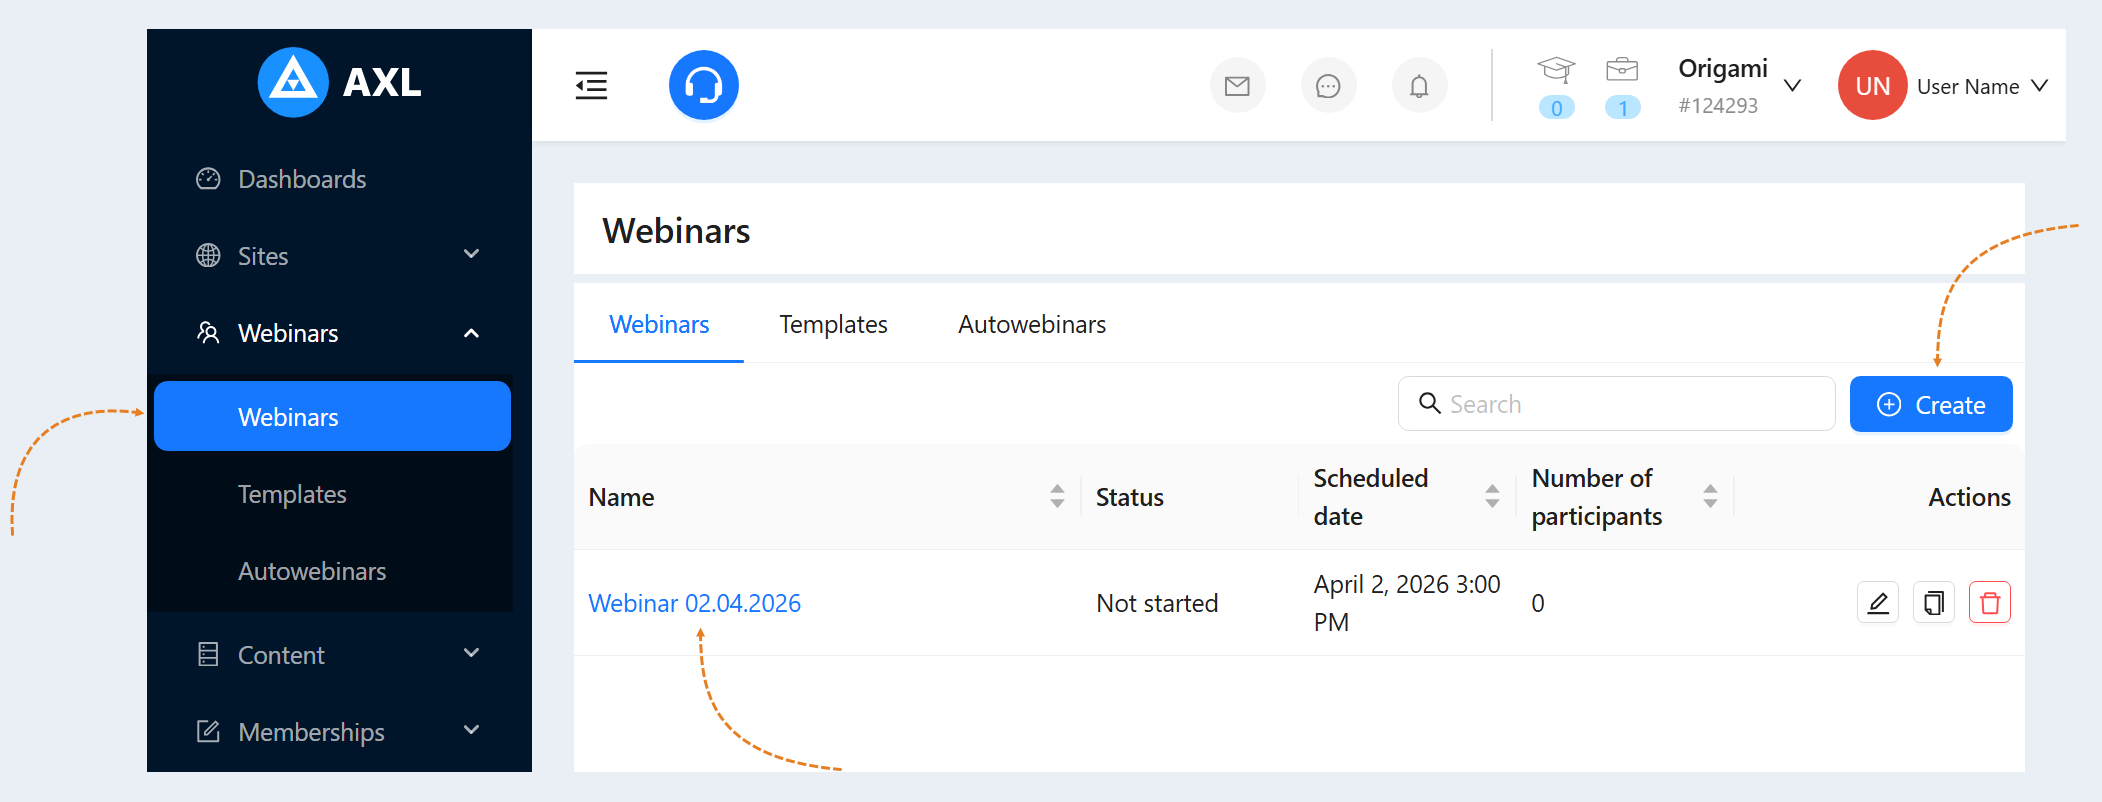
Go to the "Webinars" section. Create a new webinar or open a previously created webinar.
For more information on how to create a webinar, see the article "Webinars".
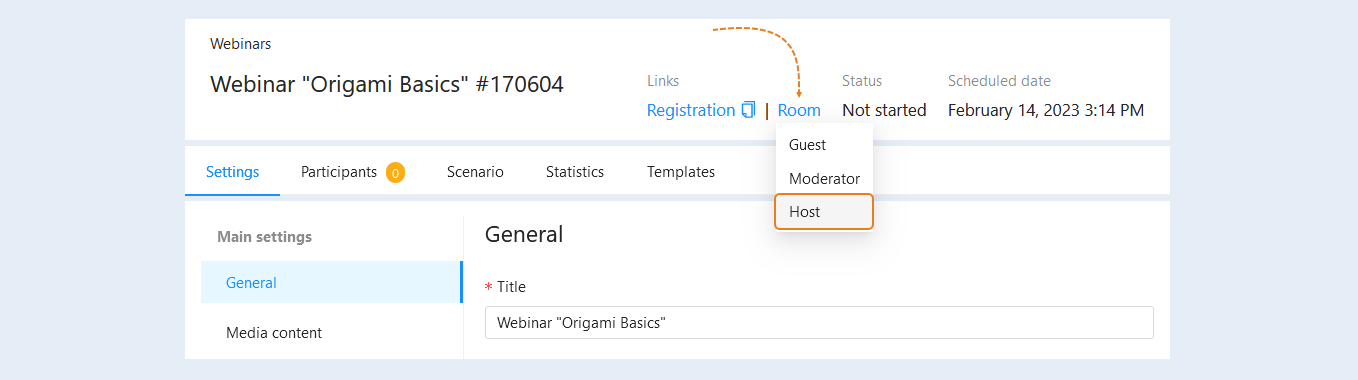
Click the "Room" button in the upper-right corner of the window. Select the "Host" role from the list.
The host has the highest level of access, full control over the presentation, microphone and video.
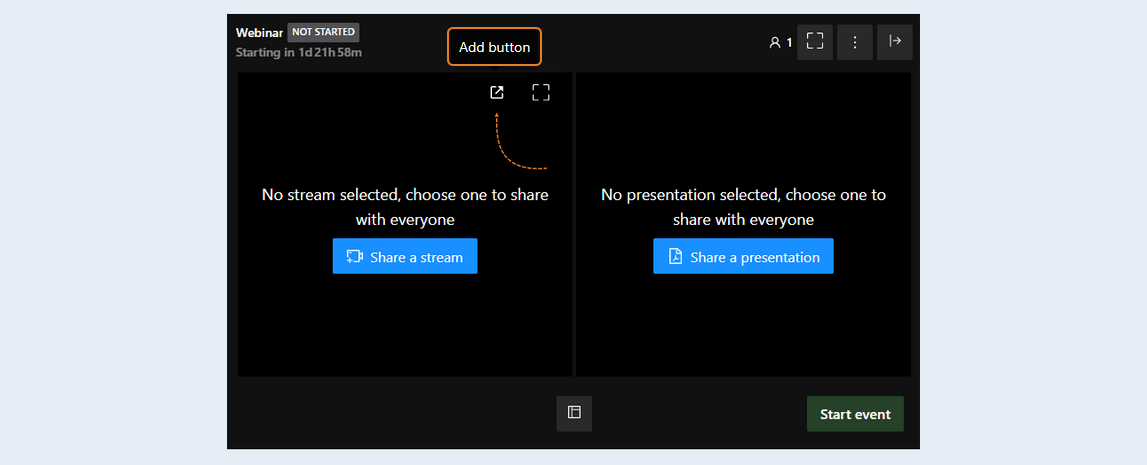
You have opened a webinar room. Click the "Add Button" button at the top of the broadcast toolbar.
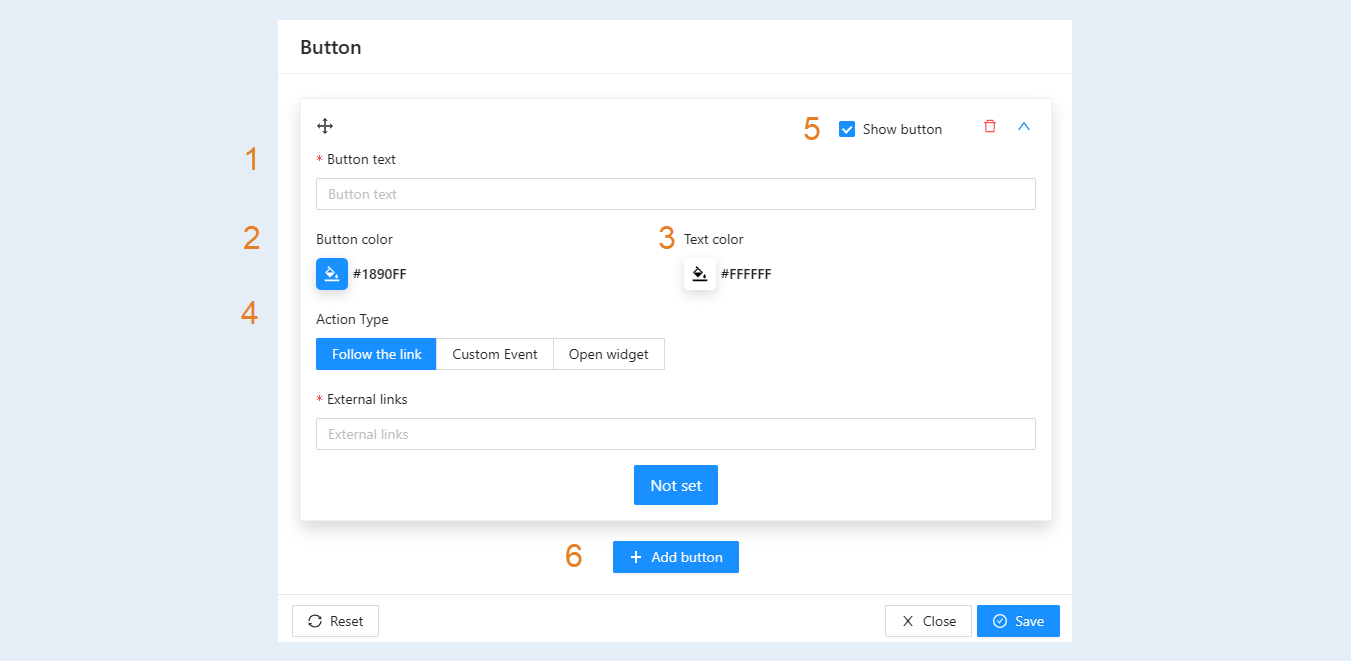
In the window that opens, fill in the fields:
Button text. Specify the text that will be displayed on the button itself. This is what the webinar participants will see and click on. The text defines what the button should do, or what message to send to the user. The text should be clear, concise and prompt to action (for example, "Learn more", "Register", "Ask a question").
Button color. You can change the color of the button itself. The color draws attention to the button and helps it stand out from the rest of the content in the webinar room. Provides better visibility and readability of the text on the button.
Text color. The color of the text displayed on the button. Provides legibility of the button text and contrast with respect to the background color. The color combination of the button and the text can match the corporate identity.
Action Type. Determines what happens when the user clicks the button. Allows you to set up different scenarios of interaction with webinar participants.
Select the type of action of clicking on the button:Follow the link. Opens the specified web page in a new browser tab. It is used to send participants to the registration, payment, download of materials, etc. pages. For more information on how to create a website on the AXL platform, see the article "How to Create a Website".
Custom event. When the button is clicked, the set user event is triggered. The event will be triggered only if the contact is registered in CRM (there is an email address). It can also be used for integration with other services. For more information on how to set up a custom event, see the article "Buttons, widgets and custom events in the webinar".
Open widget. Clicking on the button opens the widget in a modal window in the center of the screen. For example, a question form, a chat, a survey. It is used for interactive interaction with the audience and collecting feedback. For more information on how to create and configure a widget, see the article "Widgets".
Show button. Enables or disables the button visibility in the webinar room. It allows you to control when the button will be visible to participants (for example, to show it only at a certain moment of the webinar).
Add button. You can add and customize several buttons in the webinar. Click to add another button.
After completing the settings, click the "Save" button.
After completing the settings, click the "Save" button.
2
Managing webinar buttons
After creating the webinar buttons, they are displayed as a list, where the following control options are available for each button:
- The "Move" button. Next to each button in the list, a special icon is displayed indicating the movement function (this is an icon with four arrows). Hold down the icon and move the button higher or lower in the list to change the order in which buttons are displayed on the webinar for participants.
Preview of the button. It shows exactly how the button will look for the participants of the webinar. By clicking on this preview area, you can test what happens when you click on it. This allows you to make sure that the button leads to the correct page, triggers the desired event, or opens the correct widget. Use the preview to check the functionality of the button before starting the webinar.
The type of action. It displays information about what action will be performed when the button is clicked (click on a link, a custom event, or open a widget). Additional details are provided below the type of action, such as the specific URL for clicking on the link or the name of the widget to open.
Show the button. Check the box to make the button available to users, or uncheck it to hide the button. This option is useful for preparing buttons that should not be immediately visible, or for temporarily hiding a button during a webinar.
The "Delete" button. Click the button to remove the button from the list.
The "Expand settings" button. Click the button to open the settings window and make changes. Allows you to make changes to an existing button without having to delete it completely and create it anew.
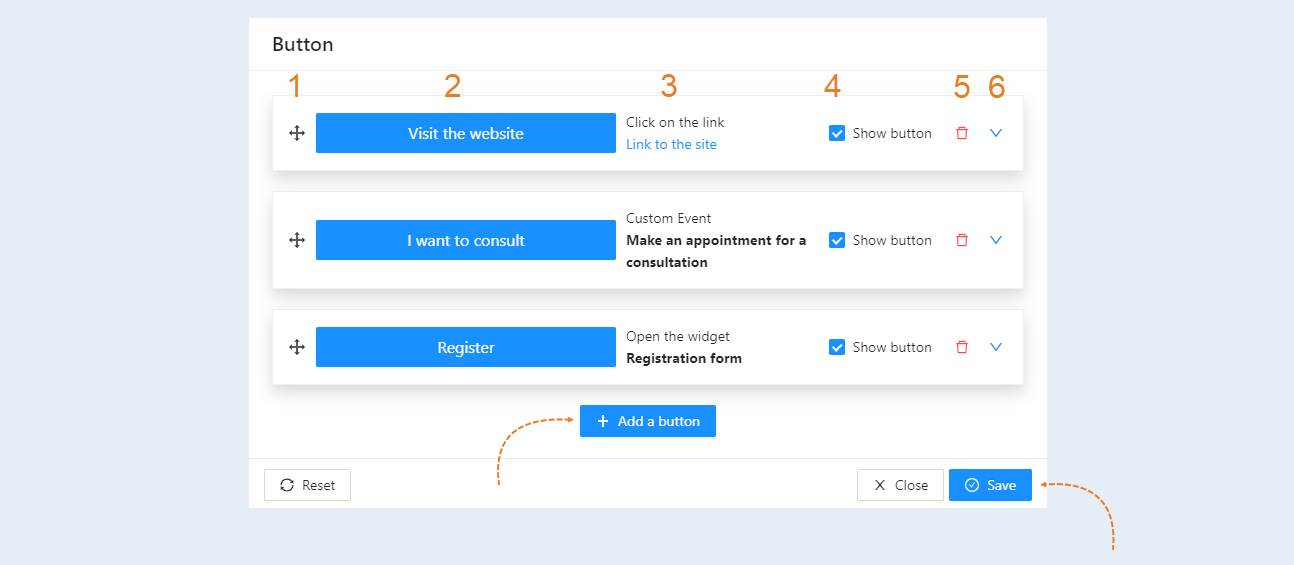
You can add and configure the required number of buttons in the webinar room.
After completing the settings, click the "Save" button.
3
Type of action "Follow the link"
This action redirects the user to the specified URL when the button is clicked. It is used to quickly direct webinar participants to important resources related to the topic of the webinar.
Usage examples:
- Link to the product/service. If the webinar is dedicated to a specific product, the button can lead to its purchase page or with a detailed description. For example, the "Learn more about the product" button leads to the product page.
Link to the registration page for the next webinar. The "Register for the next webinar" button makes it easier to register participants for future events.
Link to social media. The "Join us on Facebook" button helps to increase the audience on social networks.
In the button settings window, specify the text of the button and select the type of action "Click on the link".
In the "Website link" field, enter the link that the user will be sent to when clicking on the button. You can create a website on the AXL platform or use a link to a third-party website. For more information on how to create a website on the AXL platform, see the article "How to Create a Website".
After completing the settings, click the "Save" button.
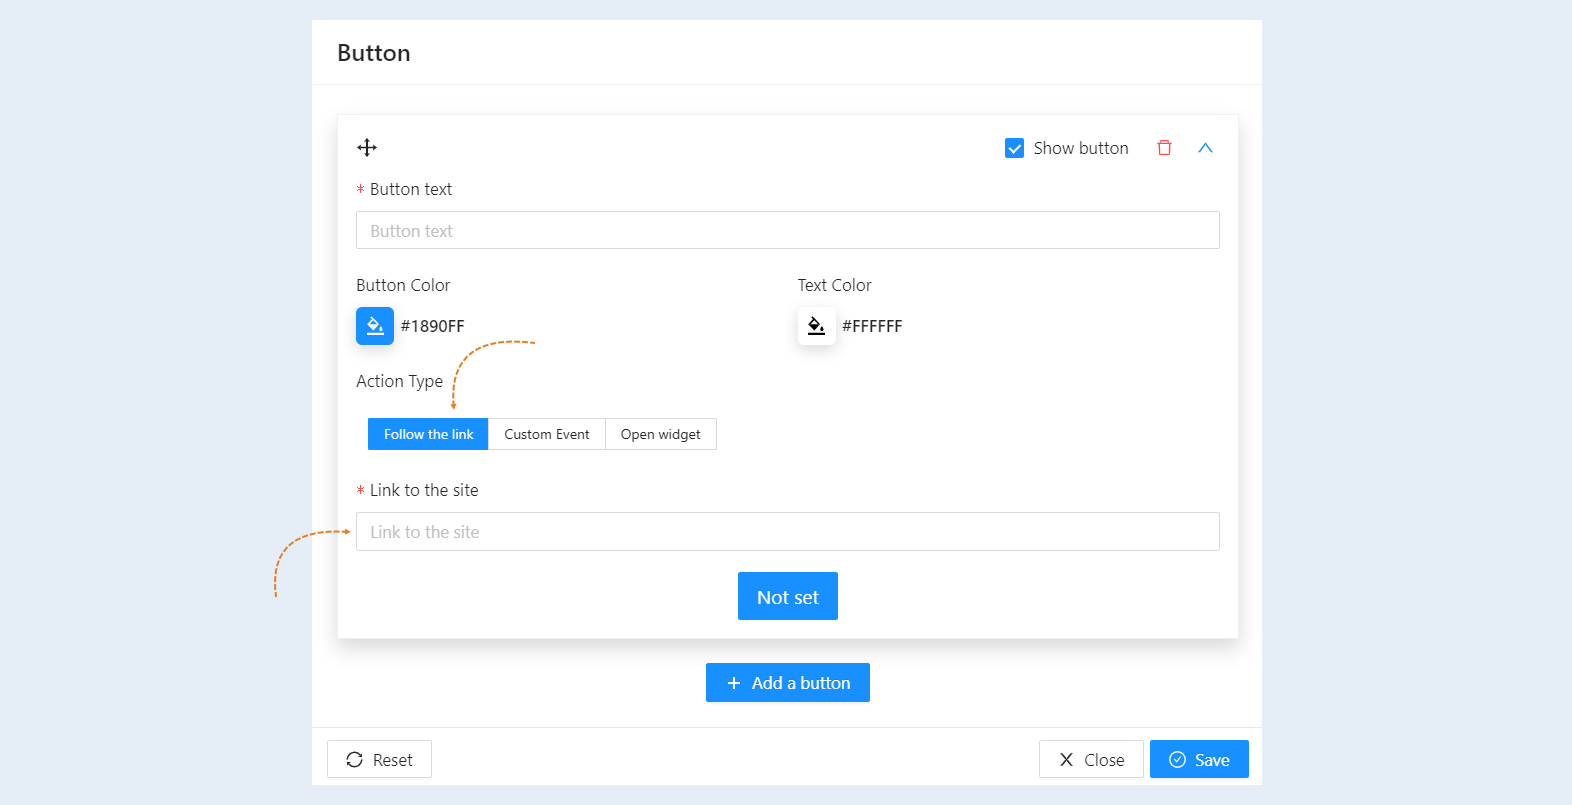
Thus, when clicking on the button, the user will be sent by a link to the specified site.
4
Type of action "Custom Event"
A user event is an event that will trigger when a webinar participant clicks on a button. This is the most flexible action. It allows you to trigger a specific chain of events and actions prescribed in the webinar script. You can create any event that will trigger the script. Please note that the event will be triggered only if the contact is registered in CRM (there is an email address).
This action is used to implement complex, specific actions. It allows you to automate and personalize actions when clicking on a button. It can also be used for integration with other services.
First, you need to create a custom event in the webinar scenario.
To do this, open the "Script" tab in the webinar settings. From the list of script events, select "Custom Event" and drag it to the script field.
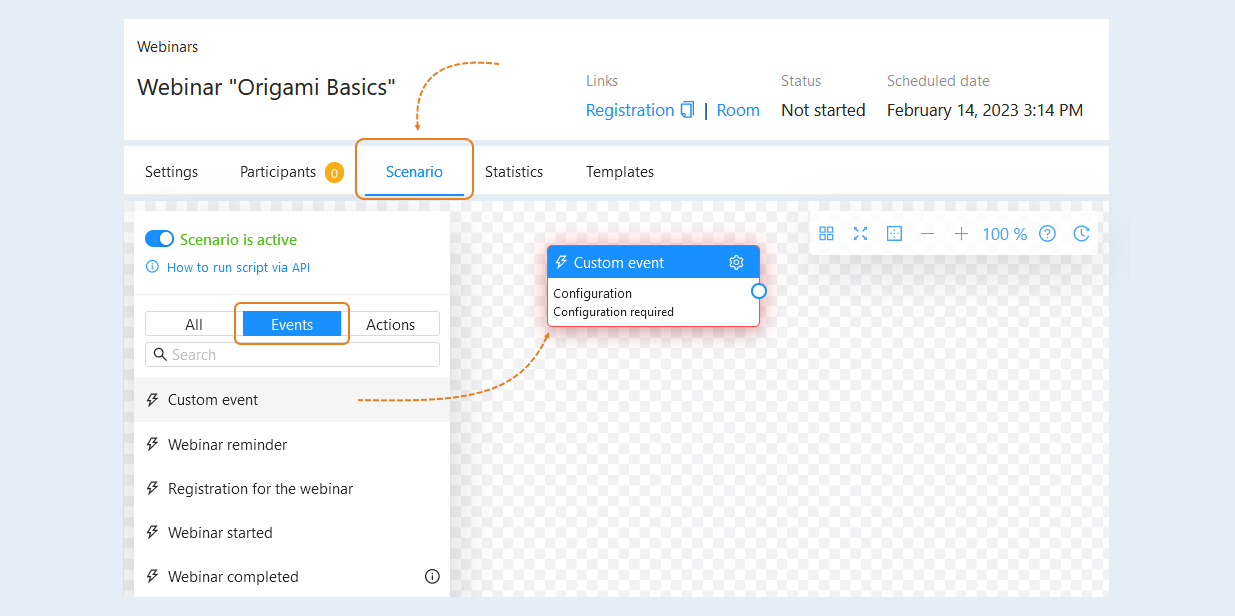
For a custom event, you need to make configuration settings. Click the "Settings" button in the user event window and then the "Configure Node" button.
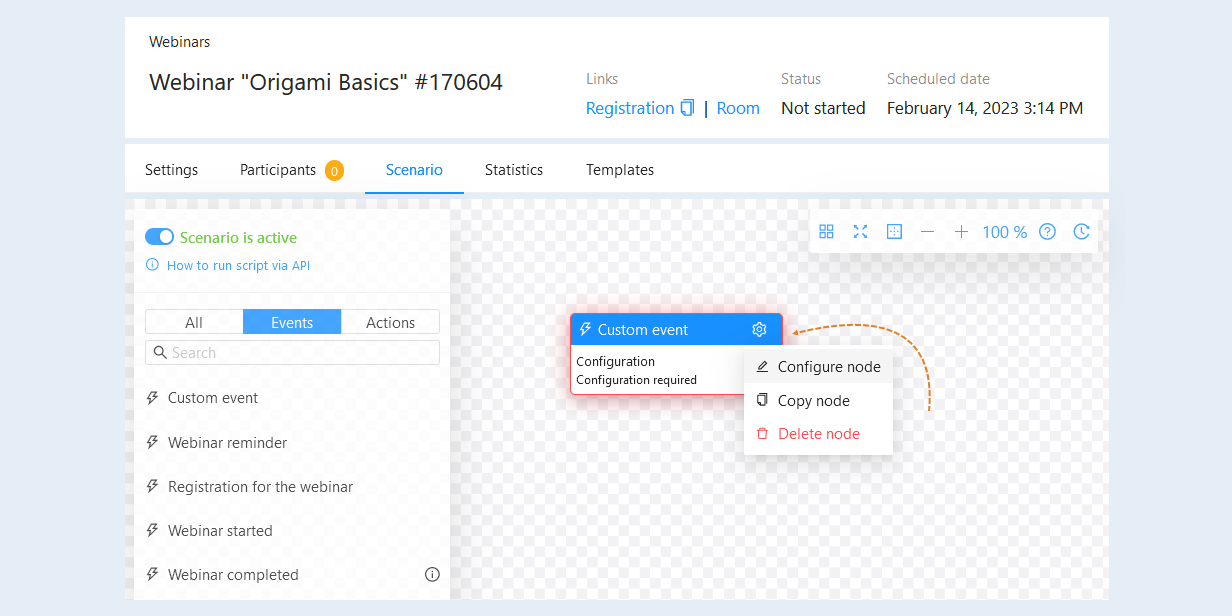
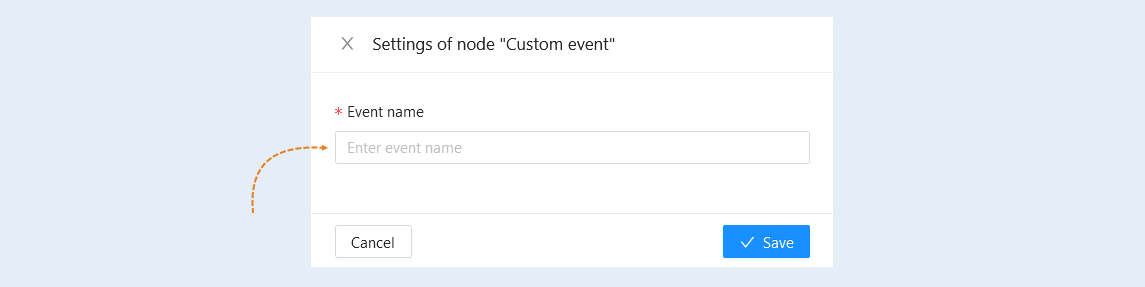
In the "Custom Event Node Settings" window, write the name of the event. Click the "Save" button.
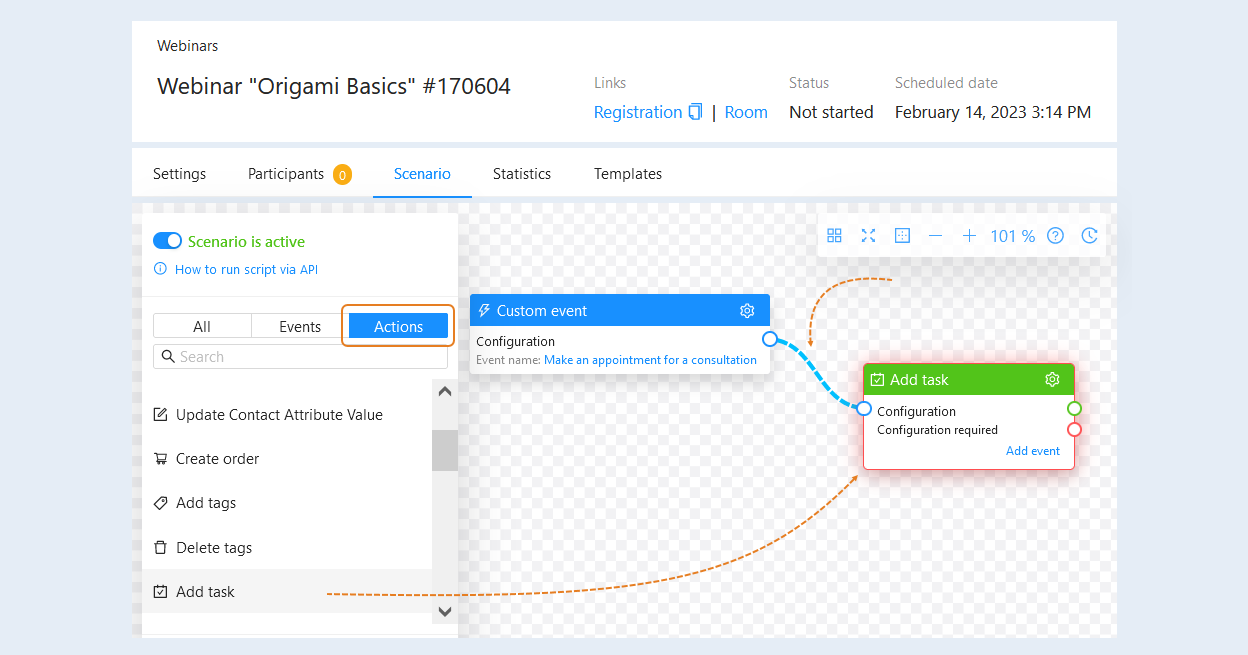
Next, open the "Actions" tab, select the desired action and drag it into the script field. Next, you need to connect the event and the action together.
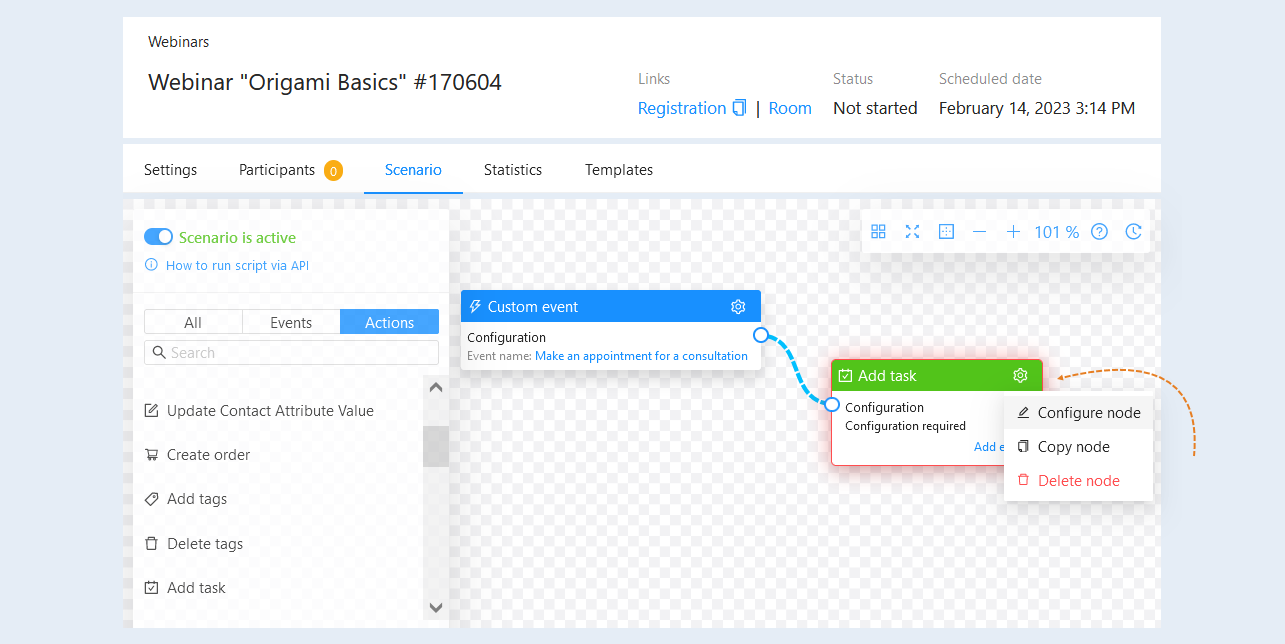
The action also requires configuration settings to be performed. Click the "Settings" button and then the "Configure Node" button. Make the necessary node settings and click "Save".
After completing the script settings, return to the webinar room. Click the "Add Button" button at the top of the webinar broadcast toolbar.
In the window that opens, specify the text of the button and select the type of action: "Custom event". In the event name field, specify the same name as in the webinar scenario.
After completing the settings, click the "Save" button.
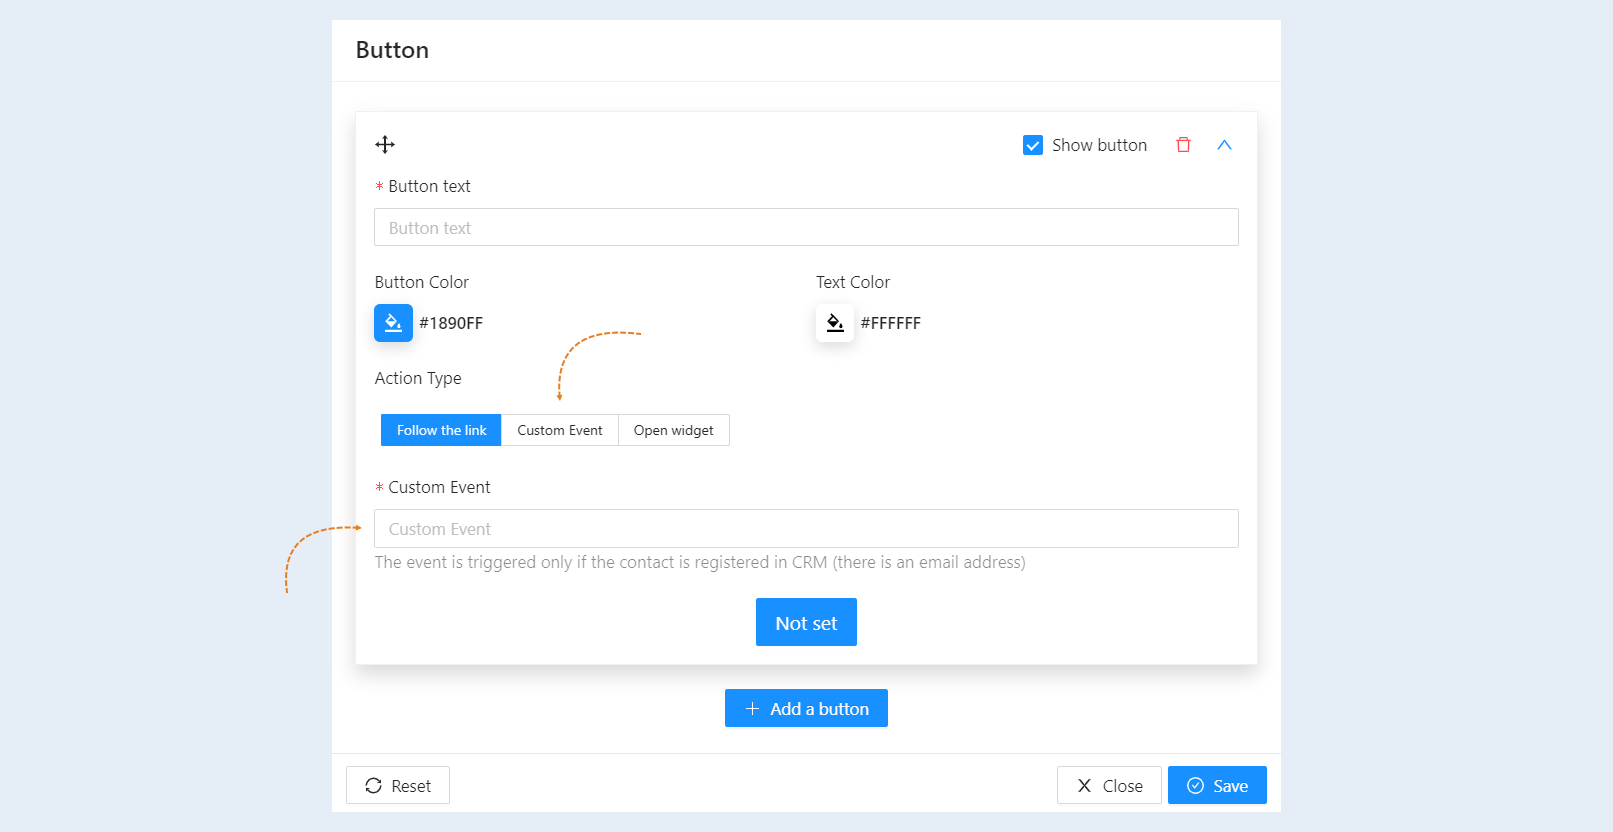
Thus, when a participant clicks a button in the webinar, a custom event will be triggered and a script will be launched.
5
Type of action "Open widget"
Widgets are embedded elements of a website that extend the functionality of a webinar room. An example of a widget can be a registration form, chat, survey, etc. When you click on the button, the widget opens in a modal window in the center of the screen. Then the viewers of your webinar will be able to fill out the registration form or pay for the purchase of the product without going to another page.
The widget is created in the same way as a website page in the page editor and can perform various functions. For more information on how to create and configure a widget, see the article "Widgets".
First, you need to create and add widgets to the webinar. To do this, open the "Settings" tab in the webinar and go to the "Content and Presentations" section. Click the "Select Widgets" button.
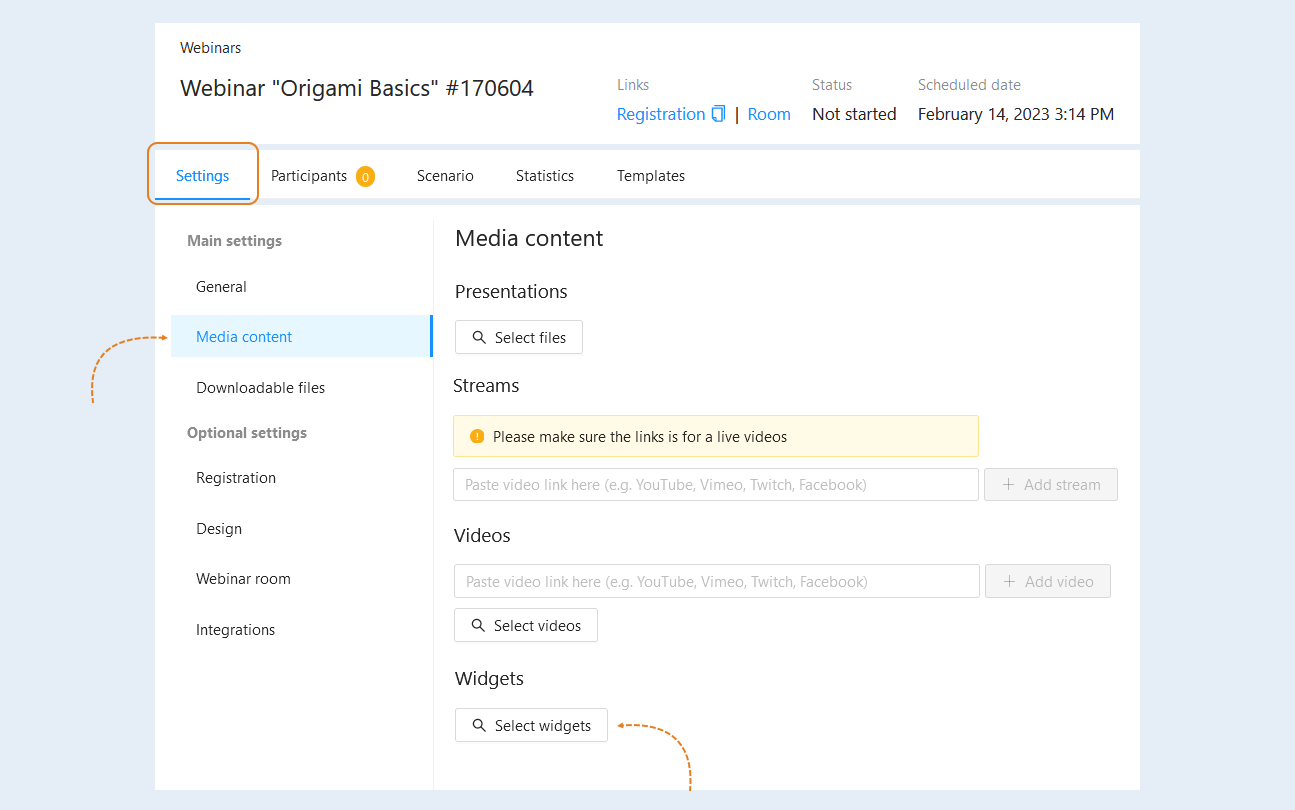
In the settings window that opens, select a previously created widget or create a new one by clicking the "Create" button. For more information on how to create and configure a widget, read the article "Widgets".
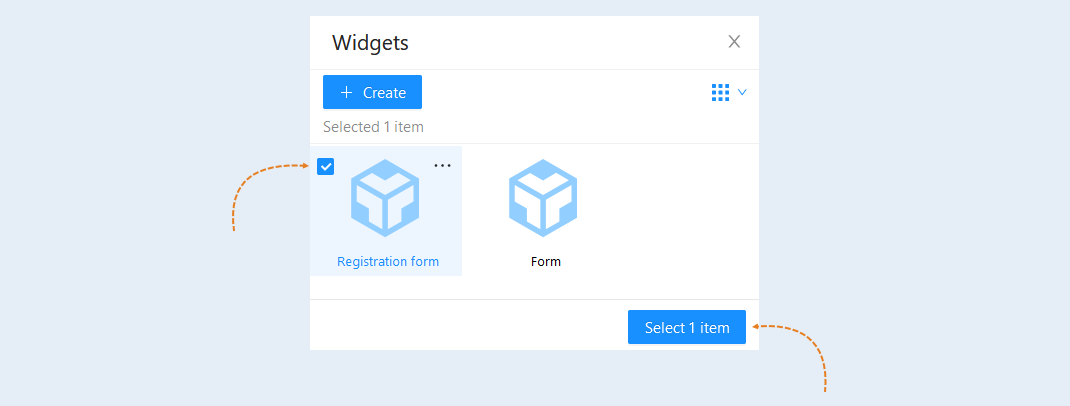
After adding the widget to the webinar, it will be available for selection in the settings of the button in the webinar room.
Go back to the webinar room. Click the "Add Button" button at the top of the webinar broadcast toolbar.
In the window that opens, specify the text of the button and select the type of action: "Open widget". Add a widget by selecting it from the list of suggested ones. Next, specify the window title and set the window width.
After completing the settings, click the "Save" button.
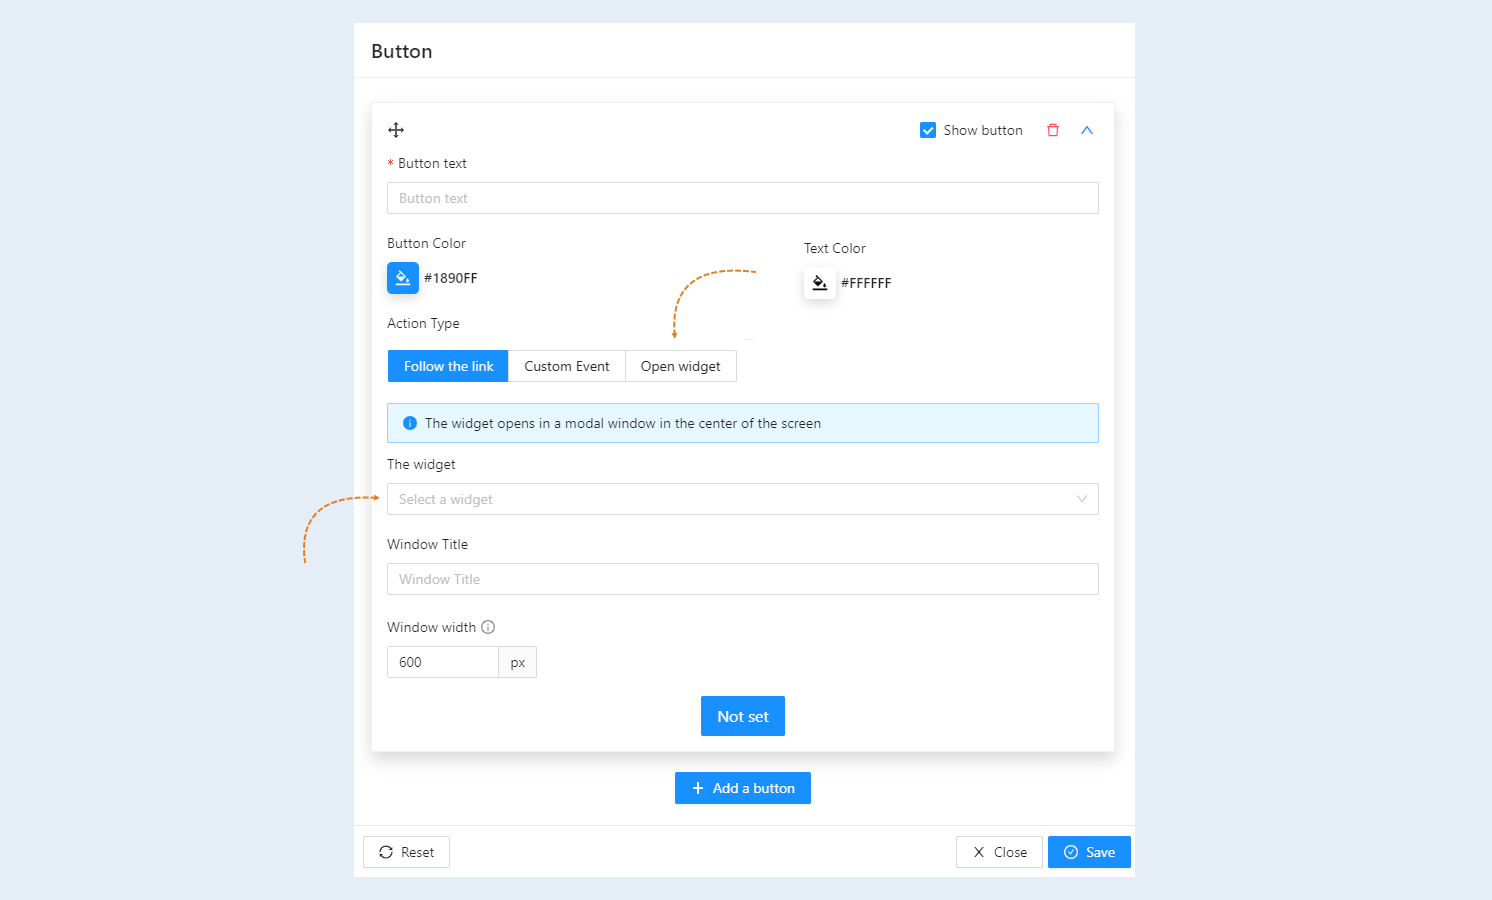
Thus, when the user clicks on the button, the selected widget opens in a modal window in the center of the screen.