Chat channels are the AXL section for connecting third-party services in order to communicate with your potential customers without leaving the AXL platform. The chat will be available to your subscribers on the following pages: VKontakte group, Viber chat, telegram chat. Your clients can write messages to these chats, and you will see these messages and respond to them without leaving your account on the AXL platform.
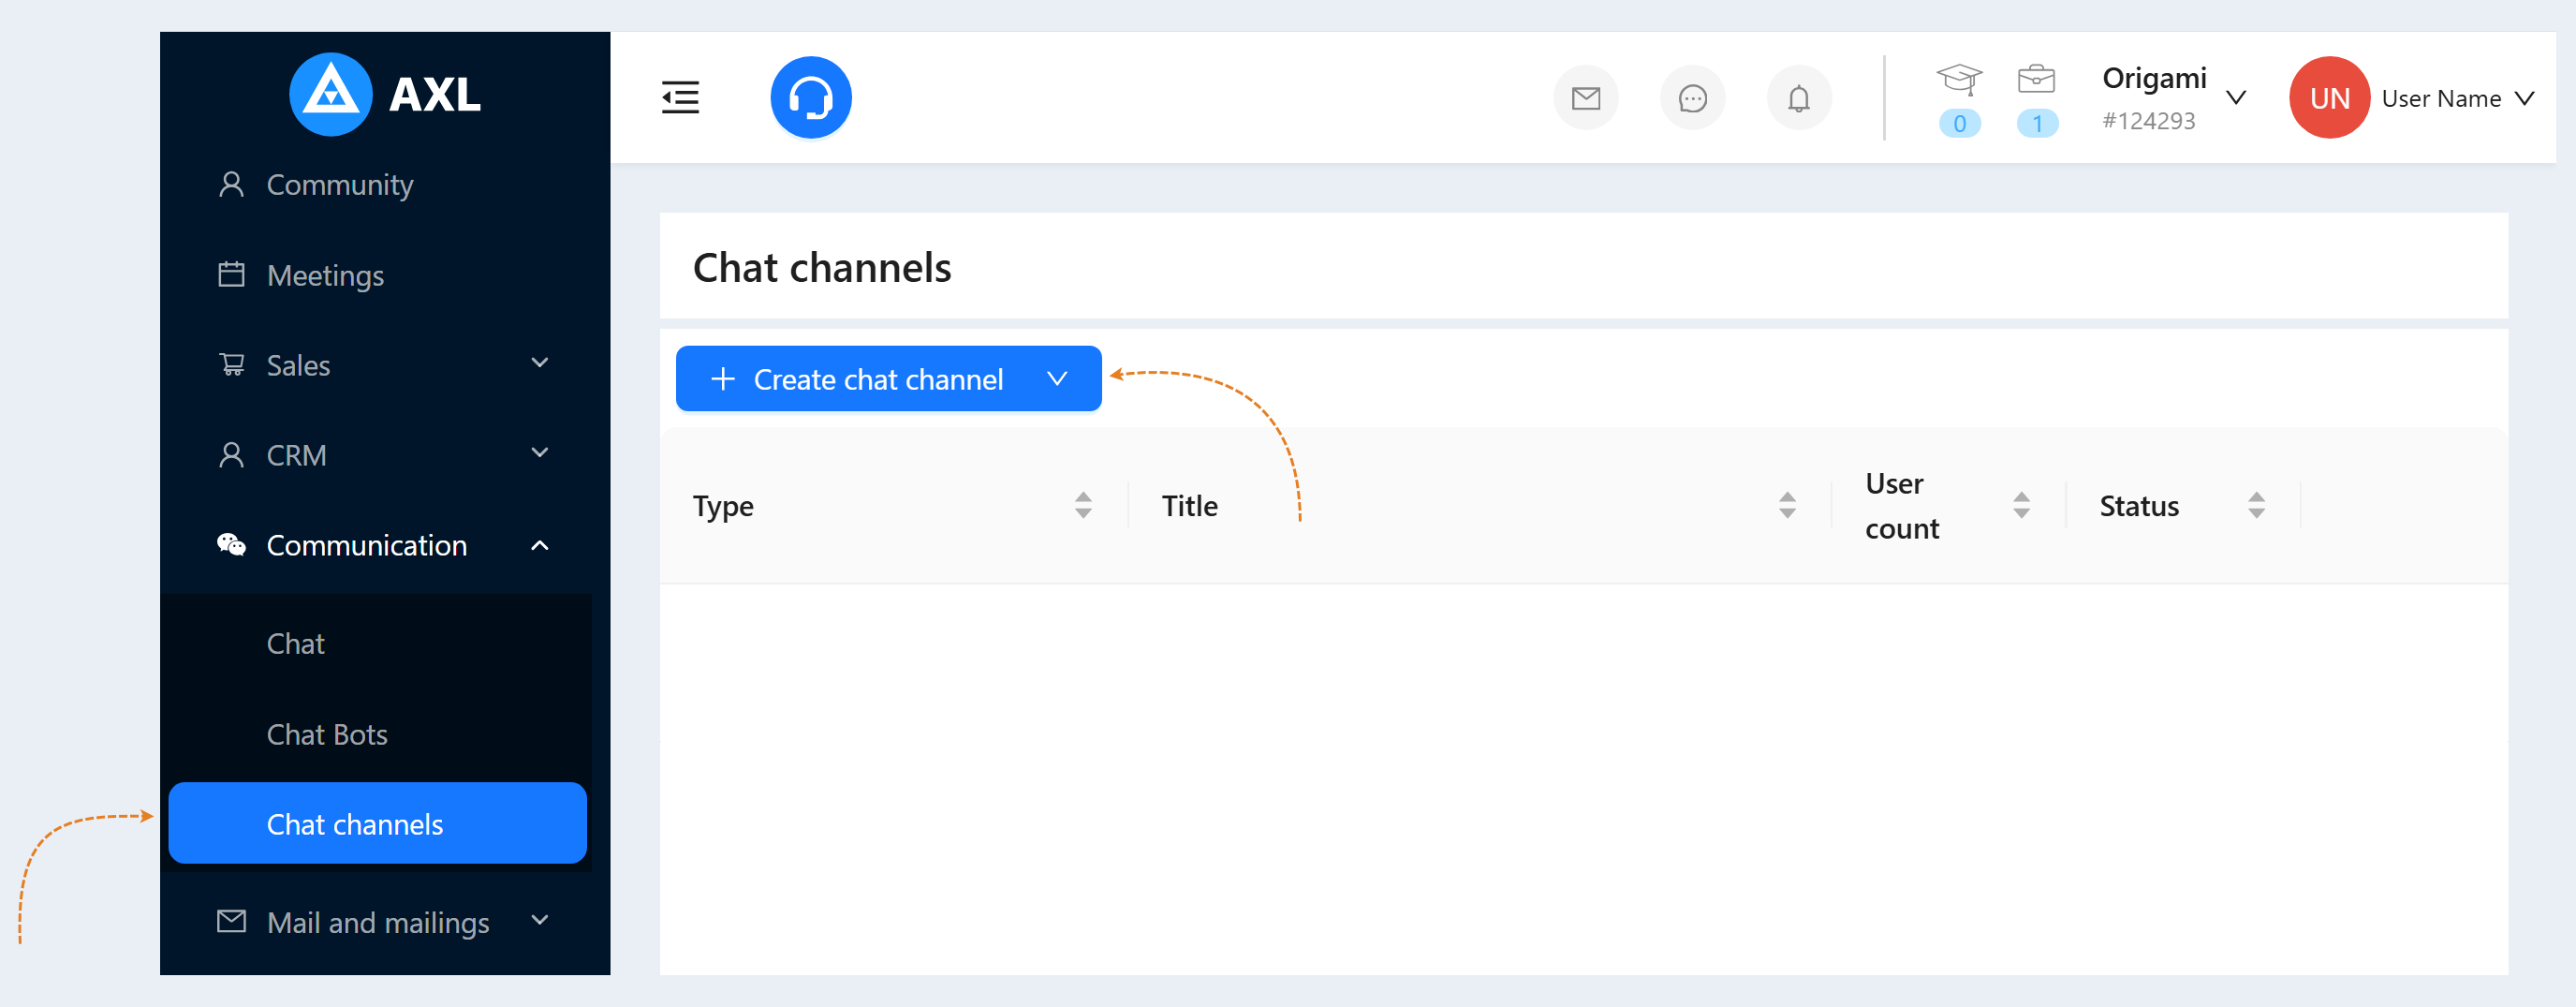
Go to the "Communication" section, the "Chat channels" tab. Click the "Create Channel" button.
Click on the desired section to go to its description:
Creating a chat channel
Chat channels are the AXL section for connecting third-party services in order to communicate with your potential customers without leaving the AXL platform. The chat will be available to your subscribers on the following pages: VKontakte group, Viber chat, telegram chat. Your clients can write messages to these chats, and you will see these messages and respond to them without leaving your account on the AXL platform.
Go to the "Communication" section, the "Chat channels" tab. Click the "Create Channel" button.
A list of available chat channels will open:
- VKontakte
Telegram
Viber
Facebook
Wazzup24
WhatsApp
Instagram
Line
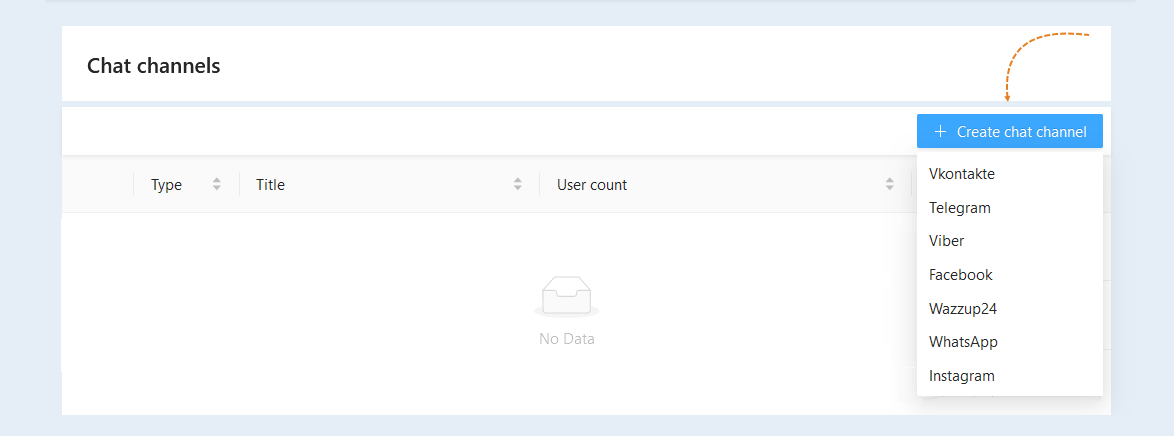
Select the chat channel you want to connect and follow our instructions. Connecting a chat on VKontakte, a chat on Viber, a chat on Telegram, a chat on Facebook, a chat on WhatsApp.
Open the created chat channel. In the window that opens, you can view information about the chat channel, as well as edit it.
Channel Settings
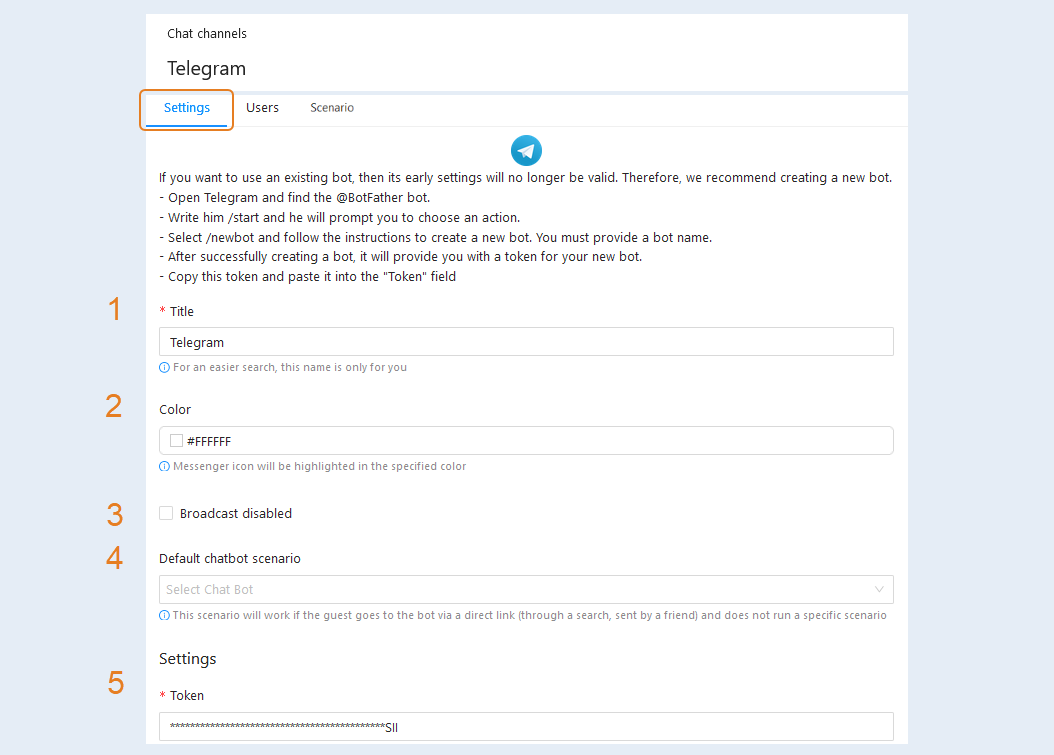
In the "Settings" tab, you can change:
- Title. Here you can edit the name of the chat channel.
Colour. Here you can add or change the color of the messenger icon.
Broadcast disabled. Check the box to disconnect this channel from the mailing list.
Default chatbot scenario. Select a scenario from the list. This scenario will work if the guest goes to the bot via a direct link (through a search, sent by a friend) and does not run a specific scenario.
Token. Here you can change the channel token. A token is a unique key that is issued when creating a bot. How to get a Telegram token, read the article "Telegram Channel".
Channel Users
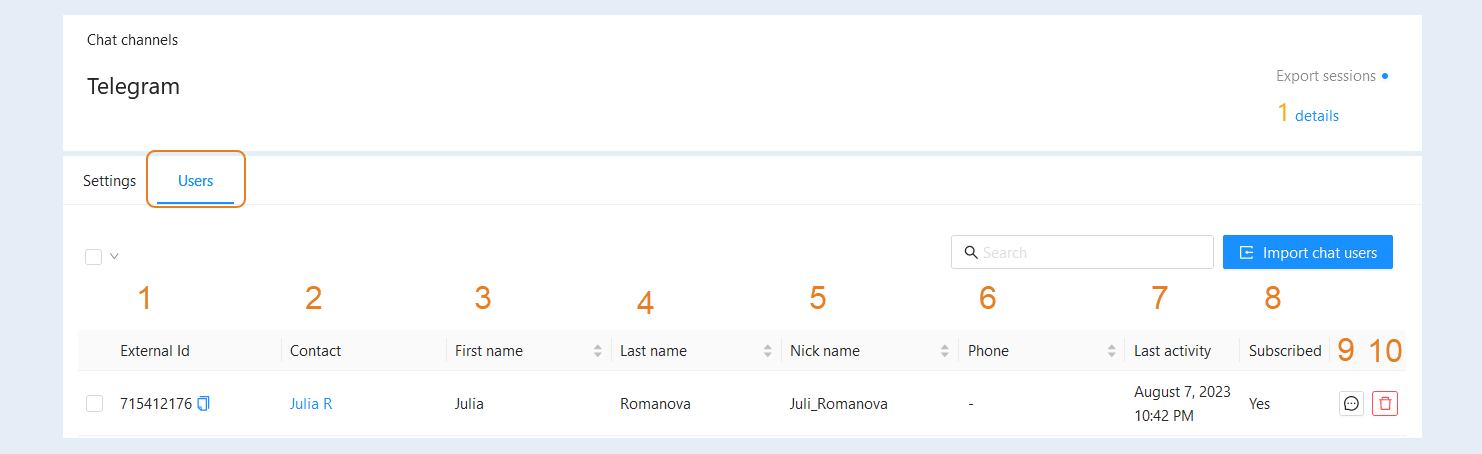
In the "Users" tab, you can see a list of chat channel users and information about them:
- External ID. You can copy the external ID by clicking on the button next to the number.
Contact. Click on the contact's name to go to the user's contact card.
First name. The name under which the user is registered in the messenger.
Last name. The last name that the user specified when registering in the messenger.
Nickname. The alias of the user in the messenger.
Phone. The phone number is specified if the user has allowed the number to be shown in the messenger's privacy settings.
Last activity. The date of the user's last activity in the messenger is indicated.
Sibscribed. It indicates whether the user is subscribed to your account's chat channel.
The "Dialog" button. Click to open a conversation with the user in the chat channel.
The "Delete" button. Click to delete this user.
Click the "Dialog" button to open a conversation with the user in the chat channel. In the dialog box, you can send a chat message to the user. In the response to the user, you can attach a file, add emojis and record a voice message.
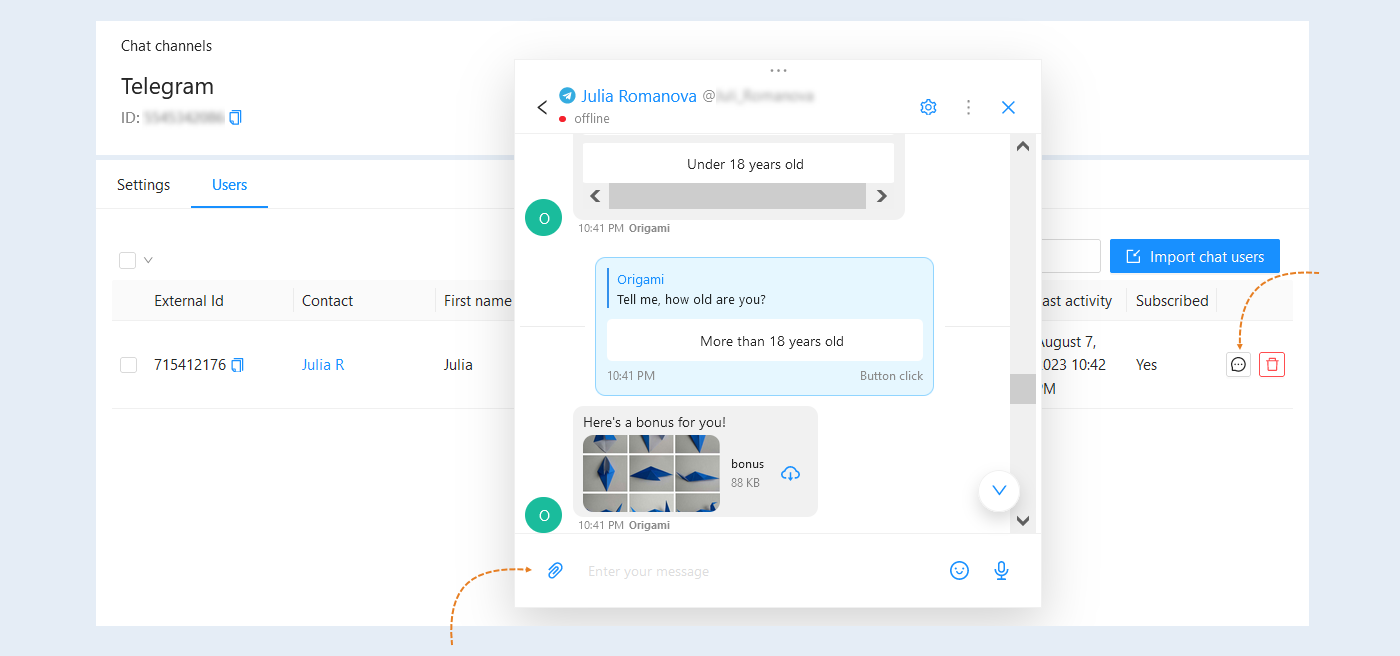
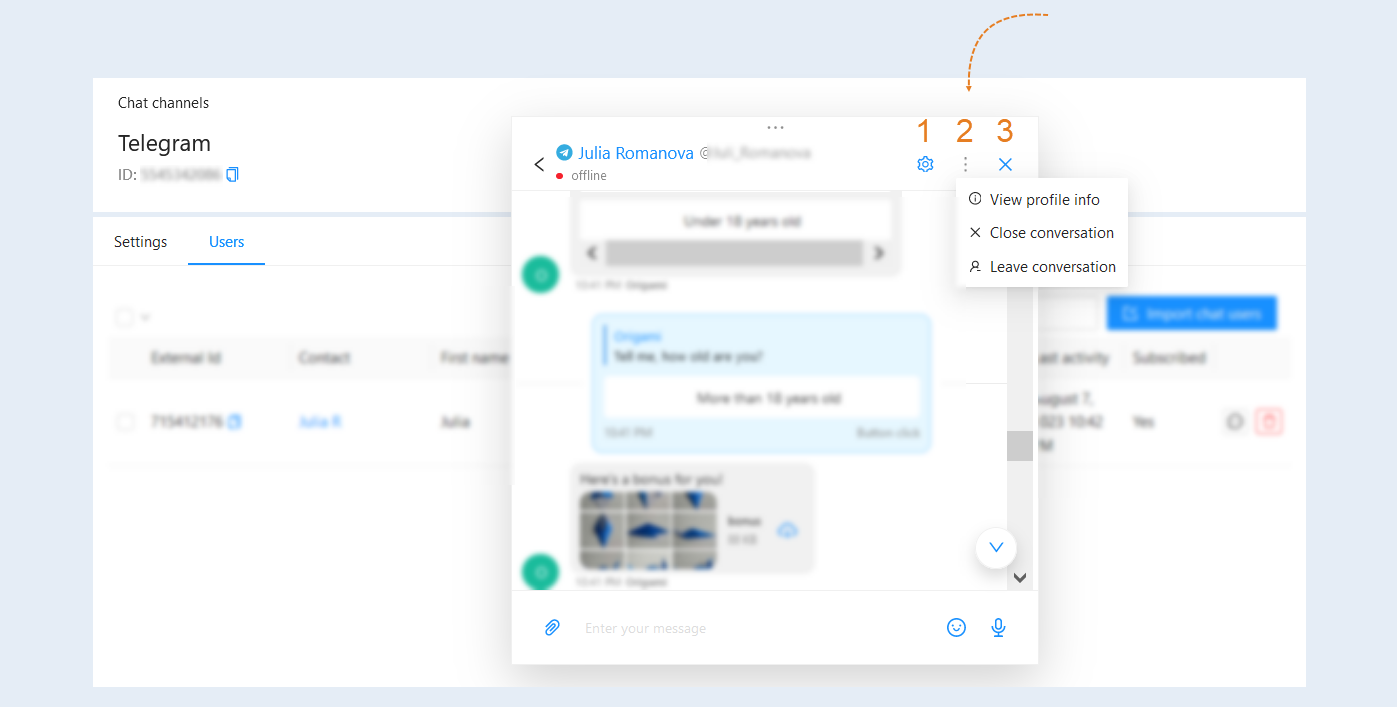
There are buttons in the top row of the window:
- The "Open settings" button. Click it to open a window with interface settings and additional devices. In this window, you can select the font size in the chat (from 75 to 200%), as well as set up access to your device's microphone to record voice messages in chats.
The "Actions" button. Click on the three dots and choose what to do with this correspondence:
- View profile information. Click to see the user's information, the associated CRM contact, and other chats with the user.
Close the dialog. Click to end the current communication session with the user.
Leave the dialog. Click to exit the current dialog.
Hide the bot's messages. Move the slider to the active position to hide the messages that were sent by the bot. This can be useful if the bot's messages distract from the necessary information.
The "Close" button. Click to close the dialog box.
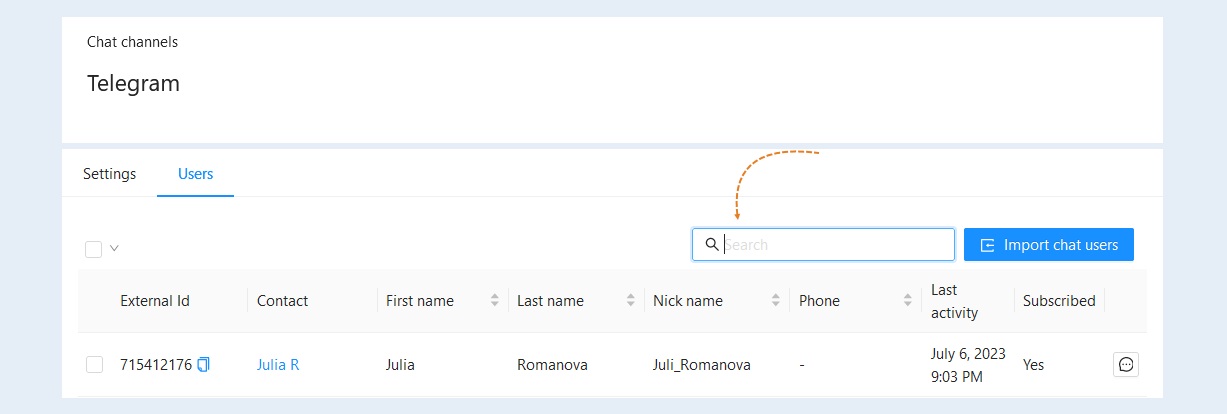
At the top of the page there is a field for filtering - search among subscribed users in chat channels. For a quick search, enter the name, nickname or phone number of the contact in the search bar.
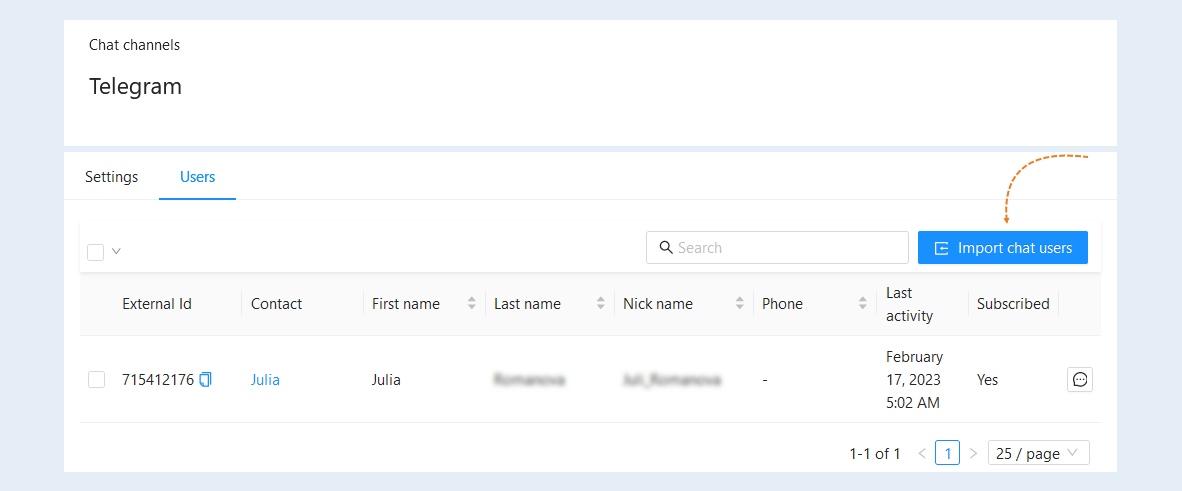
Import Chat Users
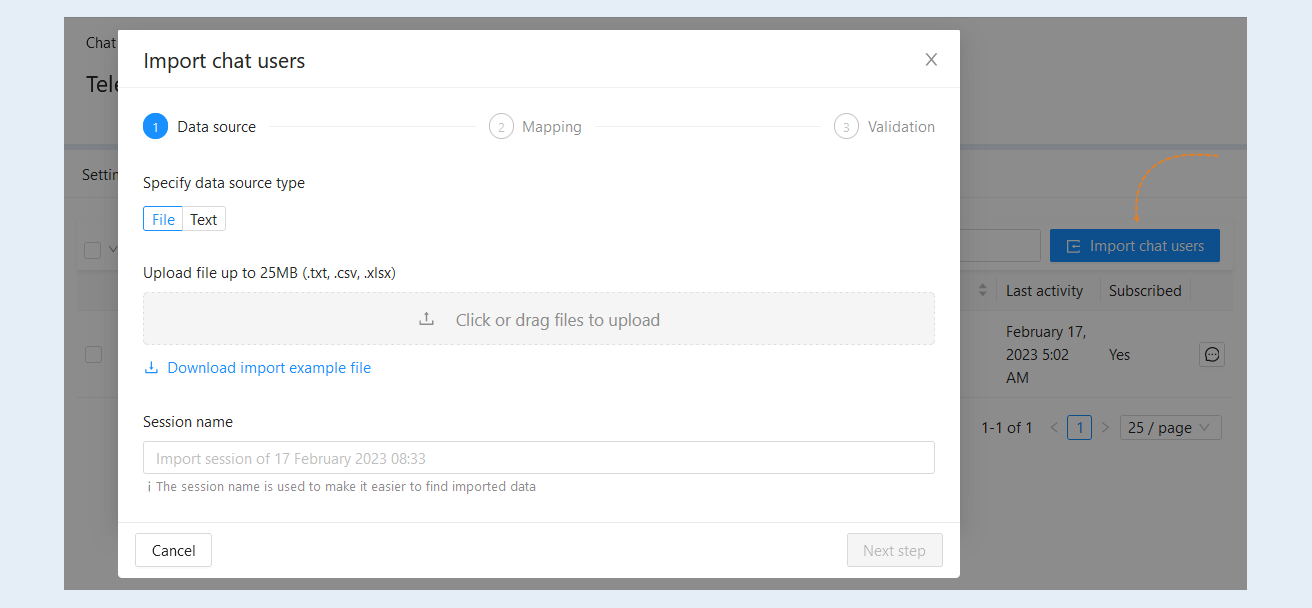
You can download the list of chat users from your device (computer, laptop, tablet) in one file (in TXT, CSV, XLSX format). This way you can quickly transfer a large number of your customers' contacts. Click the "Import Chat Users" button.
First select the data source: file or text. Next, click on the "Upload file" button to select the files on your computer. Next, enter a name for this contact import session. This is required for convenient contact search in the future. Click the "Next Step" button.
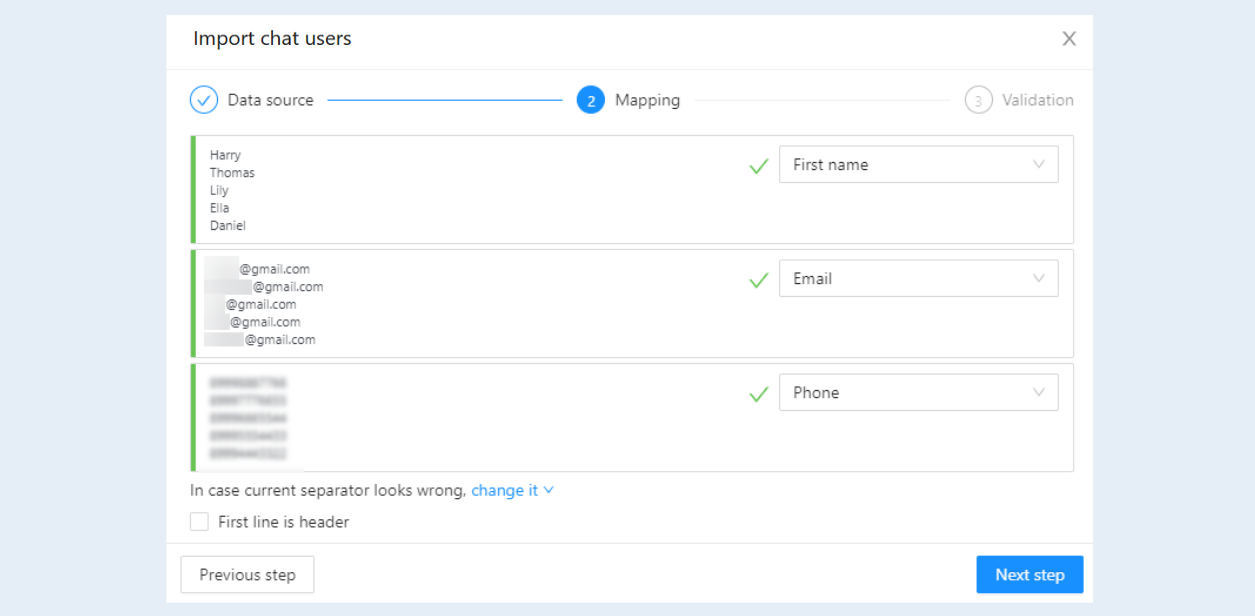
At this stage, it is necessary to coordinate the fields: the "name" field should correspond to the contact's name, the "email address" field should correspond to the contact's email, etc. Check the correctness of the data. Click the "Next Step" button.
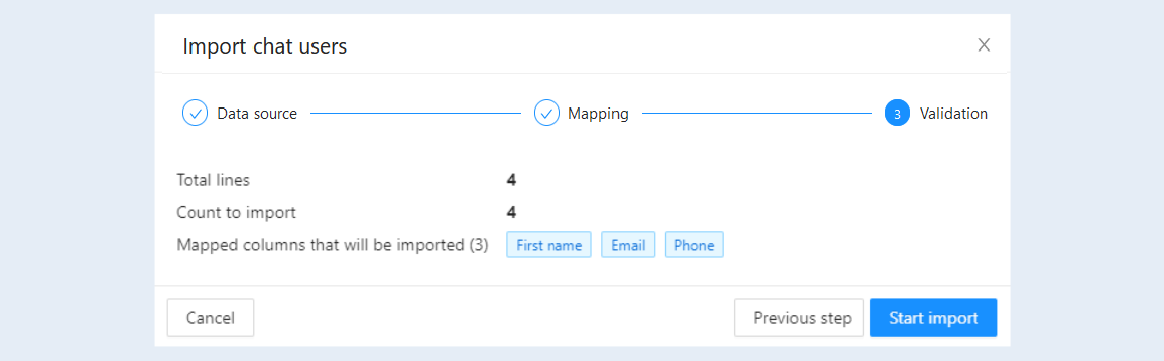
At the last stage, it is necessary to check the correctness of the data. If there are errors, then go back a step by clicking the "Previous step" button. If all the data is correct, then click the "Start import" button.
Exporting Chat Users
This action exports all selected contacts in XLSX or CSV format. Exporting contacts is uploading a list of contacts from your account to another account. Select the contacts you want to export from the list. Click the "Bulk Actions" button and select the "Export Users" action.
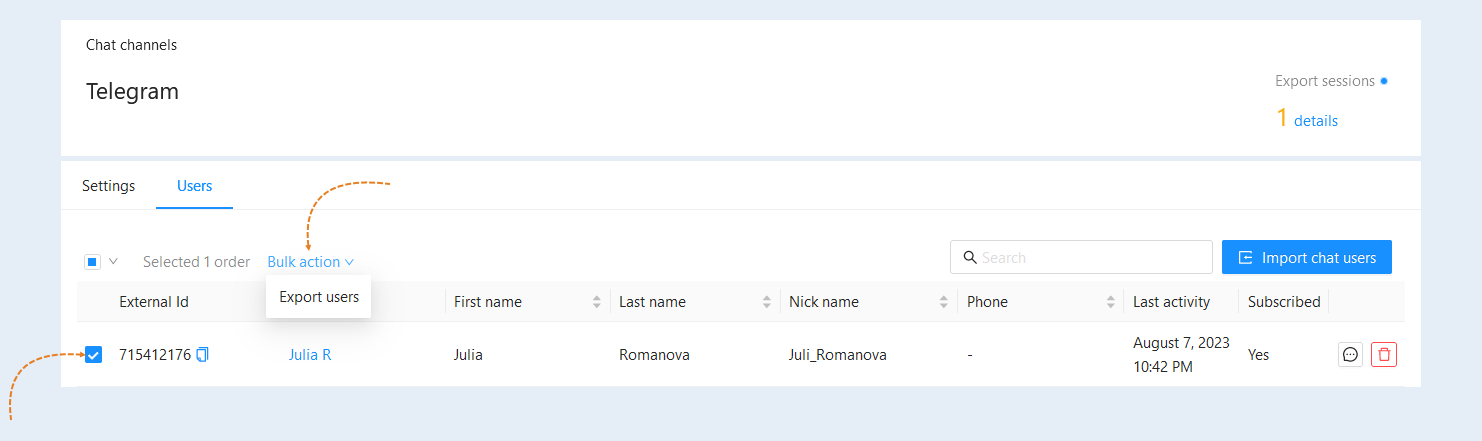
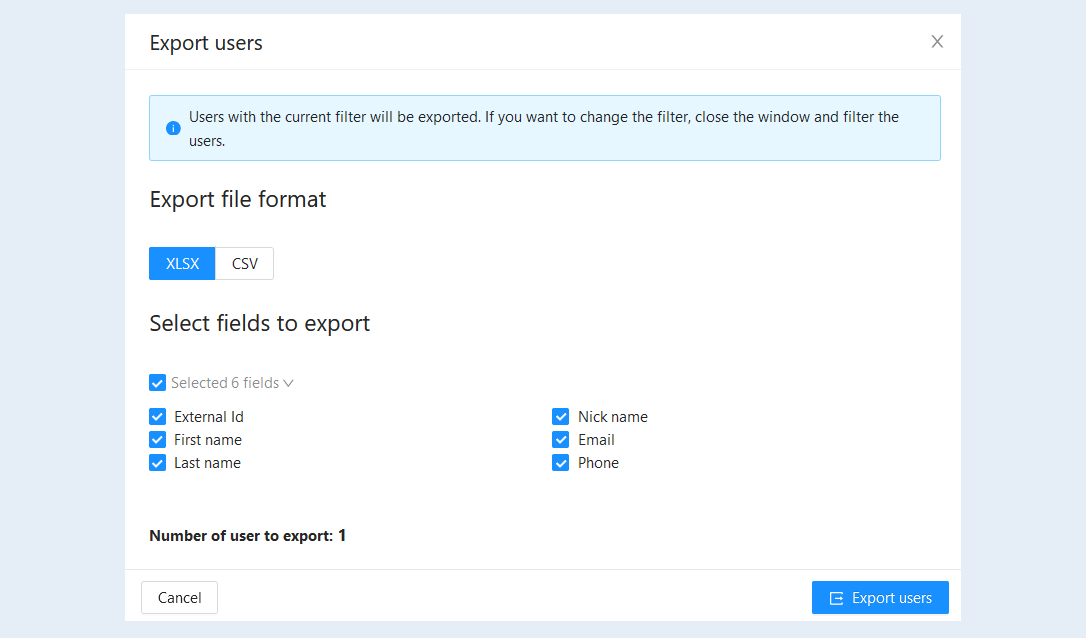
In the window that opens, select the file format and the fields to export. Click the "Export Users" button and download the file to your device (computer, laptop, tablet) in one file.
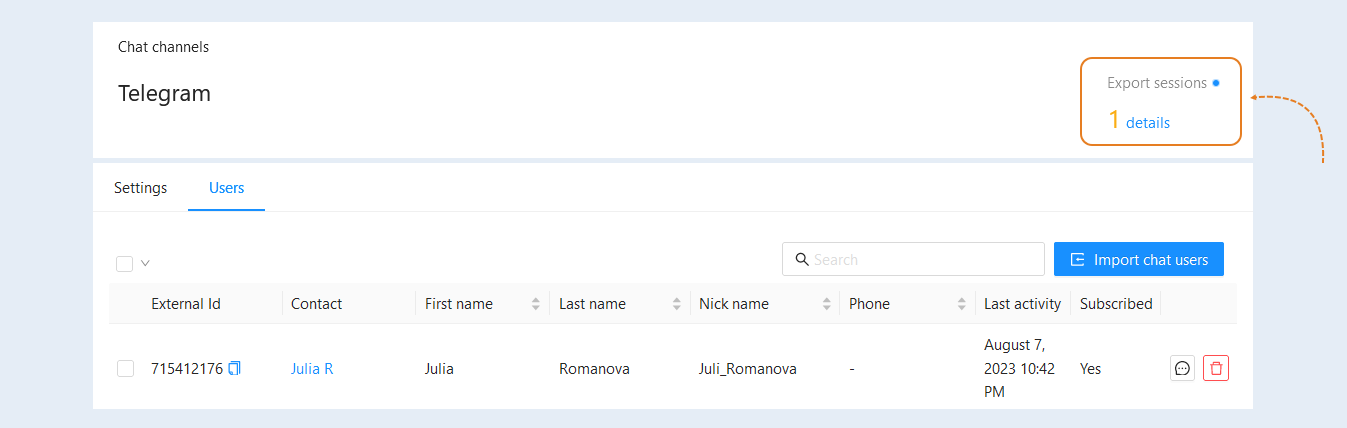
The export sessions will be saved and displayed on the panel. The number of sessions held is indicated here. Click the "Details" button to perform actions with saved sessions.
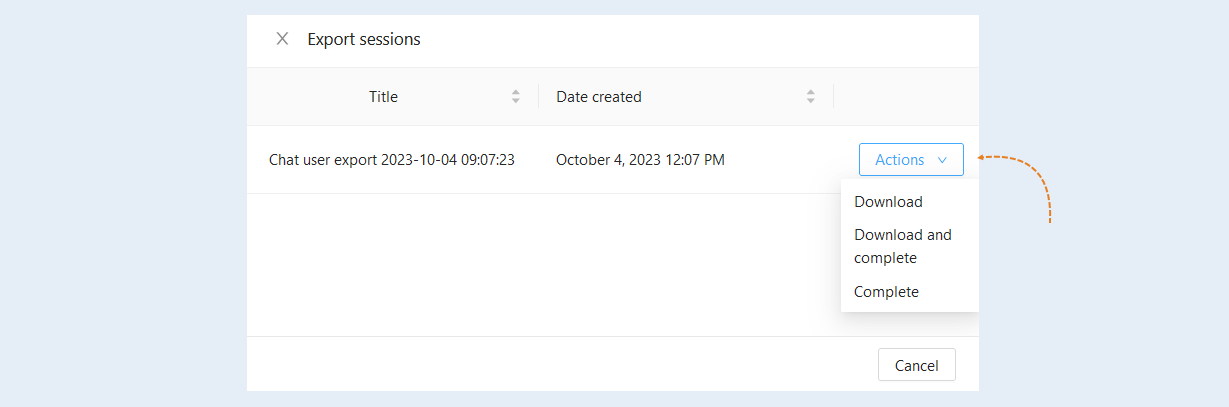
In the window that opens, all previously created user export sessions will be available. You can re-download the created files by clicking the "Actions" button and selecting the "Download" action.
Channel Templates
Open the "Templates" tab. The WhatsApp channel supports working with message templates.
You can initiate conversations and send messages using templates. WhatsApp templates are also sent correctly to all channels.
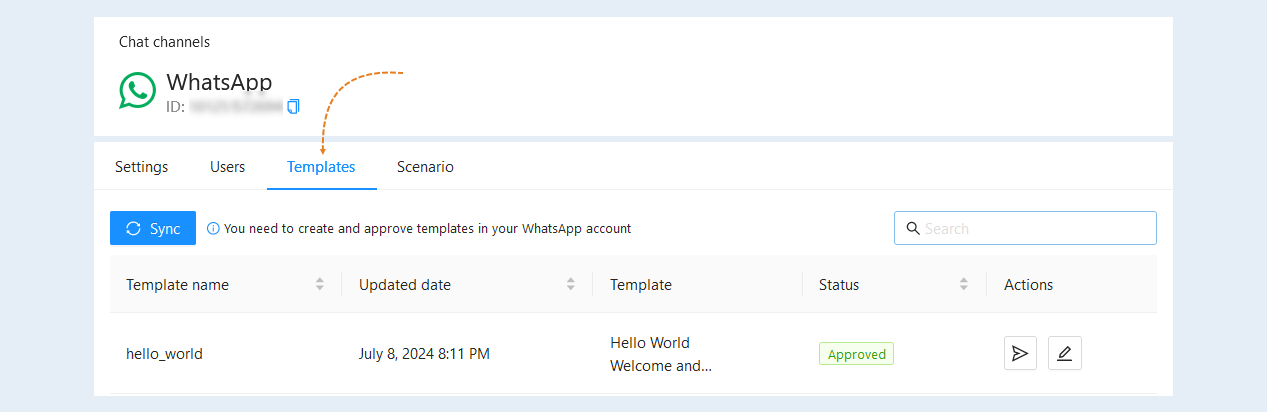
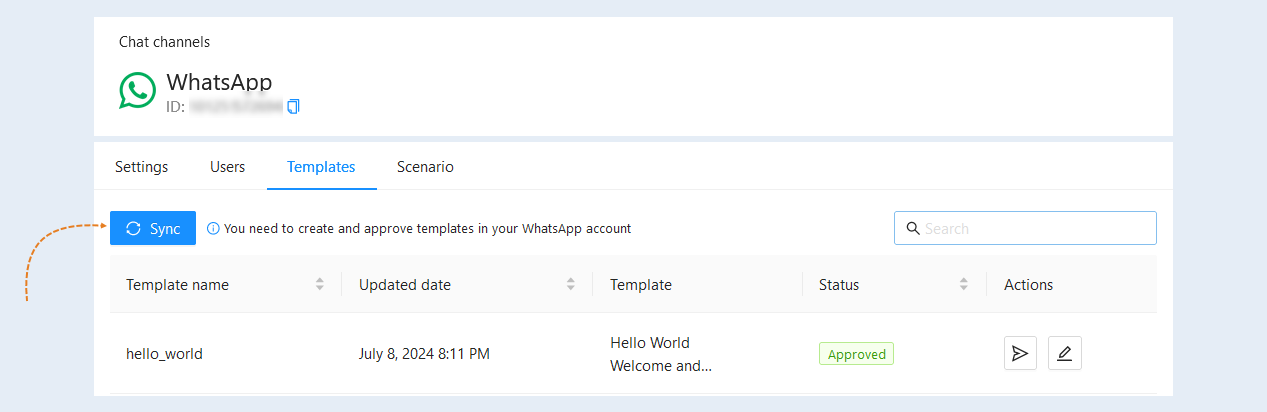
Click "Sync" to upload the templates to the AXL platform. You can create and approve templates in your WhatsApp account.
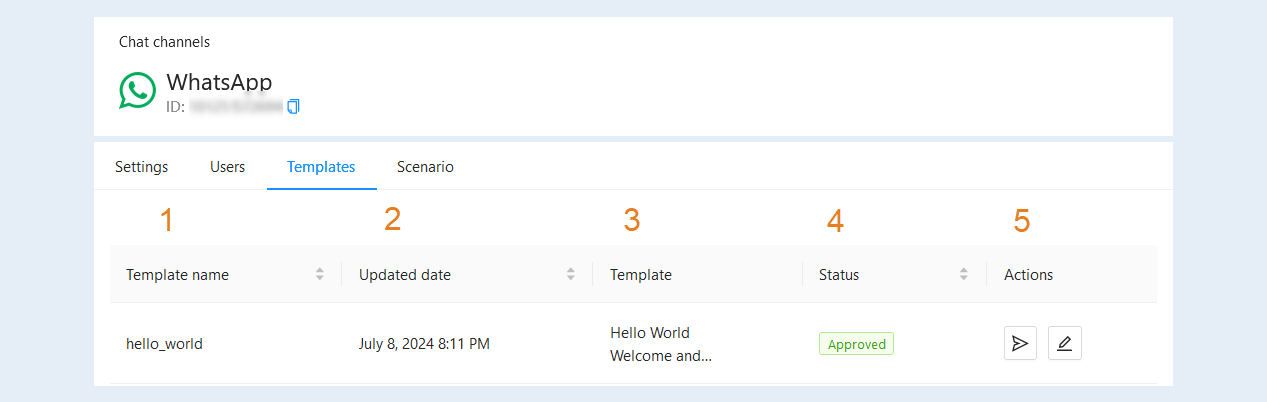
In the "Templates" tab, you can see a list of message templates and information about them:
Template name. The name of the message template is shown.
Updated date. The exact date and time of the last template update.
Template. The text of the message template is shown.
Status. It shows whether the template is approved in the WhatsApp personal account.
Actions. The following buttons are available to you here:
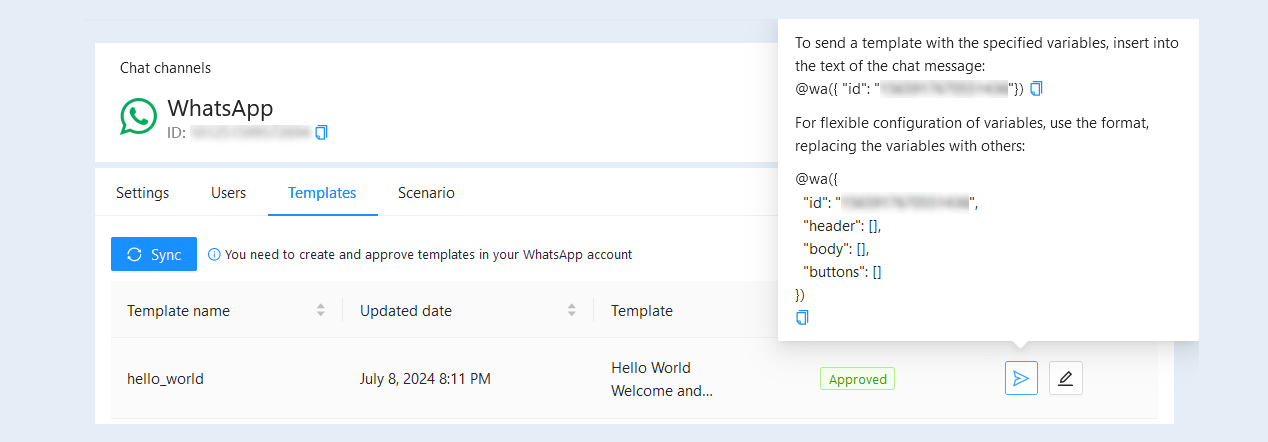
The "Send" button. Click to send a message.
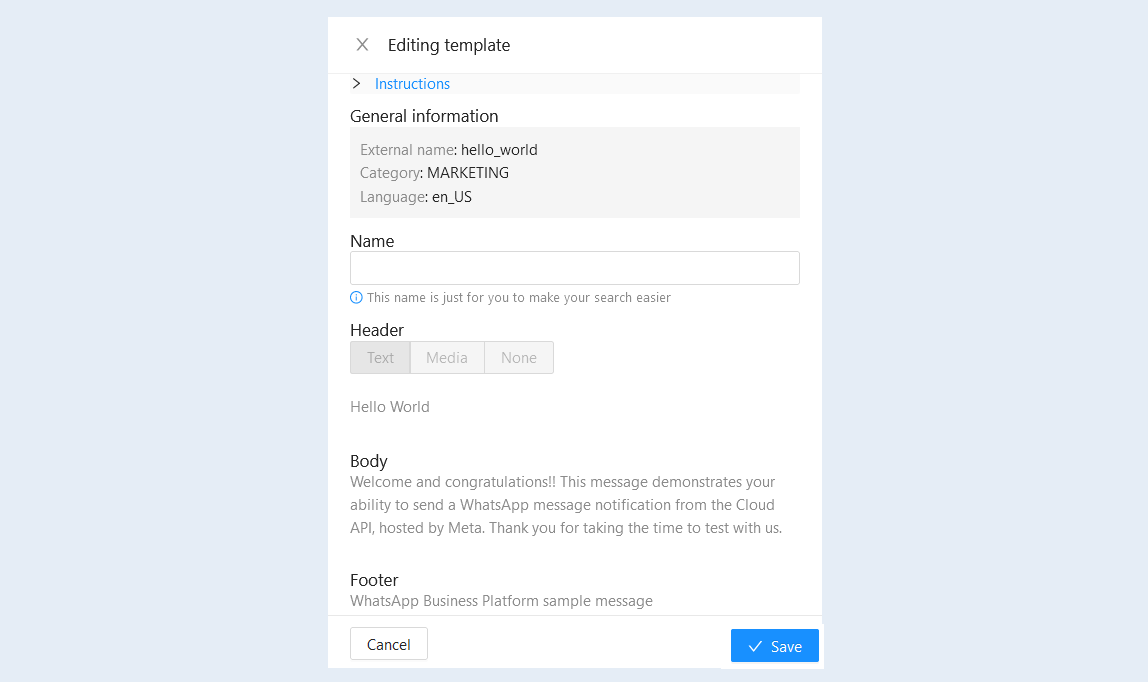
The "Edit" button. Click to make changes to the template.
Click the "Send" button to see the instructions for sending.
Click the "Edit" button to edit the template. In the window that opens, you can make changes.
Channel Scenario
In the "Scenario" tab, you can configure the scenario of the chat channel.
The scenario of the chat channel is a sequence of events and actions inside the chat of your account. The scenario reacts to a new message inside the chat and performs response actions. For more information on how to create a scenario, read the article "Chat channels scenario".
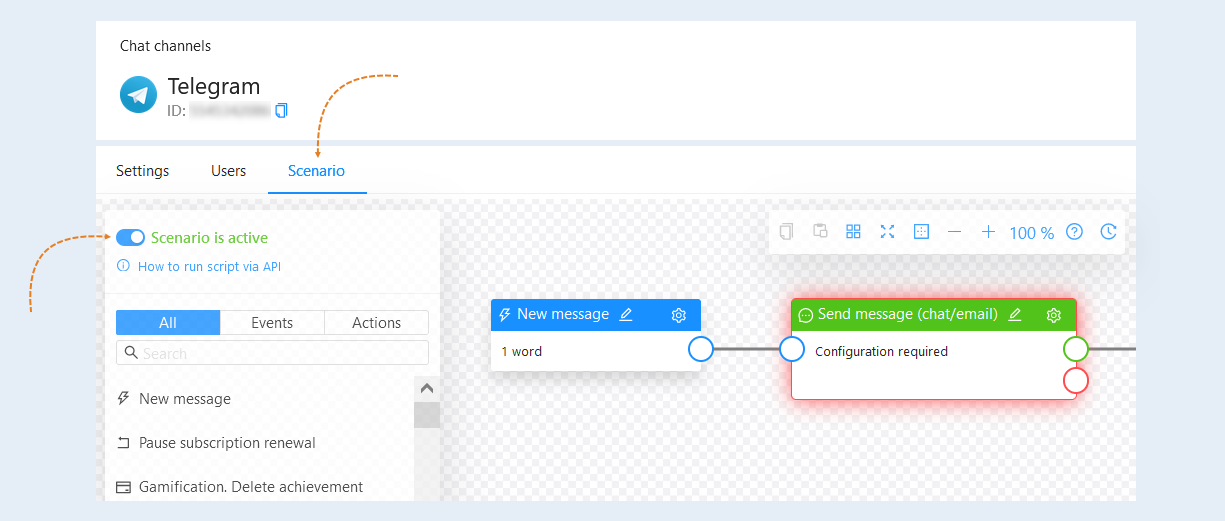
Add the required number of events and actions to your scenario. Make configuration settings. And connect the scenario elements together.
After completing the scenario settings, move the slider to the active position to activate the scenario.