After you have created the webinar, you can go to its settings.
In this article, we will look in detail at the main parameters. This will help you better understand how to set up a webinar so that it is as effective and attractive as possible for participants.
Click on the desired section of the article to go to its description.
Webinar settings
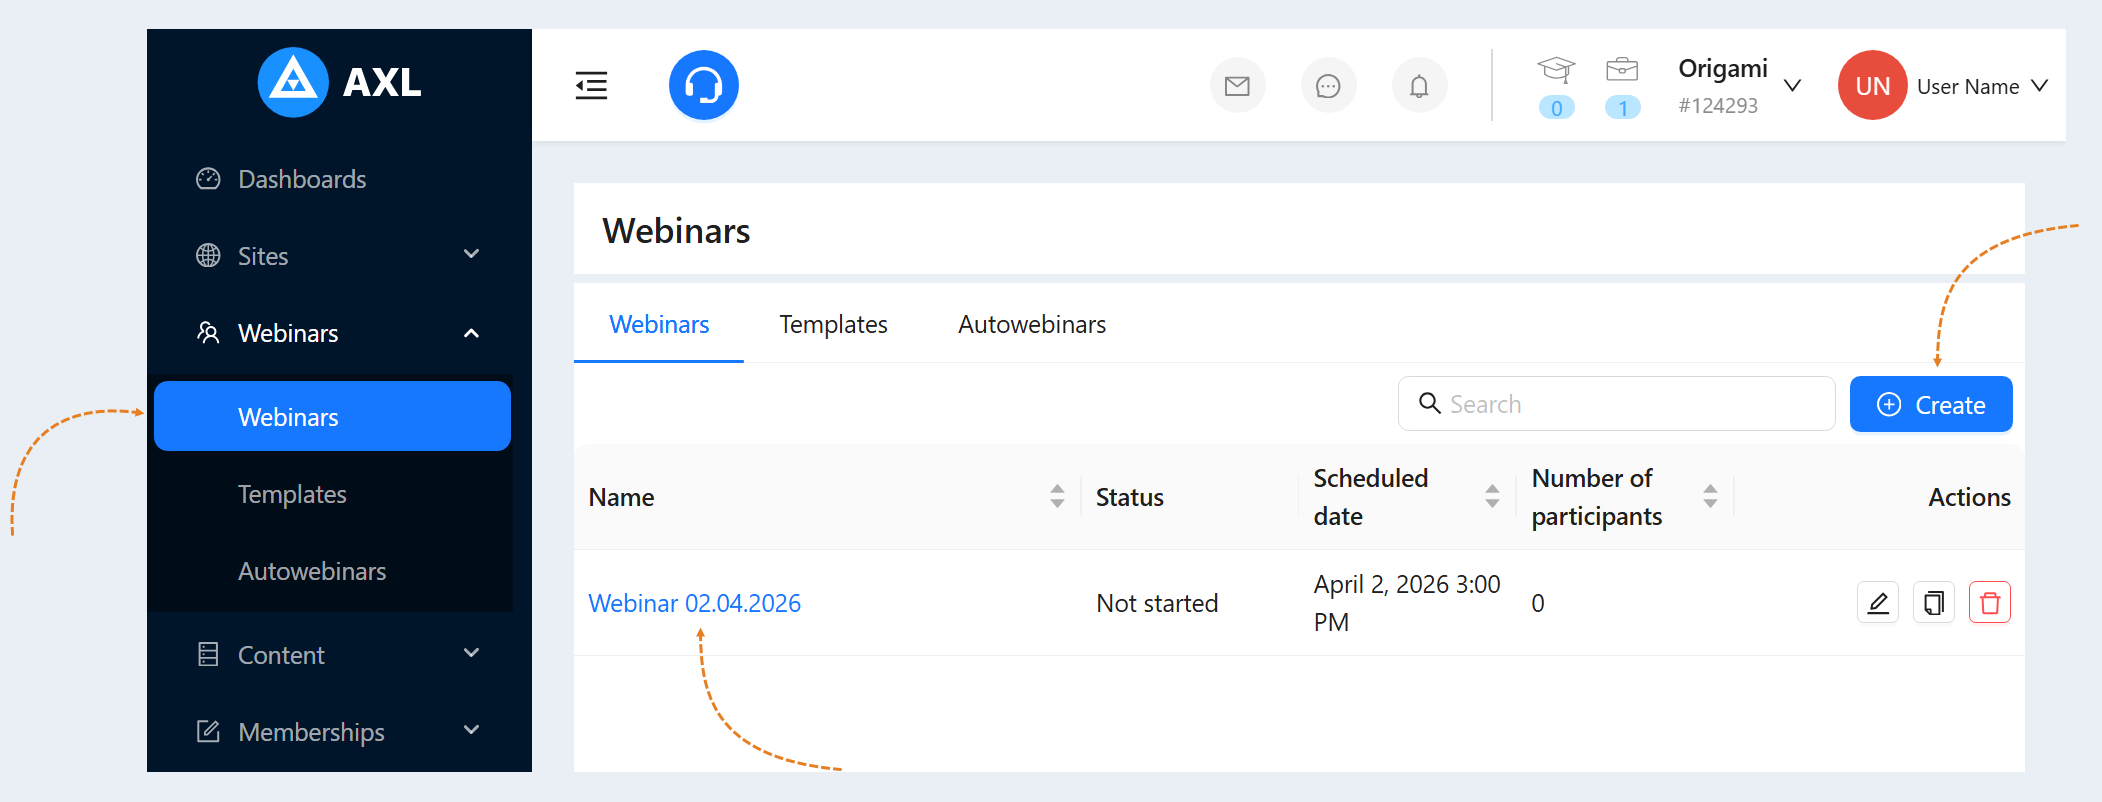
Go to the "Webinars" section. Create a new webinar or log in to an existing one. For more information on how to create a webinar, see the article "Webinars"
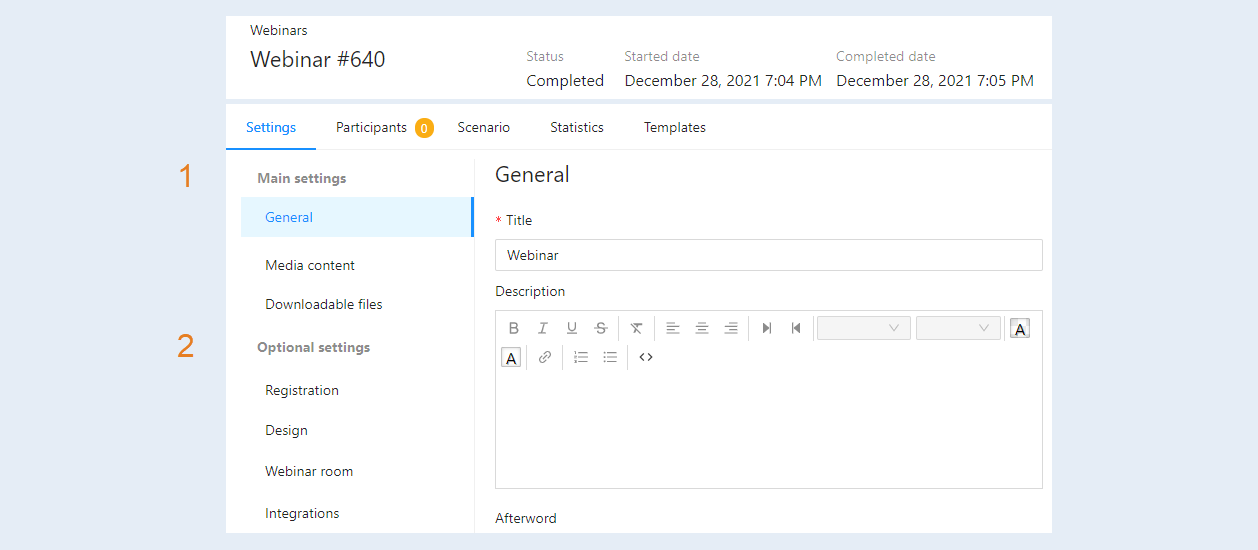
In the menu on the left, you see two sections:
- Basic settings. This section contains the most important parameters of the webinar, which determine its content and the availability of materials for participants.
- Additional settings. This section allows you to configure additional webinar settings that affect the registration process, appearance, and integration with other services.
Basic settings
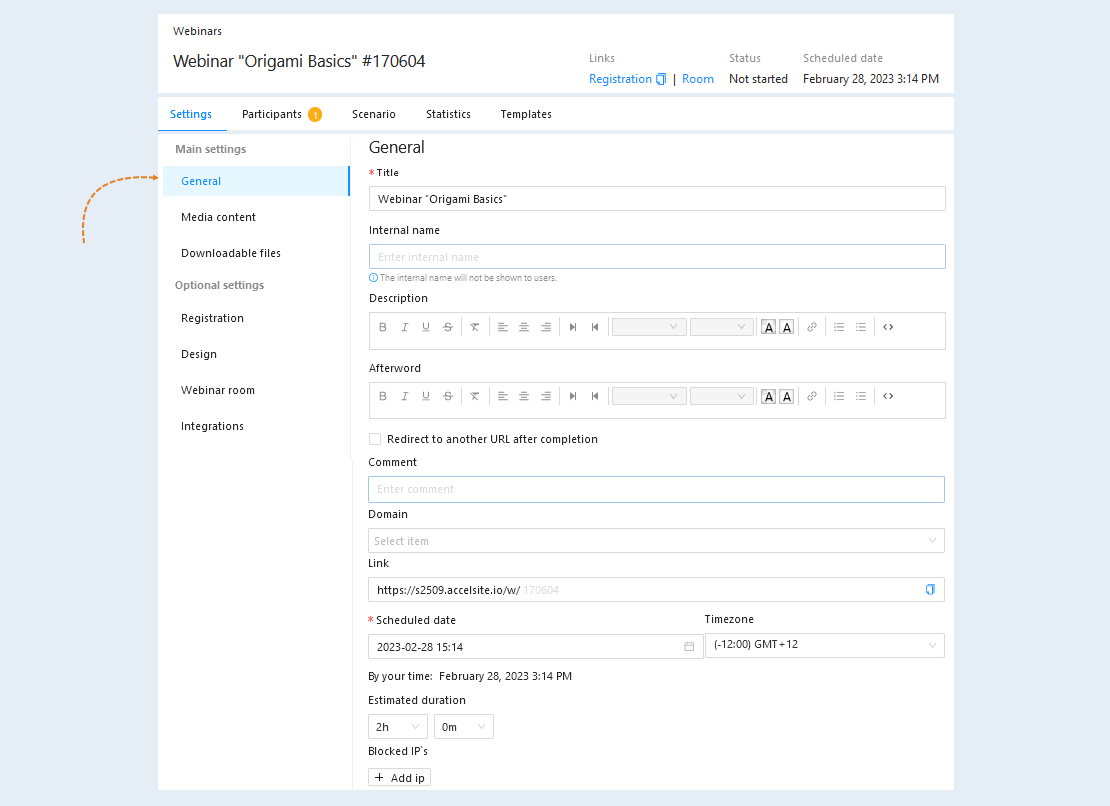
In the "General" section you can see the information about the webinar that you specified when creating this webinar:
- Title. You can change the title. This is what people will see in the webinar list, in invitations, and on the webinar page. The title helps participants understand what the webinar is about and attract their attention.
Internal name. This is the webinar title that's only visible to you and your colleagues who manage the webinar. It will not be shown to users. The internal title is created for easy searching of the webinar within the system, especially if you have many webinars with similar titles.
Description. Here, you see the description that you added when creating the webinar. A detailed webinar description explains what participants will learn, why they should attend the webinar, who the speaker is, and provides information about the webinar's content.
Afterword. Write the text that participants will see immediately after the webinar ends. You can thank participants for attending, offer additional materials (e.g., a recording of the webinar, the presentation), and provide a call to action (e.g., subscribe to the newsletter, buy a product).
Redirect to another URL after completion. Check the box to redirect participants to the specified page after the webinar ends. You can direct participants to a page with a target action (e.g., a product page that was advertised during the webinar, a feedback form page, a testimonial page). For more information on how to create a website page on the AXL platform, see the article "How to Create a Website".
Comment. You can write a comment about the webinar. Record any useful information about the webinar, such as which topics need to be covered in more detail, which questions were asked most often, and ideas for future webinars. This comment is not visible to participants.
Domain. You can add your own branded domain instead of the platform's domain. For more information on how to attach your existing domain to the AXL platform, see the article "Domains".
Link. A link to the broadcast source is provided. You can edit or copy the link.
Scheduled date. In this line, you see the scheduled date and time of the webinar, as well as the time zone.
Estimated duration. By default, the duration is set to 2 hours. You can change the duration: select hours and minutes from the list. This option allows you to plan the time and gives an idea of how long the webinar will take. It is used to display information about the webinar.
Blocked IP addresses. Add IP addresses that will be denied access to the webinar. This option allows you to protect against unwanted users (e.g., spammers, trolls, bots) and ensure the security of the webinar.
Click the "Save" button.
Media content
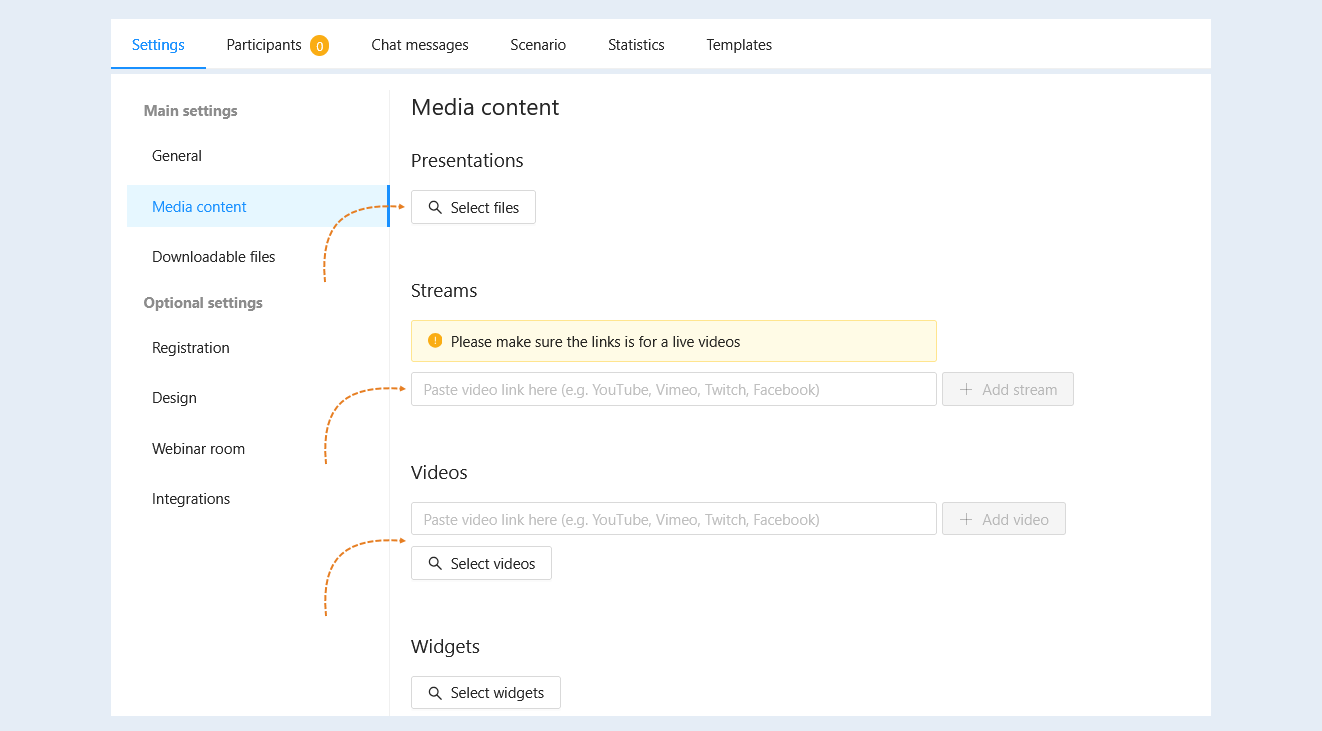
In the "Content and Presentations" section, all the main materials that you plan to use during the webinar are uploaded. These can be presentations, videos, demos, widgets, etc. Choose from the list what you want to add:
Presentations. This is a document or set of documents in PDF format intended for conducting a webinar. This is a key element of the webinar, which will help you structure information and visually present it to the audience. They allow you to present the material logically and consistently. A variety of slides, animations, and visual elements help keep listeners interested.
Streams. These are materials that you can broadcast live during the webinar. This is an effective way to teach practical skills by showing how to perform certain actions. Visualizing the process on the screen helps the audience better understand its steps.
Video. These are video materials that you can broadcast during the webinar. Videos can be recorded in advance or broadcast live. Videos can evoke strong emotions in viewers and make the webinar more memorable. You can use pre-recorded videos to avoid spending time explaining basic concepts. For more information on adding videos to the AXL platform, see the article "Video".
Widgets. These are embeddable website elements. An example of a widget is a registration form, button, or payment form for your products. Polls, quizzes, and contests allow listeners to actively participate in the webinar. Buttons for making purchases or registering for paid courses allow you to monetize the webinar. Widgets make the webinar more lively and interesting. For more information on creating a widget, see the article "Widgets".
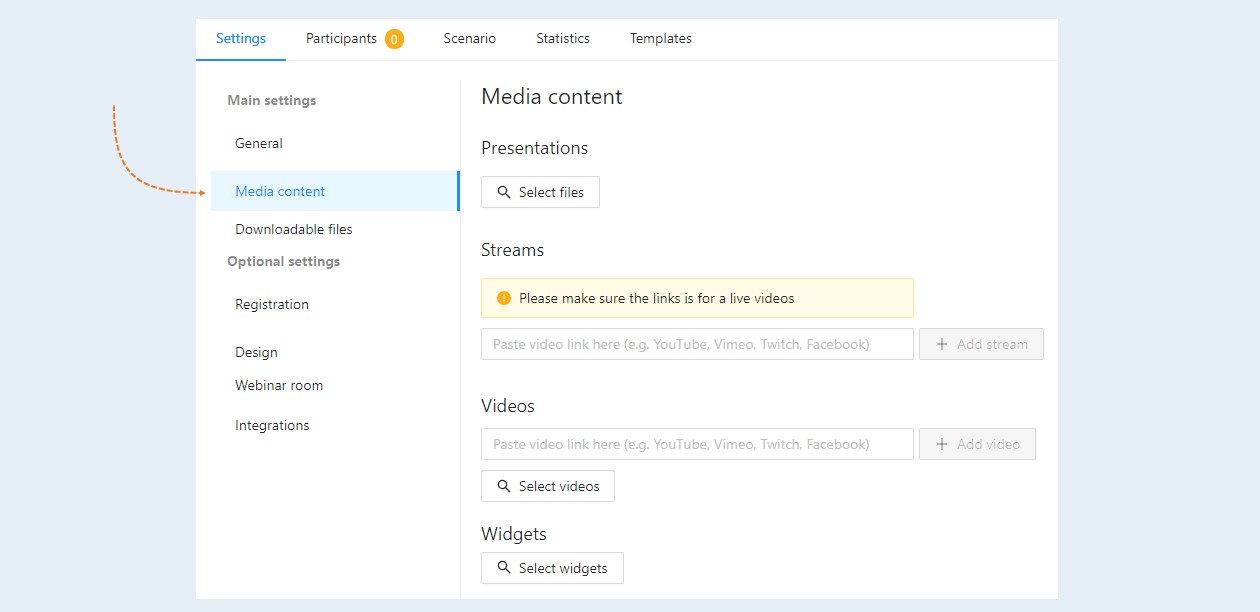
Click the "Select File" button, then upload the file to the "File Manager". After that, select the file by clicking the left mouse button. Your file will appear in the list of presentations.
Or paste a link to the broadcast video in the field and click the "Add broadcast" button next to it. The broadcast will appear in the list.
Follow the same steps to add a video.
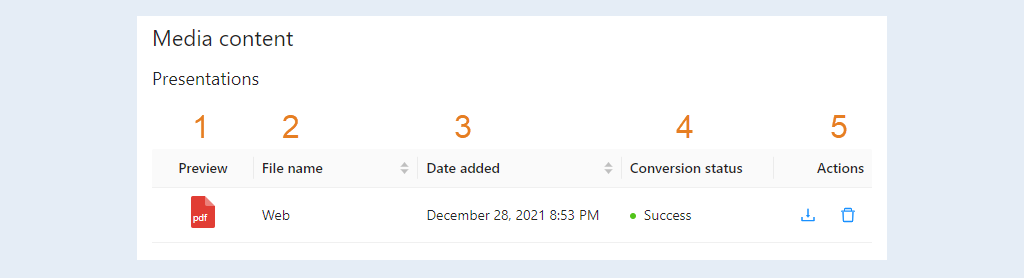
The list displays the following information:
- Preview. You see the first slide of your presentation.
- File name. The title of your presentation or content.
- Date added. The exact date and time of the file upload.
- Status. Here you can see the loading status of the presentation: pending or completed.
- Actions. Here you can download the file to your computer or delete the file from the list of presentations.
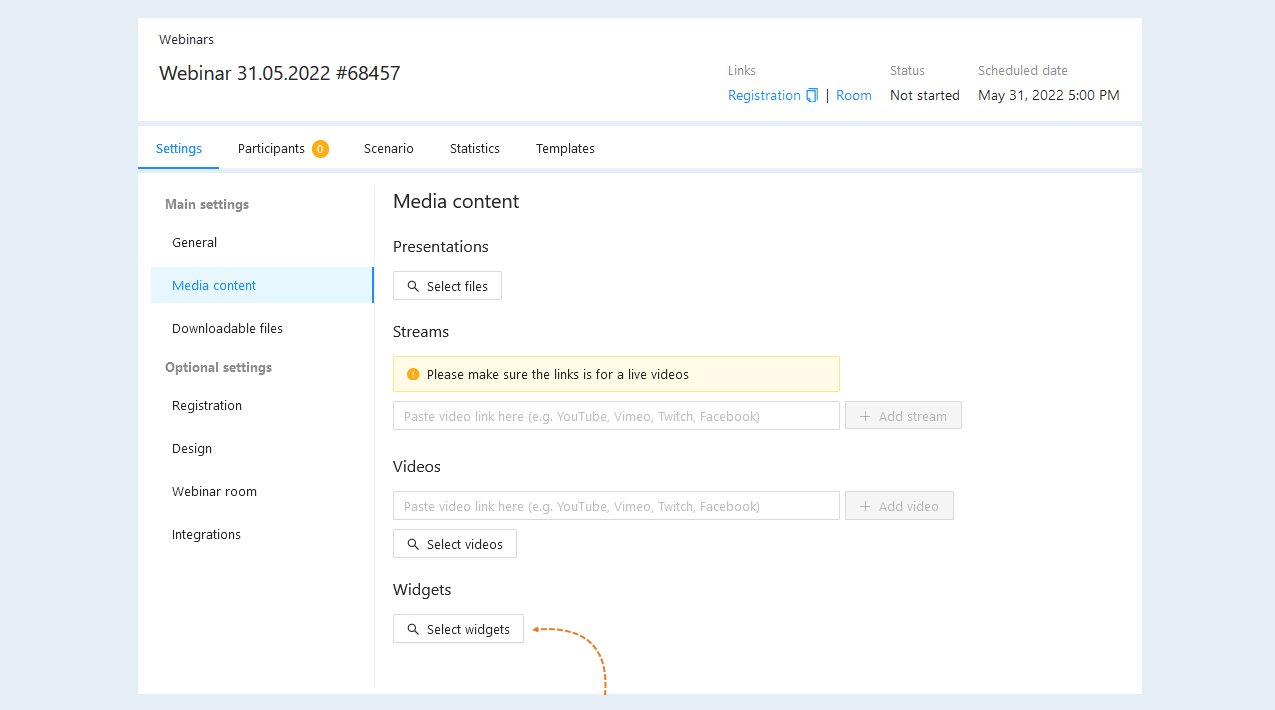
You can create and upload a widget to the webinar room. Then the viewers of your webinar can fill out the registration form or pay for the purchase of the product without going to another page. Clicking on a button or form opens a widget in a modal window in the center of the screen. Click on the "Select Widgets" button.
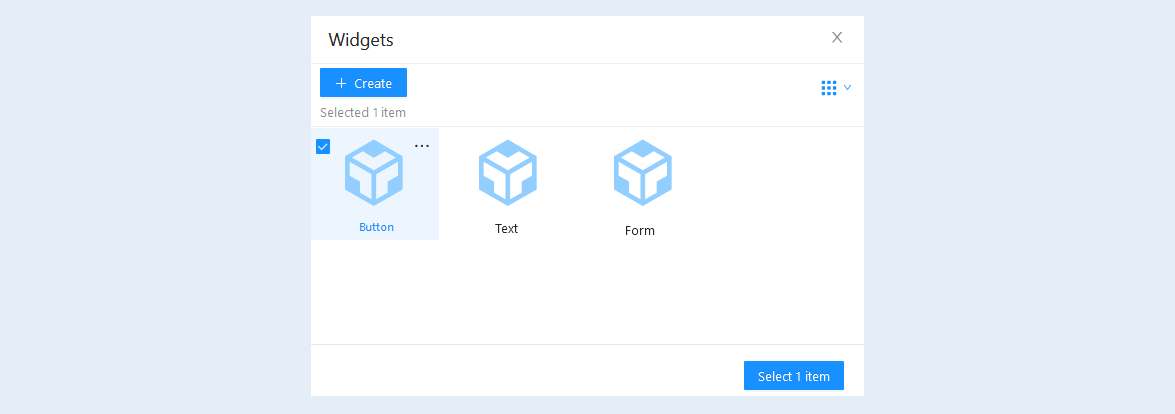
In the settings window that opens, select a previously created widget or create a new one by clicking the "Create" button. For more information on how to create and configure a widget, read the article "Widgets".
Downloadable files
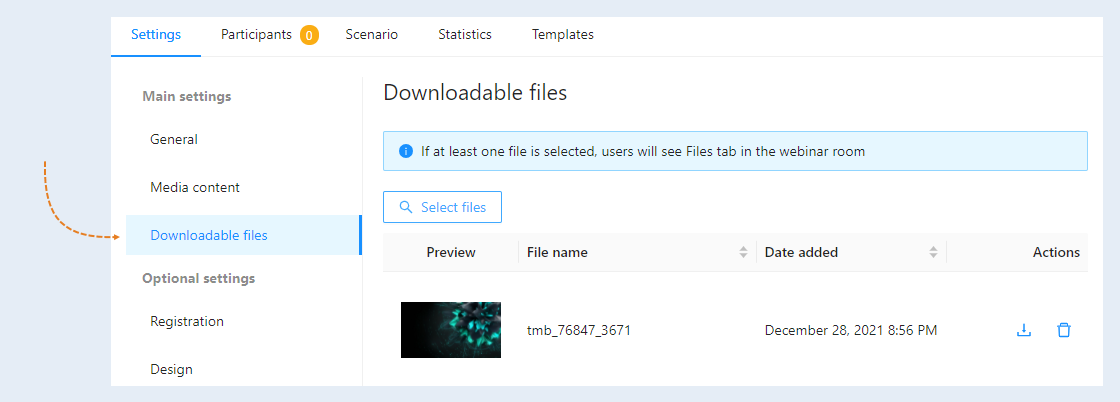
In the "Downloadable files" section, you can add various files and use them during the webinar. These can be PDF documents, templates, checklists, examples, additional resources, etc. Providing additional materials helps participants deepen their knowledge and put the information they receive into practice. If the webinar is aimed at selling a product or service, providing valuable free materials can help increase conversions.
If at least one file is selected, users will see the "Files" tab in the webinar room. The ability to download useful resources increases the value of the webinar for participants and encourages them to actively participate.
Optional settings
In the "Optional settings" section, you control the webinar room itself. This section allows you to configure additional webinar settings that affect the registration process, appearance, and integration with other services.
Registration
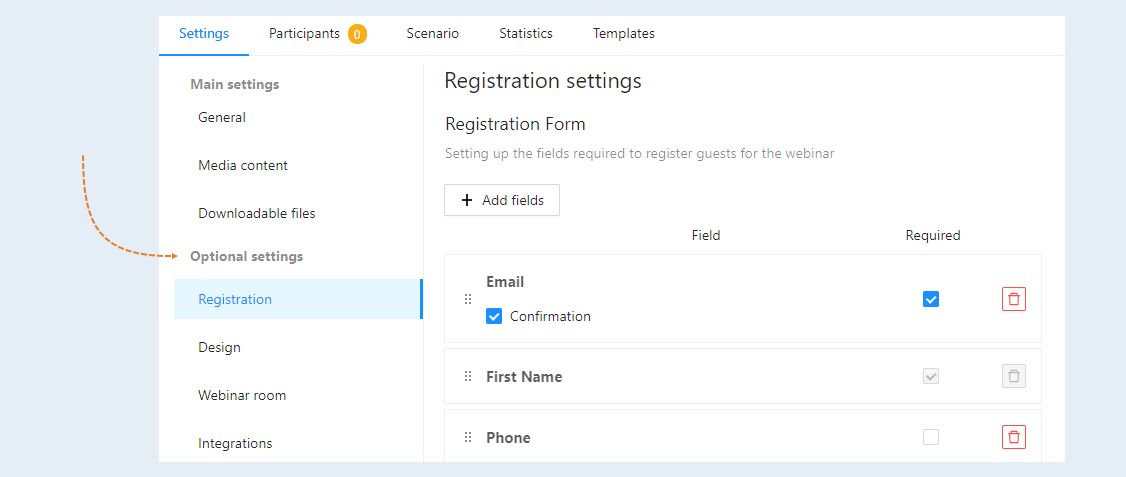
Registration settings. The "Registration" section allows you to configure the fields that participants must fill in during registration (name, email, birthday, gender, etc.). You can make some fields mandatory and others optional.
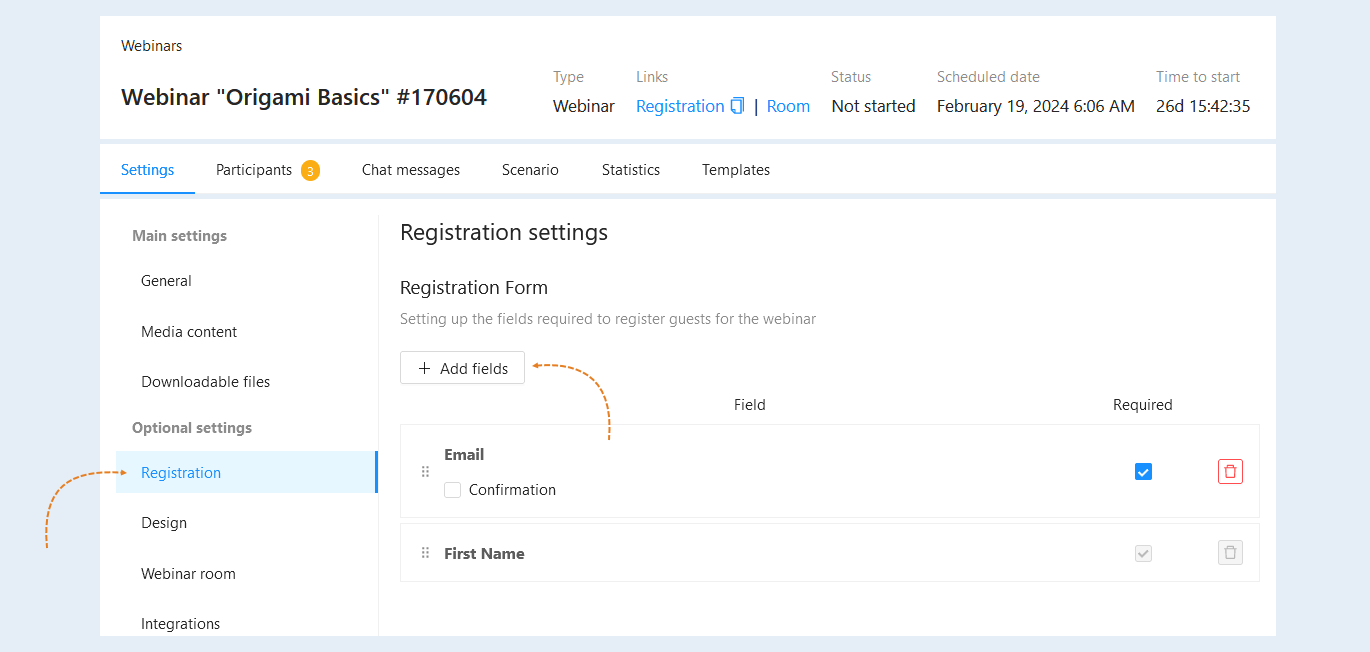
By default, the participant's email address and name are selected on the page. Click the "Add Fields" button and select a field from the list. The field will appear automatically in the registration form for the webinar.
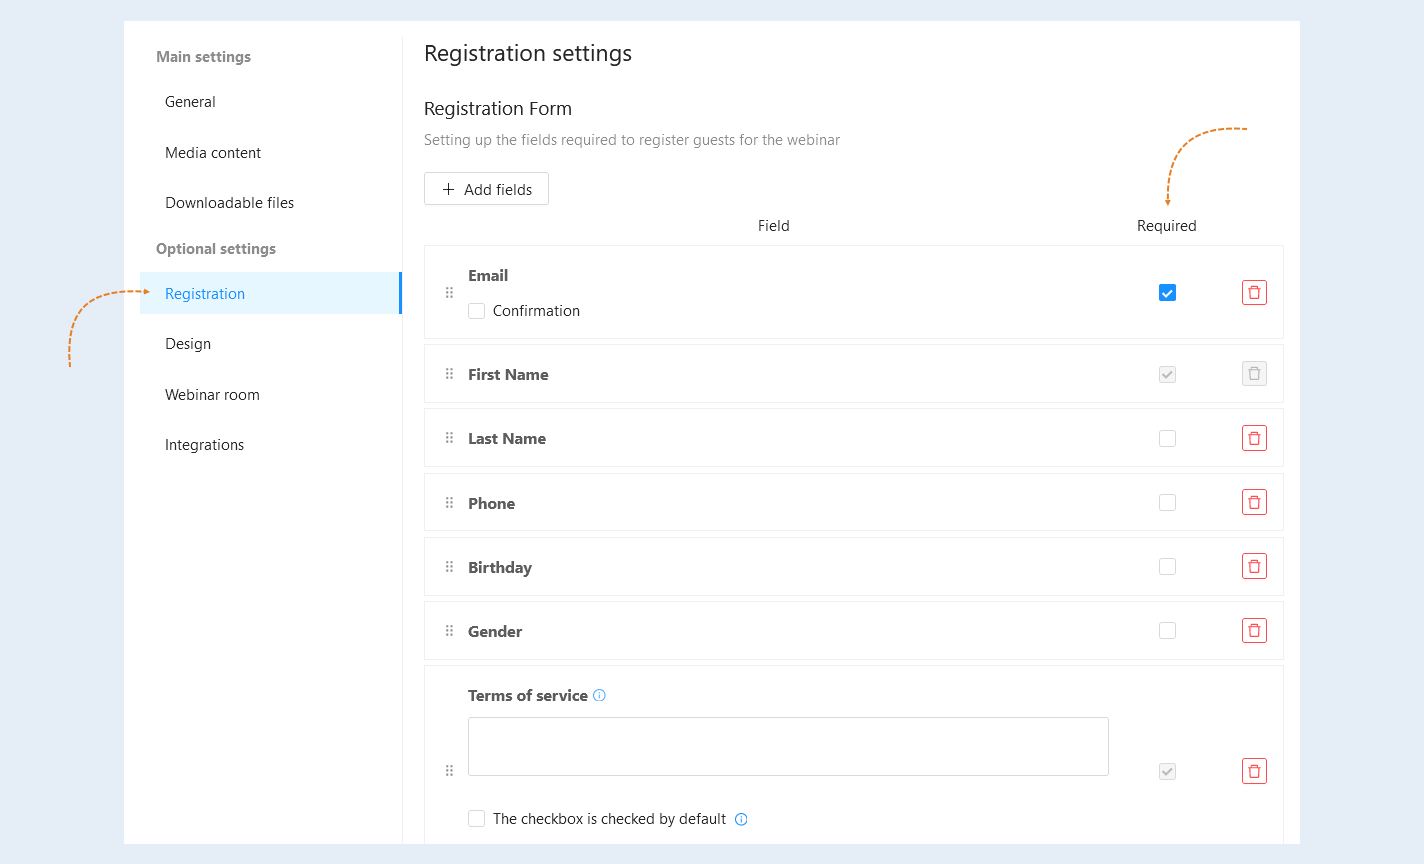
The following fields are available for registration of webinar guests:
Email. It can be used to automatically send emails confirming registration, reminders about the date and time of the webinar, and a login link.
First Name. Knowing the name makes it possible to address the participant by name in greetings during the webinar, in email newsletters, and in answers to questions.
Last Name. Combined with the name, it helps to distinguish participants with the same name.
Phone. It provides an opportunity to contact the participant in case of problems with email (for example, if the email did not arrive) or to promptly resolve issues. It is sometimes used to call back participants in order to offer additional products or services (usually requires the participant's consent).
Birthday. It makes it possible to divide the audience by age groups for a better understanding of their needs and interests.
Gender. Dividing the audience by gender for more targeted advertising and content.
Terms of service. Here you can attach a link to the documentation that regulates the terms of use of materials from the webinar. For example, it prohibits users from using this information for personal purposes.
Check the boxes next to those fields that will be required to fill in when registering for the webinar. Determine which fields are really necessary for your purposes. The fewer the fields, the higher the probability of successful registration.
And click the "Save" button.
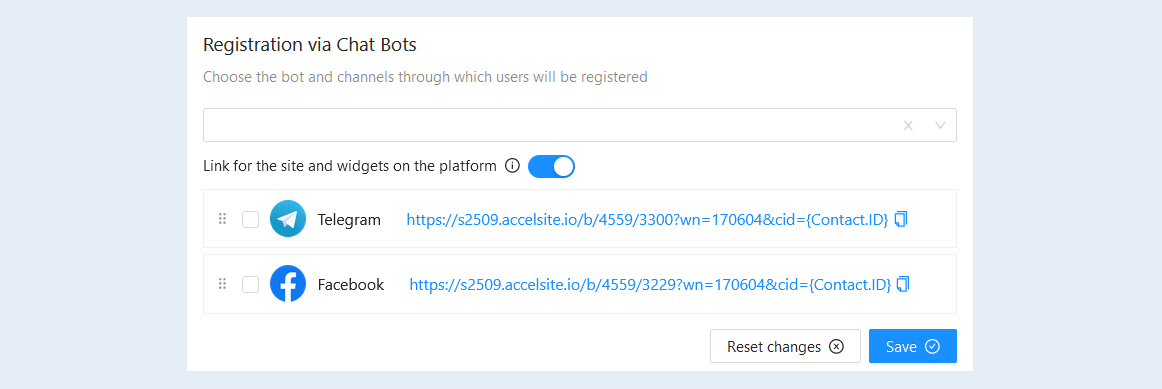
Registration via chatbots. You can also add a chatbot and channels through which users will register.
Select the bot and channels from the list and check the boxes on those channels that will be available for registration for the webinar. Next, copy the link to the channel and send it to the users.
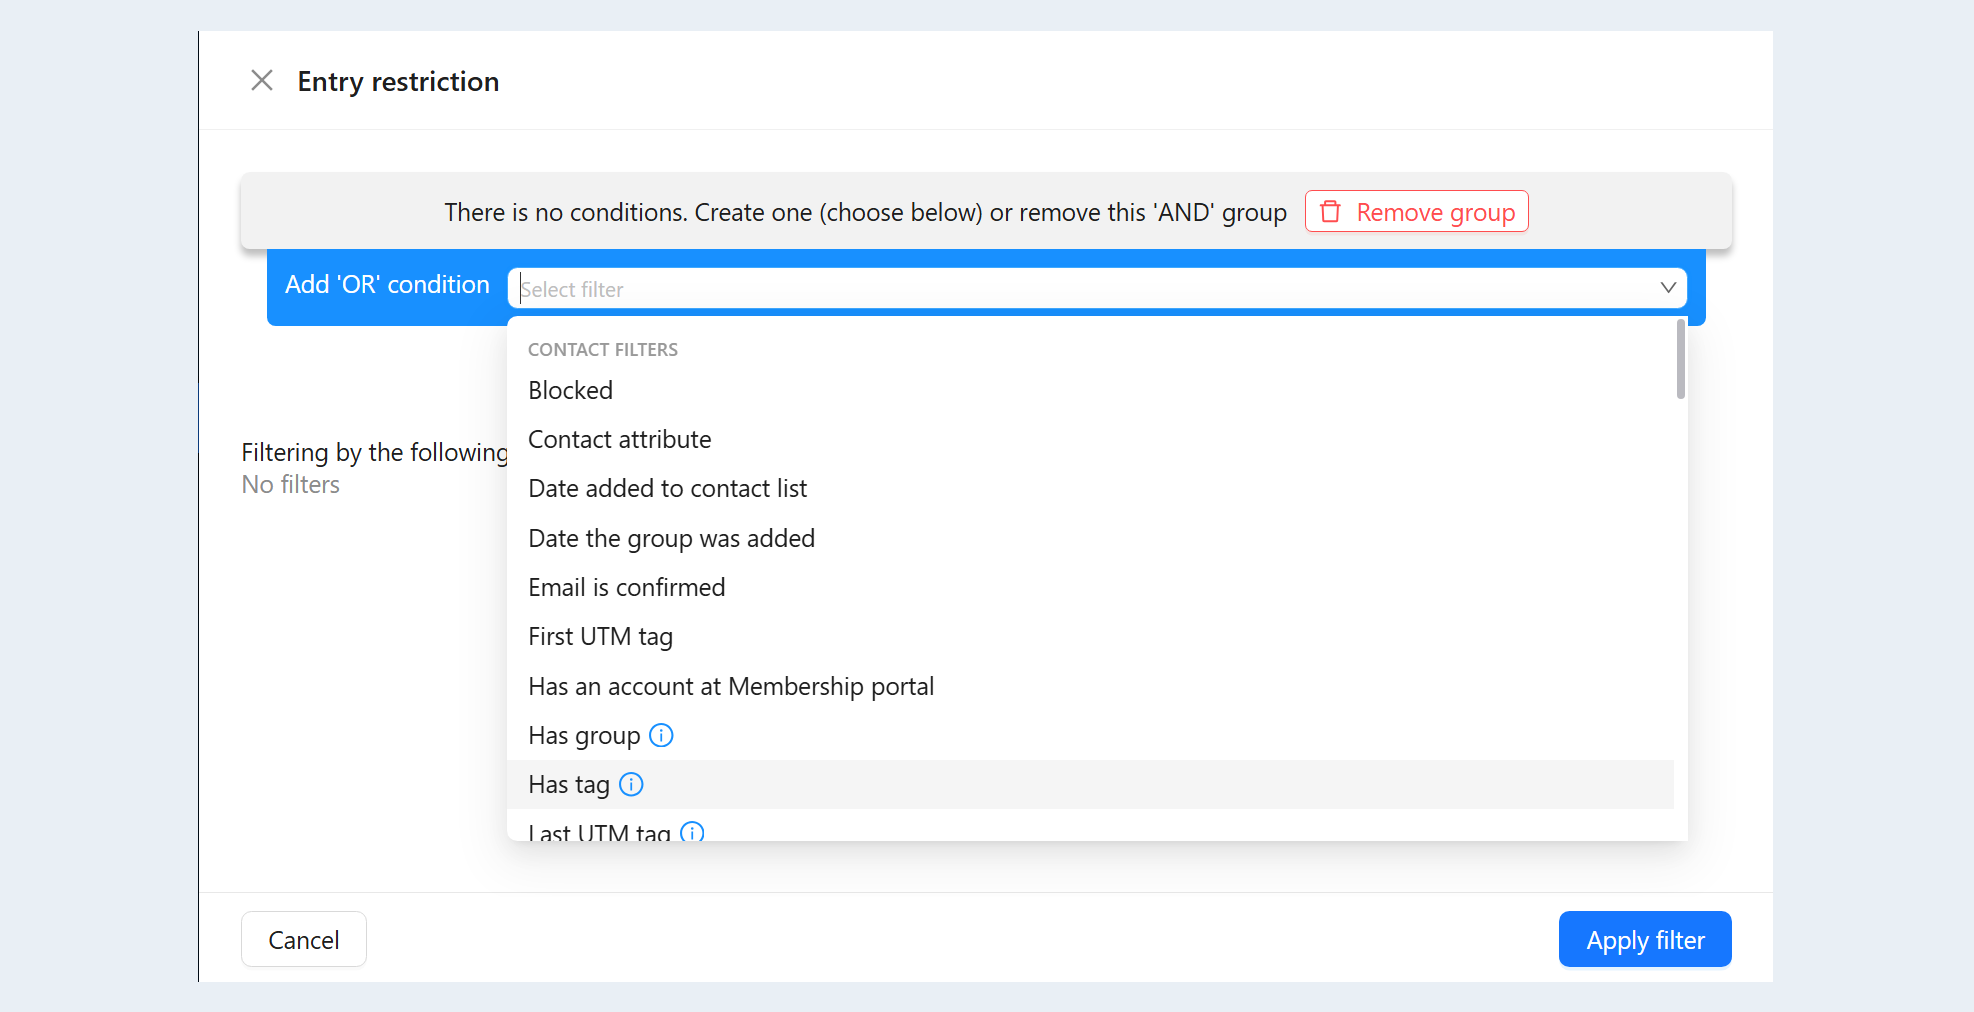
Entry restriction. You can set up a closed webinar. In this case, registration will be available only for participants who meet certain conditions and filters. Check the box "Restrict entry according to the filter".

You will have an additional window "Login restriction", in which you need to configure the contact filter. Select the desired filter condition from the list. Read more about creating a filter in the article "Filtering and search conditions".
Design
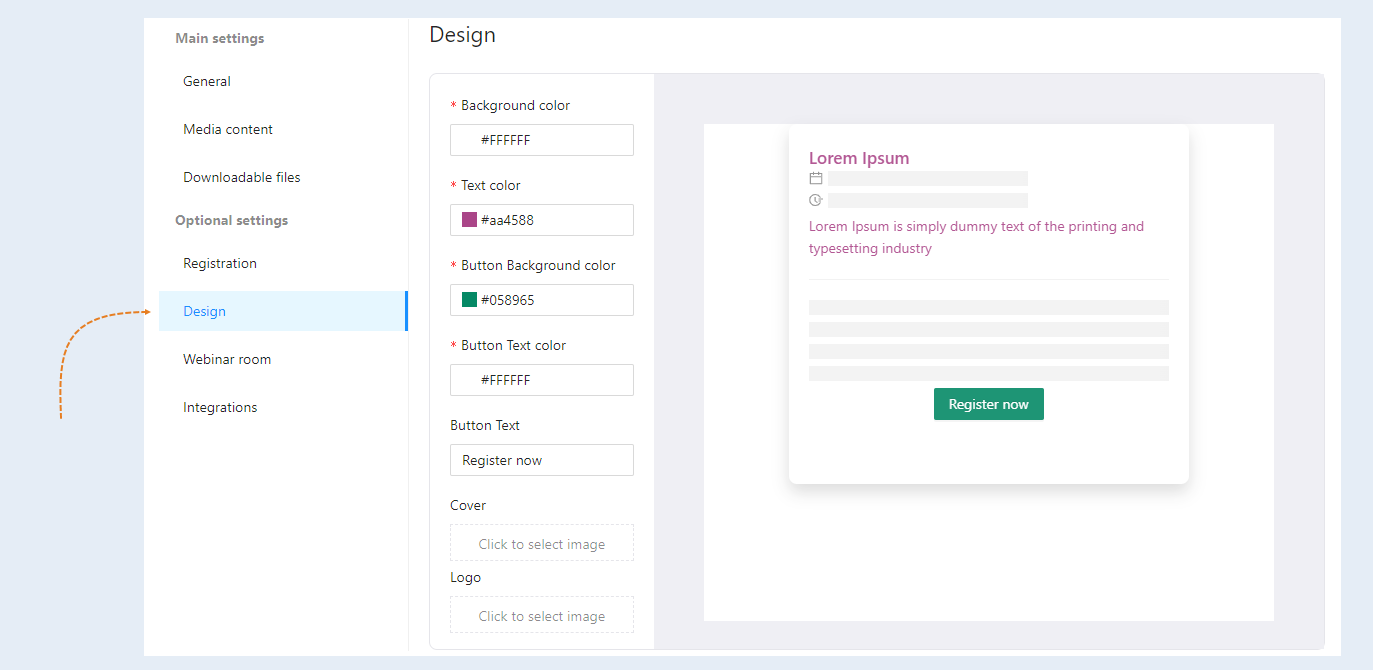
In the Design section, you customize the appearance of the Webinar Registration page to match your brand. You can create an attractive and user-friendly webinar room design, increase participant engagement and create a positive impression.
- Background color. Allows you to select the background color for the registration page. Sets the overall visual tone of the page.
Text color. Allows you to select the color of the text displayed on the page. Provides readability and visual contrast with the background.
Button Background colorn. Allows you to select the background color for the registration button. Highlights the button and draws attention to it.
Button Text color. Allows you to select the color of the text displayed on the button. Ensures the readability of the button text.
Button Text. Allows you to change the text on the buttons (for example, "Register" can be changed to "Participate for free").
Cover. Allows you to upload a cover image that will be displayed on the registration page. Creates a visual representation of the webinar topic and attracts the attention of users.
Logo. Allows you to upload the logo of your company or brand, which will be displayed on the registration page.
A preview. Allows you to see what the changes made to the design will look like before they are saved.
Room
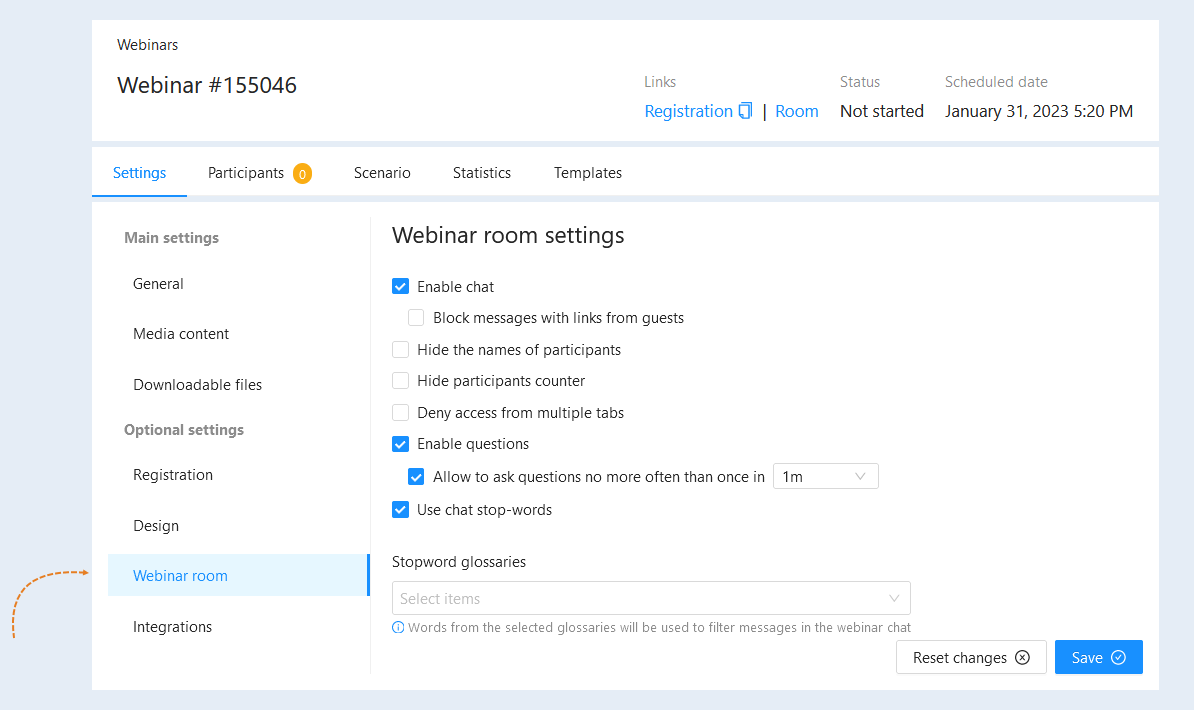
In the Room section, you set the restrictions for the participants in the selection:
Enable chat. Check the box to make the chat available to the webinar participants. Or uncheck the box to block the chat. Provides an opportunity for communication between the participants and the speaker. It gives you the opportunity to ask questions to the speaker and creates a sense of community.
Block messages with links from guests. Check the box so that the webinar participants cannot send messages containing links. Prevents spam and the spread of unwanted links.
Hide the names of the participants. Allows you to display only the names of participants in the chat and the list of participants. Protects the privacy of the participants.
Hide the participant counter. Check the box to hide the number of participants displayed in the webinar room. It helps to prevent the number of participants from influencing the perception of the webinar. Participants will rate the webinar based on its content, not the number of people present.
Deny access from multiple tabs. Check the box so that the same user cannot access the webinar from multiple browser tabs or devices. Prevents the transfer of access to the webinar to other persons, ensures honest attendance statistics.
Enable questions. Check the box to add the questions from the participants section to the chat. This is a convenient way to collect questions.
Allow no more questions to be asked than. Set time limits for sending questions to the chat: no more than once every 30 seconds, 1 minute, 1 minute 30 seconds. Prevents spam with questions and provides an opportunity to ask a question to each participant.
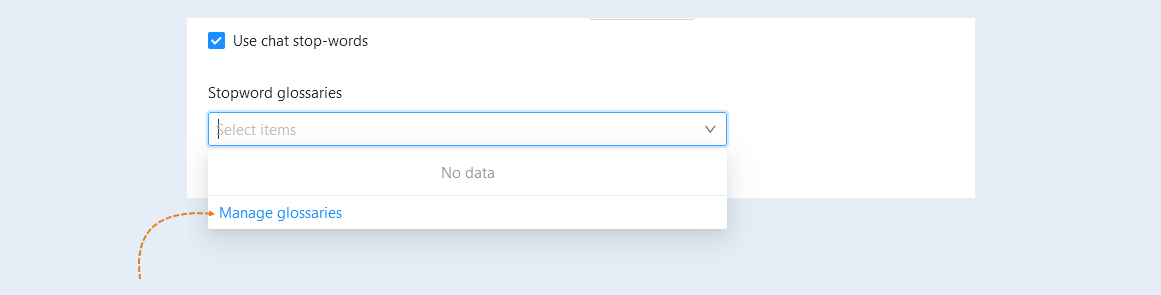
Use chat stop words. Allows you to set a list of words that will be automatically blocked in the chat. This option prevents the use of obscene language, insults and other undesirable statements. Maintains a positive and respectful atmosphere in the chat.
To add a dictionary of stop words, click the "Manage glossaries" button.
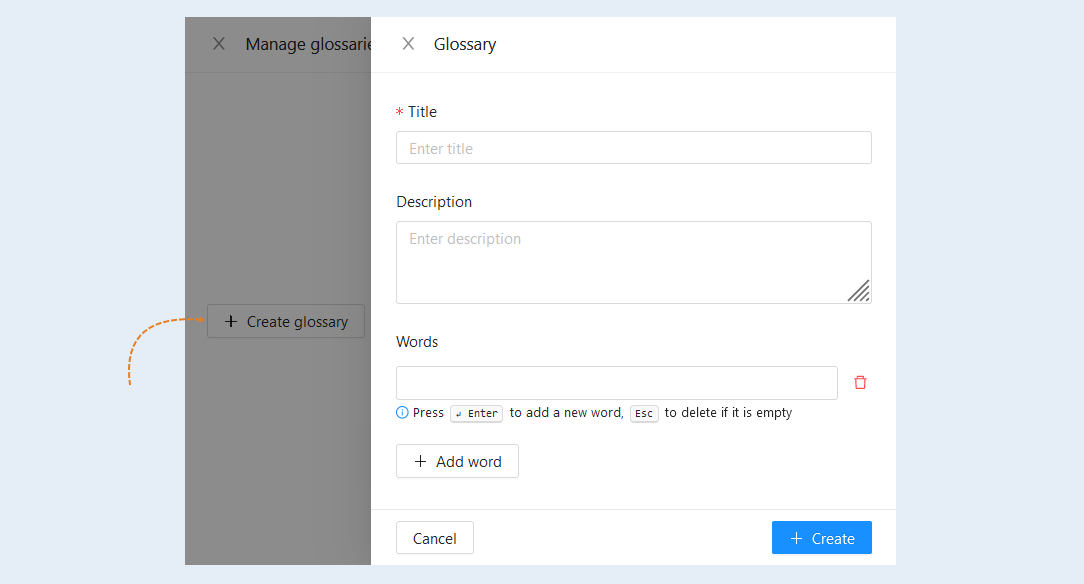
In the window that opens, click the "Create Glossary" button and fill in the fields. Click the "Create" button and add the created stop-word dictionary to the webinar settings.
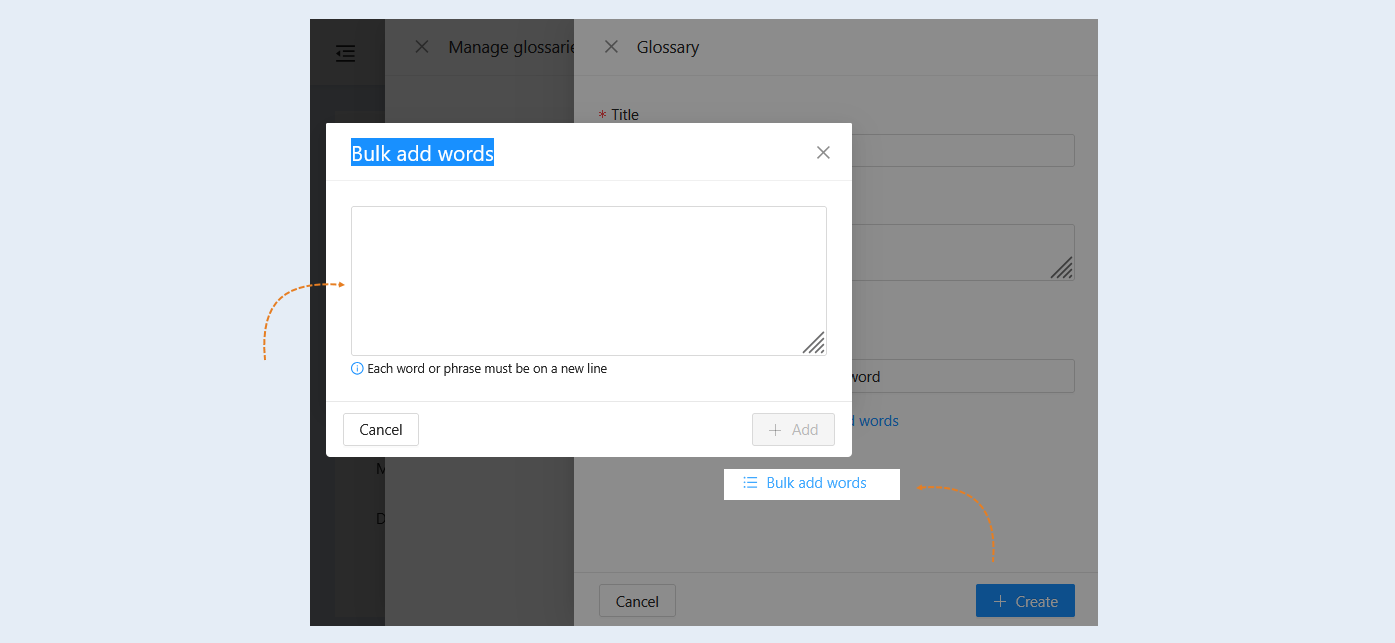
The "Bulk add words" option in the webinar settings allows you to add several stop words at once in a list, rather than one at a time. This saves a lot of time, especially if you have a large list of words that you want to prohibit from being used in the webinar chat. It allows you to quickly and easily add a large list of unwanted words to maintain a healthy and constructive atmosphere during the broadcast.
Click the "Bulk add words" button and add a list of stop words. Please note that each word or phrase must be separated from each other and placed on a new line.
Integration
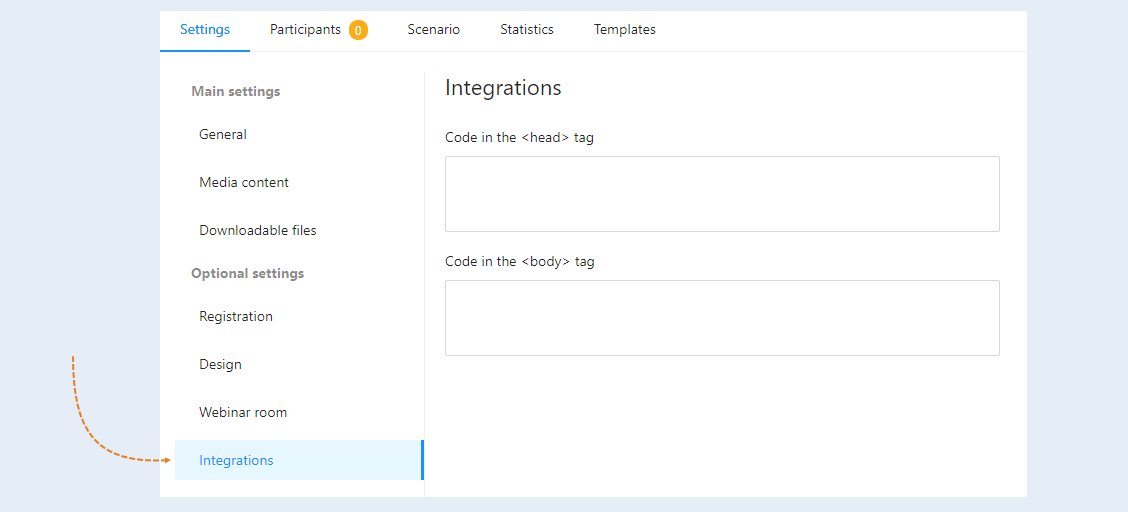
The "Integrations" section is designed to extend the functionality of the webinar room and integrate with third-party services by adding custom HTML code to webinar pages. Proper use of these fields can significantly enhance the webinar attendee experience and improve its effectiveness.
Add programmatic code for the "Webinar Registration" page:
- Code in the <head> tag. This field is for inserting HTML code that will be placed within the <head> tag on the webinar pages. The <head> tag contains meta-information about the page, such as the title, description, CSS style linking, JavaScript scripts, and other meta-tags.
Code in the <body> tag. This field is for inserting HTML code that will be placed within the <body> tag on the webinar pages. The <body> tag contains all the visible content of the page: text, images, videos, forms, interactive elements, etc. This section is typically used for inserting scripts, widgets, and other elements that should be displayed or executed on the page.
Click the "Save" button.