The "Gamification" section is a tool that uses game elements to enhance users' educational experience. It includes various gaming mechanics, rewards, and achievements designed to motivate users and make learning more interesting and engaging.
This section helps stimulate users' interest in learning and maintain their motivation at a high level. Gaming elements such as rewards and achievements create a sense of progress and accomplishment, which can inspire users to continue learning and achieve new goals.
The gamification section provides additional motivation for participating in platform activities. Competitions and contests among users can encourage them to participate in assignments and communicate with each other on forums, promoting deeper immersion and discussion of the material.
Additionally, the gamification section helps track and evaluate users' progress. Gaming elements allow users to receive feedback on their achievements and assess their own progress. It also makes it easier for teachers and platform administrators to assess users' activity and success.
All of this makes the educational experience more interesting, motivating, and effective.
Click on the desired section of the article to access its description:
Gamification
Go to the "Courses and Training" section and select the "Gamification" tab. To start working with this section, click on the "Enable Gamification" button.
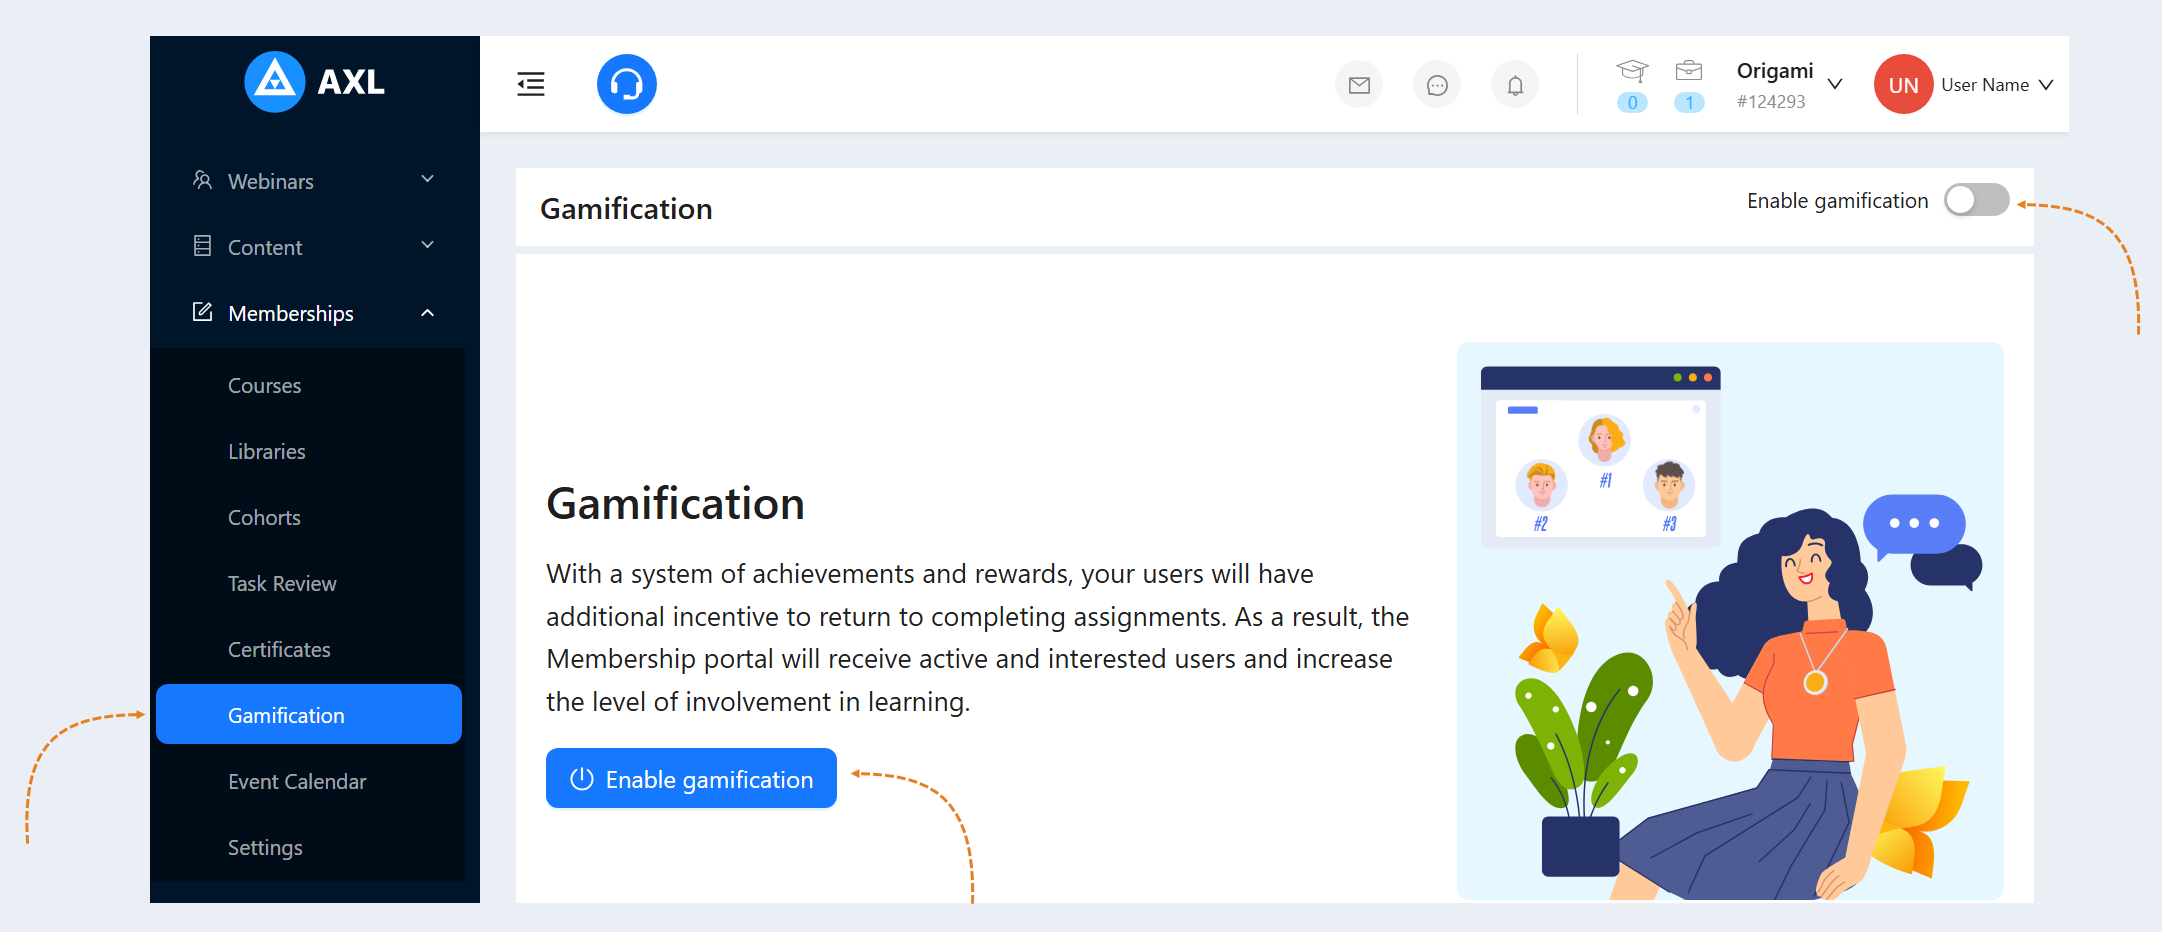
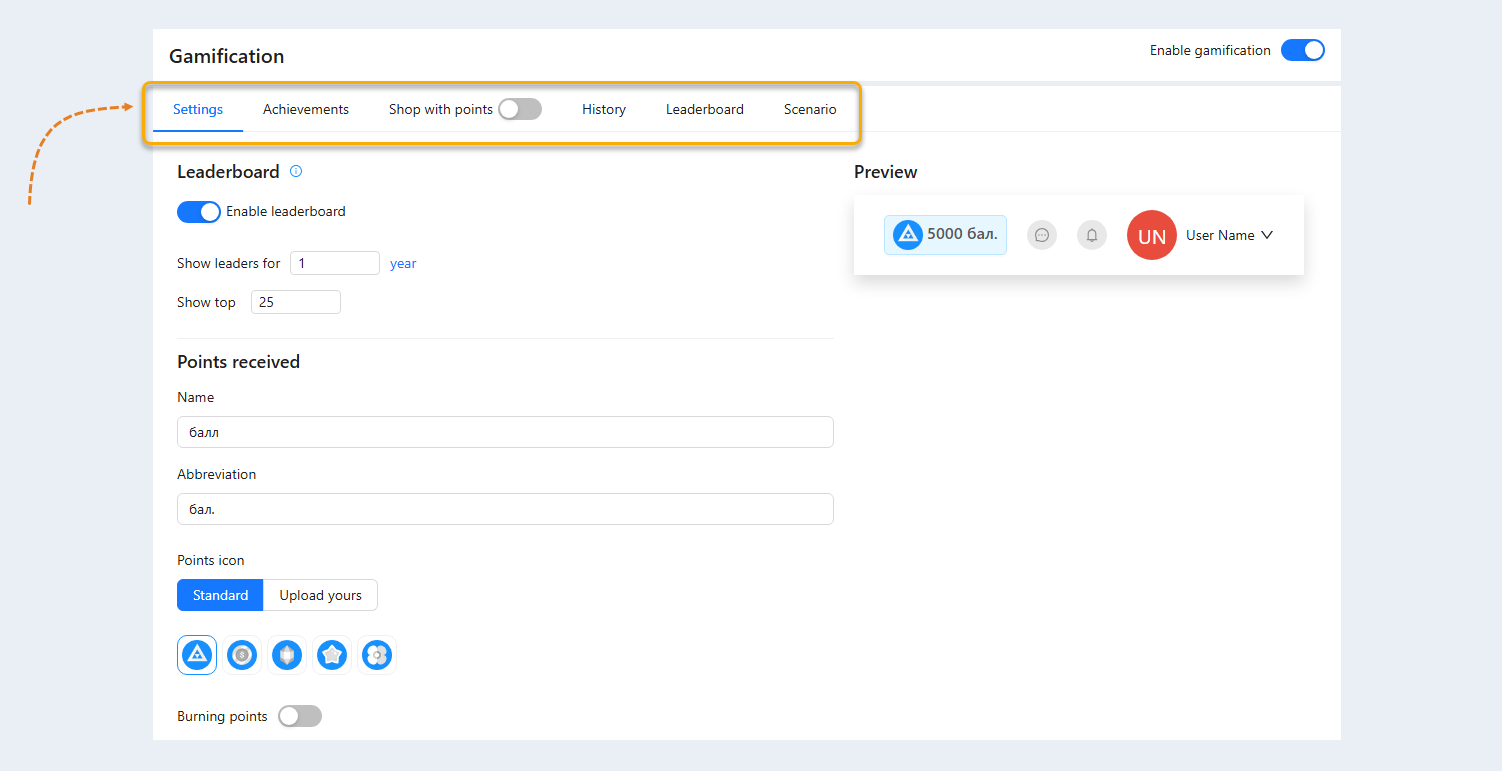
In the "Gamification" section, you have access to the following tabs: Settings, Achievements, Shop whis points, History, Leaderboard, and Scenario. Let's take a closer look at each tab.
Settings
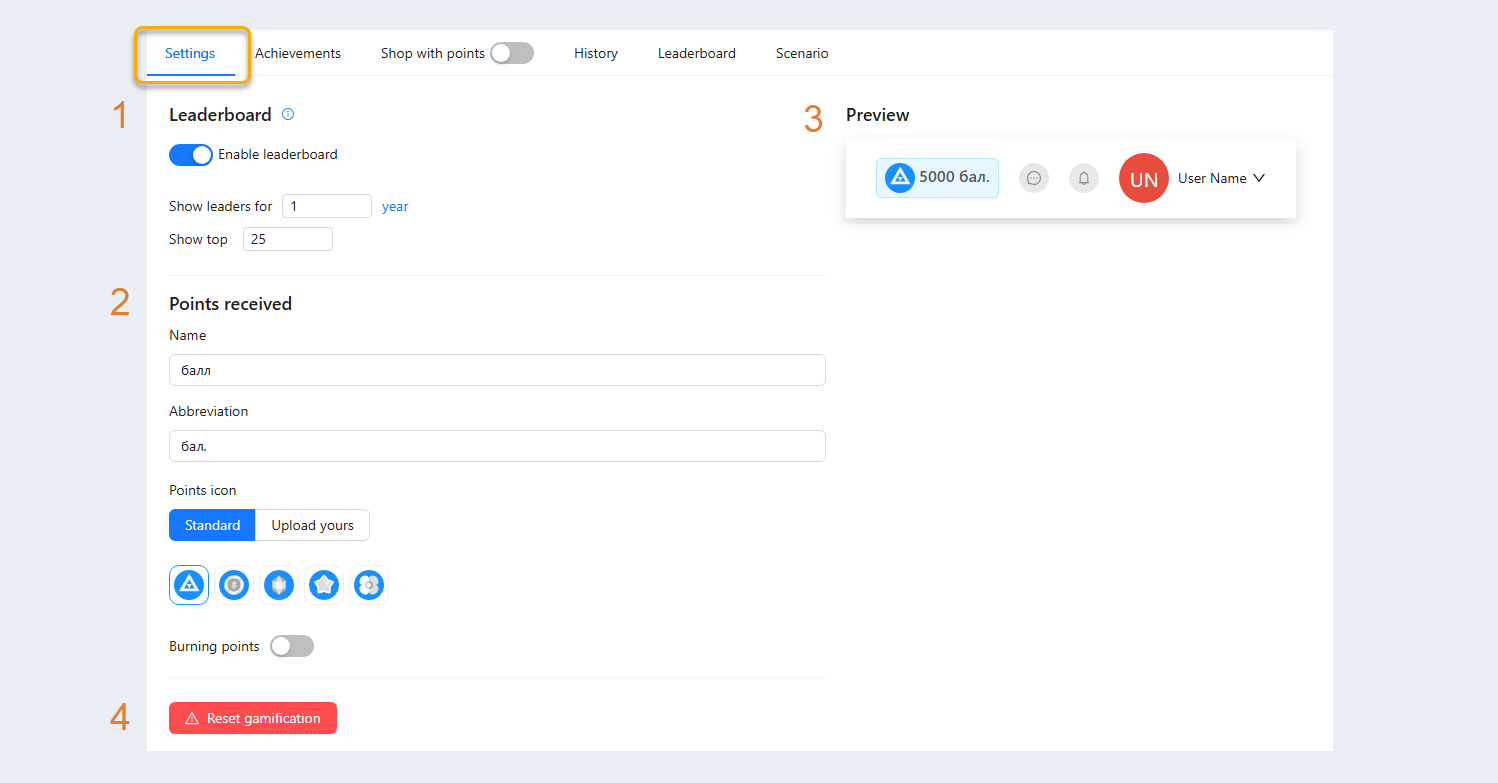
In the Settings tab, set the basic settings of the section:
- Leaderboard. Move the slider to the active position to display the achievements leaderboard in the user's personal account. The leaderboard shows which users achieve the best results in learning. This can inspire other users and show that success in learning is real and achievable. Users can track their position on the leaderboard and see how their achievements compare to other participants. This allows them to assess their progress and understand which aspects they need to focus on to improve their results.
- Show leaders for. Set the time period in days, months, or years. At membership portal, your users will see leaders for the selected period.
Show top. Specify the number of top leaders you want to display in the user's personal account. Displaying top leaders can serve as an important source of inspiration and motivation for users, as they can observe the achievements of other participants and strive to improve their own results. This can help create a healthy and collaborative atmosphere, where participants help and support each other in achieving their goals.
- Show leaders for. Set the time period in days, months, or years. At membership portal, your users will see leaders for the selected period.
Points received. Users receive points for successfully completing assignments, passing tests, or achieving milestones during the learning process.
- Name. You can change the name of the points, for example, "coins," etc.
Abbreviation. Shows the abbreviated name of the points, which will be displayed in users' personal accounts.
Points icon. You can select the visual icon for the points from the list of standard icons or upload your own custom icon.
Burning points. Move the slider to the active position to have earned points expire after a selected period. Set the point expiration period in days, months, or years. This limitation creates a sense of urgency and motivates users to take actions to not lose points or achievements in general. It helps maintain constant interest in educational materials.
Preview. In this frame, you can see a preview of the points icon as it will be available to users in their personal accounts. Earned points will be displayed in the top right corner of the user's personal account toolbar.
Reset gamification. All users achievements and transactions will be deleted. Confirm gamification reset in the window that opens.
Achievements
Achievements are special rewards or prizes that users can receive for completing specific tasks or goals during the learning process. Obtaining achievements can serve as external confirmation of a user's success and progress. They allow users to assess their efforts and achievements and can also be used for purchasing rewards in the "Points Store."
Perform basic achievement settings:
Style for Achievement. Choose a style for achievements from the provided list.
Achievements. Here is a built-in list of achievements that you can edit and customize as you wish.
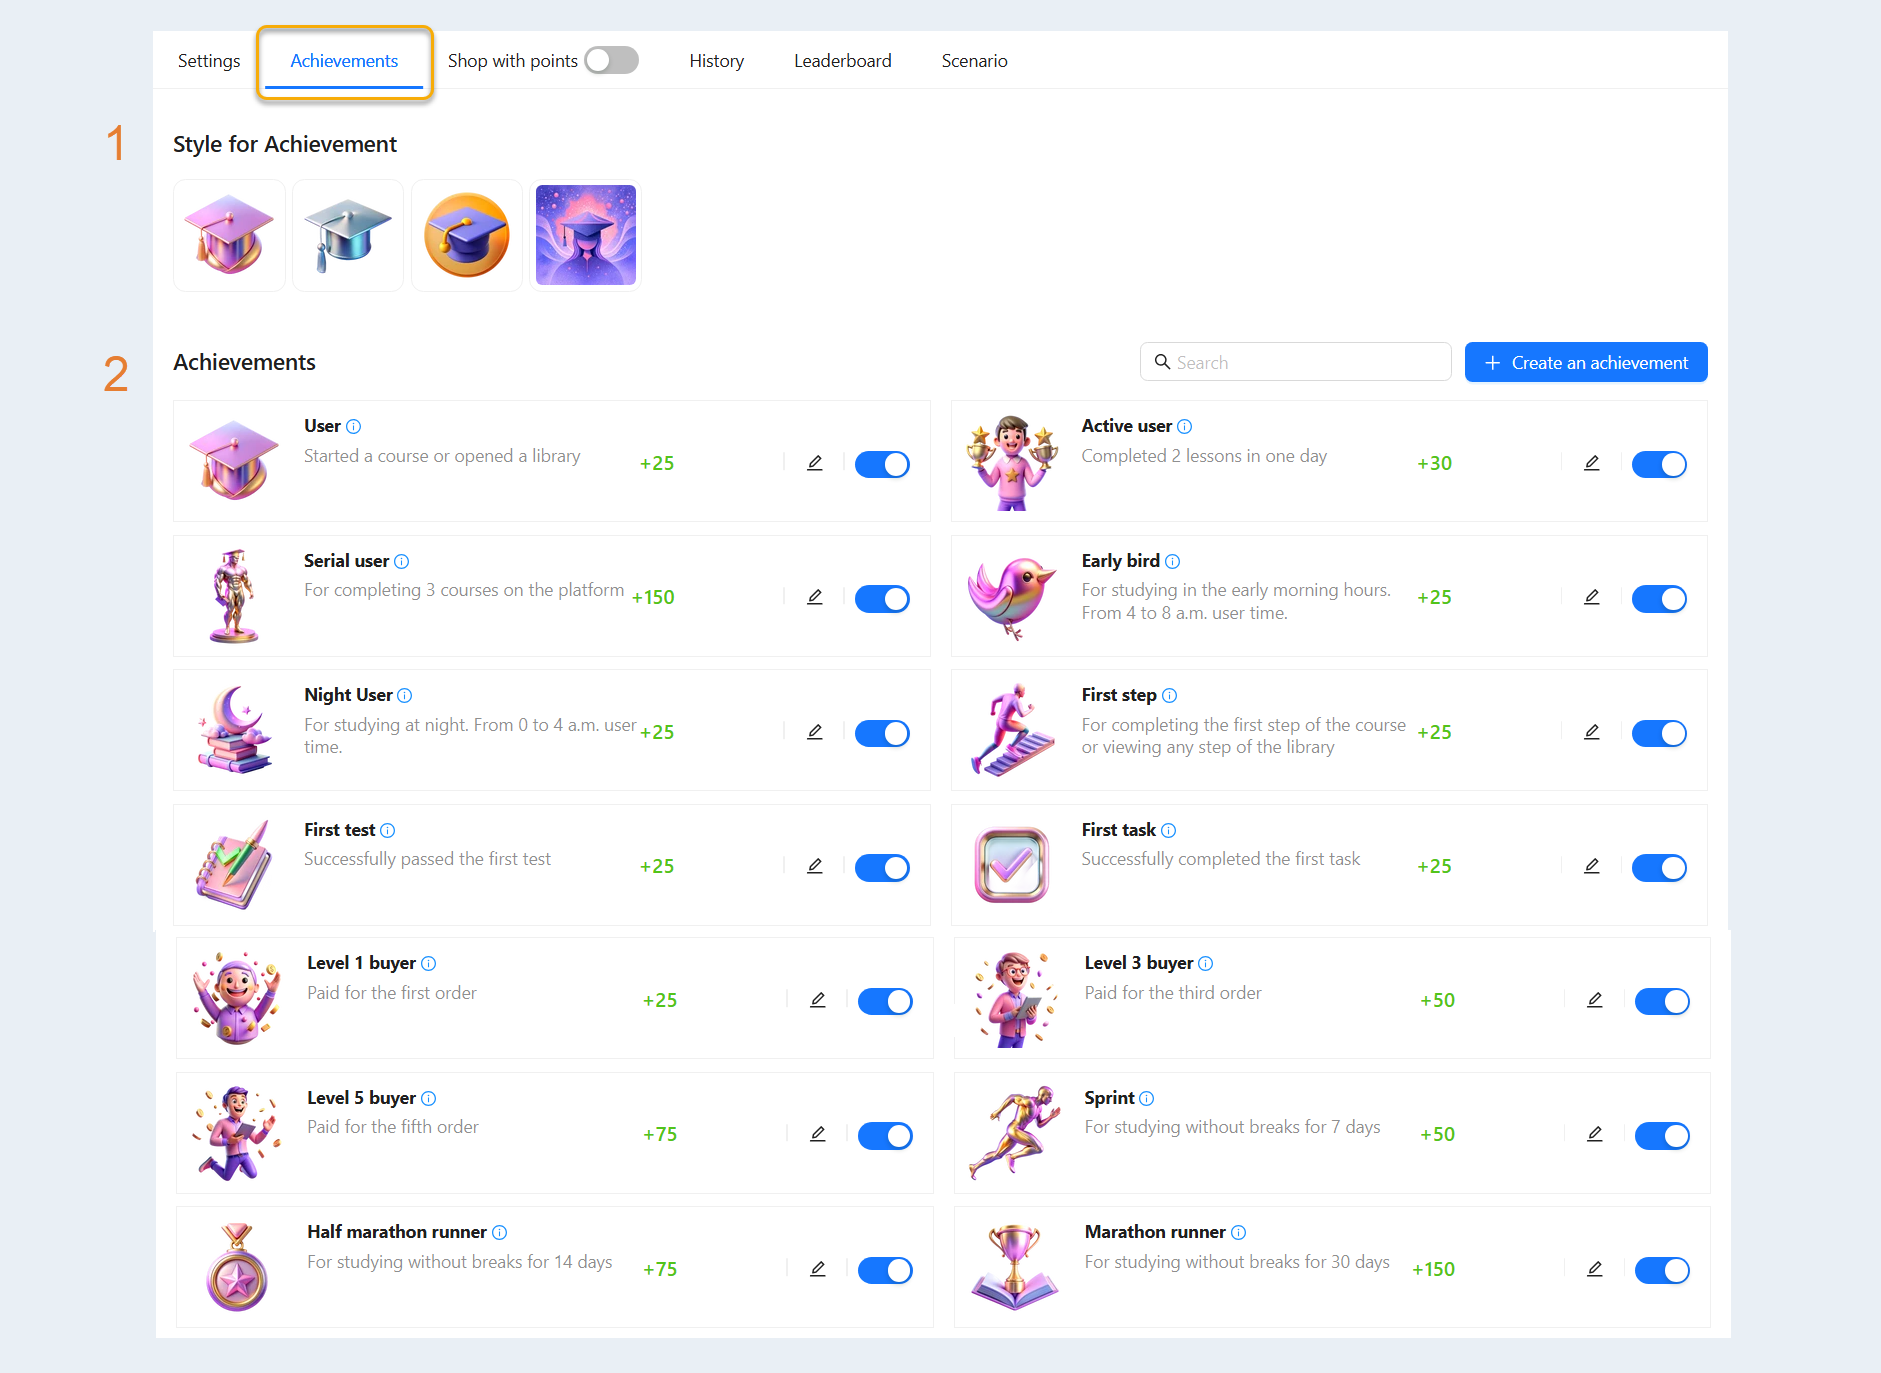
In the achievement card, you can see:
- Icon. The achievement image is displayed in the corresponding style.
Title and description. The achievement title and a brief description are shown. The description explains why the user received the achievement.
Note. The note indicates how many achievements a user can receive. For example, Can only be obtained once, Can be obtained once per course or library, Can be obtained many times or others .
Points. The number of points that will be awarded to the user for completing the achievement is shown.
Edit. Click the button to make changes to the achievement. You can change its title, description, icon, and the number of points awarded.
Make active. You can disable this achievement by moving the slider to the inactive position.

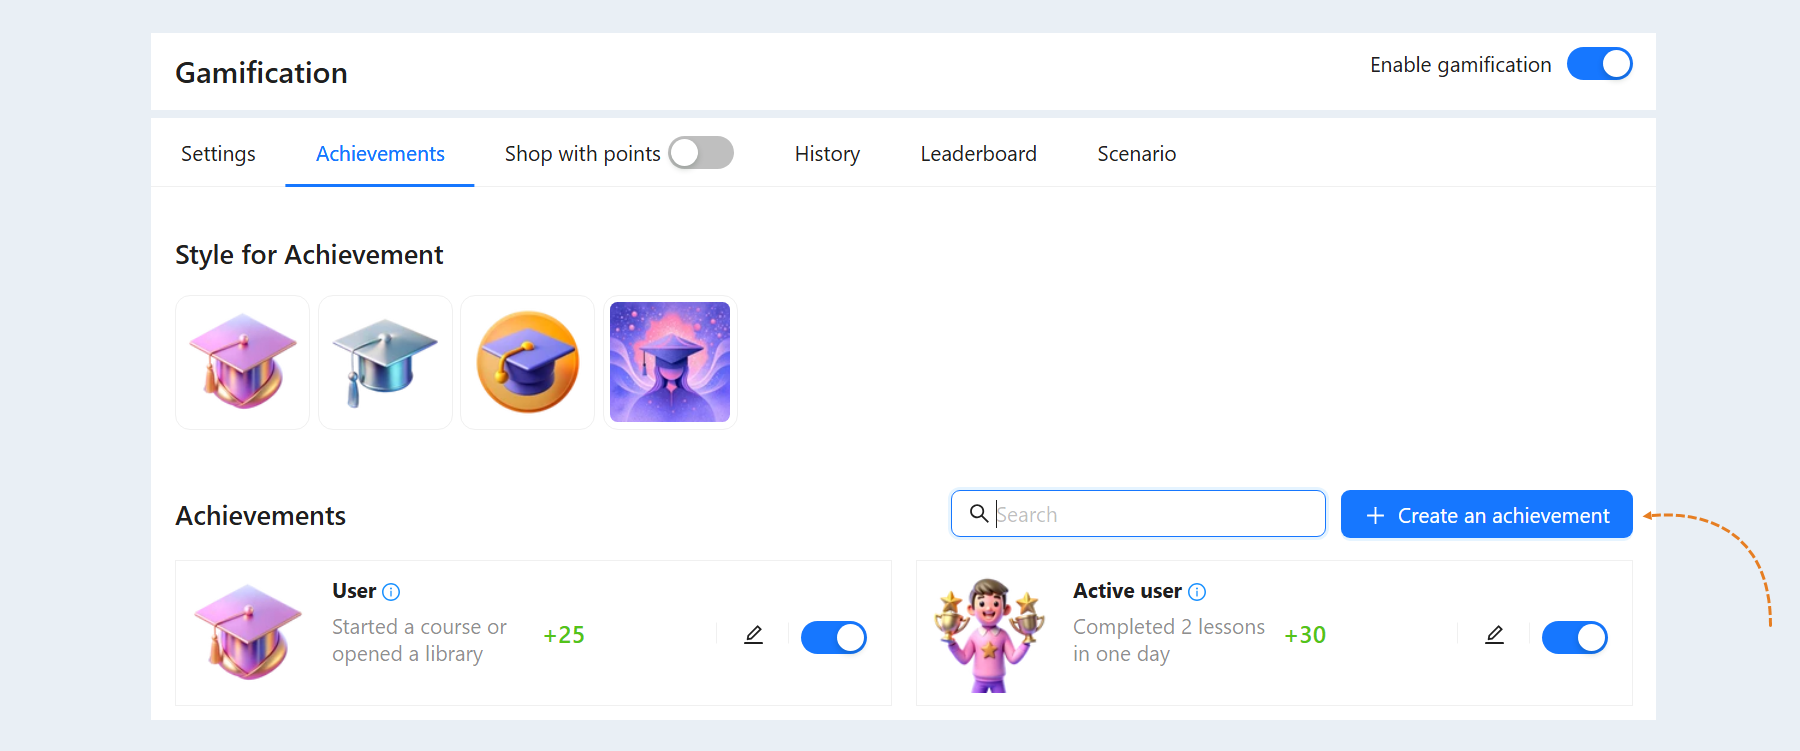
You can use the existing list of achievements or create your own. To add another achievement, click the "Create an achievement" button.
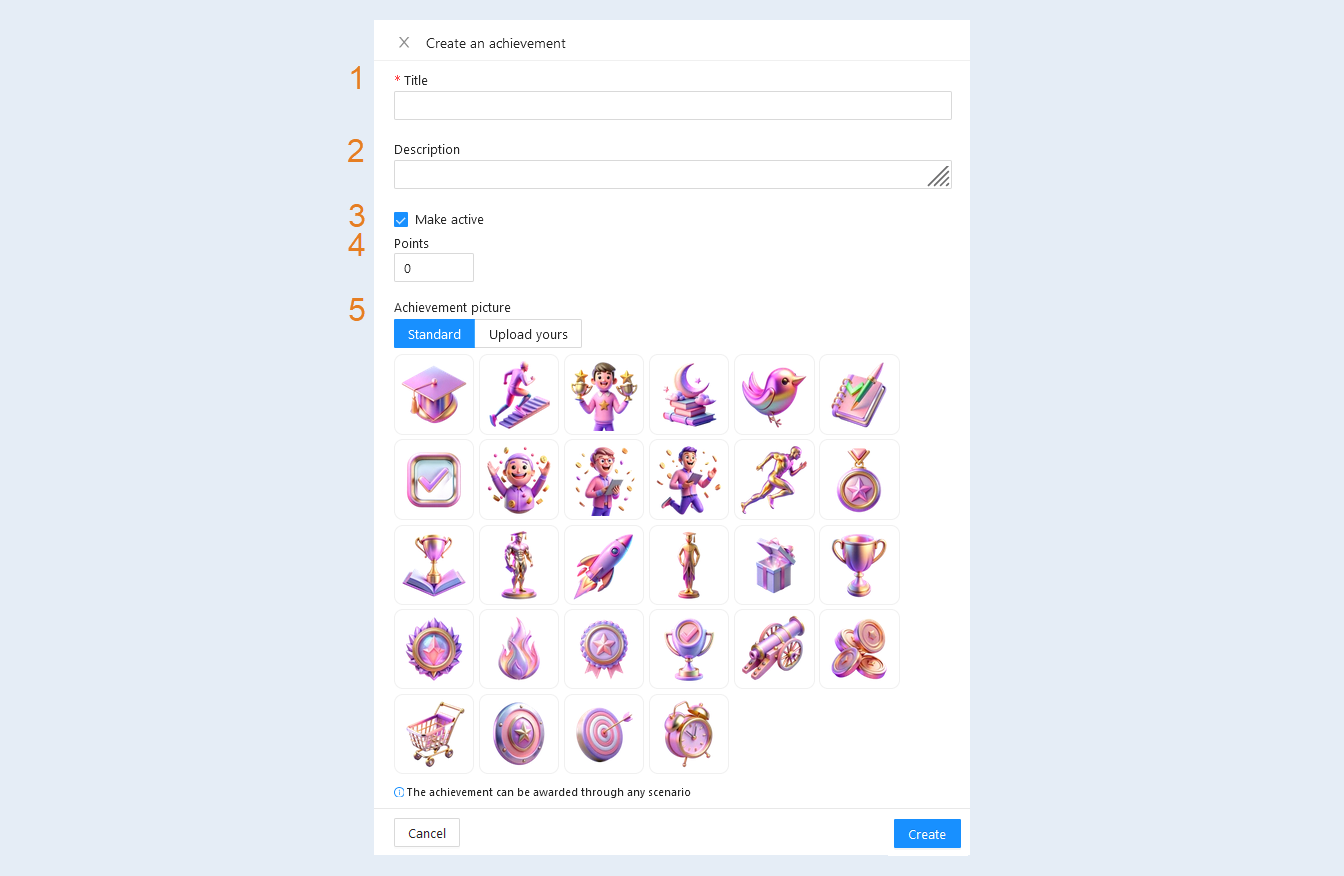
In the opened window, fill in the fields:
- Title. Specify the achievement title. The title will be shown to users in their personal accounts when they complete the achievement.
Description. Add a brief description that explains why the user received the reward. The description will be shown to users in their personal accounts.
Make active. Check the box to enable point scoring for this achievement.
Points. Specify the number of points that will be awarded to the user for completing this achievement.
Achievement picture. Choose an image for the achievement from the provided list or upload your own image.
Click the "Create" button.
Shop with points
The point shop is a virtual store where users can spend their earned points on various goods or privileges.
The shop offers a variety of items that users can purchase. The items can be different - they can be access to additional products, bonus account replenishment, or content-free items (for example, a consultation service, offline meeting, etc.). Privileges can provide users with additional opportunities. The point shop not only serves as a way to obtain additional materials or privileges but also serves as a tool for motivation and incentive for users. The earned points provide them with additional goals and rewards for their efforts in the learning process.
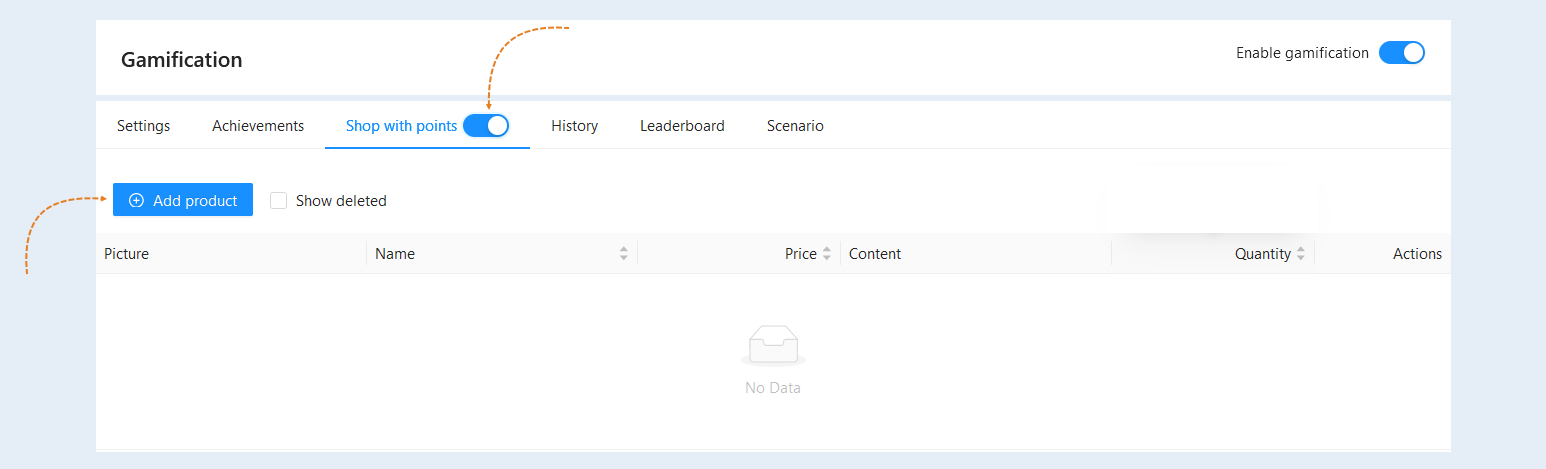
Move the "Shop with points" slider to the active position to enable the shop. Your users will be able to view and purchase items in their personal accounts. To create a new item, click the "Add product" button in the top left corner of the page.
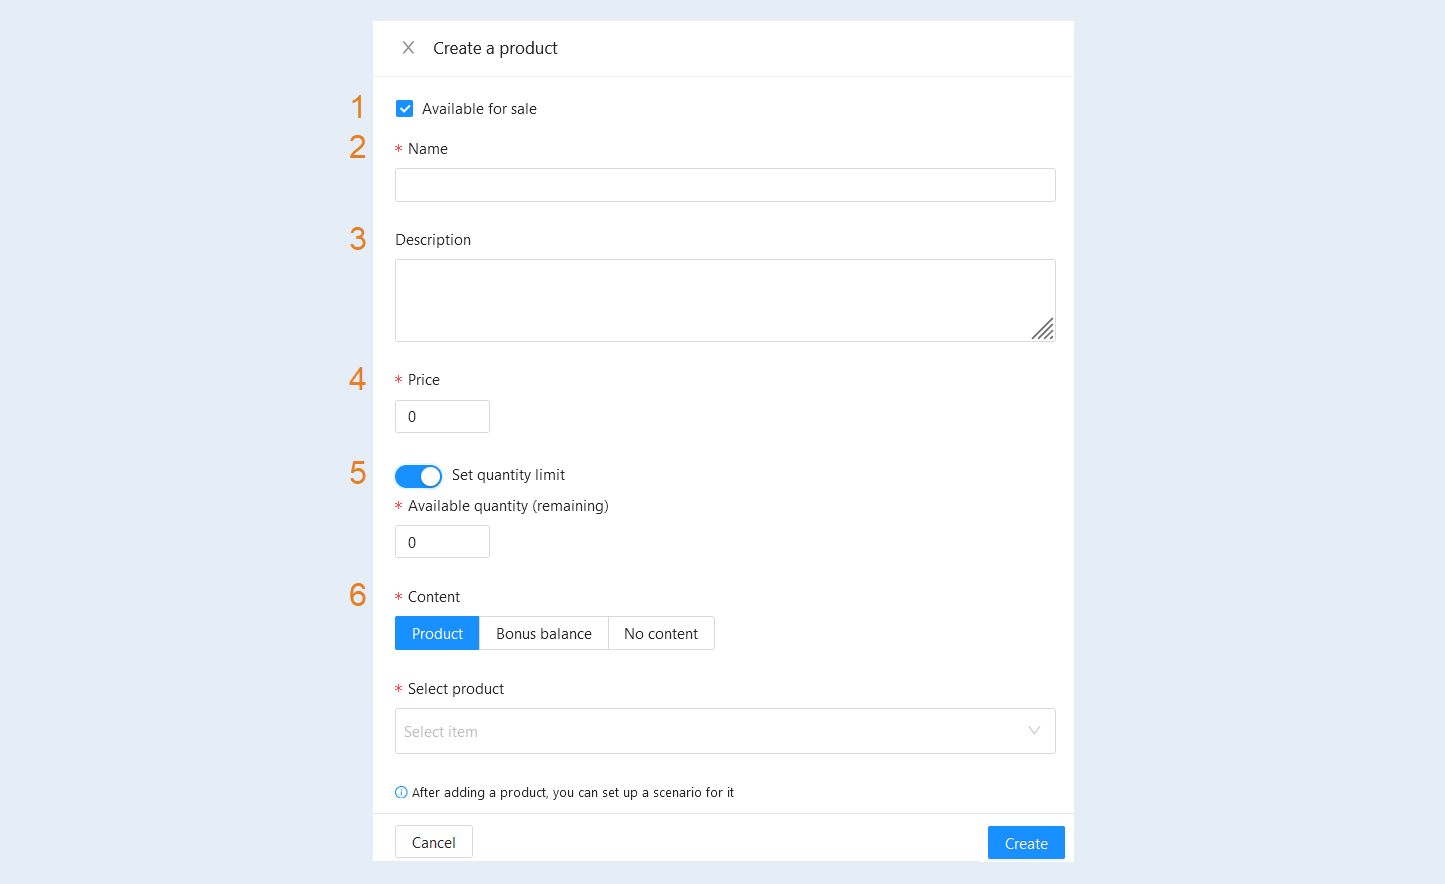
In the opened window, fill in the fields:
- Available for sale. Check the box to make the item available for purchase by users with points.
Name. Specify the item title.
Description. Add a brief description of the item. This description will be shown to users.
Price. Each item in the point shop has its own price in points. Users can choose which item or privilege they want to purchase based on the number of accumulated points. Specify the price of the item in points.
Set quantity limit. You can determine the maximum number of items that can be sold. Limiting the quantity of goods applies to all users. That is, for example, a limit of 15 products for all users collectively, not 15 products each individually.
This can be useful to limit demand and ensure a fair distribution of the item among buyers. For example, the first 10 people will be able to purchase this item. In the user's personal account, the available quantity of items will be indicated.Content. Choose the type of item:
- Product. Choose "Product" to grant the user access to the selected product after purchasing the item. Select a product from the list below.
Bonus balance. Choose this option to add a specified amount to the user's bonus account after the item is purchased. Specify the replenishment amount below.
No content. No content items can include services like consultations, offline meetings, etc. Set up a scenario to provide such items.
- Product. Choose "Product" to grant the user access to the selected product after purchasing the item. Select a product from the list below.
Click the "Create" button. After adding the item, you can configure a scenario for it. For more information on creating scenarios, refer to the "Scenarios" article.
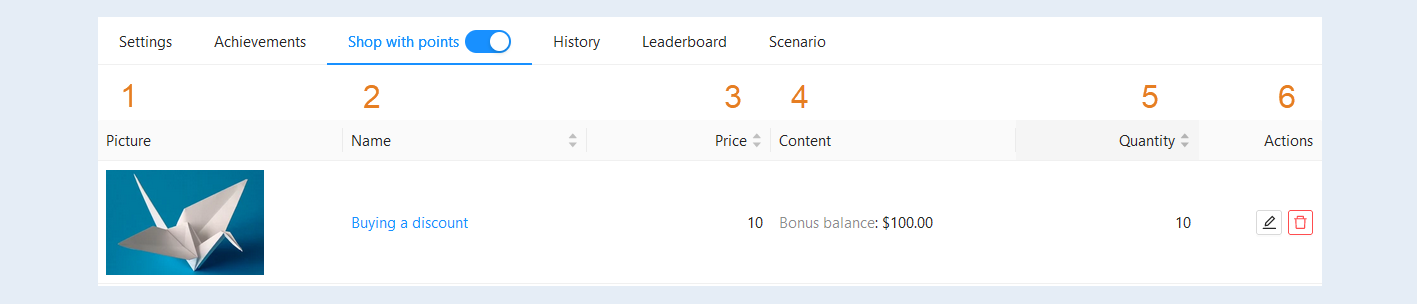
After creating a new product, it will appear in the list. Here you can see the following information:
Picture. The image of the product is displayed.
Name. The name of the product is indicated. Click on the name to open the product card.
Price. The price of the product is indicated in points.
Content. The type of product that a user will receive after purchasing is shown: access to the product, bonus points credited, or a product without content.
Quantity. The limitation on the number of sales for this product is shown.
Actions. Here you have access to the following buttons:
- "Edit" button. Click to make changes to the product.
"Delete" button. Click to delete the product.
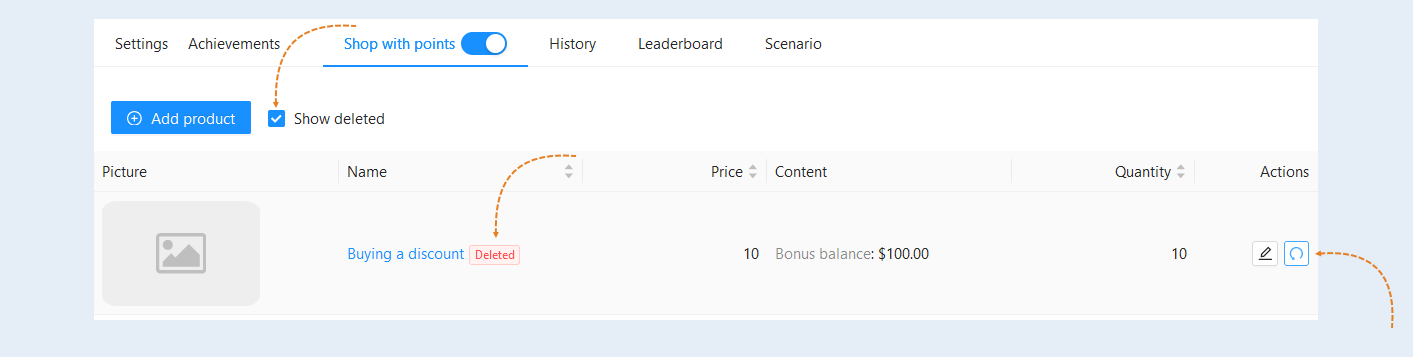
To view all previously deleted products, check the "Show deleted" box. The list will display products marked as "Deleted". You can restore a deleted product by clicking the "Restore" button in the "Actions" column.
To view the details of a product, click on its name in the list. In the opened window, you can modify the basic settings of the product.
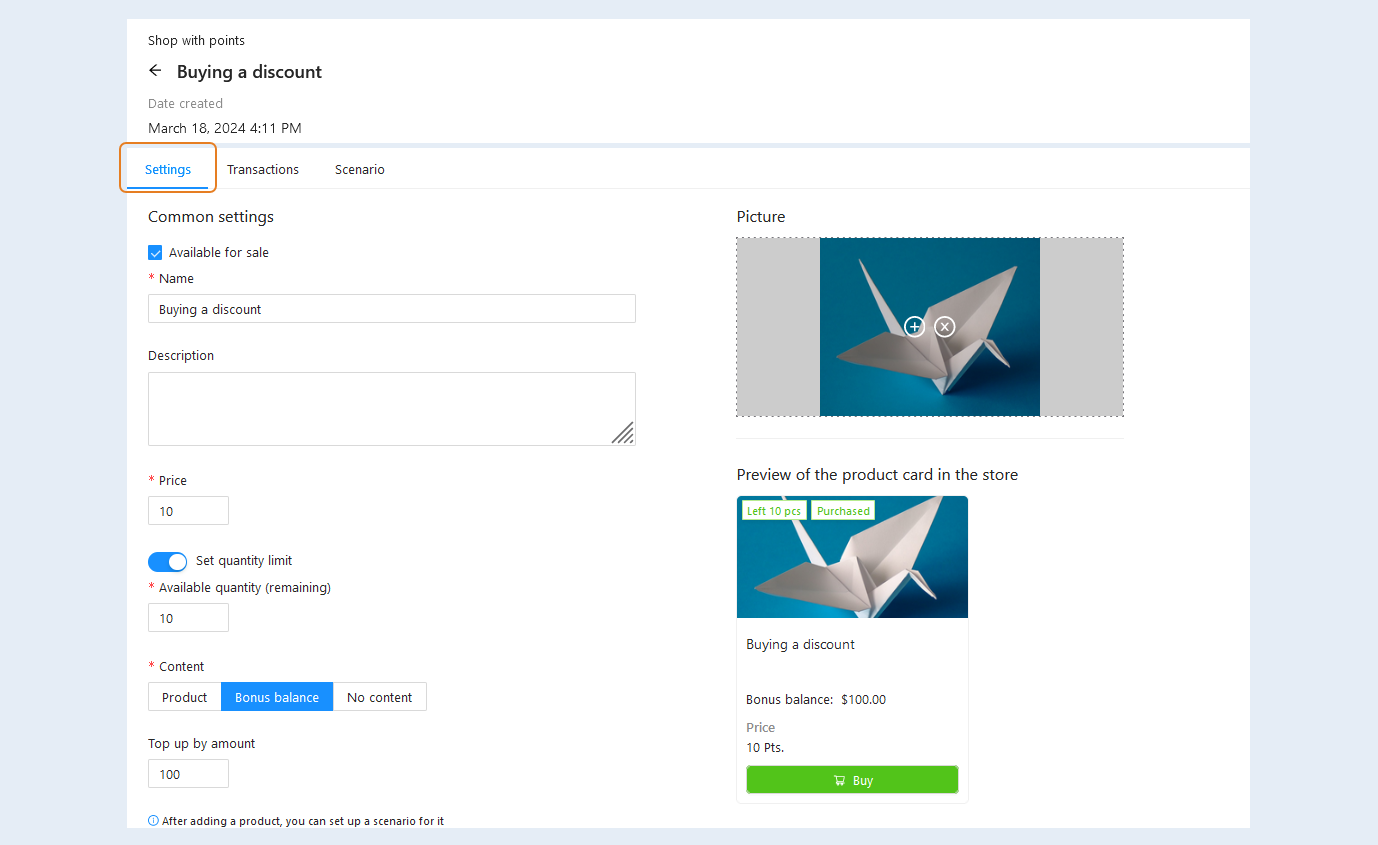
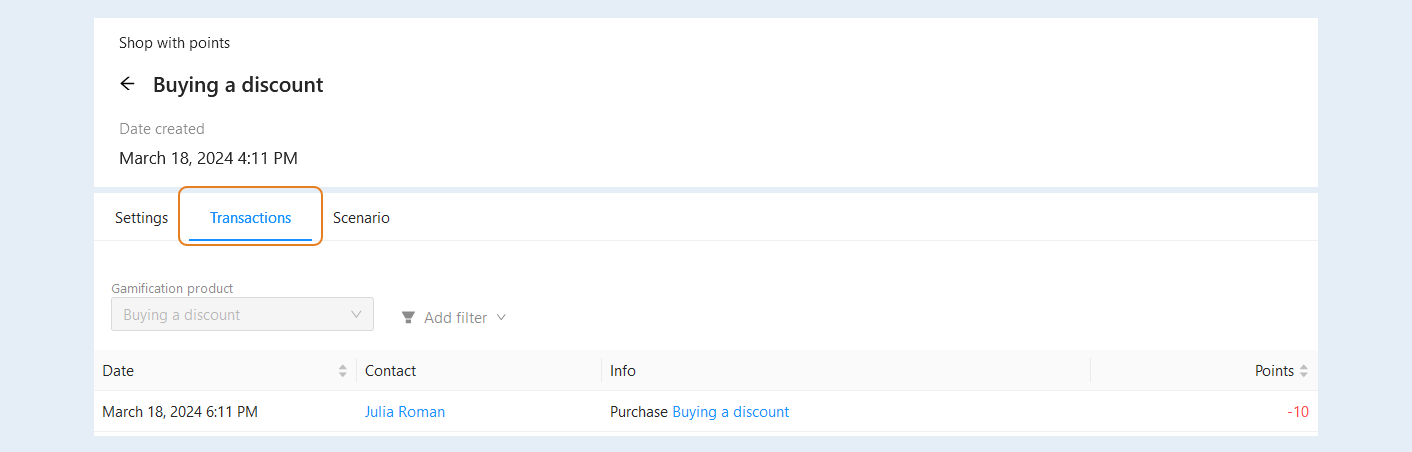
In the "Transactions" tab, you can see a list of all transactions for this product.
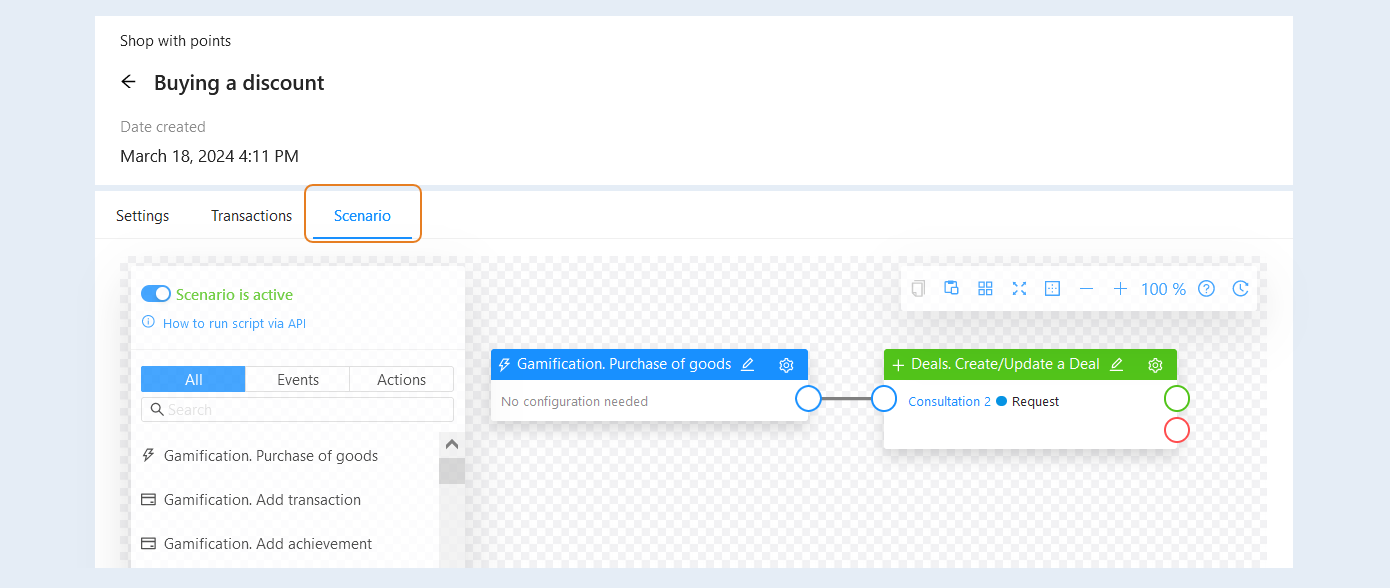
In the "Scenario" tab, you can configure the scenario for purchasing this product.
To go back to the list of products, click the "Back" button.

History
In the "History" tab, you can see a list of all transactions for earning and deducting points. The table displays the following information:
- Date. The exact date and time of the transaction.
Contact. The contact associated with the transaction is displayed.
Info. The type of transaction and its main information are indicated.
Points. The number of points deducted or earned is shown.
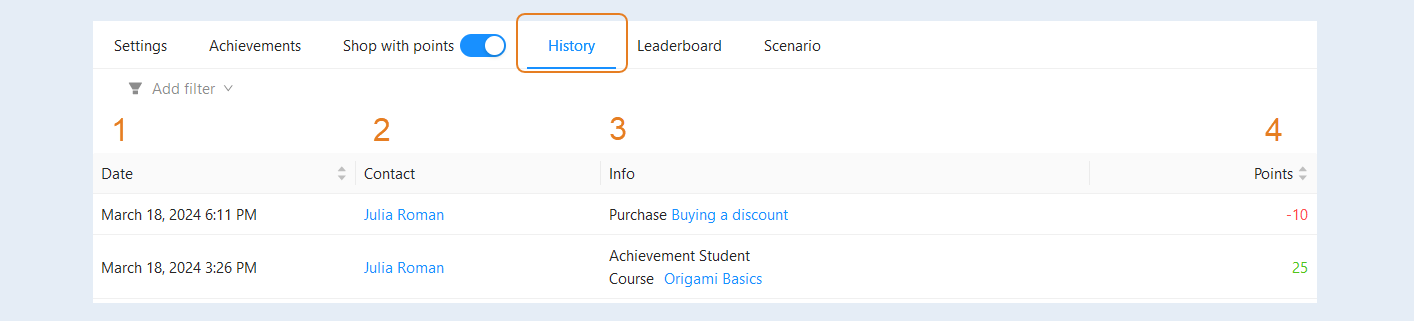
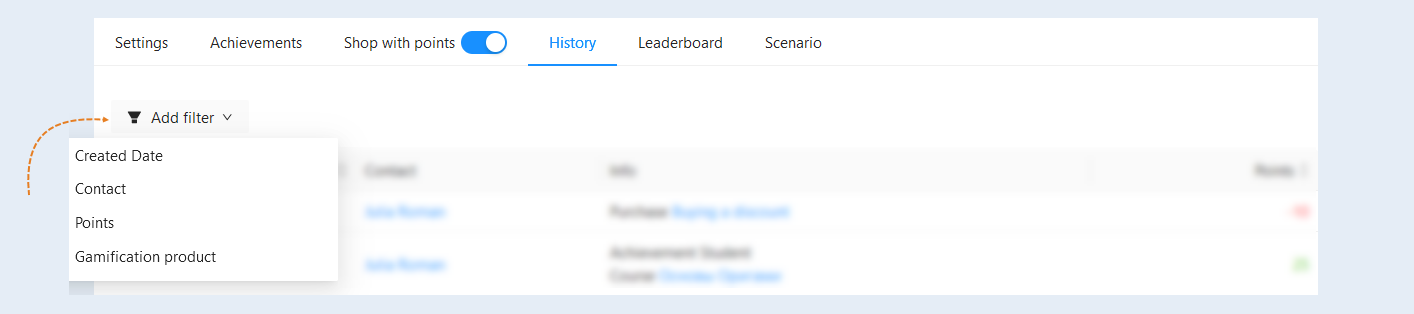
At the top of this section, there is a filter available. Use it to quickly search for a specific action in the history. Click the "Add filter" button and select a filter condition from the list:
Created Date. This condition highlights actions that were performed on specific dates. Select a date range.
Contact. This condition highlights transactions related to the selected contact. You can choose one or multiple contacts from the list.
Points. This condition highlights transactions made within a selected points range.
Gamification product. This condition highlights transactions related to the selected product.
Leaderboard
In the "Leaderboard" tab, a list of all participants in the system is displayed, along with their ratings and leadership positions. The leaderboard table shows:
Place. The ordinal number of the leader's position is indicated.
Achievements. The list of the leader's achievements is shown.
Contact. The user's contact is indicated. Click on the name to go to the user's contact card.
Total Points. The total number of earned points is displayed.
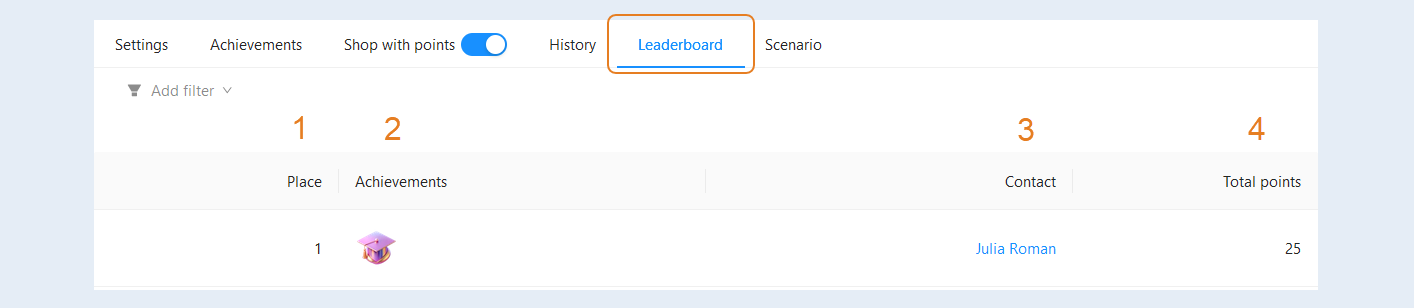
At the top of this section, there is a filter available. Use it to quickly search for a specific leader. Click the "Add filter" button and select a filter condition from the list:
- Contact. Choose a contact from the suggested list. You can select one or multiple contacts.
Number of points. This condition highlights leaders who earned a specific total points range.

Scenario
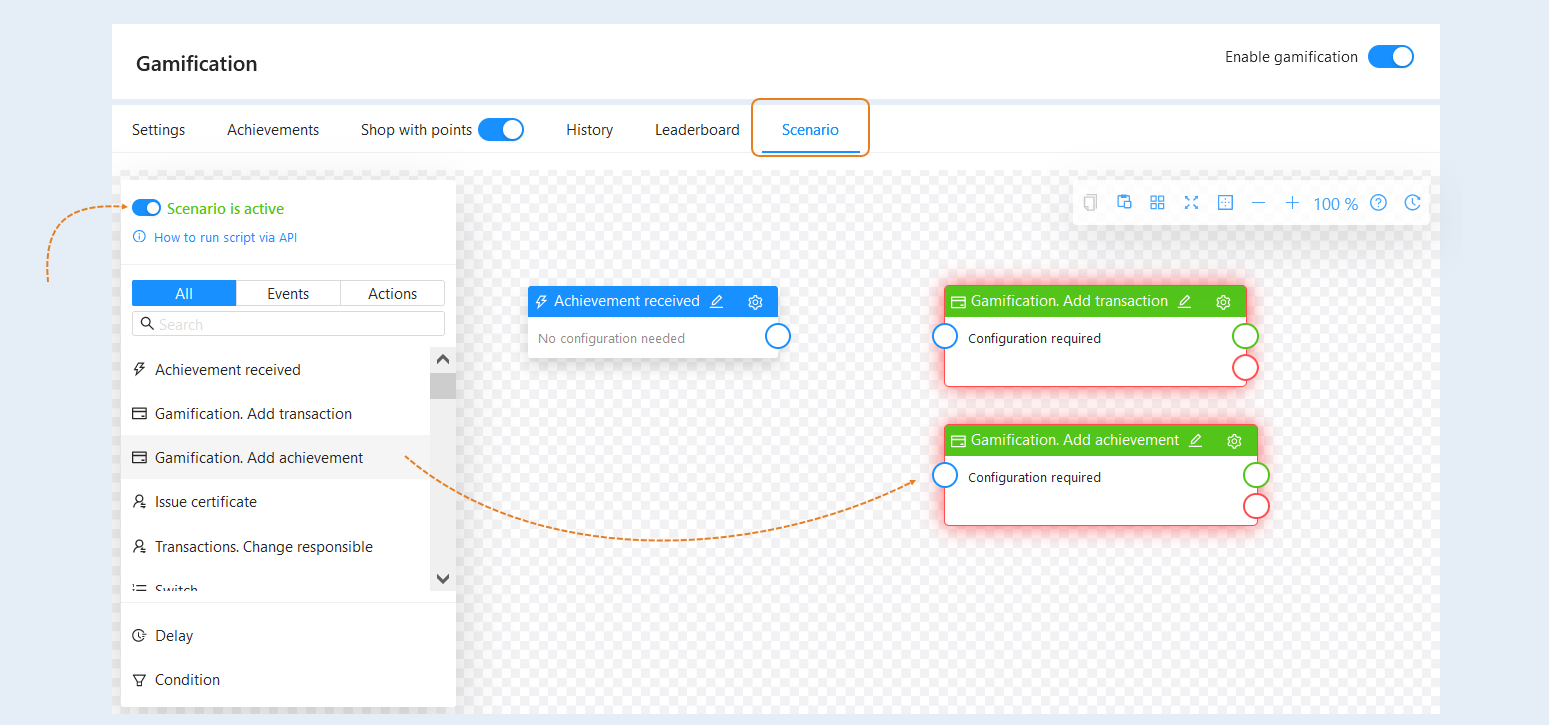
In this section, you can automate processes and configure the sequence of events and actions for achieving goals. You can learn more about creating a scenario in the "Scenarios" article.
To activate a scenario, switch the "Scenario active" slider to the "Enabled" position.
View of the section in the user's personal account
Note that gamification will be available in the user's dashboard if you have checked the "Enable gamification" option in the section settings. For more information about section settings, refer to the article above.
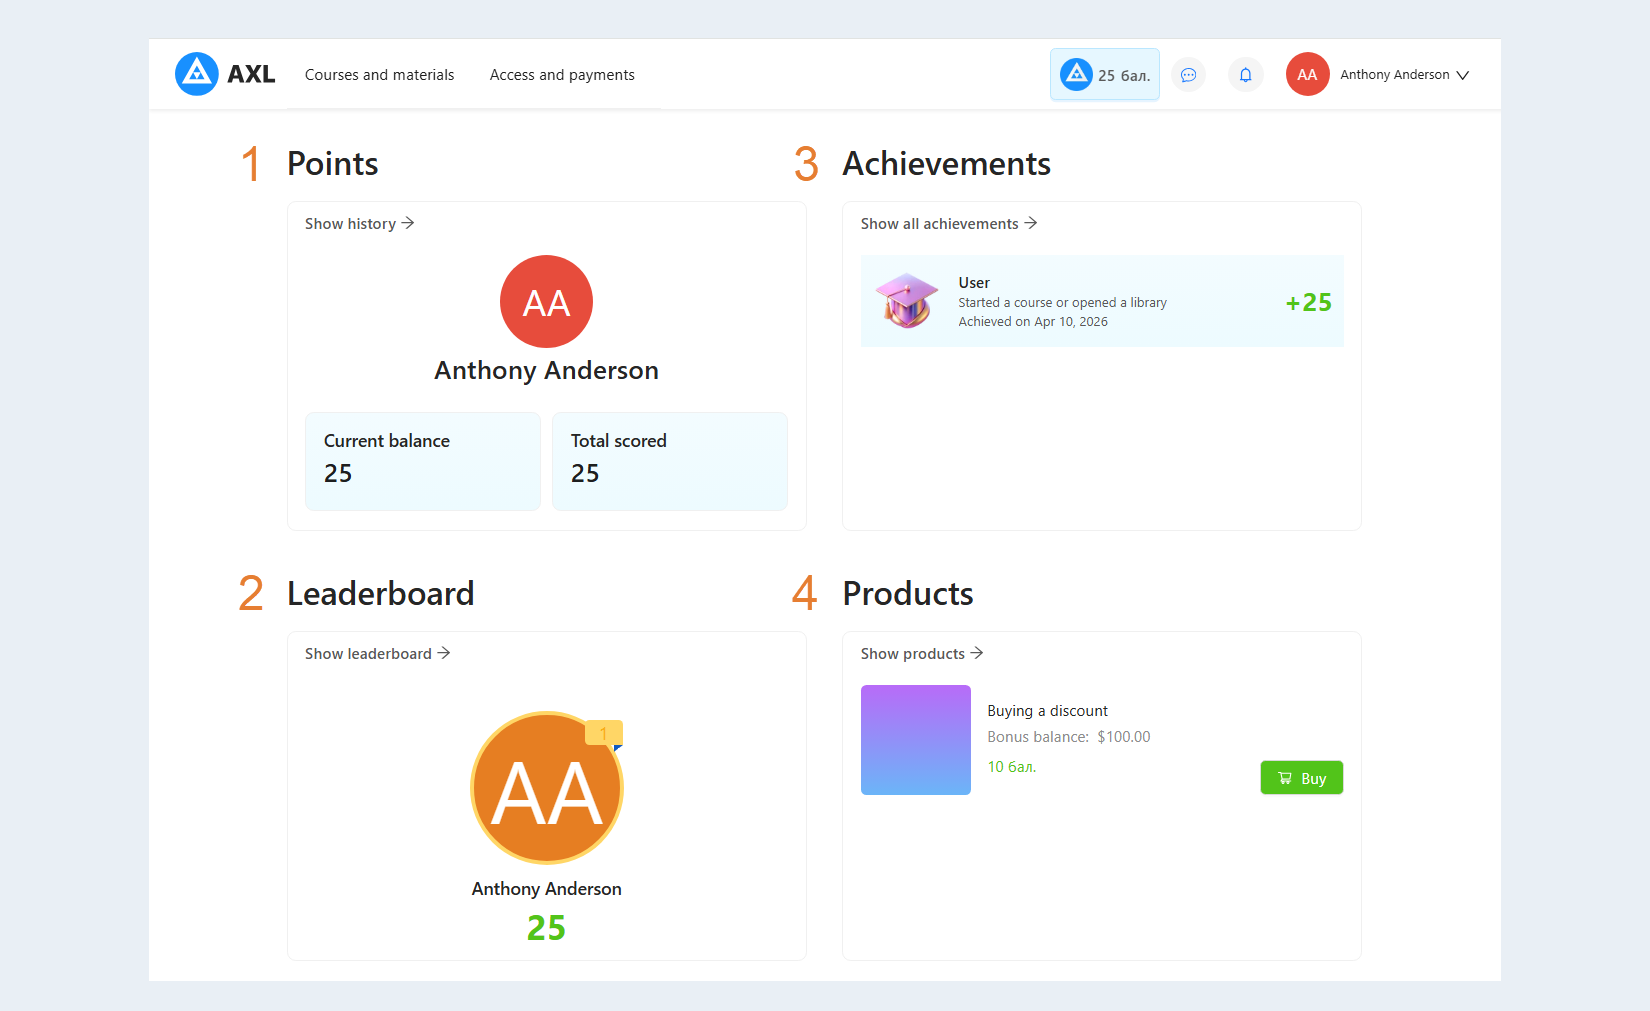
In the user's dashboard, the user sees the number of points earned for achievements in the top right corner. Clicking on the points icon opens a popup window with gamification details.
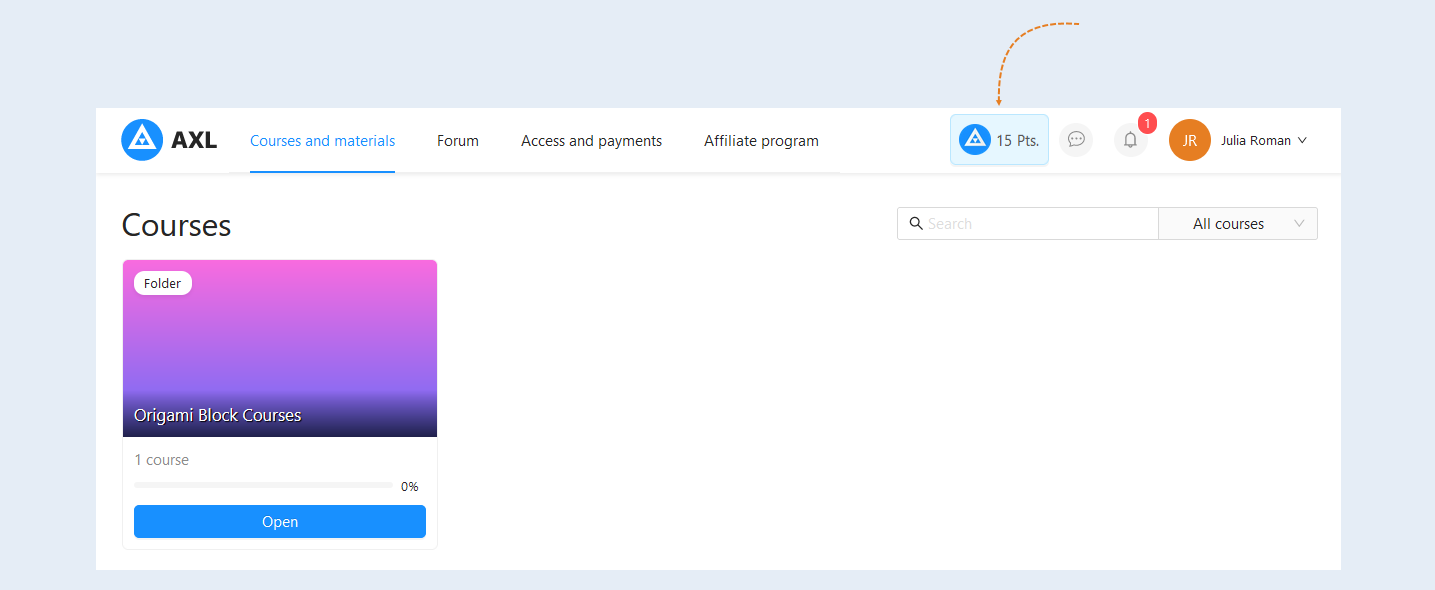
In this section, the user can see:
- Points. The current balance of points, the total number of earned points, and the history of point transactions.
Leaderboard. This section is displayed if the gamification settings have the "Leaderboard" slider set to active.
Achievements. A list of all achievements earned by the user and the number of points awarded for each achievement.
Products. A list of available products is displayed. Users can choose which product they want to purchase based on their accumulated points. They can then make a purchase using their points as currency.