The "Scenarios" section will help automate funnel processes. The purpose of the scenario is to automate the processes of interaction with the clients of your online school. The script reacts to the manipulations of employees and customers inside the funnel and performs retaliatory actions.
In this article, we will consider in detail how to configure and automate the funnel.
1
Creating a funnel scenario
Go to the "CRM" section, the "Deals" tab. Create a new funnel or select an existing one. Read more about how to create a funnel in the article "Deals".
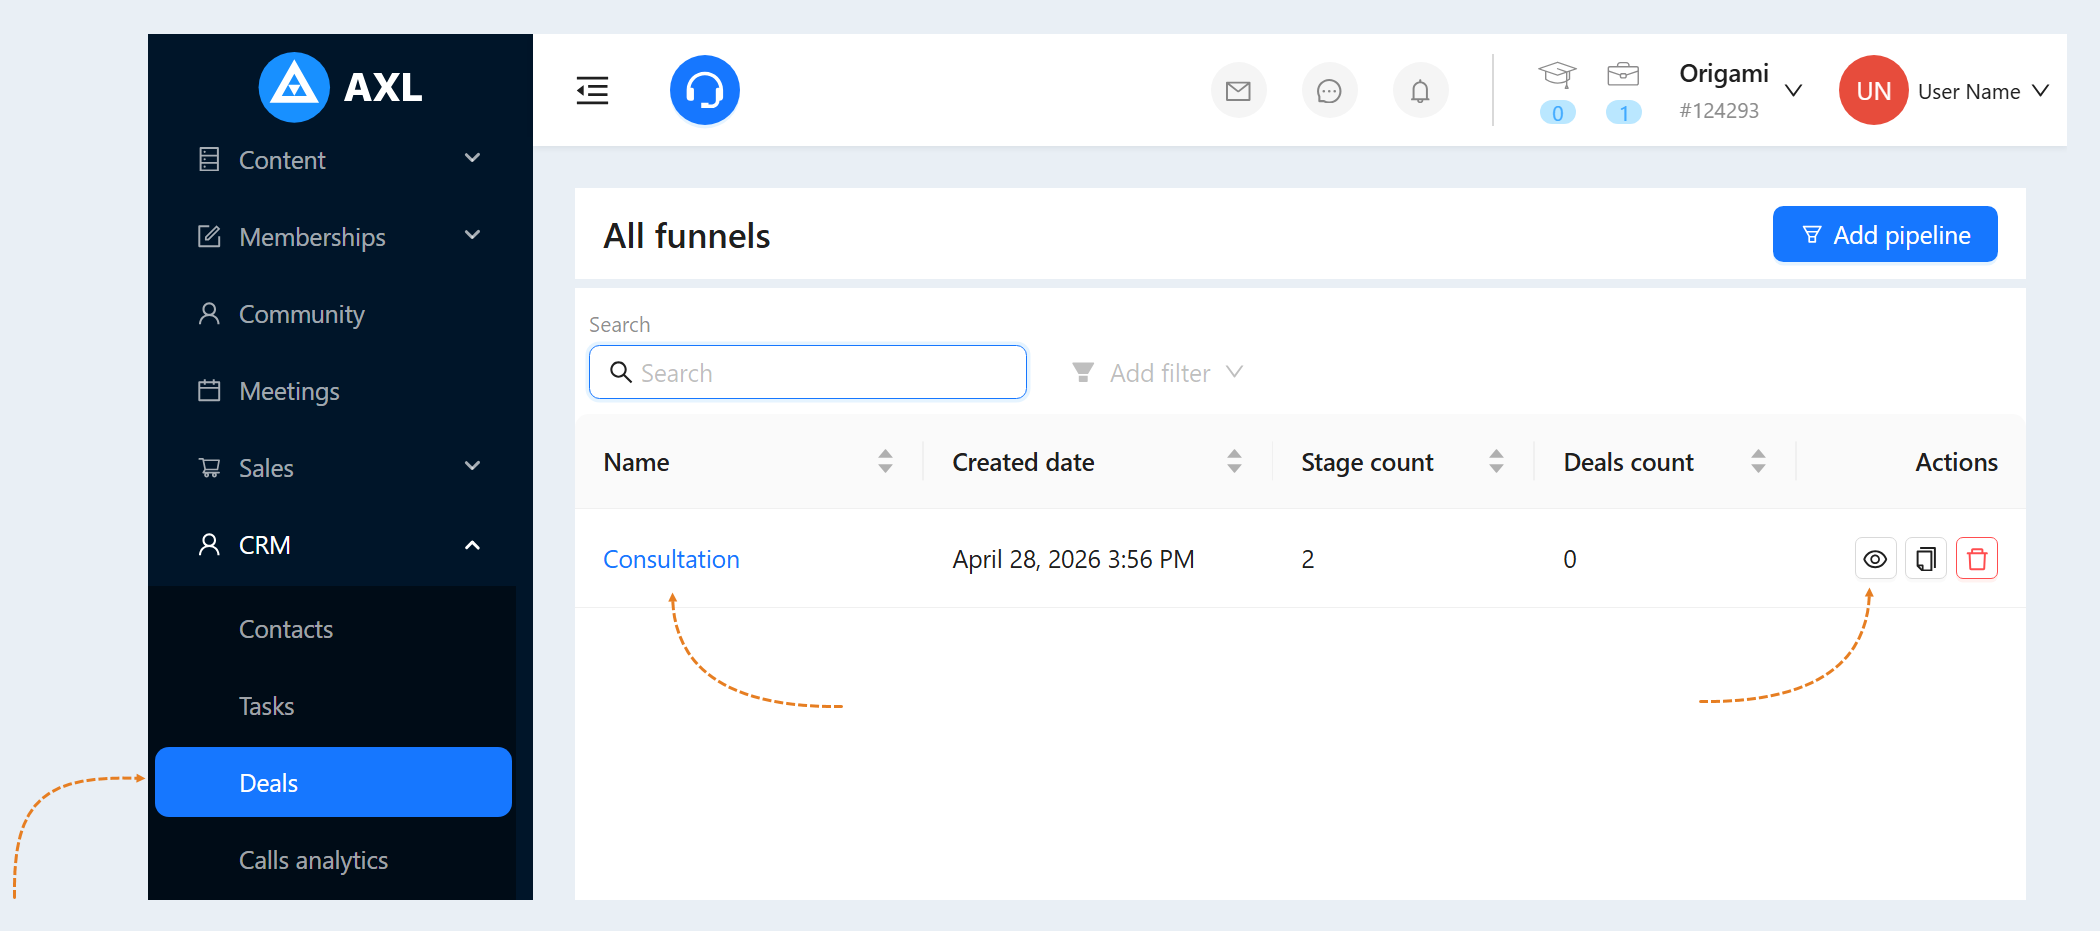
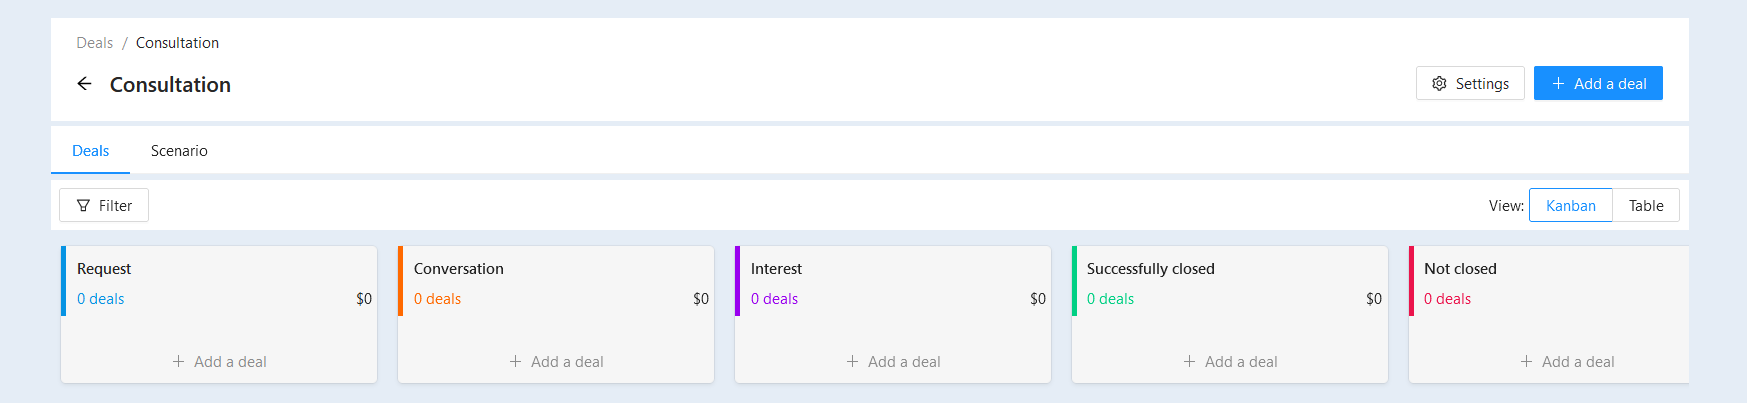
Make the necessary funnel settings and add the required number of funnel stages.
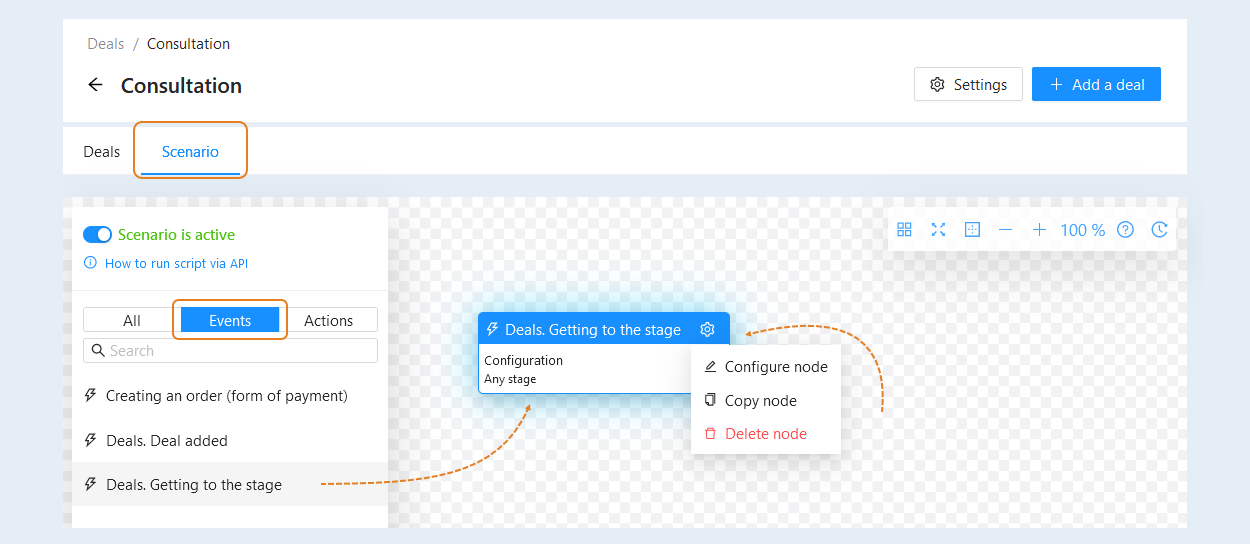
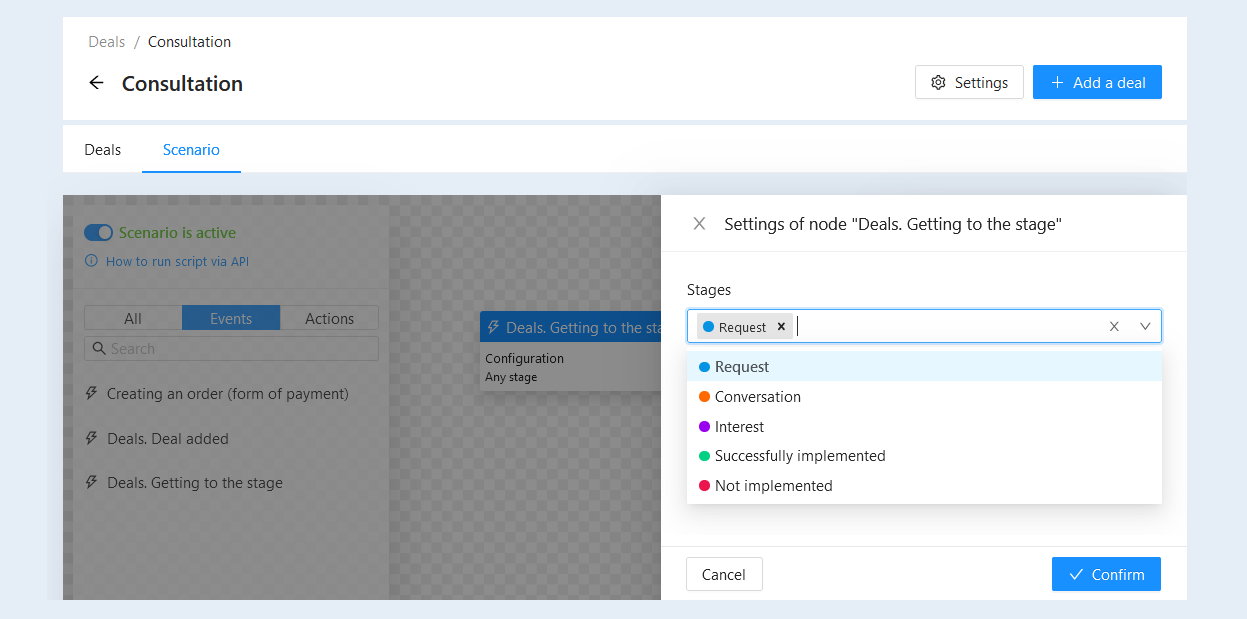
Next, open the "Scenario" tab. Select the "Deal. Getting to the stage" event and drag the event to the scenario field. For the event, you need to perform settings - configuration. Click on the "Settings" button and then the "Configure Node" button.
From the list, select the funnel stage that the deal falls into. Click the "Confirm" button.
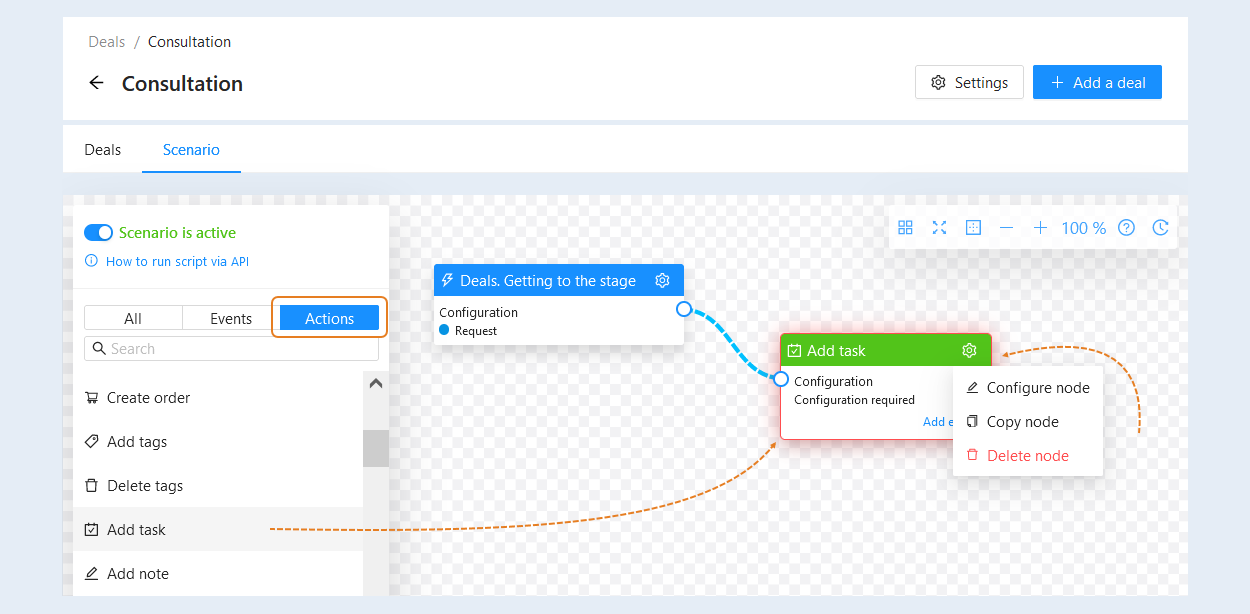
Next, open the "Actions" tab. Select the "Add Task" action and drag it to the scenario field. Connect the event and the action together.
For the action, you need to perform settings - configuration. Click on the "Settings" button and then the "Configure Node" button.
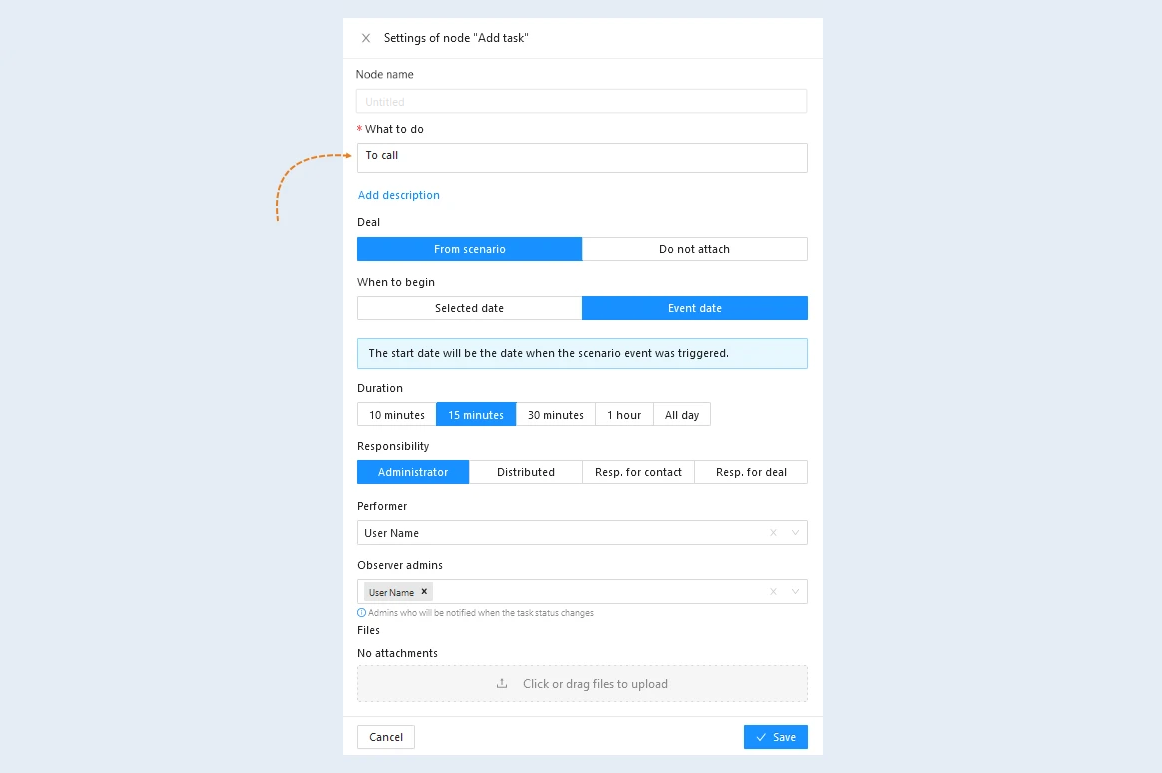
In the "Node Settings" field, fill in the fields:
Name node. Specify the name of the node, you can name the nodes in the script as you wish.
What to do. Specify the action to be performed when the deal hits the selected stage.
Add description. Click on the line to add a description of the task.
Deal. The deal can be added to the task from the scenario.
When to begin. Set the start date of the task manually or select the date of the event. In this case, the start date will be the date when the scenario event is triggered.
Duration. Specify the duration of the task.
Responsibility. Assign a responsible executor or distribute tasks among employees. You can also choose the person responsible for the contact by specifying the name of his position.
Observer admins. Assign an administrator-observer for the execution of this task, he will be notified of the change in the status of the task.
Files. Attach the necessary files to the task.
After completing the settings, click the "Save" button.
Add the required number of events and actions to your scenario. Now your script is ready. To activate the scenario, move the slider to the active position.
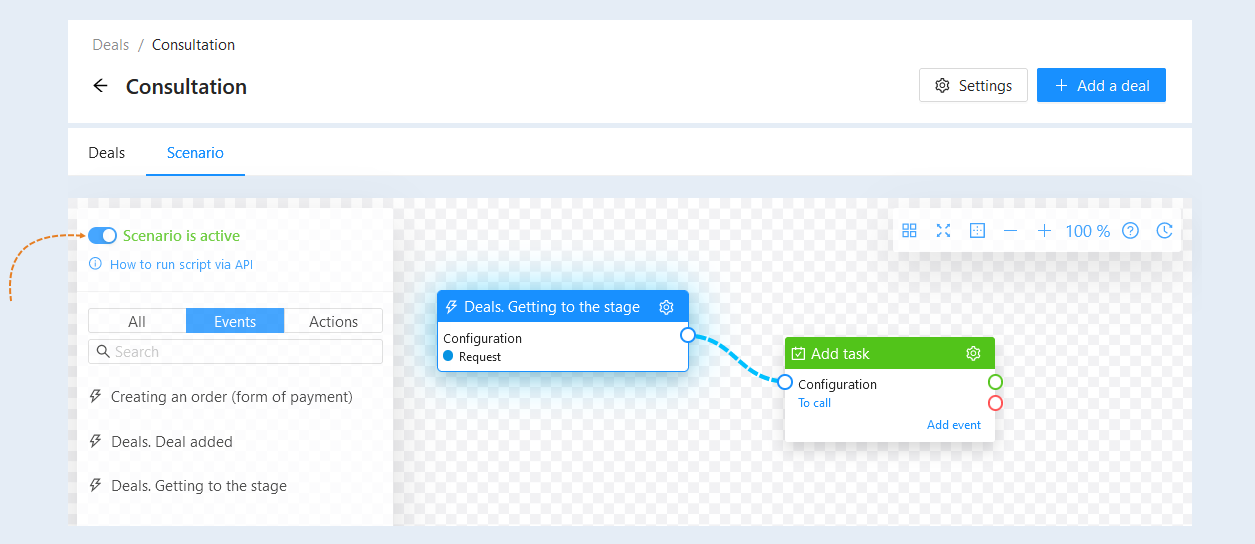
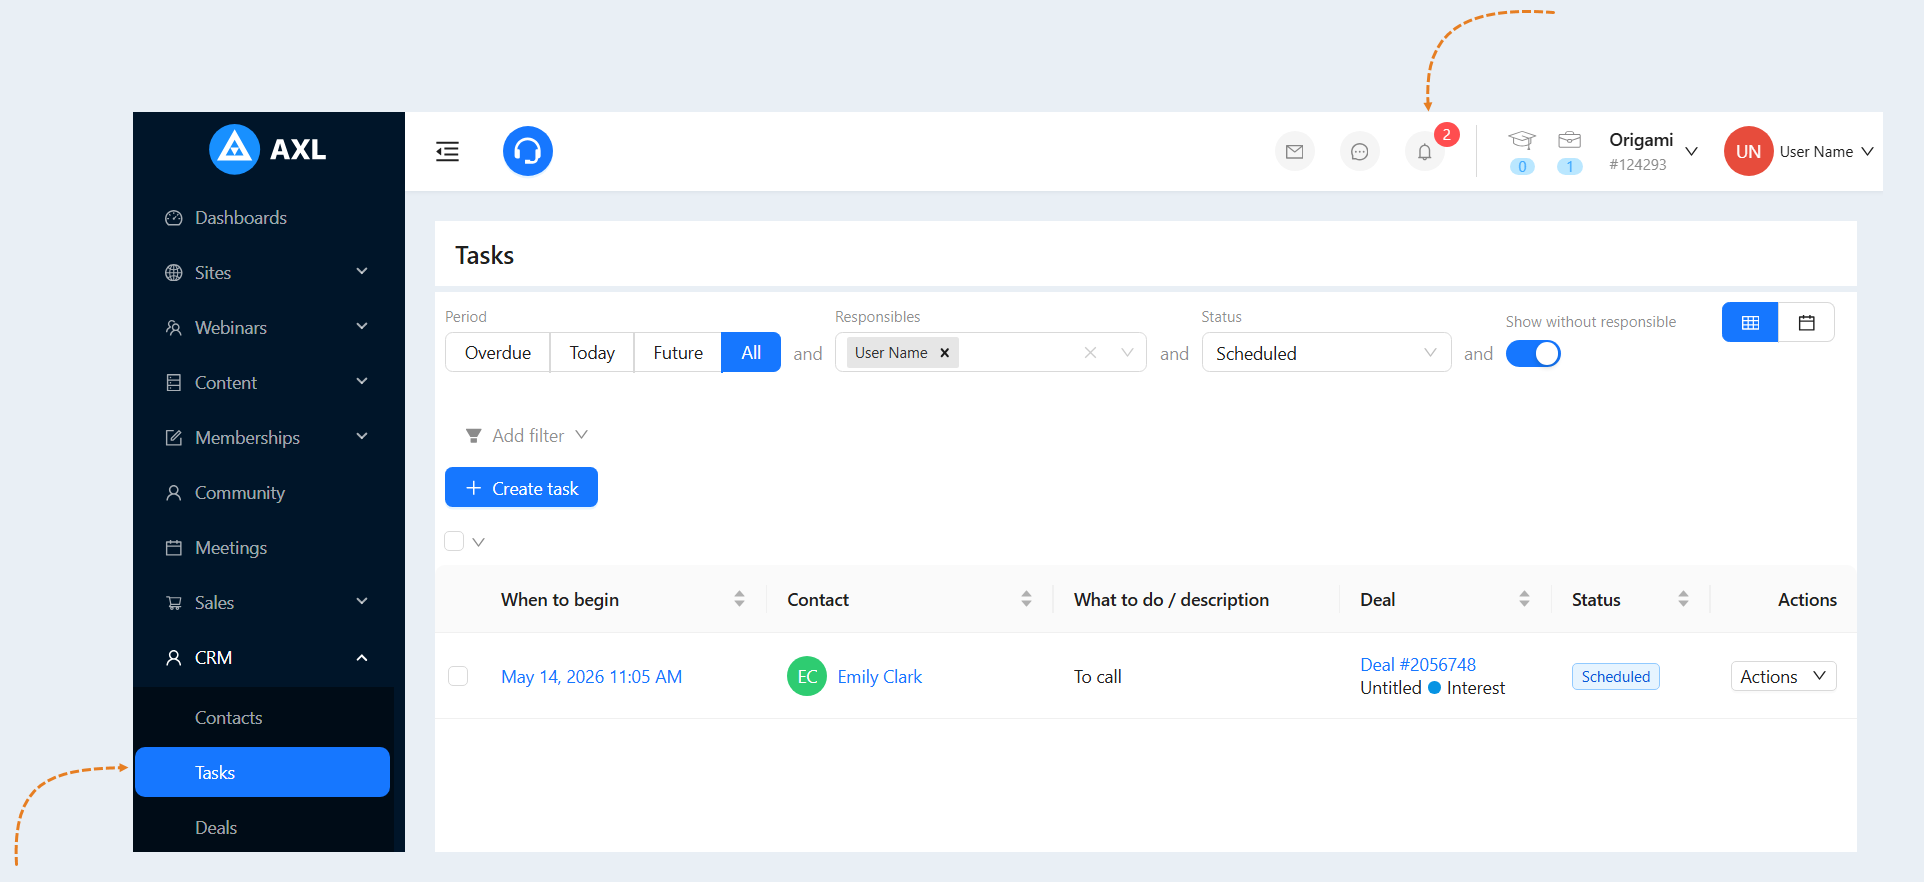
Thus, after the deal gets to the "Request" stage, the responsible employee will receive a new "Call" task. This task will be added to the task list, as well as the task will be displayed in notifications on the toolbar in the personal account of the school employee.
Creating a deal when submitting a form
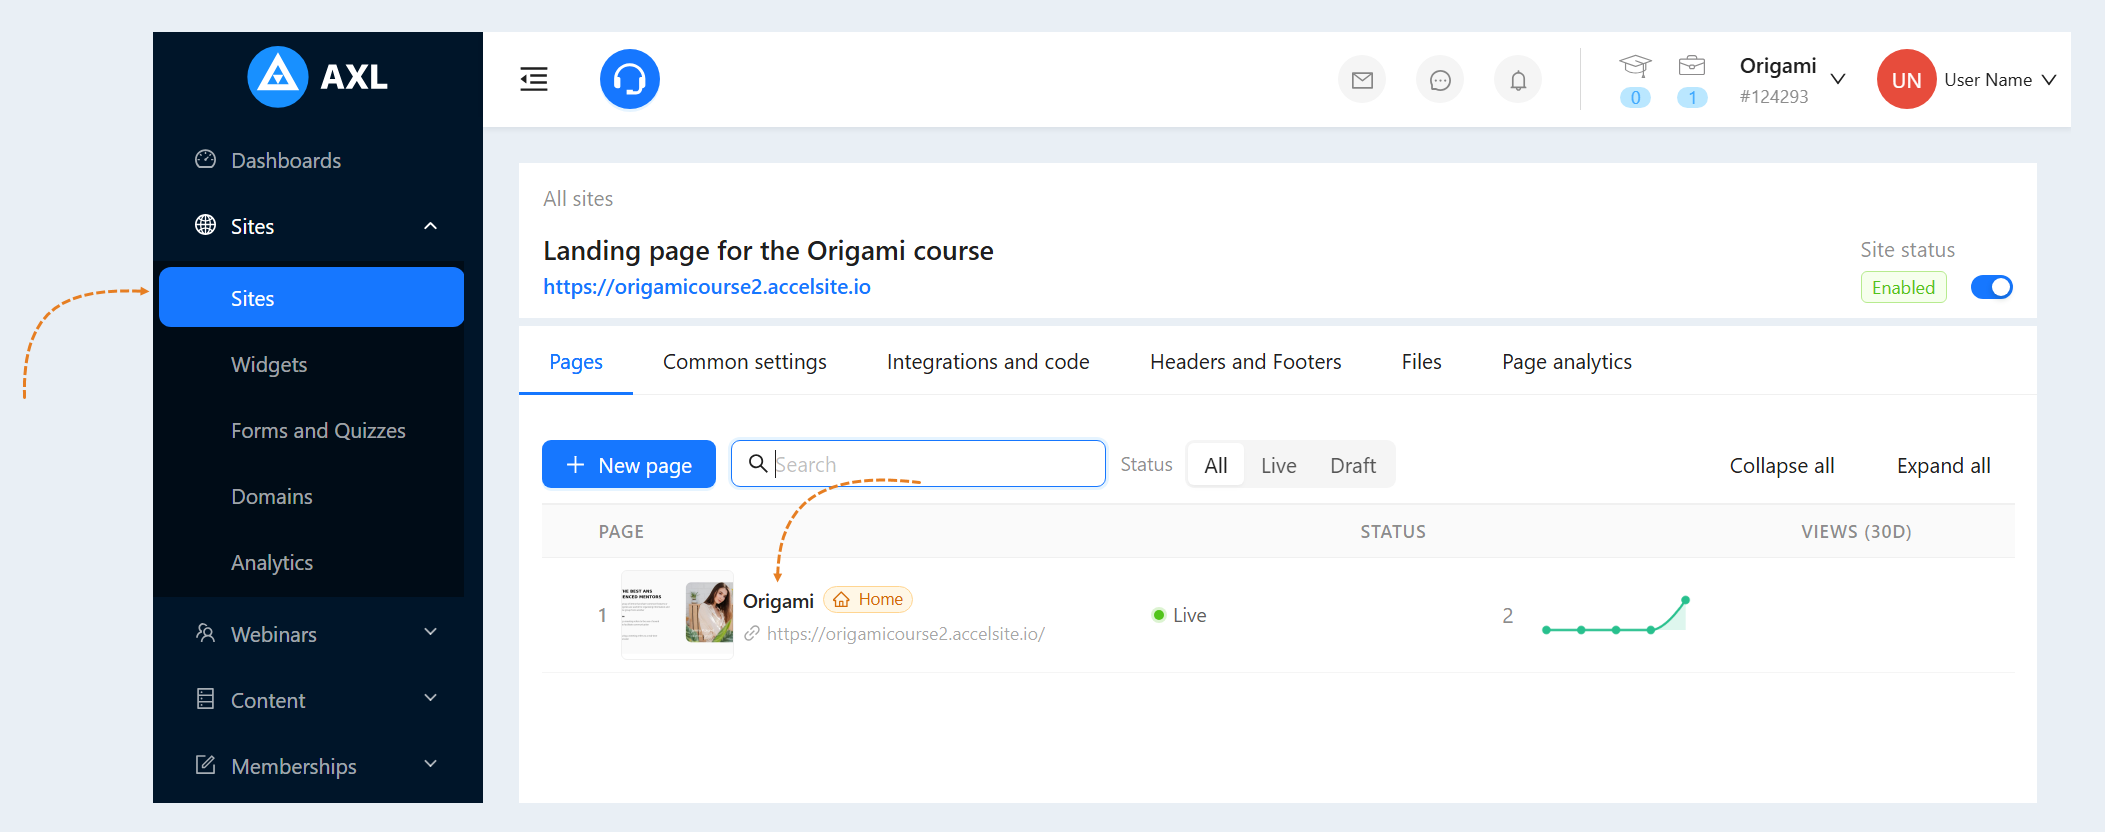
Go to the "Sites" section. Open a previously created site or create a new one. Read more about how to create a website in the article "How to create a website".
Next, in the "Pages" tab, select one of the created pages and click on the page name or the "Edit" button to open it.
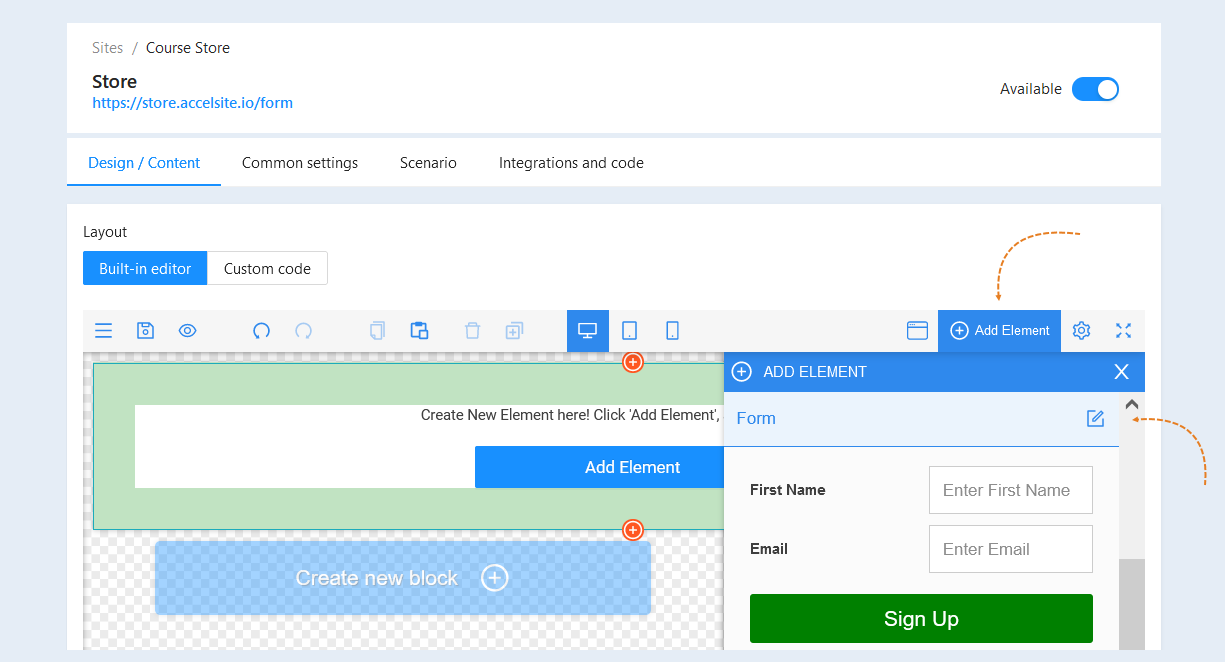
Open the site page. Click the "Add Element" button and add the "Form" element, drag the selected form into the page field. For more information on how to add elements to a site page, read the article "Elements".
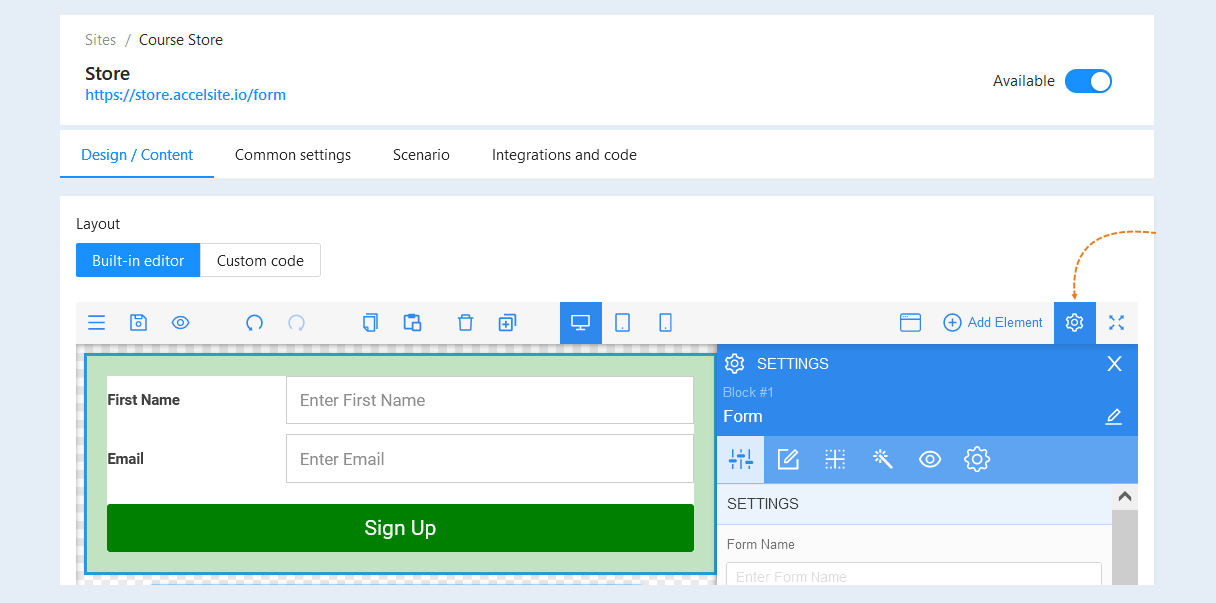
Select the entire form, the "Settings" panel of the element opens on the right. Make the necessary form settings. For more information about the form settings, read the article "Form Element".
Next, open the "Scenario" tab. Select the "Form Submitted" event and drag the event to the scenario field.
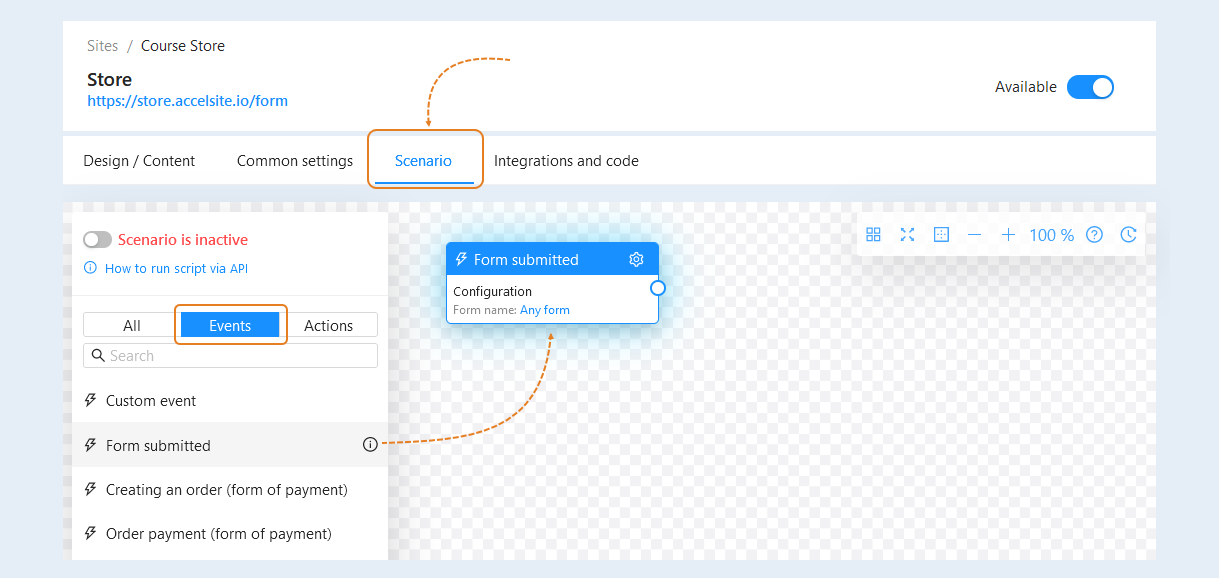
Next, open the "Actions" tab. Select the action "Deal. Add a Deal" and drag it to the scenario field. Connect the event and the action together.
For the action, you need to perform settings - configuration. Click on the "Settings" button and then the "Configure Node" button.
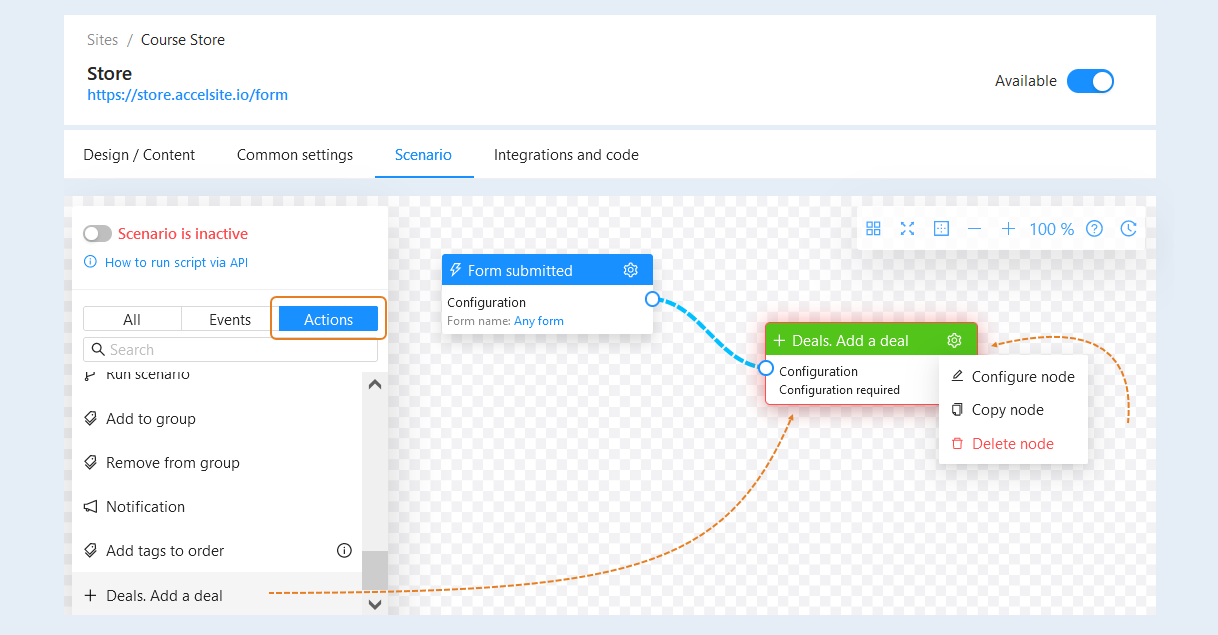
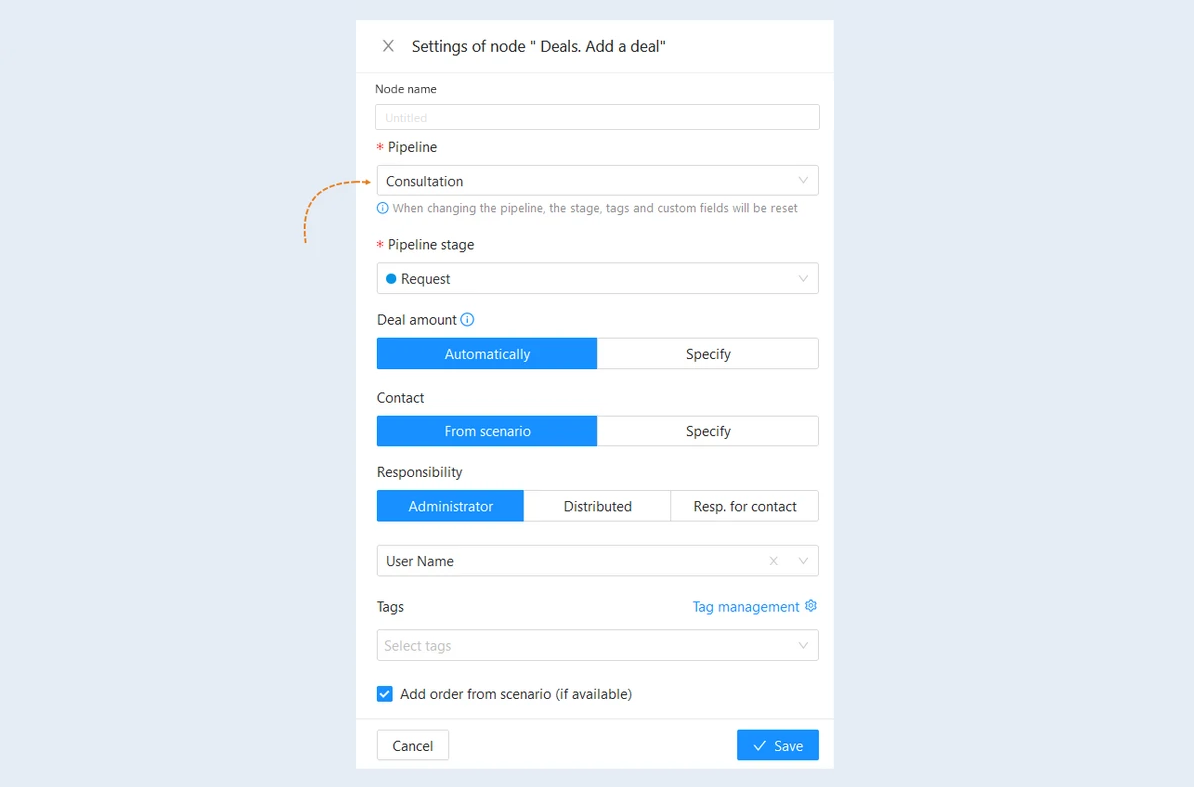
In the "Node Settings" window, fill in the fields:
Name node. Specify the name of the node, you can name the nodes in the script as you wish.
Pipeline. Select the funnel.
Pipeline stage. Specify the funnel stage to which the deal will be added after the user submits the form.
Deal amount. Specify the deal amount or select "Automatically". In this case, the amount will be automatically taken from the order that will be added to this deal. If there is no order in this scenario, the amount will be 0.
Contact. Specify the contact that will be displayed in the deal card. The contact can be taken from the scenario (the data entered when submitting the form) or the associated contact can be selected manually.
Responsibility. Assign a responsible employee to perform this task. You can choose one responsible administrator or distribute tasks among several employees. In this case, the deal will be assigned in turn between the selected team members. You can also choose the person responsible for the contact by specifying the name of his position.
Tags. Add tags to the deal. Click the Manage Tags button to find or create new tags.
Check the box "Add order from the scenario (if available)" so that the order from the scenario is added to the deal.
Click the "Save" button.
To activate the scenario, move the slider to the active position.
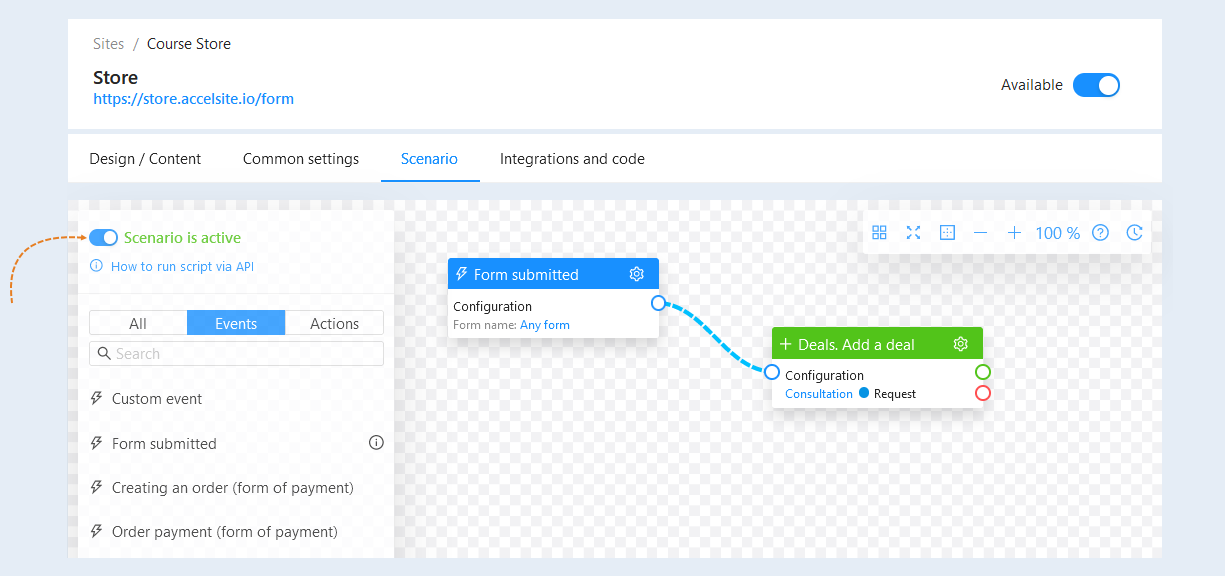
Thus, after the user fills out the form on the site page, a deal with the contact of this user will be added to the selected stage of the "Request" funnel.
And then the responsible employee will have a task to work with this deal. The scenario of creating a task for an employee is described in step №1 of this article.
Creating a deal when creating an order
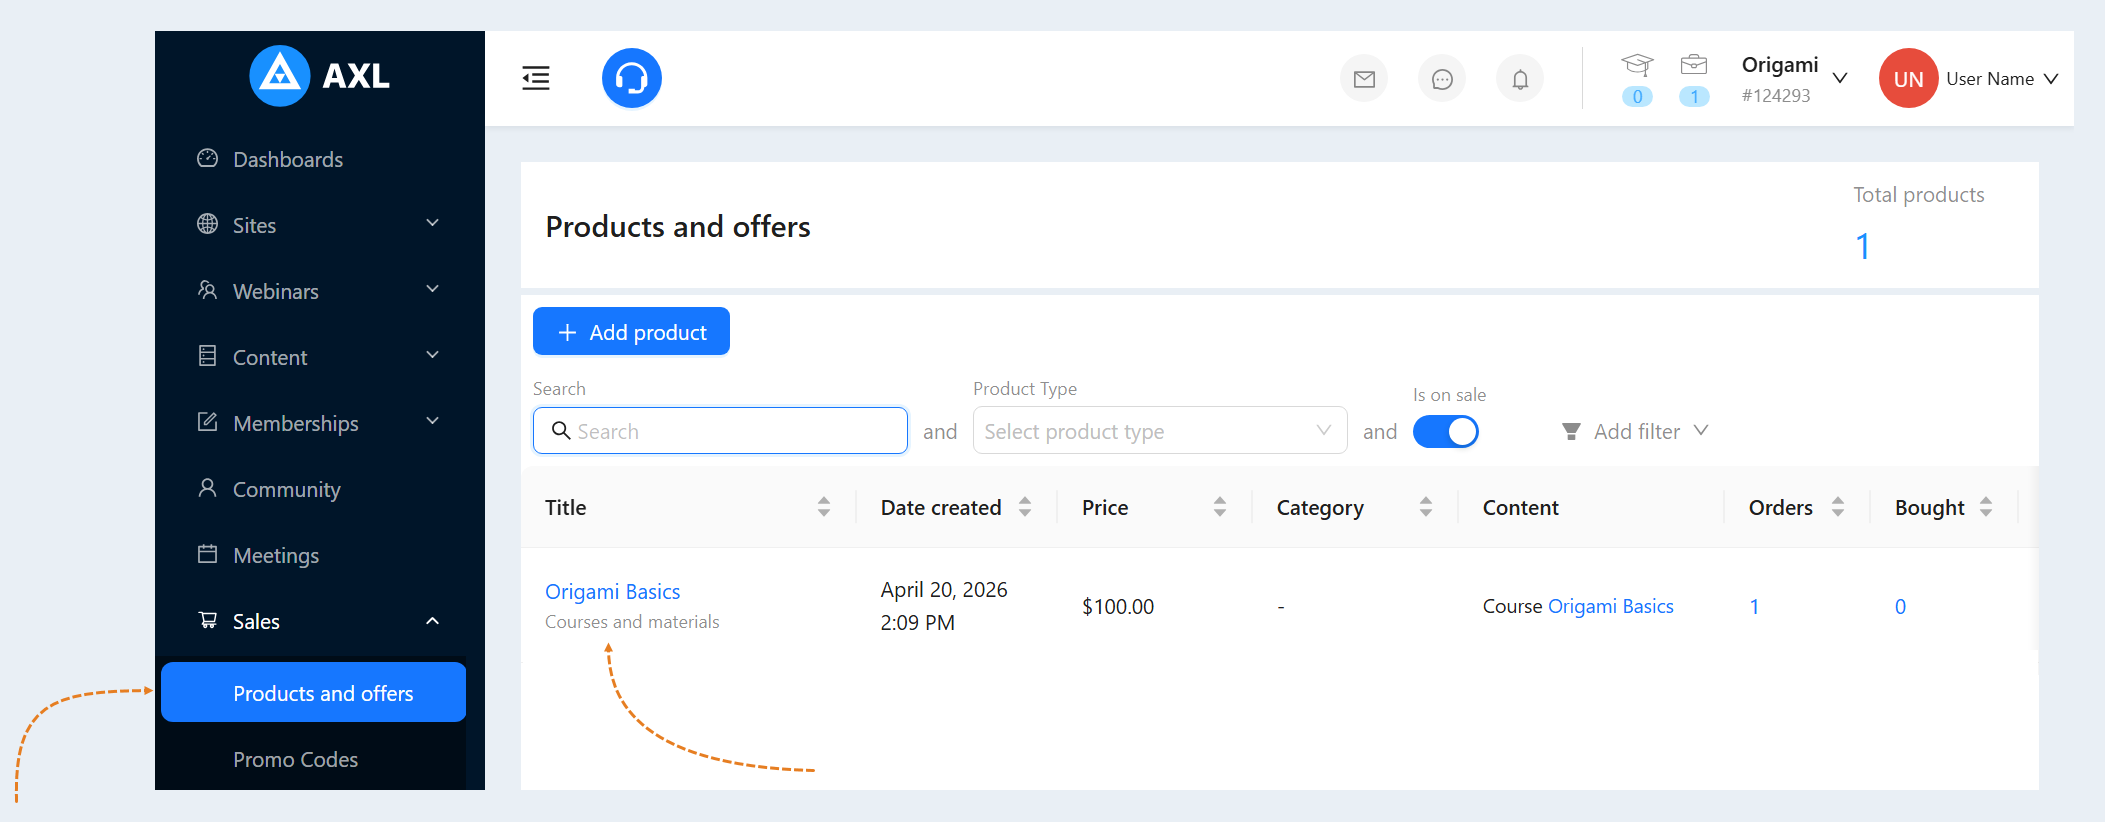
Go to the "Sales" section, the "Products and Offers" tab. Create a new product or select an existing one. Read more about how to create a product in the article "Products and offers".
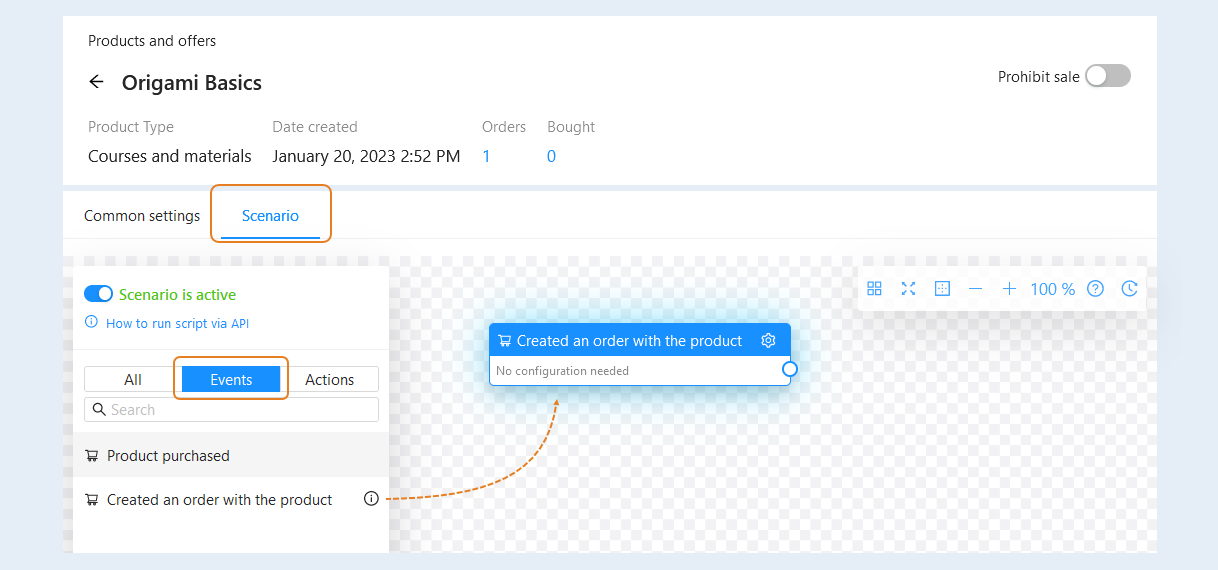
Next, go to the "Scenario" tab. Select the "Product Order Created" event and drag the event to the scenario field.
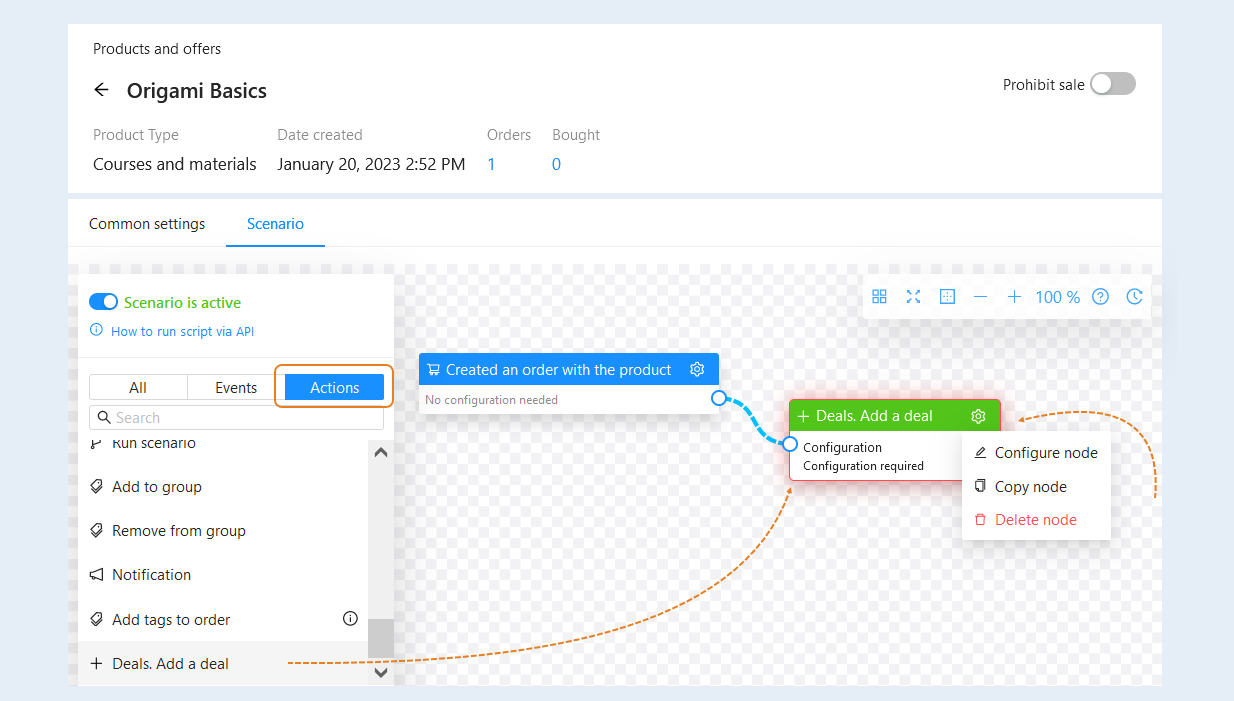
Next, open the "Actions" tab. Select the action "Deal. Add a Deal" and drag it to the scenario field. Connect the event and the action together.
For the action, you need to perform settings - configuration. Click on the "Settings" button and then the "Configure Node" button.
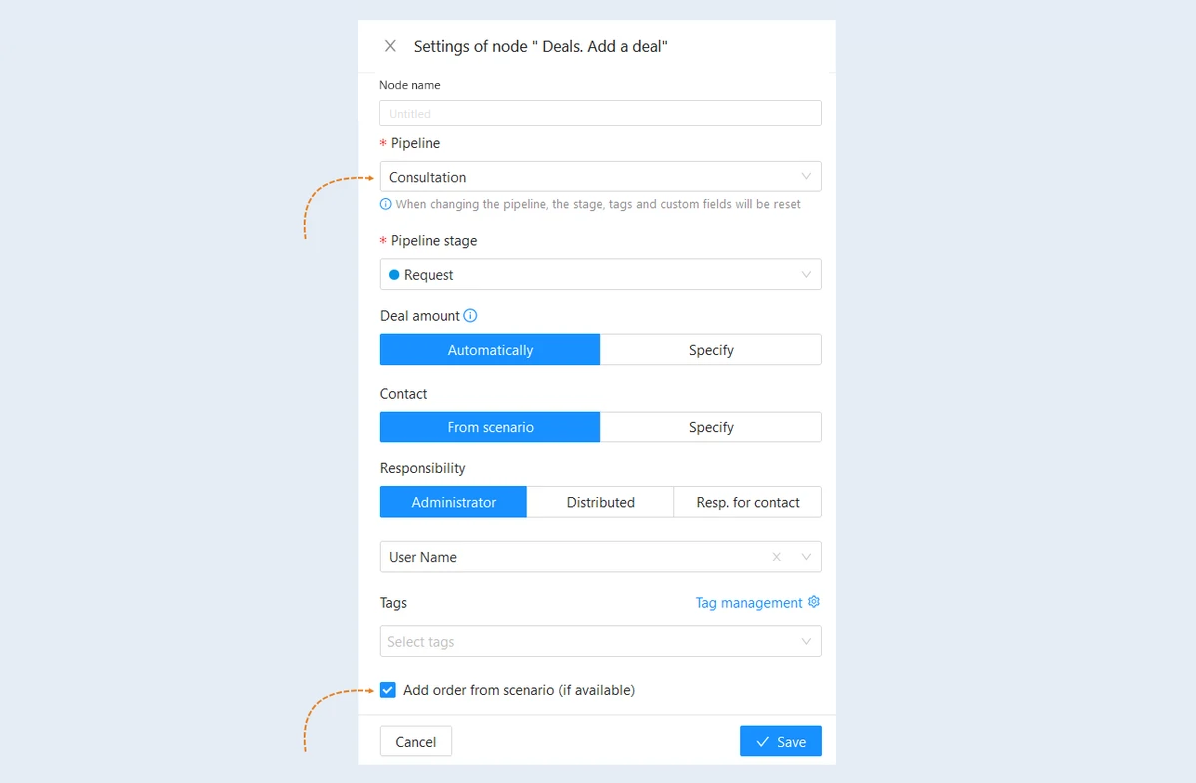
In the "Node Settings" window, fill in the fields:
Name node. Specify the name of the node, you can name the nodes in the script as you wish.
Pipeline. Select the funnel.
Pipeline stage. Specify the funnel stage to which the deal will be added after the order is created.
Deal amount. Specify the deal amount or select "Automatically". In this case, the amount will be automatically taken from the order that will be added to this deal.
Contact. Specify the contact that will be displayed in the deal card. The contact can be taken from the scenario (the data entered when submitting the form) or the associated contact can be selected manually.
Responsibility. Assign a responsible employee to perform this task. You can choose one responsible administrator or distribute tasks among several employees. In this case, the deal will be assigned in turn between the selected team members. You can also choose the person responsible for the contact by specifying the name of his position.
Tags. Add tags to the deal. Click the Manage Tags button to find or create new tags.
Check the box "Add order from the scenario (if available)" so that the order from the scenario is added to the deal.
Click the "Save" button.
Thus, when creating an order with a product, a deal will be automatically added to the selected stage of the funnel. And then the responsible employees will have a task to work with this deal.
In the funnel, you can track all the actions of employees on this order, up to the payment of the order. If, when creating the funnel, you ticked "Automatically transfer the deal to "Successfully implemented" after paying for all orders in it," then after paying for all orders, the deal will automatically get to the "Successfully implemented" stage.
Creating a deal at the end of the webinar
Go to the "Webinars" section. Create a new webinar or select an existing one. Read more about how to create a webinar in the article "How to conduct a webinar? Brief instructions".
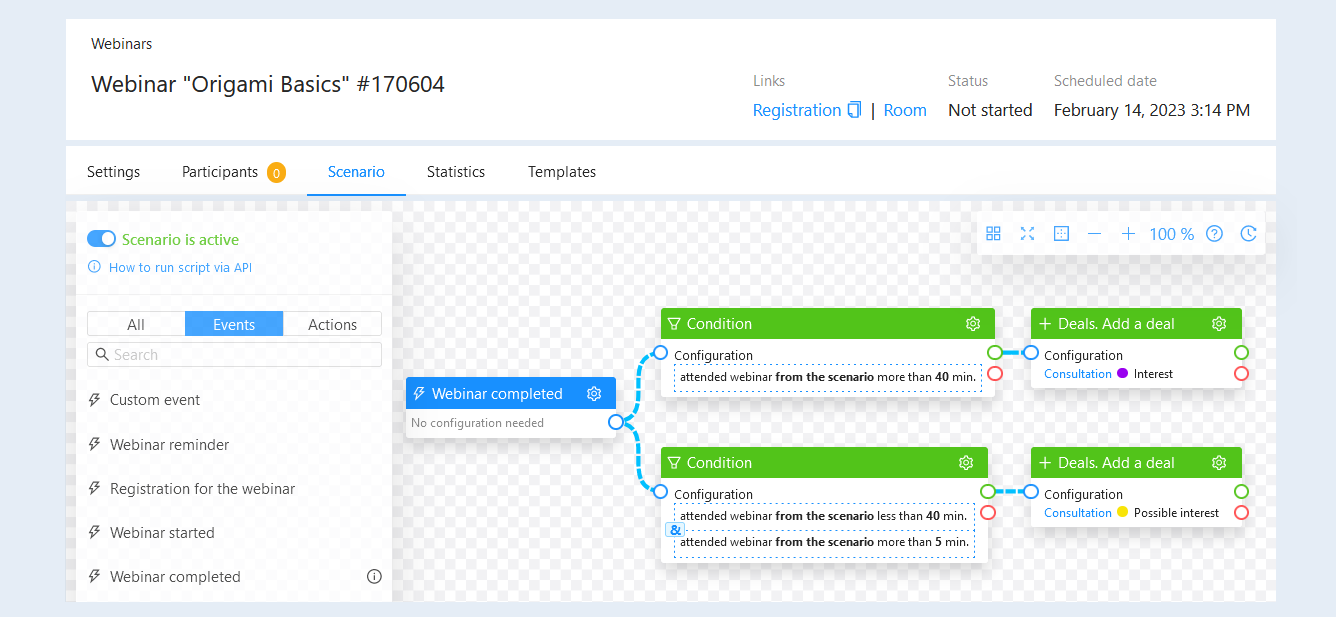
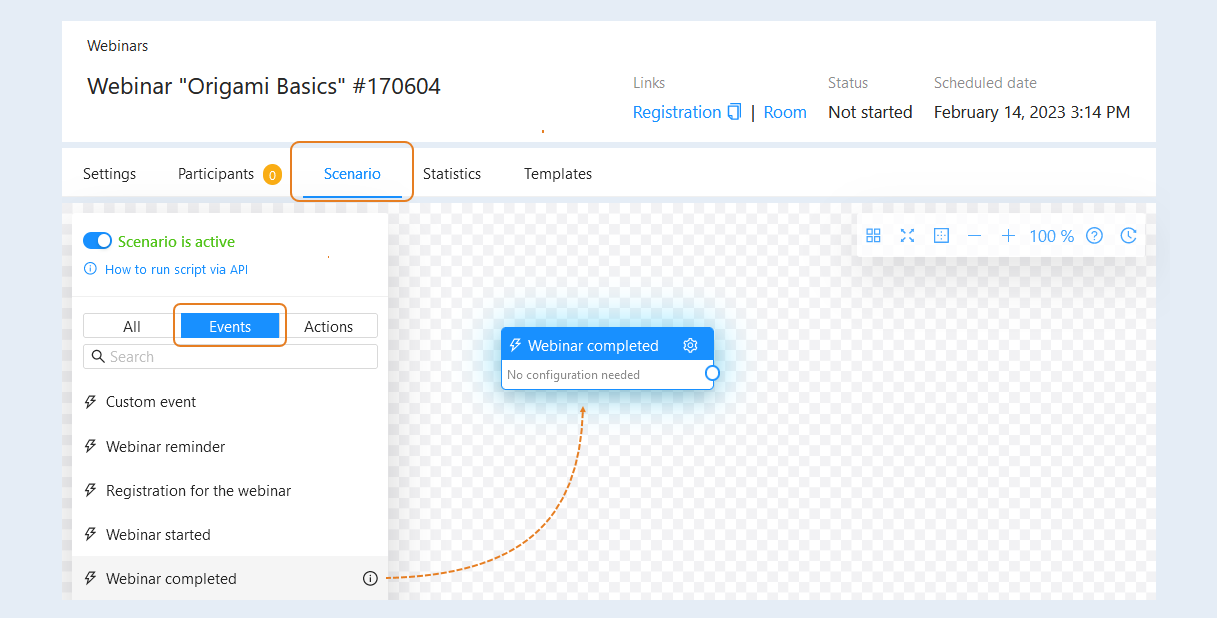
Next, open the "Scenario" tab. Select the "Webinar completed" event and drag the event to the scenario field.
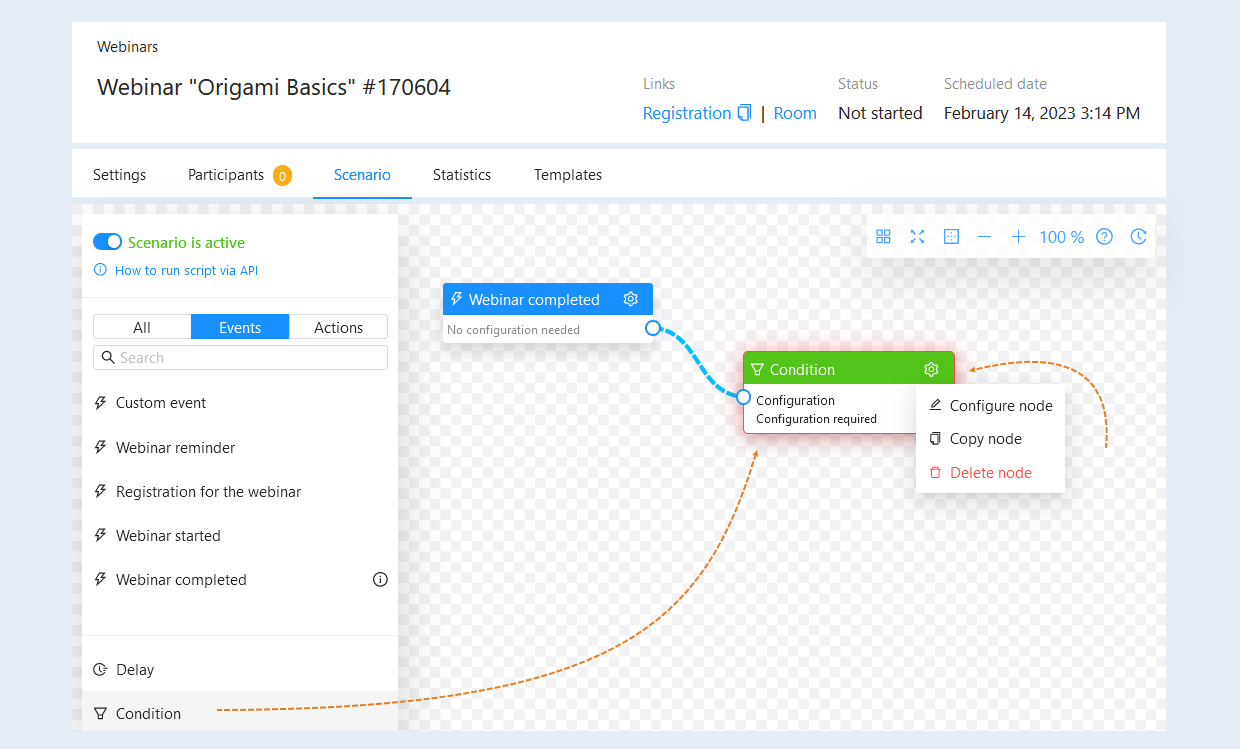
Next, select the "Condition" and drag it into the scenario field. Connect the event and condition together. For the "Condition" it is necessary to perform the settings - configuration. Click on the "Settings" button and then the "Configure Node" button.
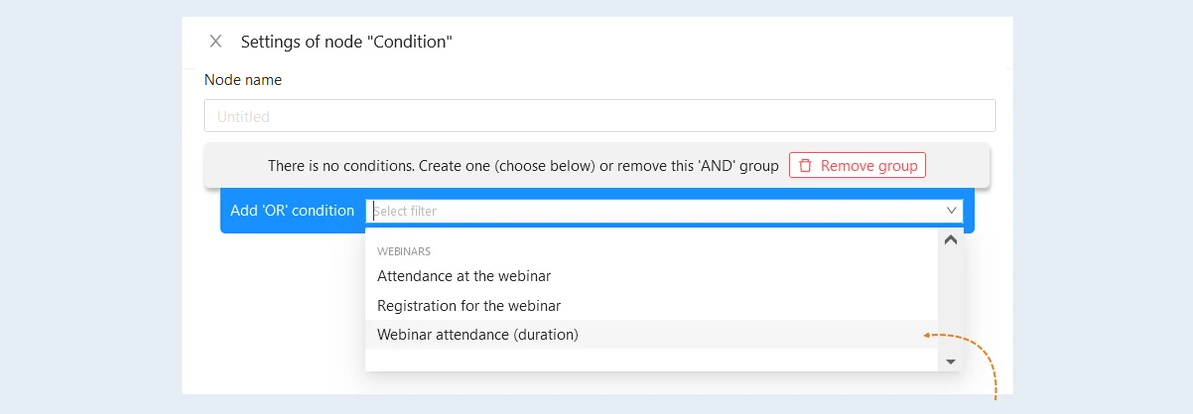
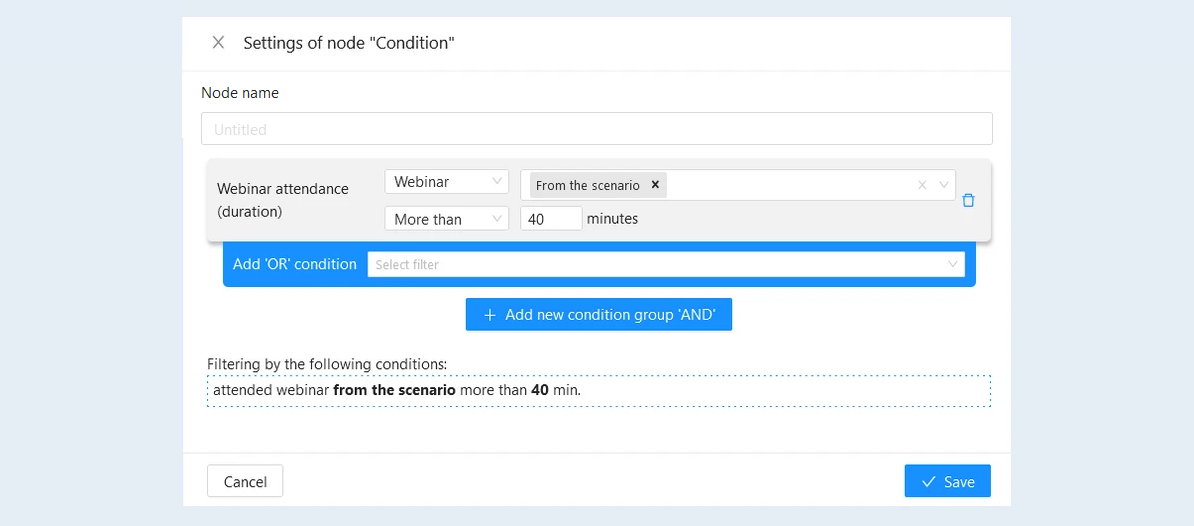
The "Condition" function allows you to select contacts by certain parameters. From the available conditions, select "Webinar attendance (duration)". This condition allocates users who attended the selected webinar for a certain amount of time.
In the duration line, specify "More than 40 minutes". Thus, the condition will highlight webinar visitors who attended the webinar for more than 40 minutes and have an interest in your product.
Next, open the "Actions" tab. Select the action "Deal. Add a Deal" and drag it to the scenario field. Connect the condition and the action together.
For the action, you also need to perform settings - configuration. Click on the "Settings" button and then the "Configure Node" button.
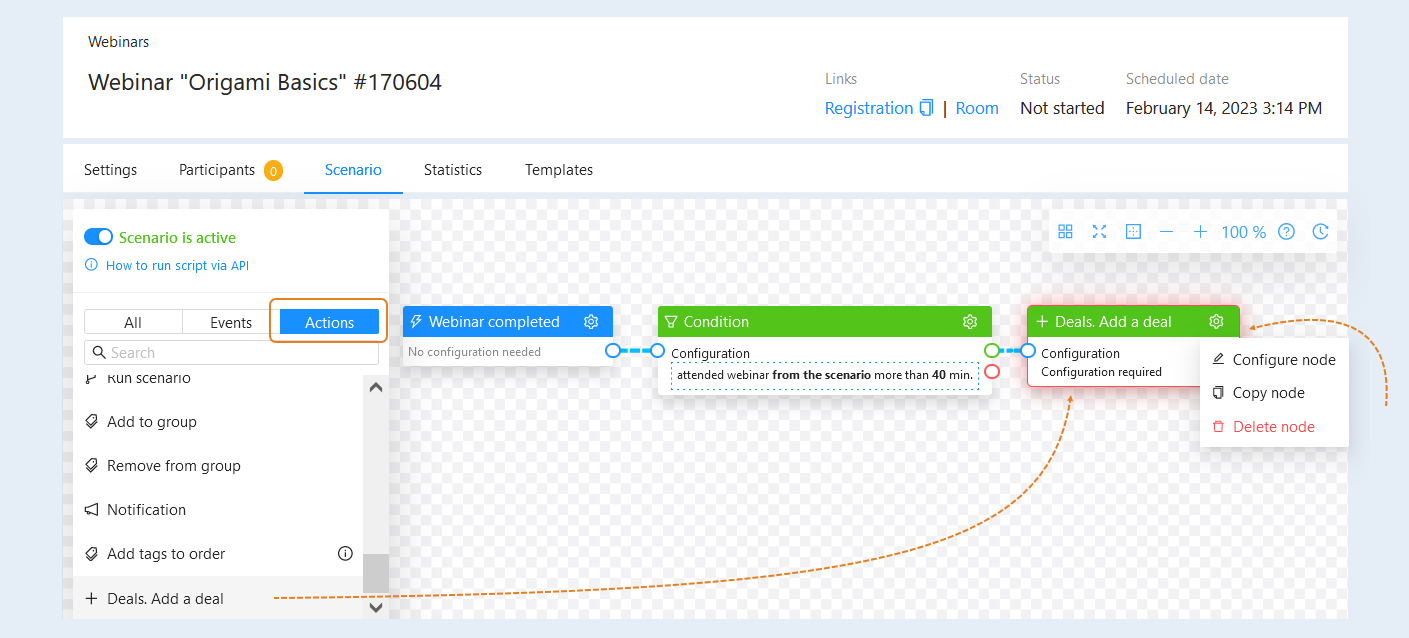
In the "Node Settings" window, fill in the fields:
Name node. Specify the name of the node, you can name the nodes in the script as you wish.
Pipeline. Select the funnel.
Pipeline stage. Specify the funnel stage to which the deal will be added after the webinar is completed.
Deal amount. Specify the deal amount or select "Automatically". In this case, the amount will be automatically taken from the order that will be added to this deal. If there is no order in this scenario, the amount will be 0.
Contact. Specify the contact that will be displayed in the deal card. The contact can be taken from the scenario (the data entered when submitting the form) or the associated contact can be selected manually.
Responsibility. Assign a responsible employee to perform this task. You can choose one responsible administrator or distribute tasks among several employees. In this case, the deal will be assigned in turn between the selected team members. You can also choose the person responsible for the contact.
Tags. Add tags to the deal. Click the Manage Tags button to find or create new tags.
Check the box "Add order from the scenario (if available)" so that the order from the scenario is added to the deal.
Click the "Save" button.
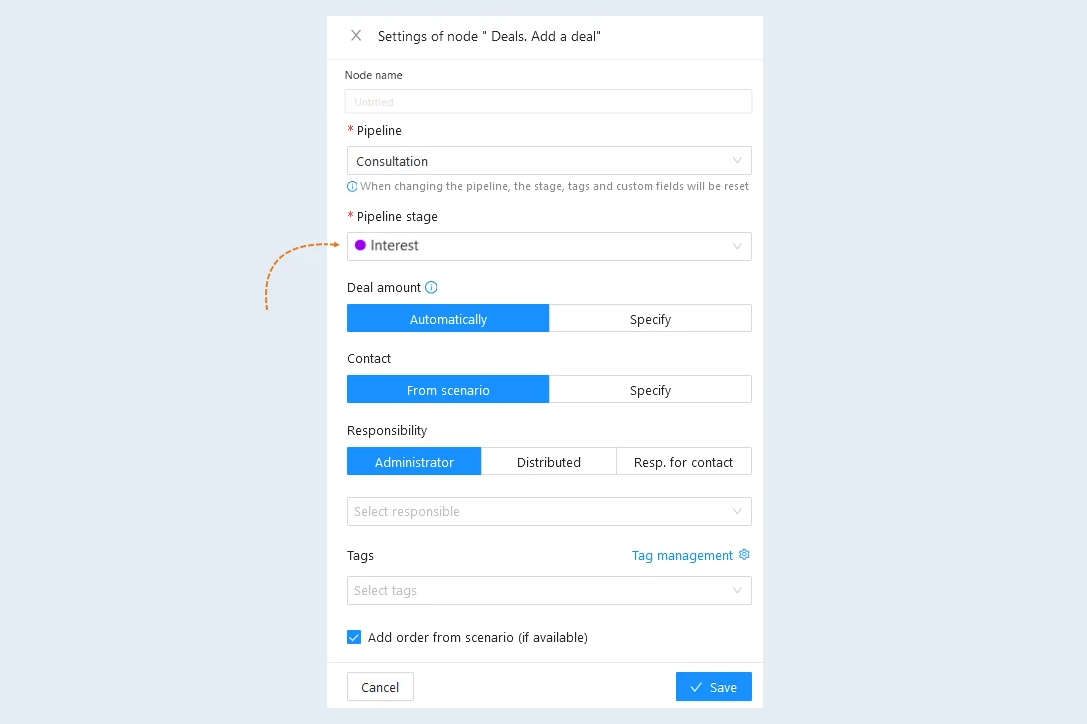
In this scenario, all webinar participants who attended the webinar for more than 40 minutes will be added to the "Interest" funnel stage.
You can also add another "Condition" that will highlight users who attended the webinar "Less than 40 minutes" and "More than 5 minutes". Such webinar participants are likely to have a possible interest in your product.
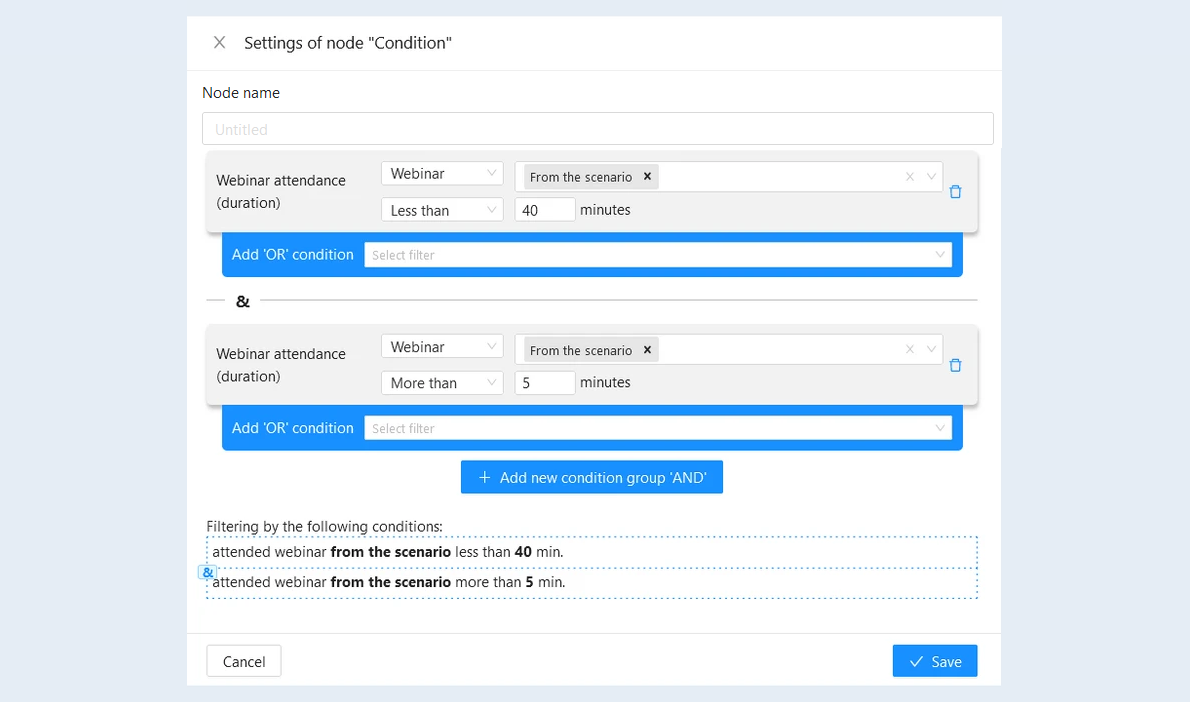
Add an action for this "Condition" that will add webinar participants to the "Possible Interest" funnel stage.
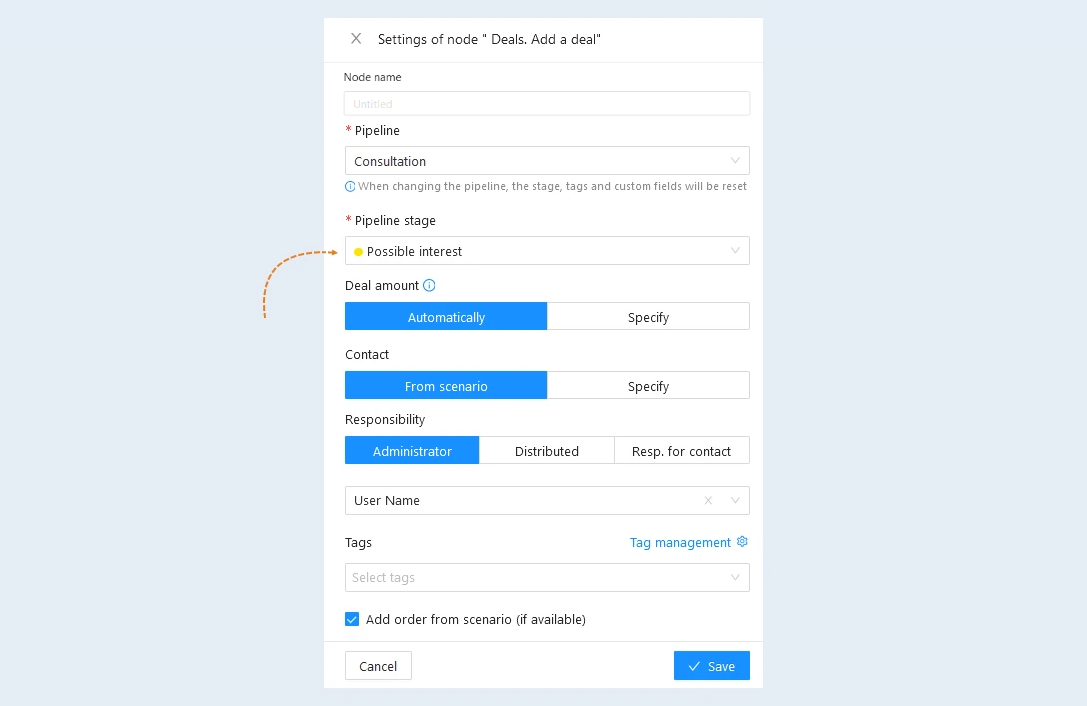
Thus, after the completion of the webinar, all participants of the webinar will go through the configured "Conditions" and a deal will be created for each participant of the webinar. All deals will be distributed according to the funnel stages: "Interest" and "Possible interest". And then the responsible employees will have tasks to work with these deals.