After you have connected and configured the Telegram groups/channels application, go to the application automation settings. Details on how to connect the application are described in the article "Telegram groups/channels Application".
The "Scenario" section will help automate the processes of the Telegram groups/channels. The purpose of the scenario is to automate the processes of interaction with the clients of your account. The scenario reacts to the manipulations of customers and employees and performs retaliatory actions.
In this article, we will consider in detail how to configure and automate the work of the Telegram groups/channels application.
Click on the desired section of the article to go to its description:
1
Creating a chat bot
Telegram groups will recognize Telegram contacts if they are already connected to AXL CRM platform contacts. If they are not connected to CRM contacts, then they will be considered anonymous and such applications for joining the Telegram group will need to be approved manually.
Therefore, we recommend setting up joining a Telegram group via a chat bot. In this case, the chat bot will guarantee that the person who buys the product will first pass the bot scenario, i.e. first connect to the bot for communication, and after that will be able to join the Telegram group without approving his application manually. In this case, joining the group happens automatically, without your participation and you will not need to check it.
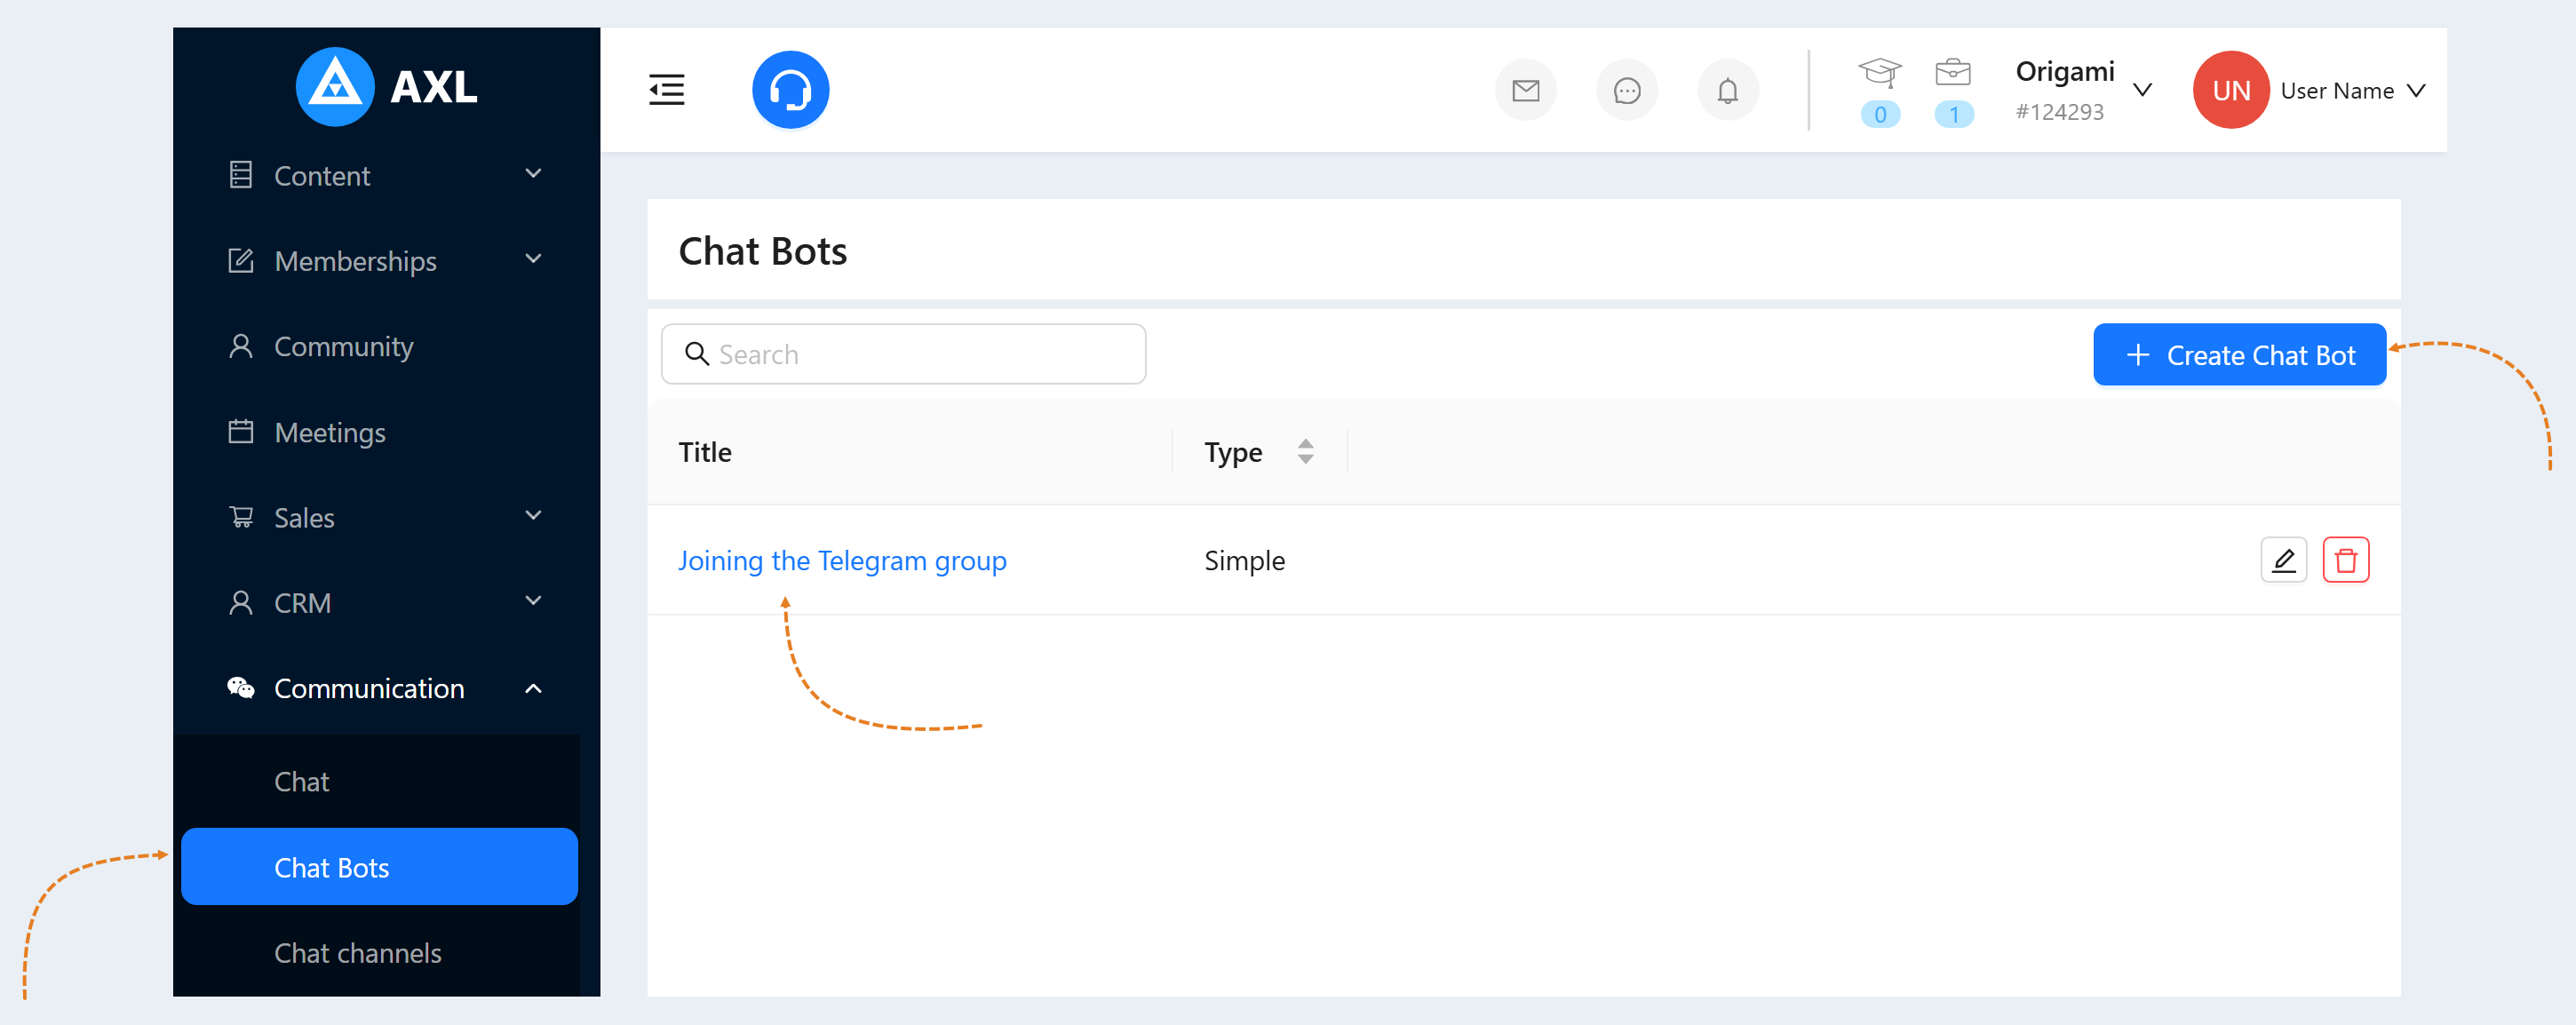
Go to the "Communication" section, the "Chat bots" tab. Create a new chat bot or select an existing one. Read more about how to create a chat bot in the article "Chat bots".
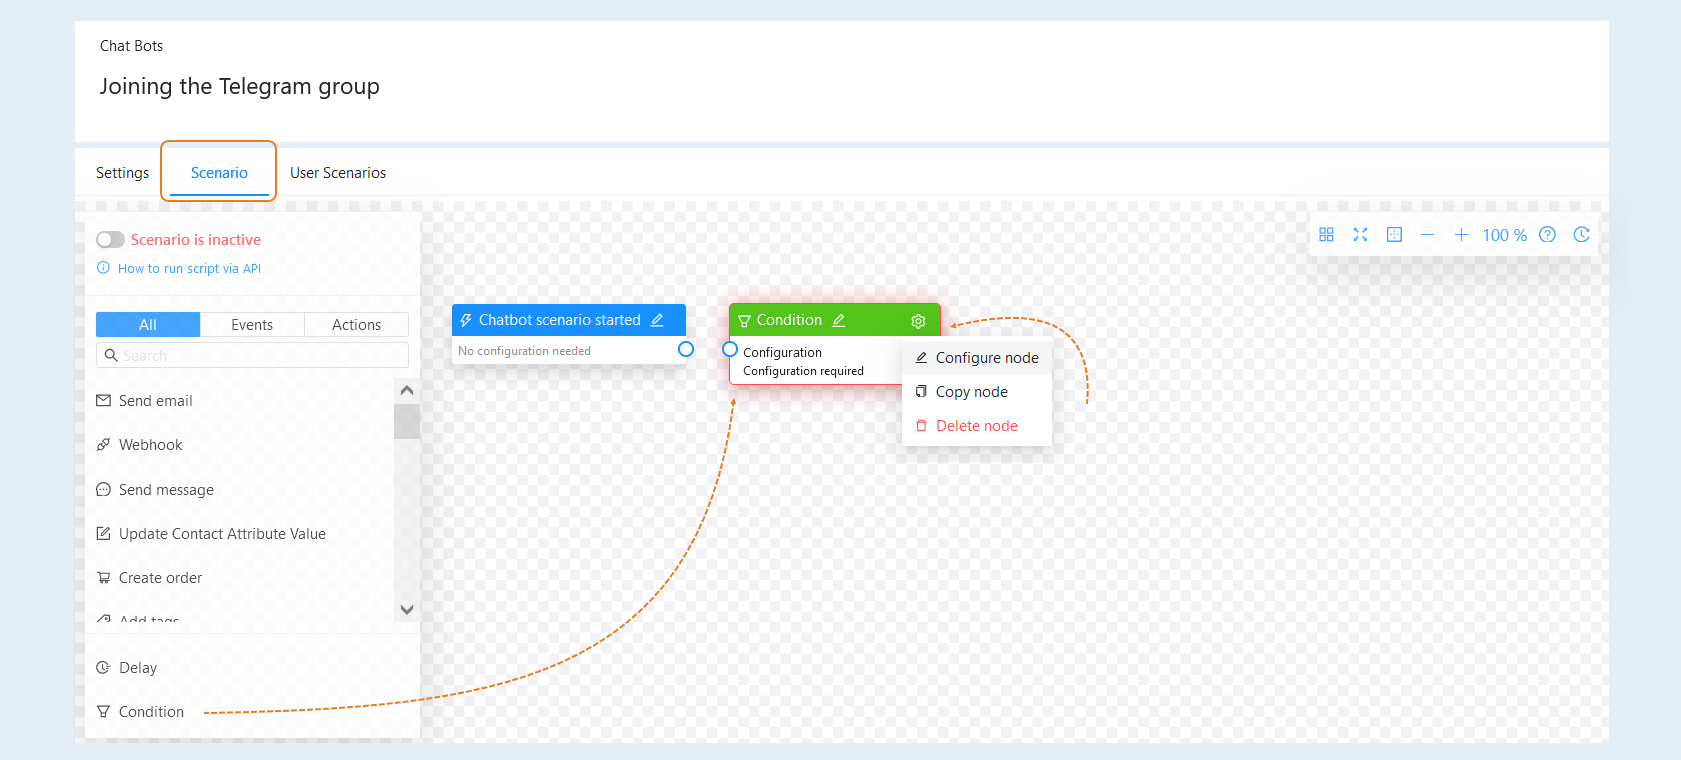
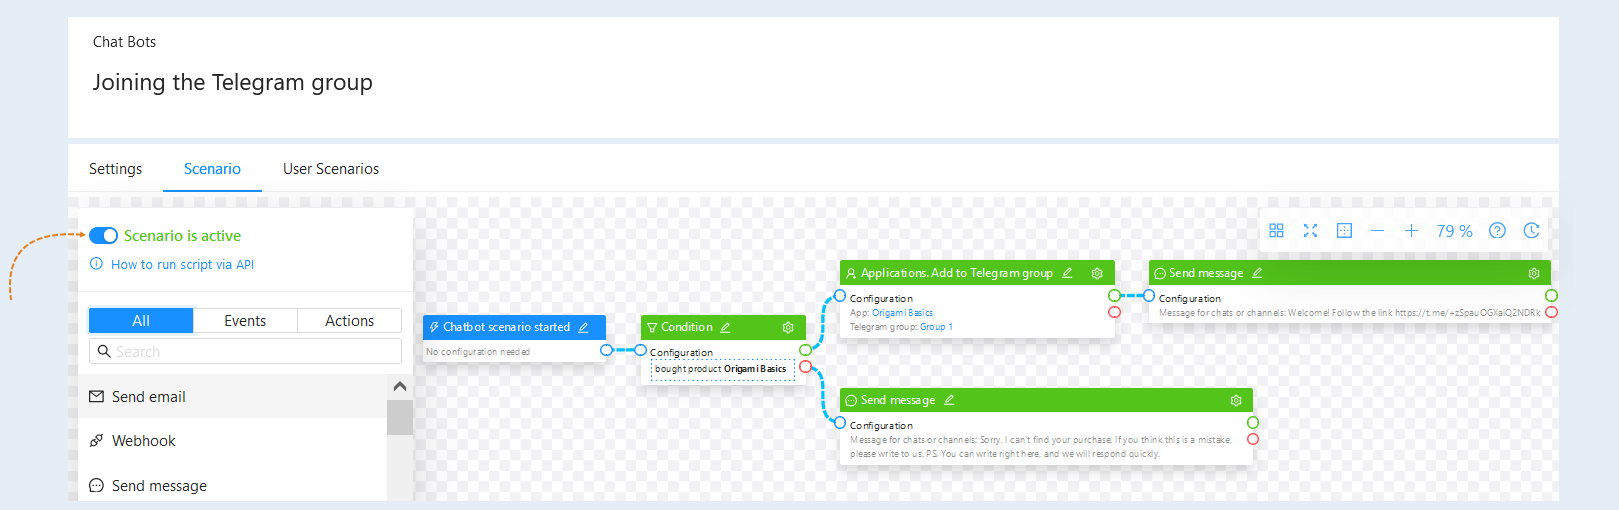
Go to the "Scenario" section of the chat bot. Here, by default, the event triggering the chat bot "Chat bot scenario started" is already set. It is automatically created when you create a chat bot. Next, select the "Condition" and drag it into the scenario field. For the condition, it is necessary to perform settings - configuration. Click on the "Settings" button and then the "Configure Node" button.
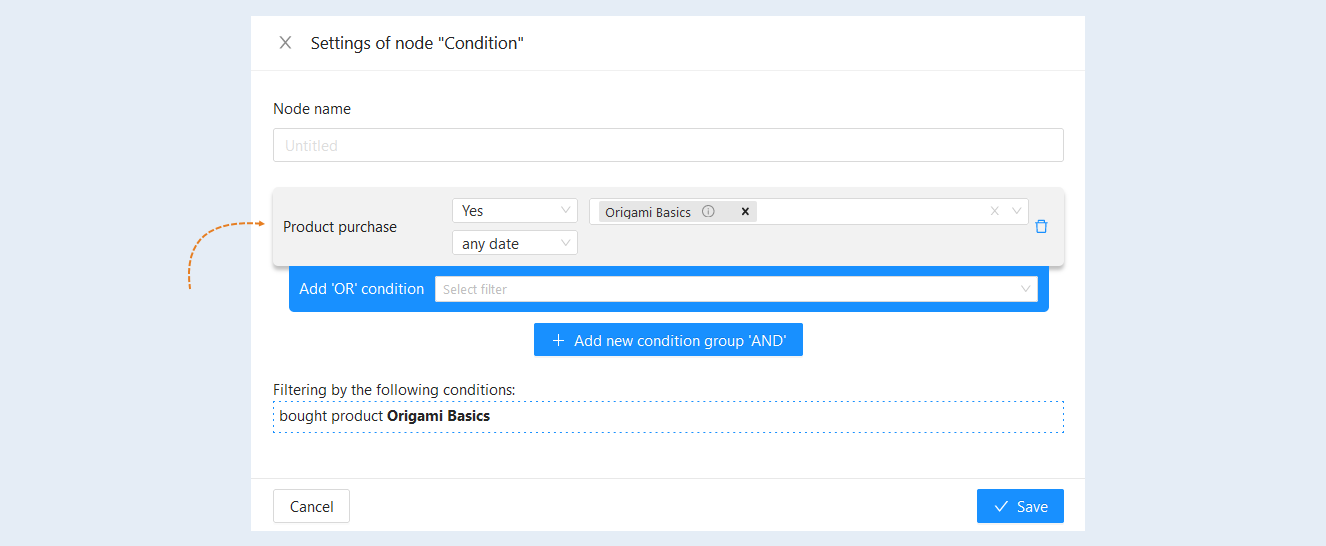
In the "Node Settings" field, select the "Product Purchase" conditions and specify the product. Click the "Save" button. This condition will highlight the users who have purchased the selected product.
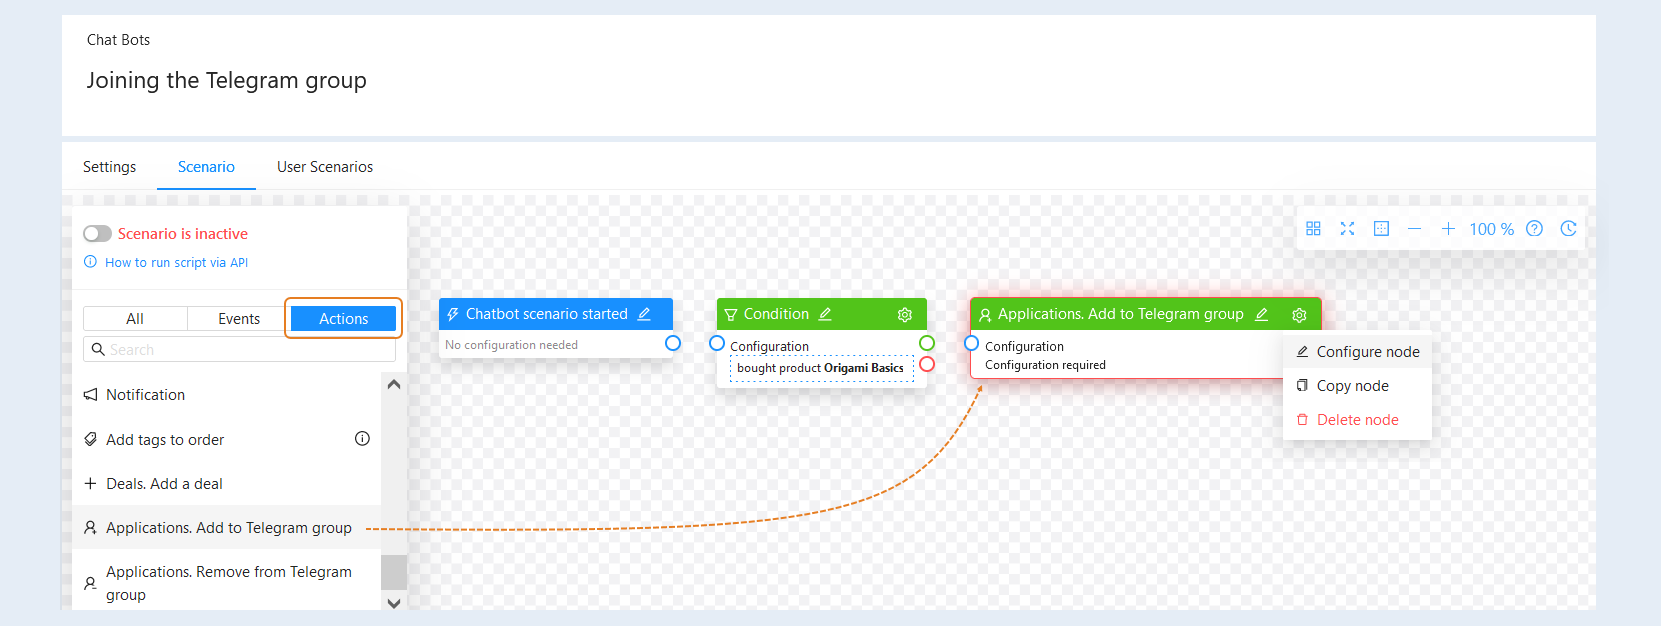
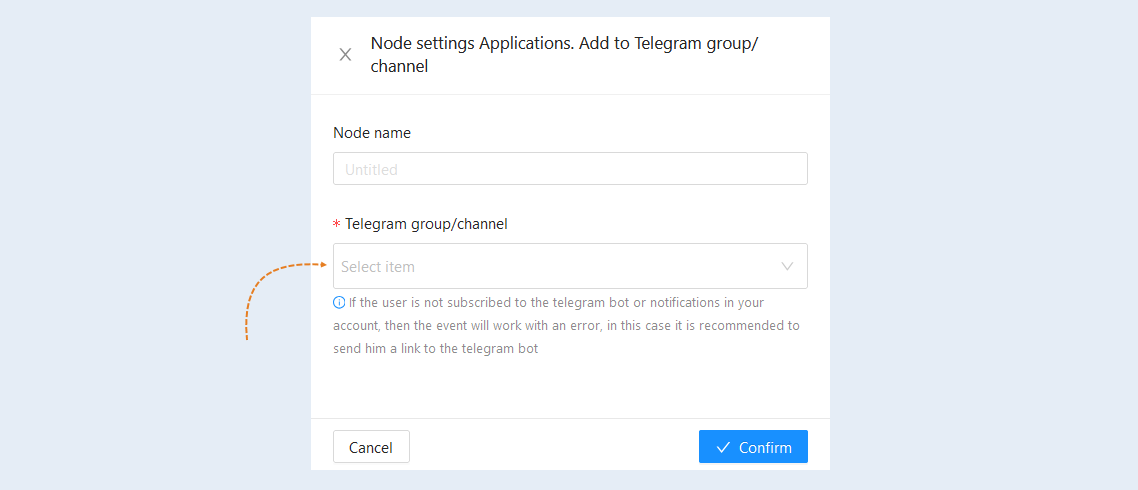
Next, select the "Applications. Add to Telegram Group" and drag it to the scenario field. For the action, you need to perform settings - configuration. Click on the "Settings" button and then the "Configure Node" button.
In the "Node Settings" field, select a Telegram group/channel from the list. Click the "Confirm" button.
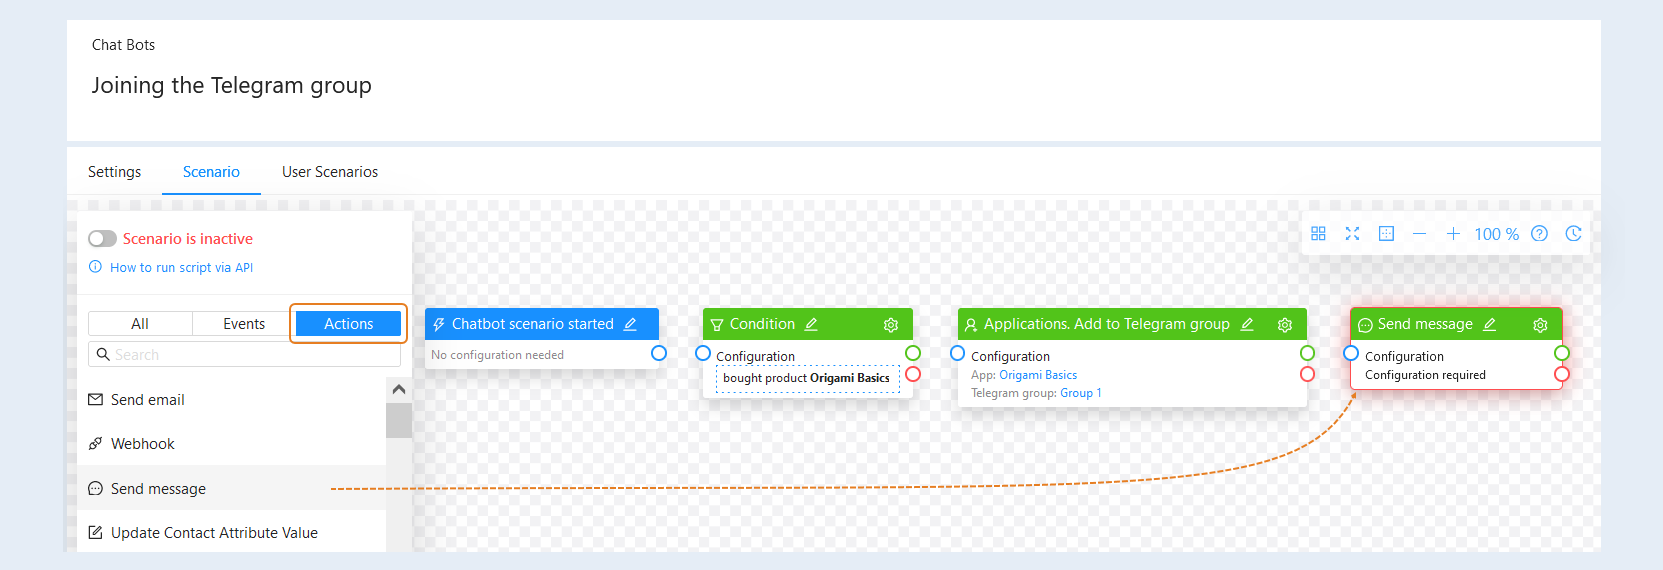
Next, select the "Send Message" action and drag it into the scenario field. For the action, you need to perform settings - configuration.
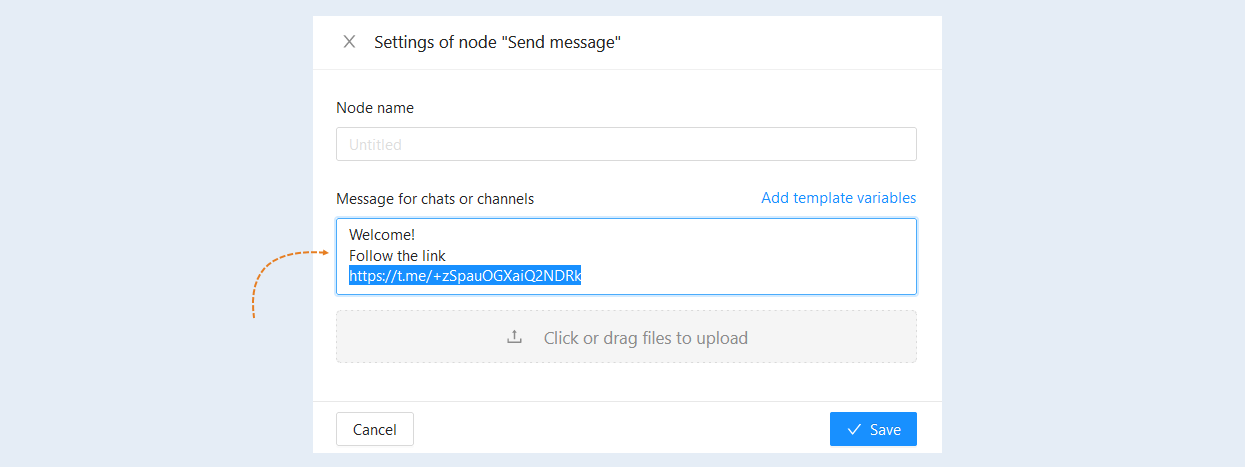
In the "Node Settings" field, specify the text of the message that will be sent to the chat bot to the user who bought the product. In the text of the message, insert an invitation link to the Telegram group. How to create an invitation link to a Telegram group, read in step №5 of the article "Telegram Group Application".
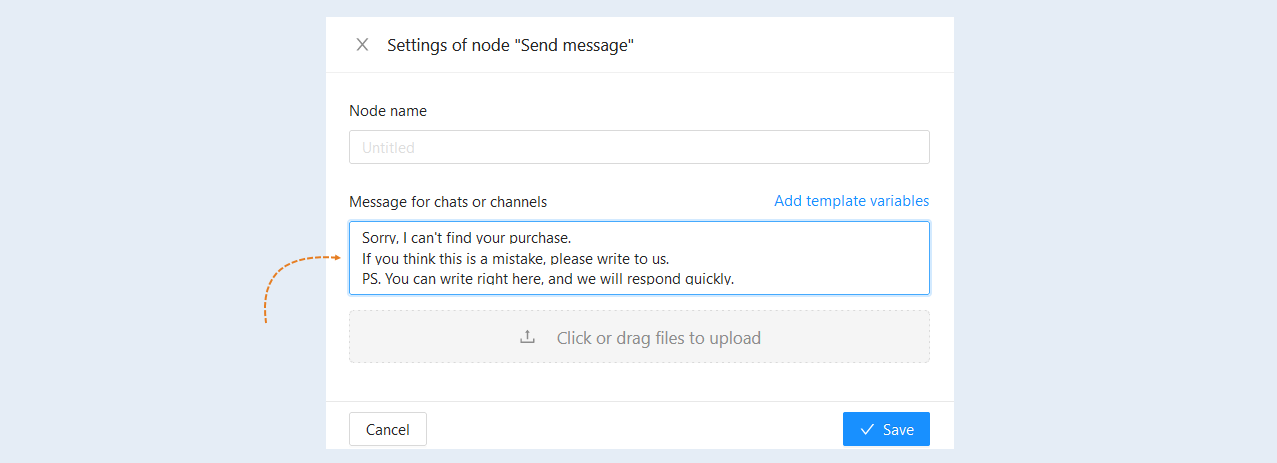
Add another "Send Message" action and drag it to the scenario field. This message will be sent to users who have not purchased the product.
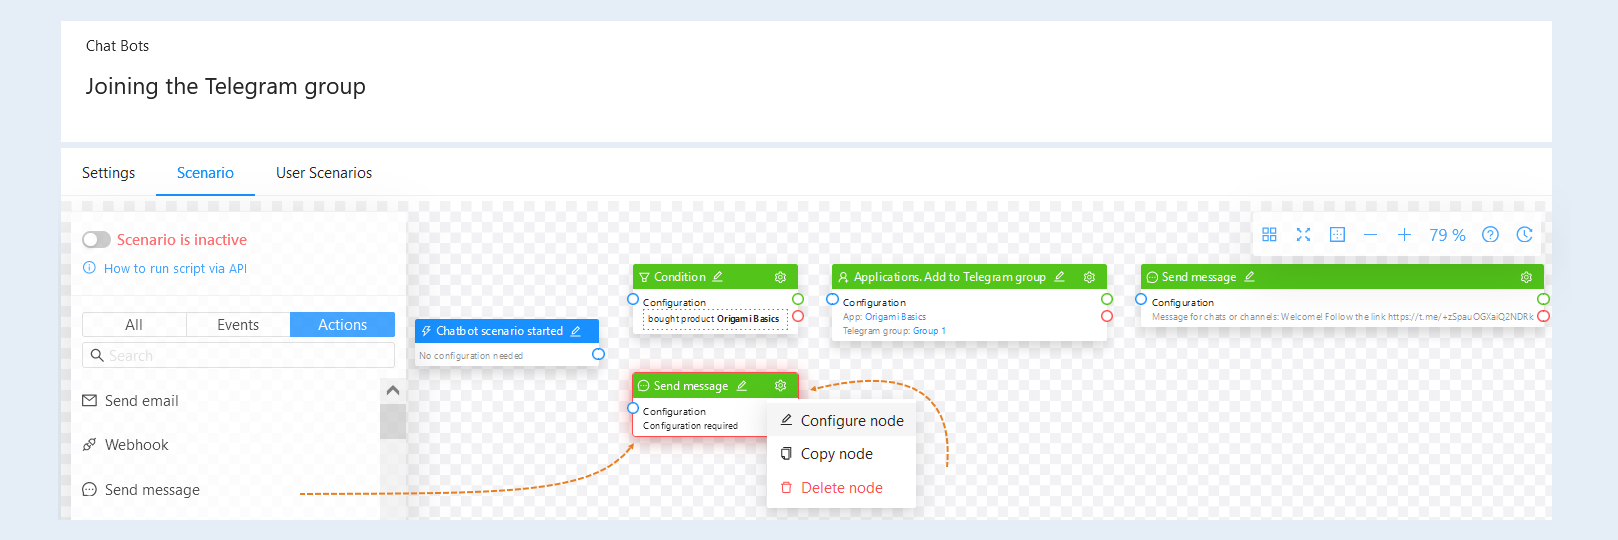
In the configuration settings, specify the text of the message that will be sent to the chat bot to the user.
Next, connect the event, condition, and actions together. Now your chat bot scenario is ready. To activate the scenario, move the slider to the active position.
Thus, as soon as the user pays for the product and launches the chat bot, he will appear in the list for joining the Telegram group as waiting. And as soon as he asks to join the group by clicking on the invitation link, the system will immediately automatically approve him.
If the user received a link to the chat bot without purchasing the product (for example, the link will be sent by a friend who bought the product), a message will be sent to the chat bot asking him to contact technical support to resolve the issue.
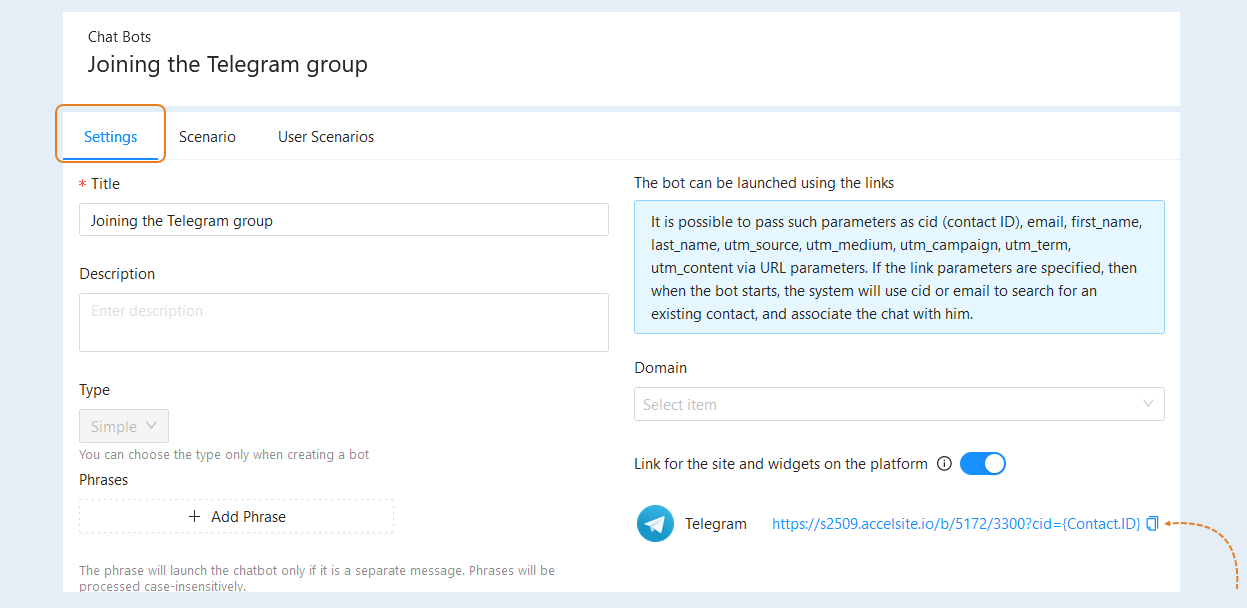
Open the Settings tab and copy the link to the chat bot. You will need this link at step №2 and №5 of this article.
2
Creating a product
Next, create a product scenario in which an email will be sent to the user with a link to a chat bot for communication.
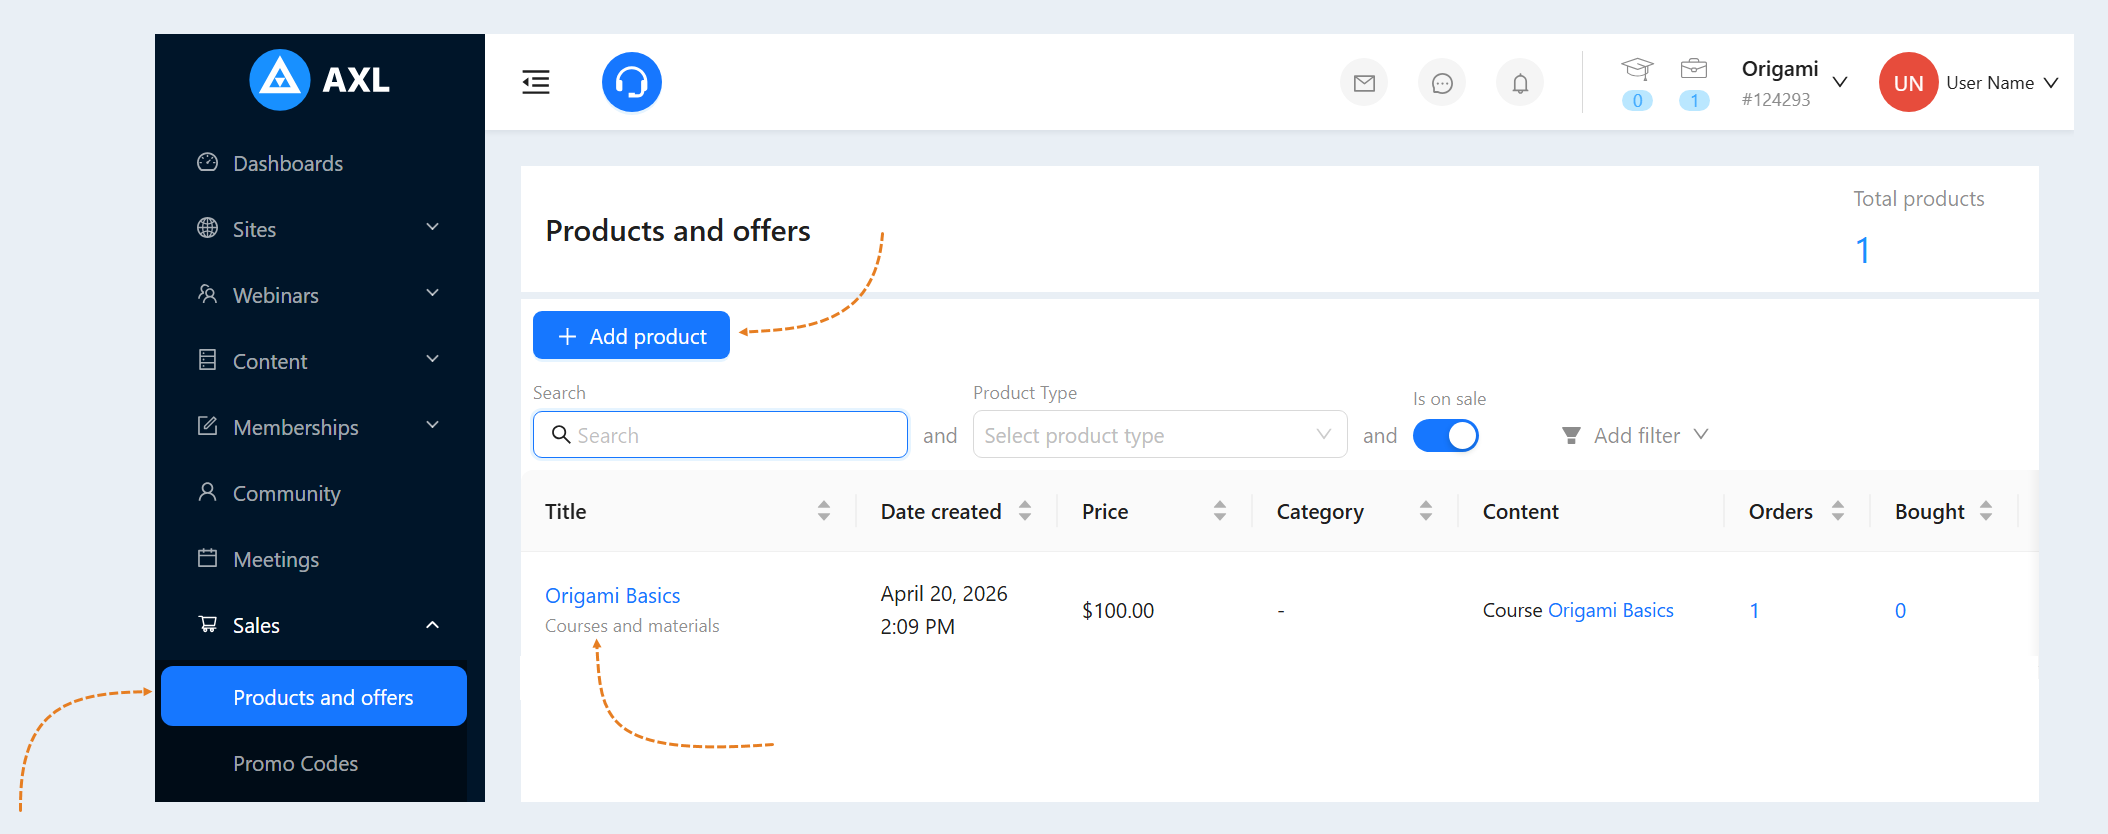
Go to the "Sales" section, the "Products and Offers" tab. Create a new product or select an existing one. Read more about how to create a product in the article "Products and Offers".
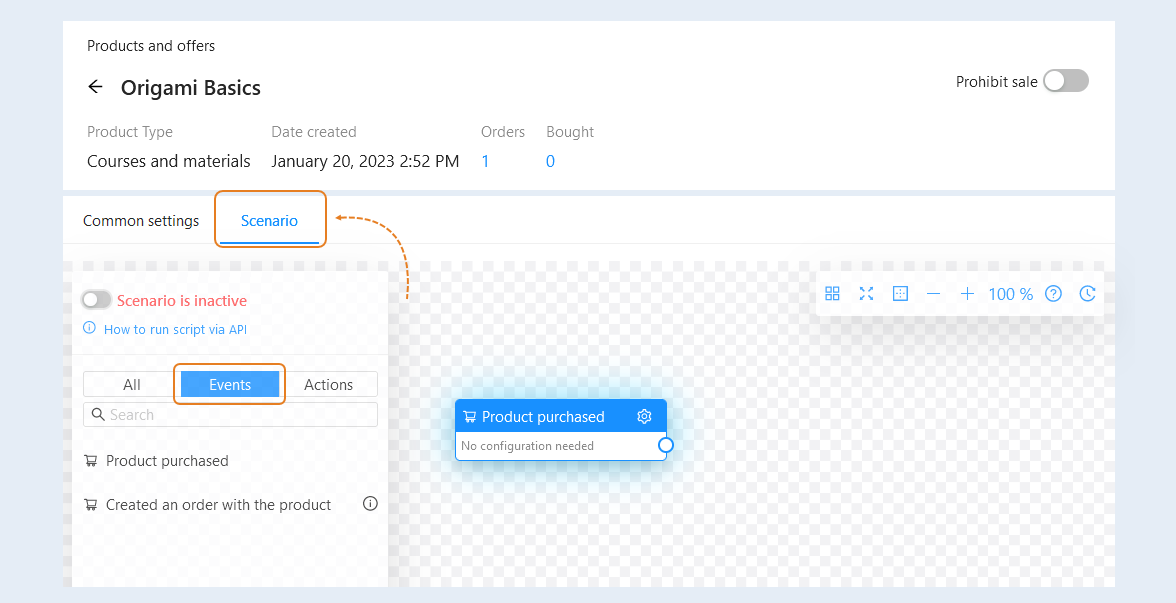
Next, open the "Scenario" tab. Select the "Product Purchased" event and drag the event to the scenario field.
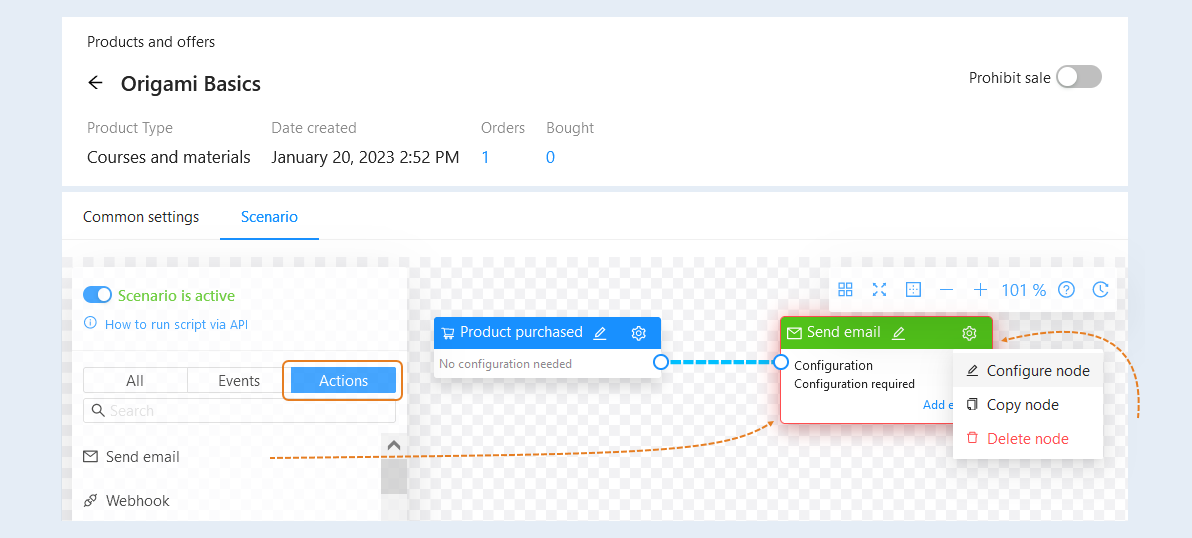
Next, open the "Actions" tab. Select the "Send Email" action and drag it to the scenario field. Connect the event and the action together. For the action, you need to perform settings - configuration. Click on the "Settings" button and then the "Configure Node" button.
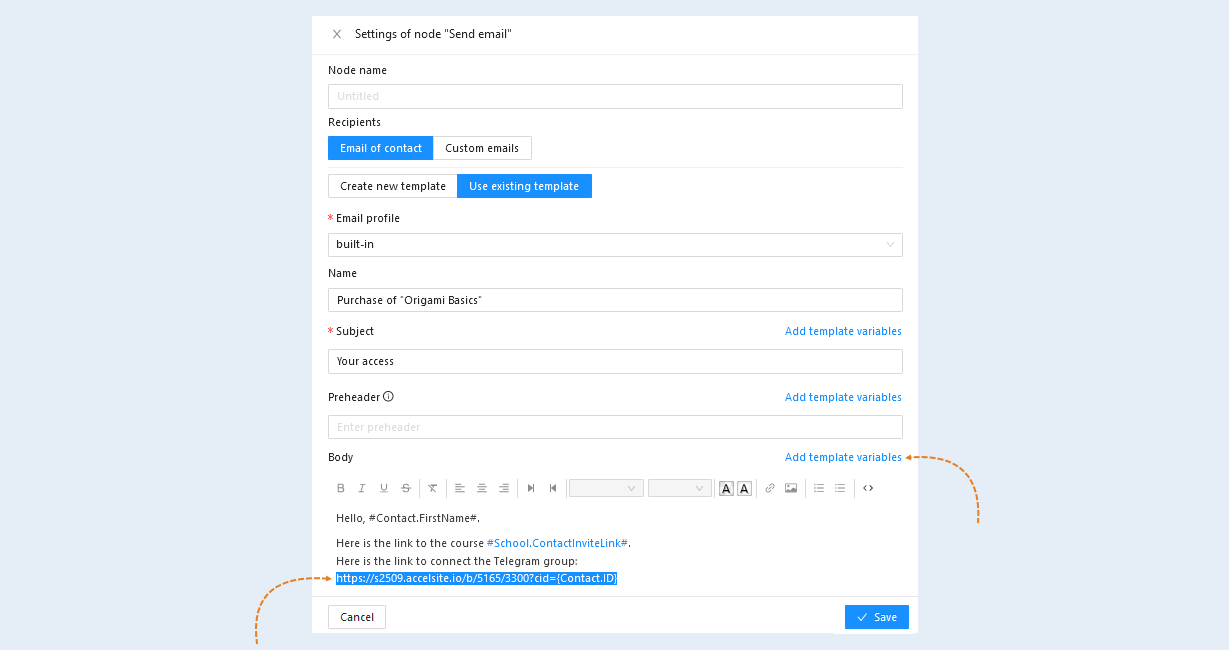
In the "Send Email Node Settings" field, fill in the fields. In the body of the email, insert the link to the chat bot copied in step №1 of this article.
In the node settings, you can add variables. A variable is a value to be automatically replaced with the data you selected. This can be the contact's name, e-mail, account name, order number, etc. Variables will automatically replace the data in the email. Specify the variable “Contact Name" and when sending an email, this variable is replaced with the recipient's name. Click the "Add Variables" button.
After completing the settings, click the "Save" button.
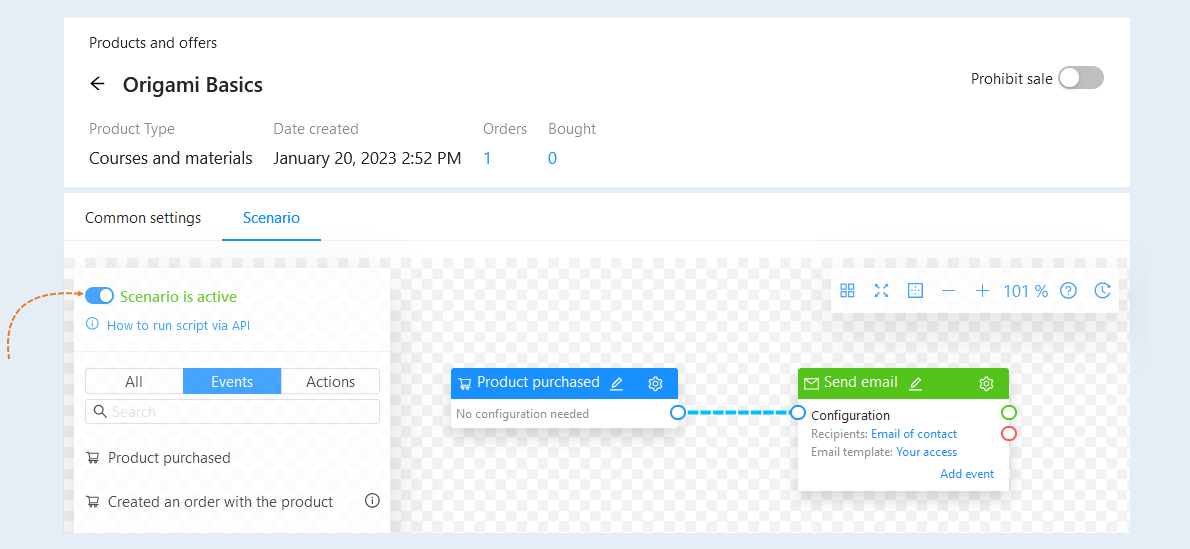
Now your product scenario is ready. To activate the scenario, move the slider to the active position.
Thus, after purchasing the product, an email will be sent to the user with a link to the chat bot. By clicking on the link to the chat bot, the user will launch the chat bot scenario described in step №1 of this article.
3
Creating a website
In order to set up a form for selling a product, create a website on the AXL platform.
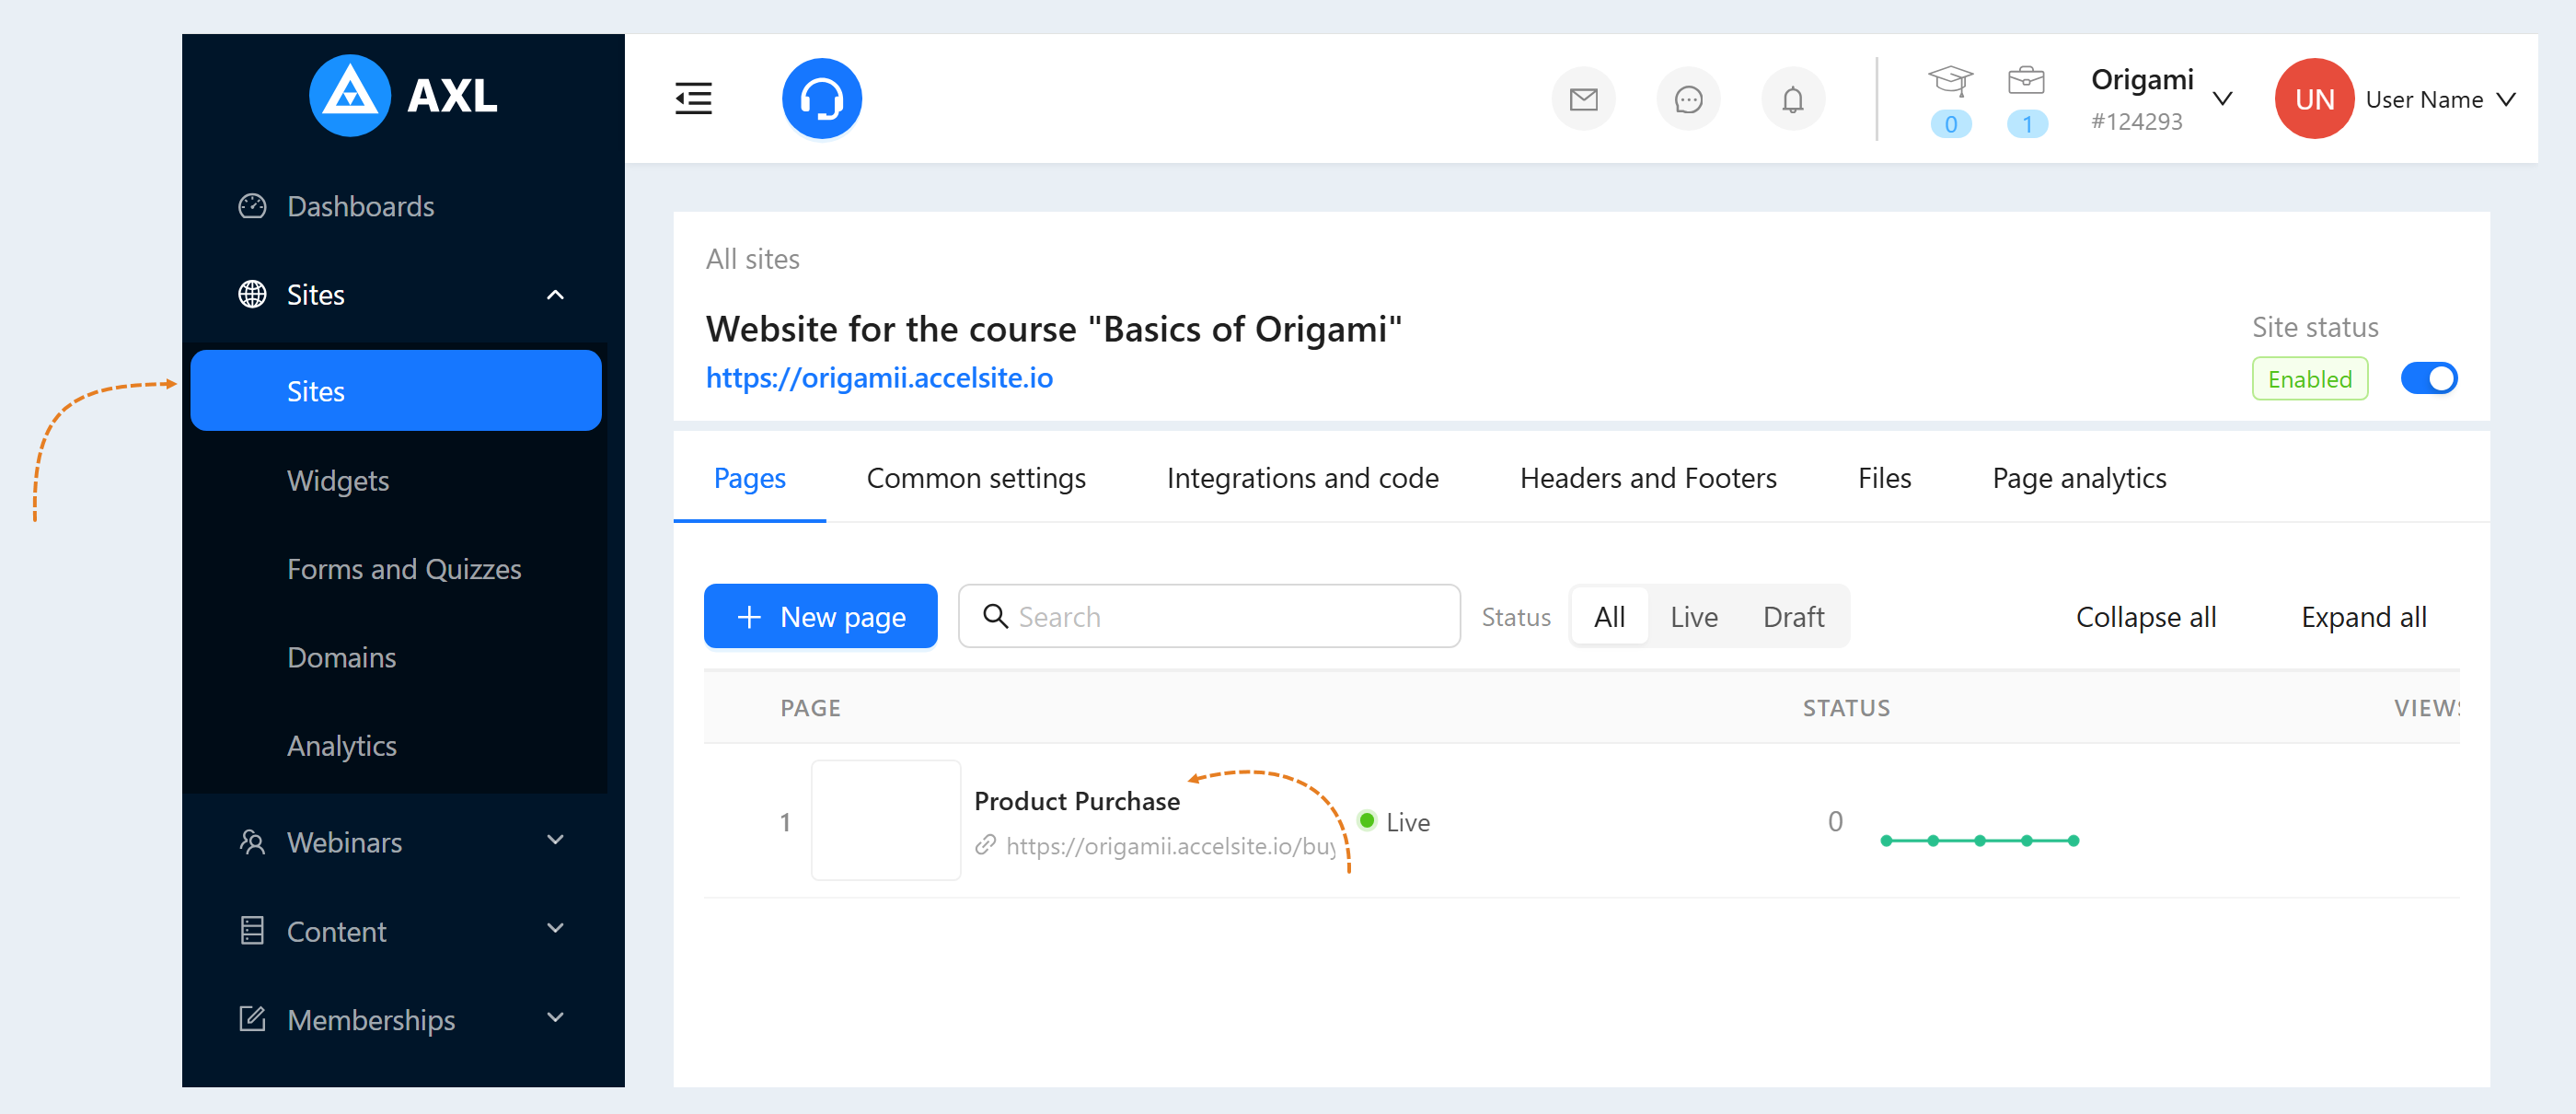
Go to the "Sites" section. Open a previously created site or create a new one. Read more about how to create a website in the article "How to create a website".
Next, in the "Pages" tab, select one of the created pages and click on the page name or the "Edit" button to open it.
4
Creating a sales form
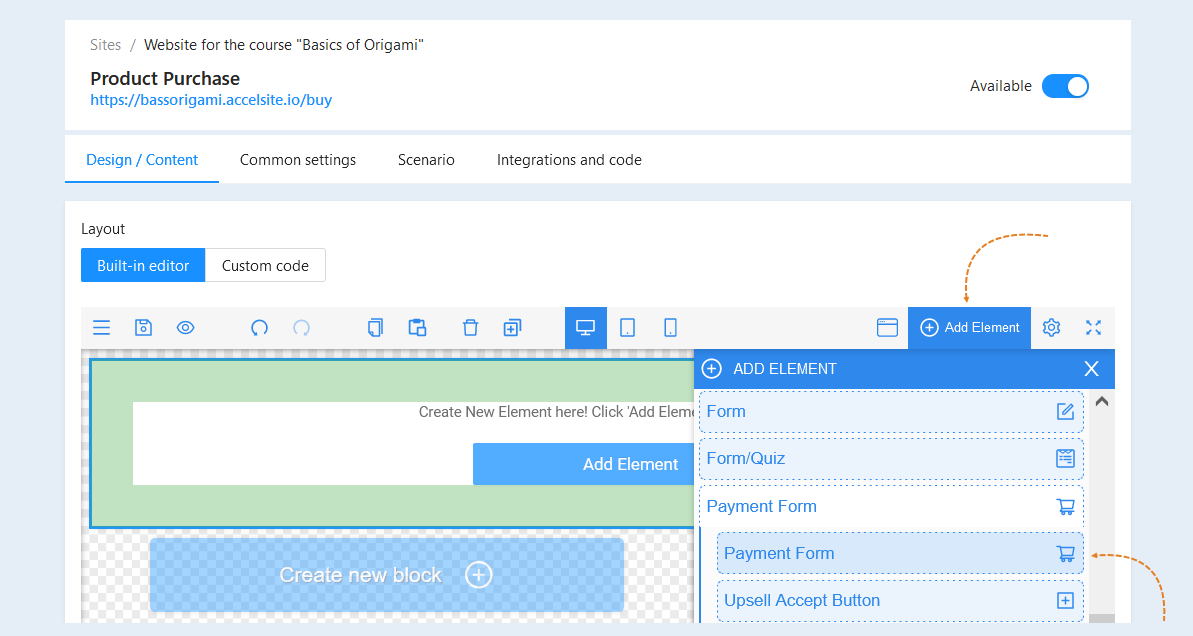
In the editor window of the site page, select "Empty block" and click "Add Element". Select the "Payment Form" element by transferring it to the page field.
Select the entire payment form to open the settings for this item. The Settings toolbar opens on the right.
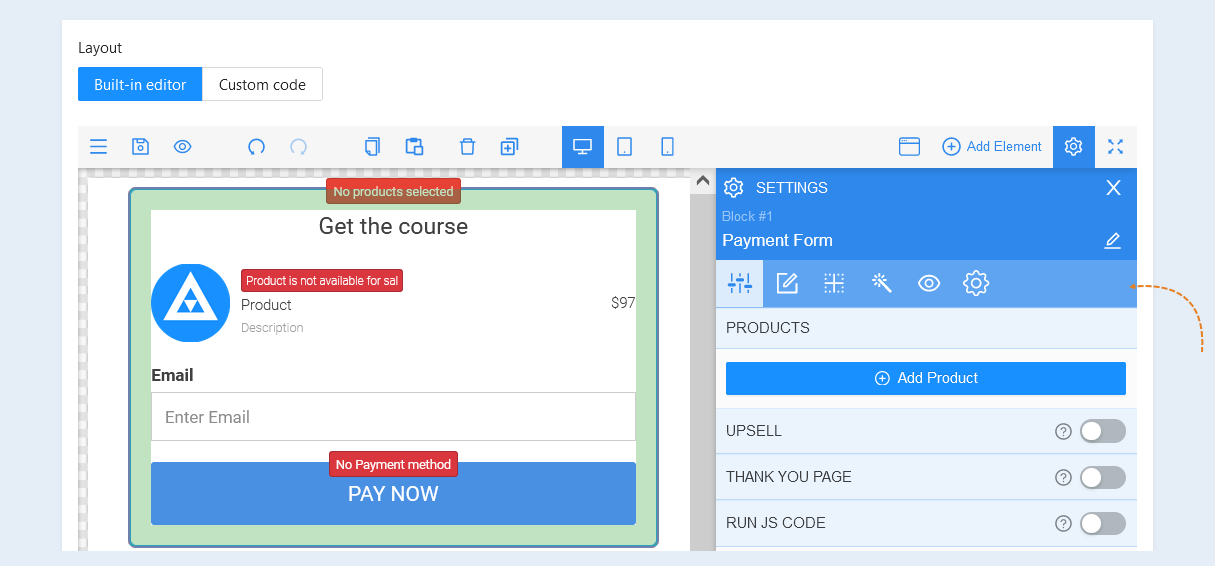
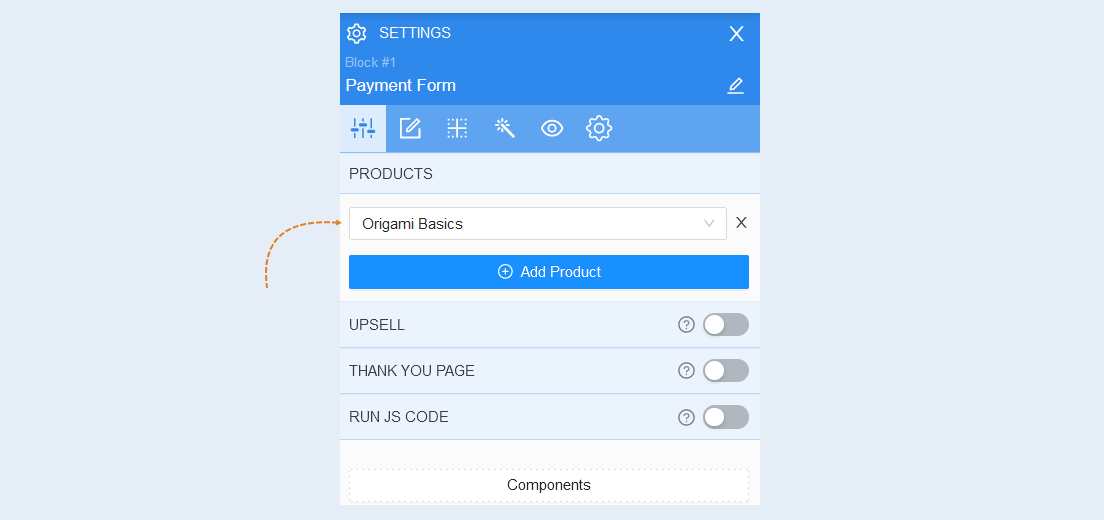
In the item settings, add products. When choosing multiple exchange rate products, they must be in the same currency.
Next, open the "Components" section. In this section, add one or more payment buttons. Each payment button will be linked to its own payment system. Link a payment method to each button by selecting it from the list. How to create a payment method is described in this article below in the section "Payment settings".
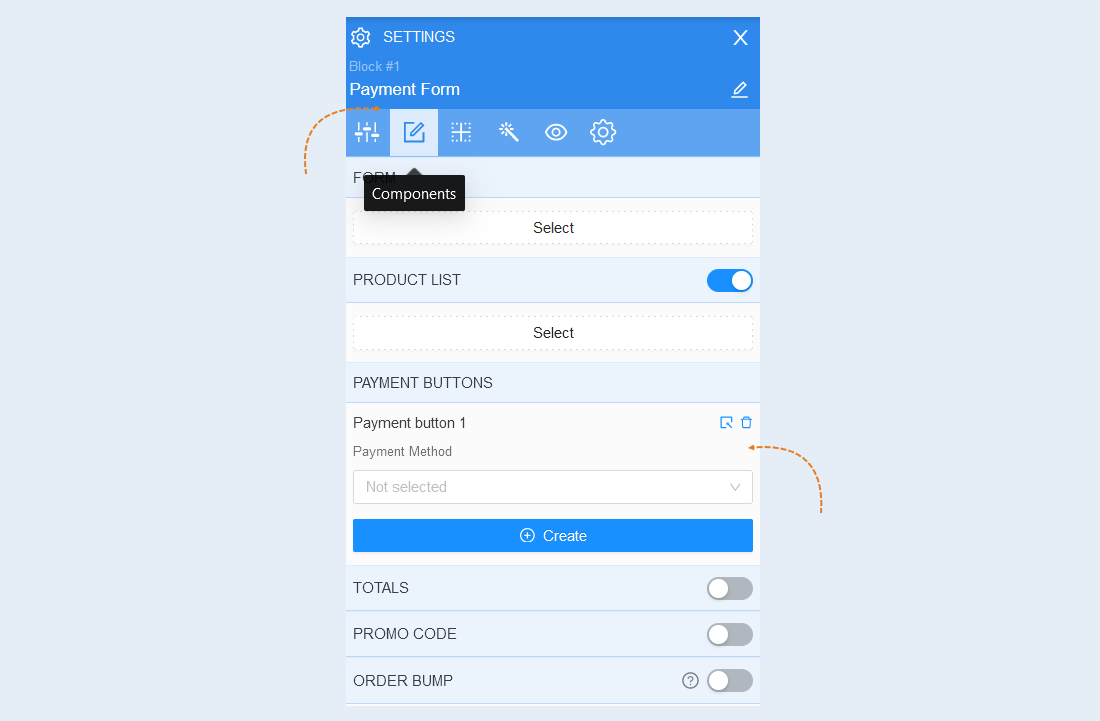
We also recommend adding a link to the chat bot for communication to the gratitude page. To add a thank you page after successful payment for the product, move the "Thank You Page" slider to the active position and add the address of the thank you page to the "URL" field.
How to create a thank you page with a link to a chat bot is described in step №5 of this article.
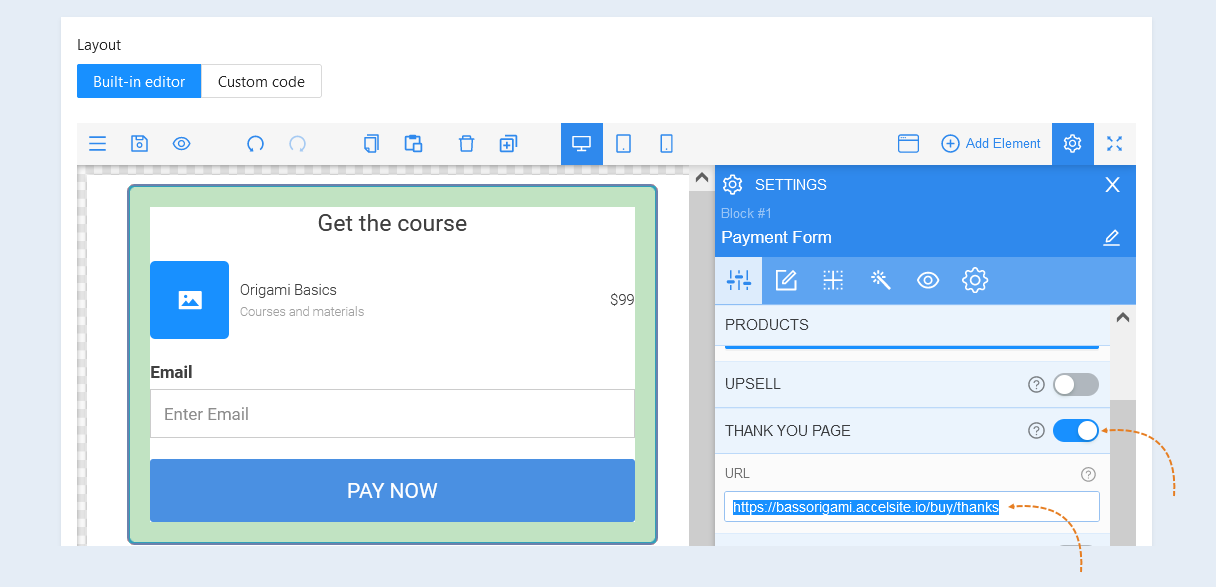
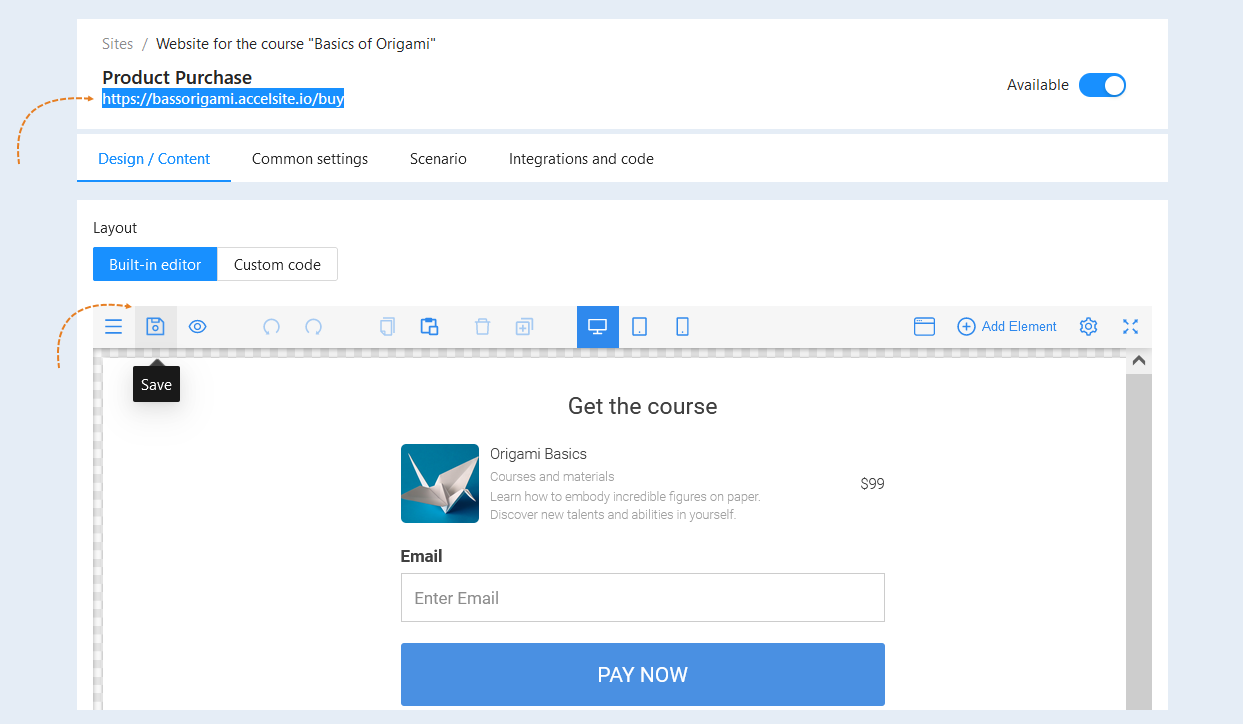
The main settings of the payment form are completed. For more information about the settings of the payment form components, see the article “Sales Form". After completing the form settings, click the "Save" button.
In the upper left corner of the page, copy the link to the payment form and send it to users. You can send the link manually or using any scenario, via a regular message or by mail.
5
Creating a Thank You page
After successful payment of the product, the user will be shown a thank you page with a button, clicking on which the user will go to the chat bot and launch the scenario for joining the Telegram group.
Create another page of the site. Click on the page name or the Edit button to open it.
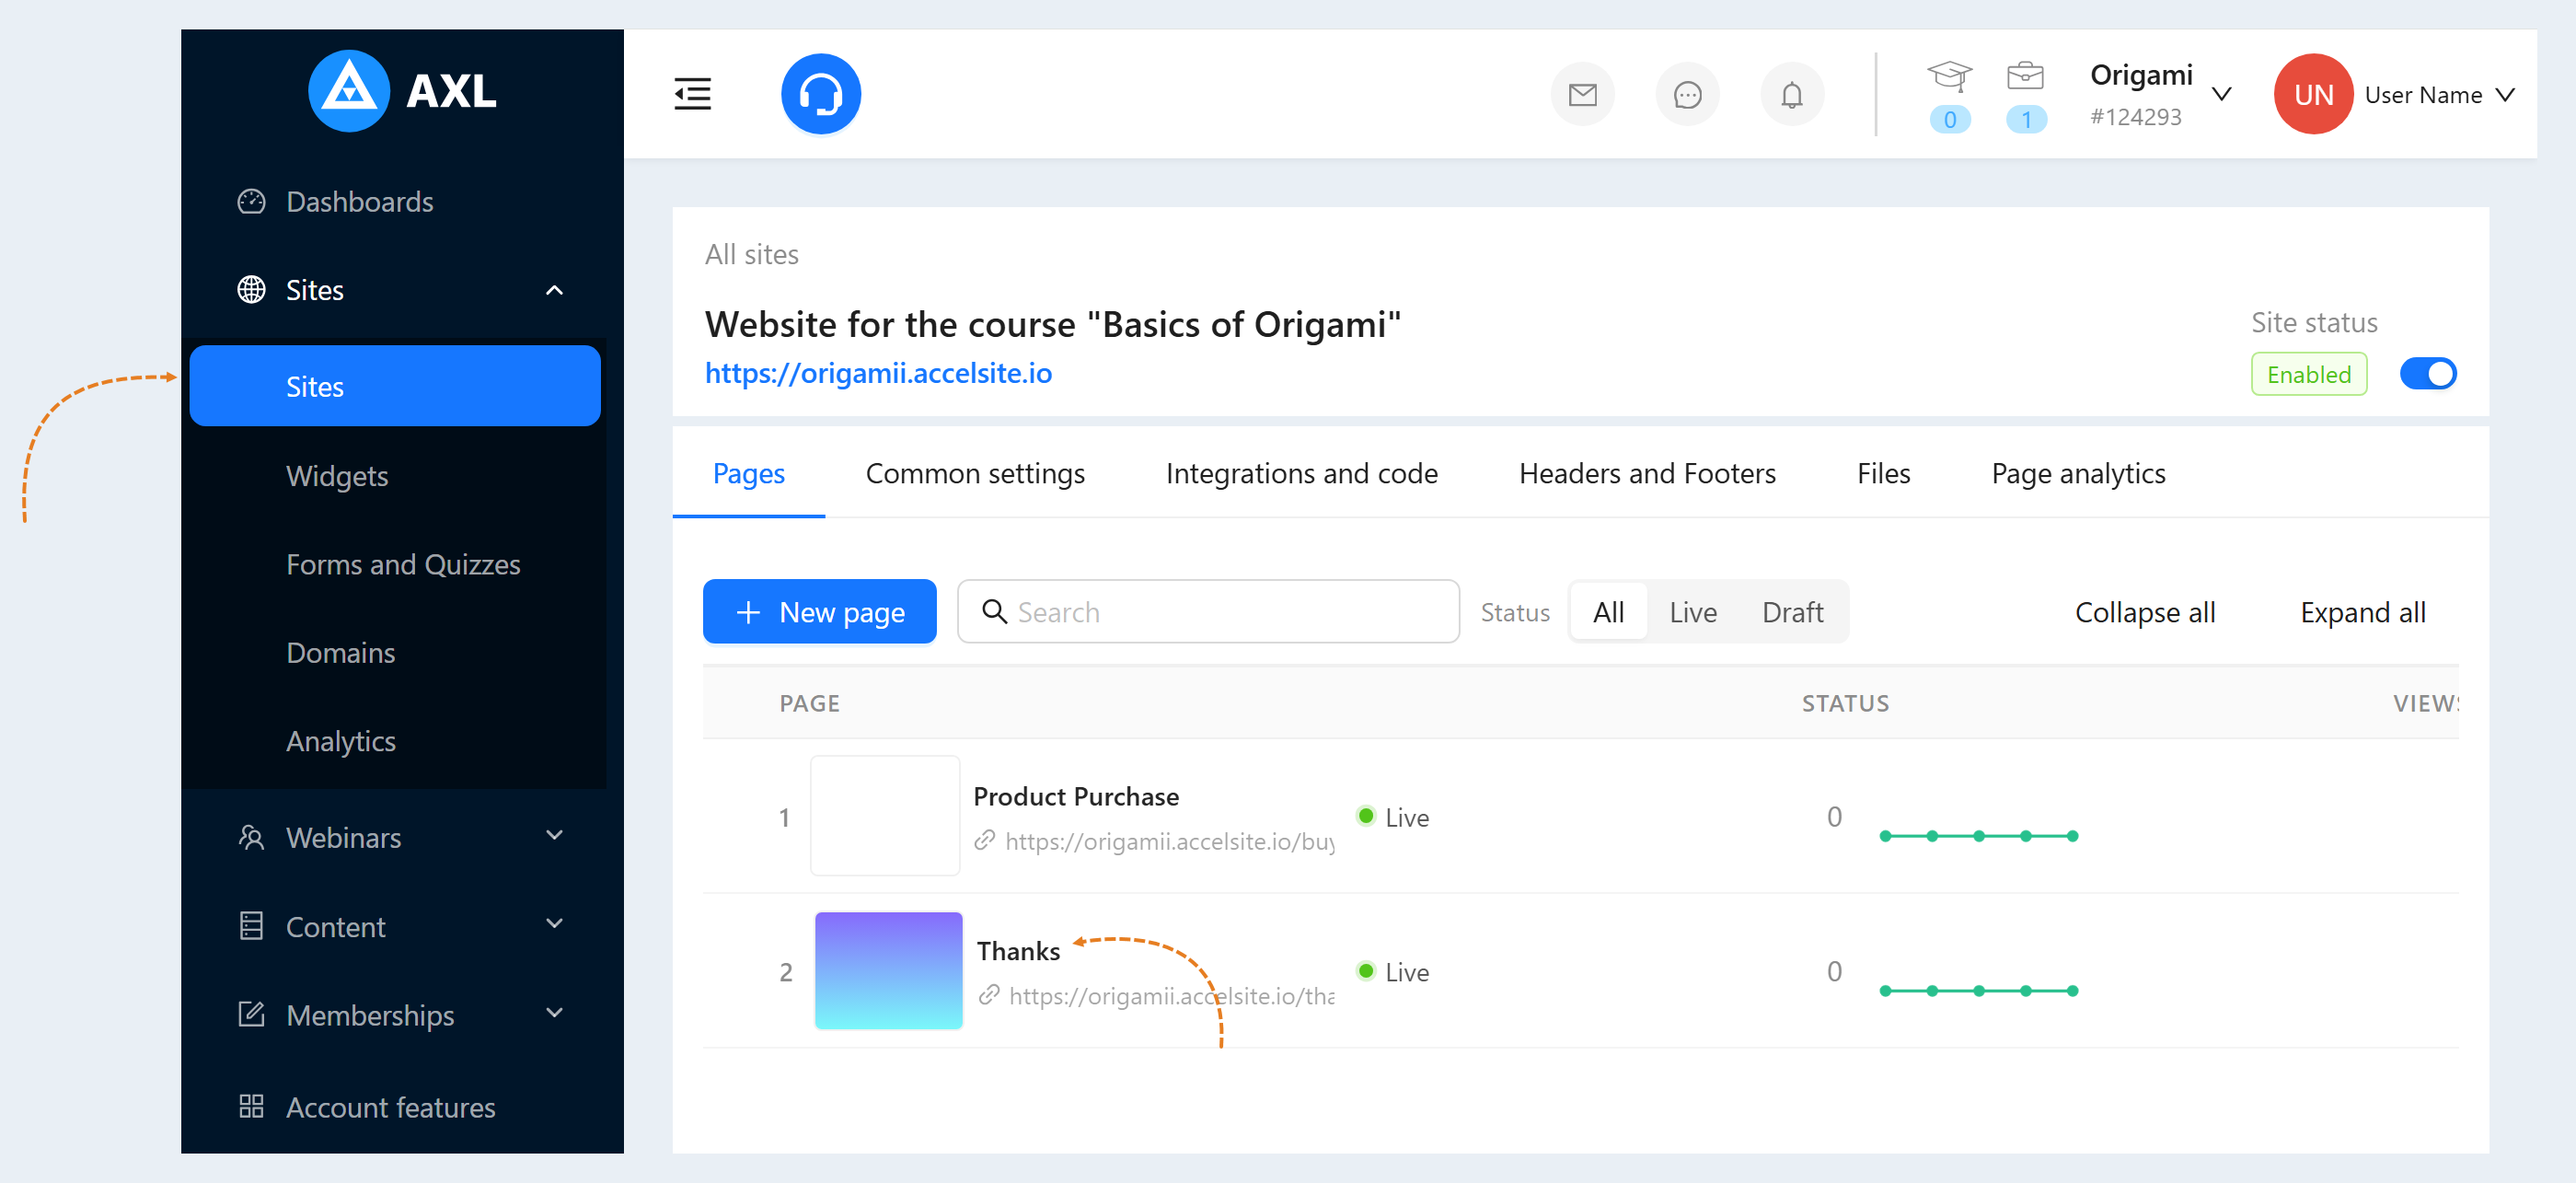
In the editor window of the gratitude page, select "Empty block" and click "Add Item". In the list of items, select "Text" and "Button". Drag the elements to the page field.
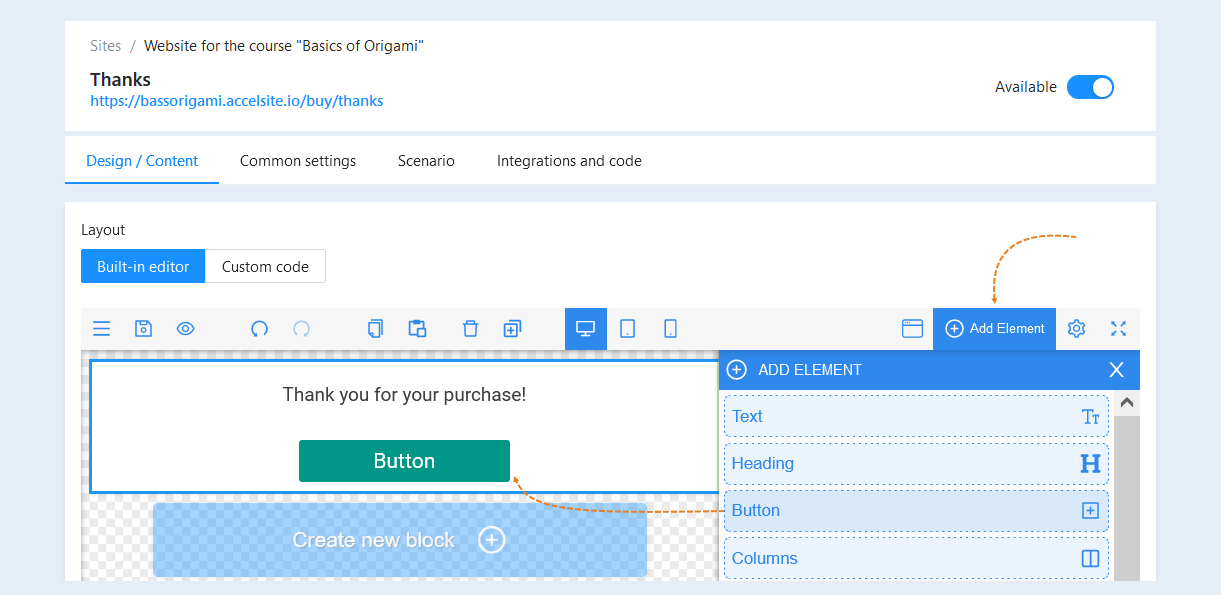
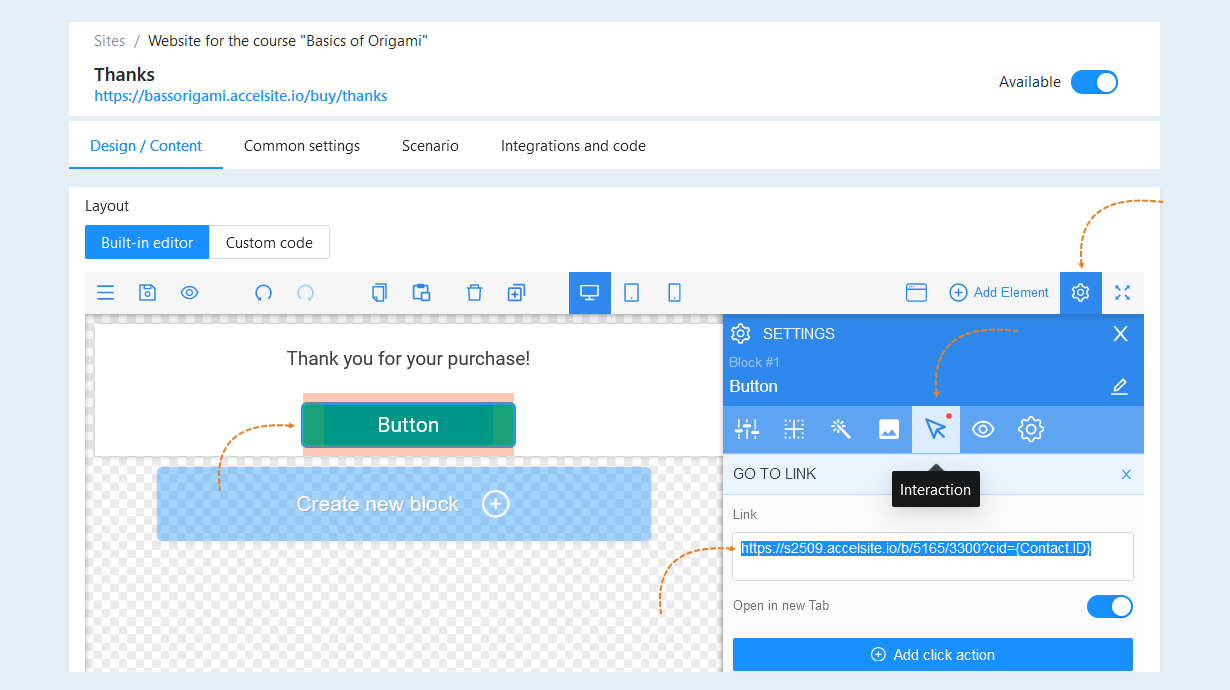
Select the entire button to open the settings for this item. The Settings toolbar opens on the right. In the settings, open the "Interaction" section, select the action by clicking "Follow the link". In the "Link" field, insert the link to the chat bot copied in step №1 of this article.
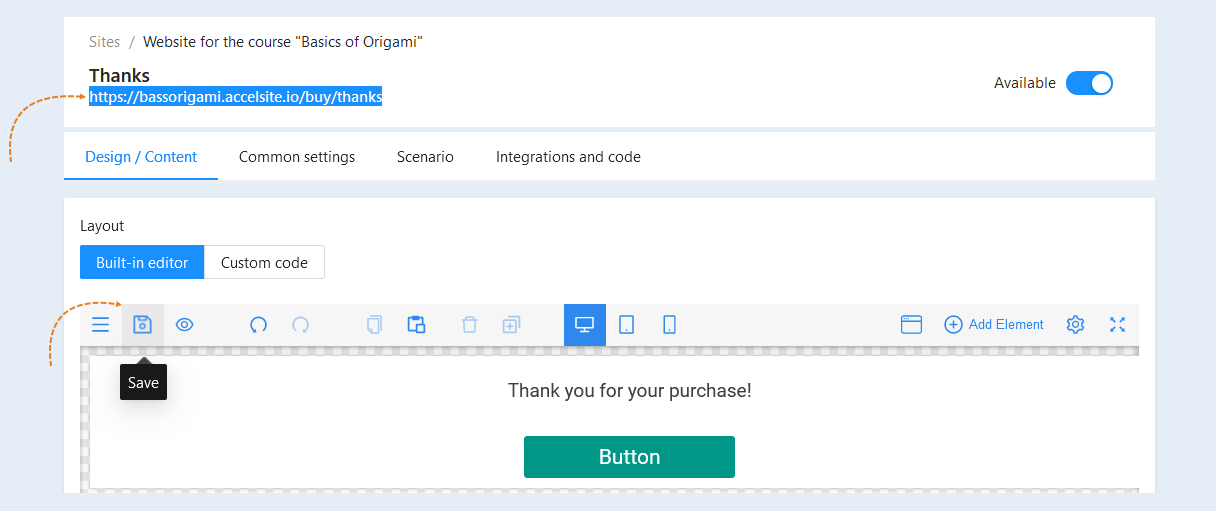
Click the "Save" button and copy the link to the thank you page. A link to the gratitude page is required at the previous step of this article. Paste the link to the thank you page in the "URL" field in the payment form settings.
Thus, by filling out the form and paying for the product, the user will be redirected to the gratitude page with a link to the chat bot for communication. A link to the chat bot for communication will also be sent to the user by email after payment for the product.
By clicking on the link to the chat bot for communication, the user will launch the scenario. According to the scenario, if the user has paid for the course, a link to the Telegram group will be sent to him in the chat bot. Following the link, the user will be automatically added to the Telegram group.
If the user has not paid for the course, he will receive a message in the chat bot asking him to write to the chat bot to resolve the issue.
If a user followed the link to the chat bot from another device and the system did not recognize his purchase, you can manually connect him to the CRM contact and approve his application to join the group.
If the user received a link to the chat bot from another person who paid for the purchase of the product, he will not be added to the Telegram group.
Read more about configuring the Telegram Group application in the article "Telegram Group Application".