Admins (AXL additional administrator) are an additional user (team member) in your account. In case you need an assistant in the work on the project, then you can add administrators.
By adding an admin, you can set access rights to your account. This means that for one administrator you can configure access only to the "Materials and Courses" section, and for another - only the "Chat with users and guests" section.
Click on the desired section of the article to go to its description:
How to add admin
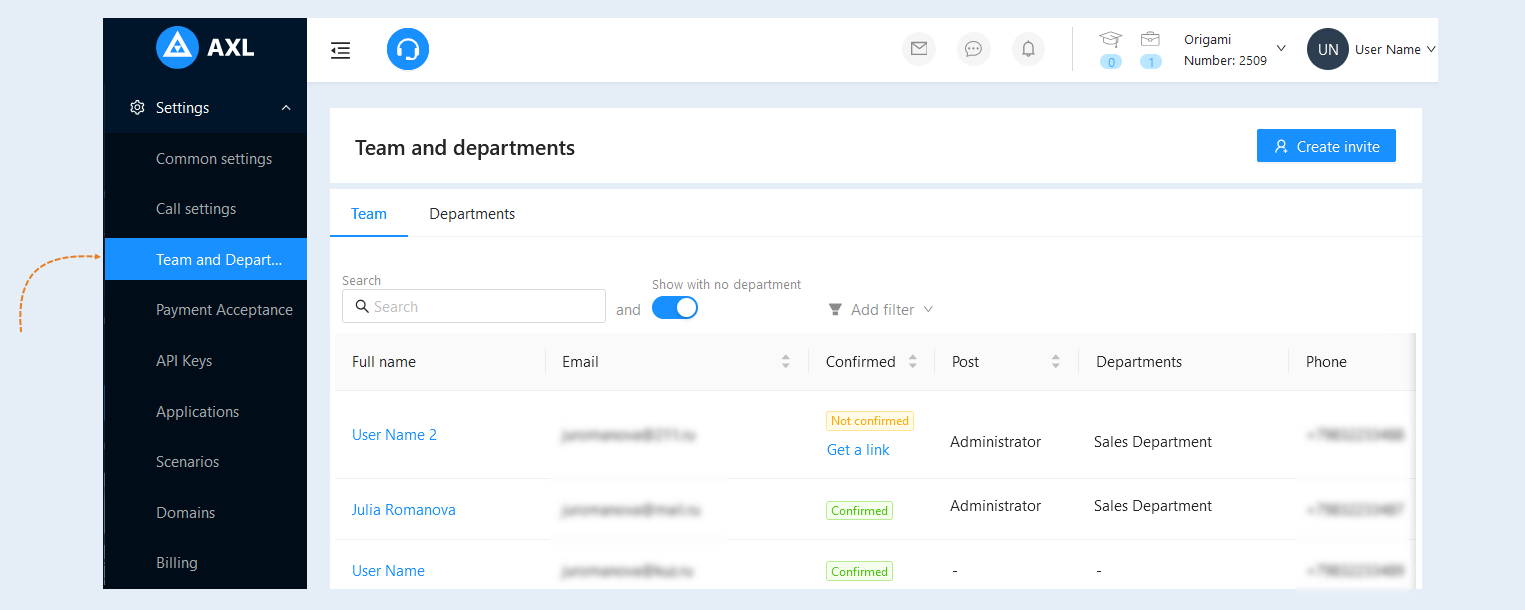
Go to the "Settings" - "Team and departments" section. Here you see one user - this is your account. To add additional administrators, click the Create Invitation button.
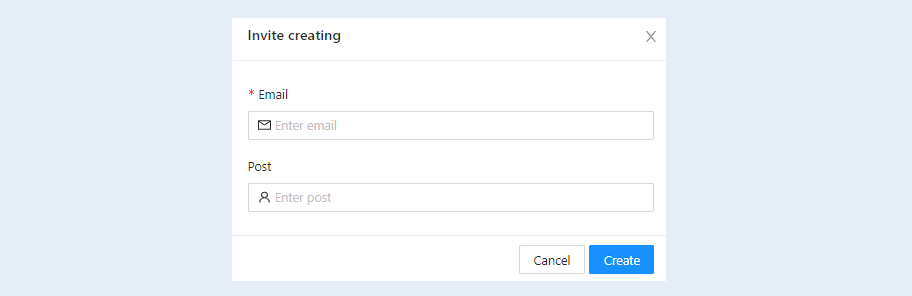
An additional window will open, fill in the fields:
- Email address. Write the email address of the user you want to join your account.
- Position. Enter the title for the invited user.
Click Create.
This user will receive an email to the address you provided. The letter will contain a link with access to your account on the AXL platform and the ability to create an account (login and password). The user follows the link and registers on the AXL platform.
Note: if the admin already has an AXL account, he will receive an email invitation to join your account. You do not need to activate your account.
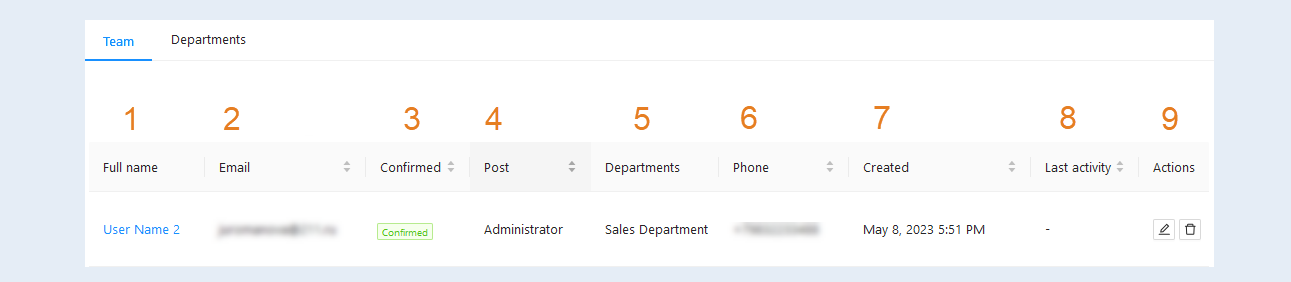
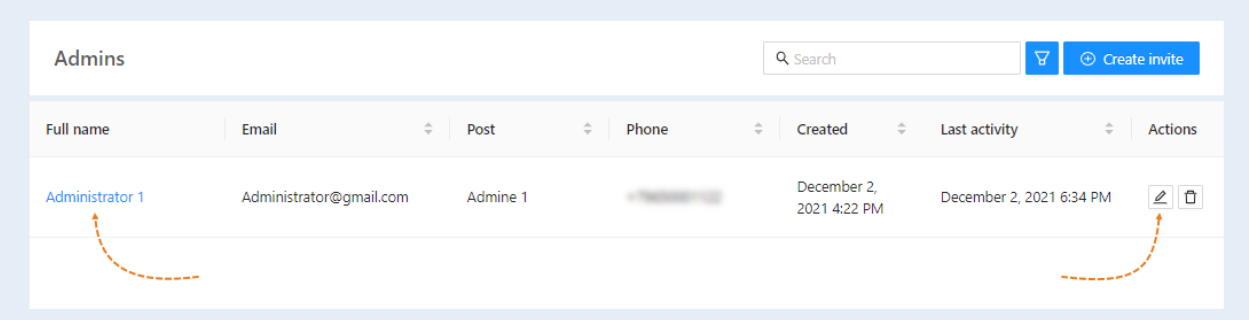
After creating a new team member in the “Team” tab, this user is automatically added to the list of admins. Here you can see the following information:
- Full name. The name of the admin is specified.
Email. The email address of the team member is specified.
Confirmed. It is indicated whether the admin has confirmed his email. Click the "Get Link" button to receive an email confirmation link.
Post. The position of the team member is indicated.
Departments. The name of the department in which the employee is listed is shown. For more information about the Departments section, see the article below.
Phone. The phone number is specified.
Created. The date and time of the invitation creation is specified.
Last activity. The date and time of the last activity of the team member is indicated.
Actions:
The "Edit" button. Click to open the contact card.
The "Delete" button. Click to delete this admin.
Now you can edit his personal data and set access rights. Click on the admin name or on the "Edit" button.
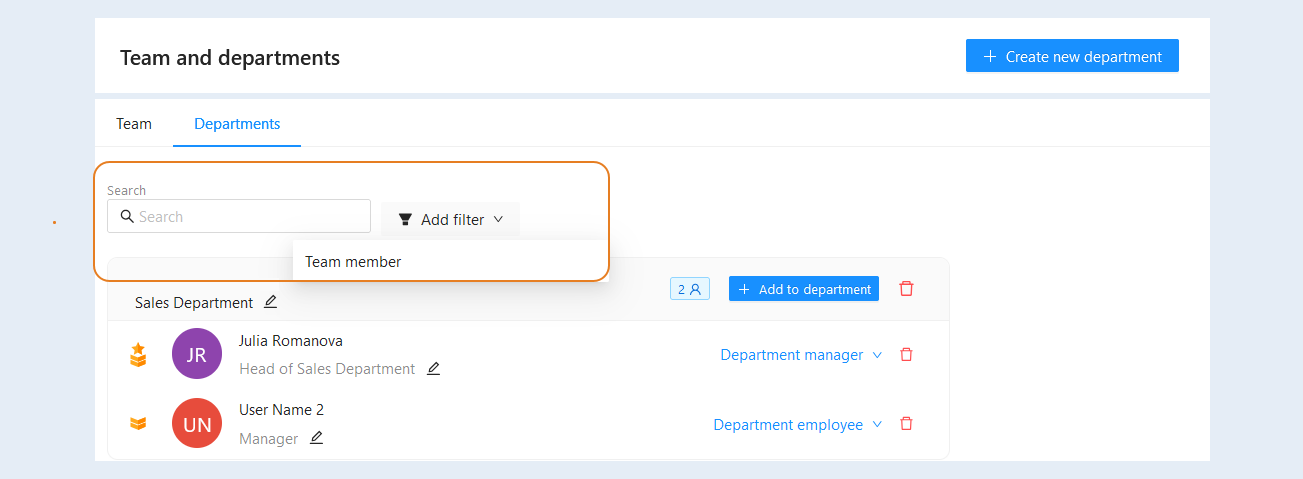
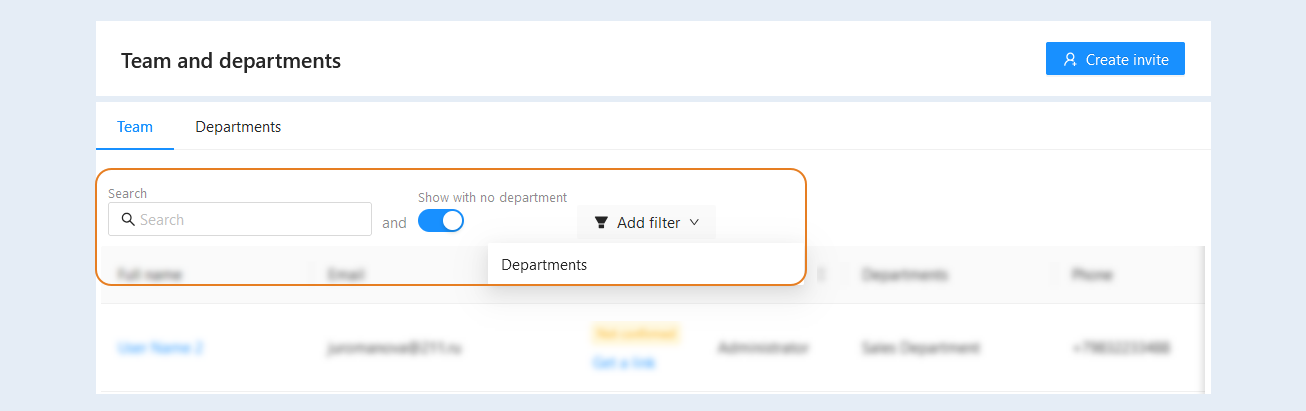
The search bar and filter are available at the top of the section. Use them to quickly find the right department or employee.
- Search. Use this string for free keyword search.
Show with no department. This filter allows you to display team members who do not belong to any particular department. This can be useful for finding and viewing employees who work outside departments or on projects that are not linked to specific departments.
Departments. This filter allows you to select team members by specific departments. Selecting this filter will allow you to see the employees who work in a particular field or group.
Common
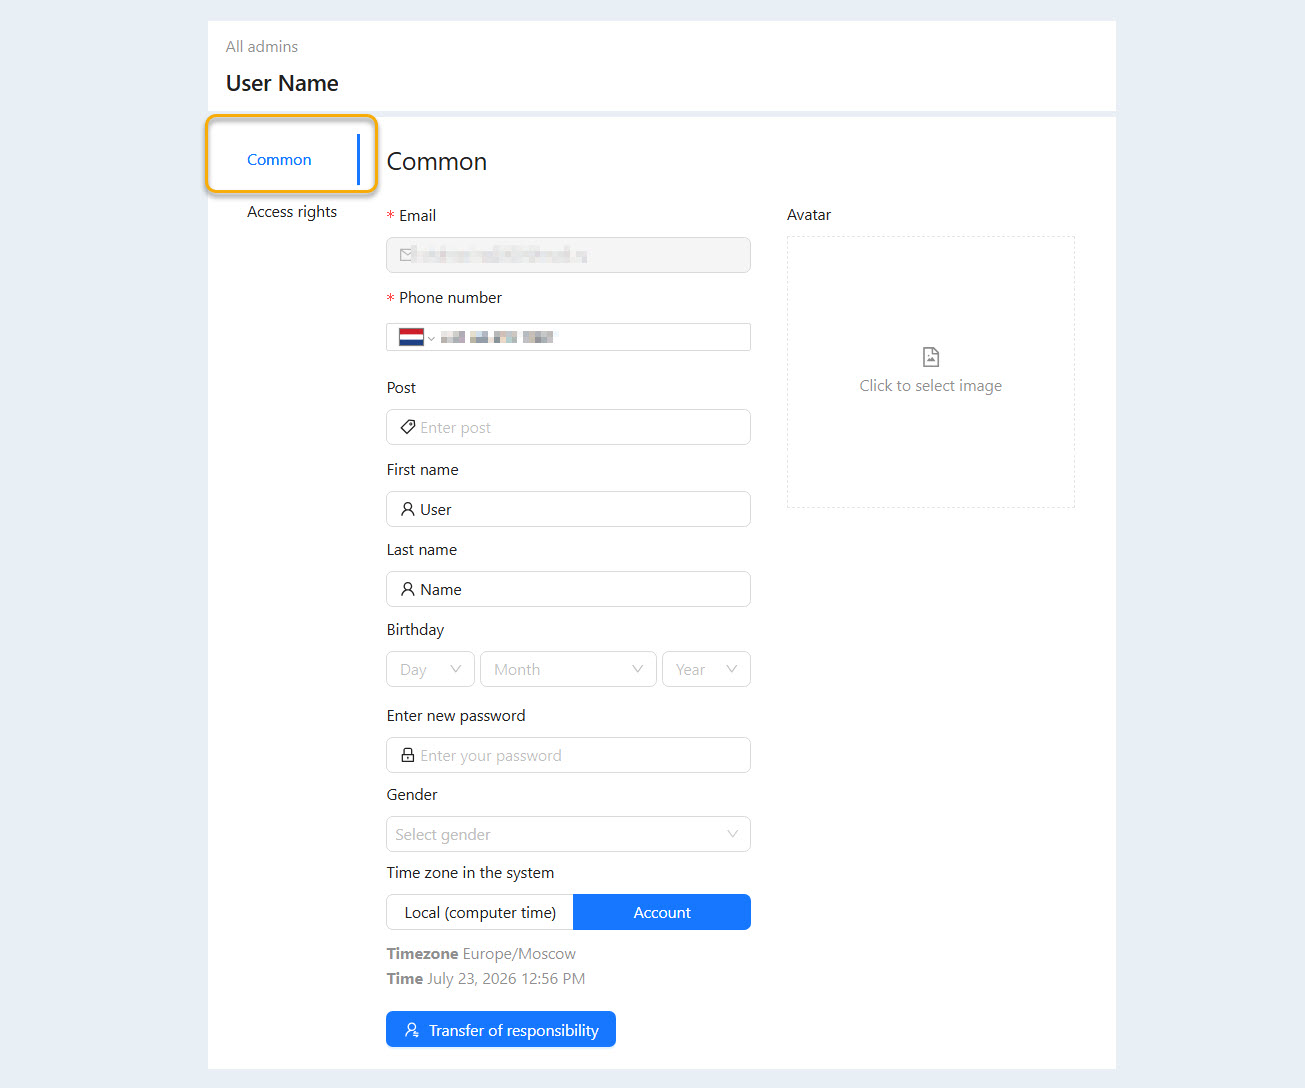
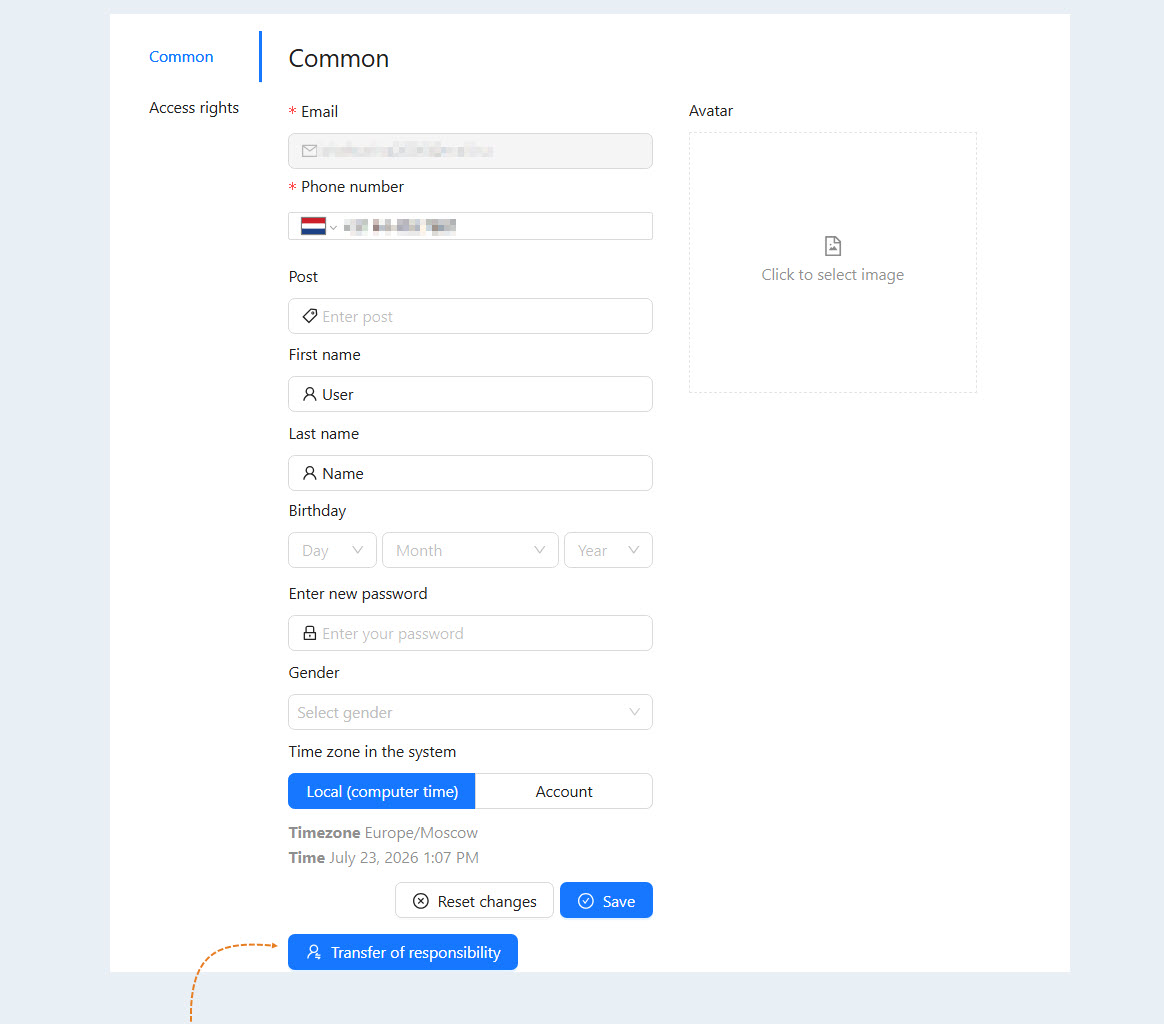
This section completely coincides with the "Profile" section. You can make changes to the personal data of the administrator: change the email, phone number, position of the user, first and last name of the employee. You can also add information about his birthday, gender and change the password for the account in your account.
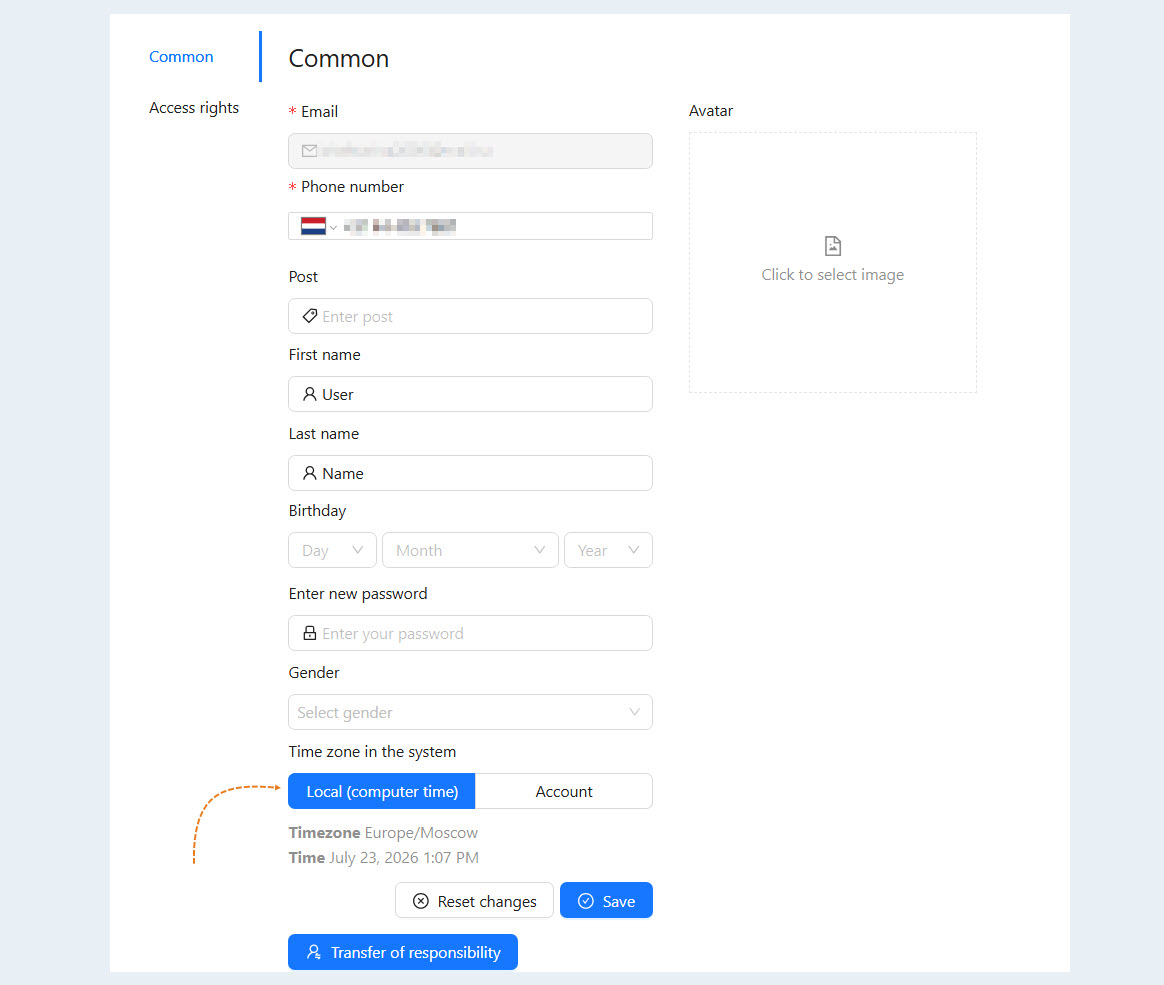
In the "Time zone in the system" section, you can select a common time zone for team members. Each administrator can choose the time zone in their settings that they want to see when displaying dates. Select the local (computer time) or account time zone. The time zone, date and time of the selected zone will be displayed below.
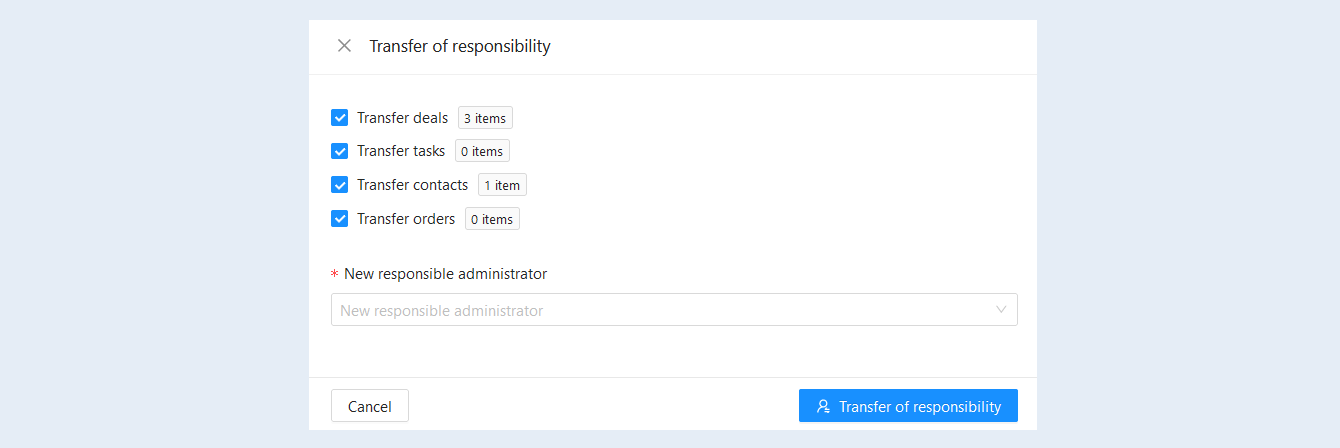
From the admin card, you can transfer all the current tasks of this employee to other administrators. To do this, click the "Transfer of responsibility" button.
The window that opens shows all deals tasks, contacts and orders that you can transfer to another employee. Check the boxes next to the required items, select a new responsible administrator from the list and click the "Transfer of responsibility" button.
Access rights
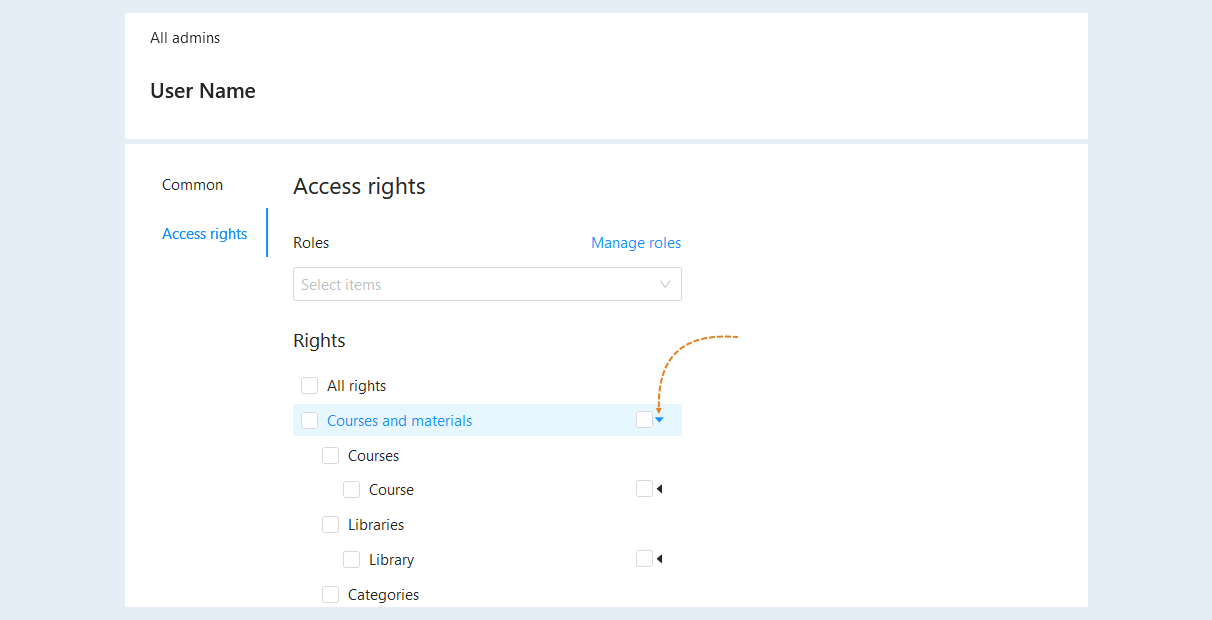
By default, the new administrator has all access rights disabled in your account on the AXL platform. You need to add the required rights to each new administrator.
Click on the Expand icon to see the subsections.
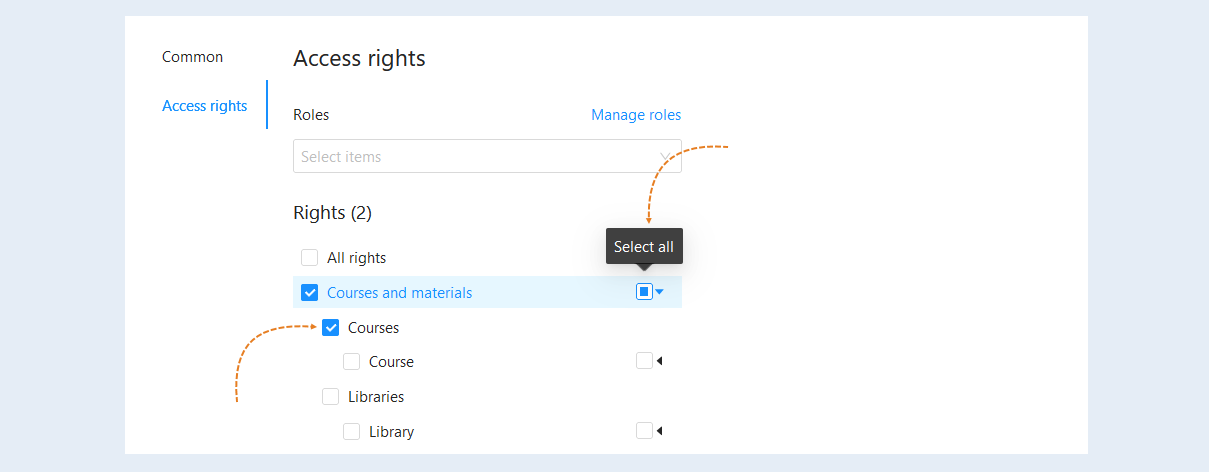
Check the box next to the desired section to give the administrator access to it. Or check the "Select all" box to highlight the entire section.
How to choose access options
Access rights are determined by the functions that the administrator will perform. And for each added administrator, this will be a different set of rights. For example, an administrator who checks written assignments may not have access to the "Mail" section, because another employee is responsible for this function.
Let's consider in detail the access rights for the administrator of your account.
All rights. This option adds all access rights to the administrator. That is, the admin gets full access to your account and can view and edit all data about the account.
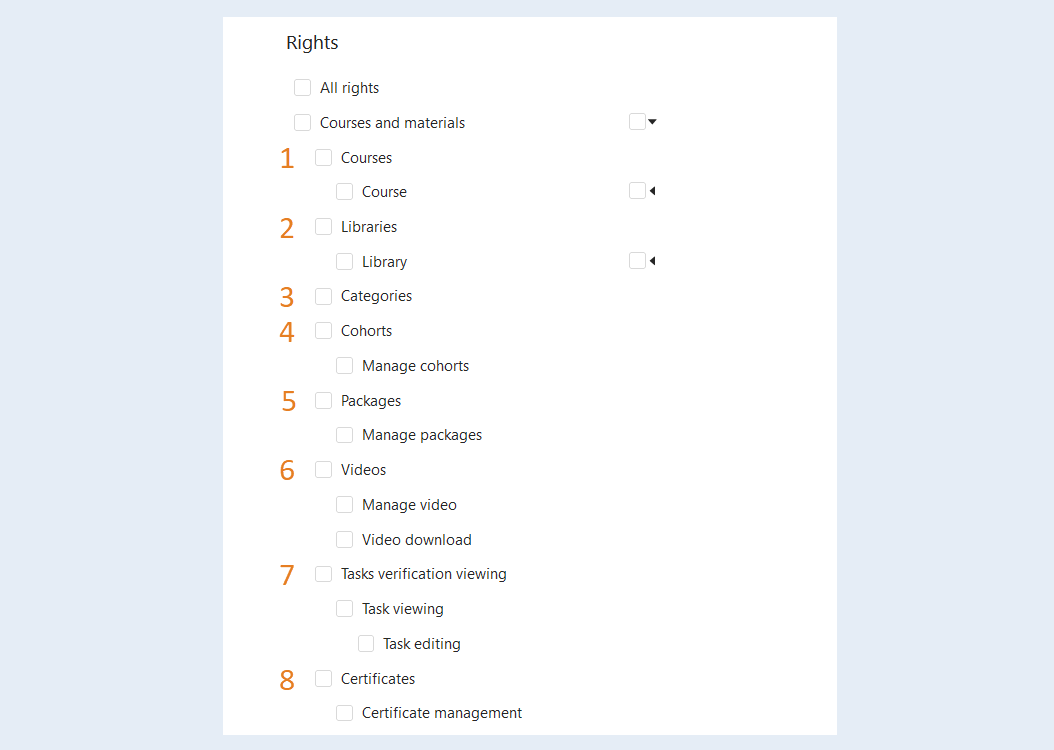
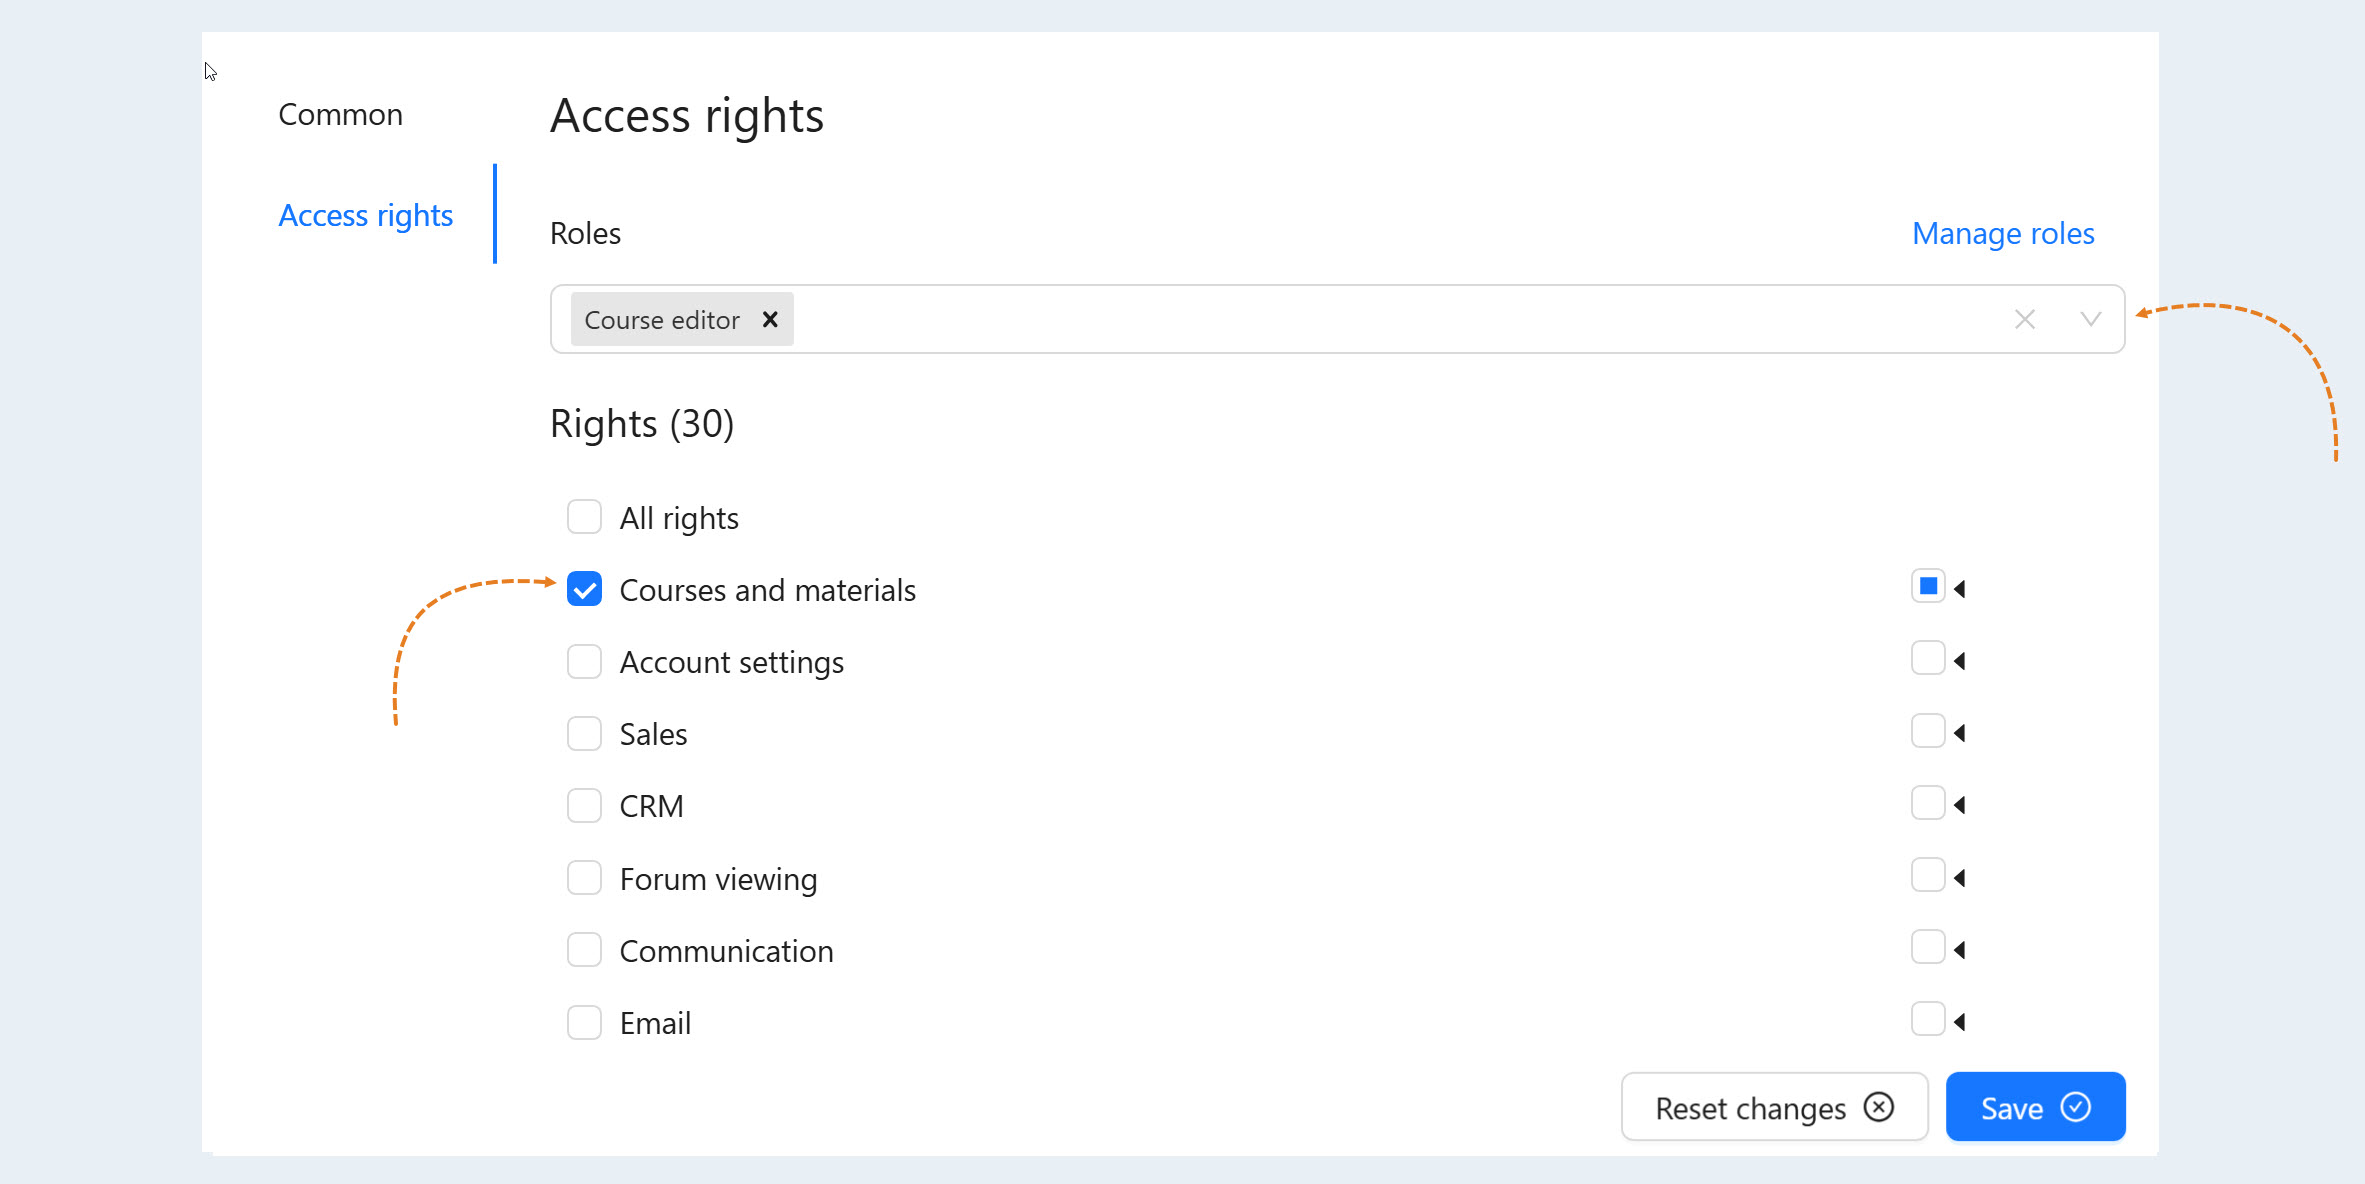
Courses and materials. The admin gets access to all courses and materials of the account. Click on the arrow and select sub-items if you want to restrict the actions of the admin in this section:
Courses. Gives you the right to manage account courses.
Libraries. Gives the right to manage the Library section.
Categories. Gives the right to manage categories.
Cohorts. Gives the right to control the flows.
Packages. Gives you the right to manage packages.
Videos. Gives you the right to manage and download videos.
Tasks verification viewing. Grants the right to review written assignments and edit assignments.
Certificates. Grants the right to manage certificates.
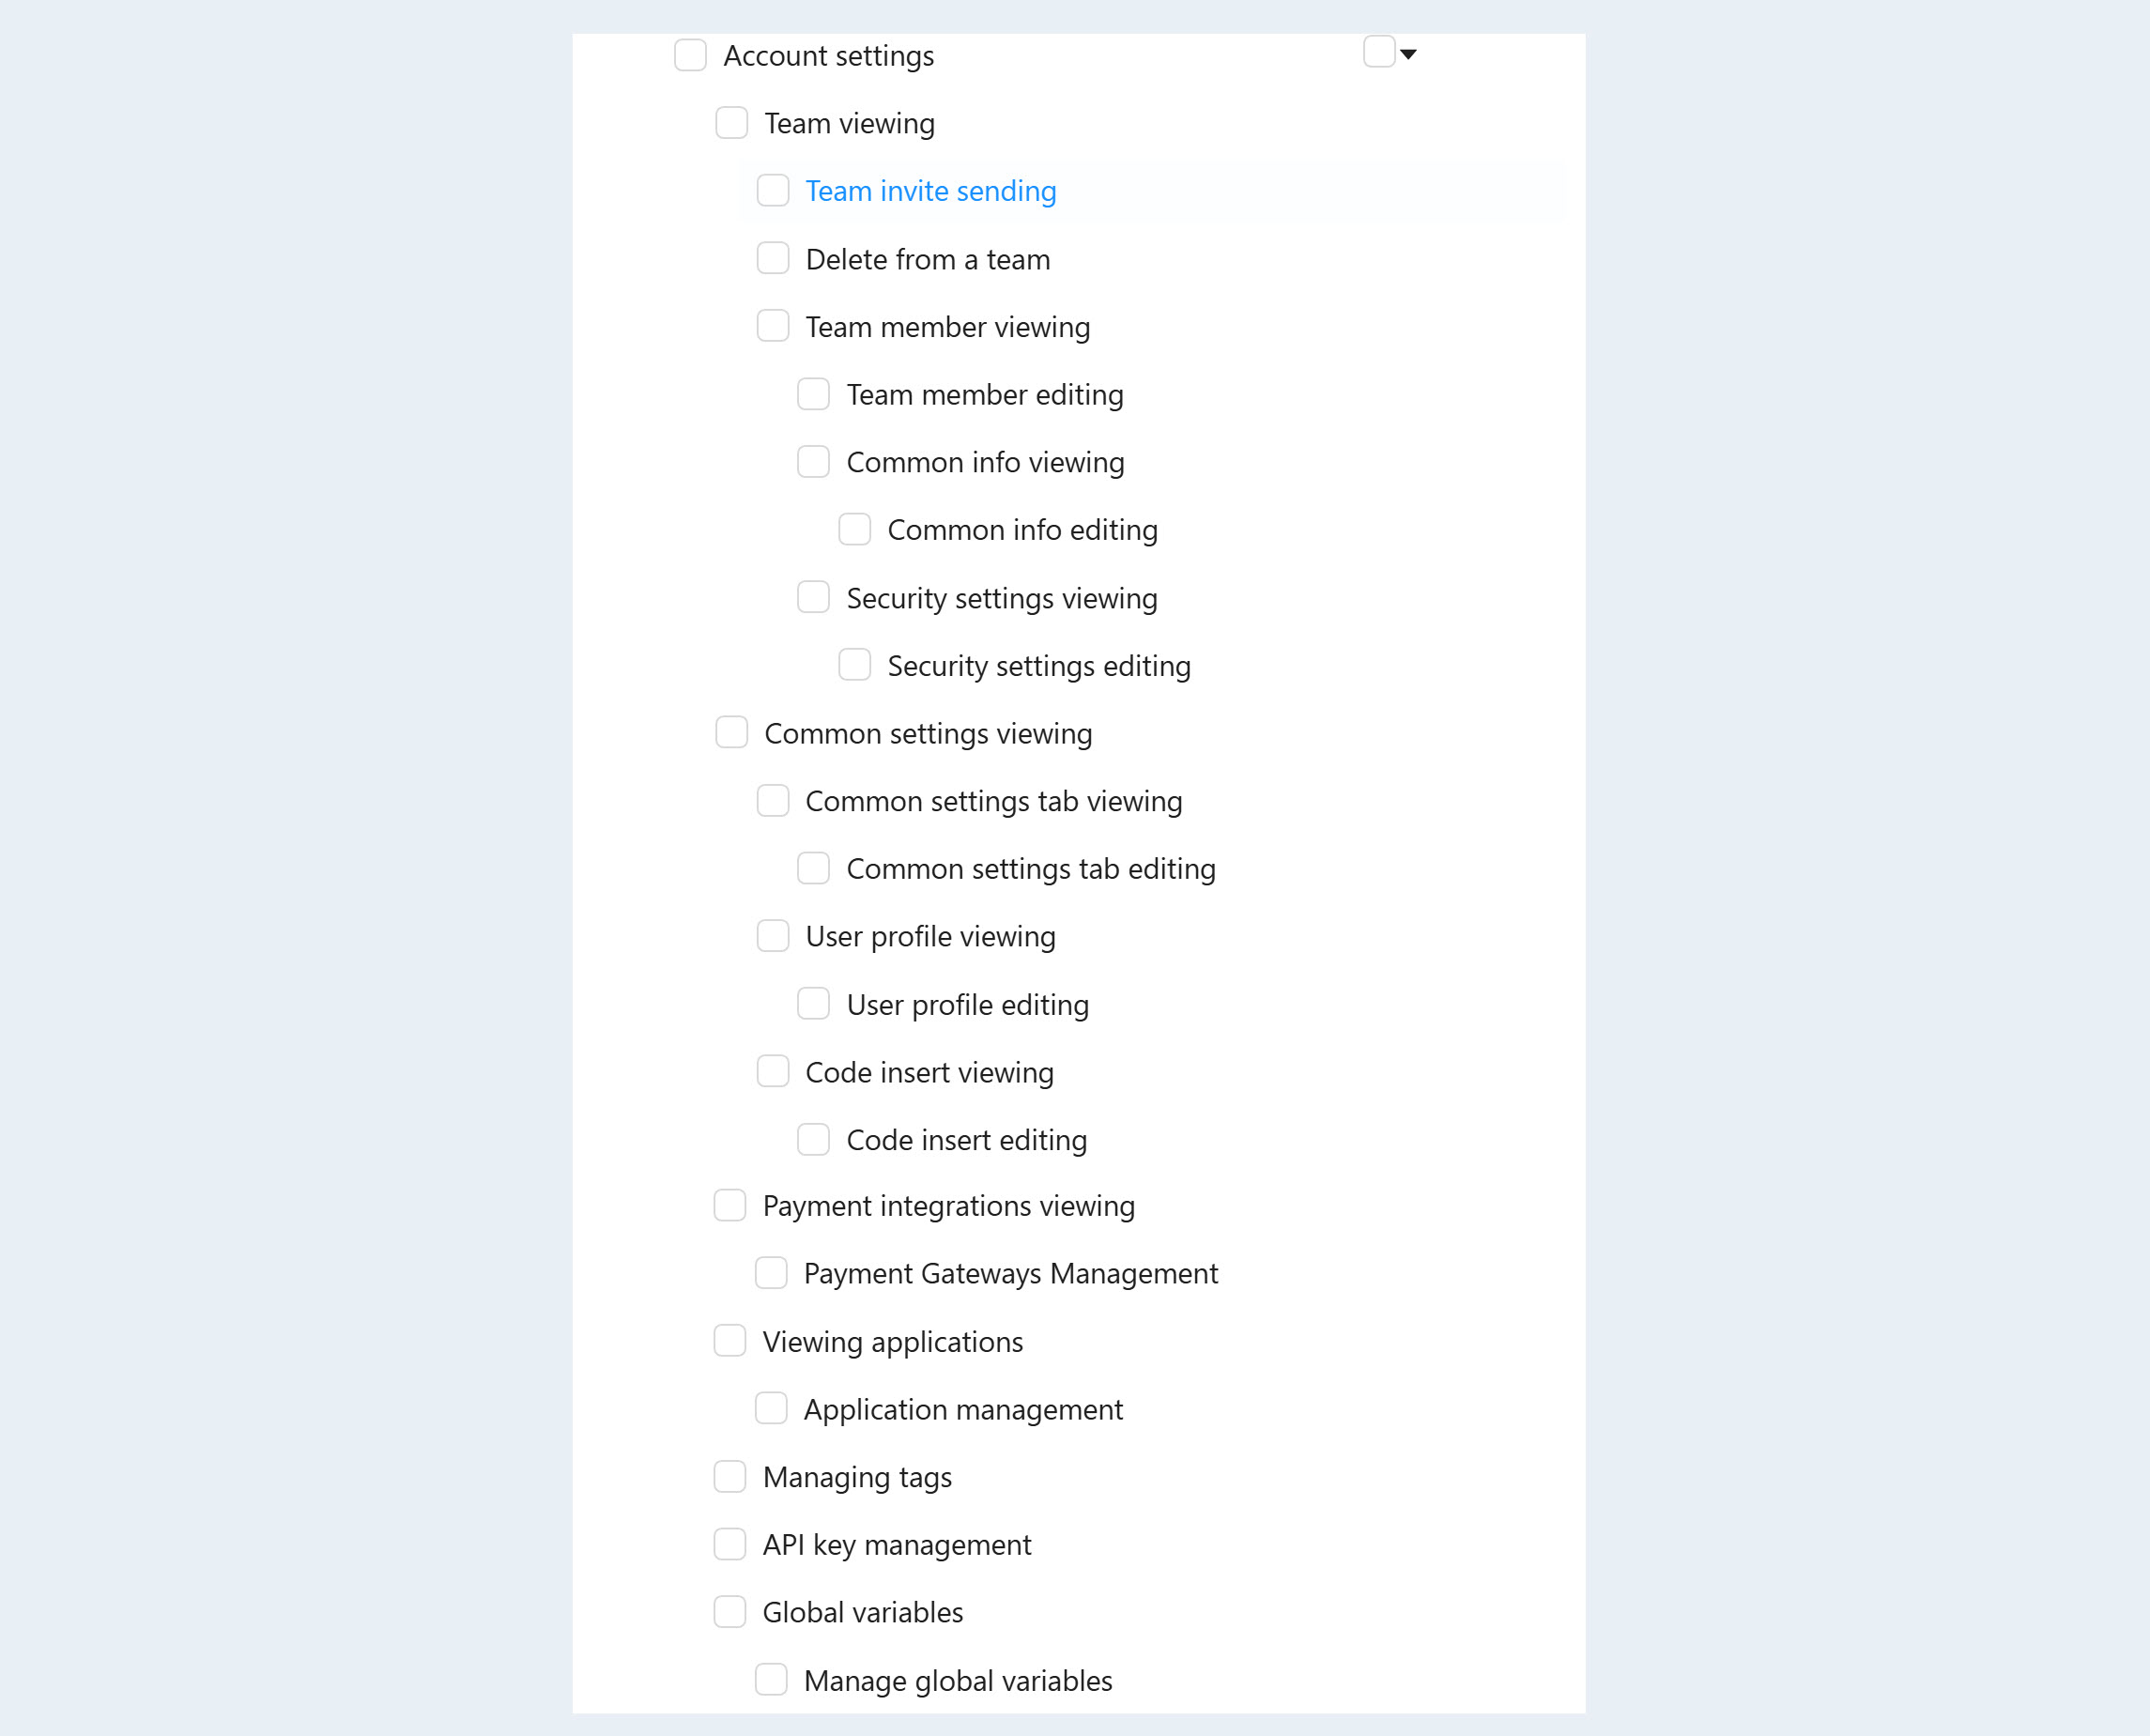
Account settings. Grants the right to view and edit general account settings, user profile, payment integrations, team and API key management.
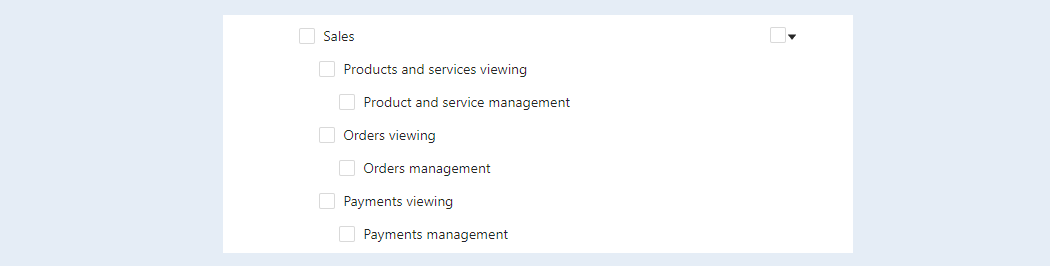
Sales. Grants the right to view and edit account products and services, orders and payments.
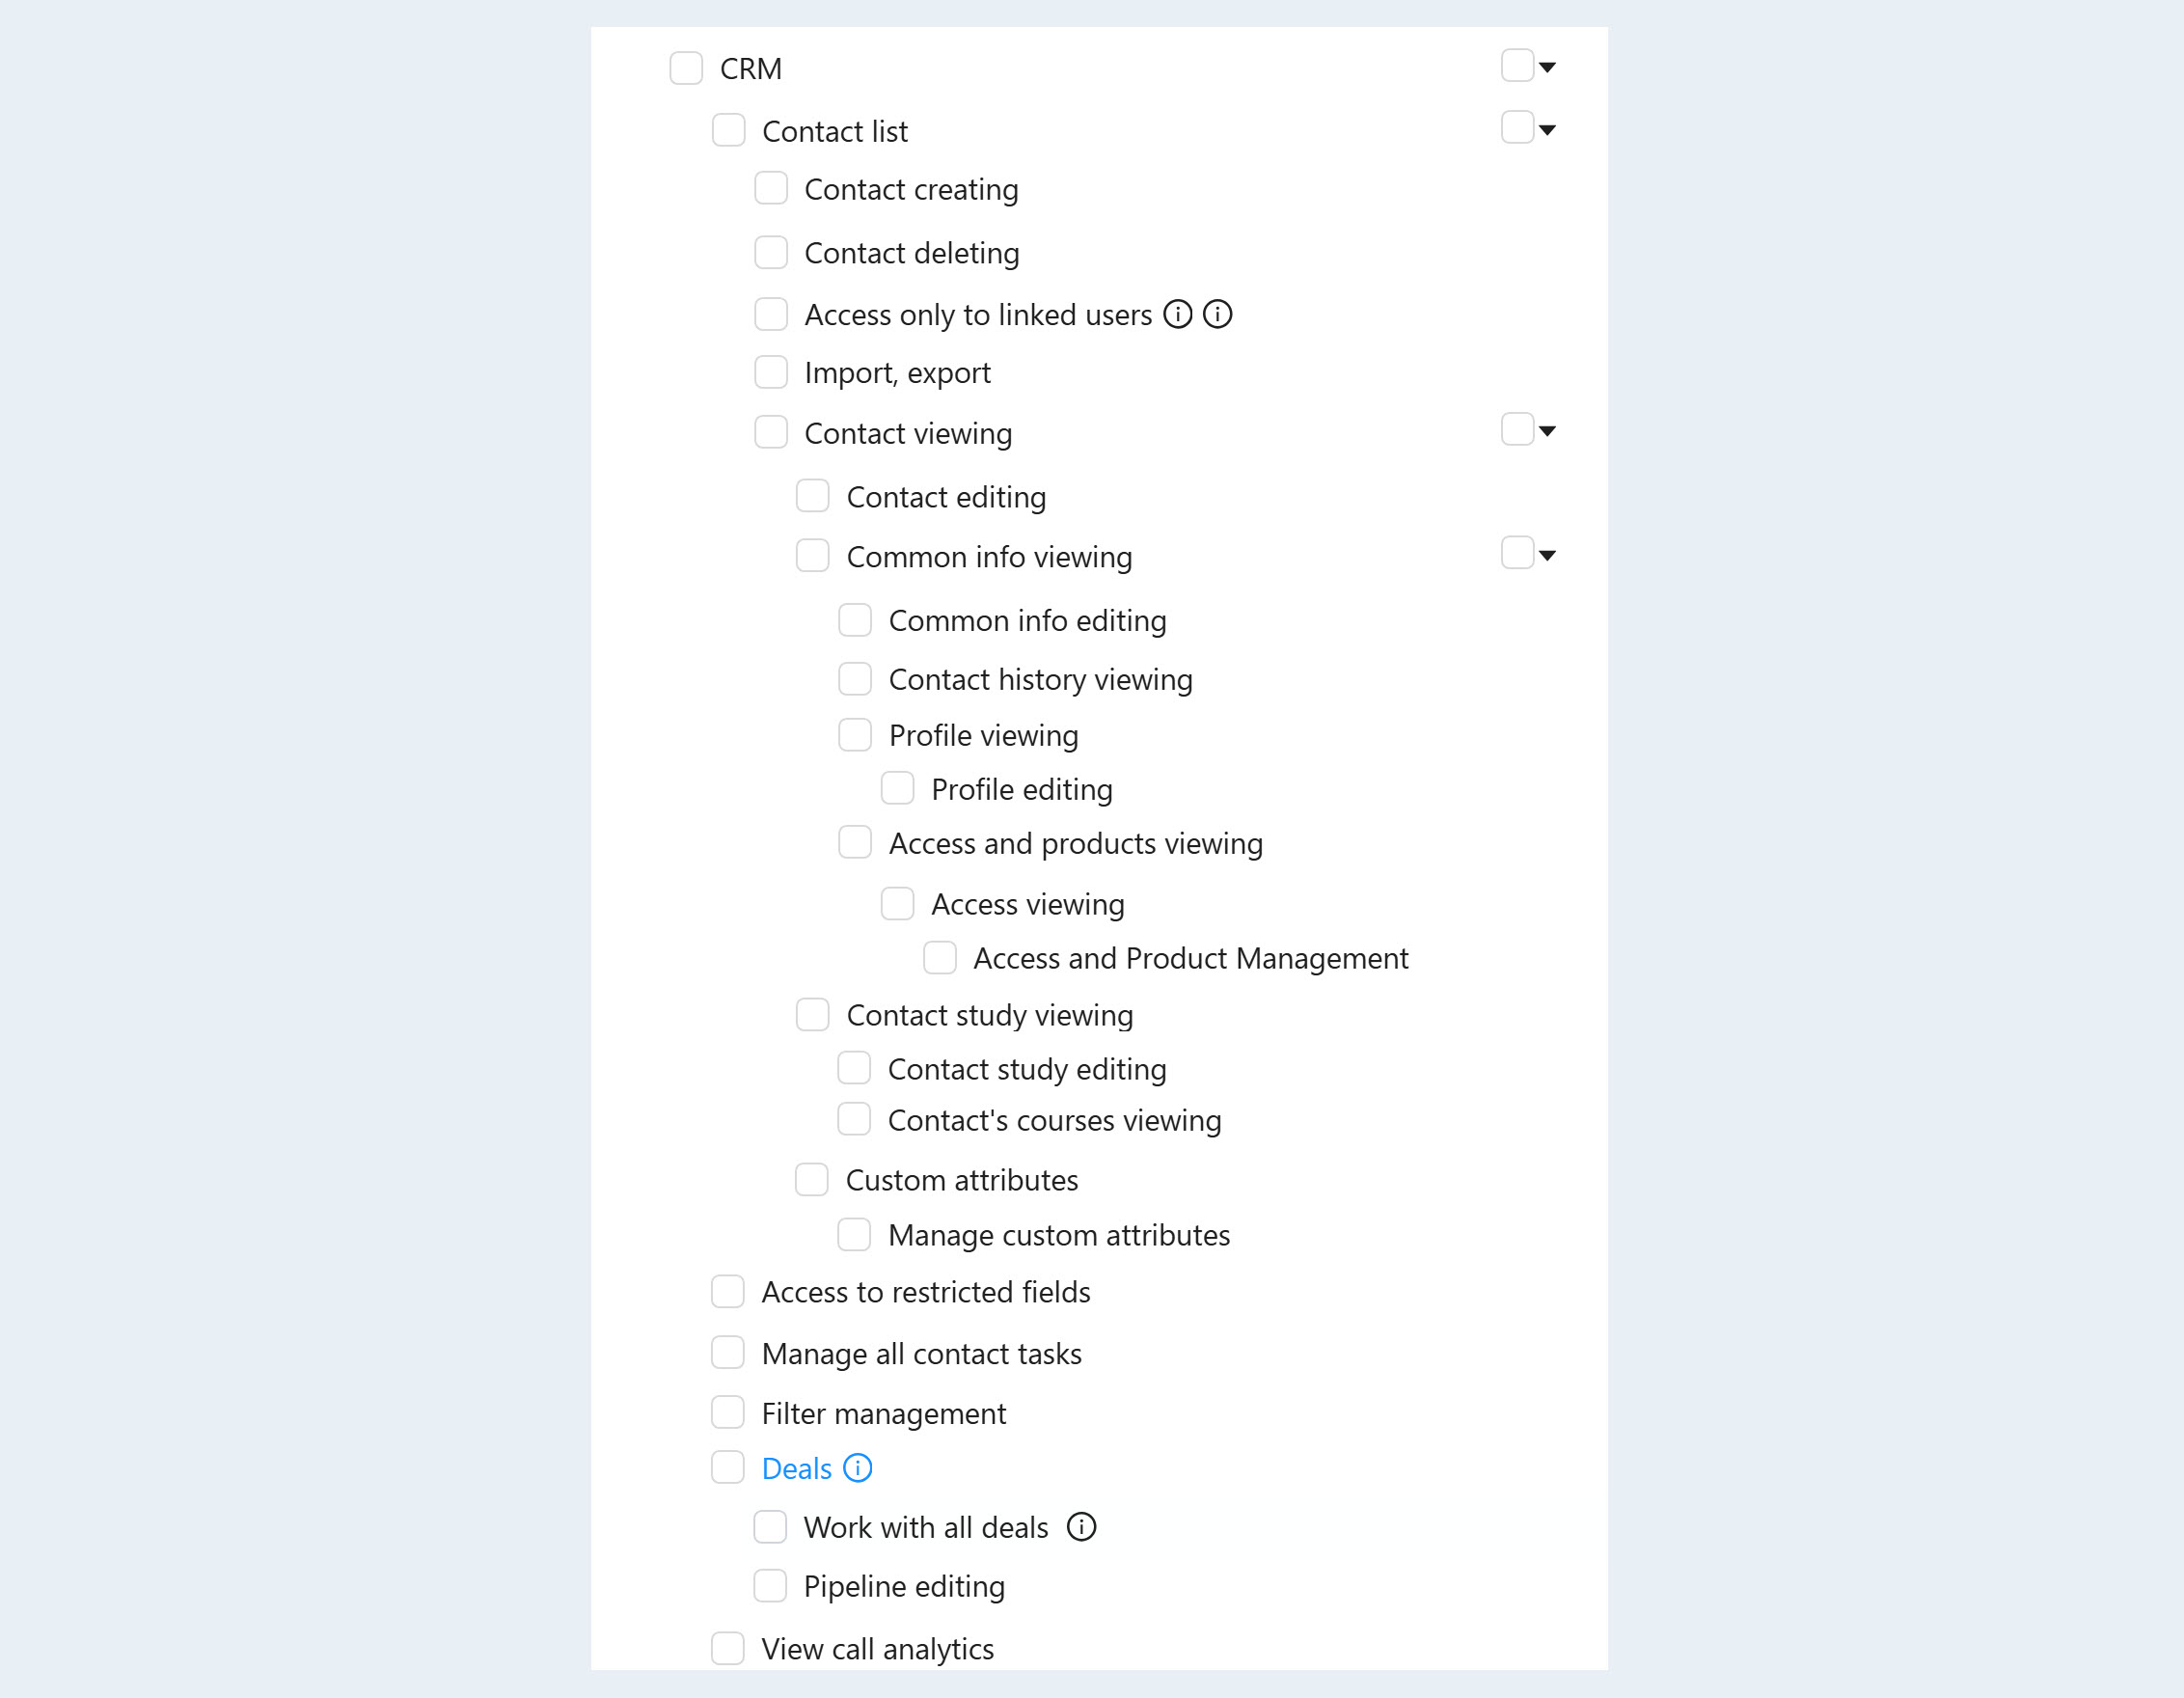
CRM. Gives access to the list of contacts - personal data of users of your account. Also, the administrator gets access to information about placed orders from clients, and also gives the right to manage contact tasks.
Viewing the forum. Gives the right to view and administer the forum.

Email. Gives the right to send mailing lists and set up mail.

Sites and webinars. Gives the right to view and edit sites, manage widgets and webinars.
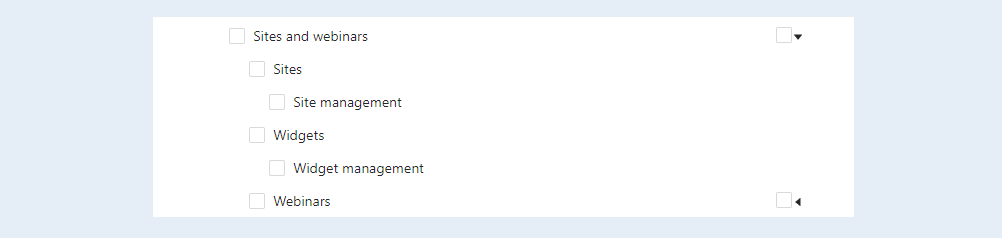
Scenario. Gives the right to view and edit scripts. Read more in the "Scenario" article.

Communication. It gives the right to correspond with users and guests of your account, as well as manage chat channels and chat bots.

Affiliate program. Gives you the right to set up and manage the affiliate program. Read more about this section in the article "Affiliate Program".
Gamification. Gives the right to manage the "Gamification" section. Read more about this section in the article "Gamification".
Tariff management (billing). Gives the right to configure and manage the rates of courses.
Sharing settings. Gives you the right to configure the "Settings sharing" section. For more information about this section, see the article "Sharing settings".
Using the File Manager. Grants access to the "File Manager" section. Read more about this section in the article "File Manager".

After you have added administrator access rights, click the "Save" button.
You can change the access rights of your administrators at any time, as well as remove them from your account or add new ones.
System roles
System roles are the title and job function of your account admin. You can set a role for each admin. To do this, click the arrow inside the Roles field. And select a role from the list provided.
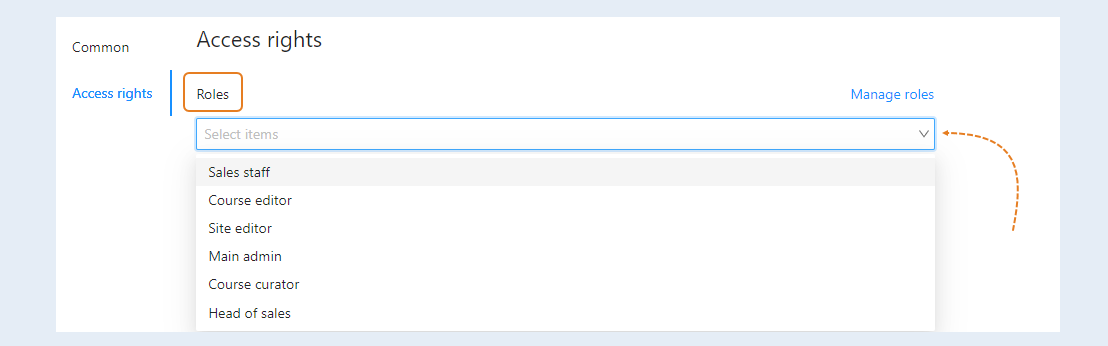
The role has a ready-made set of admin rights. For example, the Course Editor role has access rights to the Courses and Materials section. You can choose from a list of roles or create a new role and define a set of rights for this role.
Role management
In order to view the set of rights for each role and make changes, click on the "Manage roles" button.
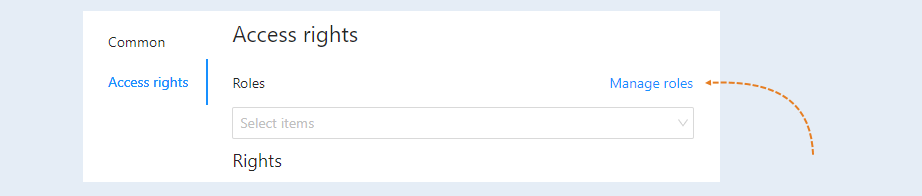
An additional window will open with a list of rights for each role. Default system roles:
- Sales staff. Access to sections: CRM to your own (contact profile; access and product management; history; training information; access only to linked contacts).
- Course editor. Access to sections: courses and materials.
- Site editor. Access to the section sites.
- Main admin. Full access to all sections of the site.
- Course curator. Access to sections: checking tasks, CRM to your own.
- Head of sales. Access to sections: CRM.
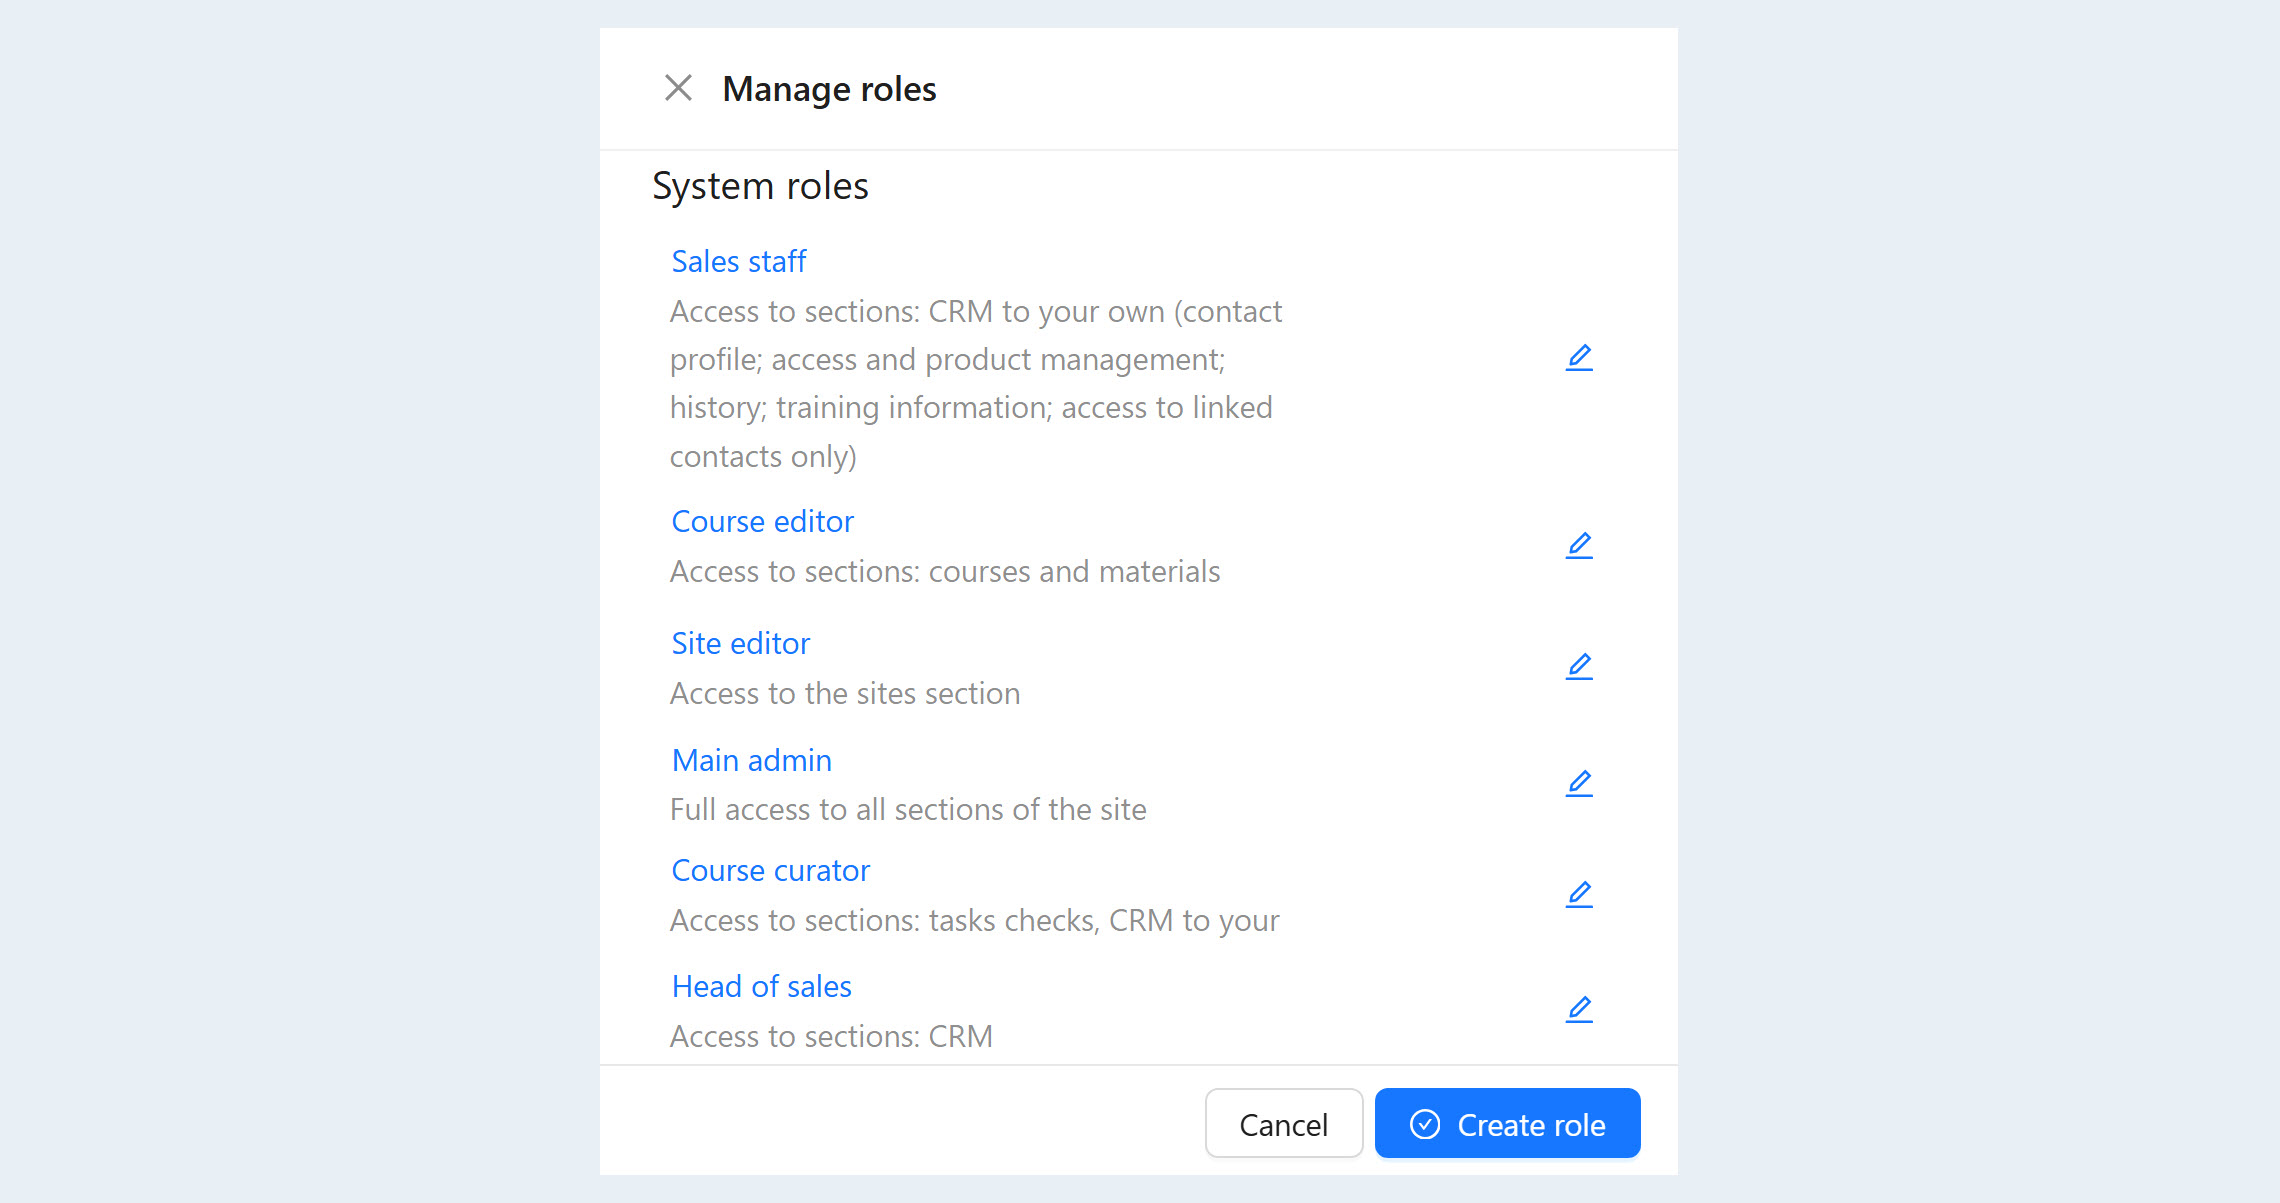
System roles cannot be changed. However, you can create a new role and add the necessary rights to this role. Click the Create Role button. And fill in the fields:
- Name. Write the name of the role.
- Description. Add a description for the role.
- Role based. You can select several options from the list of system roles.
- Rights. Select access rights from the list.
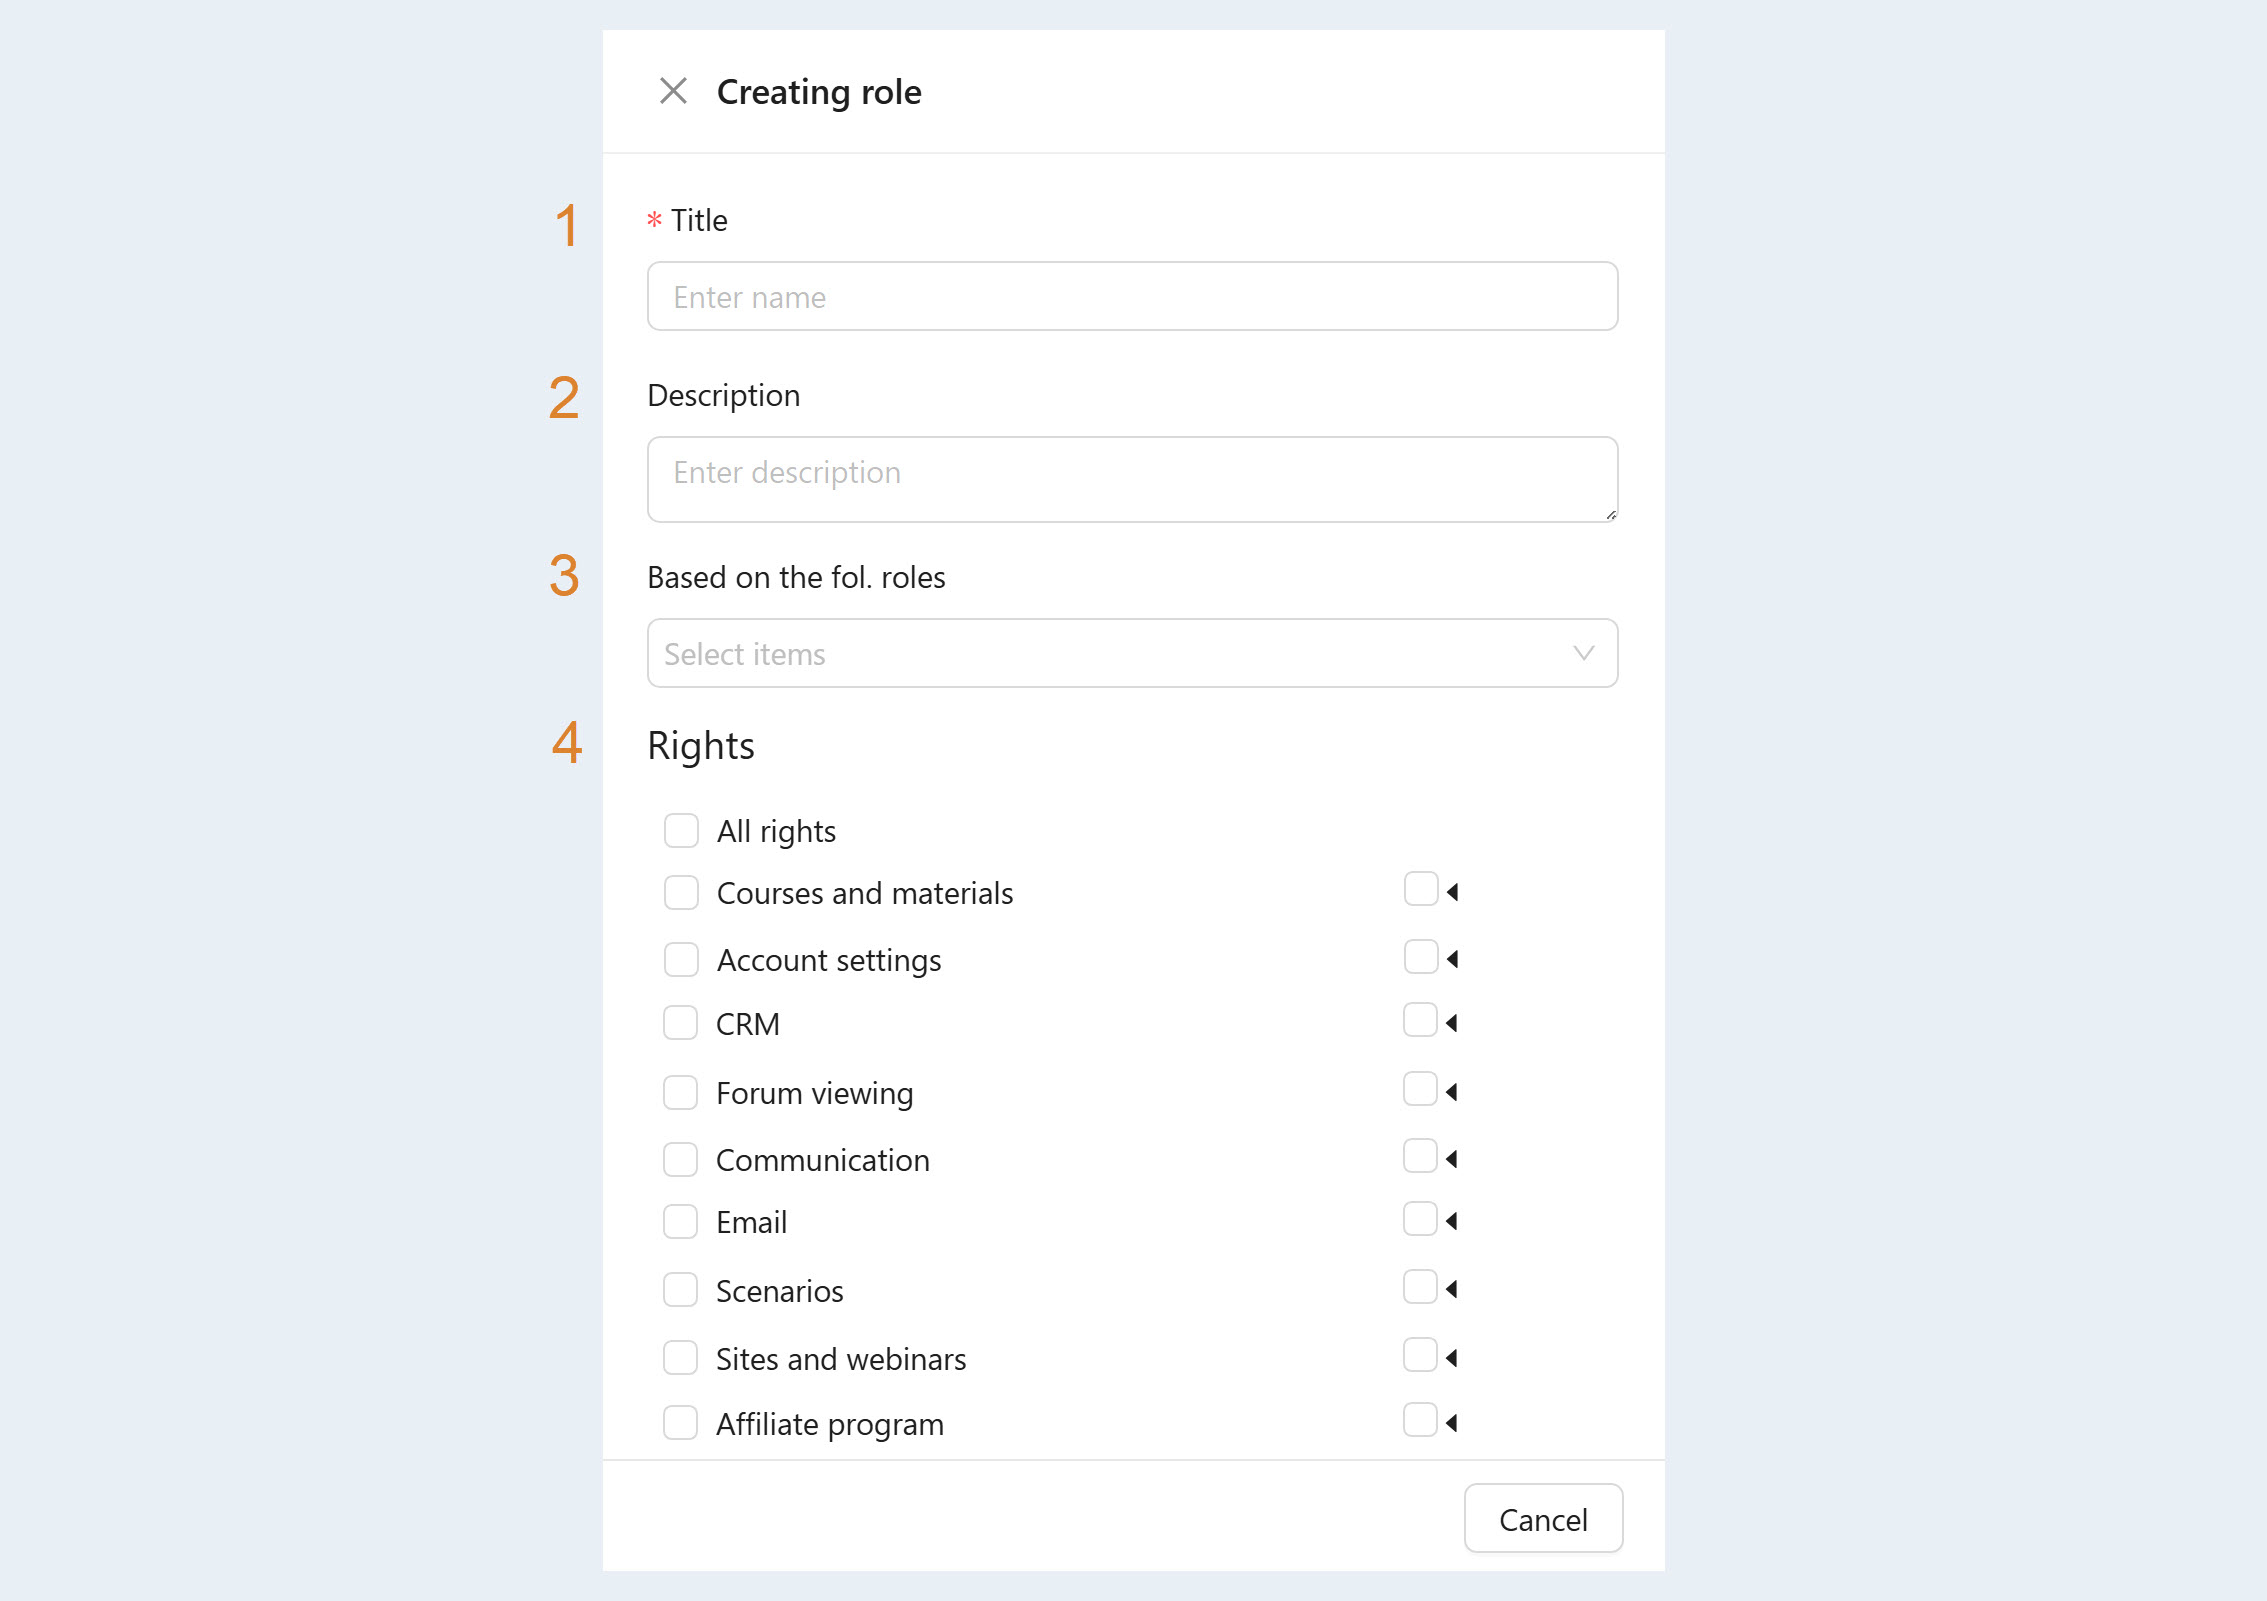
The role you created appears in the Custom Roles list. You can edit custom roles or delete them.
Departments
Open the Departments tab to create and configure your team's departments.
The Departments section helps to clearly structure the team, dividing it into specialized departments such as the content department, technical support department and marketing department, etc. This creates transparency in the responsibilities and tasks of each department, which in turn contributes to a higher level of organization and efficiency.
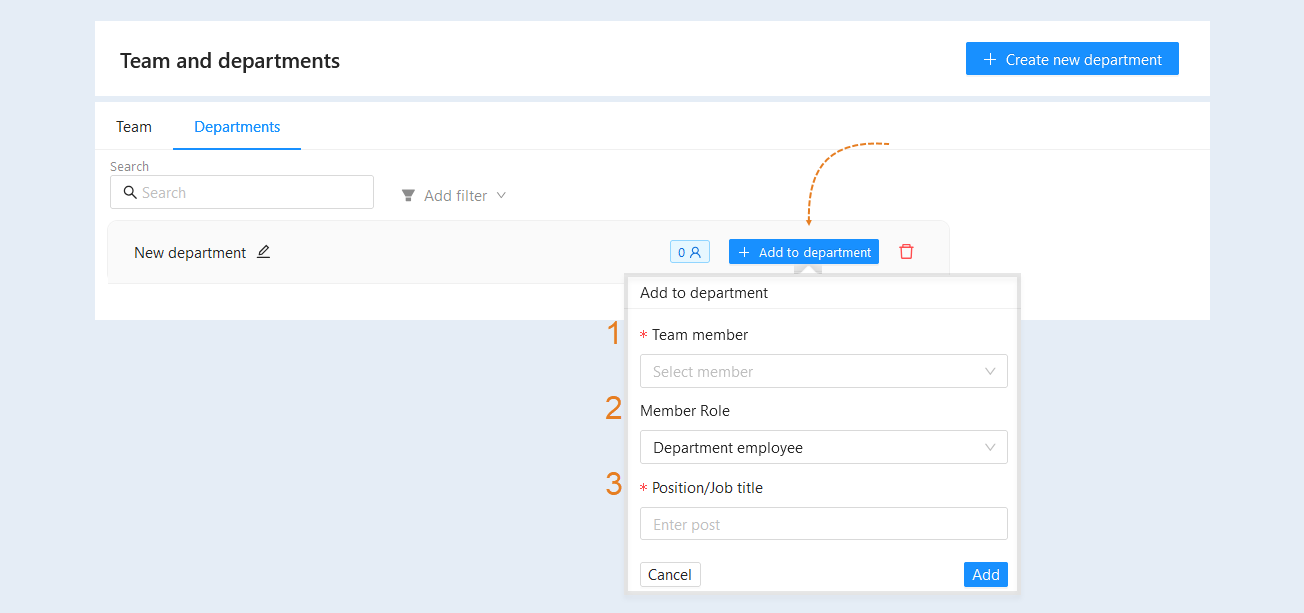
Click the "Create a new Department" button.
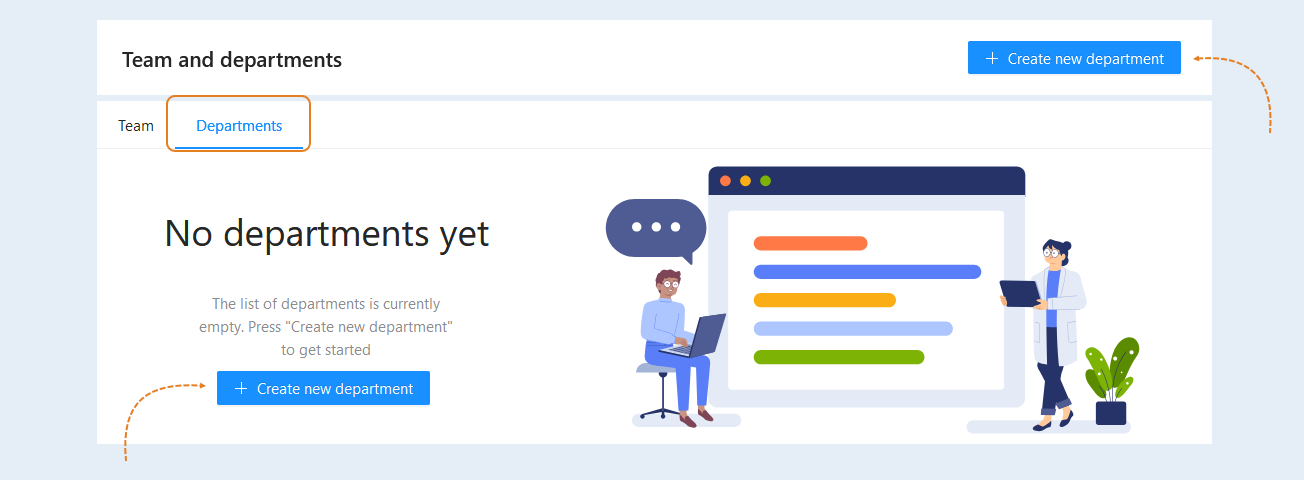
The new department will appear in the list. Here you can see the following information:
- Title. The name of each department is shown. The name is necessary so that you can easily identify different departments and understand what functions they perform. Click the Edit button to enter the department name.
Members count. This column shows the number of employees working in each specific department. It allows you to see the workload and scale of each department, and can also help with resource planning and personnel management.
The "Add to Department" button. This button allows you to add new employees to your favorite department. This is necessary to manage the workforce, increase the number of employees in departments as needed, and keep the employee list up-to-date.
The "Delete" button. This button allows you to delete a specific department. It is needed to manage the organization's structure and respond to changes, such as staff reductions or reorganizations.
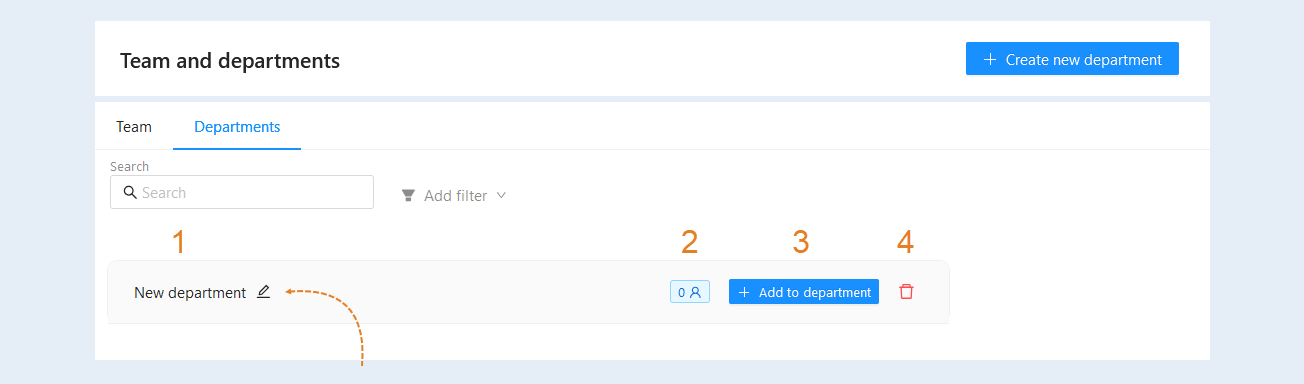
Click the "Add to Department" button. In the window that opens, specify the details:
Team member. Select a department employee from the suggested list.
Member Role. Select "Department Employee" or "Department Head". Choosing this role is important because it determines the level of responsibility and authority of the employee within the team. Depending on the chosen role, the available functions and capabilities of this employee may change.
Position/Job title. Enter the position name for the employee you are adding. The title of the position should reflect the functions and responsibilities of the employee in the department. It is important that the title of the position is clear and understandable, as it affects the internal organization and structure of the department.
Click the "Add" button.
The new employee will appear in the list.
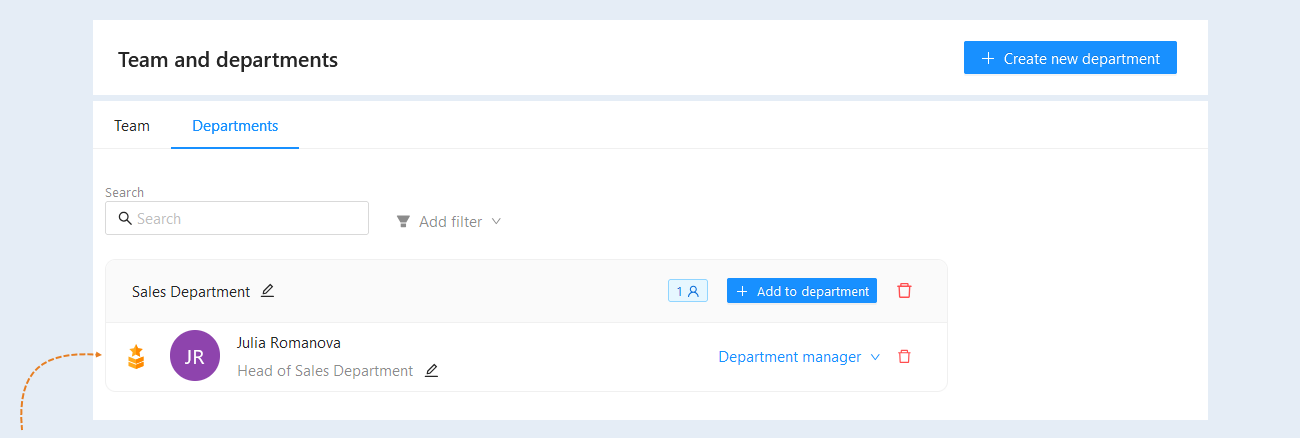
The search bar and filter are available at the top of the section. Use them to quickly find the right department or employee.
- Search. Use this string for free keyword search.
Team member. Select the appropriate employee from the list to quickly track and analyze information about employees who work in a particular department of the company.