In this article, we will consider in detail how to create various links on the AXL platform and how to work with them. Click on the desired section to go to its description:
1
Creating a link to an membership portal
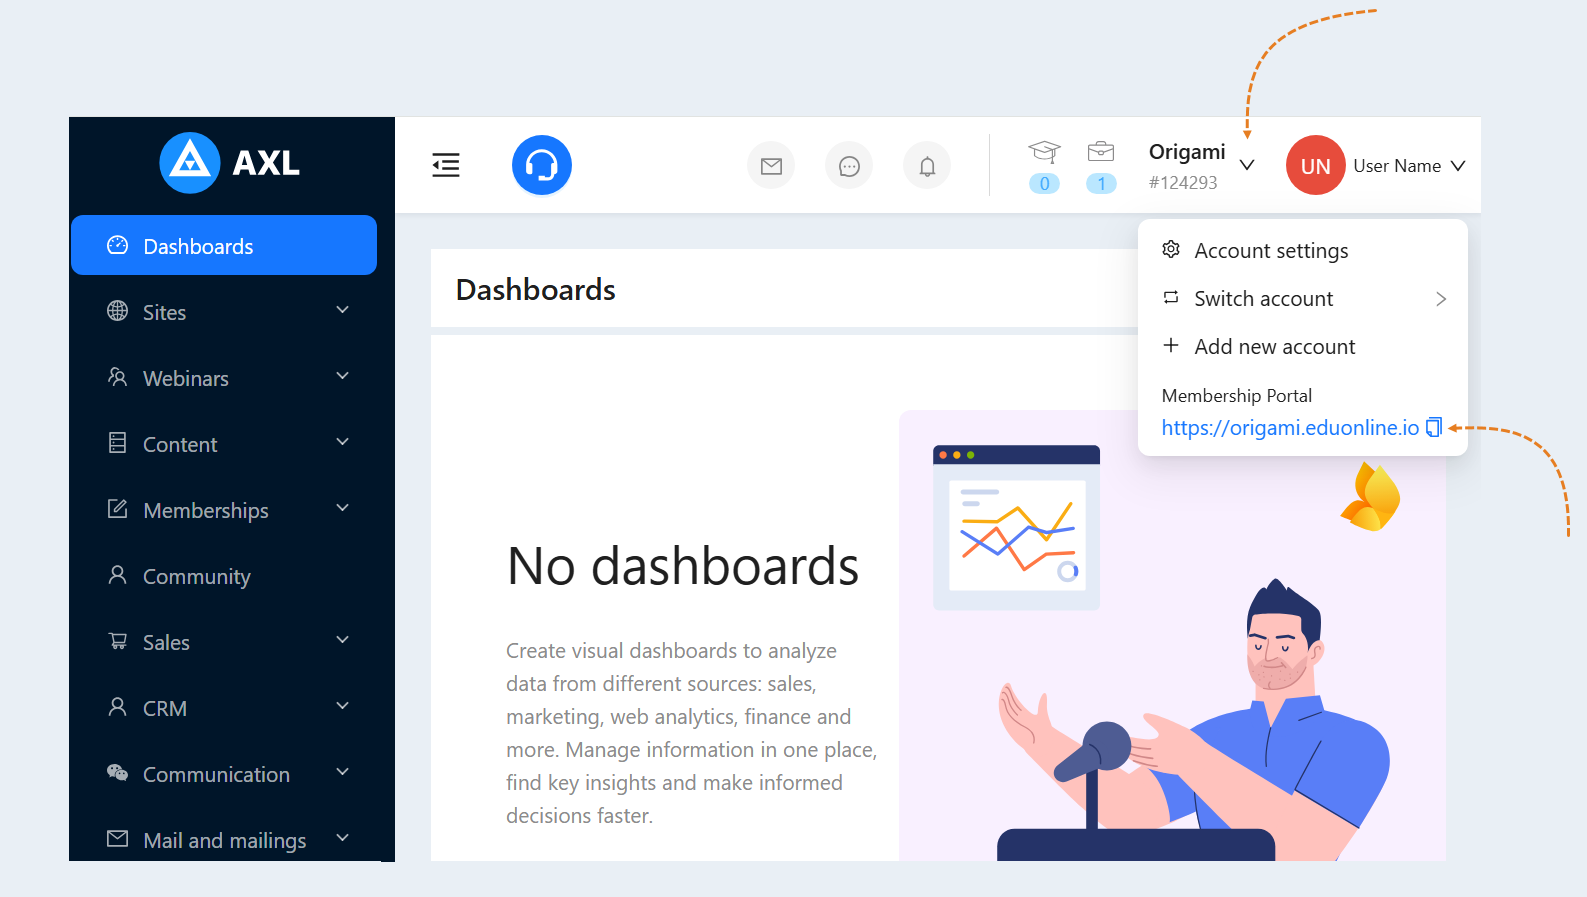
Open your account on the AXL platform. In the upper toolbar, click on the section with the name of your account. In the list of commands that opens, select "Link to membership portal" and click on the "Copy" button.
You can send this link to the membership portal to users or add it when creating a website. When the user clicks on the link, he will be offered authorization in the membership portal personal account.
Creating an invitation link from a contact card
You can copy and send a personal invitation link from the user's contact card.
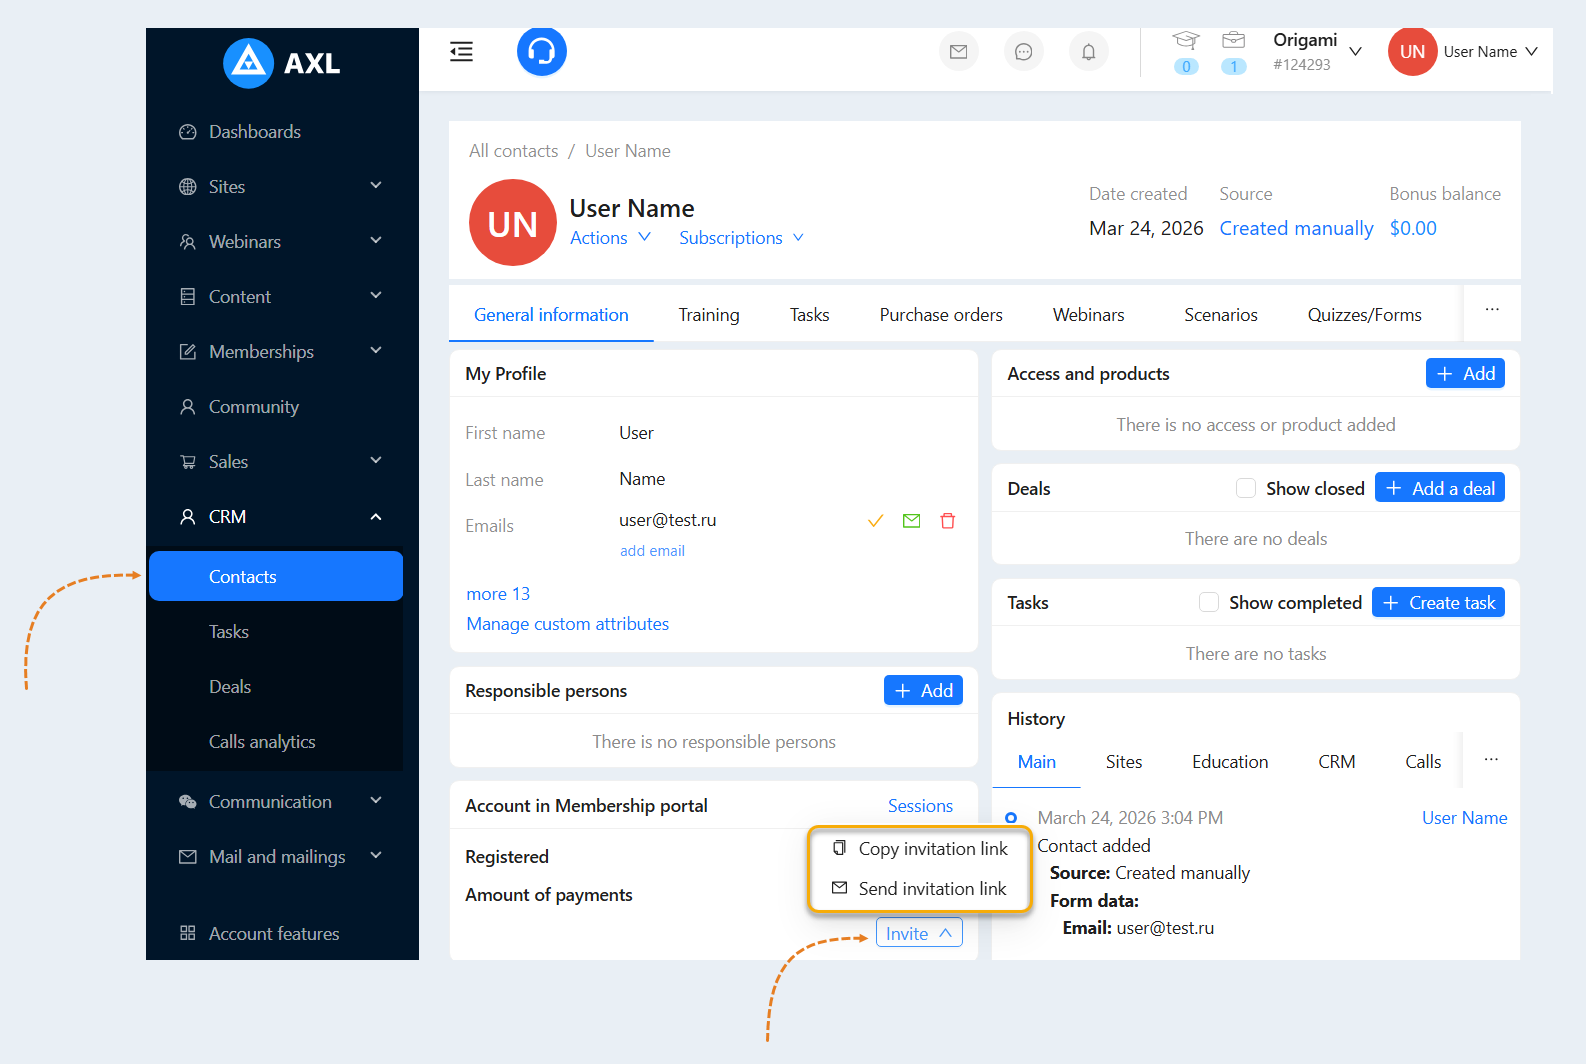
Go to the "CRM" section, the "Contacts" tab. Open a previously created contact or create a new contact. Read more about how to create a contact in the article "Contacts".
Click the "Invite" button. Next, you can copy the link or send the link to the user by mail by selecting the appropriate command.
Personal link to the school in variables
When setting up sending emails in scenarios or setting up mailing lists to users, you can add variables. Read more about how to create a scenario and a newsletter in the articles "Scenario", "Broadcast".
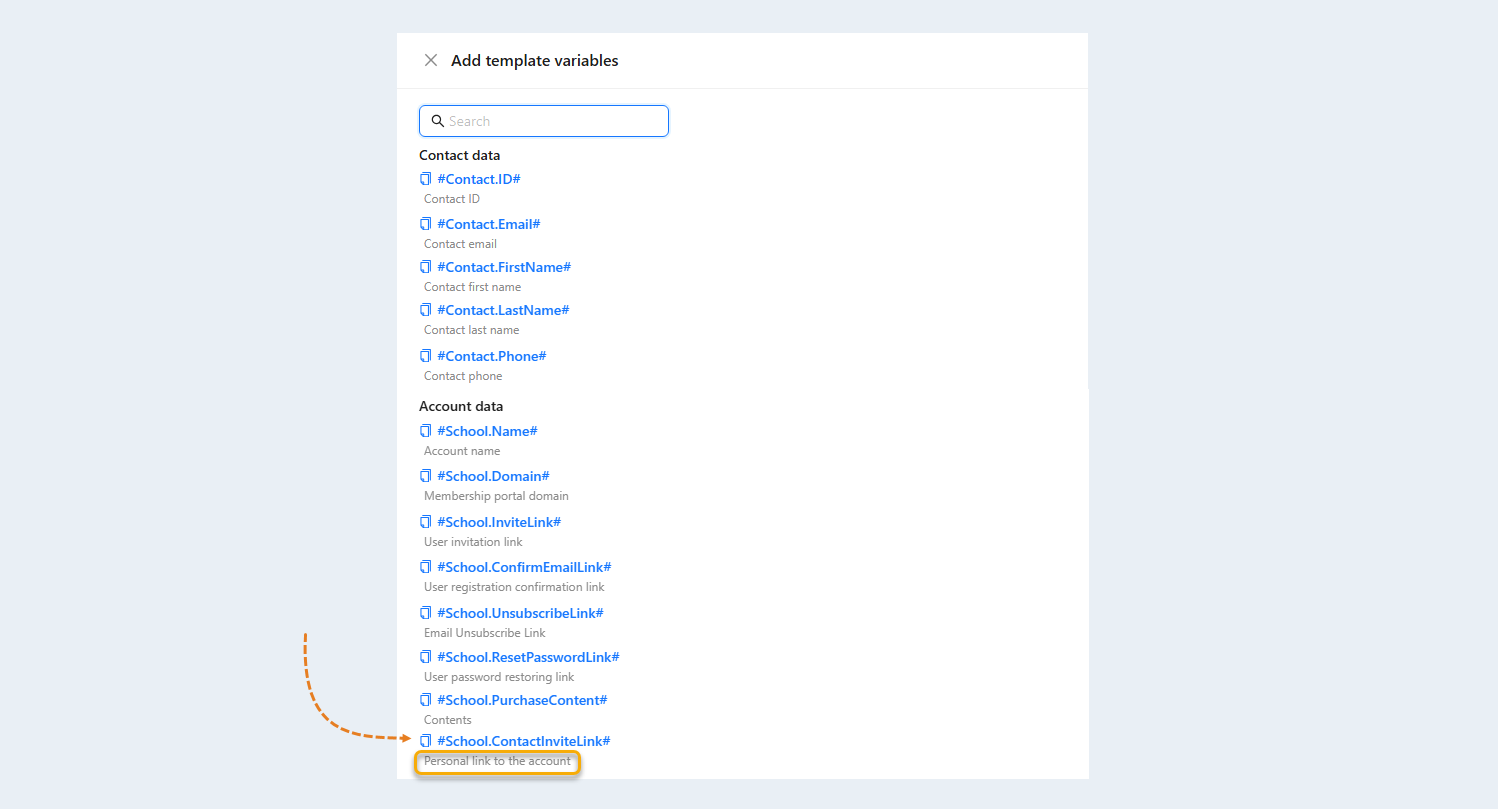
A template variable is a value to be automatically replaced with the data you selected. Variables will automatically replace the data in the email. In the mailing list settings or the settings of the "Send email" node, click the "Add template variables" button.
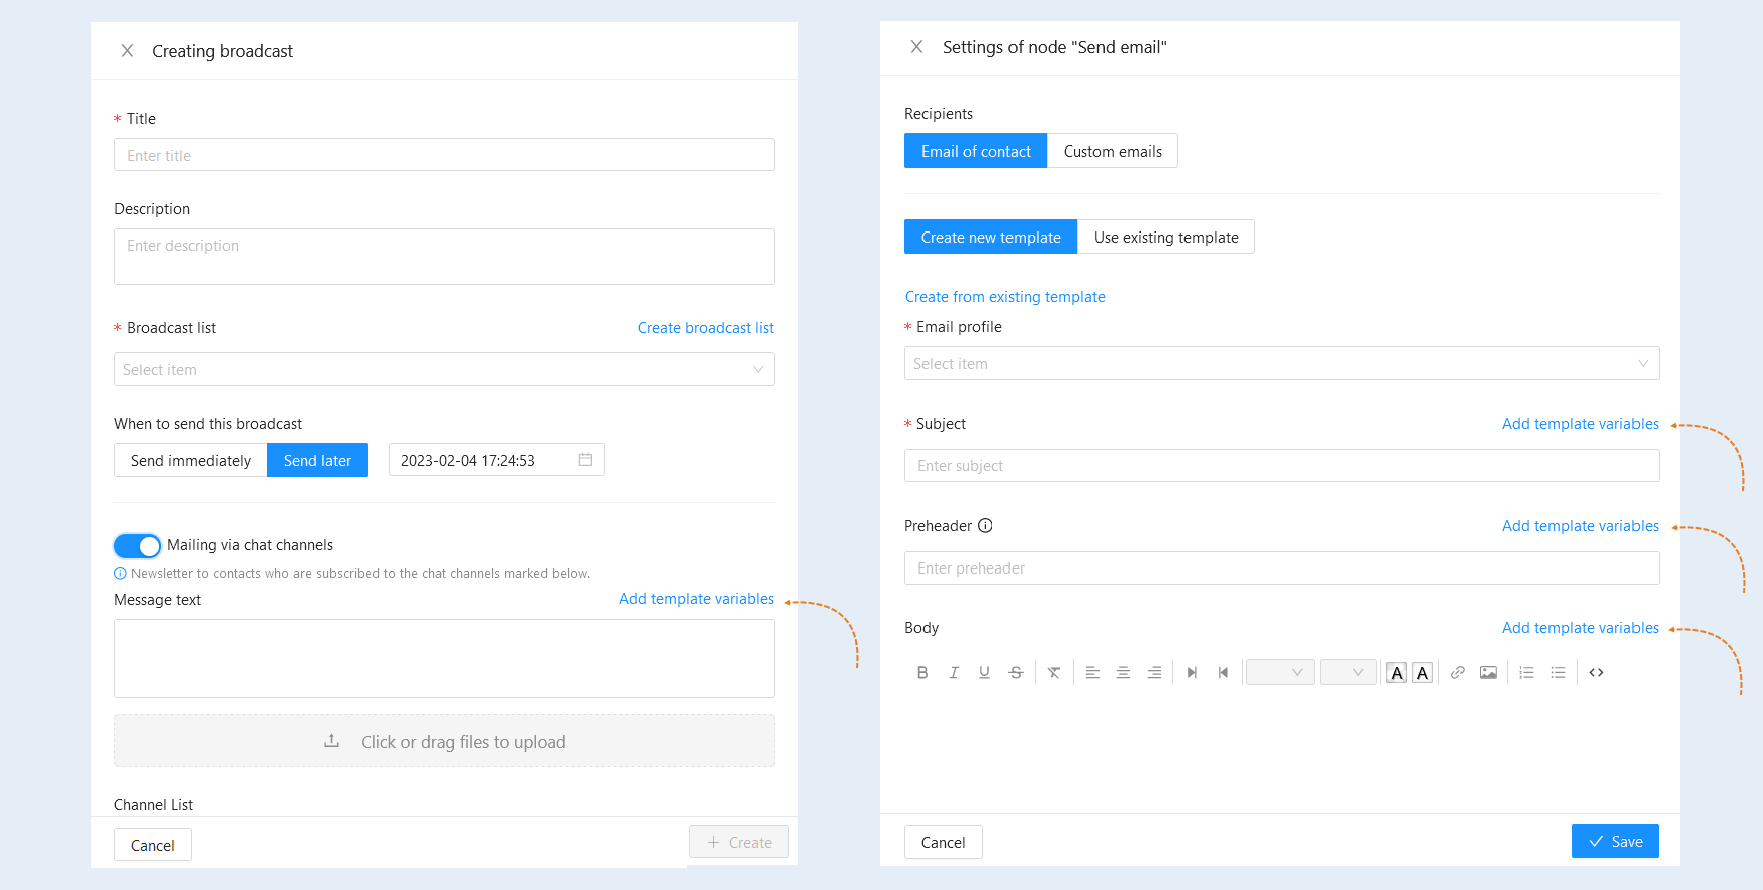
Select the variable "Personal link to the school" so that the user can follow the link to the online school's personal account.
If the user has not previously been registered in your online school and follows the personal link to the school for the first time, then he will be sent to the page where he will be asked to come up with his password for registration (you must enter the password twice). After that, he will go to the school's personal account.
If the user has previously been registered in your online school, then by clicking on the link, he will either immediately get into the student's personal account, or will be sent to the authorization page to enter a login and password.
Creating a link to a video
On the AXL platform, you can store an unlimited number of your videos and use them in your training courses and on websites.
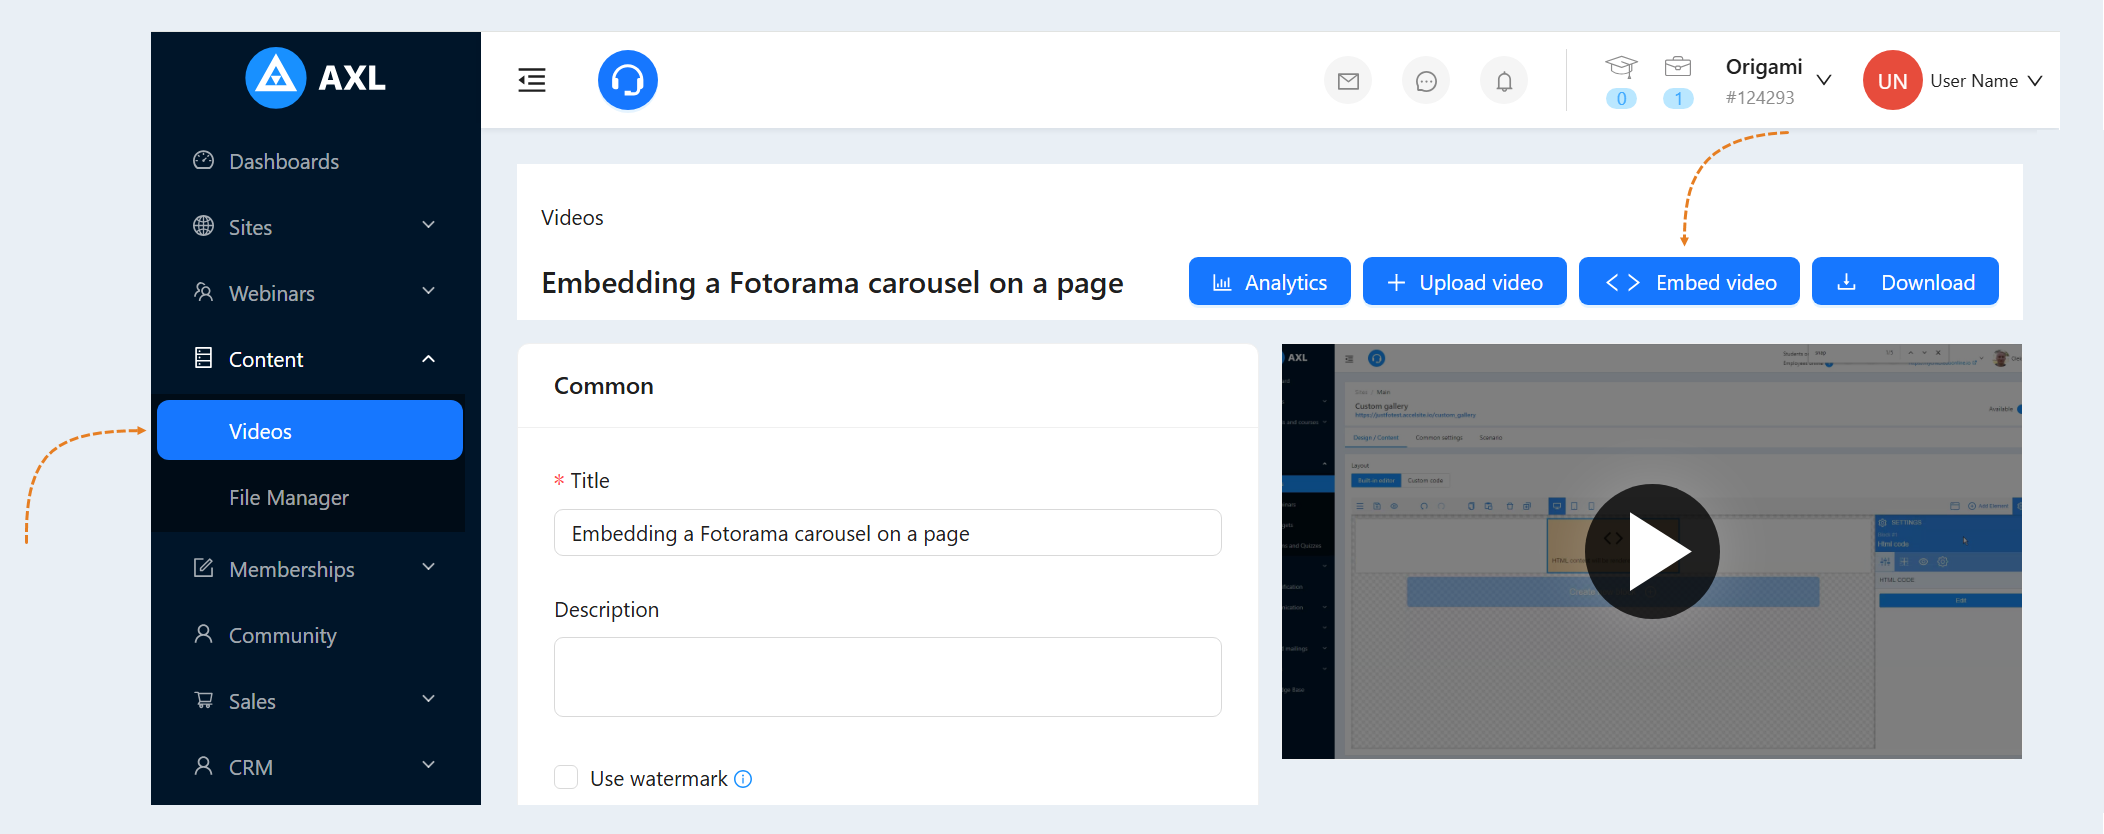
Go to the "Content" section, the "Video" tab. Open a previously uploaded video or upload a new video. Read more about how to add a video in the article "Video". Click the "Embed Video" button.
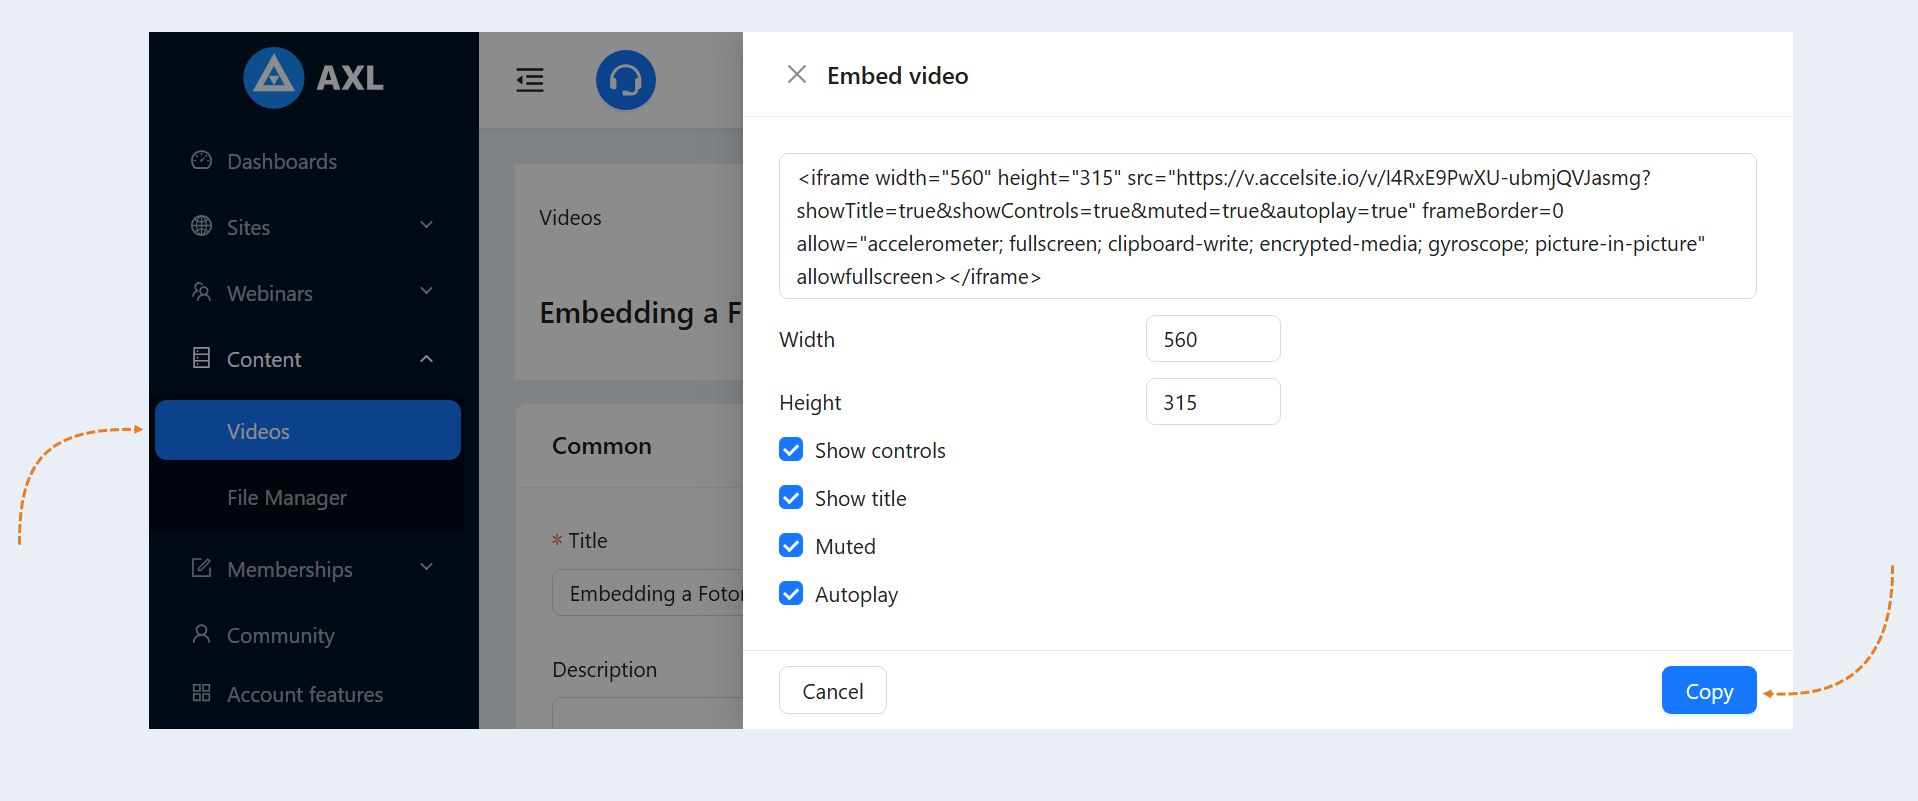
The video code is indicated in the window that opens. Click the "Copy" button to copy the link to the video. You can add this link to your course or to a website created on the AXL platform, and it can also be added to a third-party website or social networks.
Adding a video to a course lesson
To add a video to a course lesson, go to the "Courses and Training" section, the "Courses" tab.
Open a previously created course or create a new one. Add lessons (steps) to the course. Read more about how to create a course in the article "How to create a course in 5 minutes".
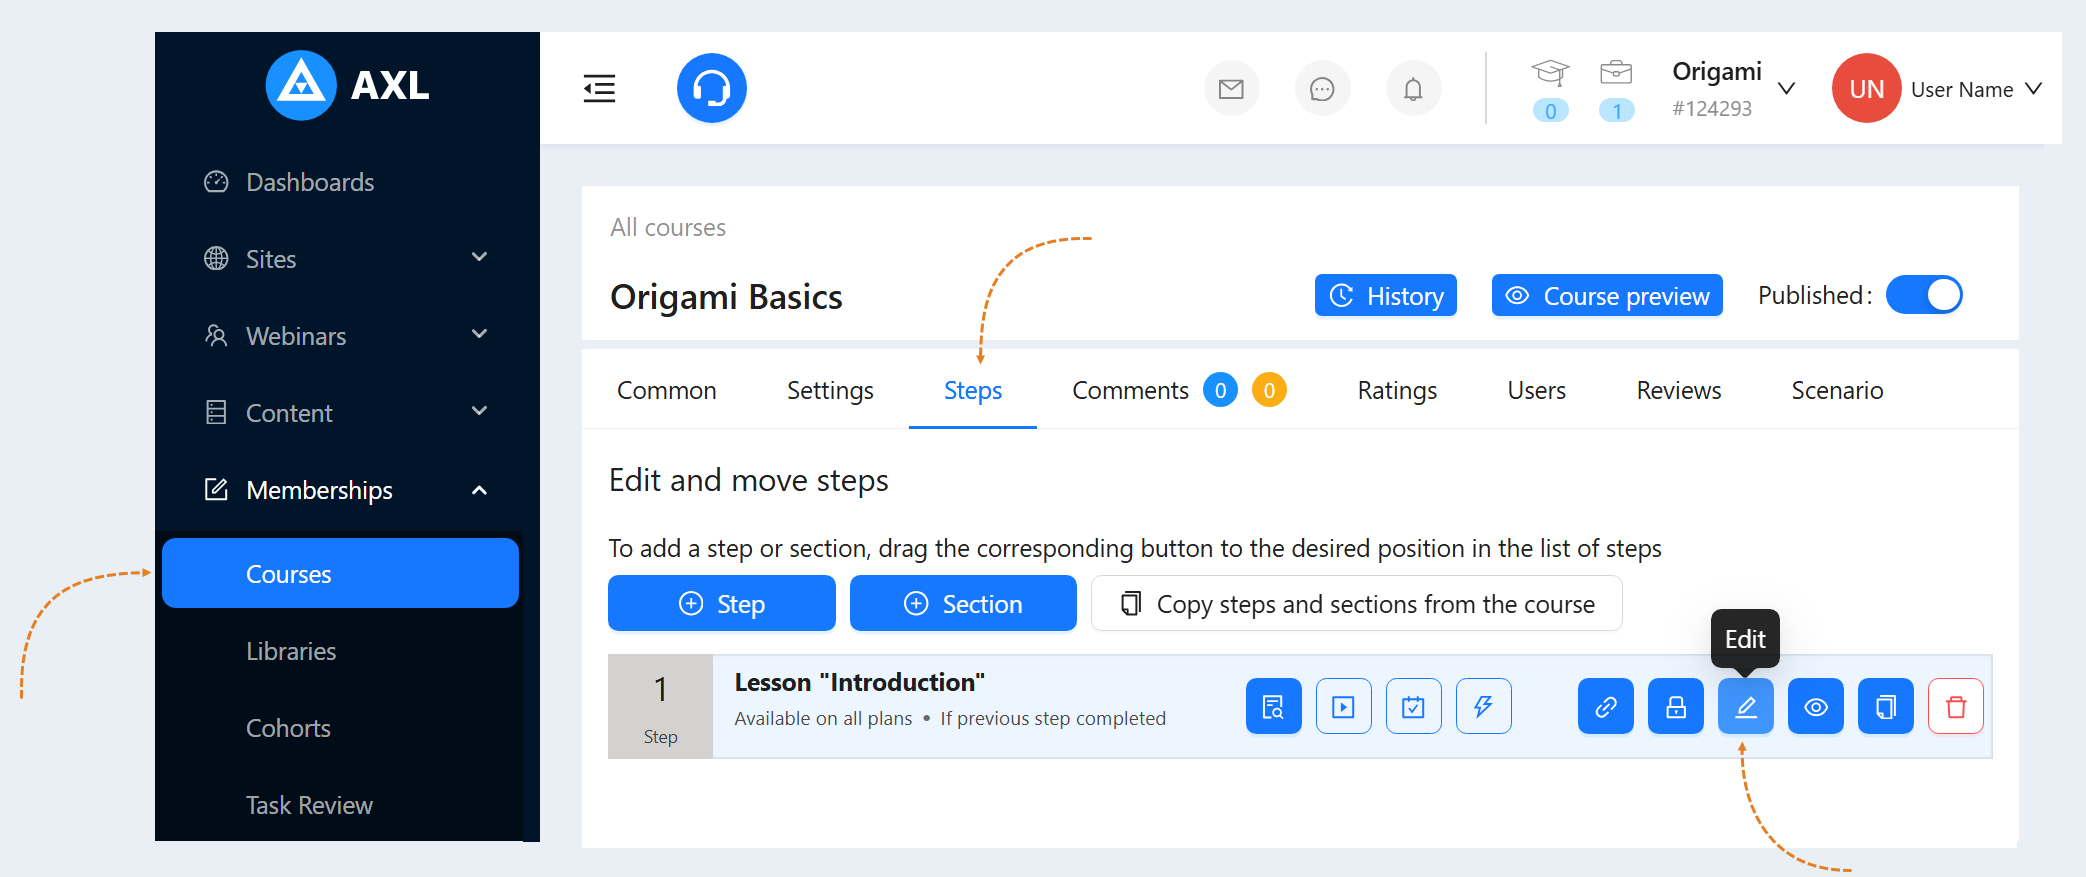
Go to the "Steps" tab, click on the lesson name or the "Edit" button to open the course step.
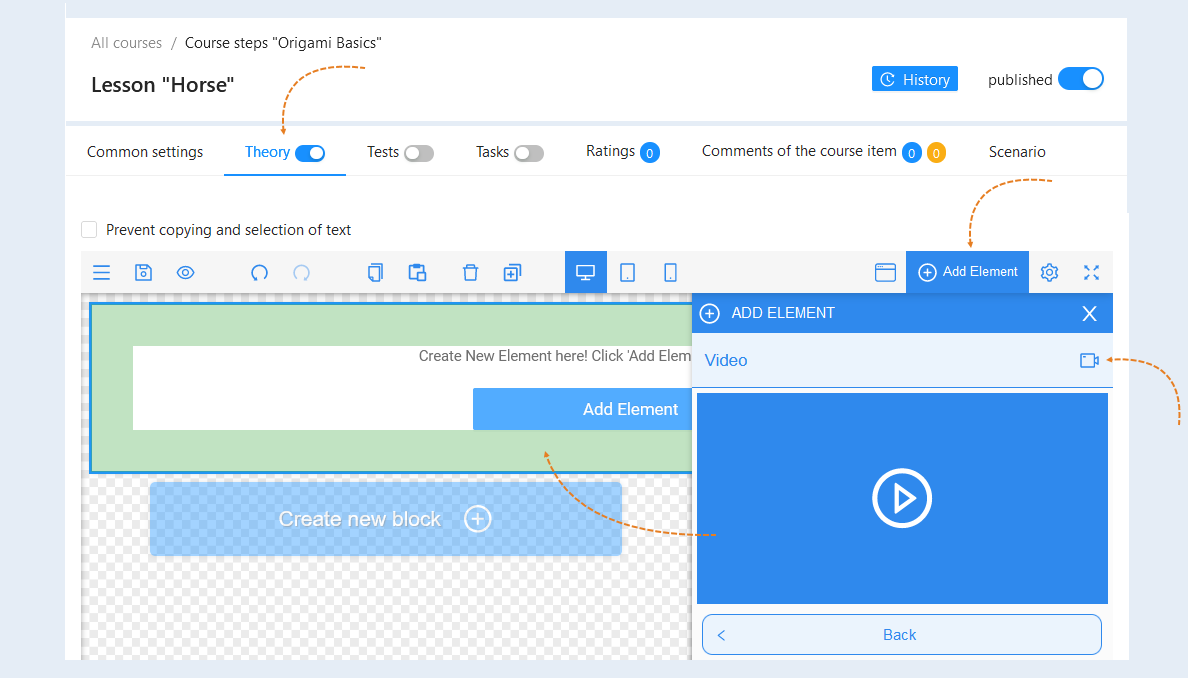
Go to the "Theory" tab. Click the "Add Element" button and add the "Video" item by dragging the video into the page field.
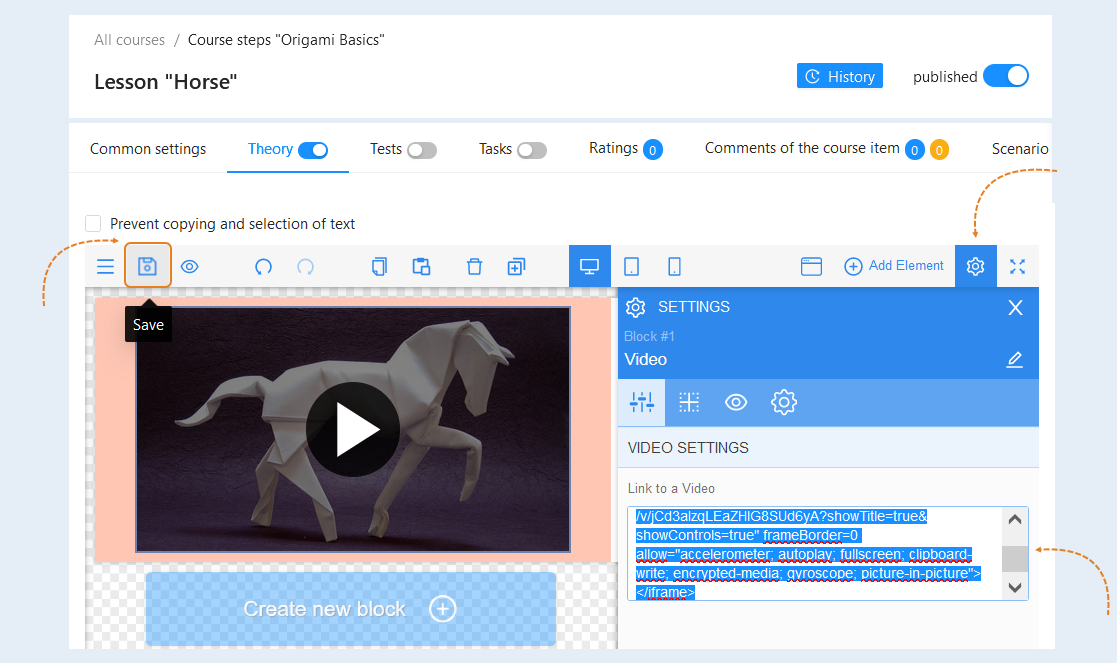
Select the entire video, the "Settings" panel of the element opens on the right. In the "Link to a video" field, paste the copied link to the video. Click the "Save" button.
Adding a video to a website page
To add a link to a video to the site page, go to the "Sites" section. Open a previously created site or create a new one. Read more about how to create a website in the article "How to create a website".
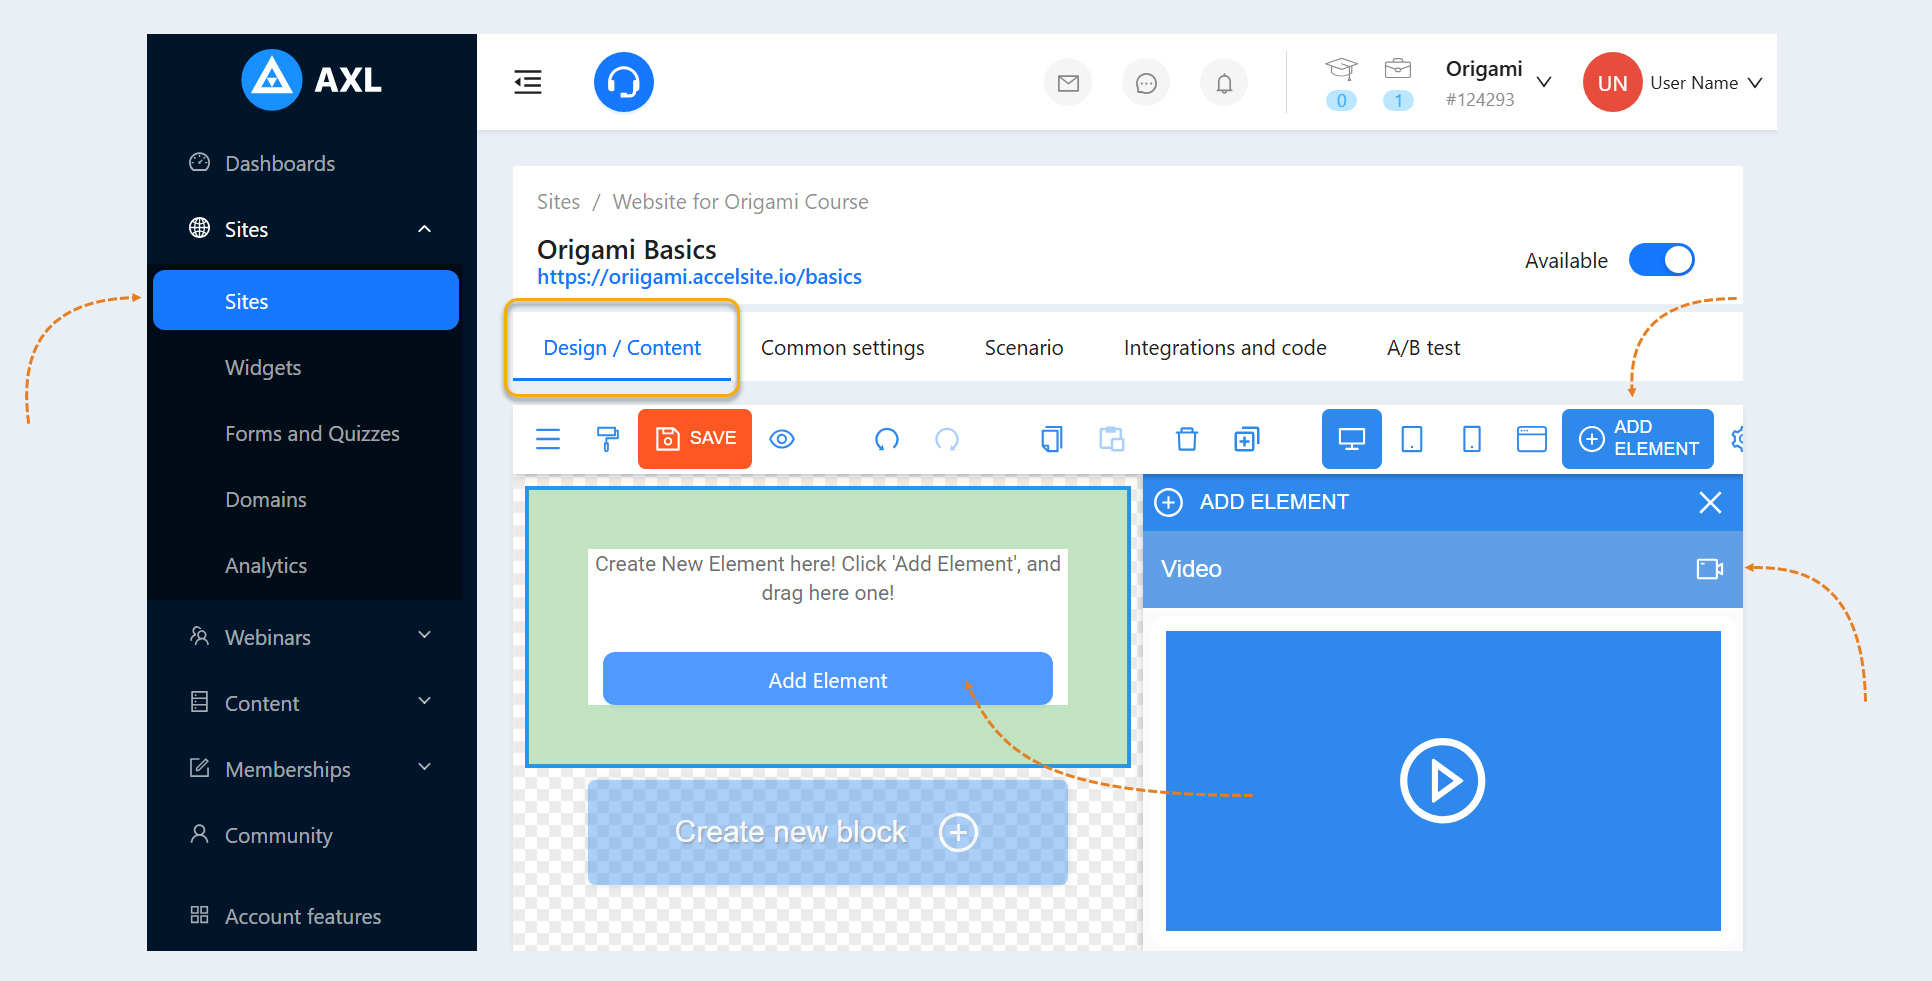
Open the website page, the "Design/Content" tab. Click the "Add Element" button and add the "Video" item by dragging the video into the page field.
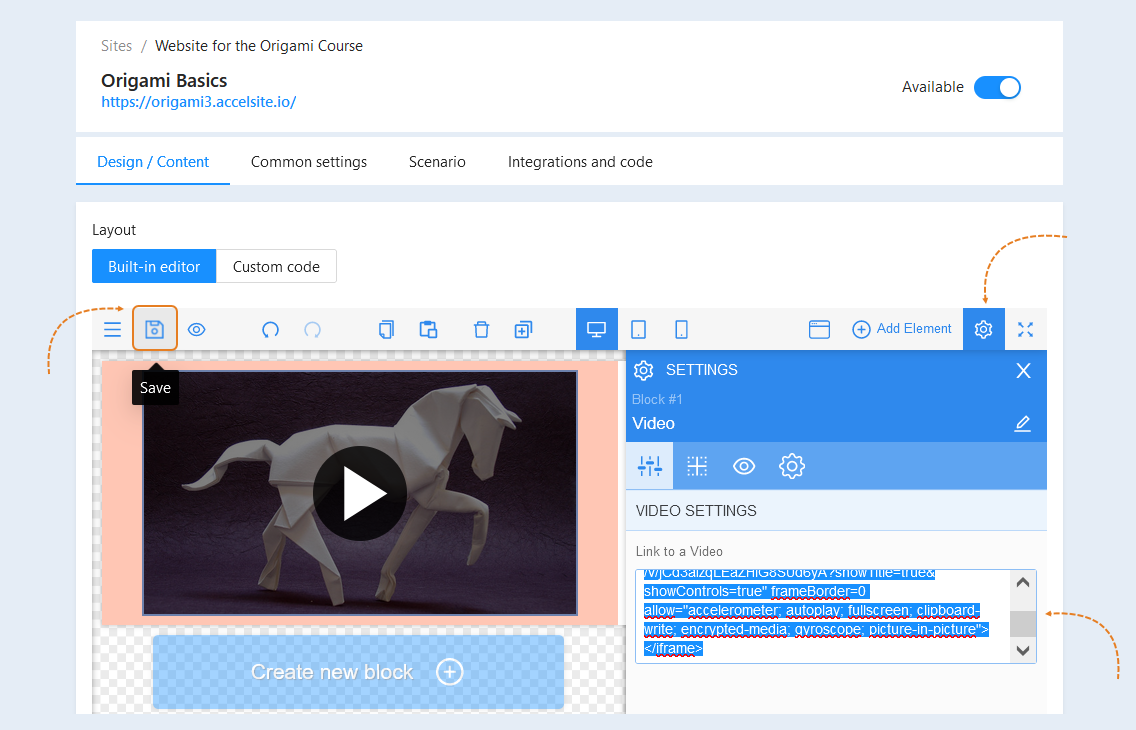
Select the entire video, the "Settings" panel of the element opens on the right. In the "Link to video" field, paste the copied link to the video. Click the "Save" button.
Creating a link to a website
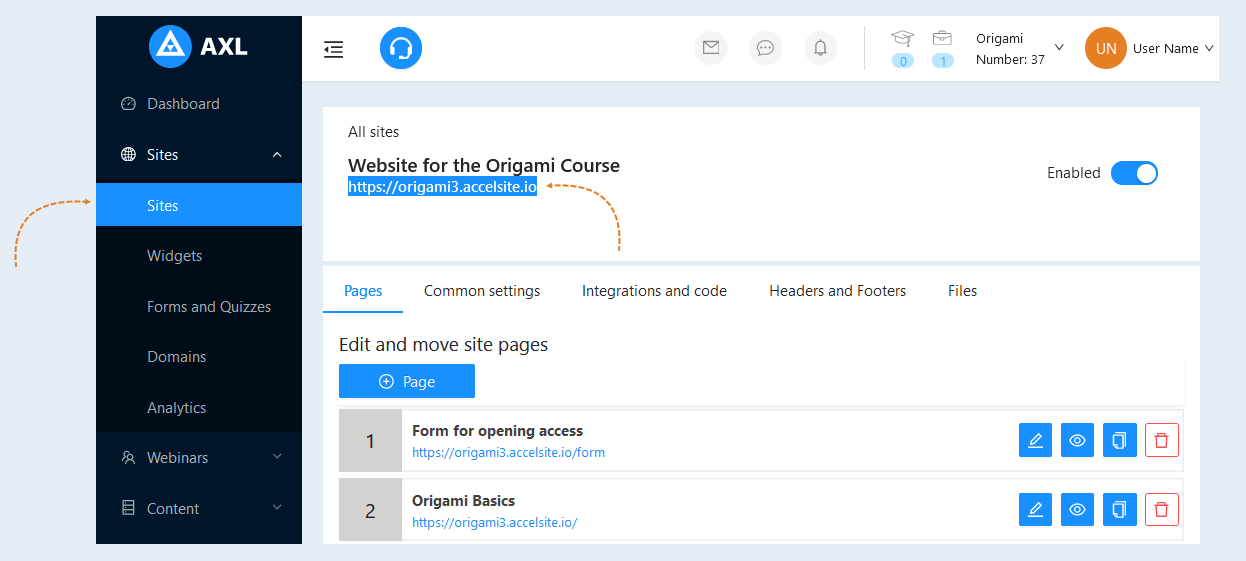
Go to the "Sites" section. Open a previously created site or create a new one. Read more about how to create a website in the article "How to create a website".
After completing the site settings, select and copy the link located under the site name at the top of the page. You can send this link to the site to users or use it in forms, buttons or other sites to redirect the user to this site.
Creating a link to a website page
The site can consist of several pages, you can also copy the link to a separate page of the site.
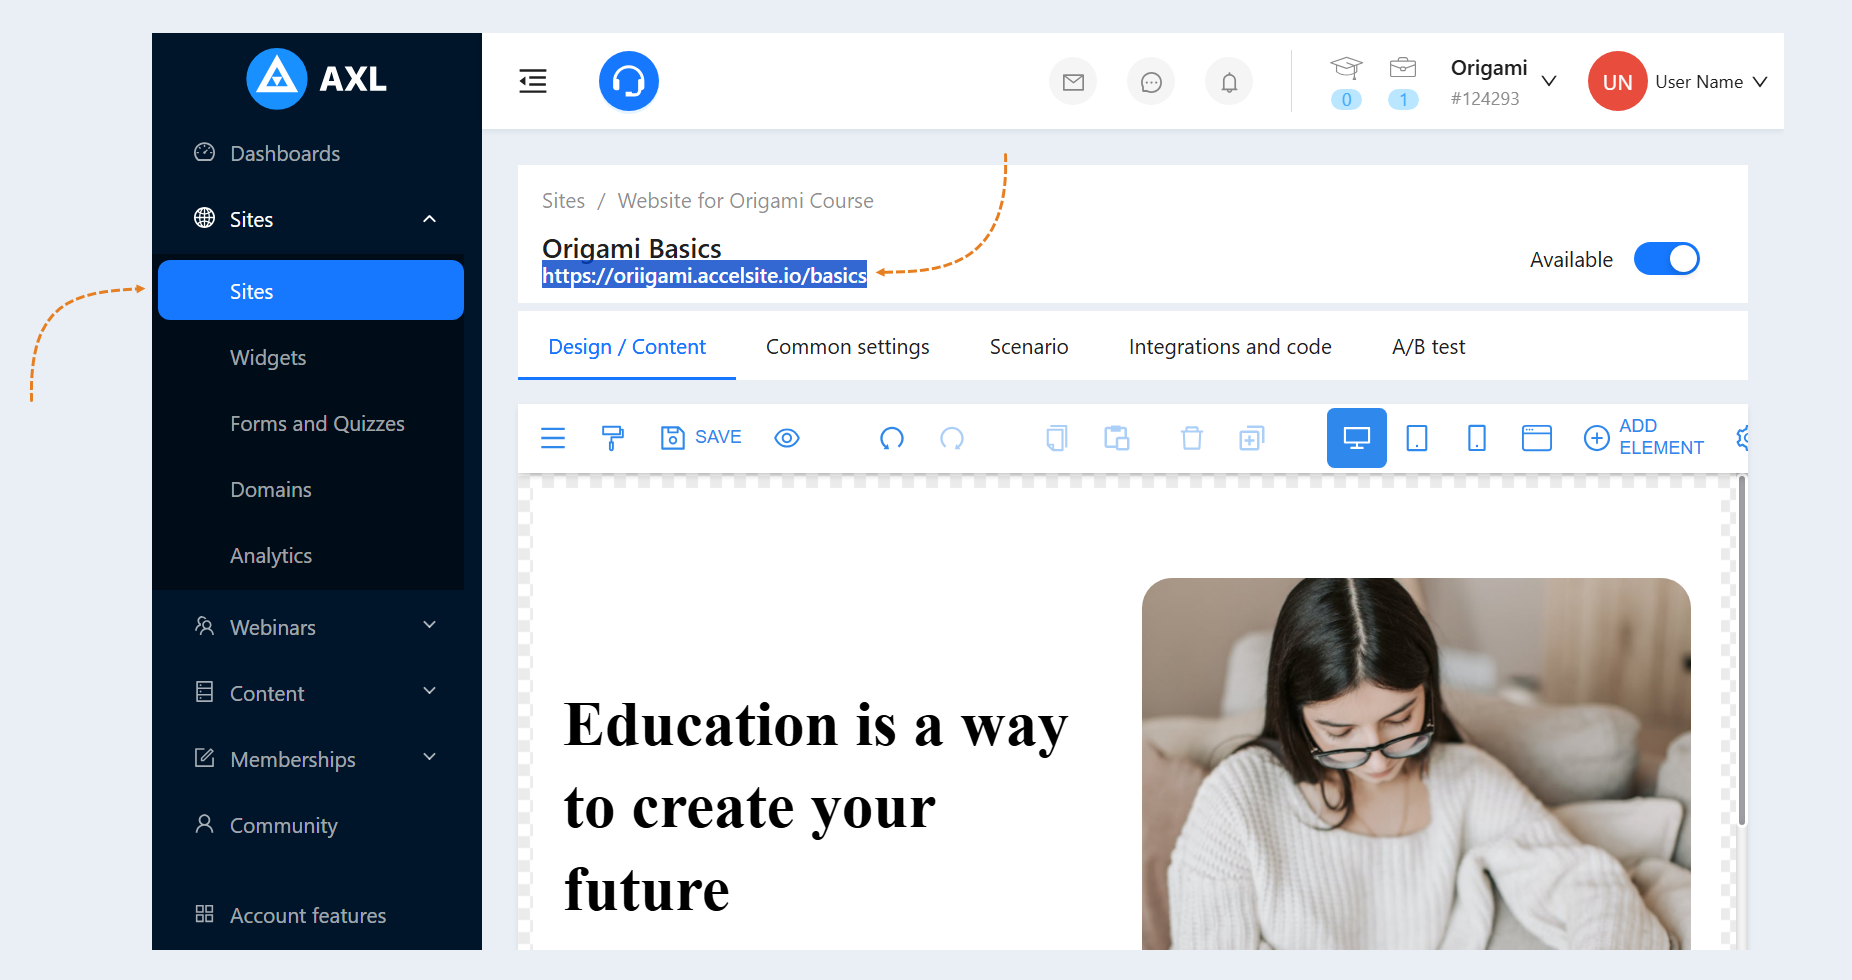
Go to the "Sites" section. Open the previously created site, then open the "Pages" tab. Click on the name of the site page to open it. Select and copy the link located under the name of the site page. You can send this link to the site page to users or use it in forms, payment forms, buttons or other sites to redirect the user to this page.
Adding a site page link to a form
In order to add the link of the site page to the form, follow the instructions.
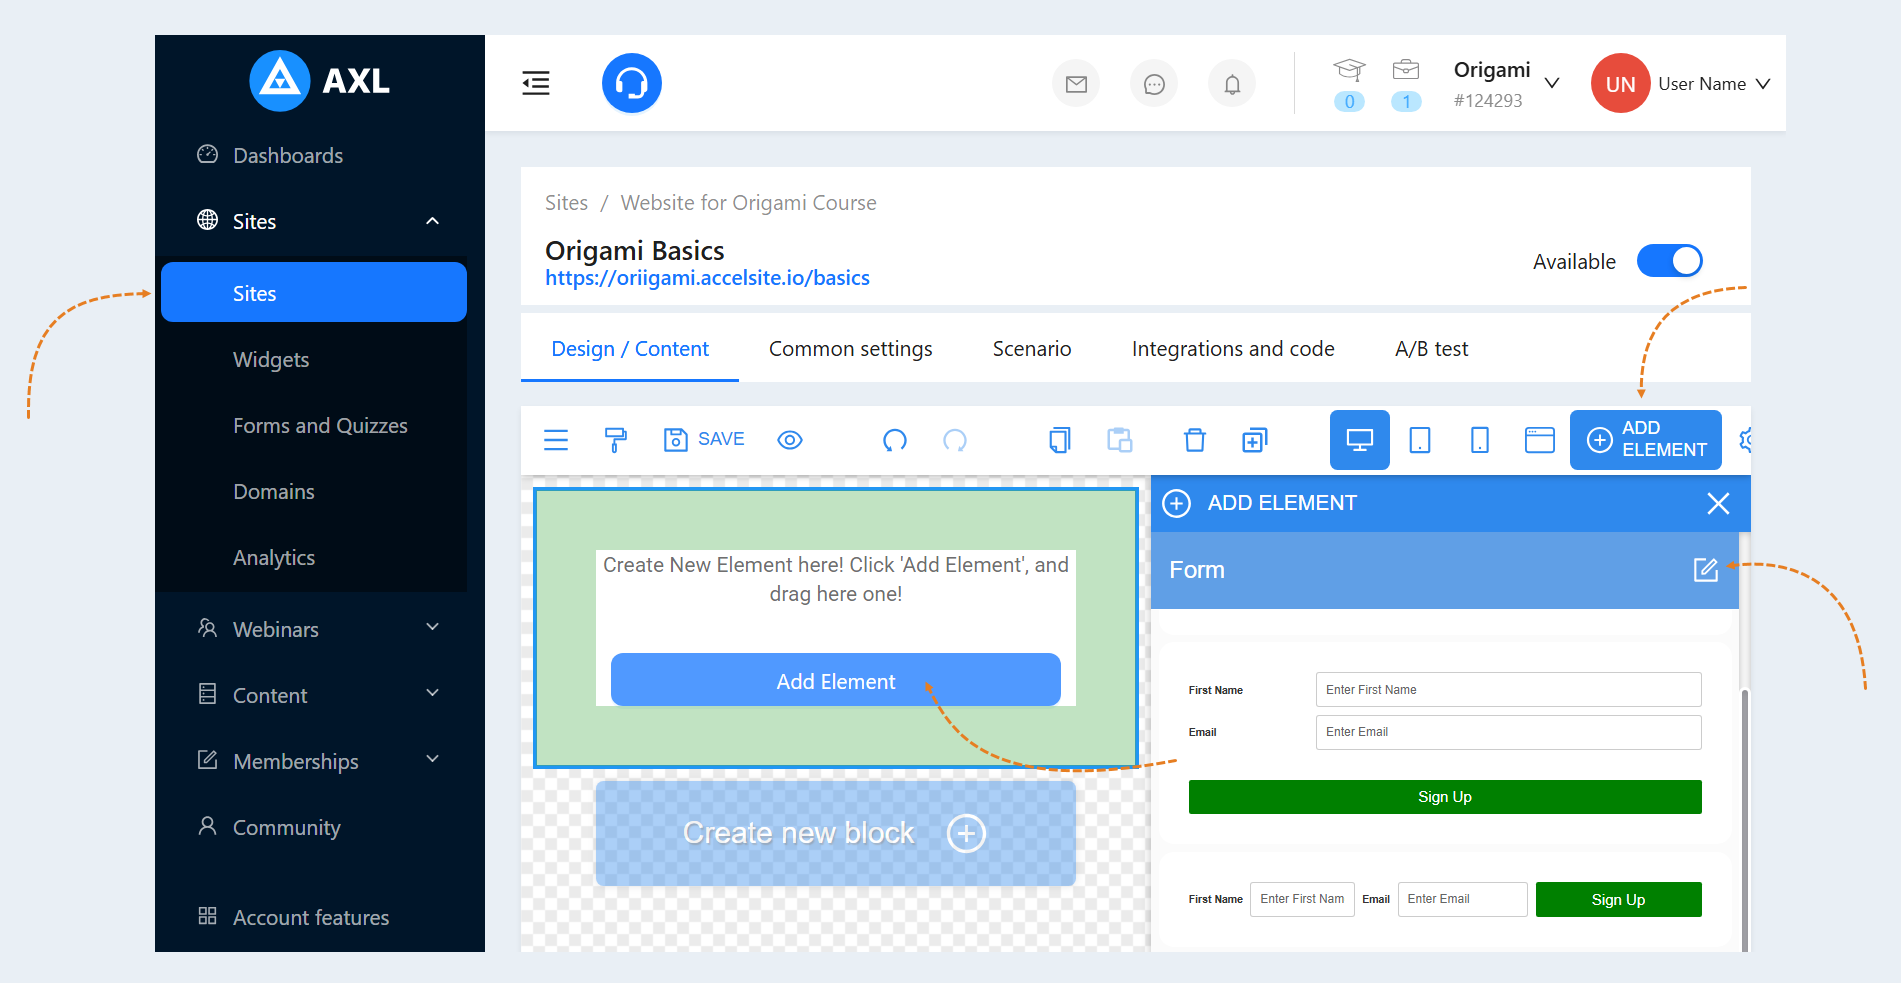
Open the website page, the "Design/Content" tab. Click the "Add Element" button and add the "Form" or "Payment Form" element, drag the selected form into the page field. For more information on how to add elements to a site page, read the article "Elements".
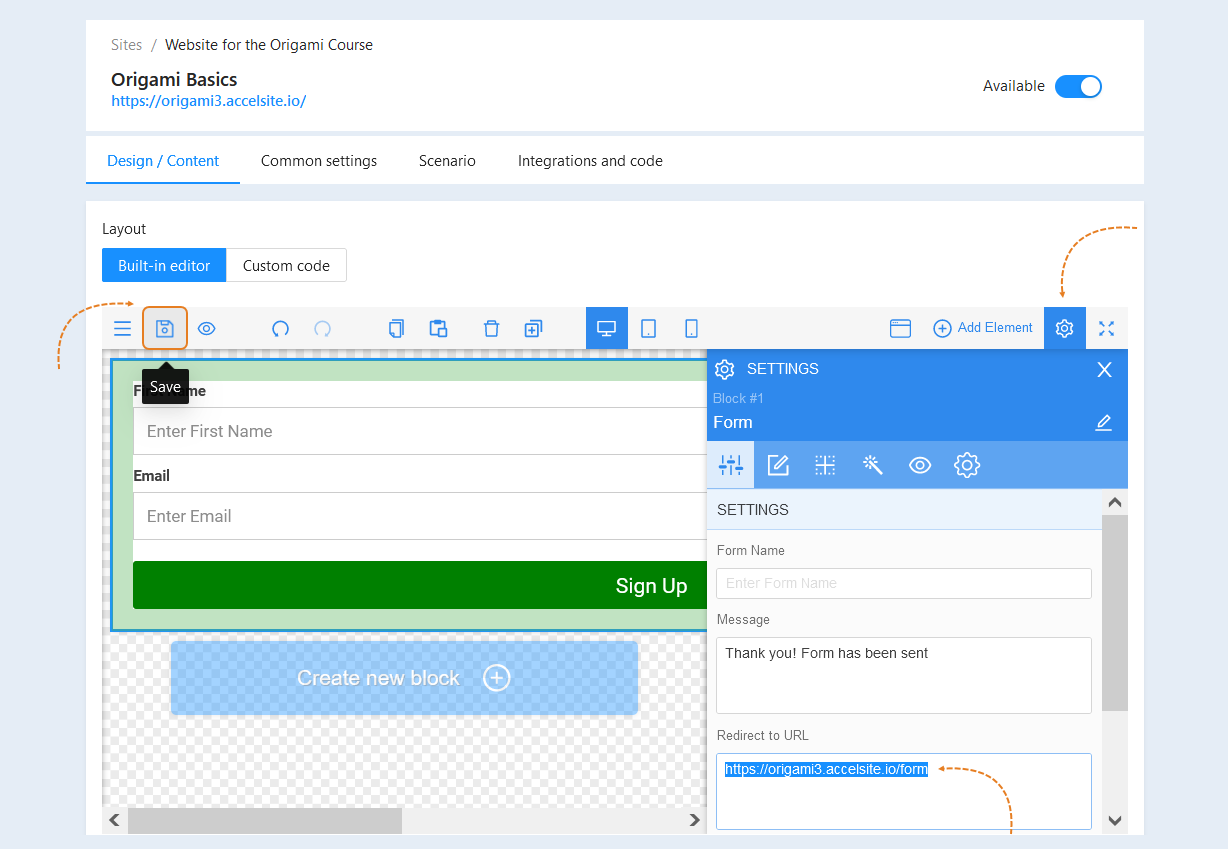
Select the entire form, the "Settings" panel of the element opens on the right. In the "Redirect to URL" field, insert a link to the site page. Click the "Save" button.
After filling out the form, the user will be redirected to the specified page of the site.
Adding a site page link to a button
In order to add a link to the site in button interactions to redirect the user, follow the instructions.
Open the website page, the "Design/Content" tab. Click the "Add Element" button and add the "Button" element by dragging it into the page field.
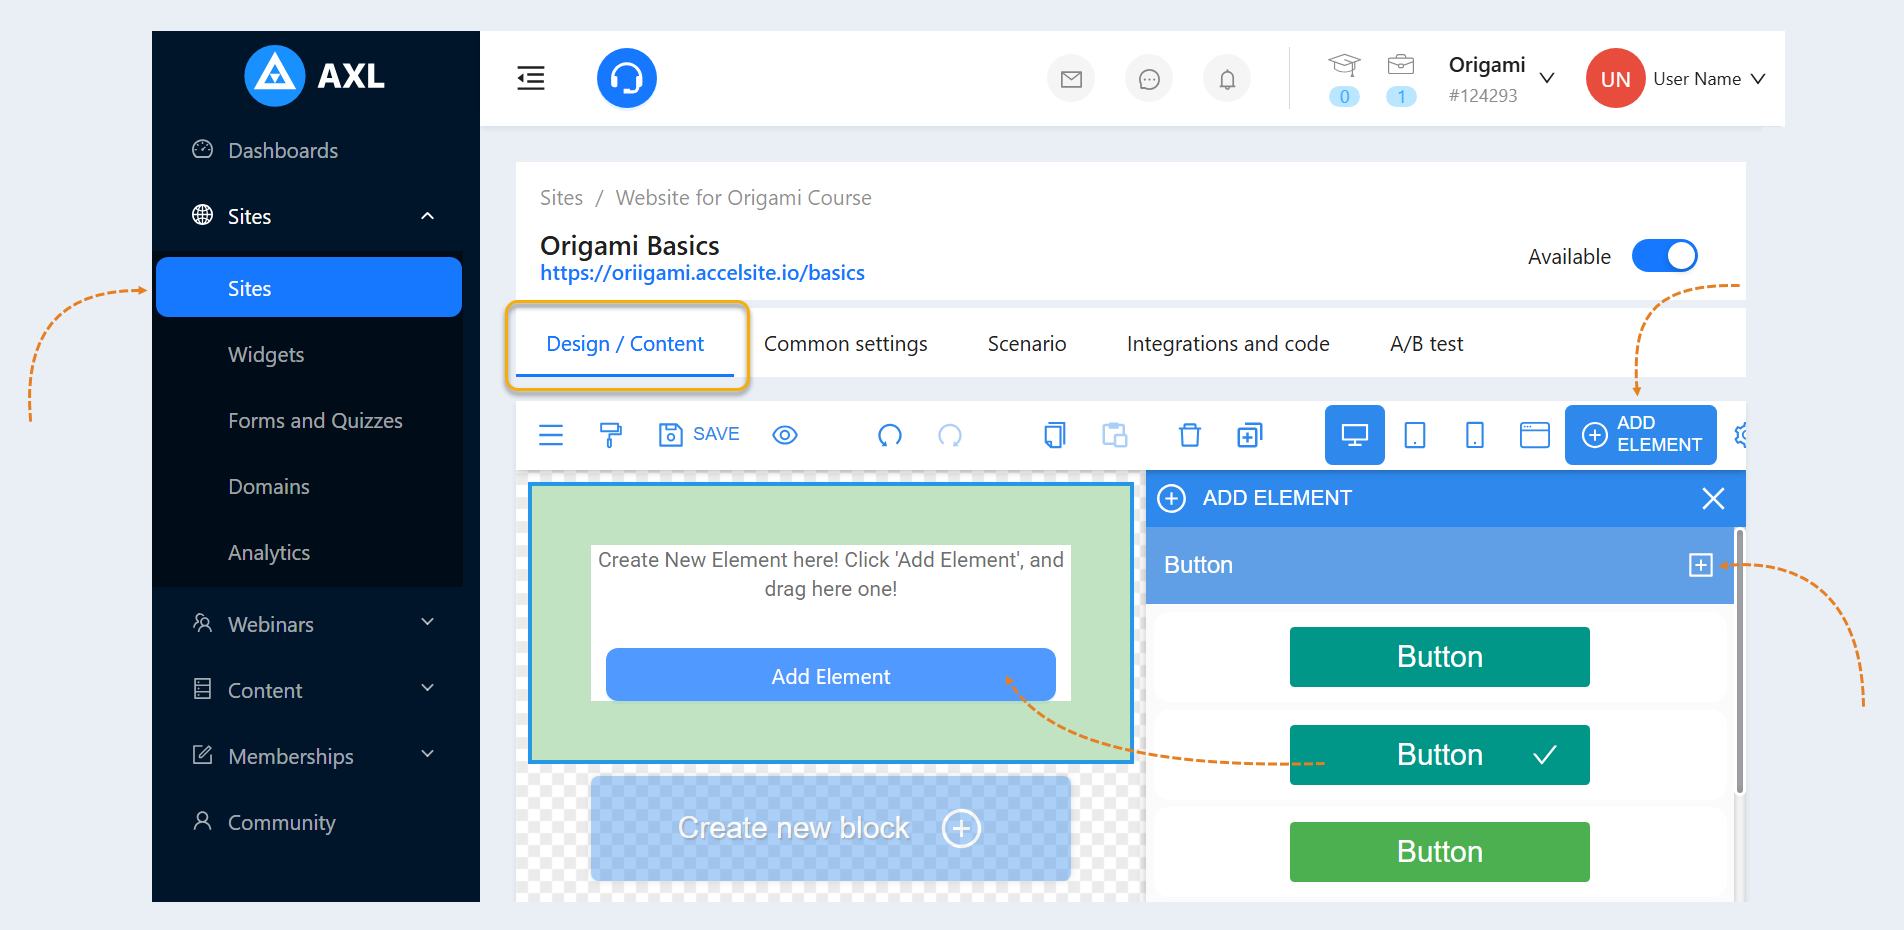
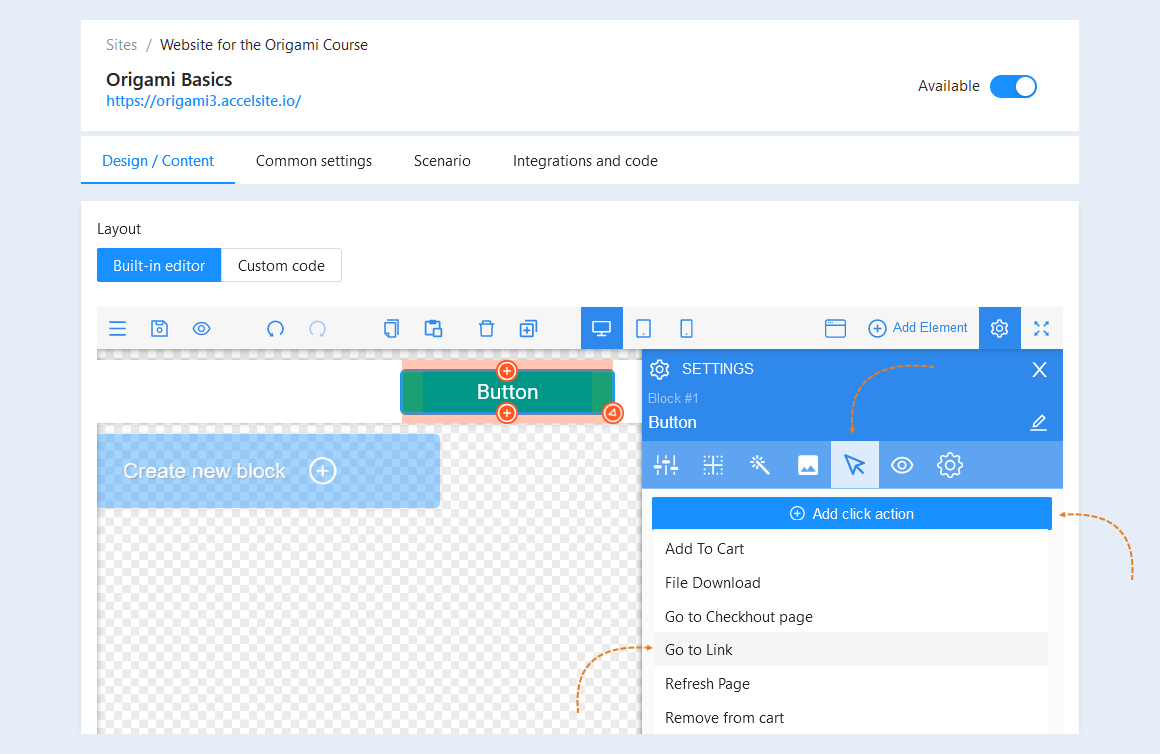
Select the entire button, the "Settings" panel of the element will open on the right. Open the "Interaction" tab, add an action by clicking "Go to link".
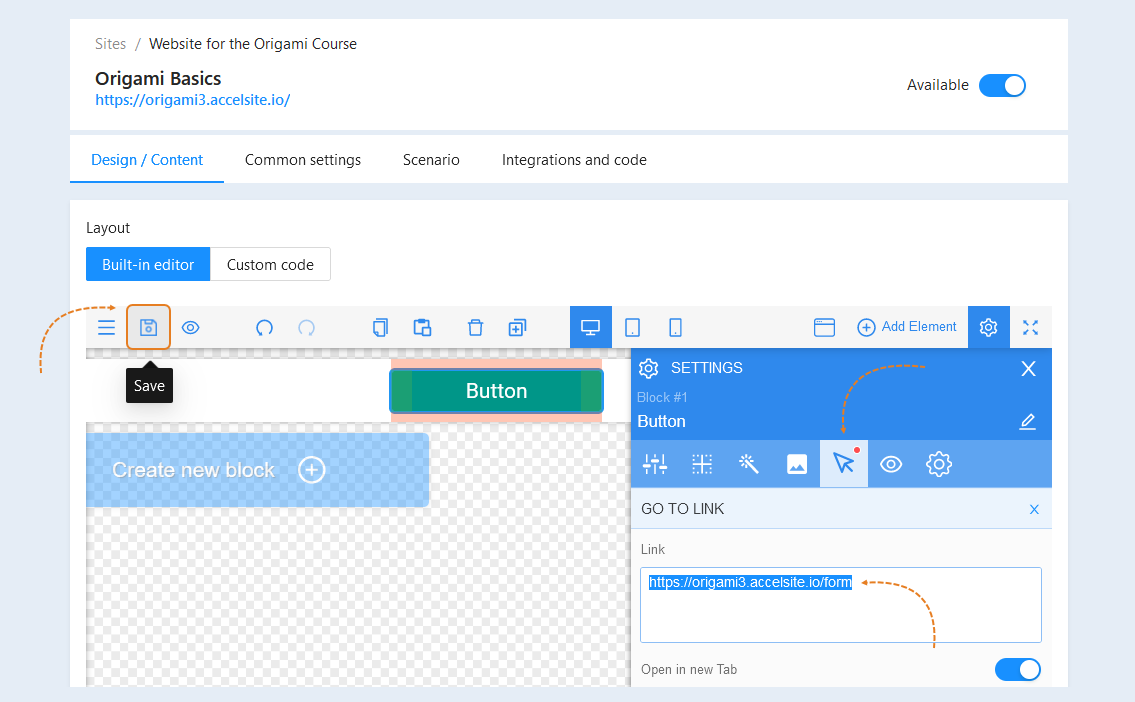
Paste the link to the site page in the field. Click the "Save" button.
After that, as soon as the user clicks on the button, he will be redirected to the specified site.
Creating a link to a chat bot
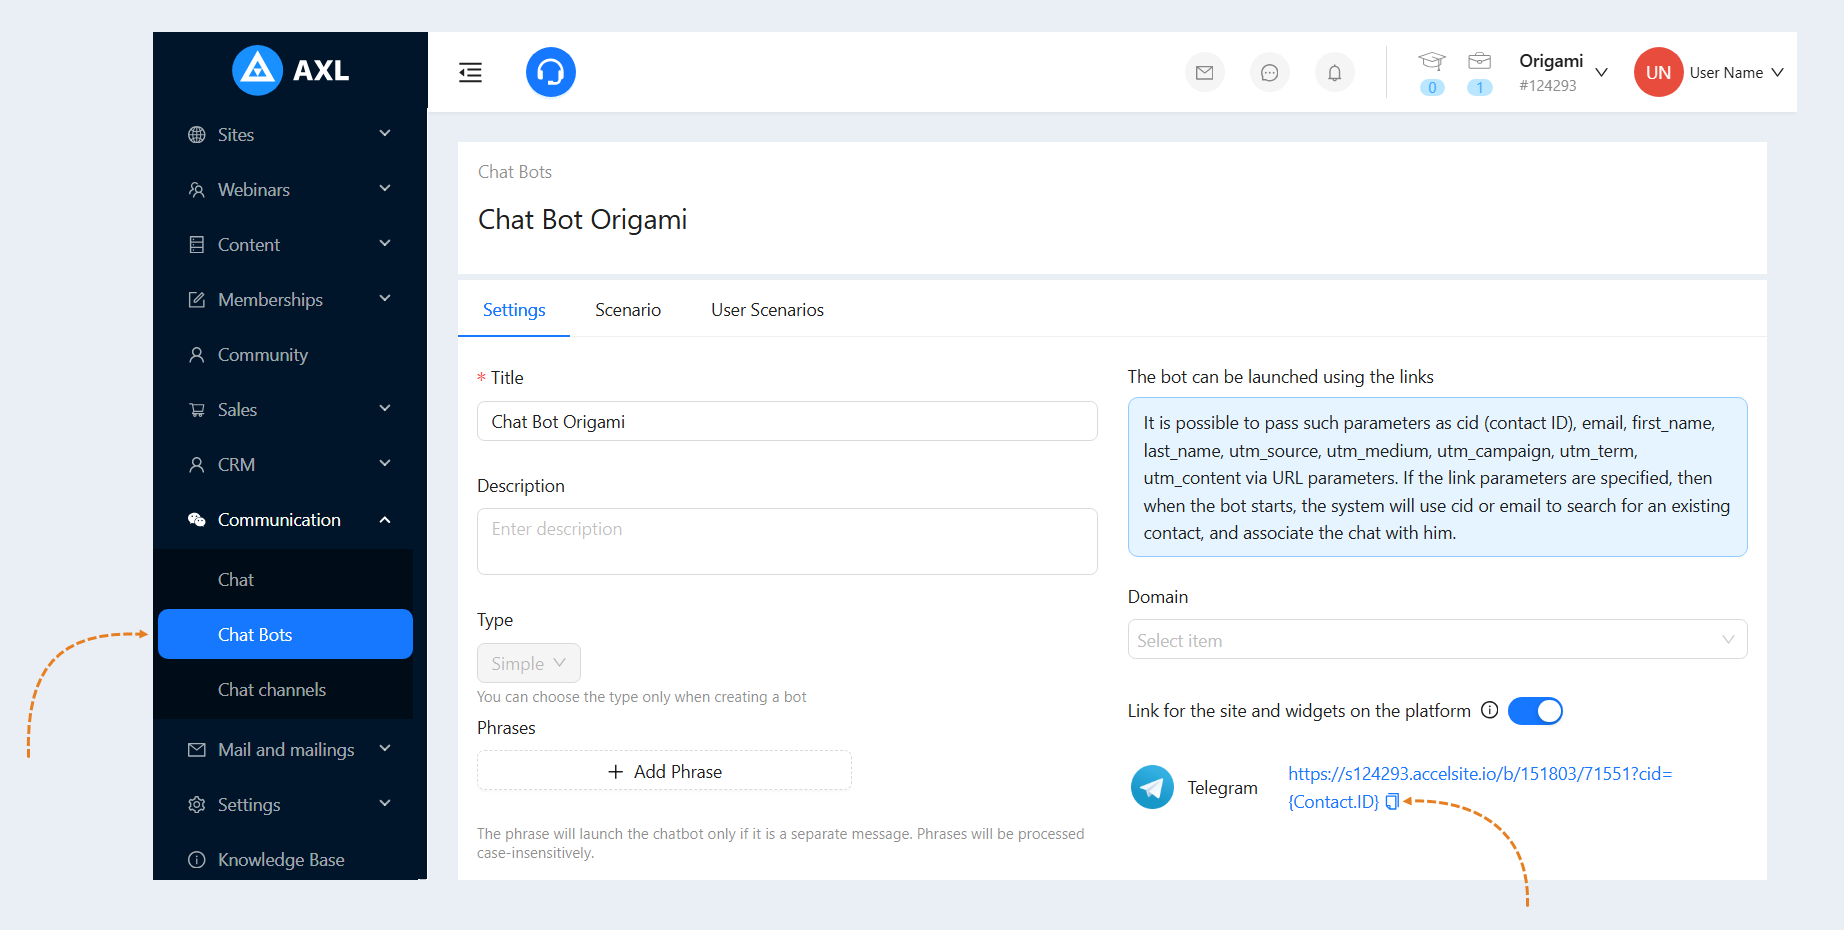
Go to the "Communication" section, the "Chat bots" tab. Open a previously created chatbot or create a new one. Read more about how to create a chatbot in the article "Chat bots".
In the lower right corner of the chatbot page, copy the link. You can send this link to the user. By clicking on it, the user will be sent to the chat bot.
Creating a link to order payment
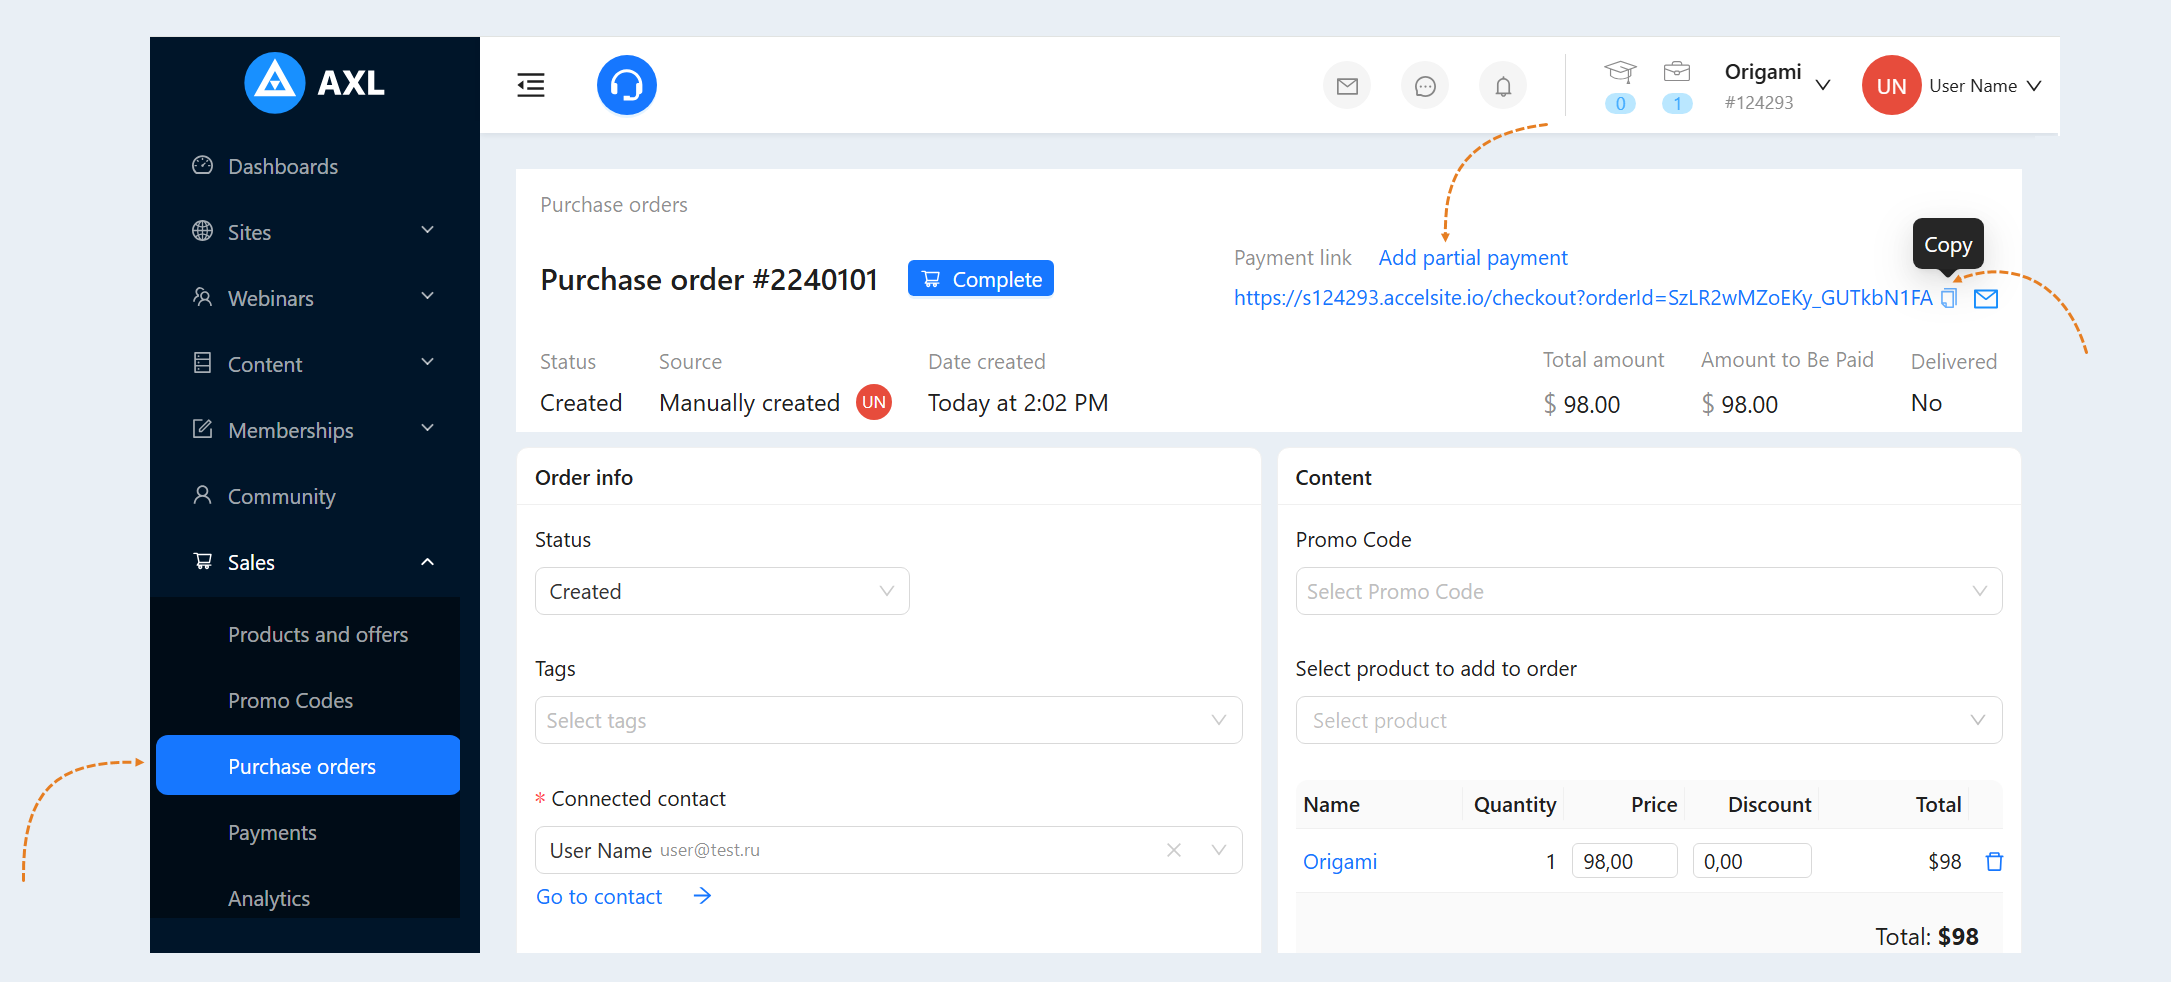
Go to the "Sales" section, the "Purchase Orders" tab. Open a previously created order or create a new one. Read more about how to create an order in the article "Orders".
A payment link will be available in the upper right corner of the order. Copy it by clicking the "Copy" button. You can also create a link for partial payment of the order. Click the "Add partial payment" button, then specify the required amount and copy the link.
These links are personal links to order payment, you can send them to the user who is associated with this order.
Link to order payment in variables
When configuring the sending of emails in the script, you can add a variable that will create a link to order payment in the email. Read more about how to create a product script in the articles "Product Scenario".
A template variable is a value to be automatically replaced with the data you selected. Variables will automatically replace the data in the email. The list of variables about the user's order will be displayed if the actions "Create an order", "Purchase a product" or "Created an order with a product" were added to the script at the previous step.
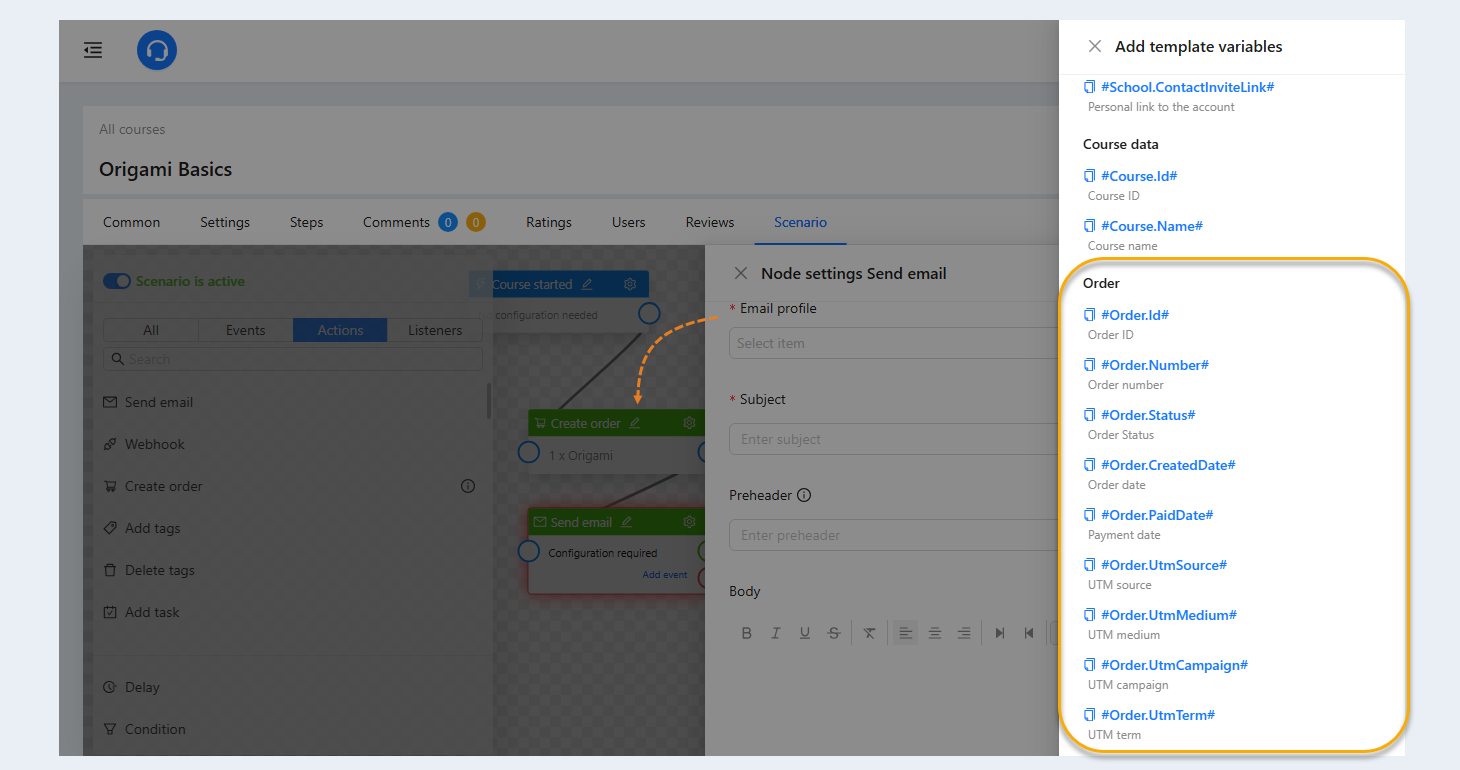
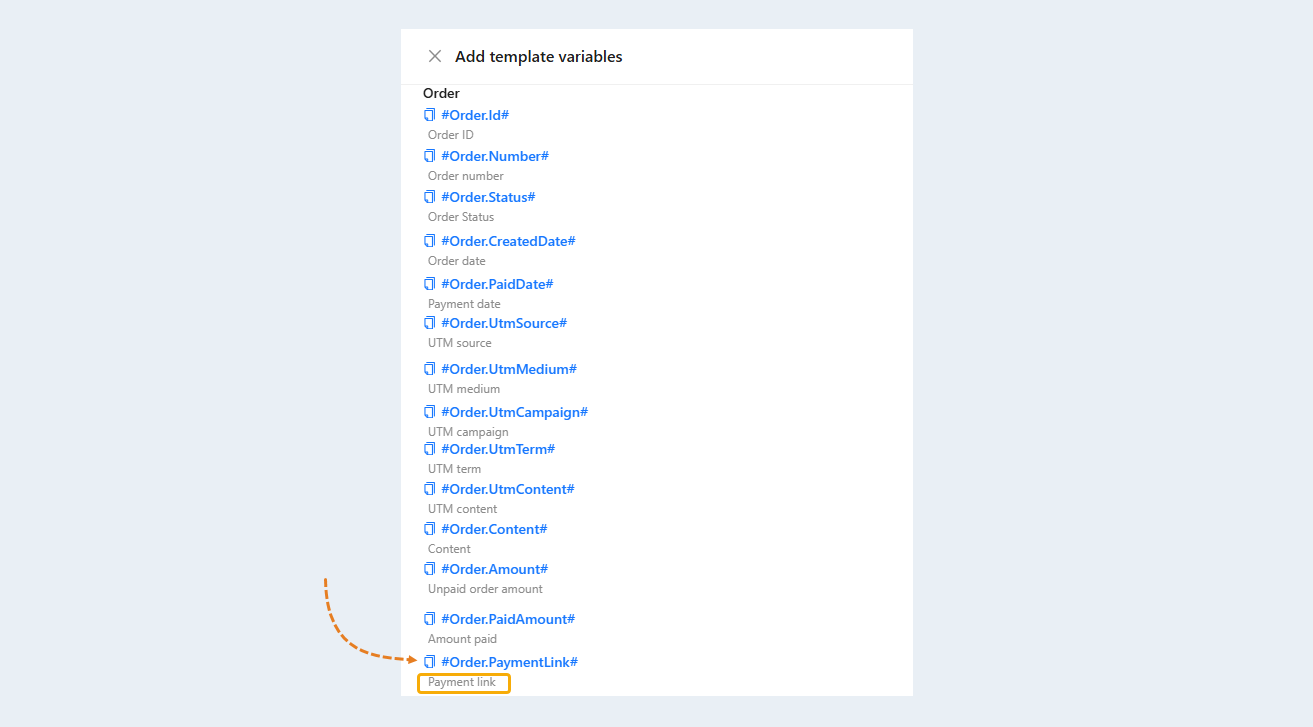
In the settings of the "Send email" node, click the "Add template variables" button. Select the variable "Payment link" so that the user can follow the link in the email and pay for the order.
Creating a link to the webinar
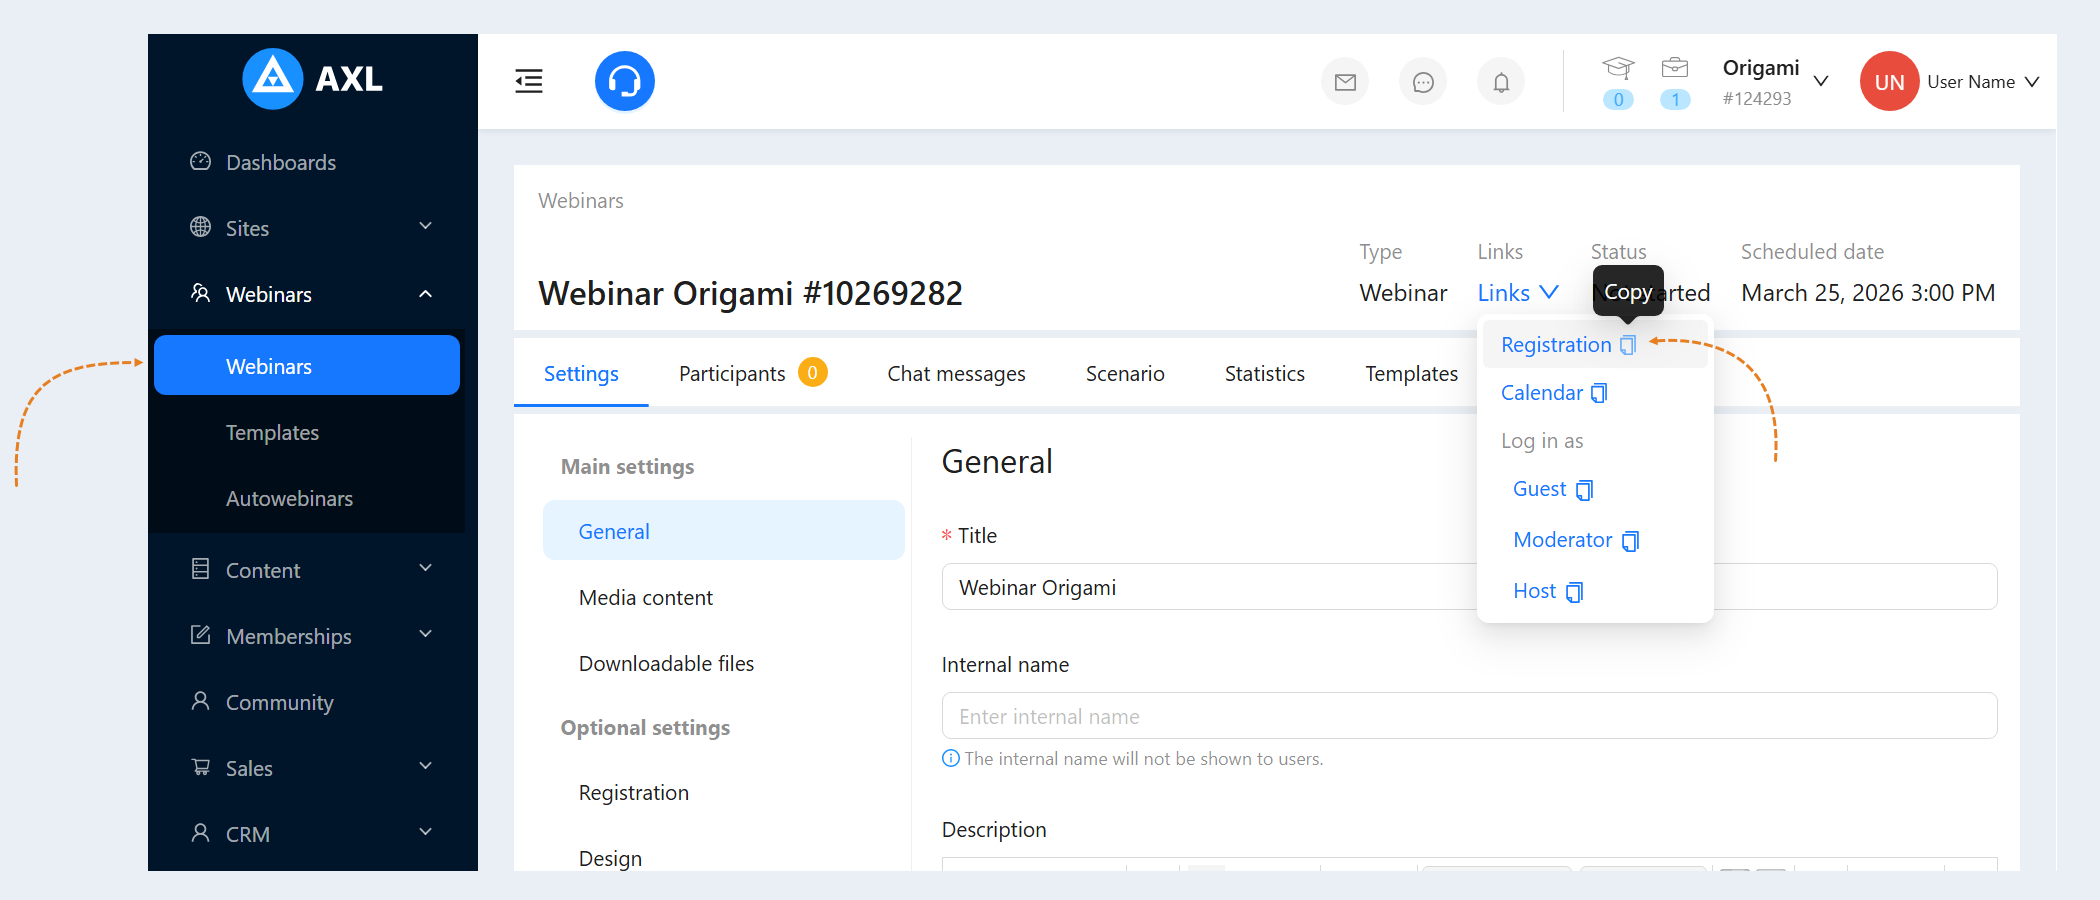
Go to the "Webinars" section. Open a previously created webinar or create a new one. Read more about how to create an order in the article "Webinars".
A registration link will be available at the top of the webinar page. Copy it by clicking the "Copy" button. You can send this link to users. By clicking on the link, the user will be sent to the page for entering data: email and name. After filling in the data, a link to log in to the webinar will be sent to the email specified by the user.
Webinar personal login link to the webinar in variables
When configuring the sending of emails in the webinar script, you can add a variable to the link for authorization to the webinar. Read more about how to create a webinar script in the articles "Webinar Scenario".
A template variable is a value to be automatically replaced with the data you selected. Variables will automatically replace the data in the email.
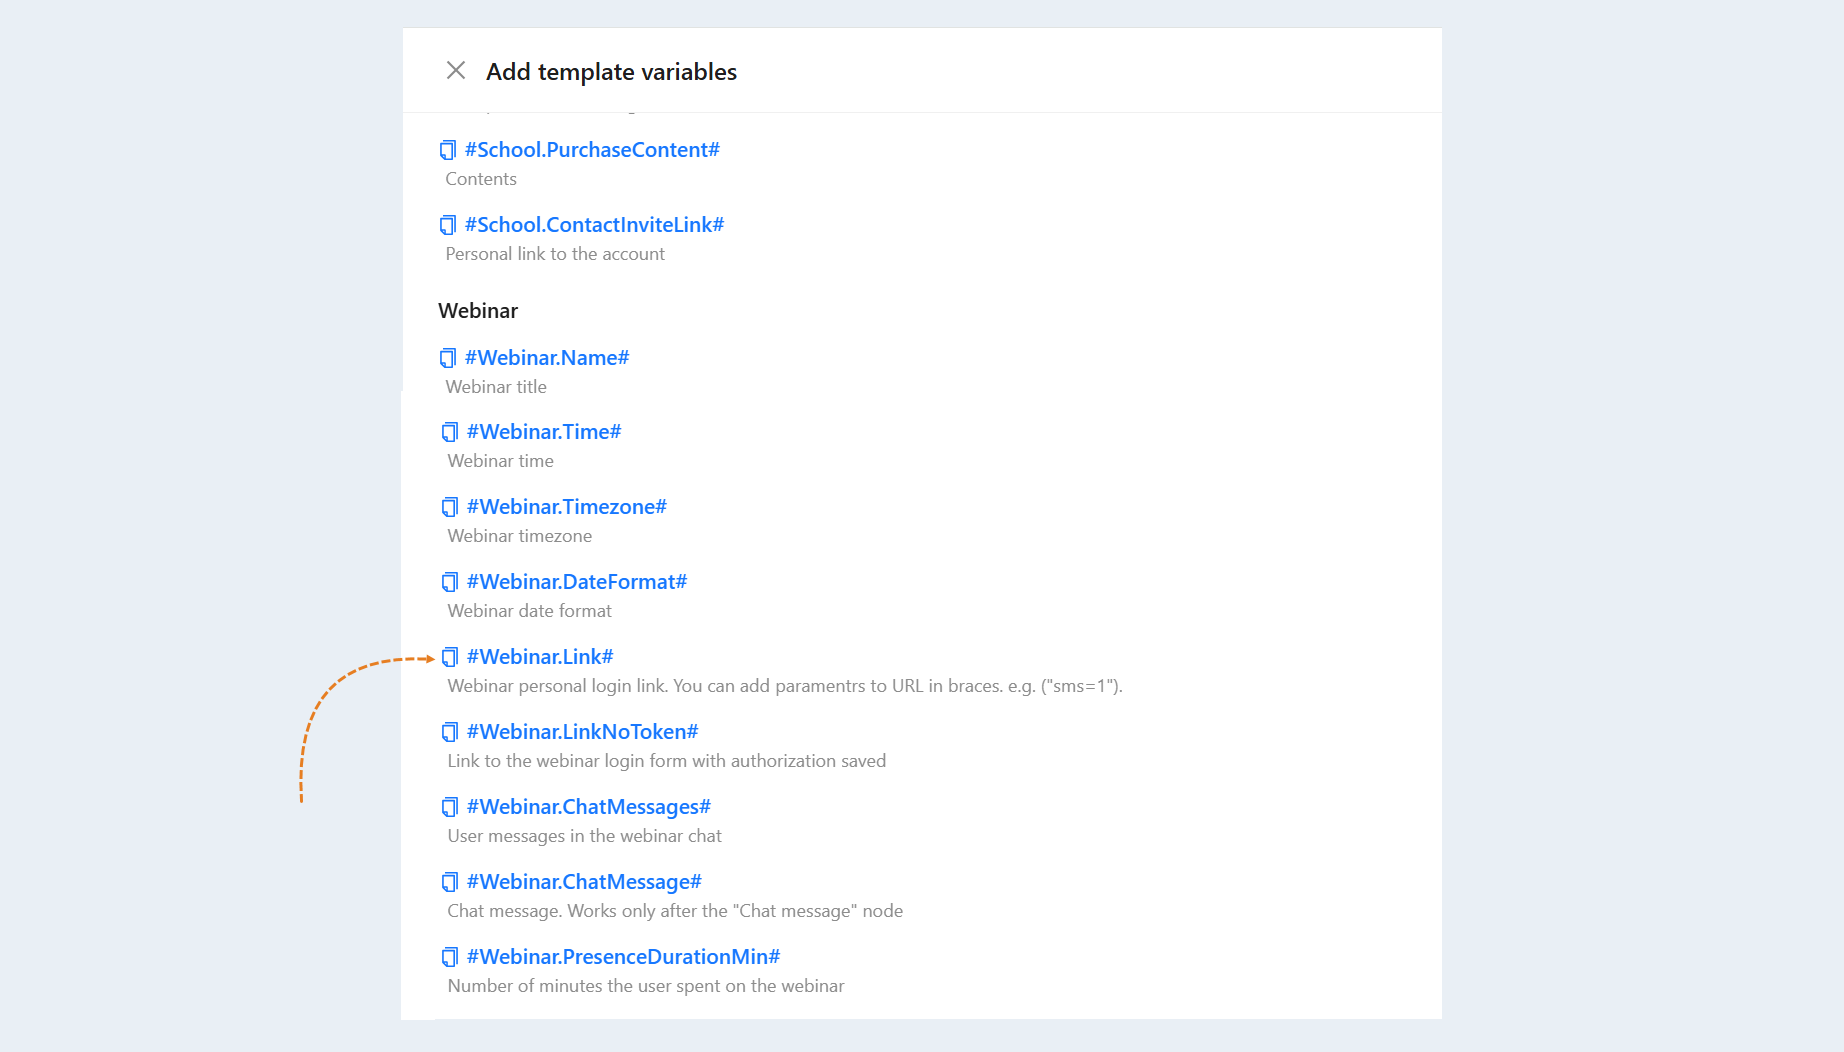
In the settings of the "Send email" node, click the "Add variables" button. Select the variable "Webinar personal login link" so that the user can click on the link in the email and get to the webinar.
Creating a link to the certificate
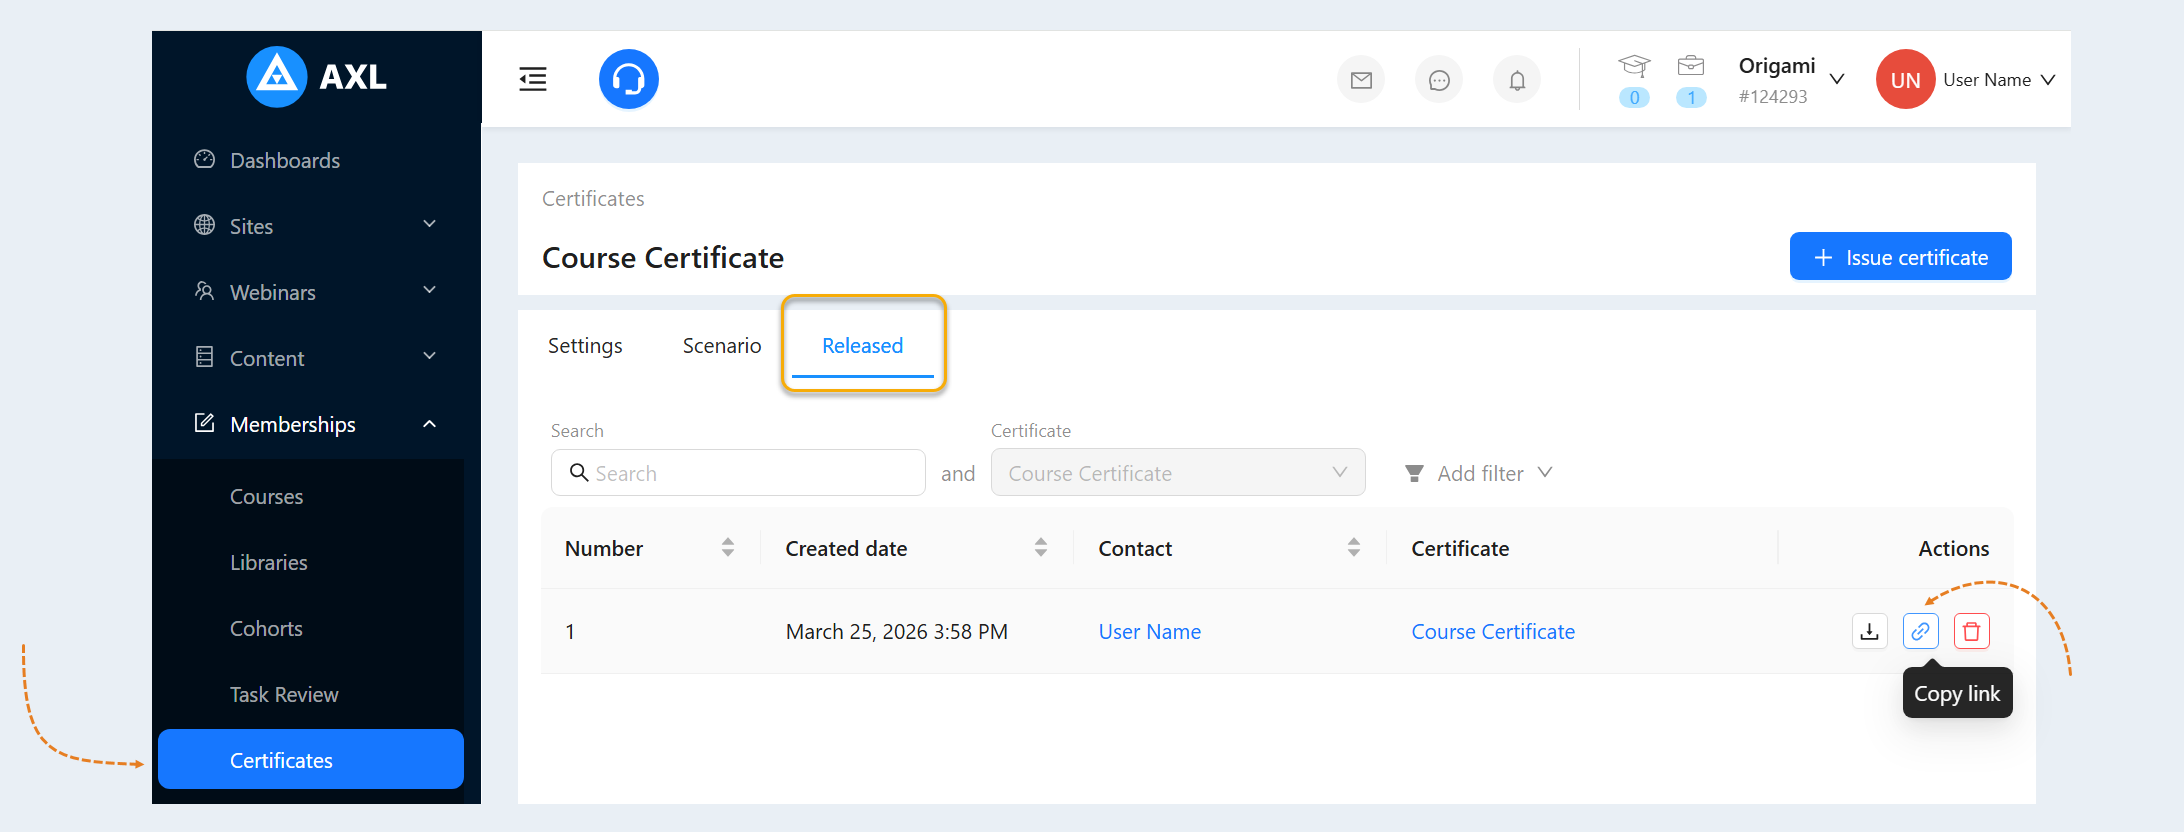
Go to the "Courses and Training" section, the "Certificates" tab. Open a previously created certificate or create a new one. For more information on how to create a certificate, see the article "Certificates".
In the "Released" section, you can see a list of all previously issued certificates. Click the "Copy Link" button to copy the link to the issued certificate. You can send this link to the student.
Certificate reference in variables
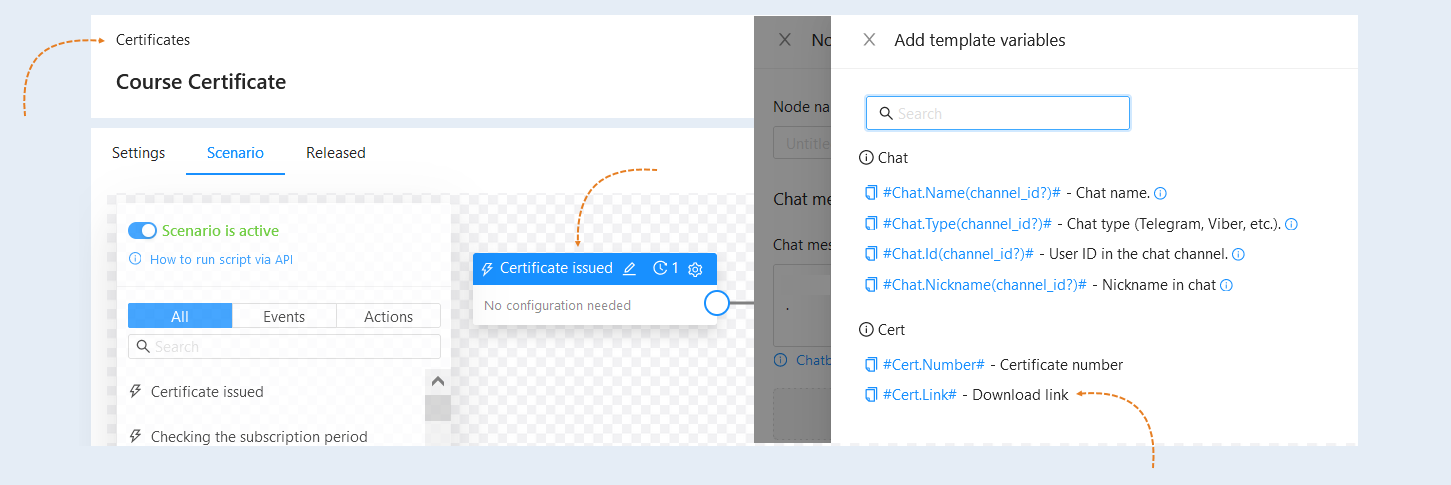
When configuring the "Send Email" node in the certificate scenario, you can add a variable to the download link for the personal certificate. For more information on how to create a certificate scenario, see the articles "Certificate Scenario".
In the settings of the "Send email" node, click the "Add variables" button. Select the "Download link" variable so that the user can click on the link and download the certificate.