Let's take a closer look at the participants' chat in the webinar room on the AXL platform.
Click on the desired section of the article to go to its description:
Webinar room interface
The webinar room is divided into two parts:
- The broadcast window (on the left). This is the main area where you see the speaker, presentation, and screen demonstration. The broadcast window provides the visual and audio information necessary to understand the topic of the webinar.
Read more in the article "Webinar Room".
Participants' chat (on the right). This is a text field where webinar participants can communicate with each other and with the moderator. Here you can ask questions, share comments, express your opinion and participate in discussions. Participant chat provides interactivity and audience engagement. It allows you to ask questions to the moderator, receive feedback and create a sense of community.
Let's take a closer look at the "Chat of webinar participants".
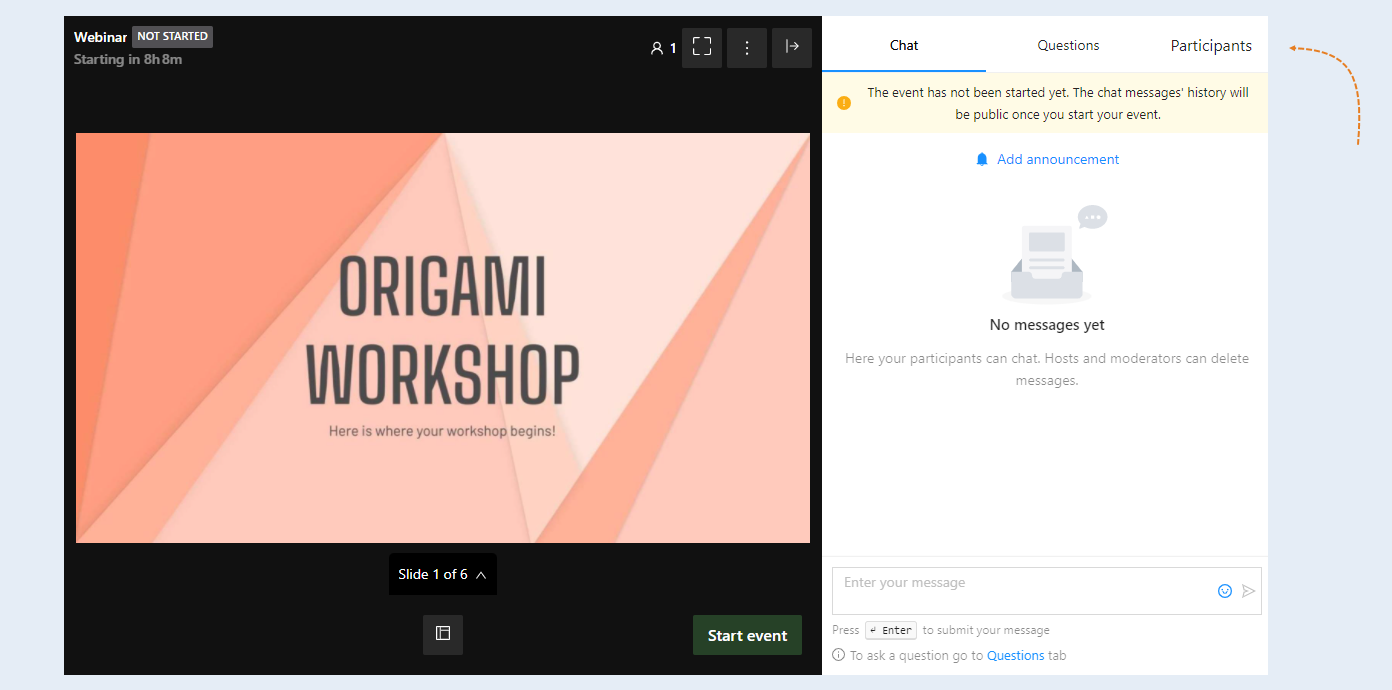
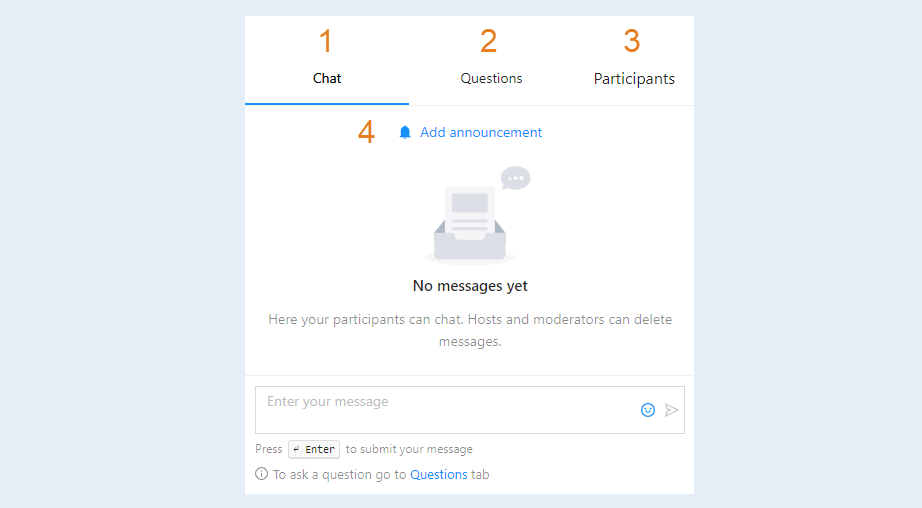
In the "Chat of webinar participants" section, you can see the following tabs:
- Chat. This is the main space for communication between the webinar participants and the moderator. It publishes messages in which users share their thoughts, comment on what is happening, and share experiences. This is the place for a live discussion of the webinar topic.
Questions. This tab displays the questions of the participants for the speaker. Allows participants to ask questions to the moderator without losing them in the general flow of messages. In this tab, questions can be marked so that the speaker knows which of them are most relevant to the audience. The moderator or moderator can monitor the questions and answer them whenever possible.
Participants. A list of all participants of the webinar is shown. Displays the names and emails of the users who are in the webinar room. Each field contains information about the role of the participant (for example, moderator, moderator, guest).
Chat room
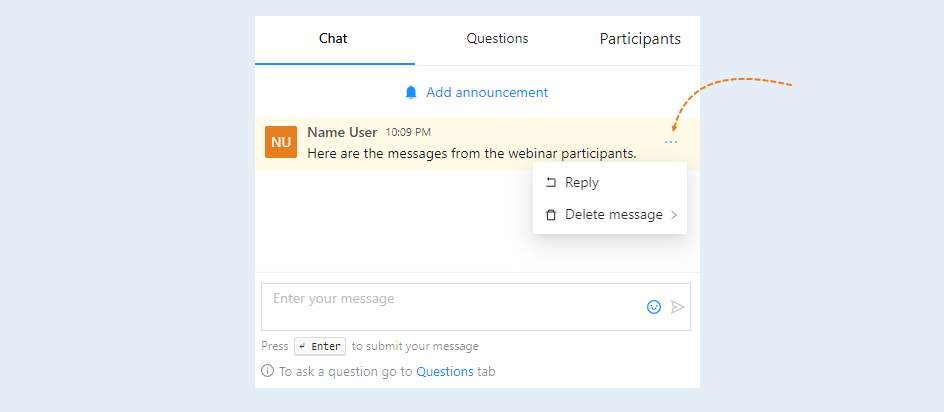
In the "Chat" tab, you can see the correspondence of the participants.
You can manage messages. These actions allow the moderator or moderator to control the discussion and maintain order in the chat.
Click on the three dots on the right and select an action from the list:
- To answer. Click to begin responding to a specific participant's message in writing. When you select this option, your message will be linked to the message you are responding to, which makes it easier to understand the context and maintain the coherence of the discussion.
Delete the message. Click to delete the unwanted message from the chat. If a message violates the rules of the webinar (for example, it contains spam, insults, obscene language, or does not relate to the topic), the moderator can delete it.
Delete all user's messages. This action deletes all messages of a particular participant from the chat. It is used if a participant systematically violates the rules of the webinar or publishes a lot of spam.
Turn it off. This action turns off the microphone sound of a particular participant. It is used as a temporary measure to prevent background noise.
Block the chat. It completely prohibits sending messages to the chat for all participants. It is used in cases when chat communication becomes unmanageable, or when it is necessary to temporarily stop the discussion.
Block. Removes a participant from the webinar room. It is used as a more stringent measure. The participant will be excluded from the webinar and will no longer be able to log in (from this account).
Block by IP. Prohibit access to the webinar from a specific IP address. The strictest measure used in cases of serious violations of the rules of the webinar or attempts at sabotage. Prevents the participant from reconnecting to the webinar from the same IP address, even if they change their account. You need to use it carefully, as different users may use the same IP address (for example, on a shared network).
There is a text input field at the bottom of the chat where you can type and send messages to other webinar participants. You can add emojis to visually express emotions and make the message more personal and friendly. This allows you to spice up communication and make it more emotional. Press Enter to send the message.
Advertisement
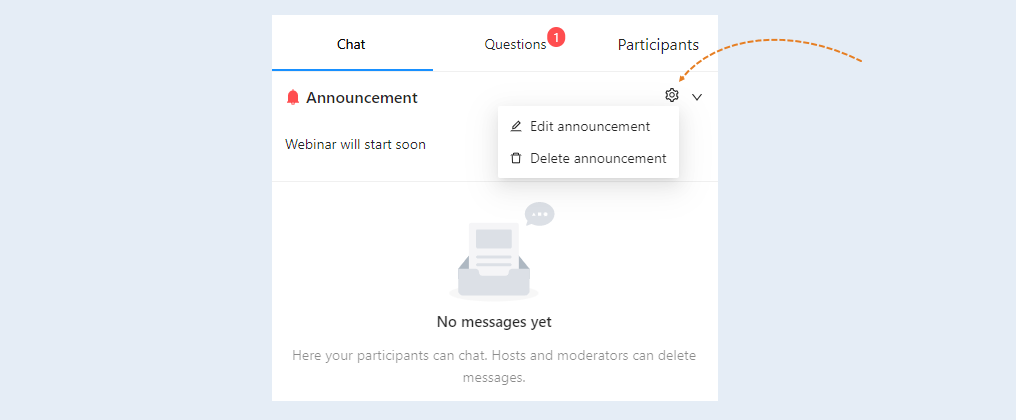
Click the "Add Ad" button to post important messages or notifications to all participants of the webinar. When the moderator or moderator clicks this button, a field appears for entering the text of the ad. After posting, the ad is pinned at the top of the chat to attract the attention of all chat users.
The following actions are available for you to advertise:
- Settings. These actions allow the moderator or the webinar organizer to manage the announcement pinned in the chat:
- Edit the ad. Allows you to change the ad text, correct typos, or update information.
Delete the ad. Removes an ad from visibility in a chat, for example, when it has lost relevance.
Hide/expand. This action allows users to hide or expand long ads so as not to clutter the chat. If the ad is minimized, only part of it is visible, which makes it easier to view the rest of the discussion.
Questions
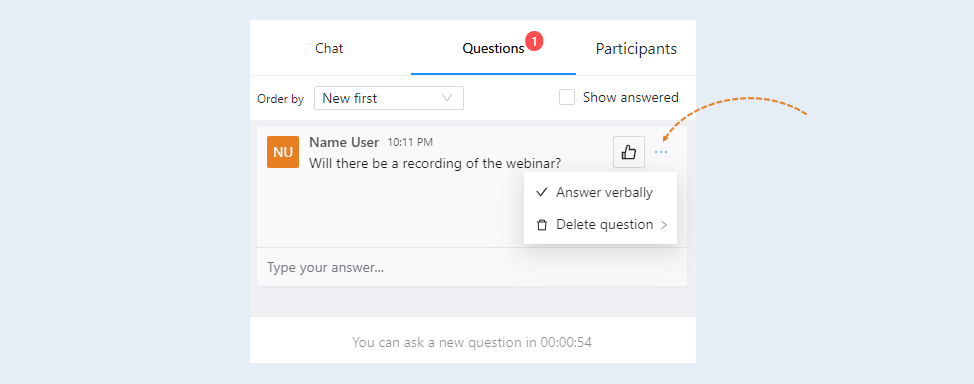
In the "Questions" tab, you can see a list of questions from the webinar participants. The following actions are available to you for questions:
- Like. Please like the question to highlight it as interesting and important. Users will see the number of "likes" of their question.
Actions. Click on the three dots and select an action from the list:
- Respond verbally. This action allows you to mark the question that was answered verbally during the webinar (that is, not in text in the chat). It is used to remember which questions have already been voiced and which have been answered, or so that participants can see which questions have already been considered.
Delete the question. This action allows you to remove a question from the general list of questions. Deleting incorrect, offensive questions or questions unrelated to the topic of the webinar.
Delete the question and block the chat. This action combines deleting a question with blocking the user who asked it.
Answer. There is a text input field under each question where you can type and send the answer to a specific question.
In the upper part of the "Questions" section, you can:
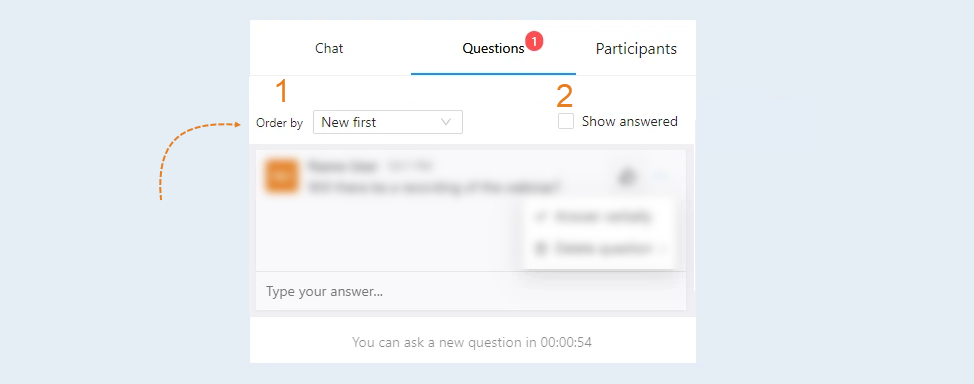
- Sorting. Click to select the questions:
- New ones first. Shows the questions in the order they were received, with the most recent questions at the top of the list. It is useful not to miss the latest questions.
The old ones first. It shows the questions in the order they were received, with the very first questions at the top of the list. It is useful to make sure that none of the questions from the beginning of the webinar were missed.
Popular ones first. Shows the questions that have received the most "likes" from the participants. It is useful for identifying the most interesting and important questions for the audience.
Unpopular at first. Shows the questions that received the least number of "likes" from the participants. Sometimes it's useful to review these questions to make sure that important issues don't go unnoticed.
Show the replies. This option allows you to see the questions that have already been answered.
Participants
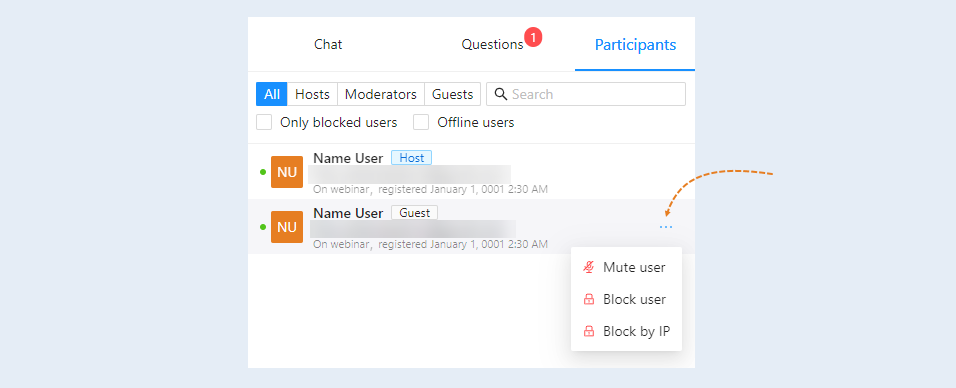
In the Participants tab, you can see personal information (first name, last name, email, role), as well as manage webinar participants.
Click on the three dots on the right and select an action:
- Block the chat. Deprives the selected participant of the opportunity to send messages to the general chat of the webinar. To stop a user who writes spam, insults, or messages unrelated to the topic of the webinar.
Turn it off. Disables the microphone of the selected participant. To remove background noise from a participant that interferes with others, or to prevent the speaker from interrupting.
Block. Removes the user from the webinar. He will not be able to log in again using the same account.
Block by IP. Blocks access to the webinar for all users using the blocked participant's IP address.
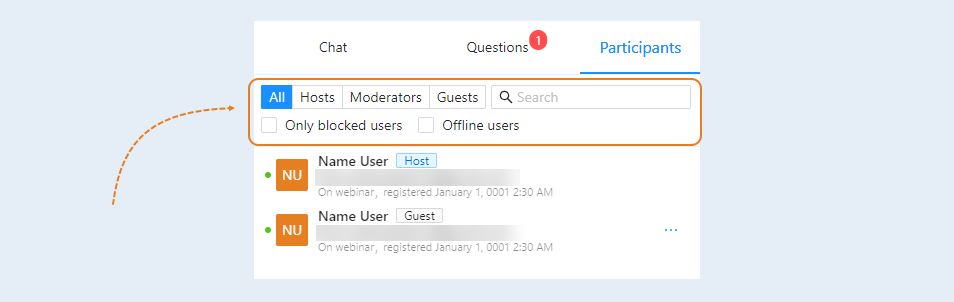
The following filters are available in the upper part of the window:
- Role. Allows you to filter the list of participants by their role in the webinar:
- All. Displays all participants of the webinar, regardless of their role.
Host. Shows only users who have been assigned the role of the webinar host.
Moderators. Displays moderators only.
Guests. Shows all participants who are not presenters or moderators. These are ordinary webinar listeners.
Search. A text input field that allows you to find a participant by first name, last name, login, or other identifier.
Only the blocked ones. Displays only users who have been blocked by a moderator or moderator. Shows a list of blocked users so that you can, for example, silence them or unlock them (if necessary).
Offline users. Shows users who were previously connected to the webinar, but are currently offline (disconnected). It is useful for tracking attendance, especially if the webinar involves mandatory attendance.