Video is the Prodamus.XL section for storing your video materials. Here you can upload an unlimited number of videos, store them and use them in your training courses and websites. You also have access to detailed statistics of your videos: the number of views, duration, periods of views. Video materials include any video tutorials, recordings of online meetings, master classes, webinars, commercials, etc.
On the Prodamus.XL platform, we have created our own video player, so all video materials are maximally protected from copying and using by third parties. You yourself determine who will see this video, on which pages or sites. Each video has a program code with which you can embed a video on any web page (membership portal, website, social networks, etc.) and then track video analytics (number of views).
Click on the desired section of the article to go to its description:
Adding video from computer
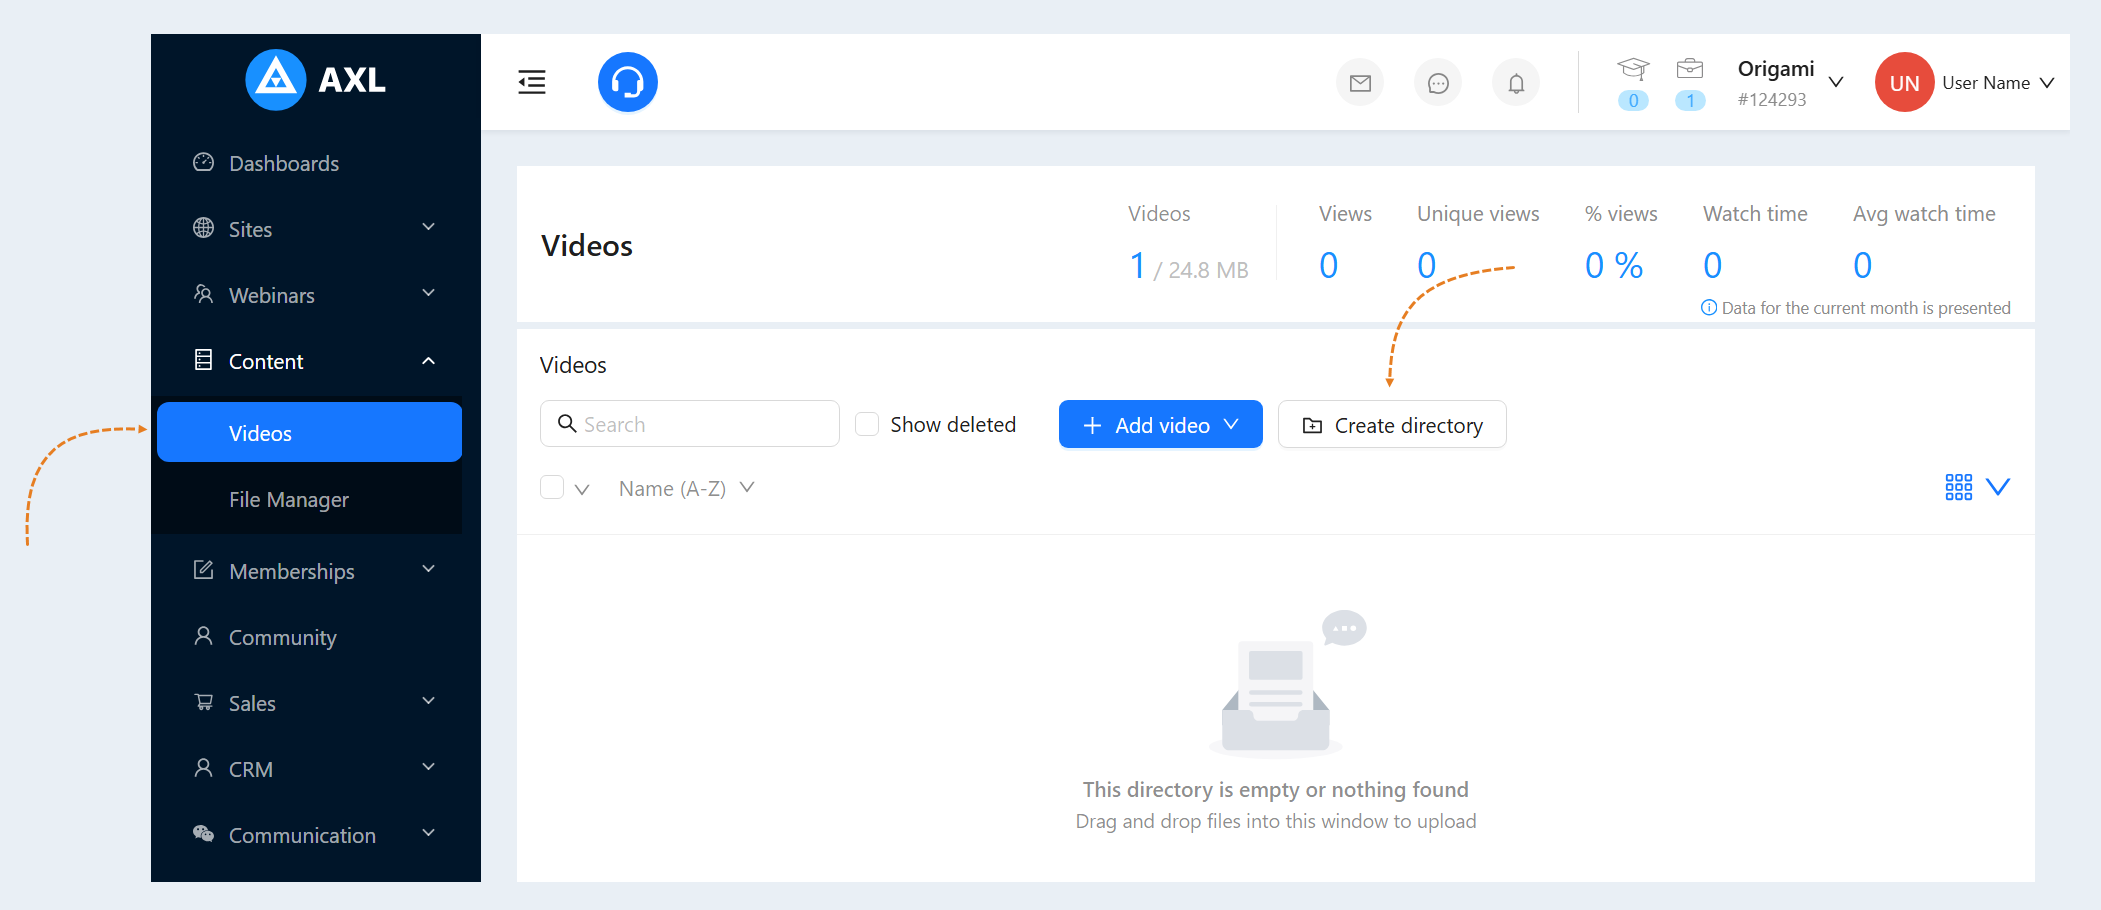
Go to the "Content" section, the "Video" tab. For the convenience of sorting and searching uploaded videos, create folders. Click the "Create Directory" button.
You will see the "Create Directory" window. Specify the name of the folder and click "Create".

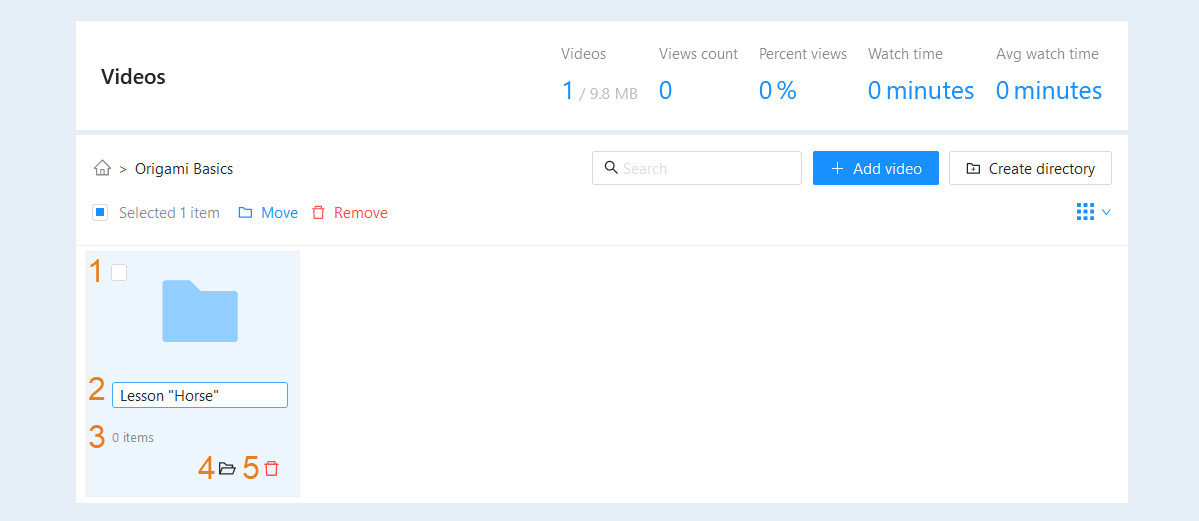
The created folder will appear in the list. Here you can see the following information:
- Check mark "Select". Check the box to select it and perform further action with the folder, for example - move it to another location.
The name of the folder. Click on the folder name to rename the folder.
The contents of the folder. The row shows the number of items inside the folder.
The "Open" button. Click the button to open the folder.
The "Delete" button. Click the button to delete the folder.
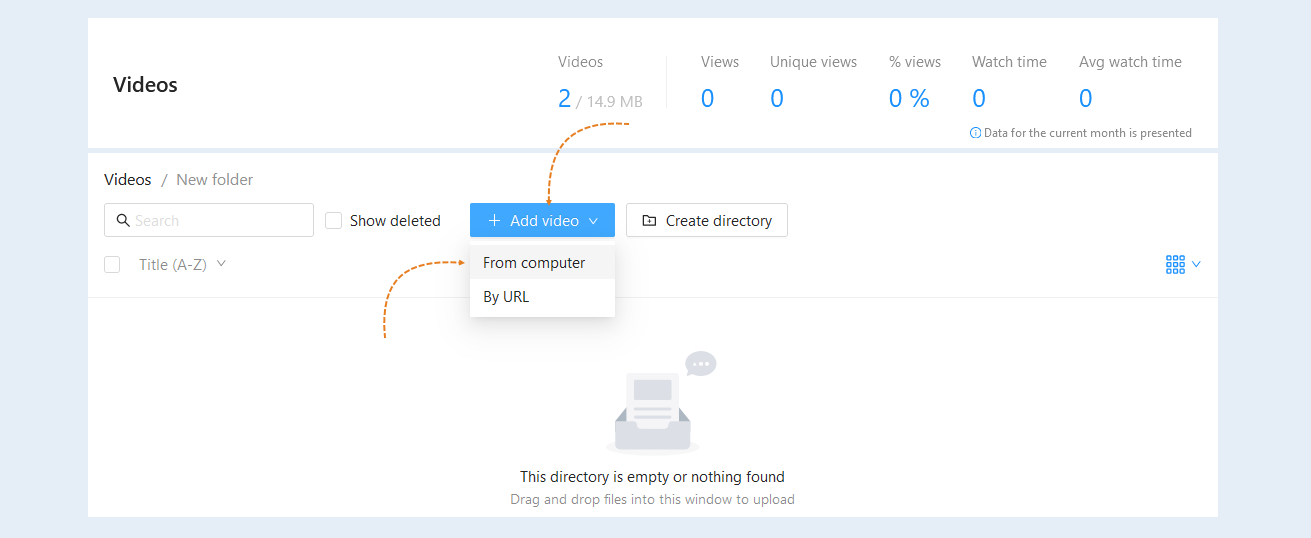
Inside the created folder, you can create either another folder, thus creating a chain of folders. Or you can upload a video to it. To do this, click the "Add Video" button and select "From computer".
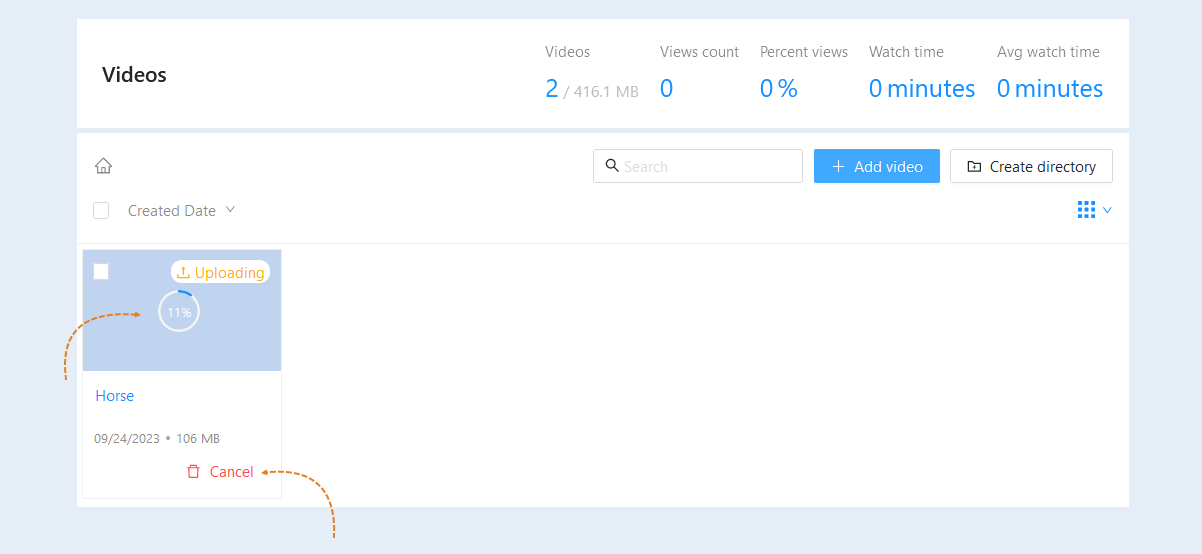
Select the file on your device (computer, laptop). The selected file will be uploaded to your account on the AXL platform. During the video upload, its card will be created and will appear in the list. Here you can see the percentage of video downloads to the platform. Click the Cancel button to cancel the video download.
We recommend that you stay on this page until the video is fully loaded, and do not refresh the page to avoid loading failures.
Adding a video by URL
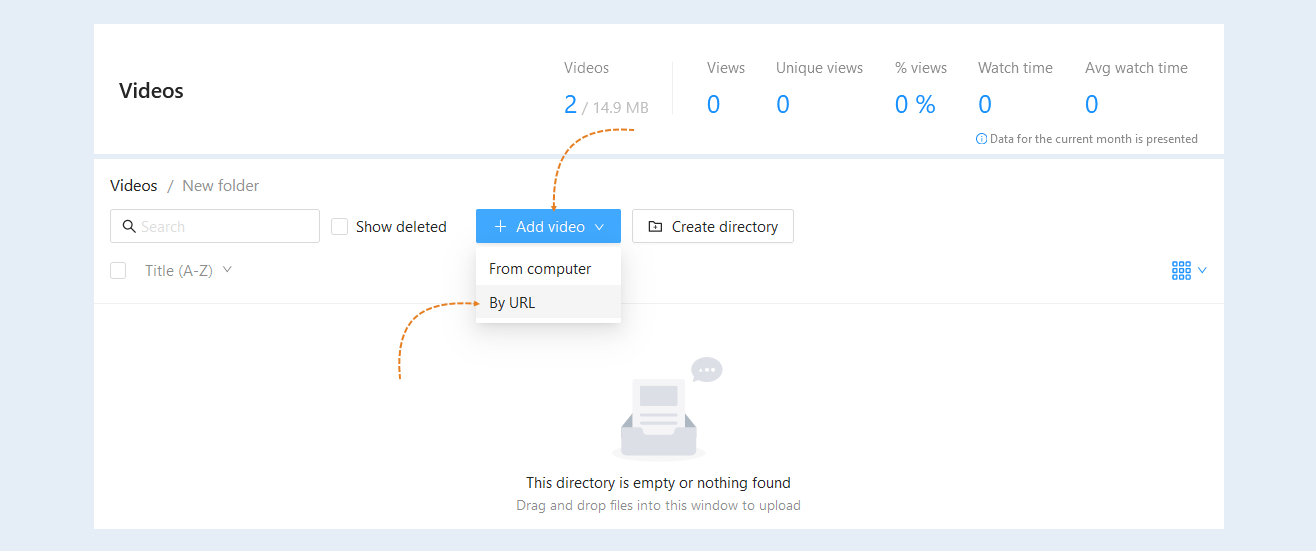
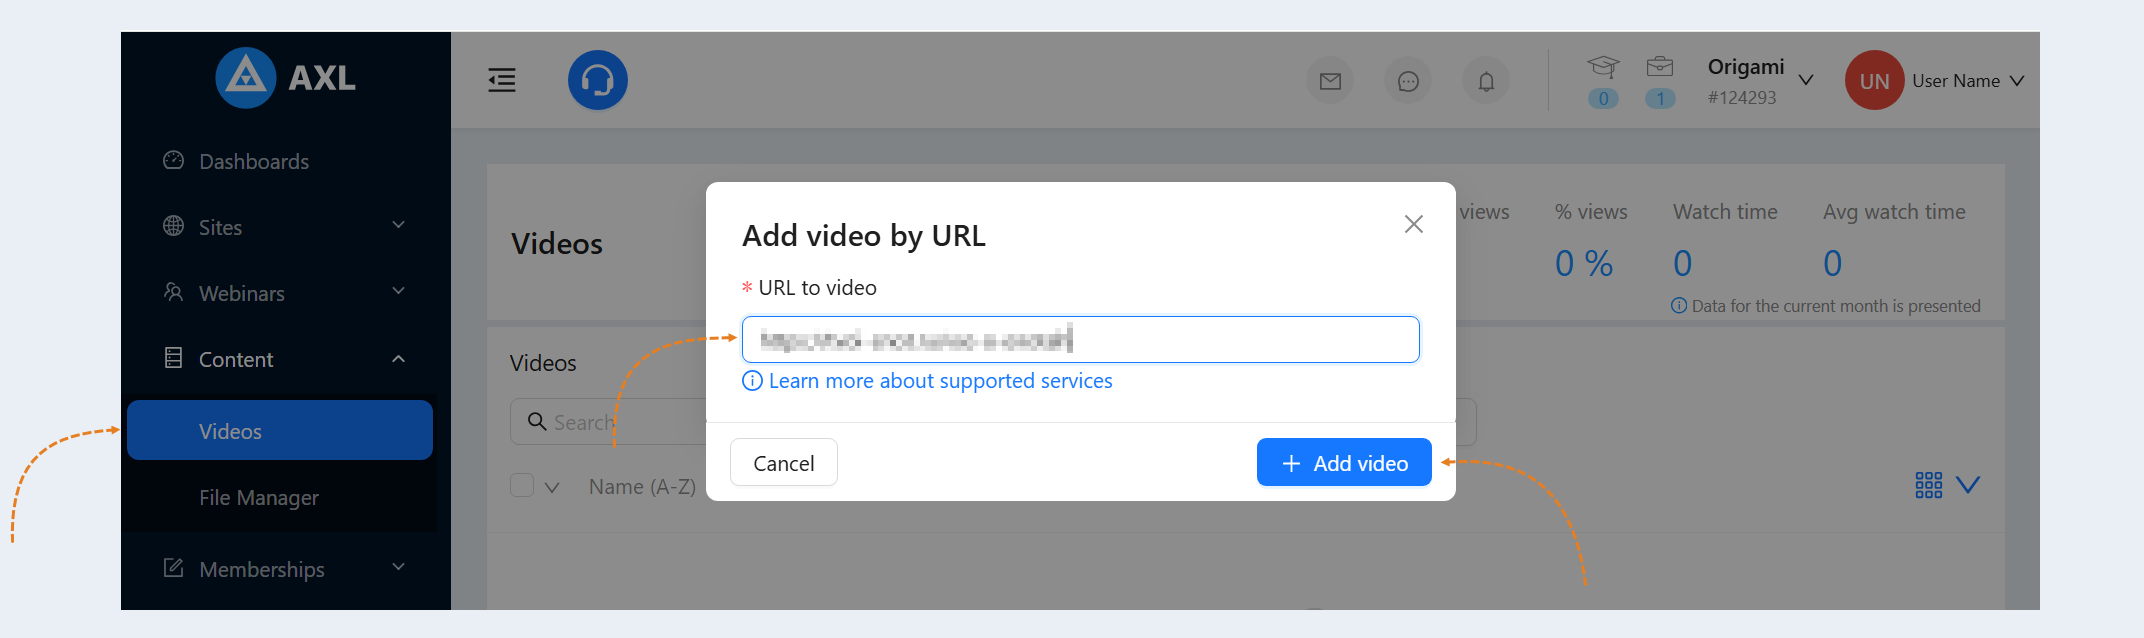
To add a video by link, click the "Add Video" button and select "By URL".
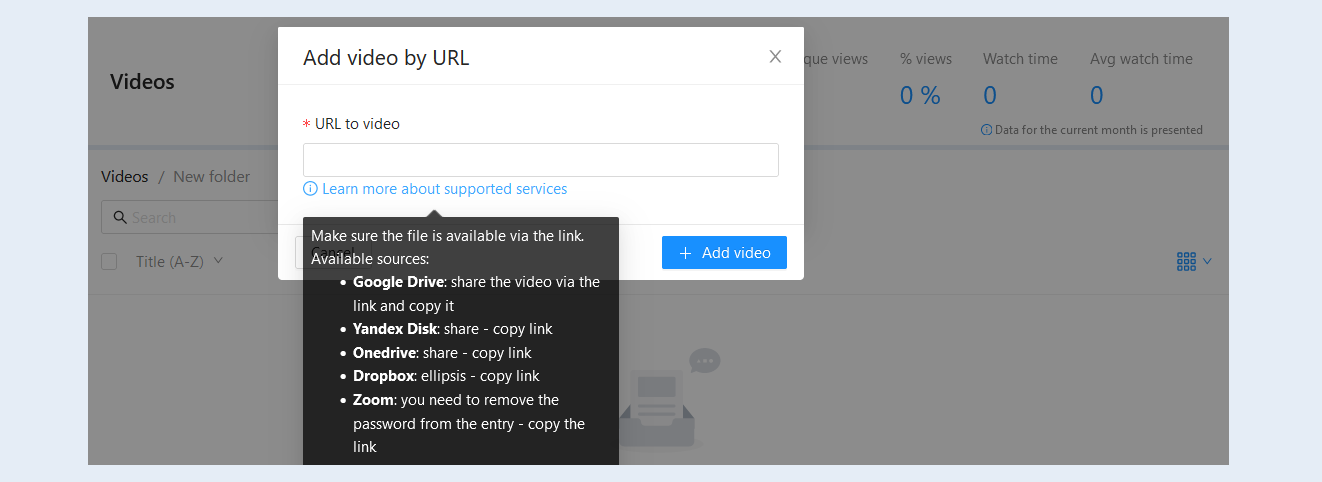
The platform has the ability to add videos from various services:
Google Drive
Yandex Disk
Onedrive
Dropbox
Zoom
The procedure for adding videos for each service is described below.
Adding a video via Google Drive link
Log in to your Google Drive account by following the link. Open the file storage.
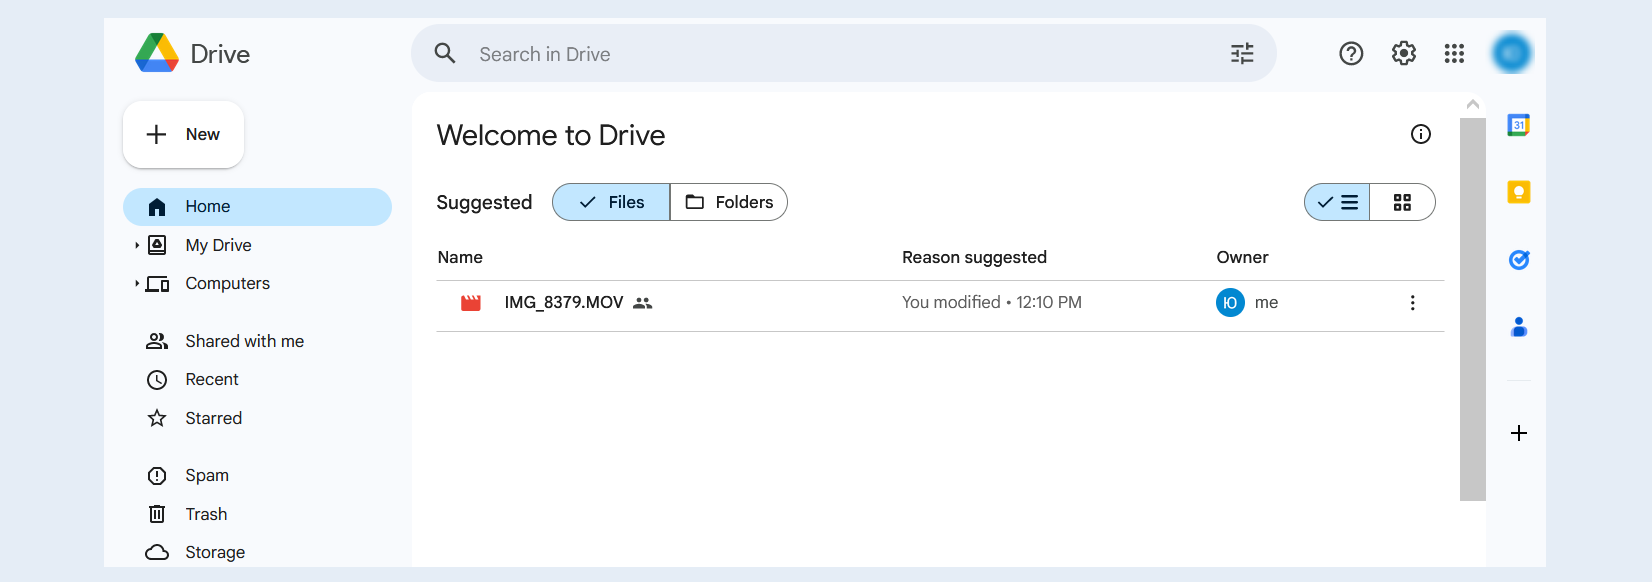
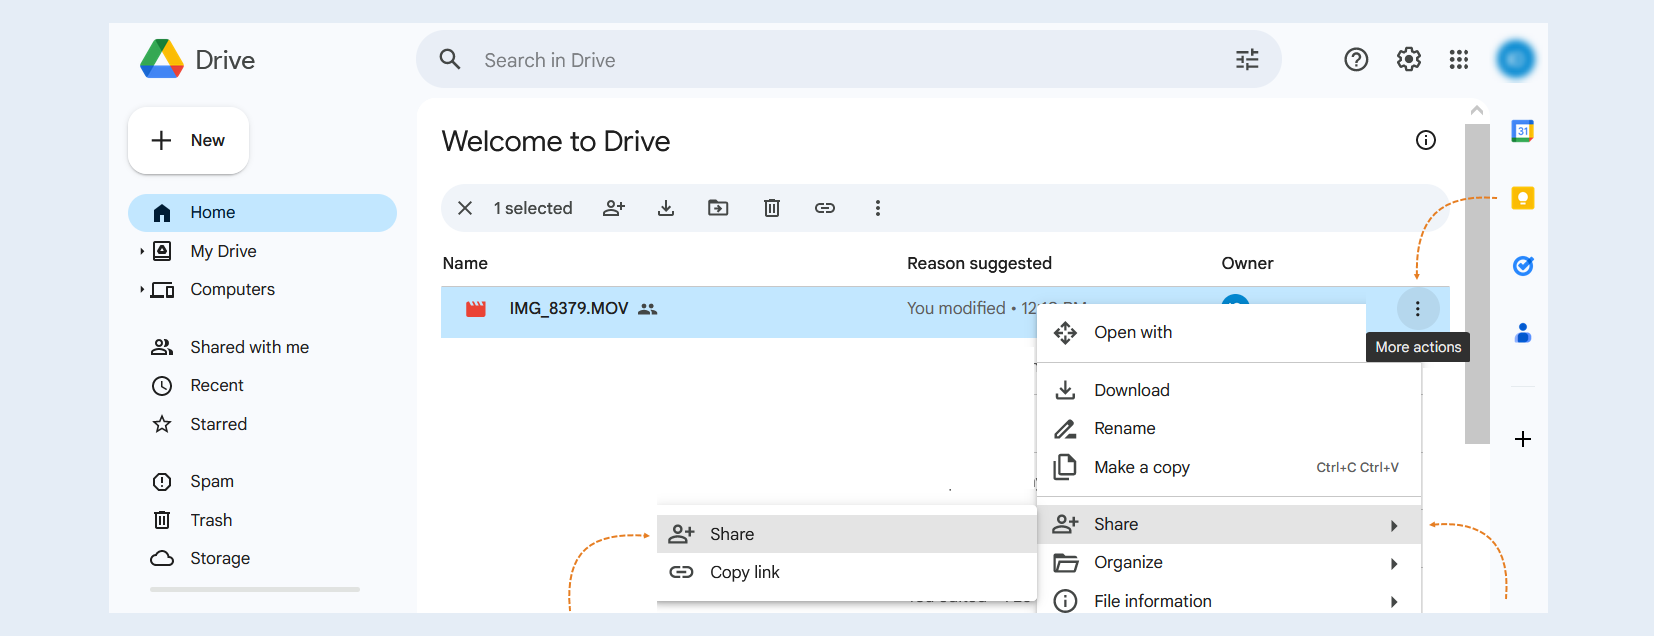
Choose the desired recording from the list. Next to the recording, click on "More actions" to open the menu with options. Select the "Share" sections.
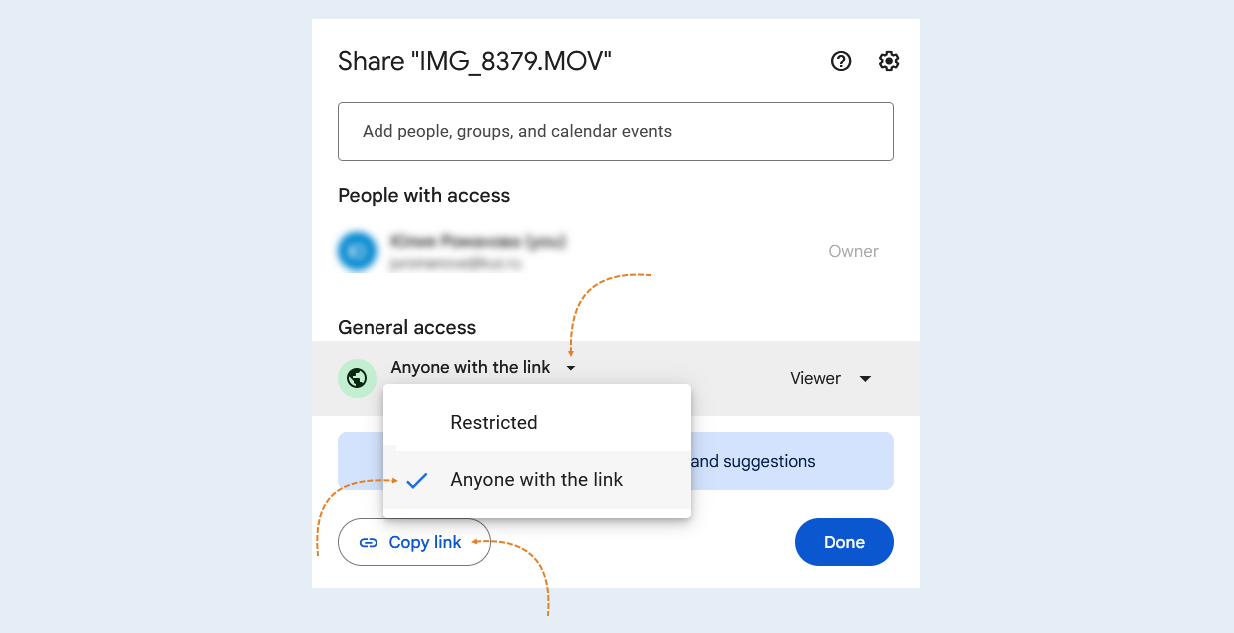
In the opened window, in the "General accesss" field, allow access to the video to anyone with the link. Copy the link and click "Done".
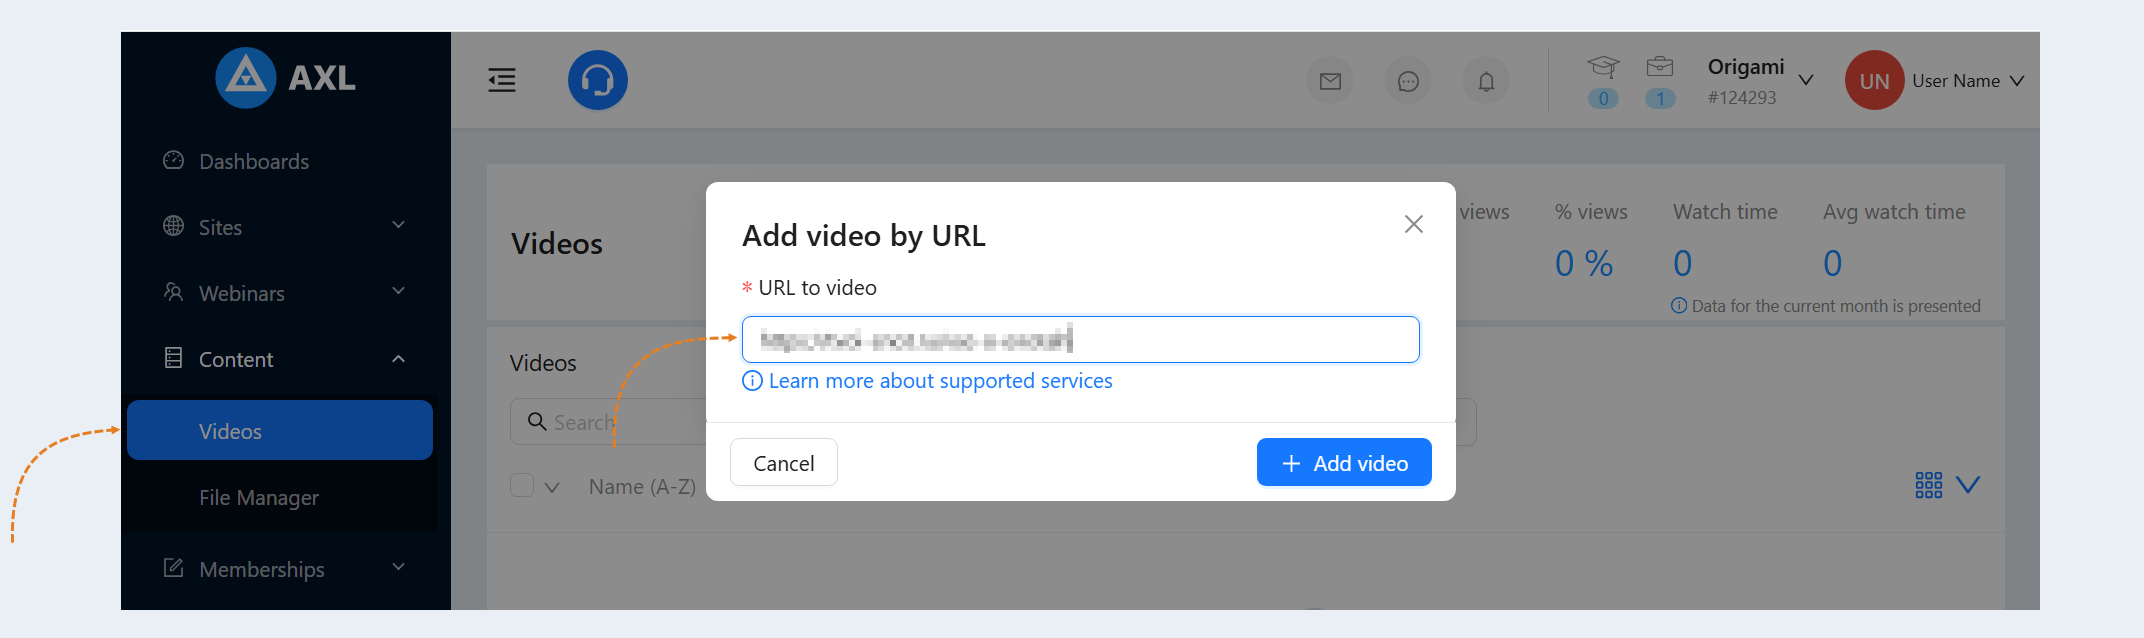
Return to the Prodamus.XL platform. Paste the copied link into the field and click "Add video".
The selected file will be uploaded to your account. During the video upload, a card for it will be created. Here you will see the percentage of the video upload to the platform. Click "Cancel" to cancel the video upload.
Adding videos via the Yandex.Disk link
Log in to your Yandex.Disk account by clicking on the link. Open the file storage on the disk.
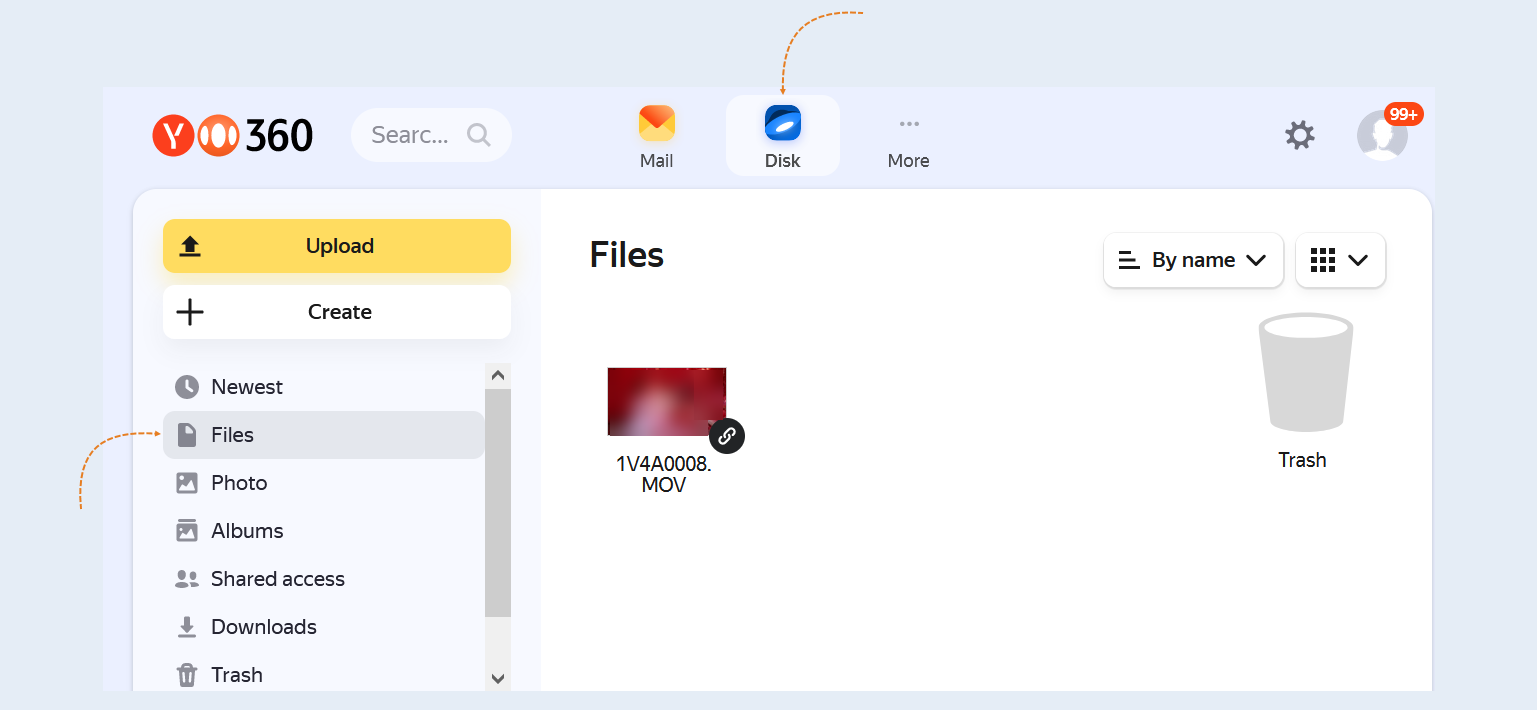
Select the desired entry from the list. Right-click on the menu with sections. Select the "Share" section.
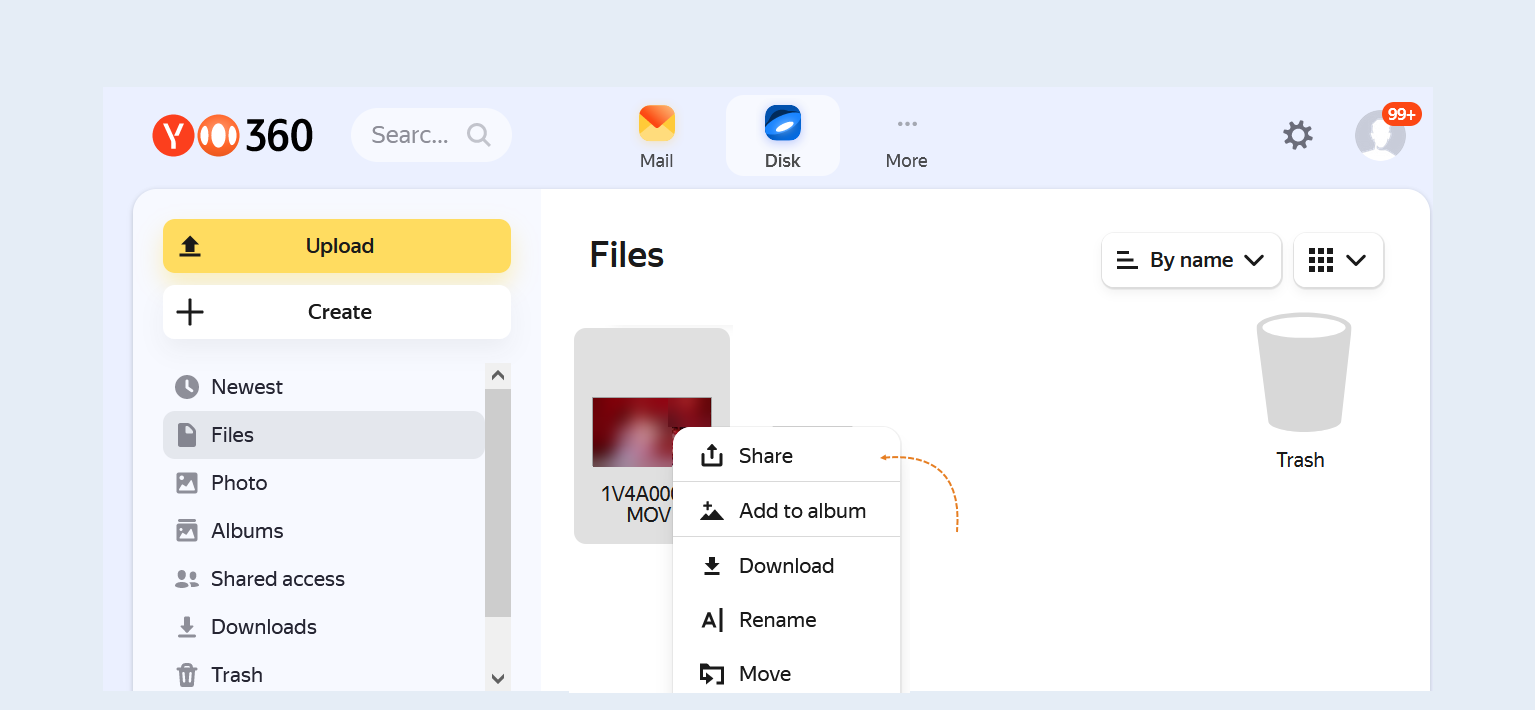
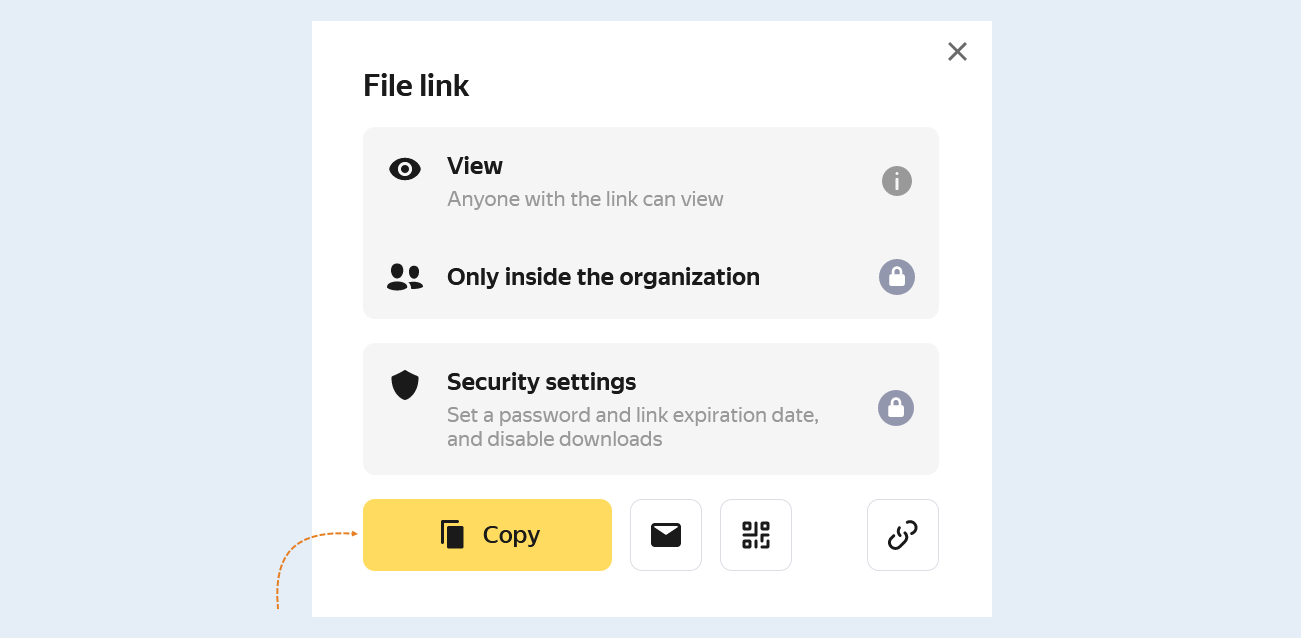
In the window that opens, set the necessary access settings and copy the link.
Return to the AXL platform. Paste the copied link into the field and click "Add video".
Adding a video via OneDrive link
Log in to your OneDrive account by following the link. Choose the desired recording from the list. Right-click to open the menu with options. Select the "Share" section.
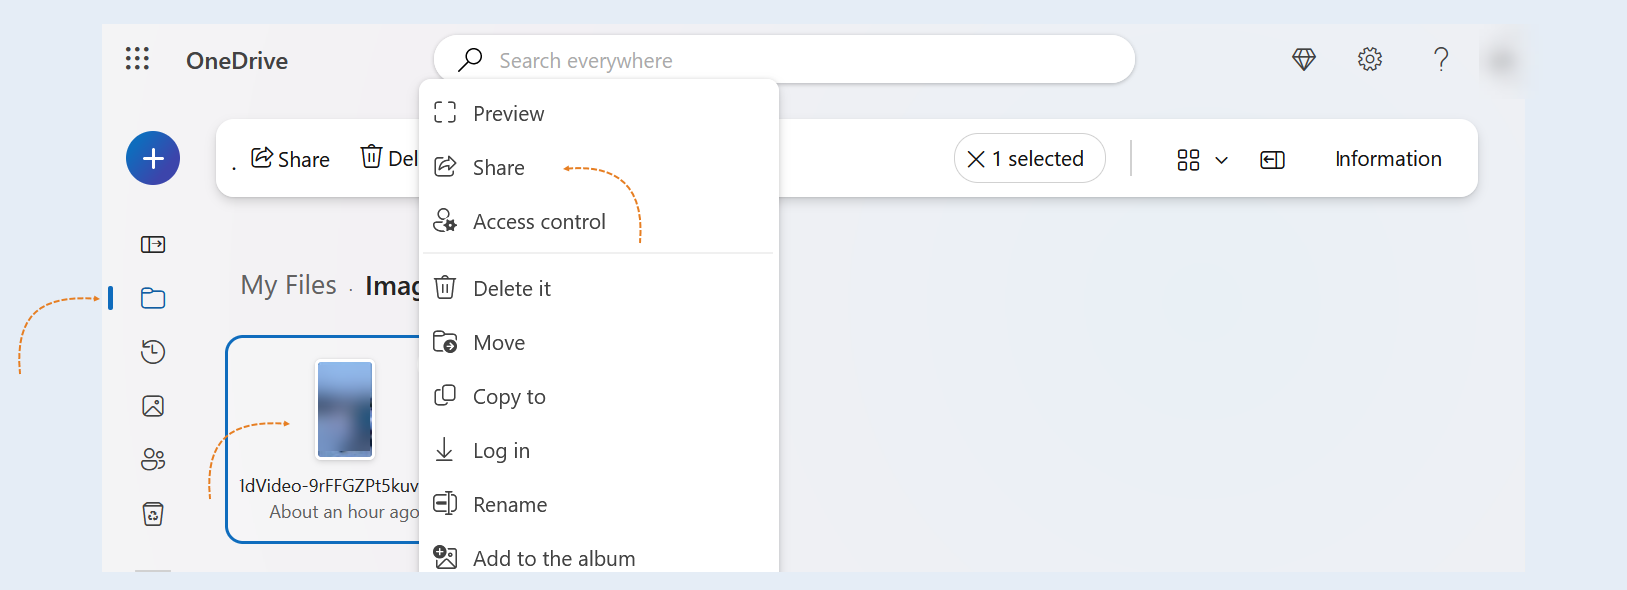
In the opened window, set the necessary access settings and copy the link.
Return to the prodamus.xl platform. Paste the copied link into the field and click "Add video".
Adding a video via Dropbox link
Log in to your Dropbox account by following the link.
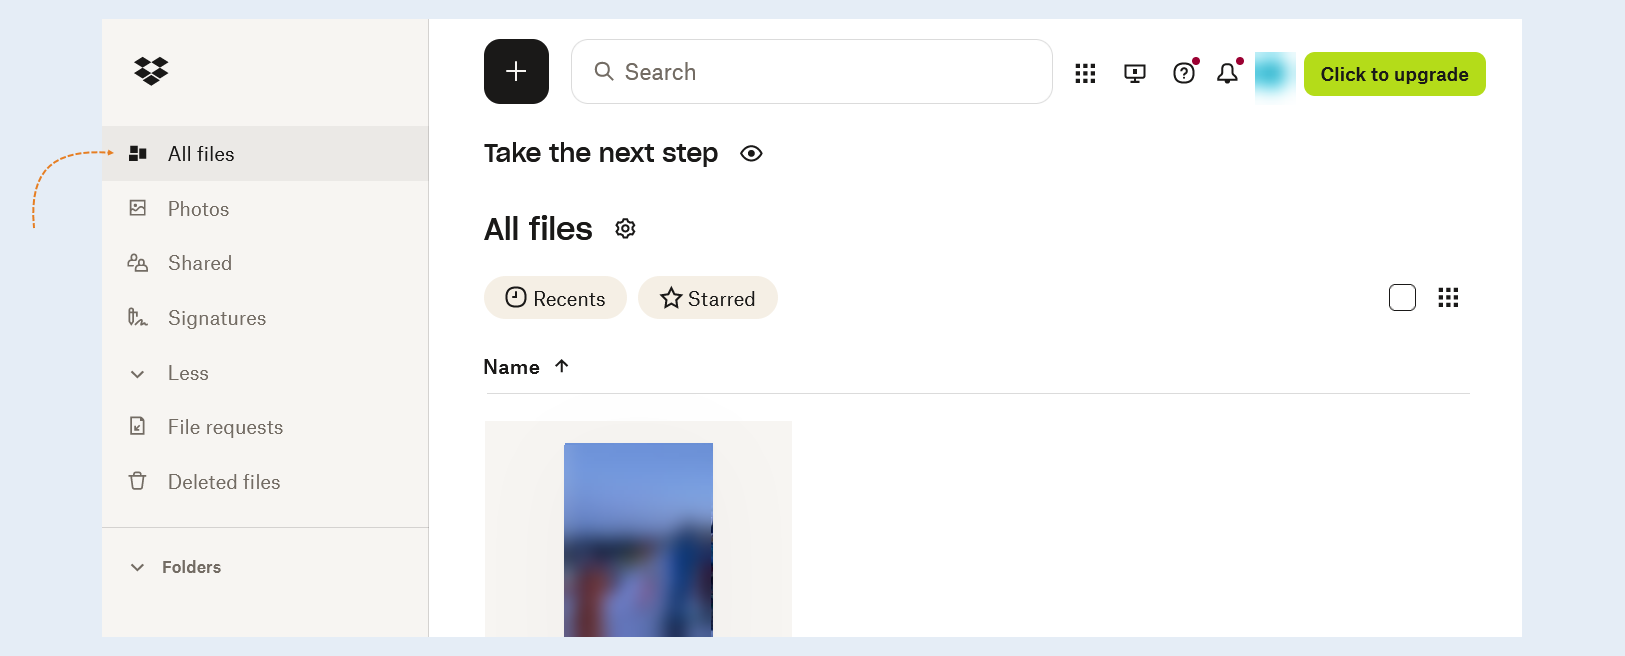
Choose the desired recording from the list. Click on "Share".
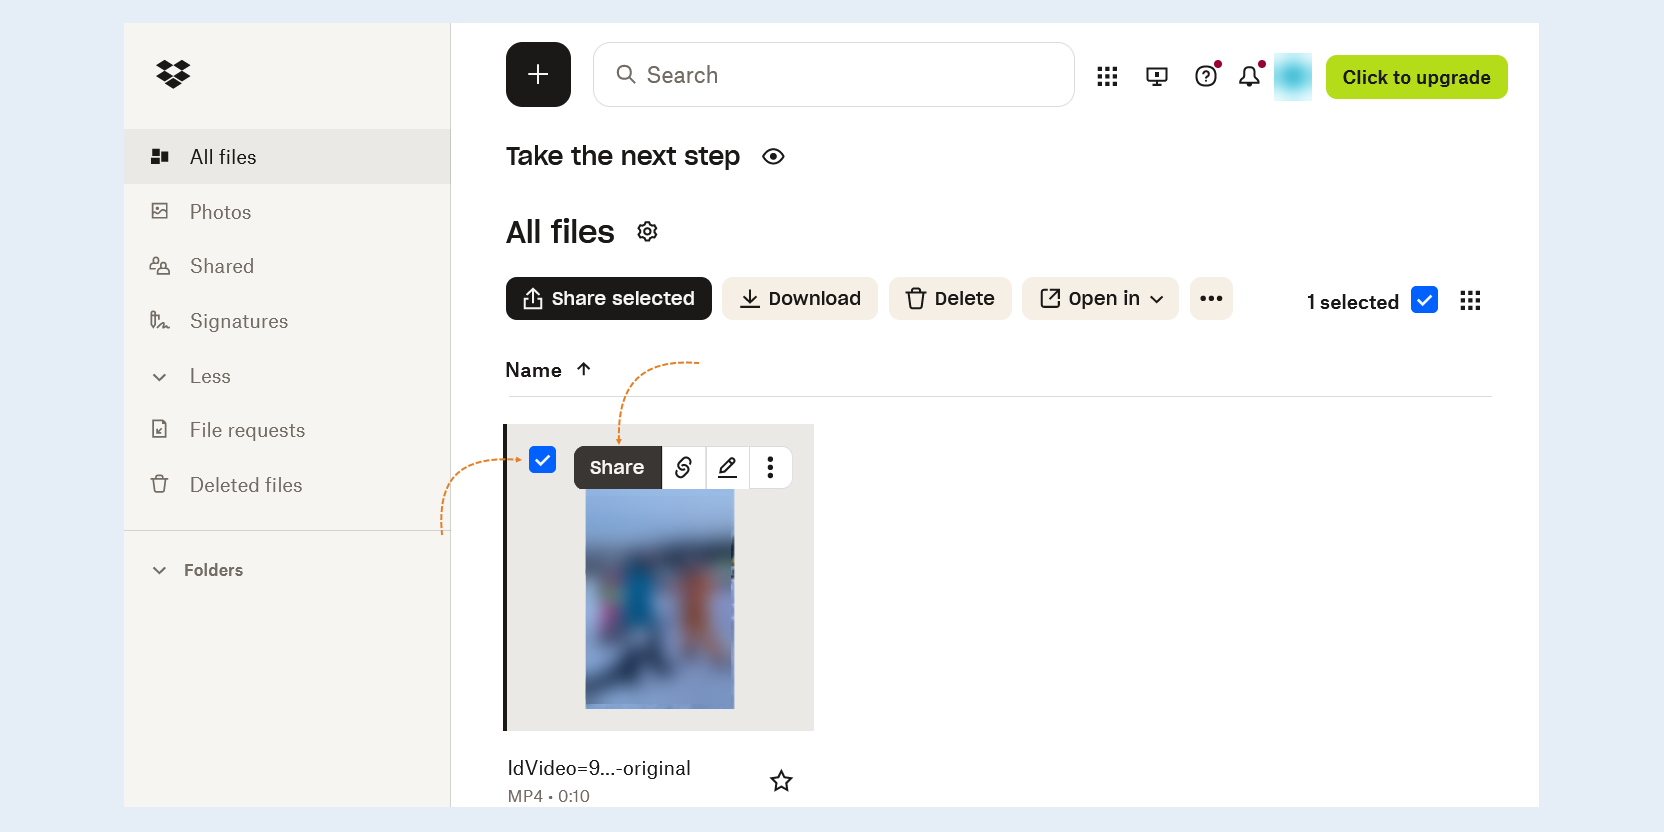
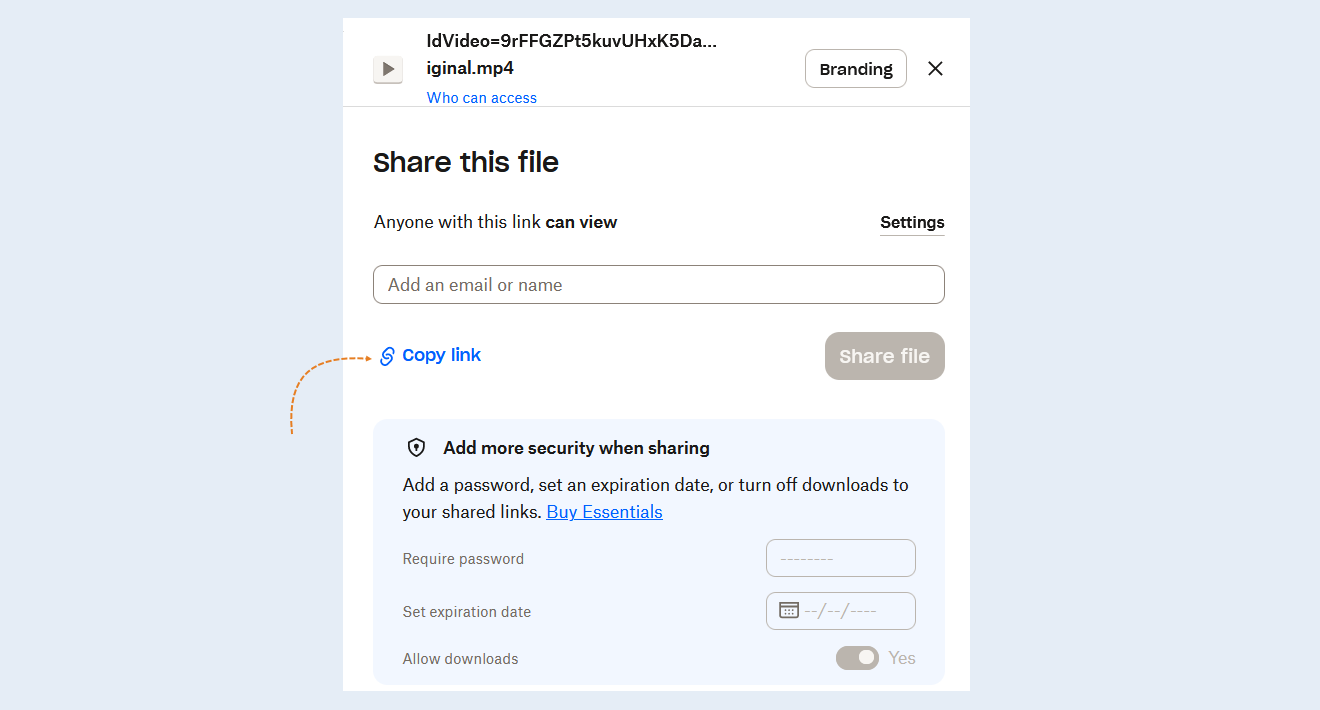
In the opened window, set the necessary settings. Create and copy the link.
Return to the prodamus.xl platform. Paste the copied link into the field and click "Add video".
Adding a video via Zoom link
Log in to your Zoom account by following the link.
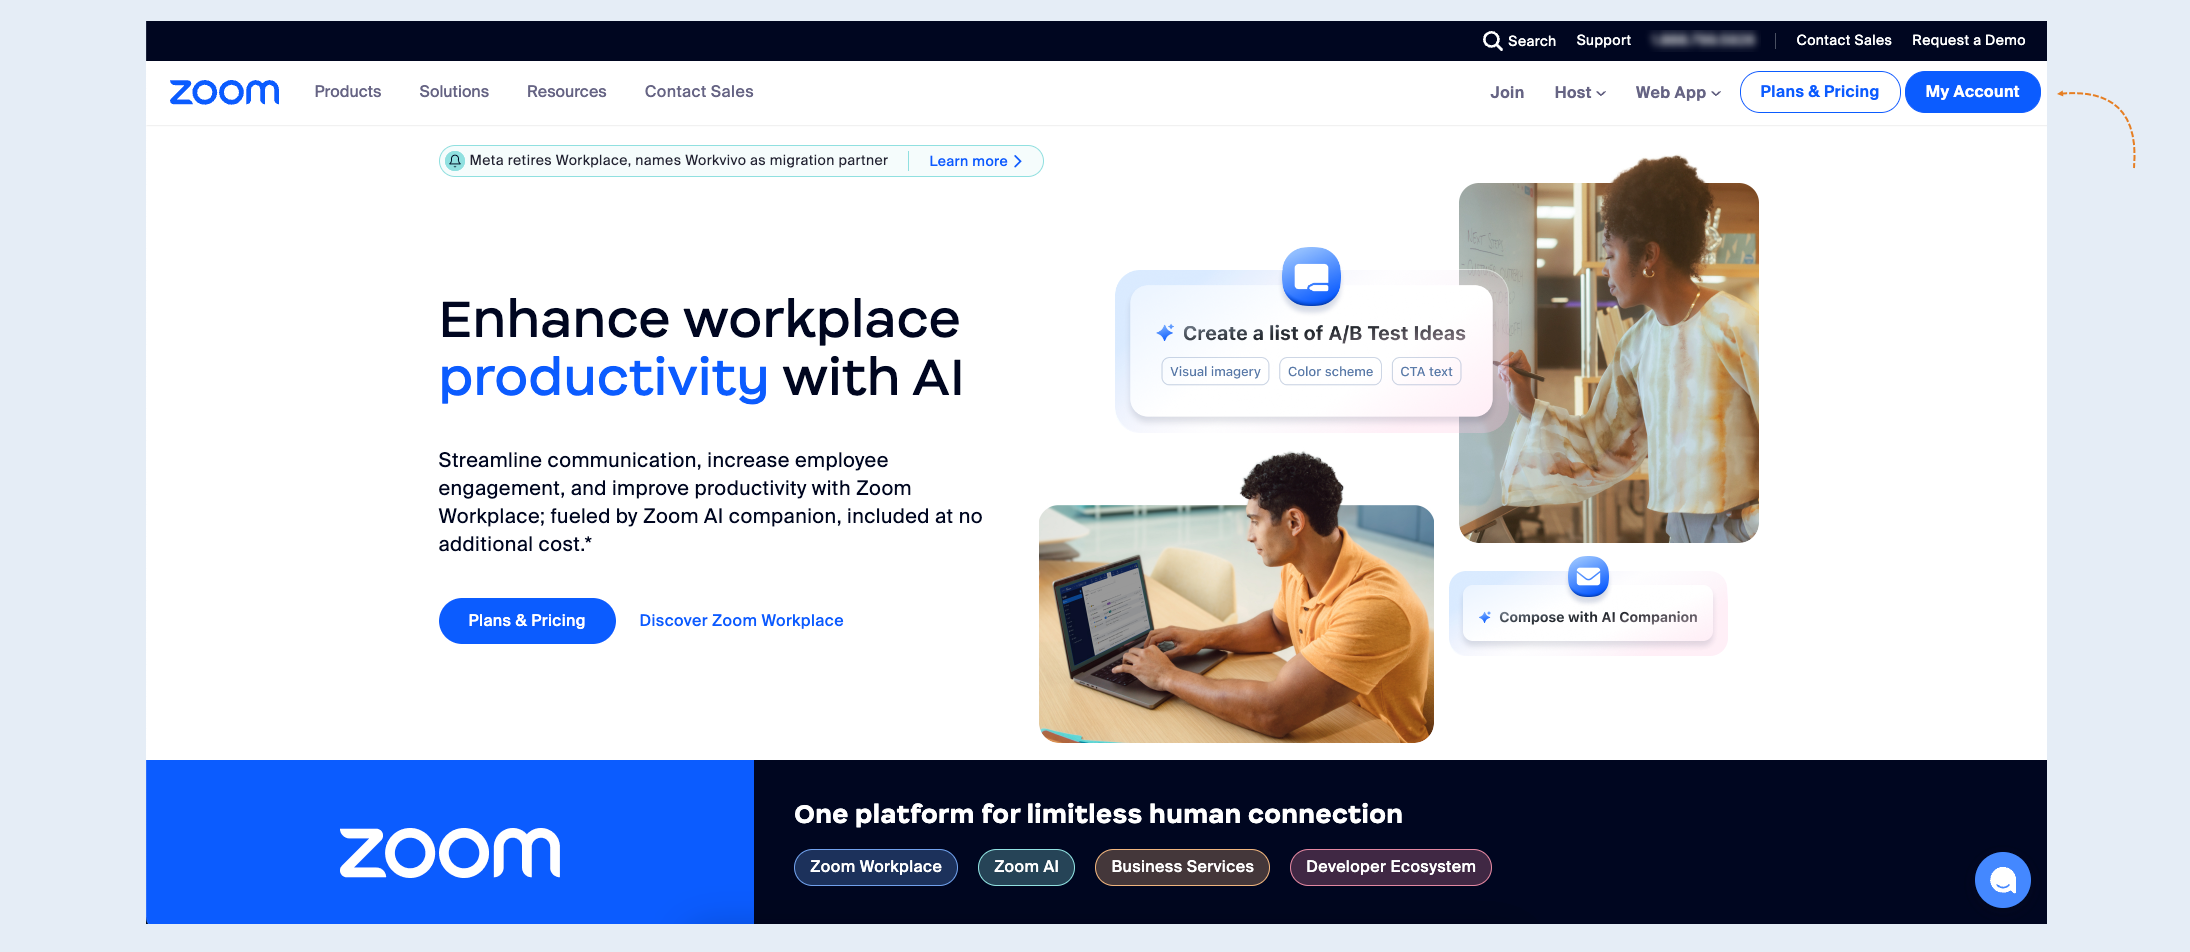
Open the "Settings" section, then "Recording".
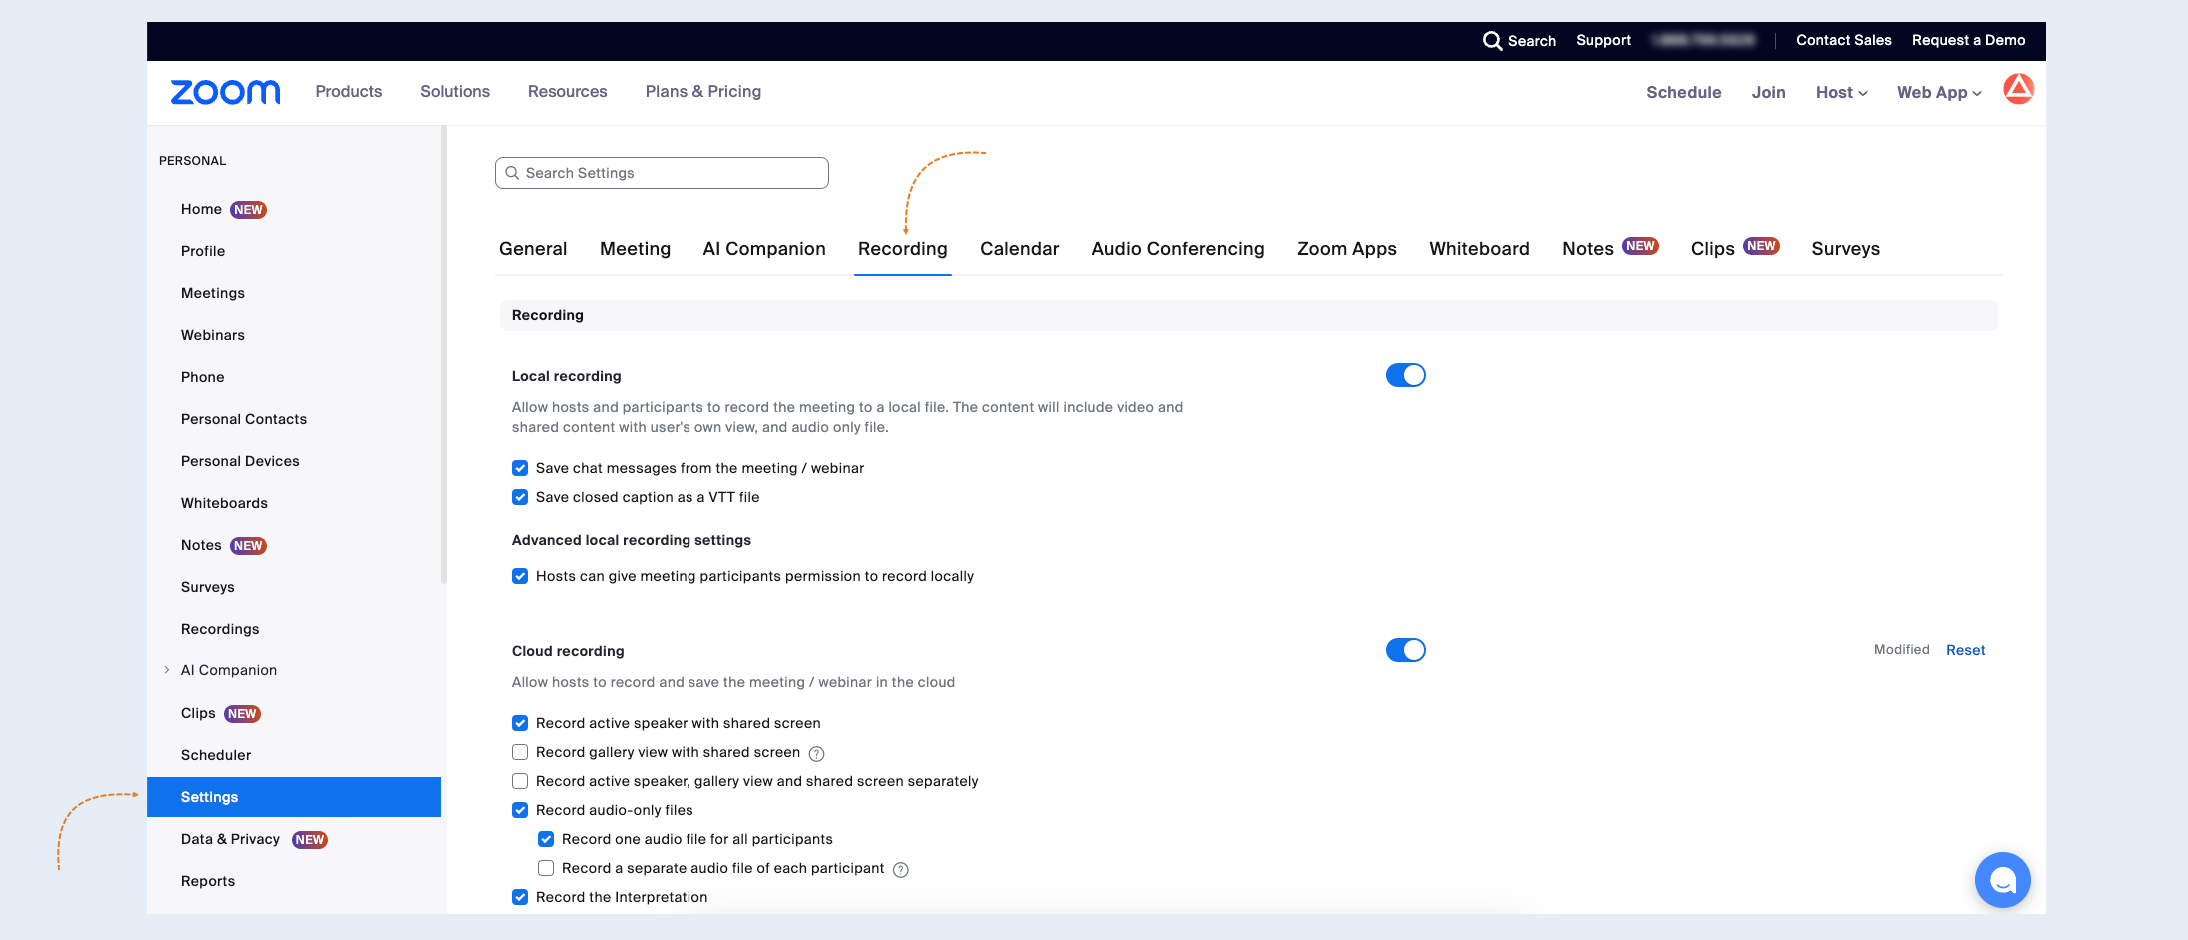
In the settings, select "Require passcode to access shared cloud recordings" and move the slider to the inactive position. When this option is disabled, the system will not require a password to access the records. After disabling this option, all future recordings can be uploaded to the Prodamus platform.Click on the link.
Please note that the old records (which were created before disabling this option) will remain with the password requirement and cannot be downloaded from the link. In this case, you can download the video to your device and upload it to the Prodamus.XL platform, as described above in the section "Adding videos from a computer".
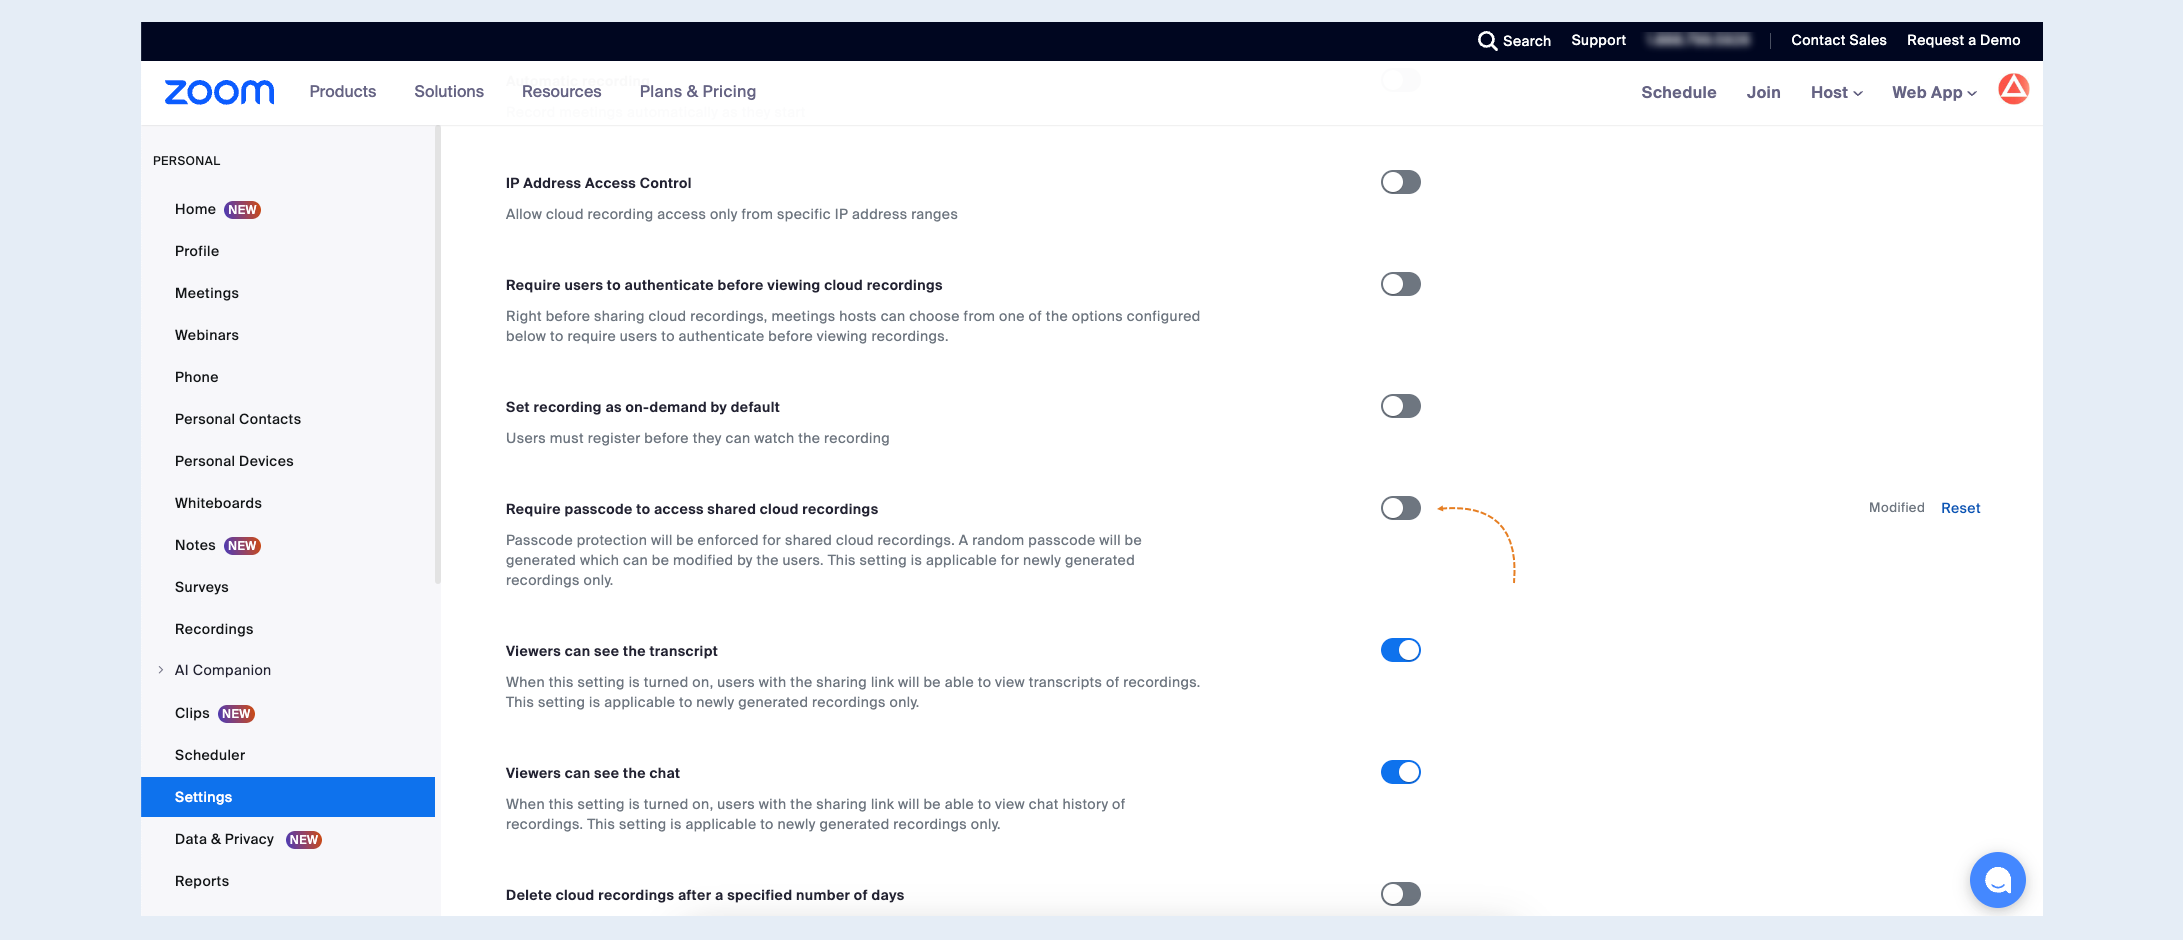
Next, open "Recording" to go to Zoom recordings. Select the desired entry from the list and click on its name to open the entry card.
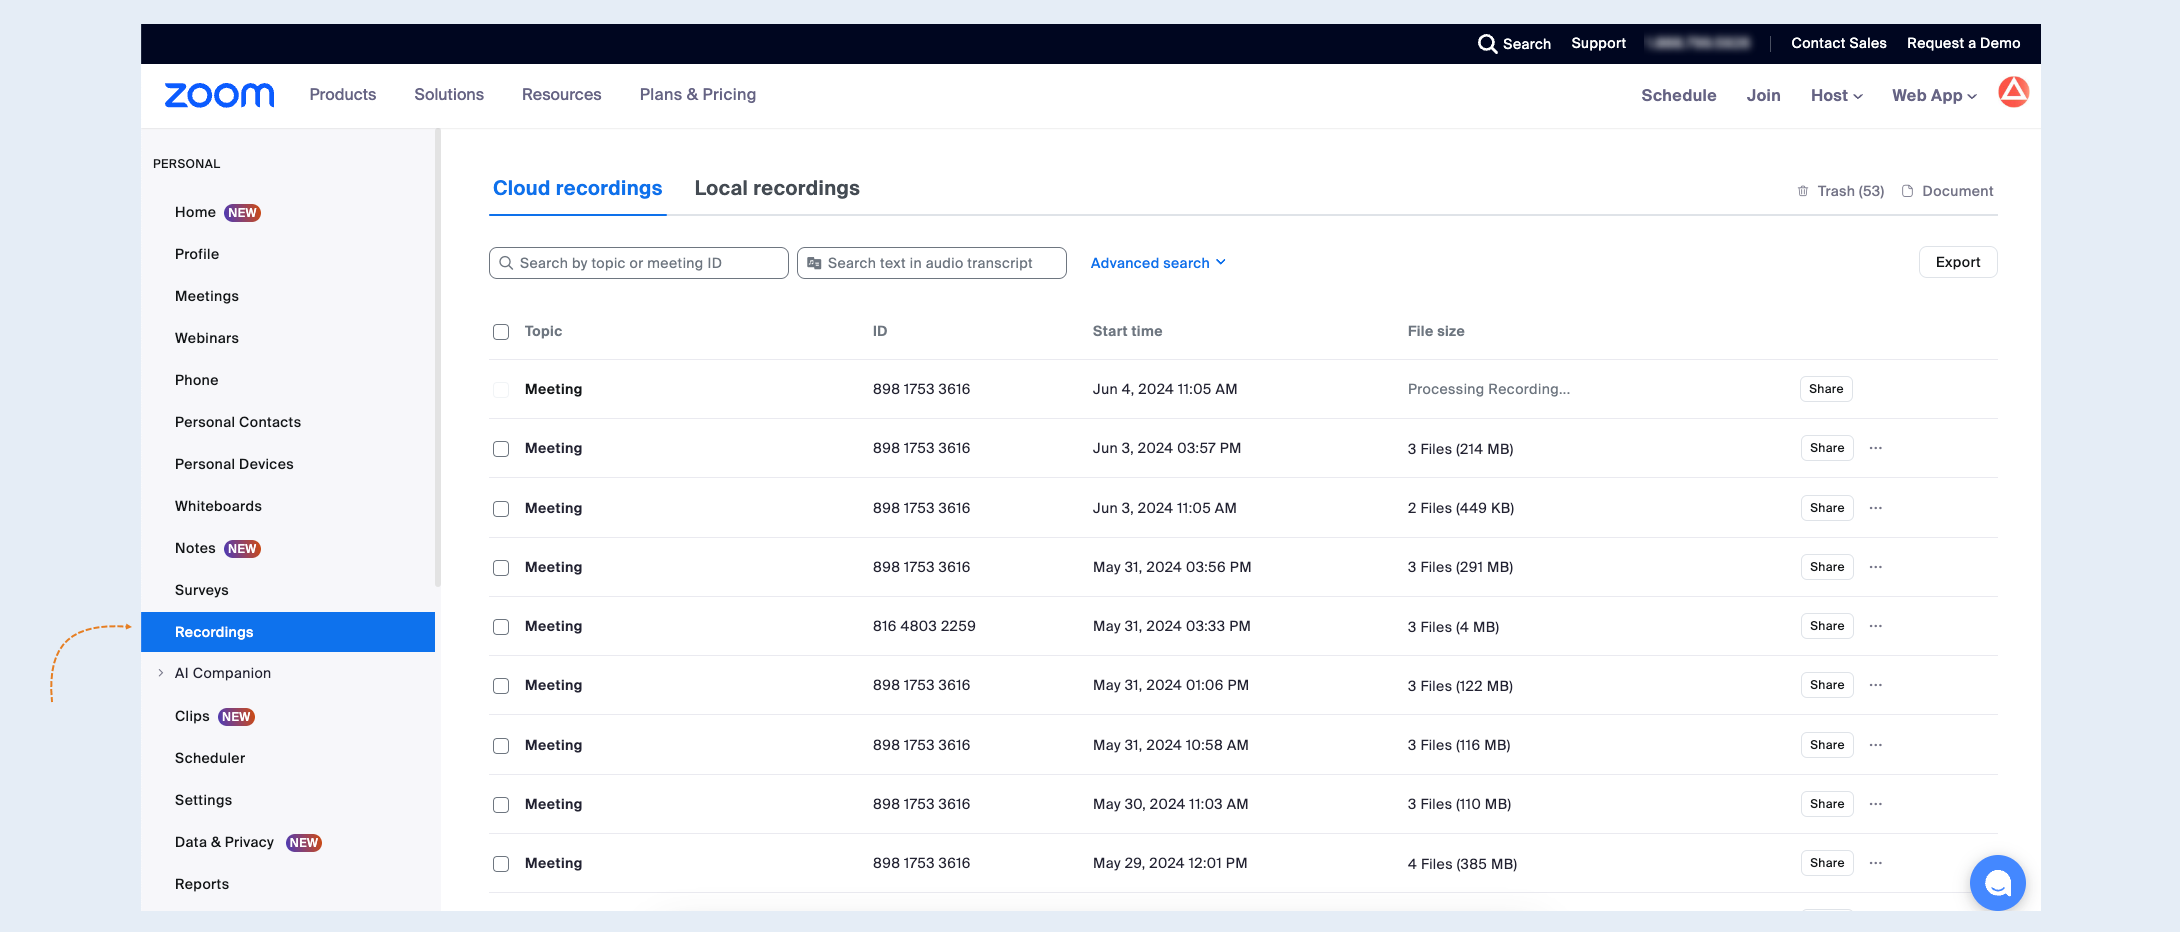
Click the "Copy" button in the "Shared screen with speaker view" field to copy the link.
Return to the Prodamus.XL platform. Paste the link you copied earlier into the field and click the "Add video" button.
The video will be added to the list.
Video Card
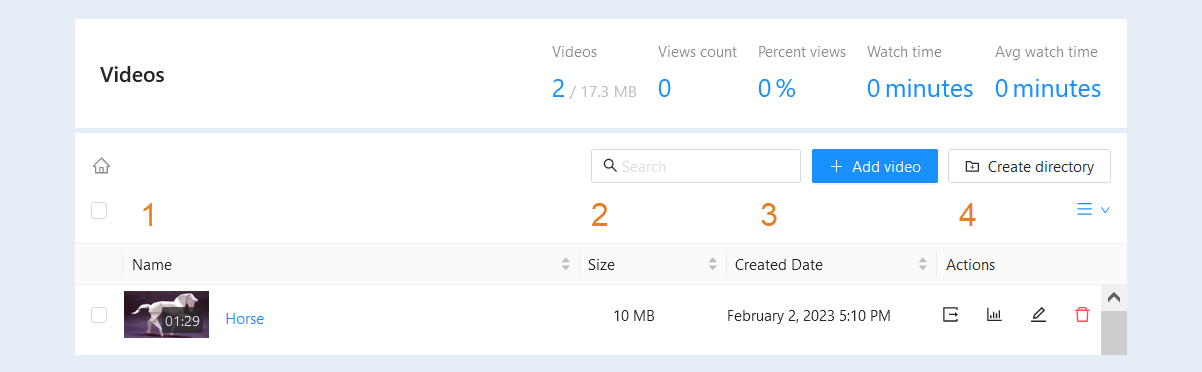
After adding the video to the platform, it appeared in the video list. Here you can see the following information:
- Name. The title, the type of cover and the duration of the video clip will be displayed here.
Size. This column will display the size of the video clip in MB.
Date of creation. Here you can see the exact date and time of creation of this video.
Actions. The following buttons are available to you here:
- Embed. Click the Embed Video button to copy the embed video code to the webpage.
Show analytics. Click the "Show Analytics" button to view video statistics. For more information about the analytics of views, read the article "Video Analytics".
Edit.Click the Edit button to open the video card or make changes.
Remove. Click the "Delete" button to delete this video.
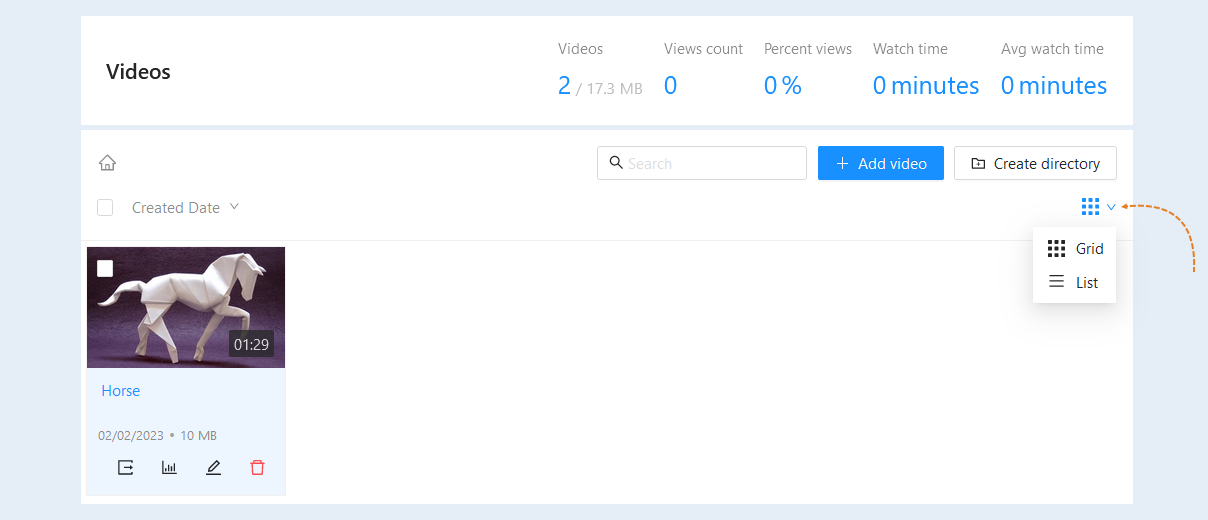
You can change the appearance of the "Video" section. In the upper right corner of the section, click the "View" button and select the viewing mode: "Grid" or "List".
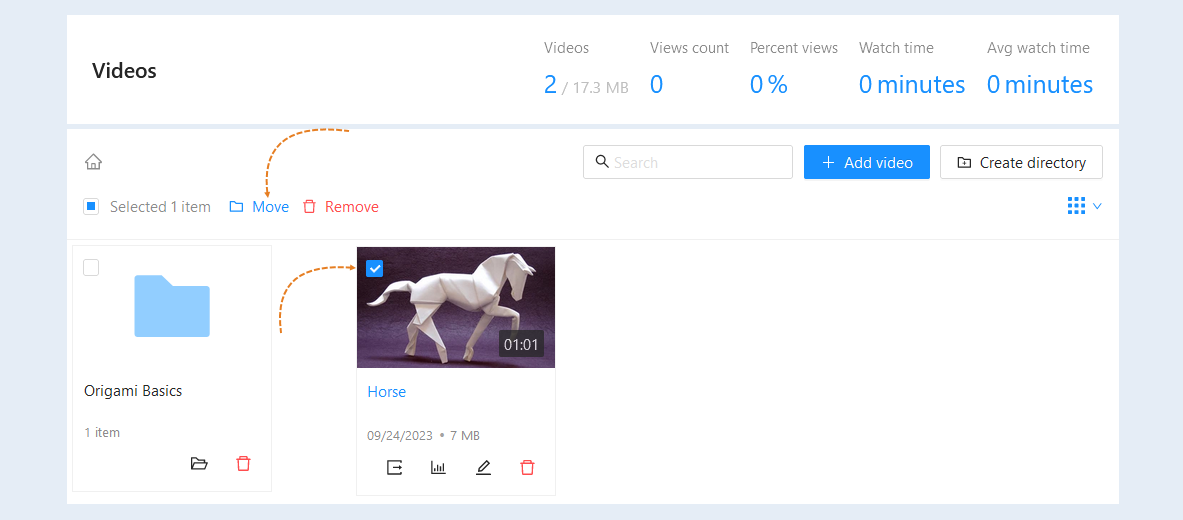
You can move the uploaded video between folders either individually or in a group method. Check the box next to the selected video or several videos and click the "Move" button.
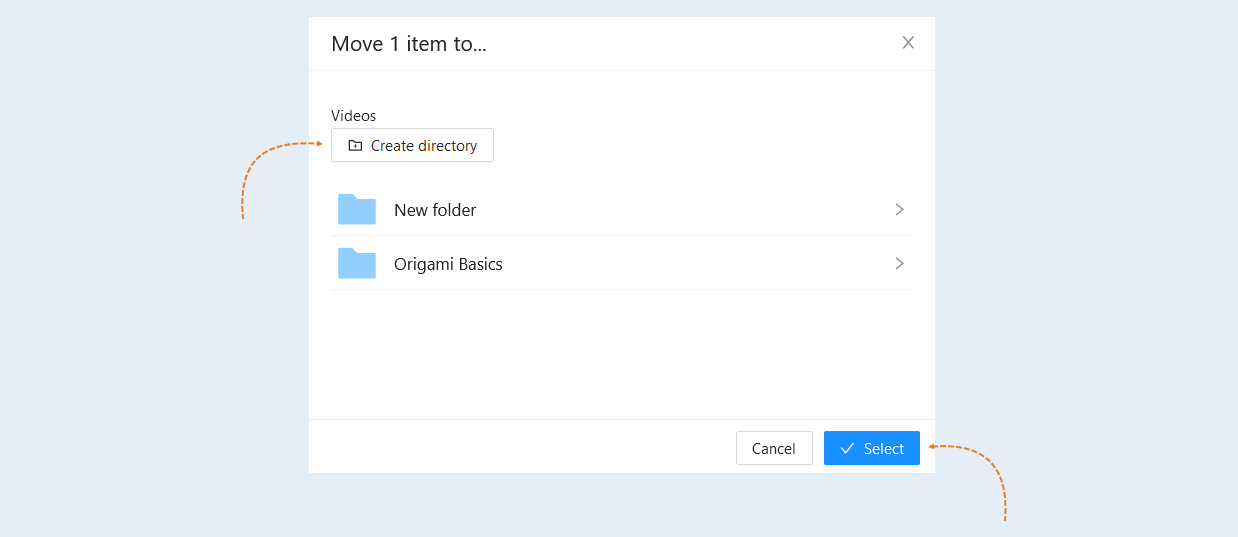
In the window that opens, select the folder to which you want to move the video. Or create a new folder by clicking the "Create Folder" button.
After selecting the folder to move, click the "Select" button. The video will be sent to the selected folder.
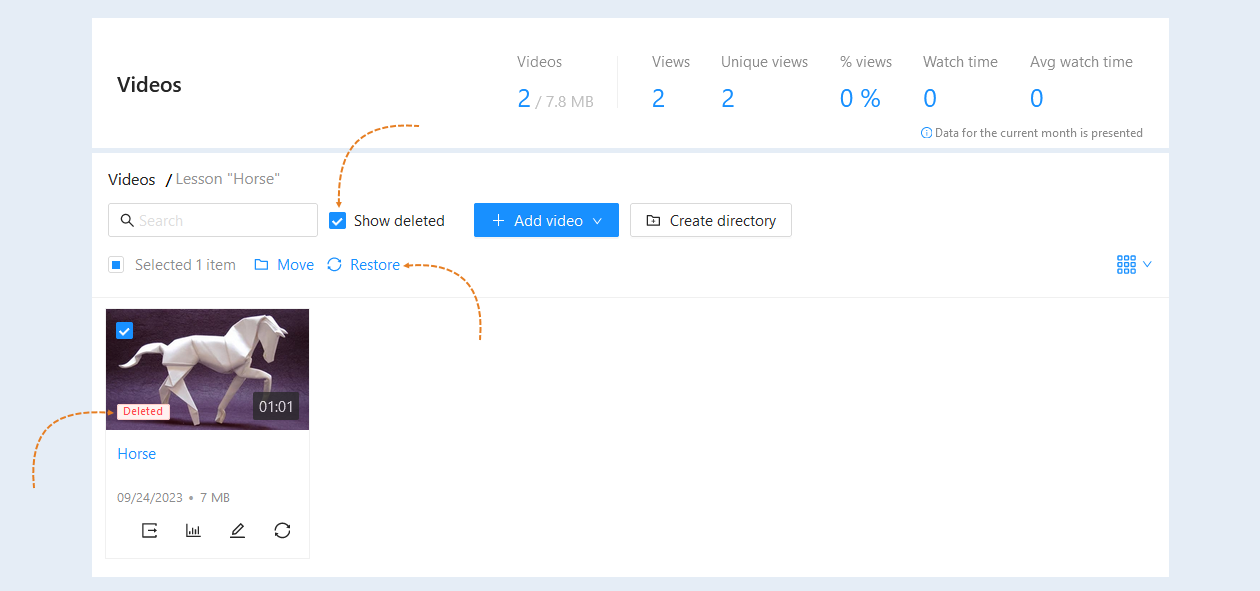
To see all previously deleted videos, check the "Show deleted" box. Videos marked "Deleted" will appear in the list. You can restore deleted videos by selecting the deleted video and clicking the "Restore" button.
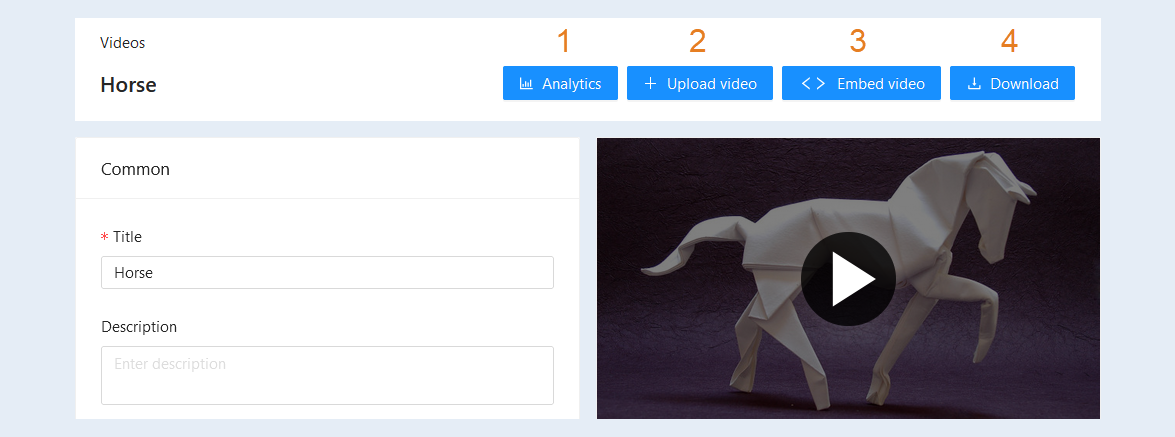
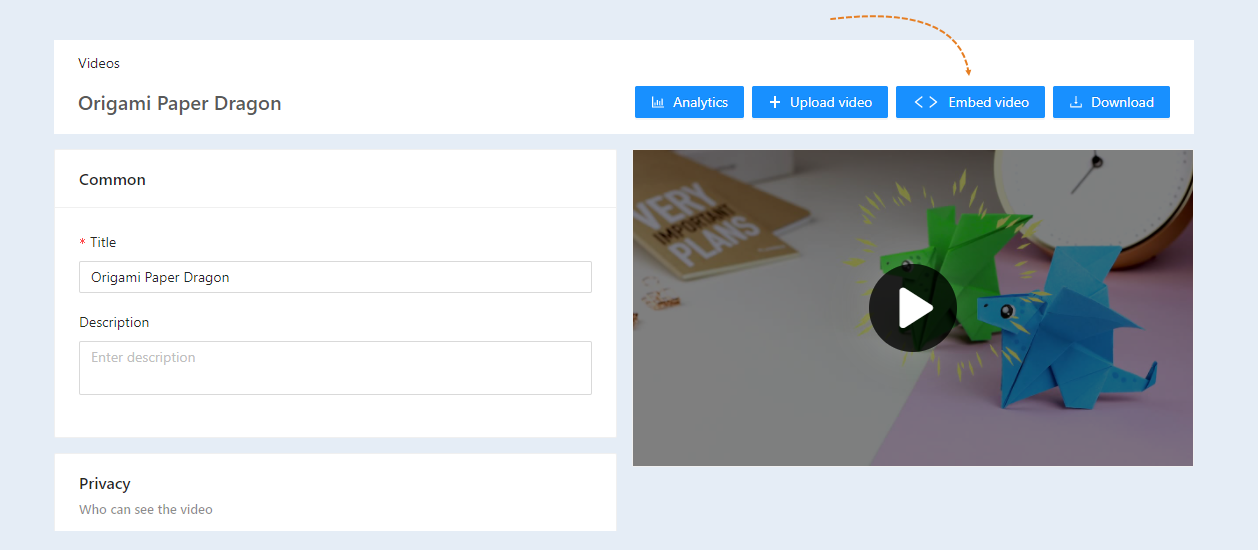
Click on the video title to open the video clip card. In the upper part, the buttons are available to you:
- The "Analytics" button. You can track the statistics of each of your videos uploaded to the Prodamus.XL platform. Click the "Analytics" button to view information about the views of this video. For more information about the analytics of views, read the article "Video Analytics".
The "Upload video" button. Click the button to update the video.
The "Embed video" button. Click the Embed Video button to copy the embed video code to the webpage.
The "Download" button.
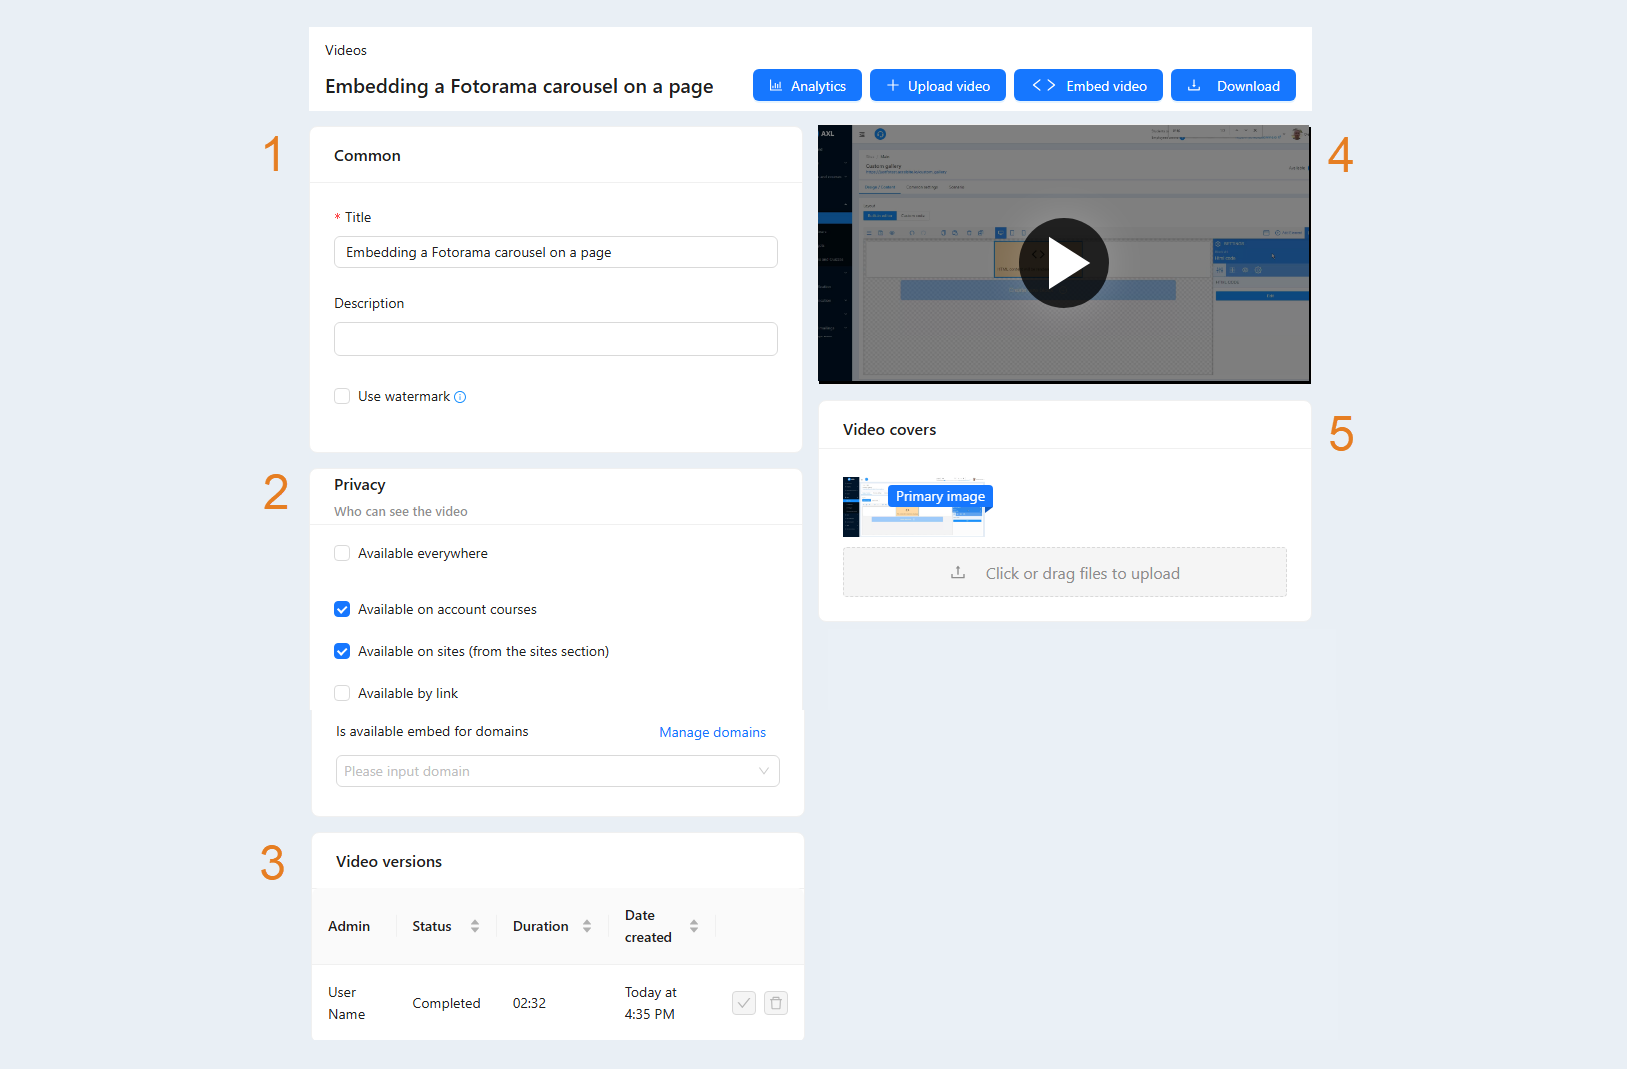
Below you can see the full information about the video:
- General information.
Confidentiality.
Video versions.
Preview the video.
Video covers.
Each section is discussed in detail below.
General information
The "General Information" section is intended to provide basic information about the video and manage its settings.
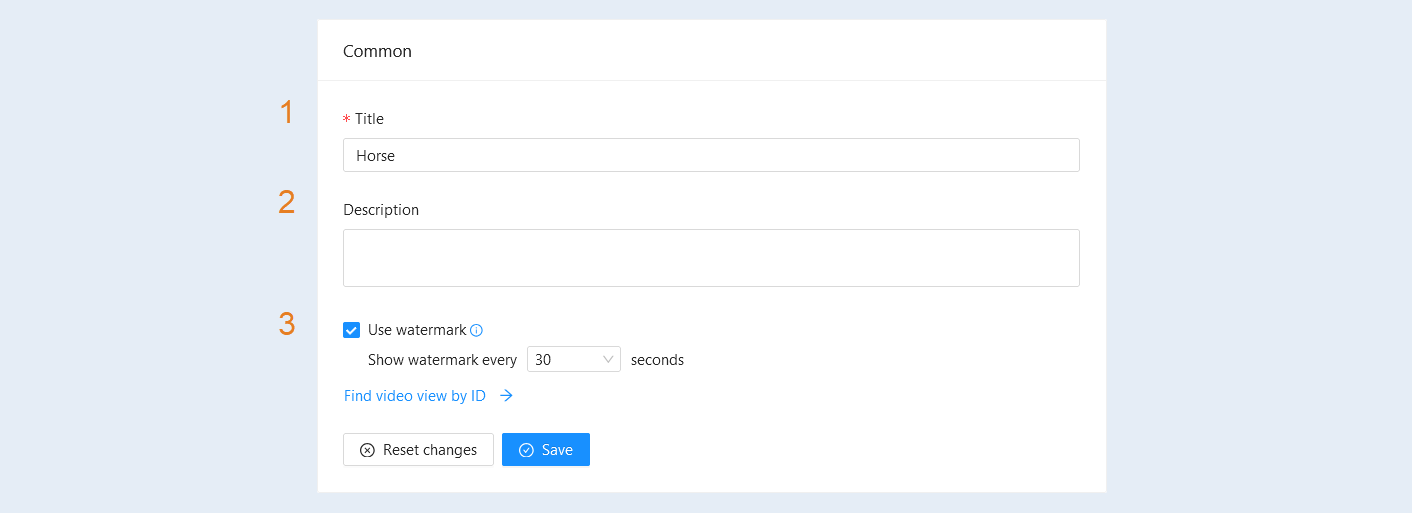
In this section, the following fields are available to you:
- Title. This field is used to specify the video's title. The title helps in searching for content on the platform. It is also used in catalogs, lists, and during navigation.
Description. This field allows you to add detailed information about the video's content. The description helps viewers understand what the video covers and which topics are addressed. It may also include key points or instructions.
Use Watermark. The "Use Watermark" option allows you to add a logo or text watermark that will be displayed over the video. The watermark helps protect the content from unauthorized copying or use. The watermark will appear in different locations on the video at different times. It will be displayed as an overlay and will not alter the original video.
Click "Find View by ID" for the system to locate the watermark by its ID and associate it with your video.
Click the "Save" button or click "Reset Changes" to clear the fields.
Confidentiality
In this section, you define the conditions for watching the video - which of the users will see this video. By default, you are offered the conditions "Available everywhere". This means that this video is available for viewing on any pages where it will be published. Uncheck the box to see other options:
- Available everywhere. Select this condition so that the video can be viewed on any of your pages.
- Available at membership portal courses. Select this condition so that the video will be available for viewing only in the courses of your membership portal.
- Available on sites (from the sites section). Select the condition for the video to become available for viewing on your sites inside the "Sites" section on the Prodamus.XL platform.
- Available here. Select this condition to make the video available for viewing to all users who have a link to the video.
- Embedding is available for domains. Here you need to specify your domain where you want to install the video using the program code.
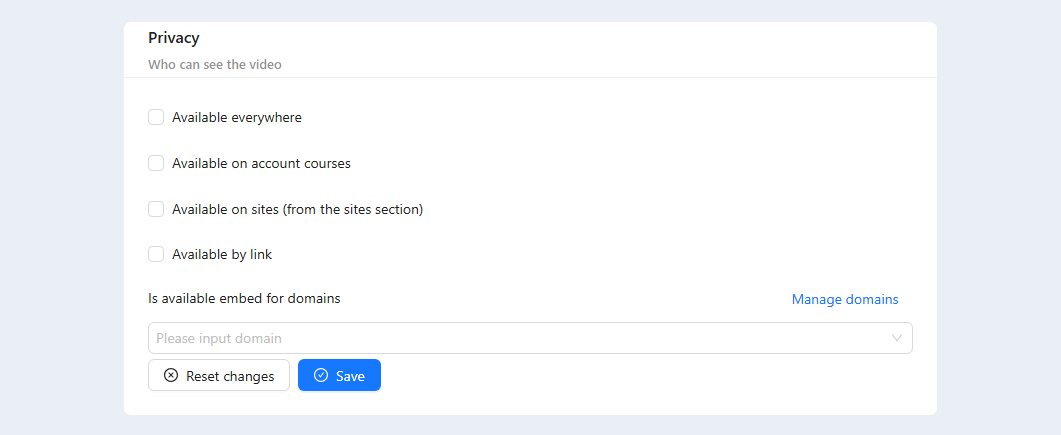
Click the "Save" or "Discard Changes" button.
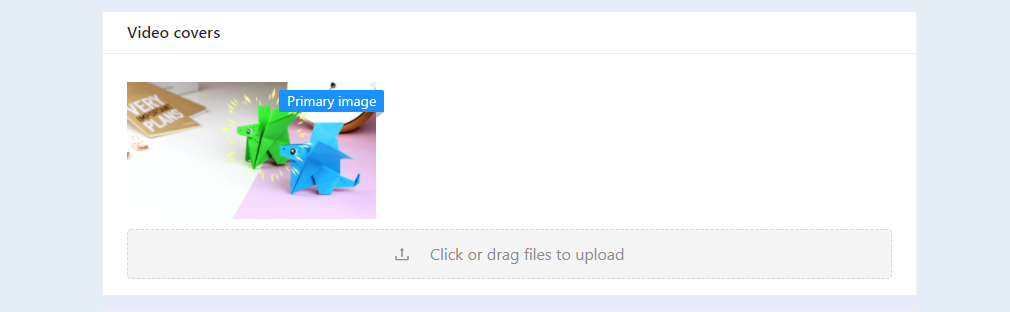
Video Covers
Here you see frames from the video. You can choose one of the frames for the video cover or upload a picture from your device and use it as the video cover.
Video versions
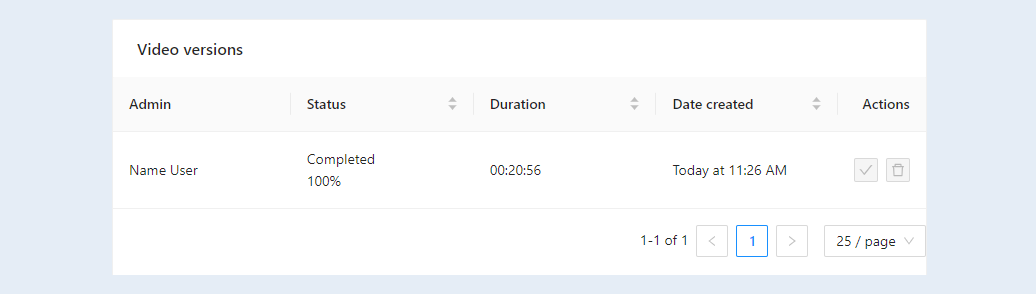
This section displays all existing versions of this video. With the help of the "Video Versions" section, you can update the outdated version of the video in one click in all places (courses, websites, etc.) where it was uploaded.
In the section you can see the following information about the video versions:
- Administrator. The name of the admin who uploaded this video to the account.
- Status. You can see the download status: download, conversion, or complete. You can also see the download percentage.
- Length of the video. Here you can see the total length of your video.
- Date of creation. The exact time and date the video was uploaded to the platform.
- Actions. Here you can use the buttons: "Select the current version of the video". And the button "Delete video version". Check the box next to the current version of the video and it will be updated in all previously uploaded courses and websites.
Embed video
On the right side of the page, you see the video file itself. Above there are buttons "Upload video" and "Embed video". Click on the "Embed Video" button.
An additional window will open for embedding the video on the site.
- Code. This code is required to embed a video on a web page: website, social. network, membership portal, etc. Copy and place the code on the page you need.
- The width of the video window.
- The height of the video window.
- Show controls. The controls are the standard start, pause, forward, backward buttons. You can hide these items. To do this, uncheck the box.
- Show title. You can choose to show the title while watching the video or hide it from viewers.
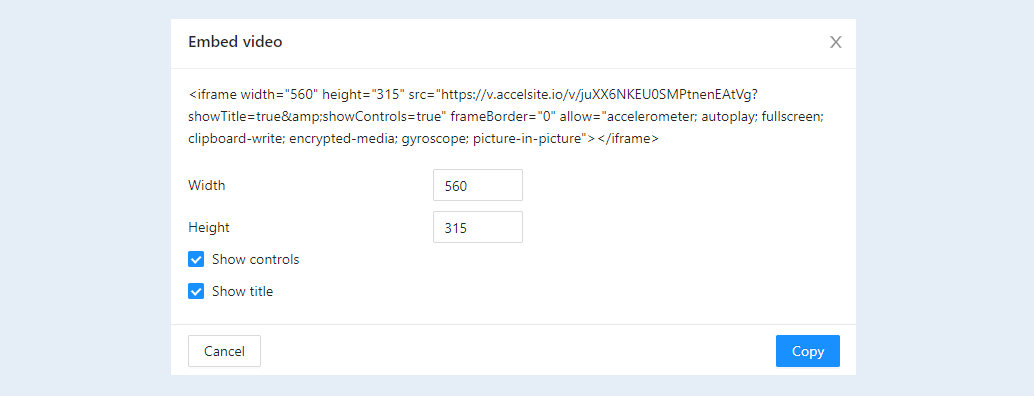
Click the "Save" button. After that, this video will be displayed on those sites where you insert the video code.
General analytics
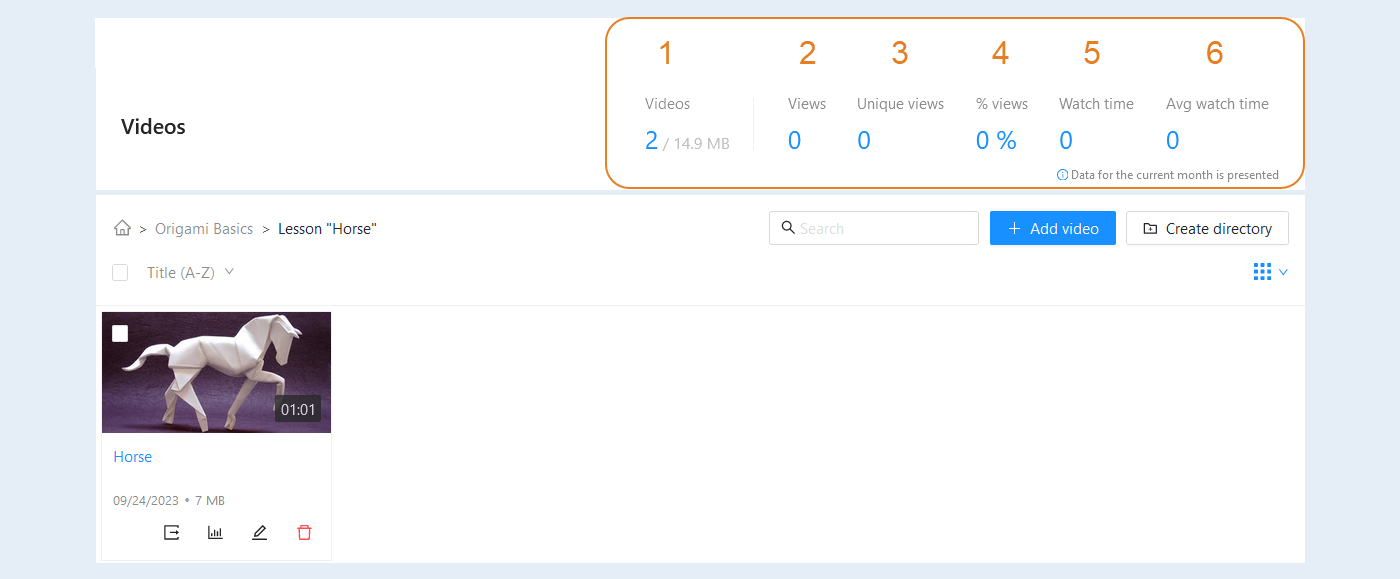
Return to the Video page. In the upper right corner, you have access to general analytics of all your videos. Data for the current month is presented.
- Video. The number of downloaded files and the total amount of data.
Number of views. The total number of views of all your videos.
Unique views. Unique video views differ from simple video views in that they only take into account the unique users who viewed the video. Thus, unique views allow you to estimate how many times a video has been viewed by different users, excluding repeat views from the same account. This is useful for analyzing the popularity of videos and the engagement of unique users.
Percentage of views. The number of views as a percentage of the total number of videos.
- Viewing time. The total amount of time all your videos have been watched.
- Average viewing time. The average length of time your videos are viewed over the total number of videos.
Sorting and filtering
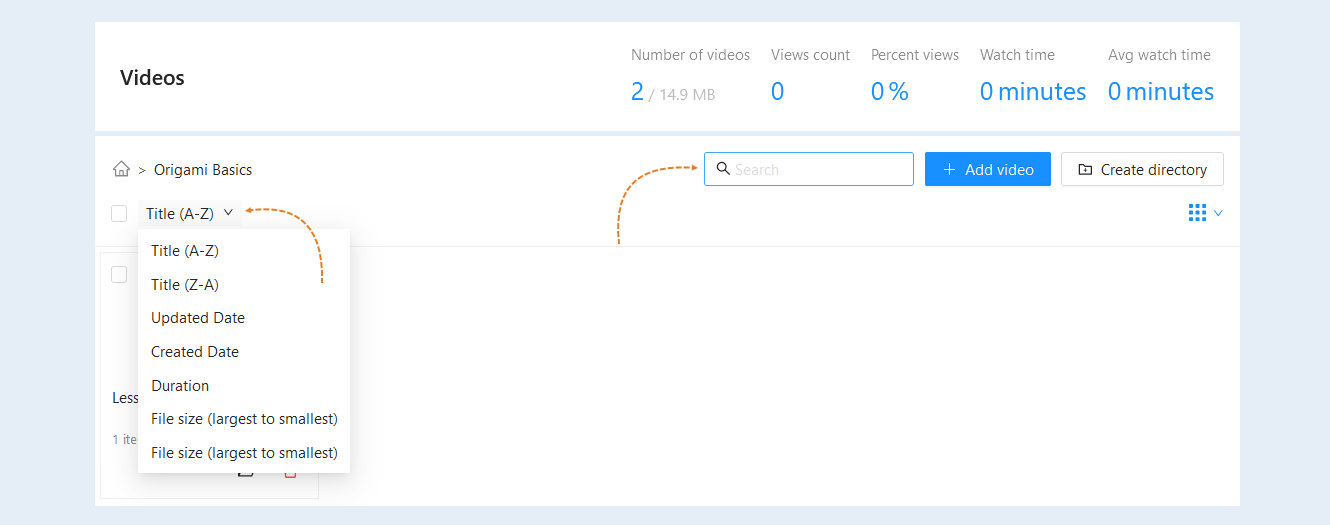
A keyword search is available to you at the top of the page. Use it to quickly find the desired video or folder.
In the upper left part of the page, you can change the video sorting. By default, the video is sorted by creation date. Click on the "Sort" button and select another sort from the suggested list:
- Title (A-Z)
Title (Z-A)
Updated Date
Created Date
Duration
File size (largest to smallest)
File size (largest to smallest)