Mail settings are settings for sending outbound email messages to your customers. In this section, you manage the mail server through which letters are delivered to clients. The AXL platform has a built-in mail server that is used by default to send outgoing messages. But you can connect your own mail server.
Click on the desired section of the article to go to its description:
Send profiles
Go to the "Mail" section and click on the "Mail Settings" tab.
In this section, you see the Submission Profile - this is the mail server through which your emails are sent to clients. By default, the built-in mail server AXL is used here.
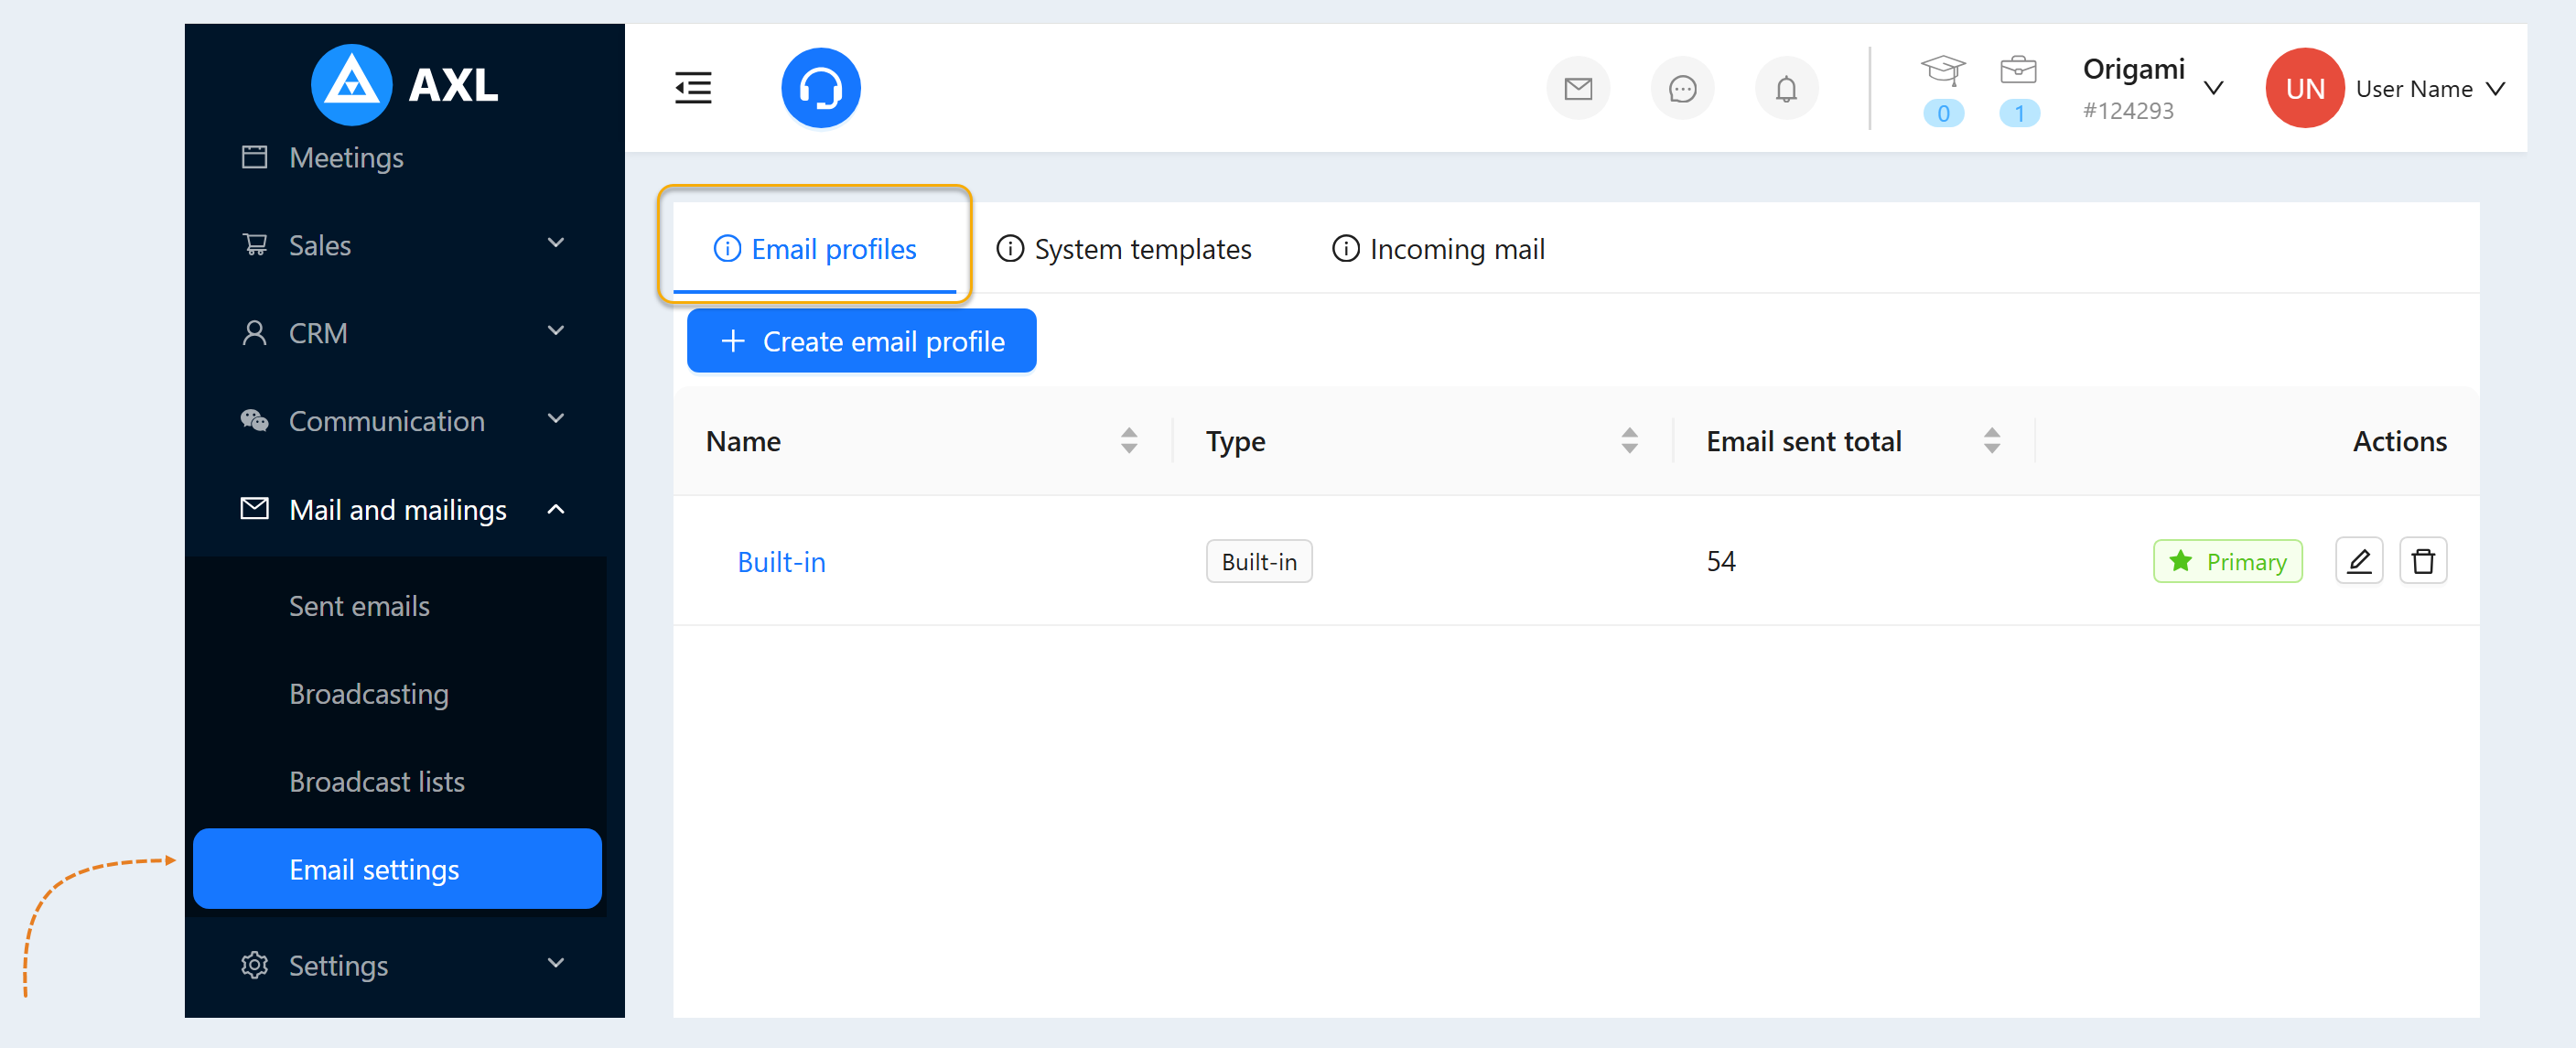
There are two types of sending profiles on the AXL platform: built-in and native. They differ in the type of smtp connection.
SMTP (Simple Mail Transfer Protocol) is a network protocol for transferring e-mail.
An SMTP connection has two functions:
- Verifies that the settings are correct and gives permission to the computer that is trying to send the email.
- Sending an outgoing message to the specified address and confirming that the message was successfully sent. If delivery is not possible, the server returns a response with a sending error to the sender.
Built-in Send Profile
The built-in AXL submission profile is used by default when creating an account. For this profile, you are provided with a ready-made smtp connection address - @s37.accelmail.io (where numbers indicate the number of your account on the AXL platform). You specify the prefix (the first part of the email before the @ sign) yourself. This can be the name of your account, your name, or the common "no_reply" - "no answer", that is, an address that does not provide a response to this message.
Click on the name of the submission profile or the "Edit" button.
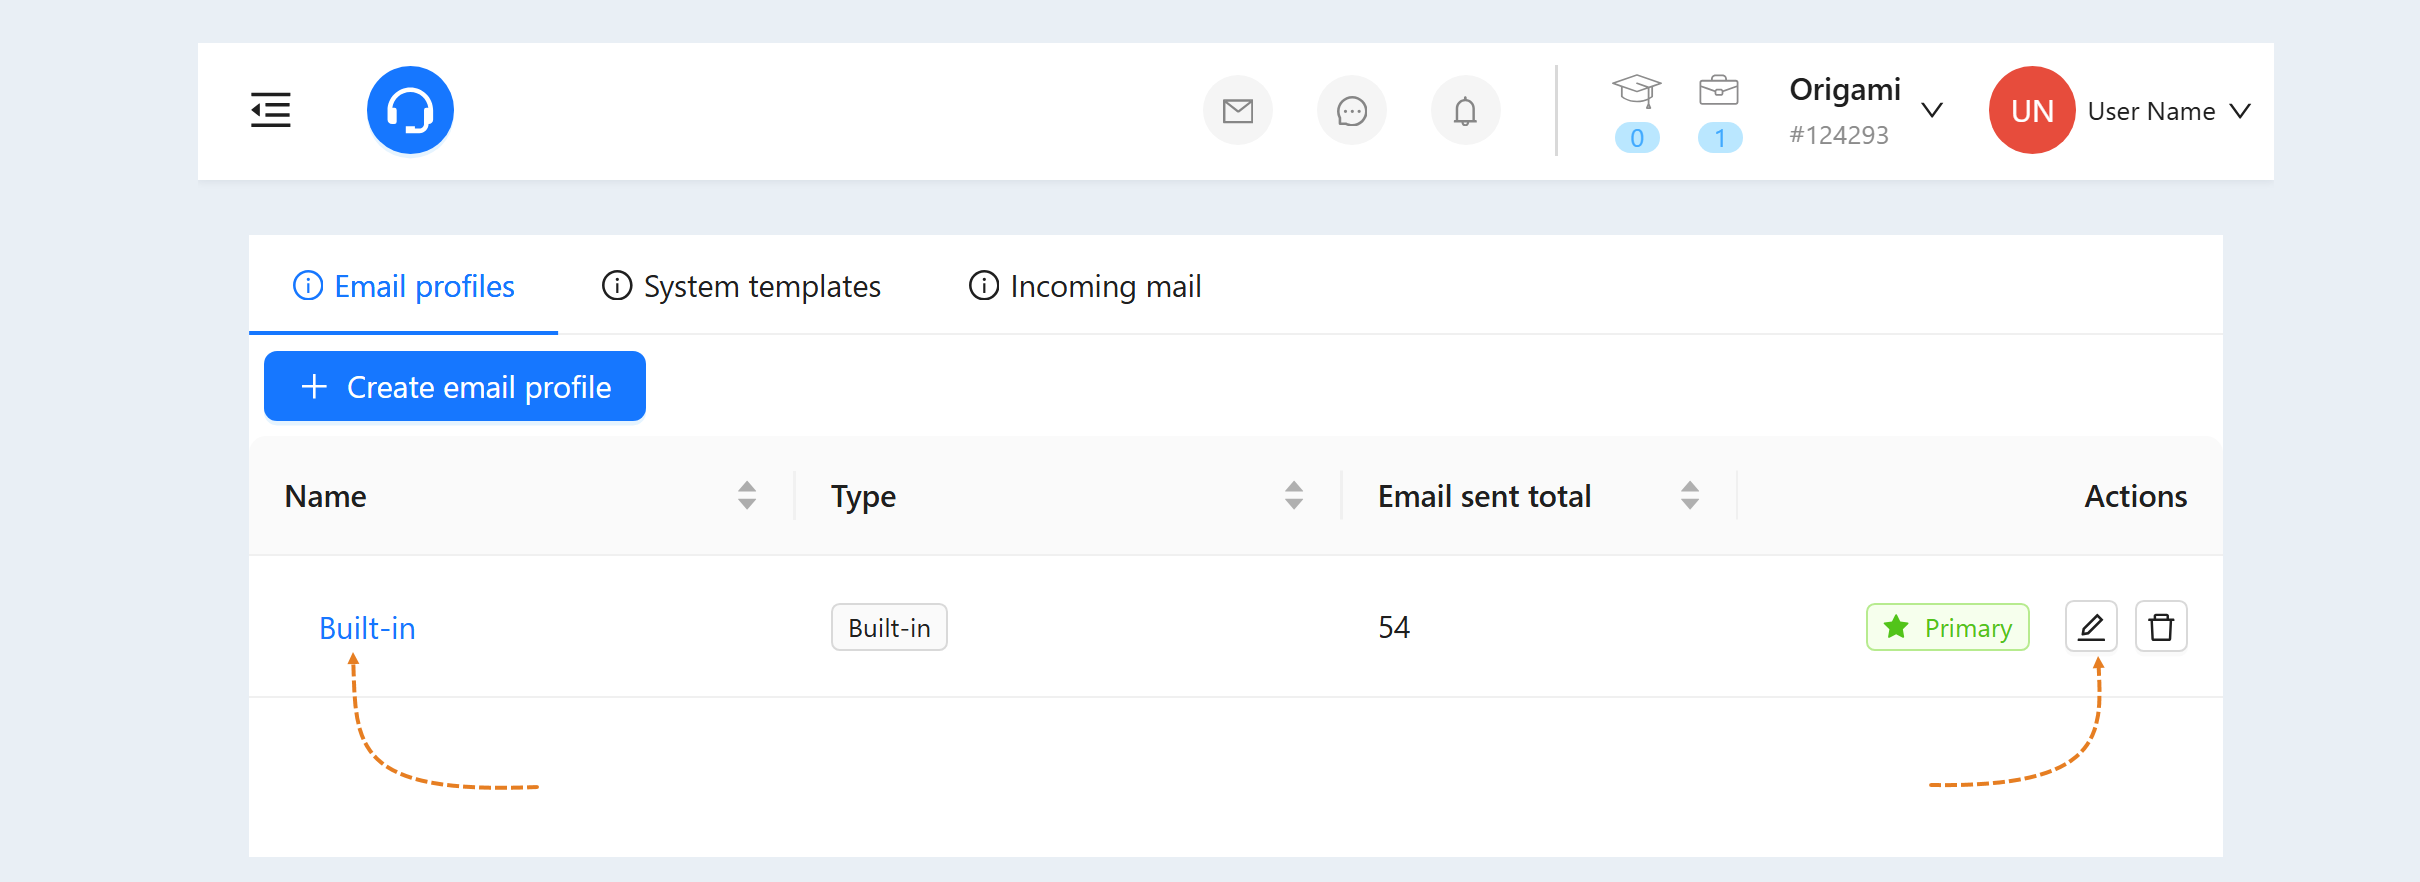
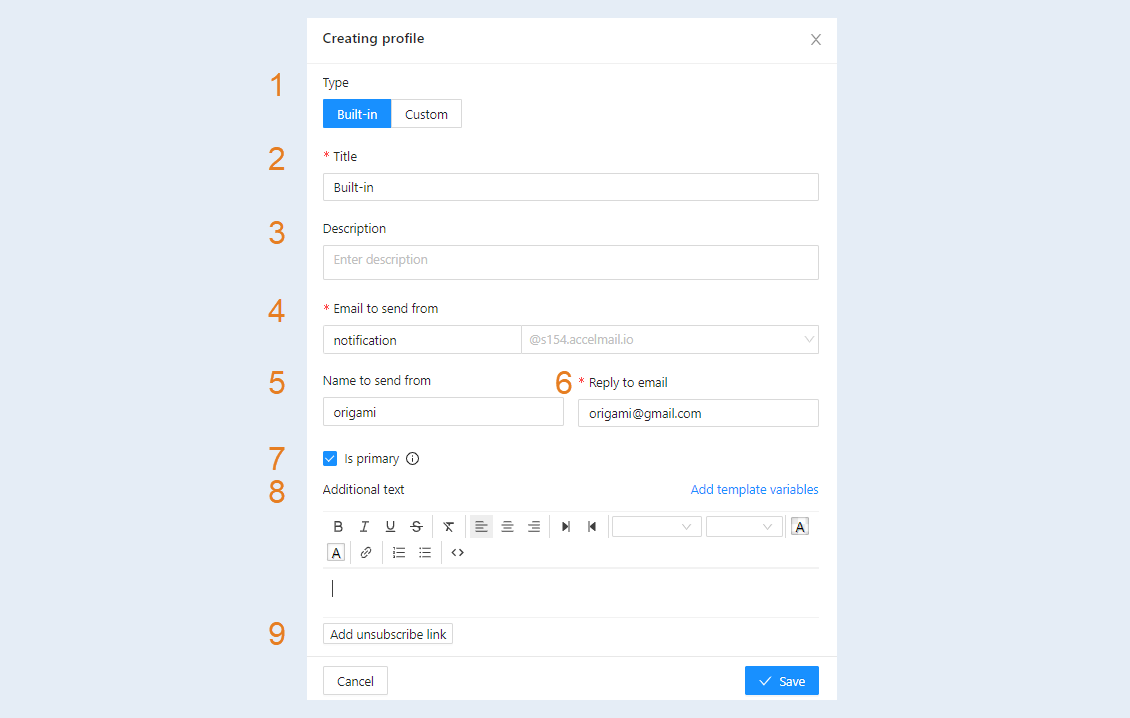
An additional window will open in which you can configure the AXL sending profile:
- Type of. Here you can see the smtp connection type - built-in.
- Name. Enter a name for this connection.
- Description. You can add a description for this connection.
- Sending from mail. Enter a prefix for your account's email address. From this address, mailings will be sent to your customers. This could be the name of the account or your name.
- Sender's name. Enter your name or the name of your account. This name will be seen by your customers in the incoming message as the name of the sender.
- Mail for reply. Enter here the email address that will receive responses from customers.
- Basic. Check this box if this submission profile is the main one. There can be only one main profile.
- Additional text. You can enter additional text in this field. This text will be automatically added to all outgoing emails. For example, you can add text with links to the social networks of your account, or specify the details of your account.
- Add unsubscribe link. Click on this button to automatically add a link to unsubscribe from your mailings in the text of your outgoing letters.
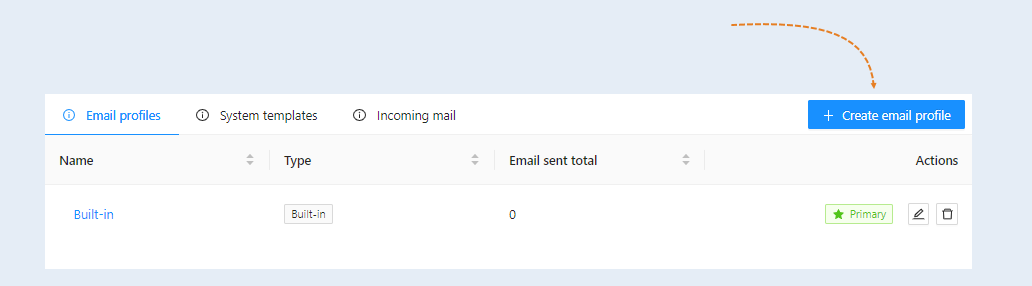
Click the "Save" button. If you would like to create a new embedded submission profile, click the Create Submission Profile button and fill in the same fields that we just looked at.
Custom sending profile
Native Submission Profile is a third party mail server for sending outbound messages on the AXL platform. You can use any mail server for your mailings. To create your own submission profile, you need to configure the settings.
Сlick on the “Create Submission Profile” button.
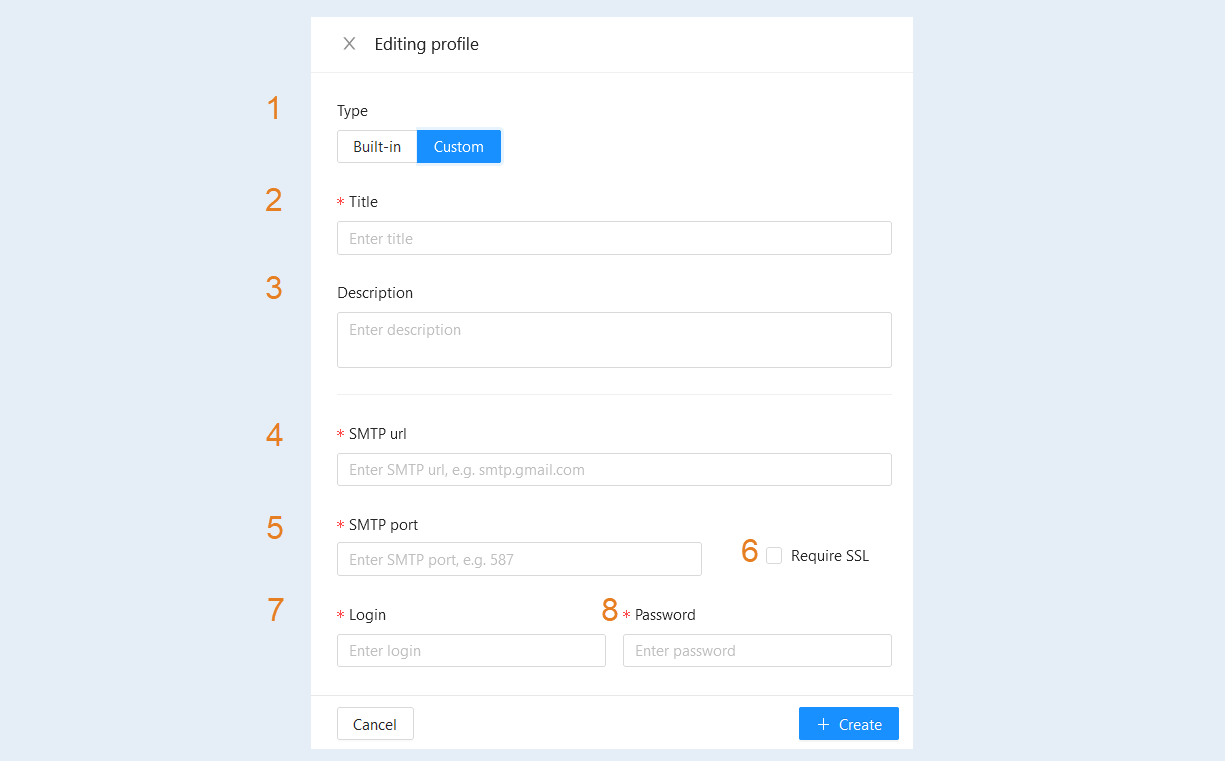
In the window that opens, fill in the fields:
- Type of. Select "Custum".
- Name. Enter a name for the upload profile.
- Description. Add a description for this submission profile.
- SMTP address. Enter the SMTP address on the line.
- SMTP port. Specify the digital port.
- SSL certificate. Check the box SSL certificate required
- Login. Enter the full name of the mailing address including @ and domain.
- Password. Enter the password you use to log into your mailbox.
Further, in the same window, fill in the fields below:
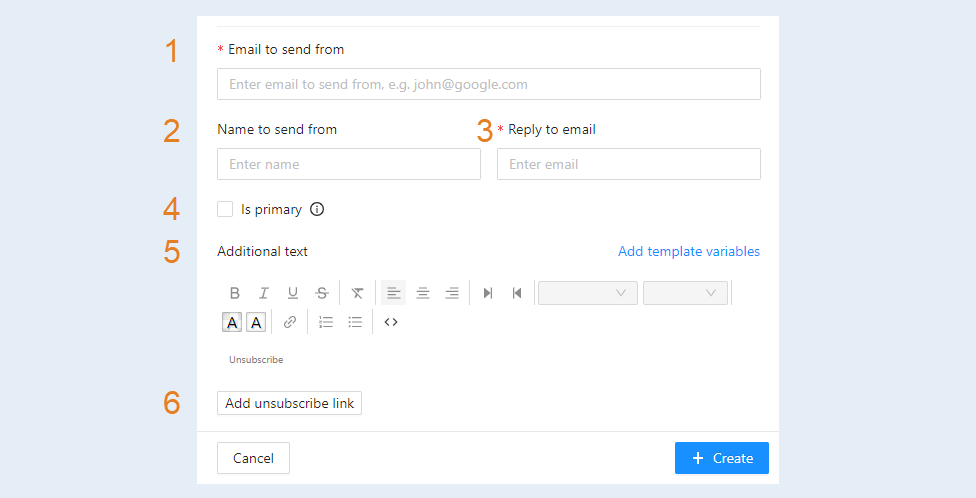
- Sending from mail. Enter the email address to send. Or click on the “Create Mail Domain” button to change your mail domain.
- Sender's name. This name will be seen by the recipient of the letter.
- Mail for reply. This address can be different from the address from which letters are sent, or you can use the same address for sending and receiving.
- Main profile. Check the box if you want to make this mailing profile the main one. If the profile is the main one, then system notifications will be sent through it by default. There can be only one main profile.
- Additional text. You can enter additional text in this field. This text will be automatically added to all outgoing emails. For example, you can add text with links to the social networks of your account, or specify the details of your account.
- Add unsubscribe link. Click on this button to automatically add a link to unsubscribe from your mailings in the text of your outgoing letters.
Click the “Save” button.
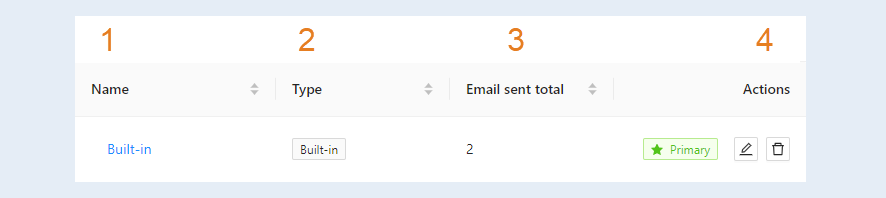
Built-in and custom profiles will be displayed in the list of sending profiles. Here you can see the following information:
- Name. Enter the email address to send. Or click on the “Create Mail Domain” button to change your mail domain.
- Type of. Send profile type: built-in or native.
- Messages sent in total. Here you can see the number of emails sent.
- Actions. Here you can see which profile is the main one. And also available to you:
- the "Edit" button. Click to make changes to the profile settings.
- the "Delete" button. Click to delete the upload profile.
System Templates
In this tab, you have already configured several standard mailings:
Registration for the webinar.
- Webinar start reminder.
- Upcoming webinar reminder.
- Payment for the order. After your client has paid for any product of your account, the system sends him a notification of successful payment.
- User password restoring. This letter is sent to the user upon his request for password recovery.
- An invitation to register. This notice contains a link to your membership portal and is sent in case the administrator invites another user to register with your membership portal.
- Confirmation of registration. This notification is sent to the user's mail after registering at your membership portal. The user must confirm his registration.
- Confirmation of invitees. This notification is sent to confirm the registration of the invited users.
- Admin password recovery. This notification is sent by mail to the administrator upon request for password recovery.
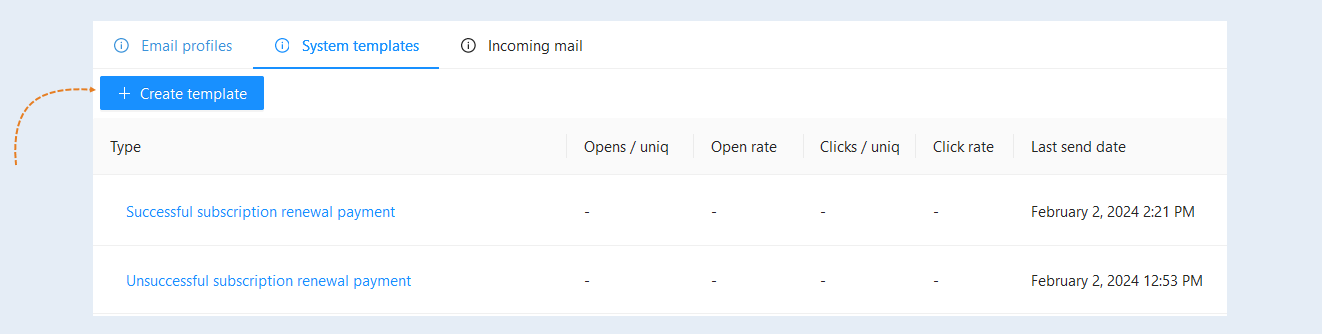
To create a new system template, click the "Create Template" button.
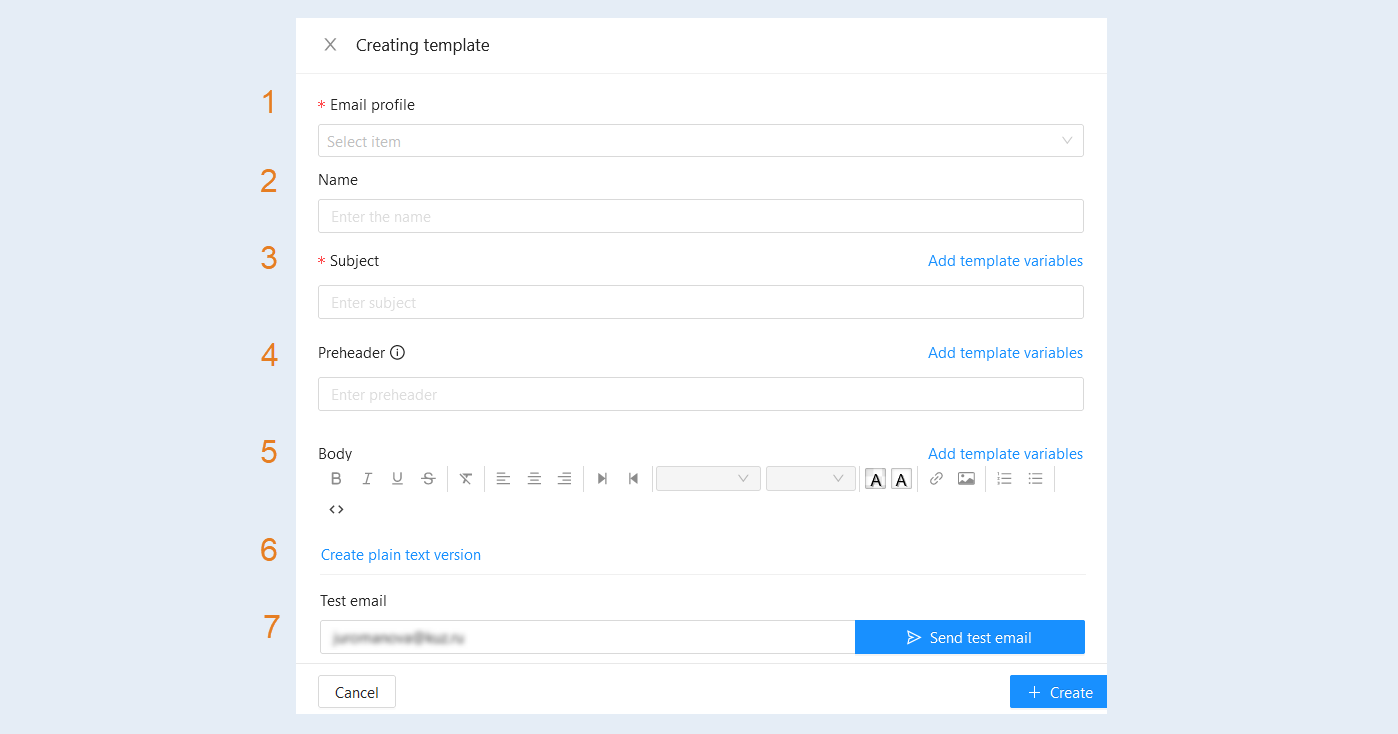
In the window that opens, fill in the fields:
Email profile. Select the tool from the list that will be used to send the email. It can be a built-in or integrated tool.
Name. Specify the name of the template.
Subject. Write the subject of the letter.
Prehader. This is a piece of text that is displayed in the mailbox immediately after the sender's name and the subject of the letter. Sometimes it is also called a subtitle.
Body. Write the text of the letter.
The button "Create plain text version". The text version of the letter is necessary for better delivery. If you don't create it, it will be created automatically.
Test email. Specify your Email address and send a test email to your email.
Click the "Create" button, the created template will appear in the list.
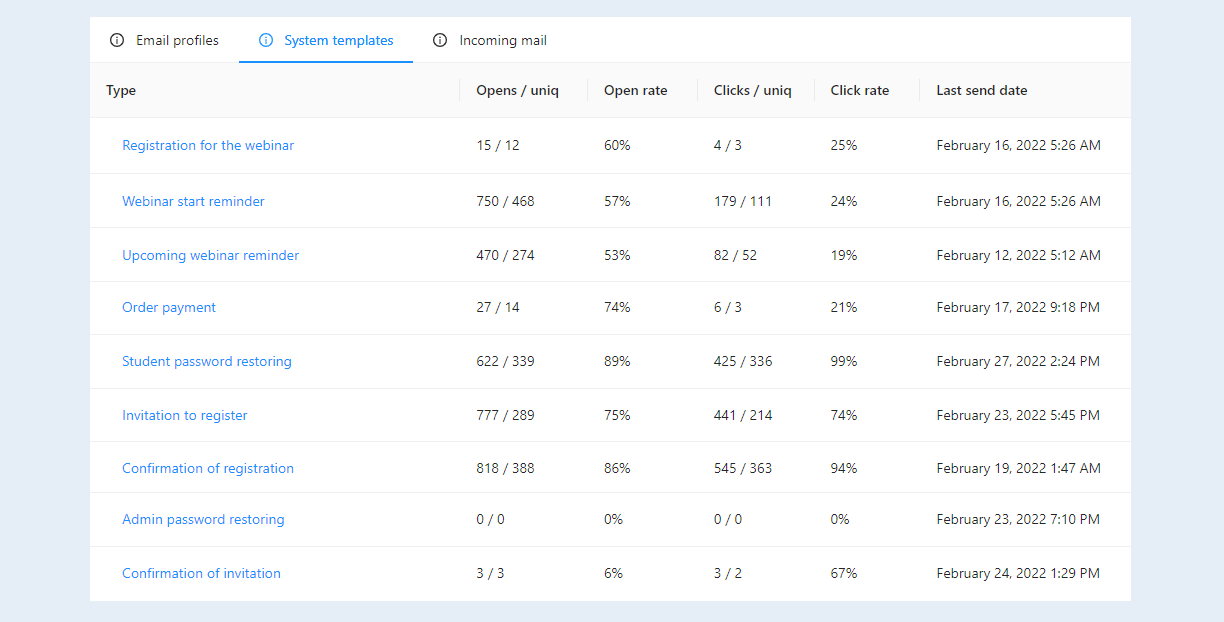
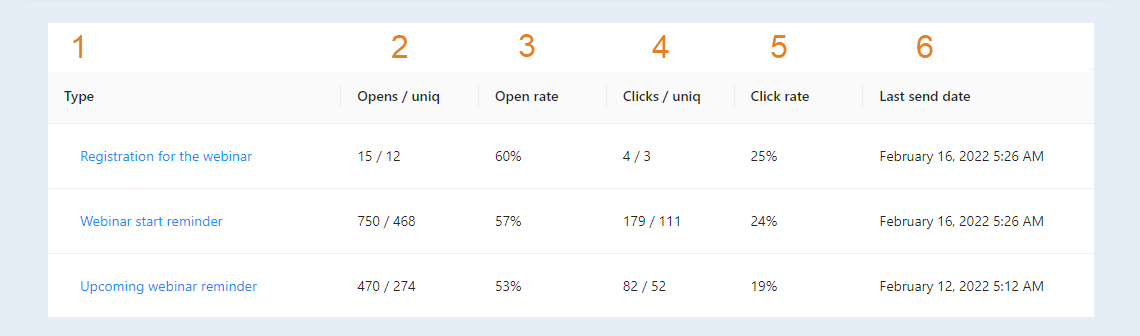
In the list of system templates, you can see information on sent emails:
- Type of. System template type.
- Discoveries / Unique. The number of times a given notification has been opened and the number of unique discoveries (that is, the number of users).
- % discoveries. The number of openings as a percentage of the total number of openings.
- Clicks / Unique. The number of clicks on the link inside the letter and the number of unique clicks.
- % of clicks. The number of clicks as a percentage of the total number of clicks.
- Last dispatch date. The exact time and date of sending the last system letter.
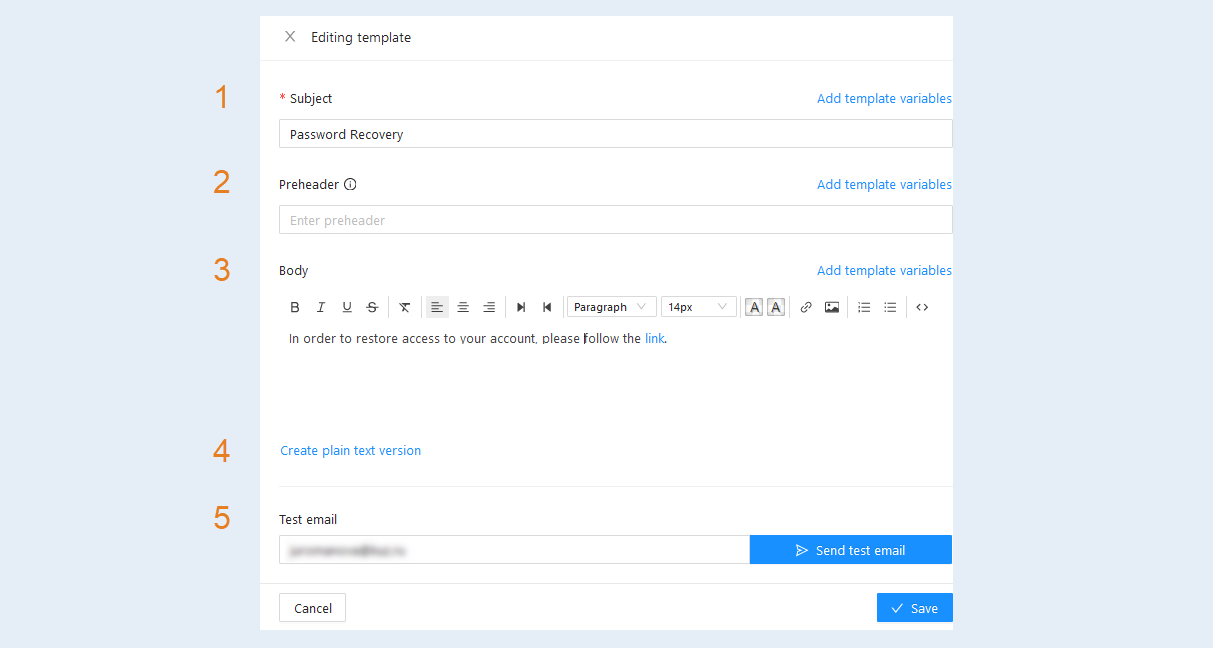
You can edit these templates. Click on the name of the template and make changes in the window that opens:
Subject. You can change the subject of the email.
Preheder. A piece of text that appears in the mailbox immediately after the sender's name and subject line.
Body. Here you can make changes to the text of the letter, add variables, pictures, links, edit the font, text color, text size, alignment, etc.
- Create plain text version. A text version of the letter is being created to improve sending. You can create a text version yourself, or it will be generated automatically.
Test email. Enter your email address and click the "Send" button, a test letter will be sent to the specified address. This function is used to check the deliverability of emails and the display of emails in the browser.
Click the “Save” button.
Incoming mail
In this section you can see the incoming mail settings.
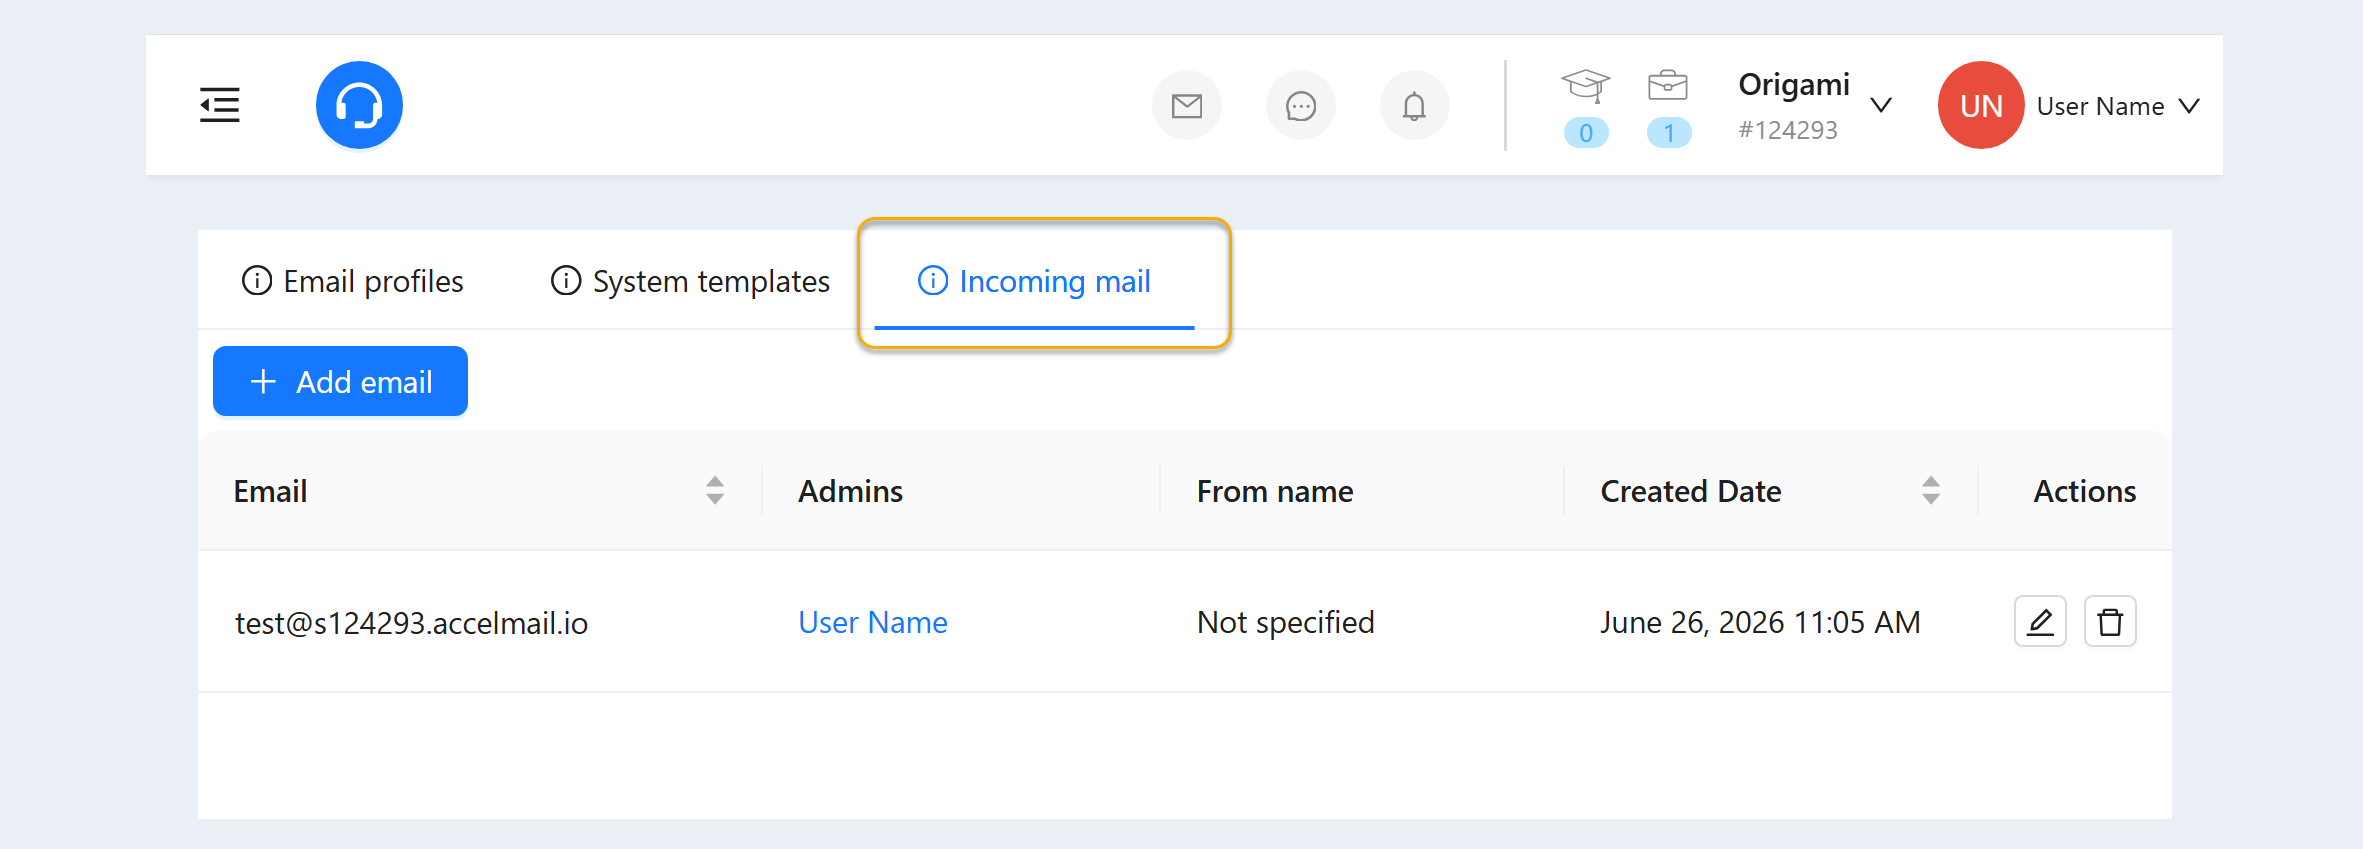
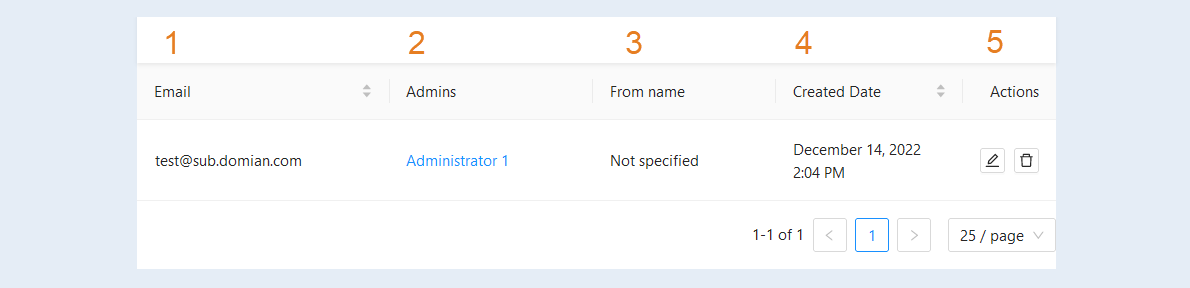
The list will display a list of email addresses. Here you can see the following information:
- Email. The name of the Email address.
Admins. Team members who can use this address.
From name. The name of the sender from whom the letter came.
Created Date. Date of creation of the Email address.
Actions:
- the "Edit" button. Click to make changes to the address settings.
- the "Delete" button. Click to delete the email address.
Click the "Add Email" button and make changes in the window that opens:
- Email. Enter the email prefix to send and select the domain.
From name. Specify the sender's name.
Catch-all. Check the box so that all emails sent to non-linked mailboxes are forwarded to the specified address.
Team members who can use this address. Choose from the list of administrators of your team.
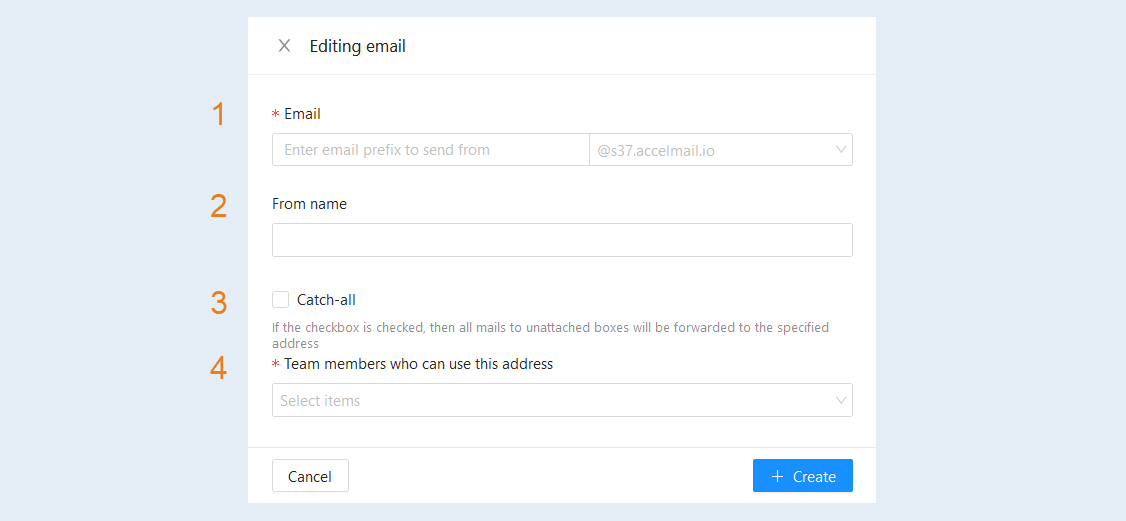
Click the “Save” button.