In this article, we will consider in detail how to configure and automate the work of a warming-up chatbot. Click on the desired section of the article to go to its description:
1
Creating a chatbot
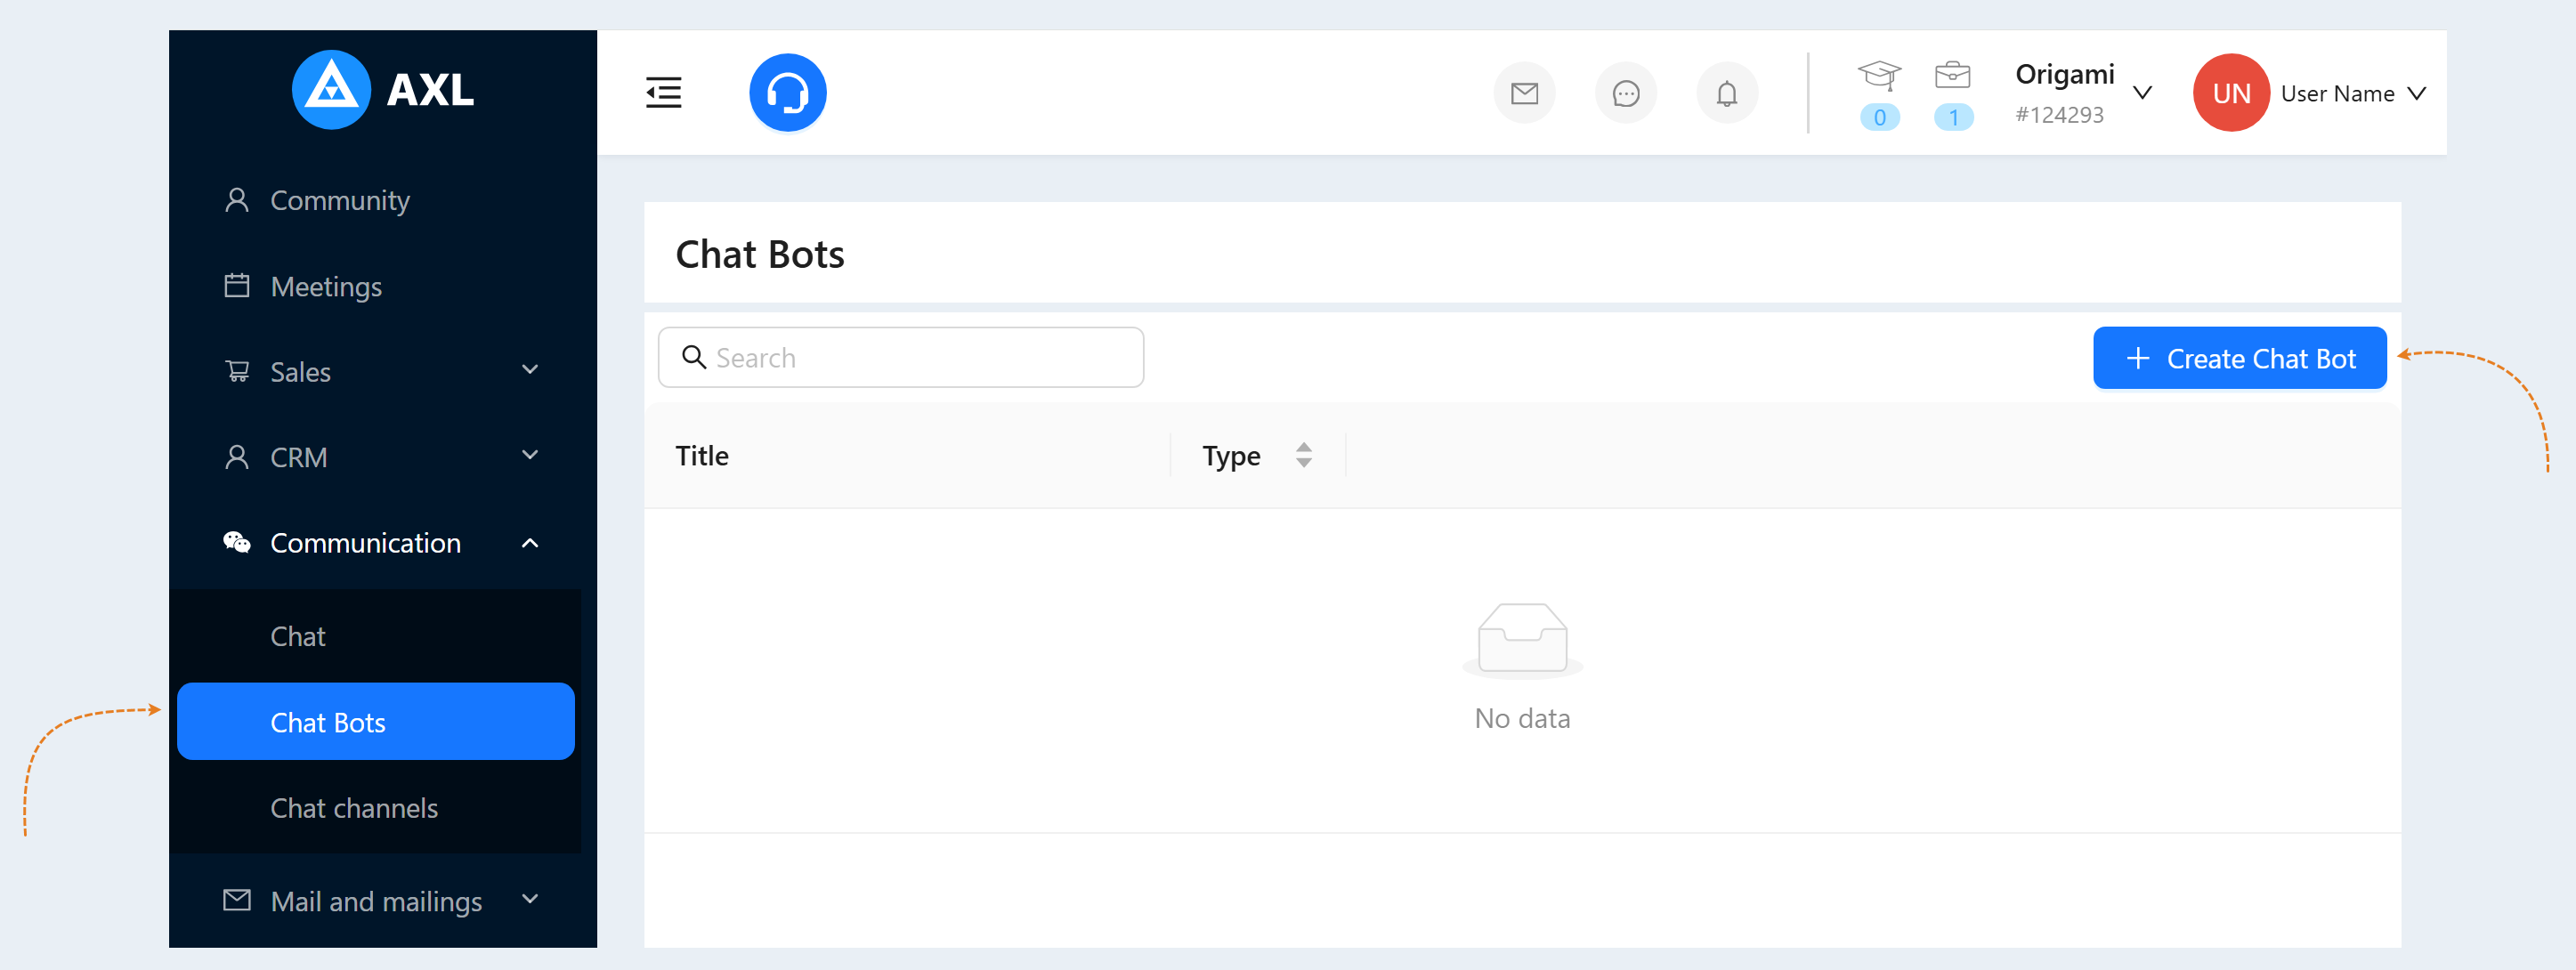
Go to the "Communication" section, the "Chatbots" tab. Click the "Create a chatbot" button.
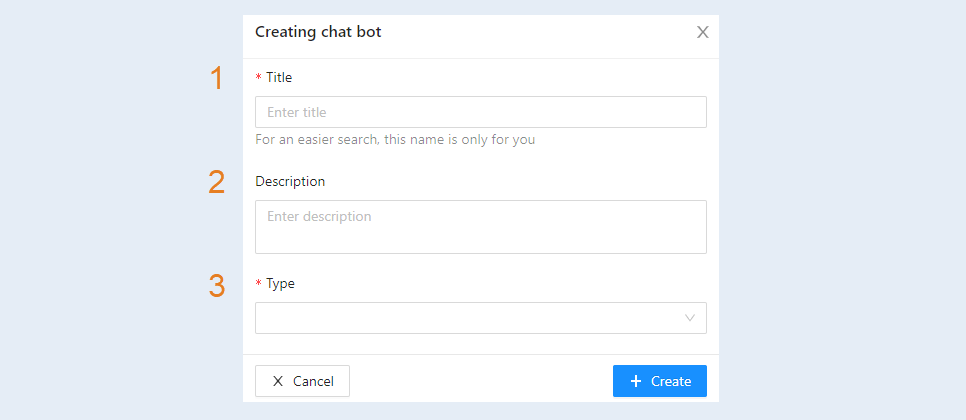
An additional window will open for you. Fill in the fields:
- Title. Write a name for your chatbot.
Description. Add a description for the chatbot.
Type. Choose the type of chatbot from the list: simple or webinar.
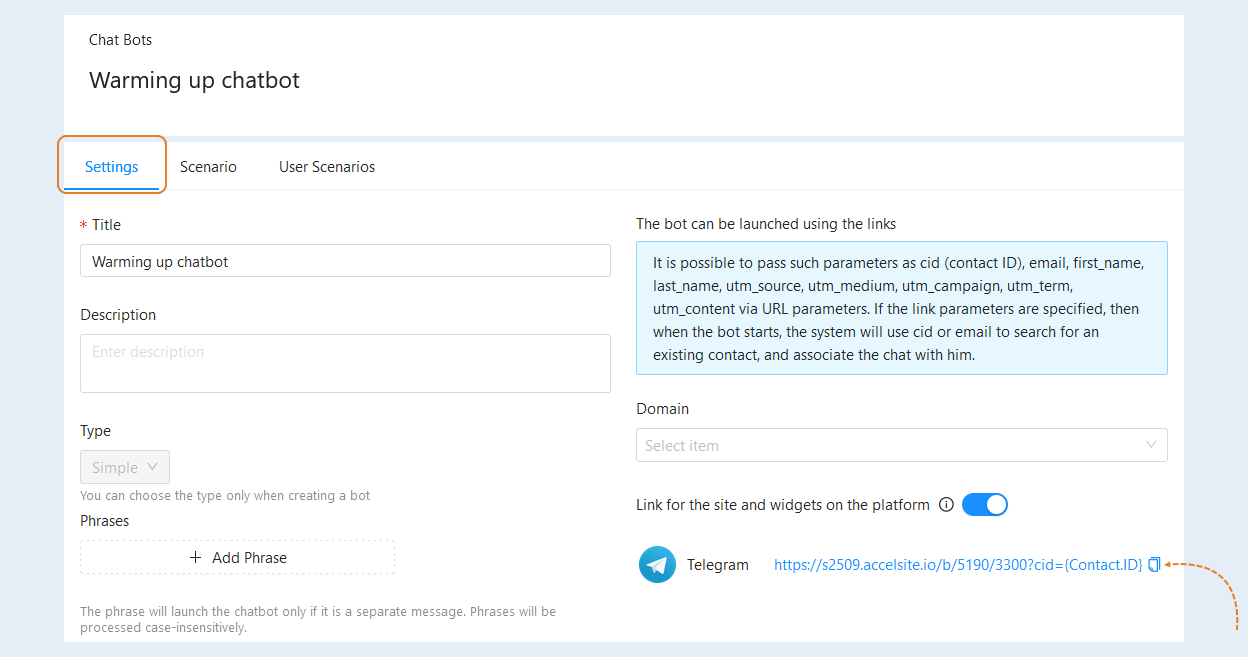
Click the "Create" button. The chatbot settings will open for you. Copy the link to the chatbot. You will need this link at step №5 of this article.
2
Chatbot scenario
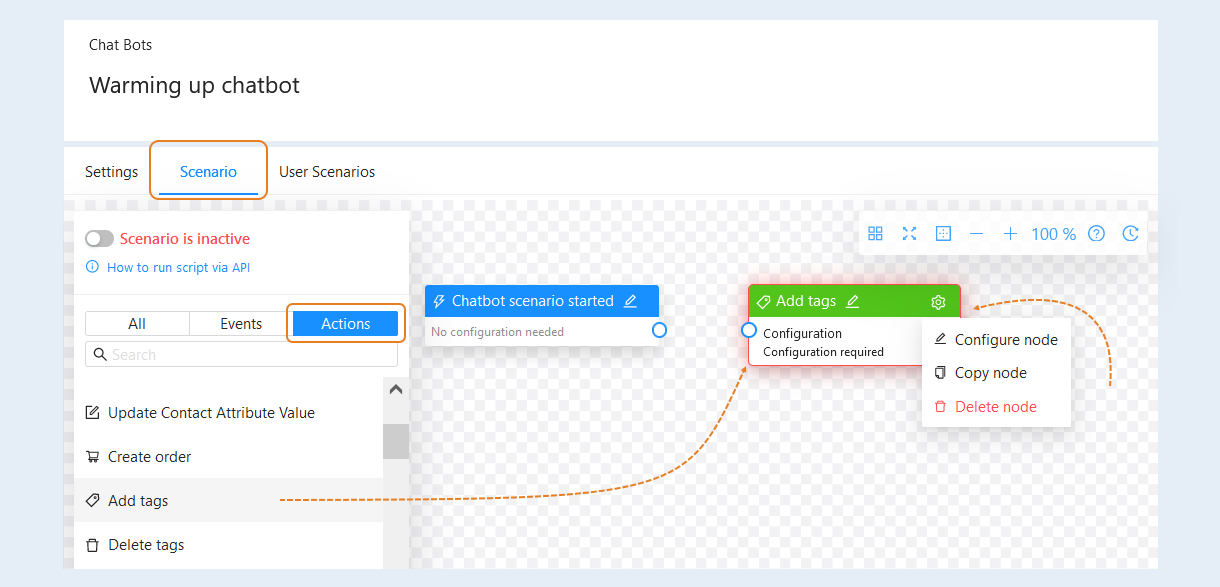
Go to the "Scenario" tab of the chatbot. Here, by default, the event triggering the chatbot "Chatbot scenario started" is already set. It is automatically created when you create a chatbot. Next, select the "Add Tags" action and drag it into the scenario field. For the action, you need to perform settings - configuration. Click on the "Settings" button and then the "Configure Node" button.
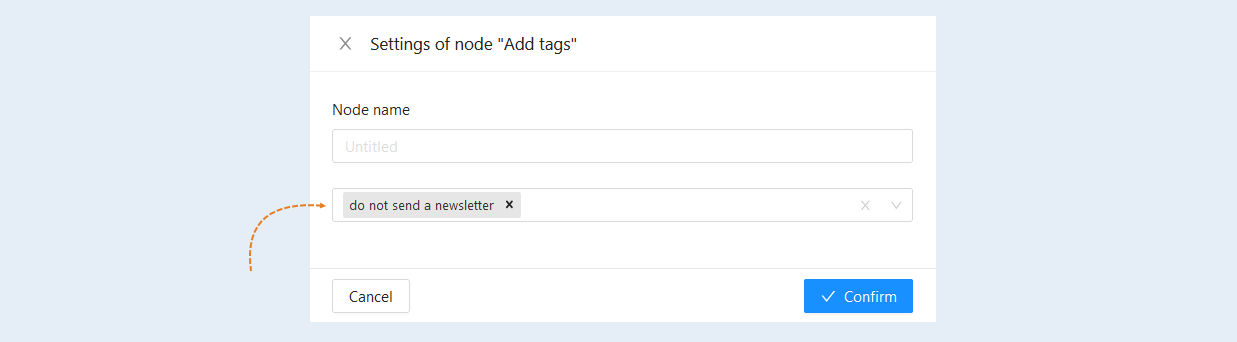
In the "Node Settings" field, select from the list or create the "do not send newsletter" tag. This tag will allow you to highlight users who are still in the warm-up chatbot. So that they don't get into the general mailing list database.
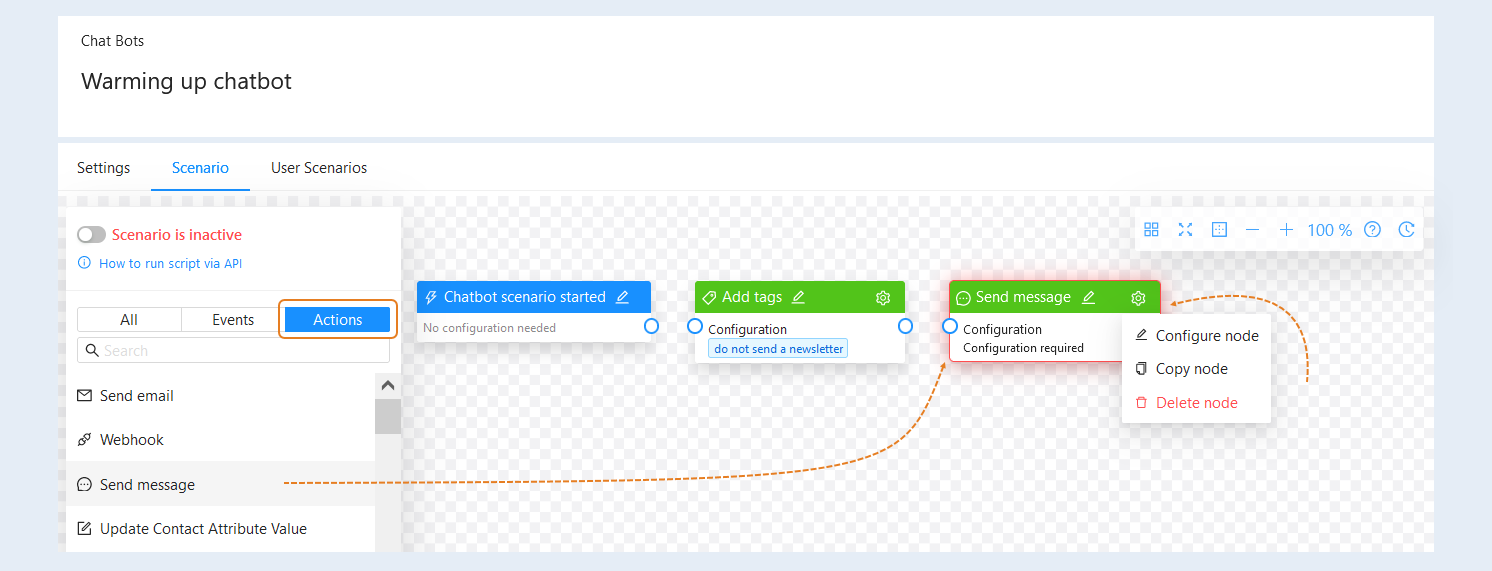
Next, select the "Send Message" action and drag it into the script field. For the action, you need to perform settings - configuration. Click on the "Settings" button and then the "Configure Node" button.
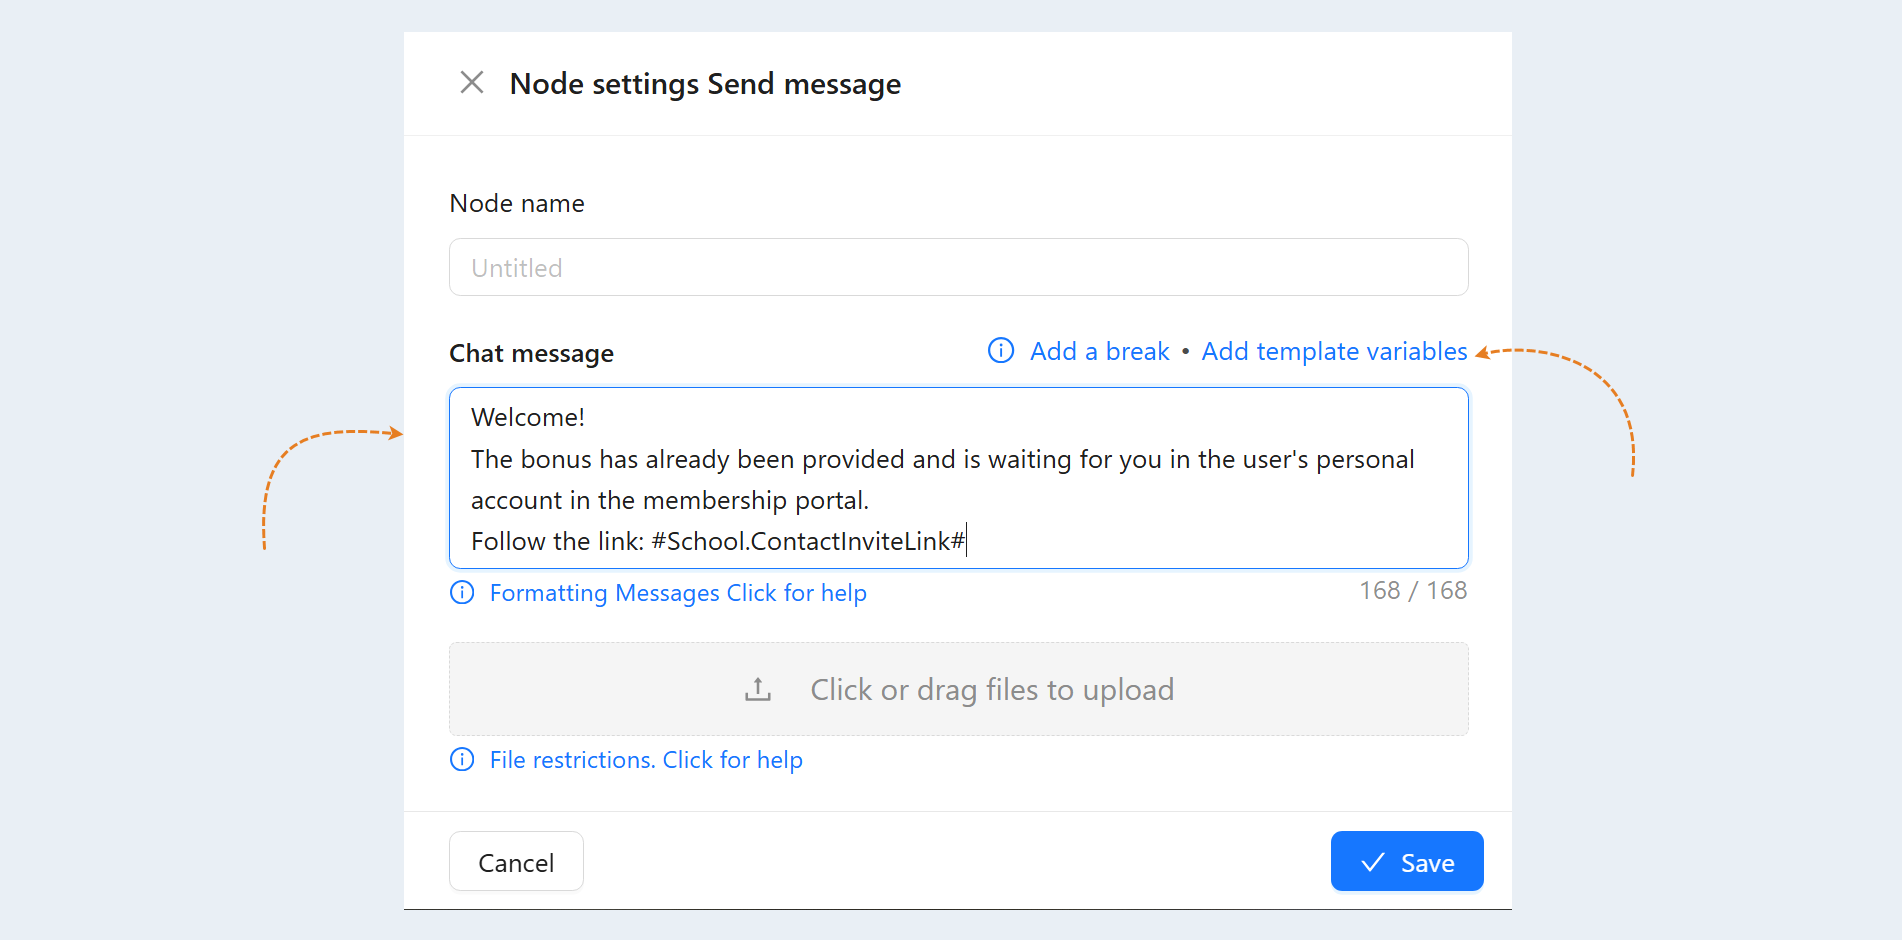
In the "Send Message Node Settings" field, specify the text of the message for the chat.
You can add variables to the message text. A variable is a value to be automatically replaced with the data you selected. This can be a contact name, a personal link to the membership portal, an order number, etc. Variables will automatically replace the data in the email.
Click the "Add Variables" button. Select the variable “Personal link to membership portal” from the list and when sending a message, this variable is replaced with a personal link to the user's personal account.
After completing the settings, click the "Save" button.
Next, select "Delay" and drag it to the script field. Waiting adds a time delay between the event (or action) and the next action.
This way you can set up sending messages with a delay in minutes, hours or days.
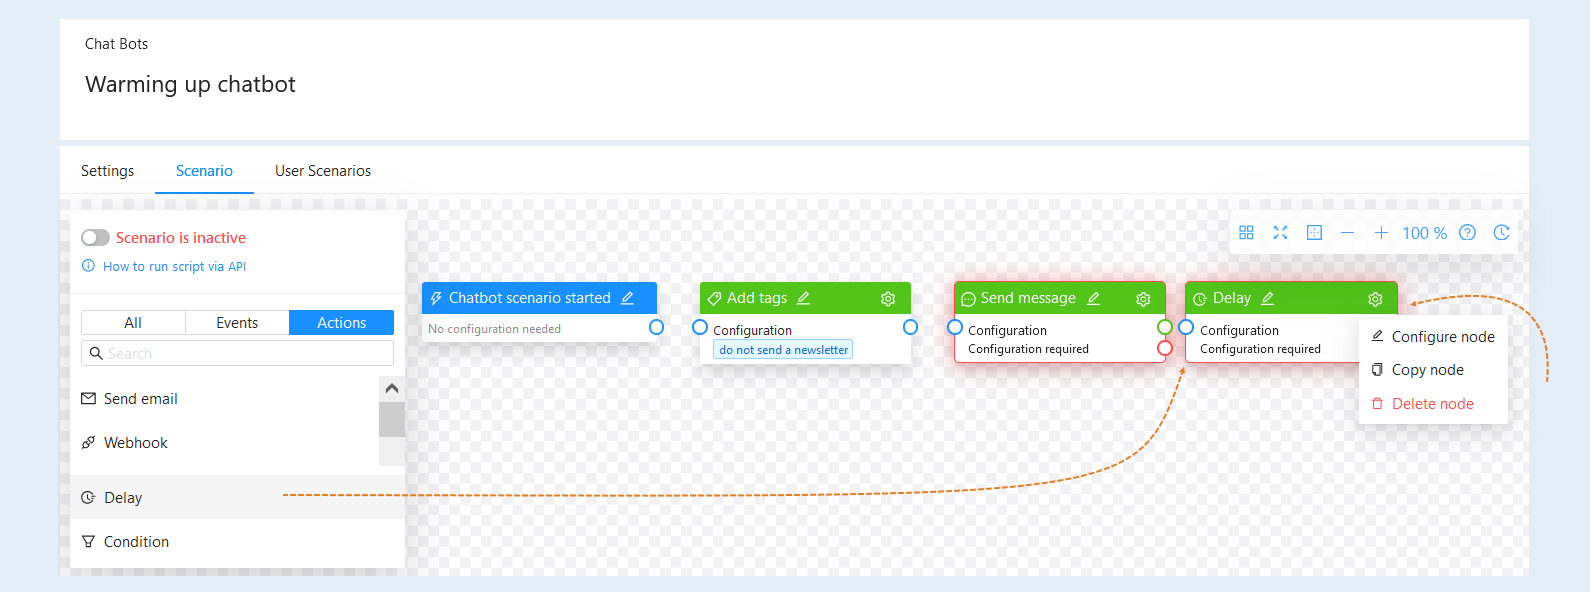
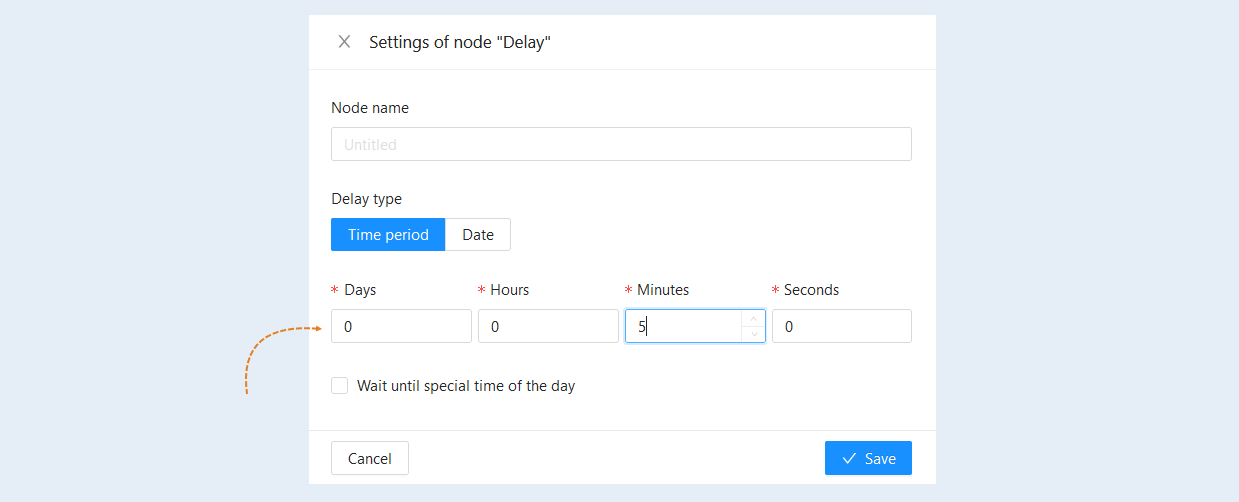
In the configuration settings, select the type of delay: the time period is the delay between the event and the action that you define yourself, or the date is the delay between the event and the action until a certain date that you set in the settings. Specify the delay period or date and click “Save".
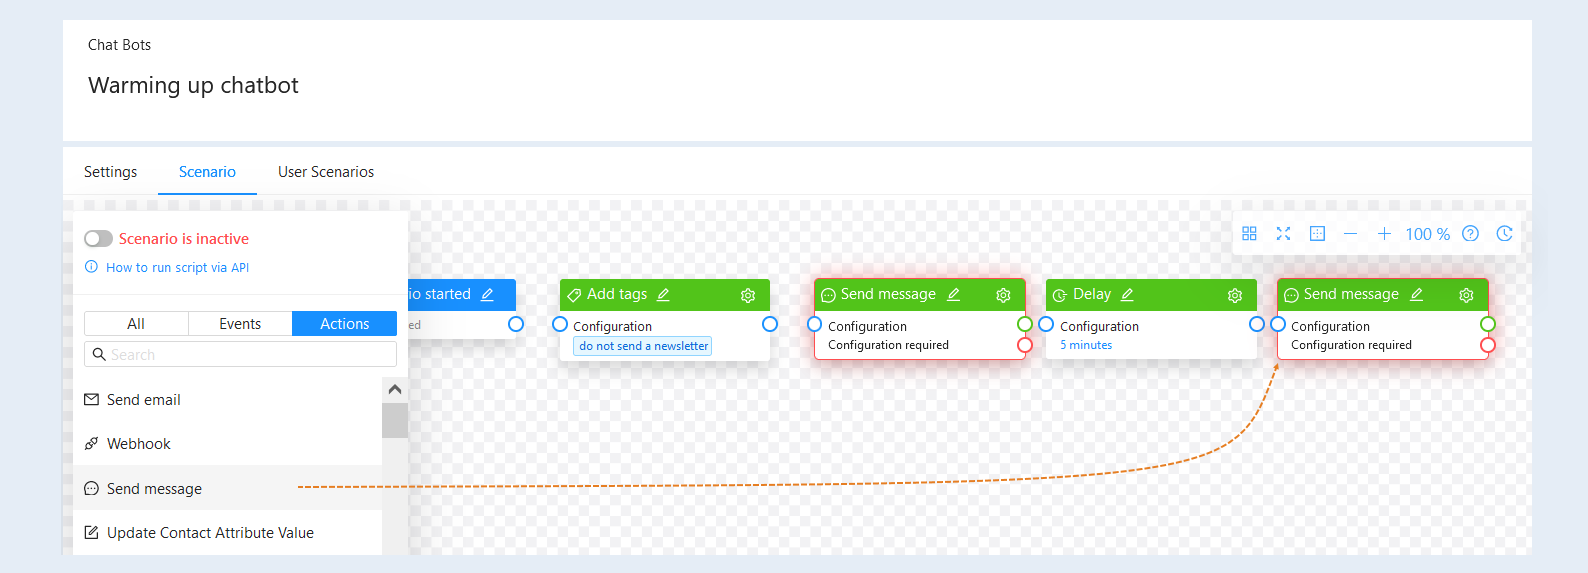
Select the next action "Send an email" and drag it into the script field. Perform the configuration settings for the action.
In the same way, set up sending several welcome messages with a delay of 1-3-5 days.
At the end of the chatbot script, add the "Delete Tags" action and drag it into the script field.
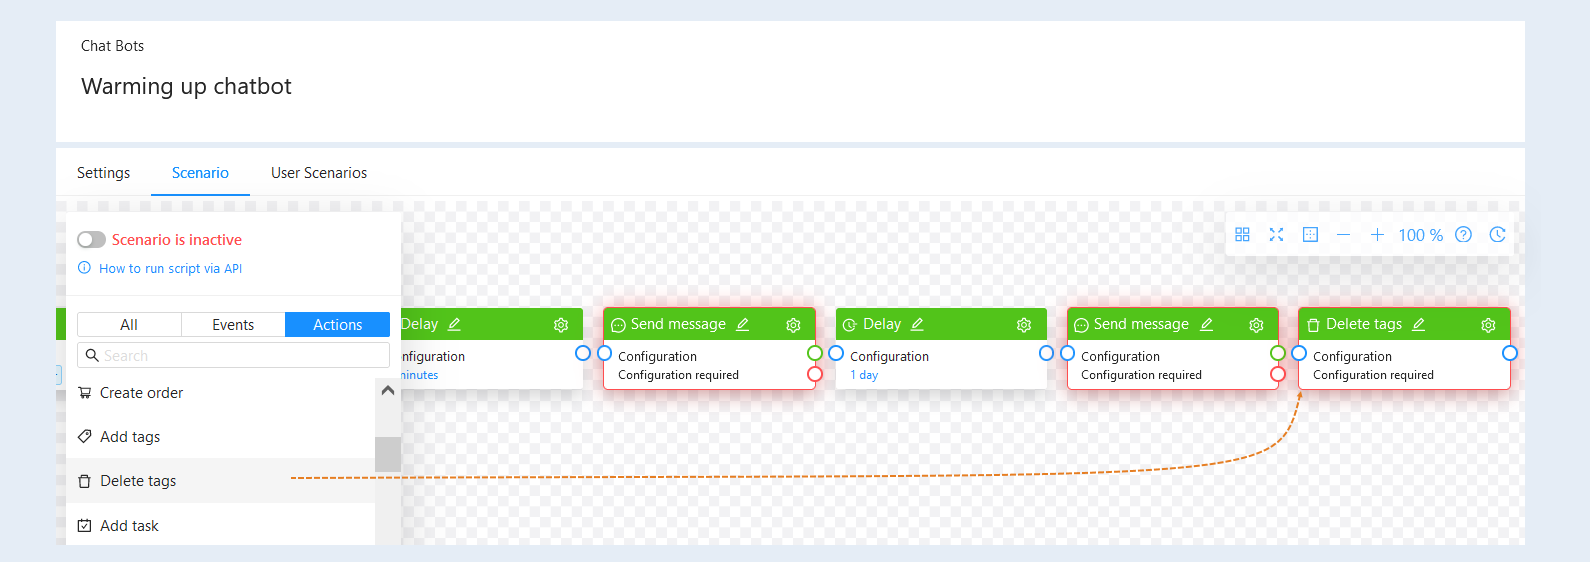
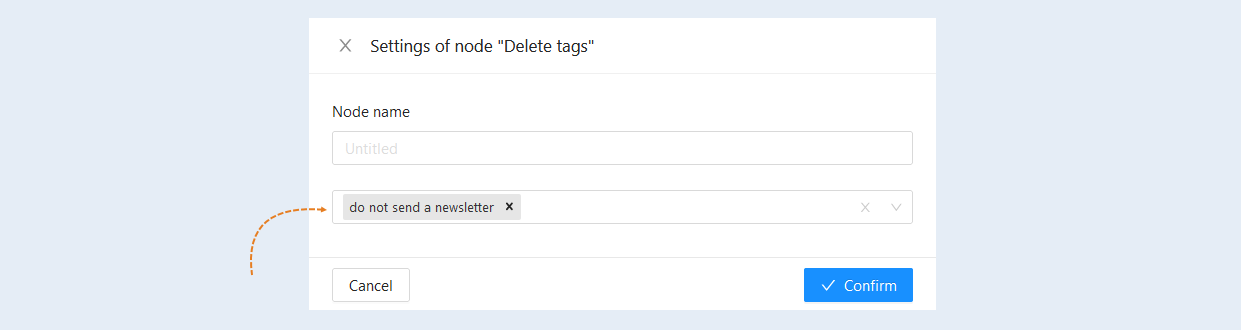
In the settings of the "Delete tags" node, select from the list the tag that was added at the beginning of the script and click the "Confirm" button. This action will delete the tag and the user gets into the general mailing list database.
Next, connect all the events, expectations, and actions together. Now your chatbot scenario is ready. To activate the scenario, move the "Scenario is active" slider to the active position.
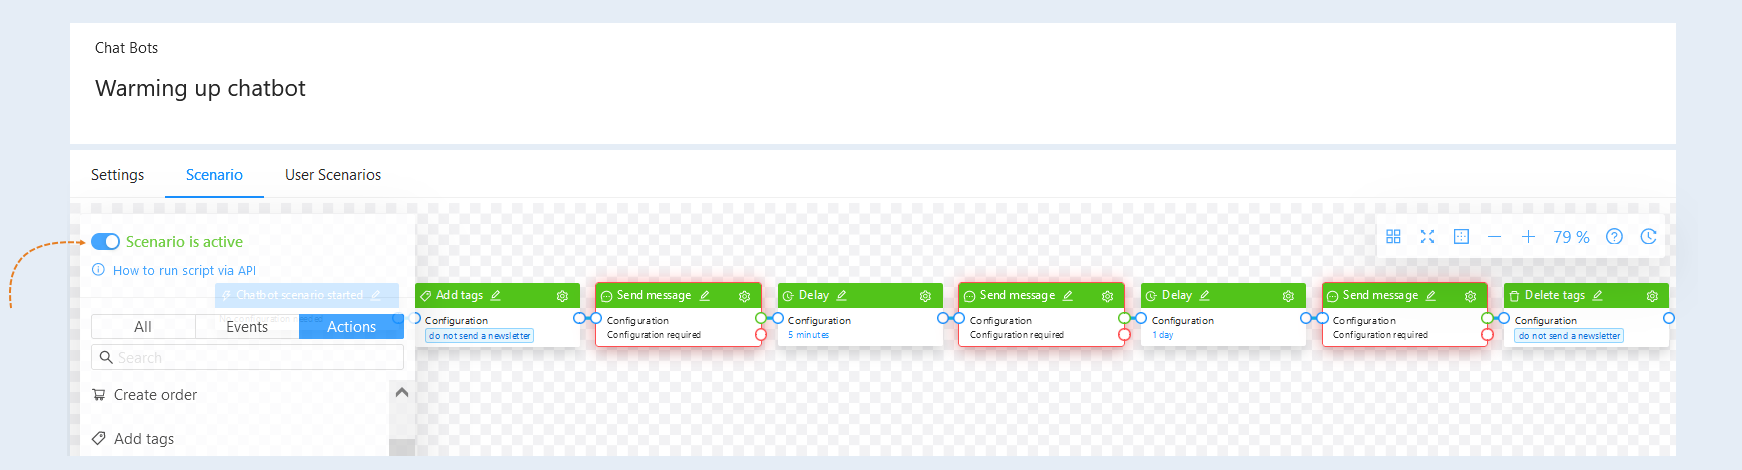
Thus, as soon as the user starts the chatbot script, he will be assigned the tag "do not send a newsletter". After that, several welcome messages will be sent to the chatbot to the user with a delay of, for example, 5 days. After the last message sent, the "do not send a newsletter" tag will be deleted and the user gets into the general mailing database.
3
Creating a form
In order to customize the form, create a website on the AXL platform.
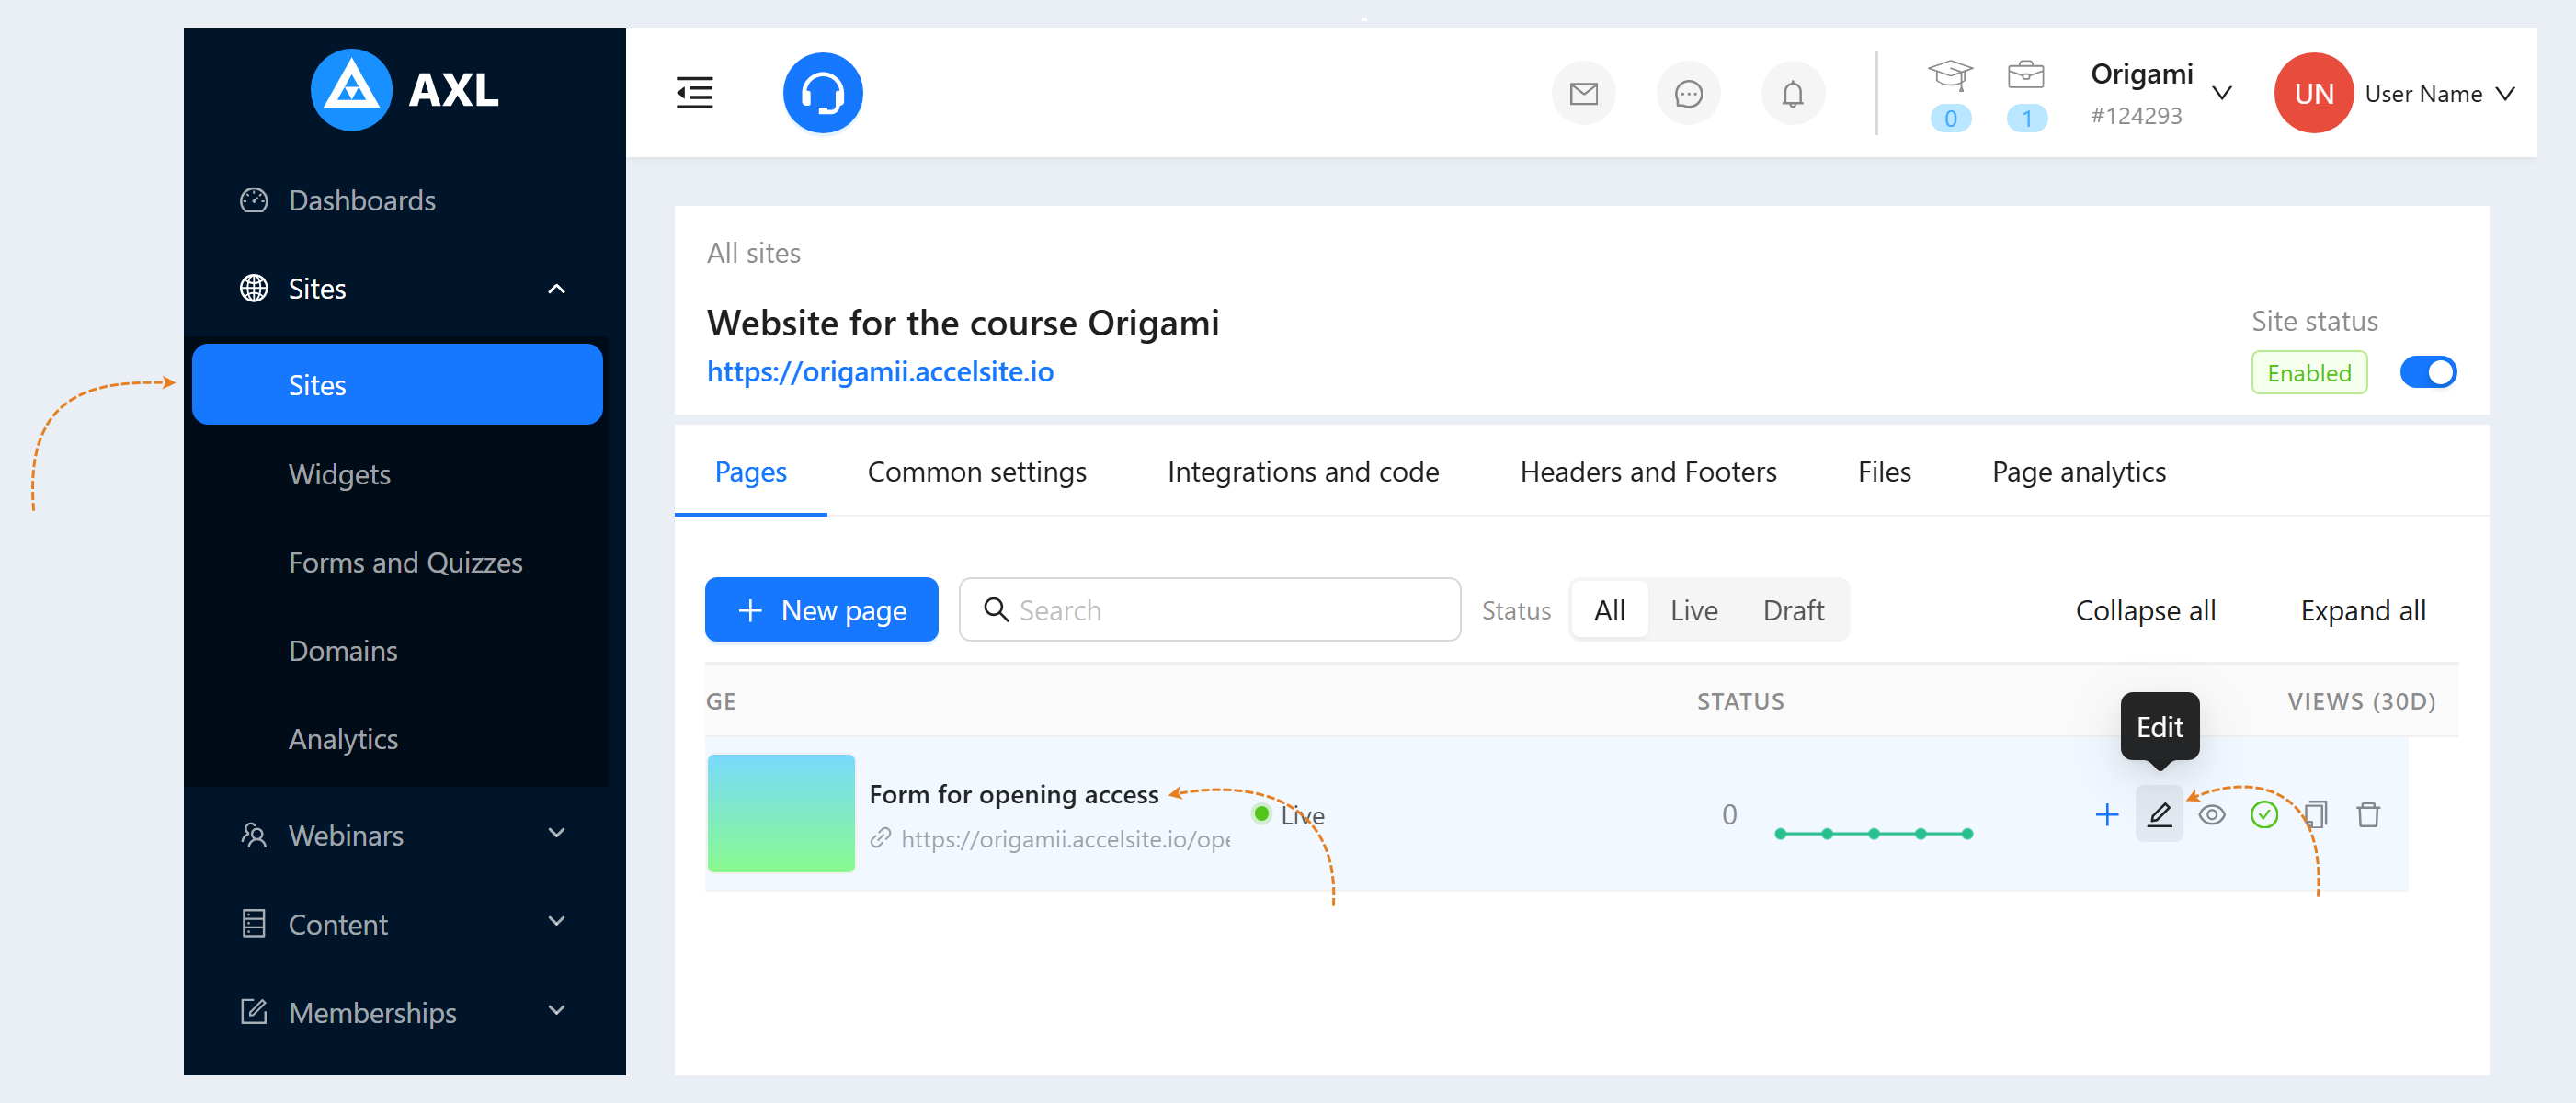
Go to the "Sites" section. Open a previously created site or create a new one. Read more about how to create a website in the article "How to create a website".
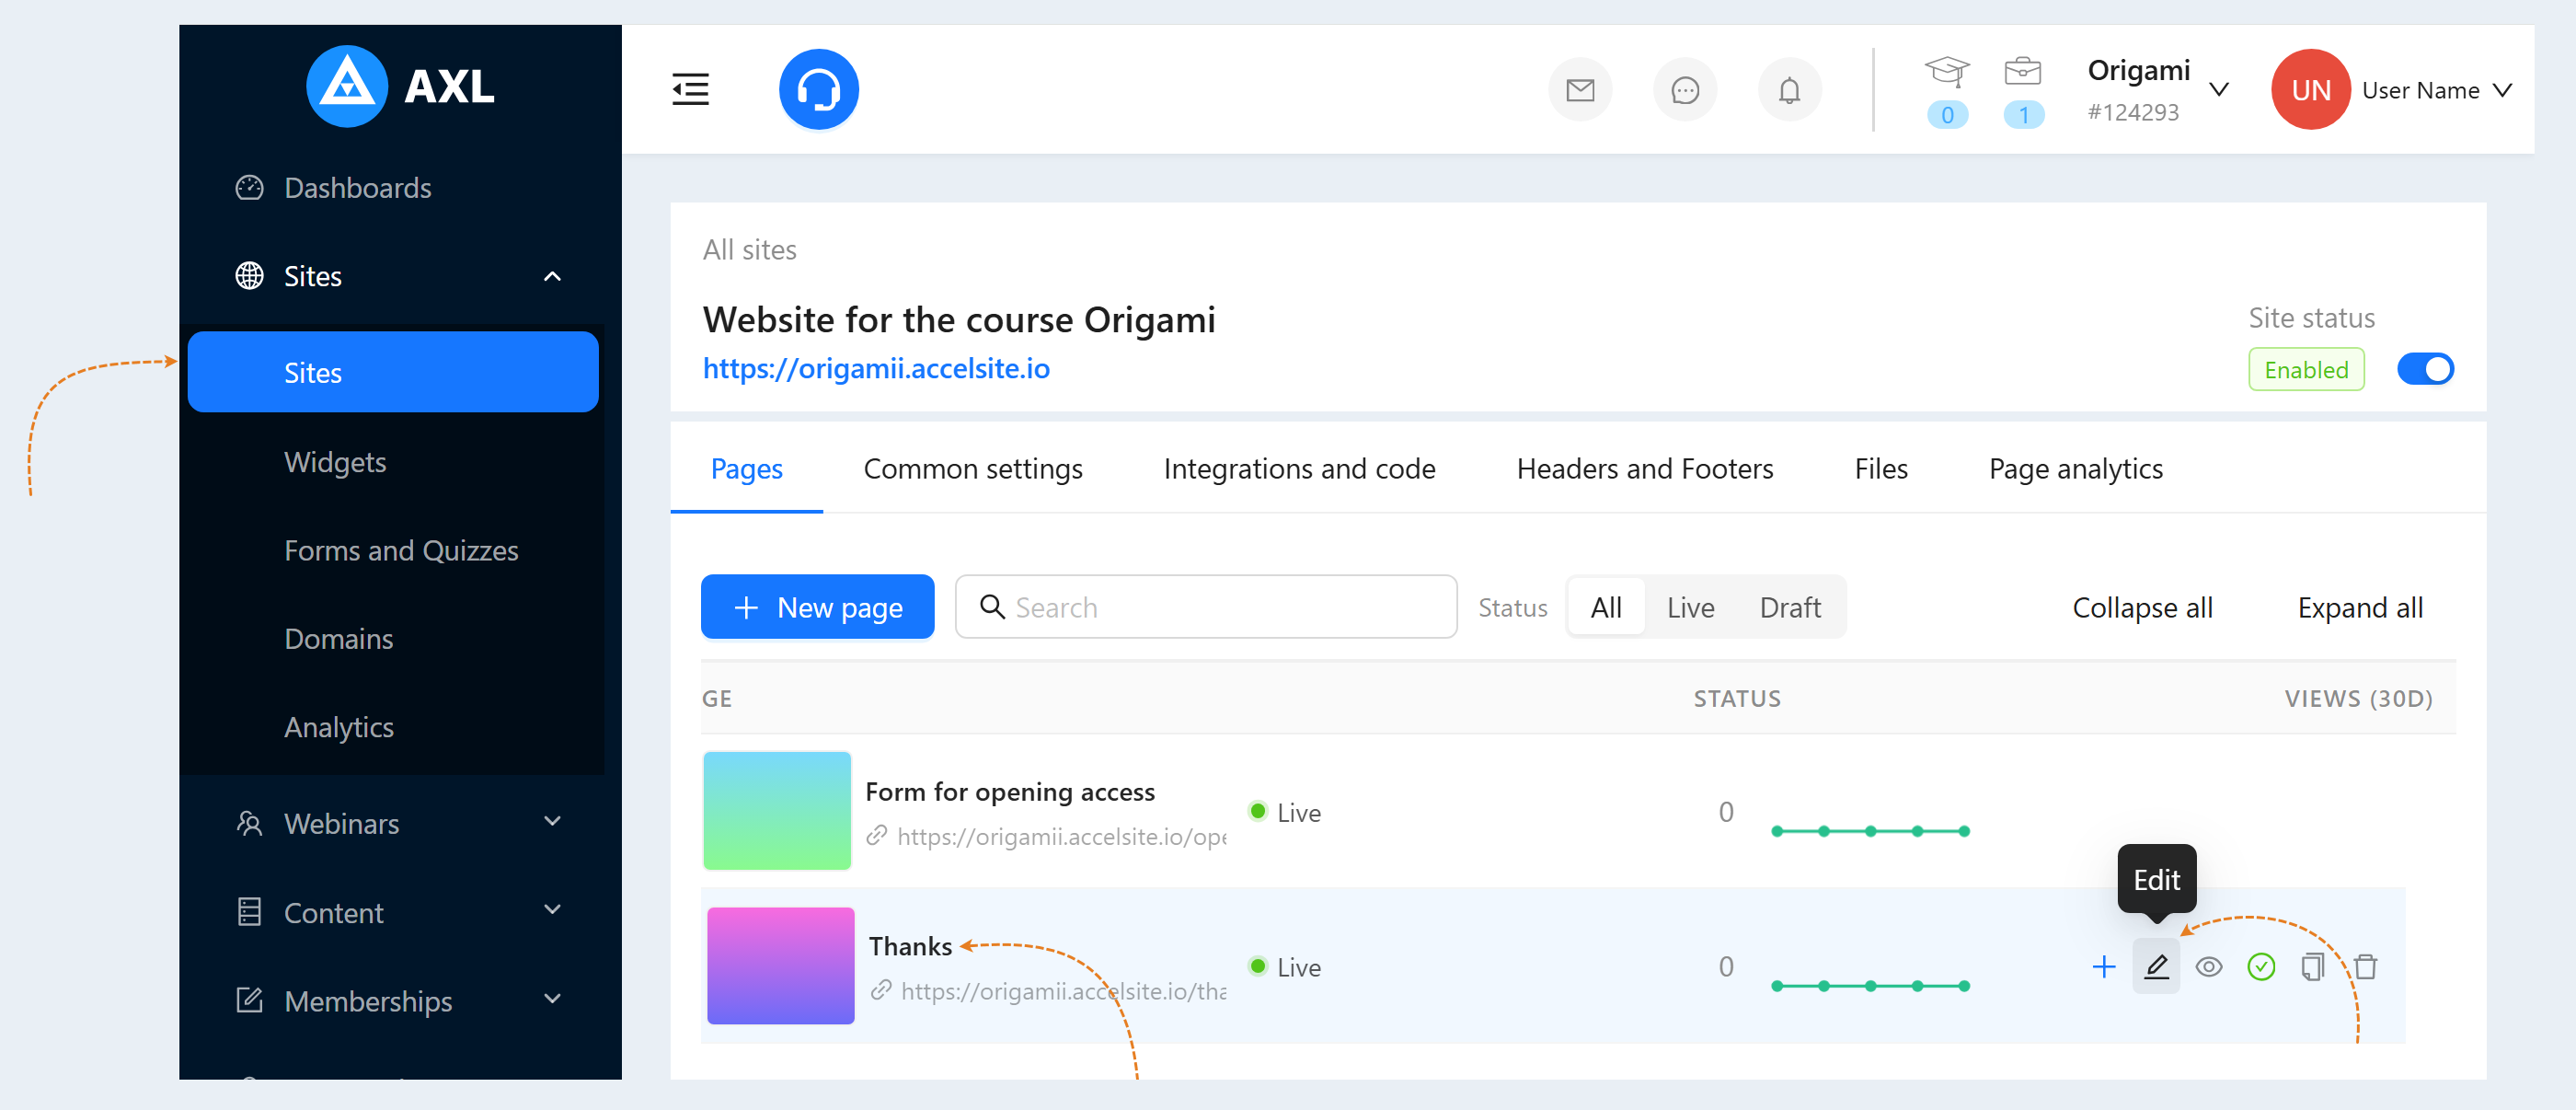
Next, in the "Pages" tab, select one of the created pages and click on the page name or the "Edit" button to open it.
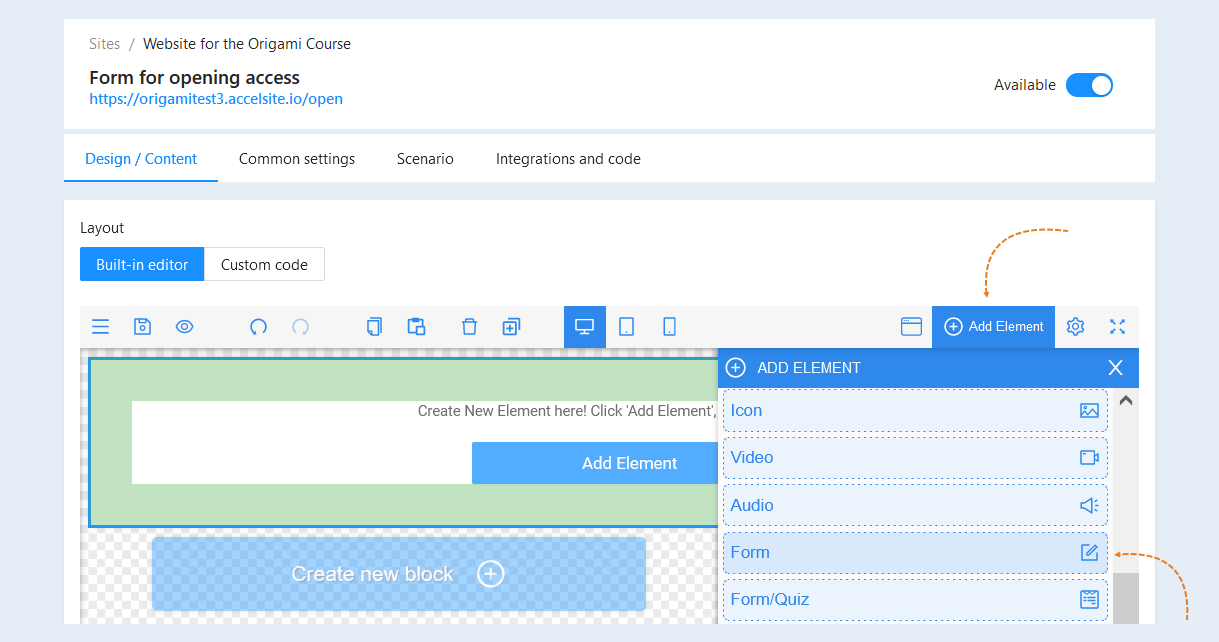
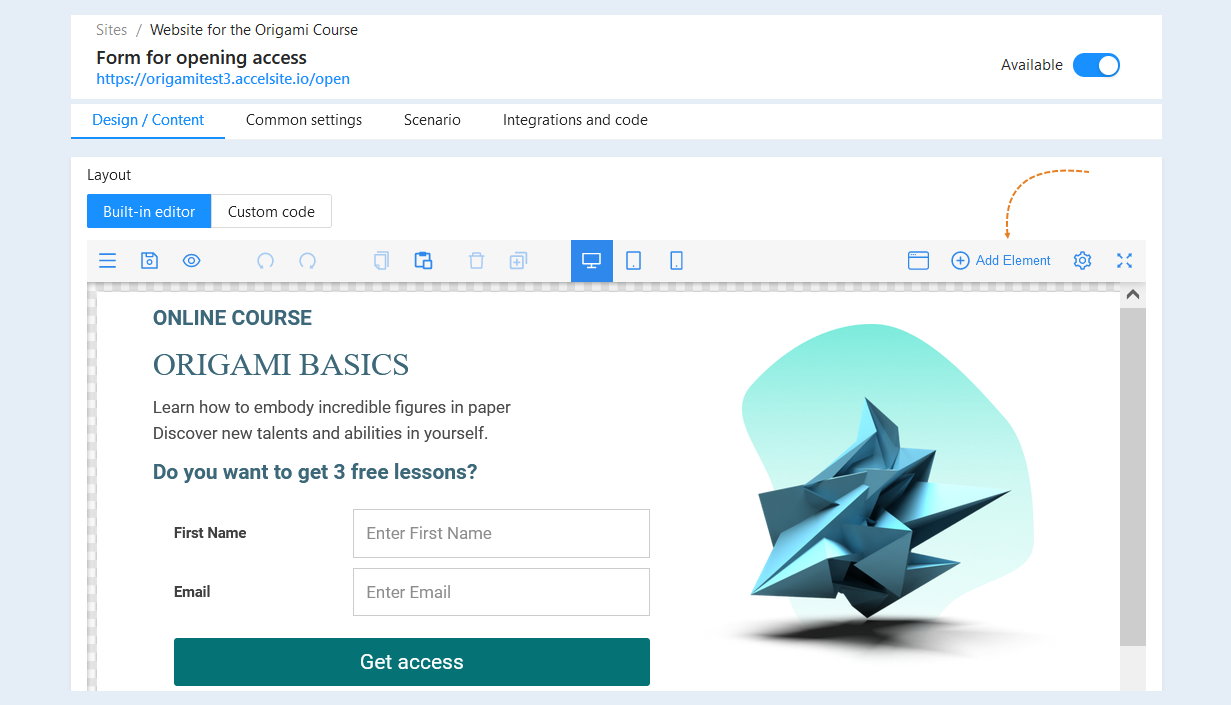
In the editor window of the site page, select "Empty block" and click "Add element". Select the "Form" element by moving it to the page field.
Select the entire form to open the settings for this element. The Settings toolbar opens on the right.
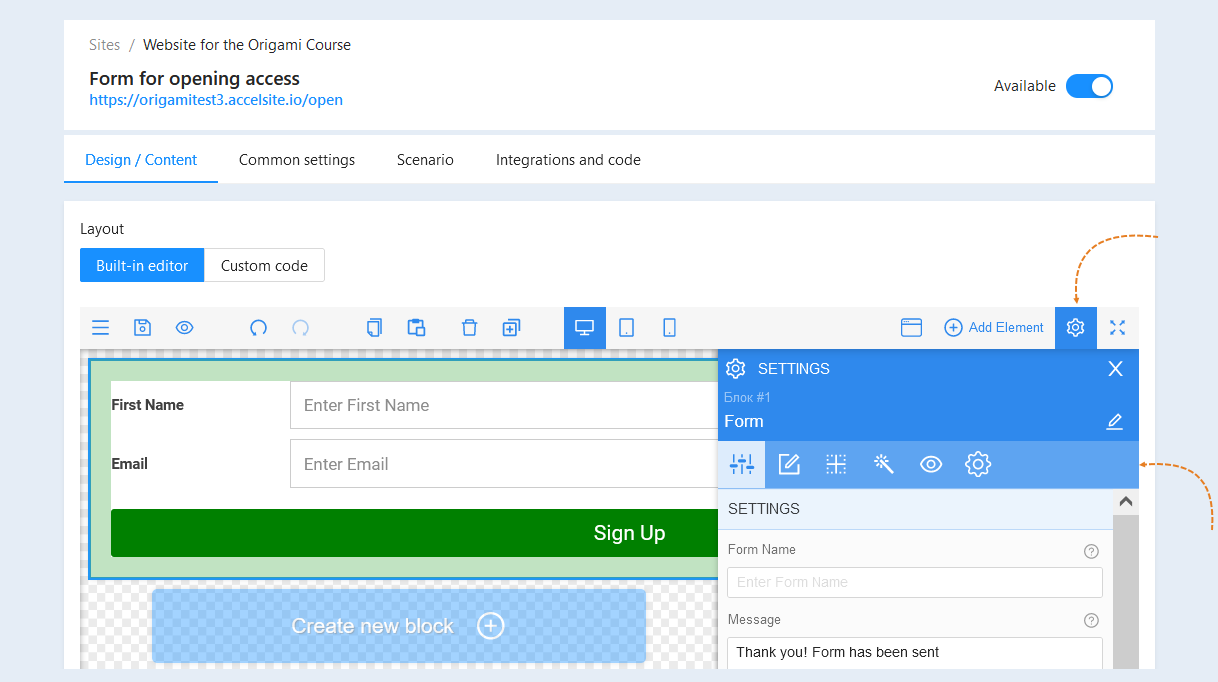
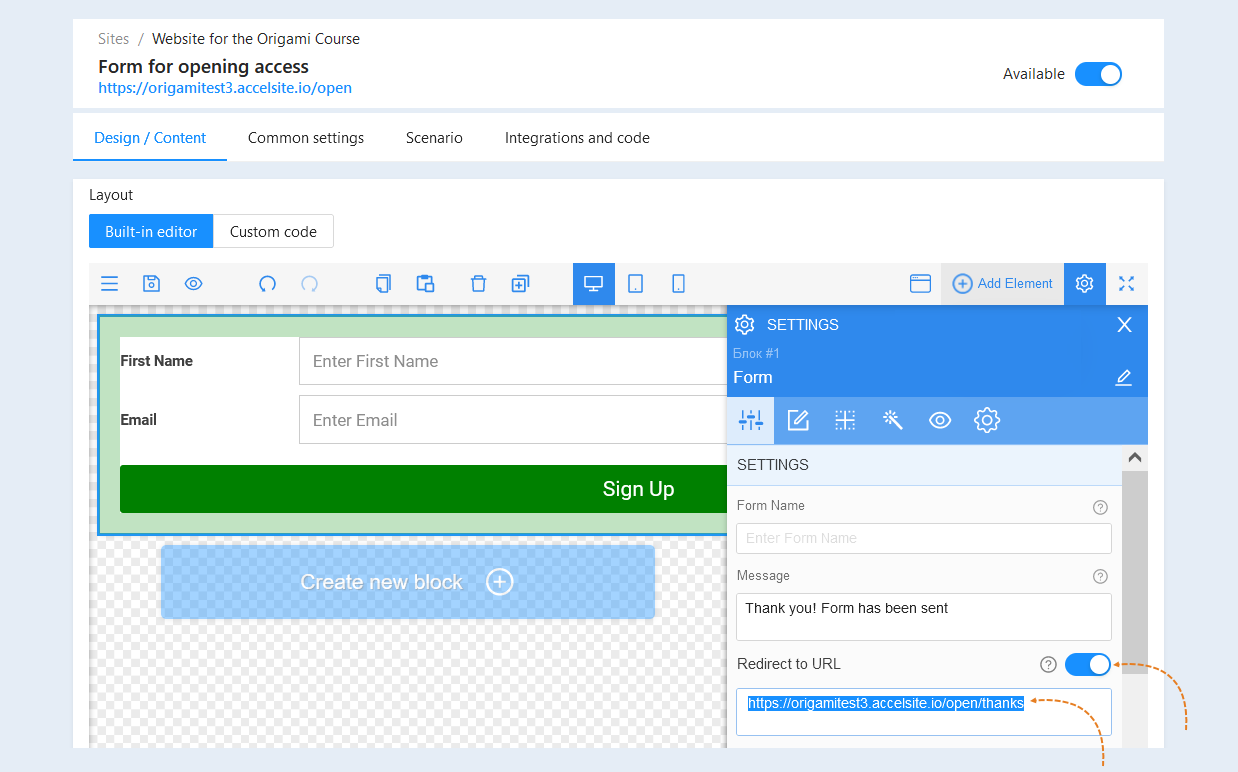
We recommend adding a link to the chatbot to the thank you page, which will appear after successfully submitting the form. To add a thank you page, move the "Redirect to URL" slider to the active position and add the address of the thank you page to the field.
Details on how to create a thank you page with a link to a chatbot are described in step №5 of this article.
Next, configure the form view. Add the necessary elements to the form: course name, course description text, image, etc. Read more about how to add site elements in the article "Elements".
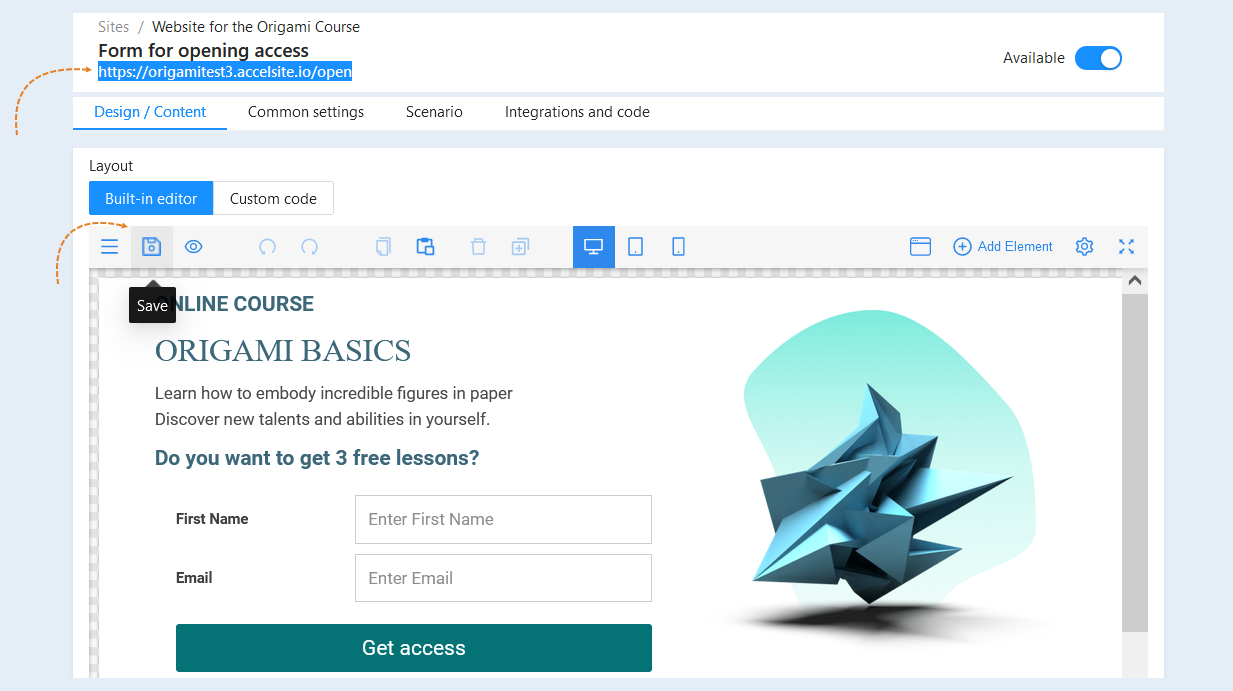
After completing the form settings, click the "Save" button.
In the upper-left corner of the page, copy the link to the form and send it to users. You can send the link manually or using any script, via a regular message or by mail.
4
Form scenario
Go to the "Scenario" tab of the site. Select the "Form Submitted" event and drag the event to the script field.
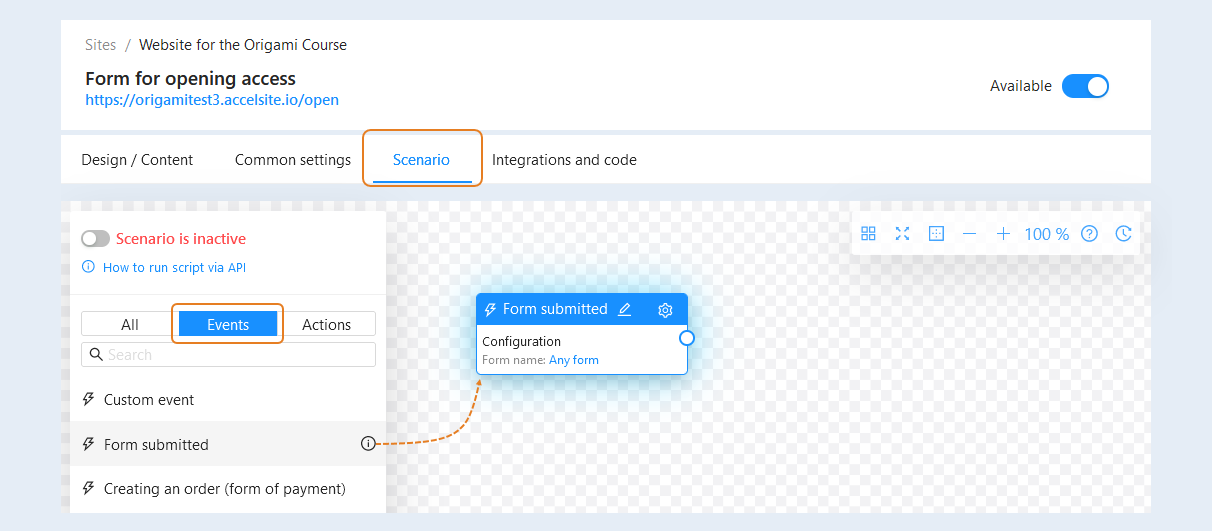
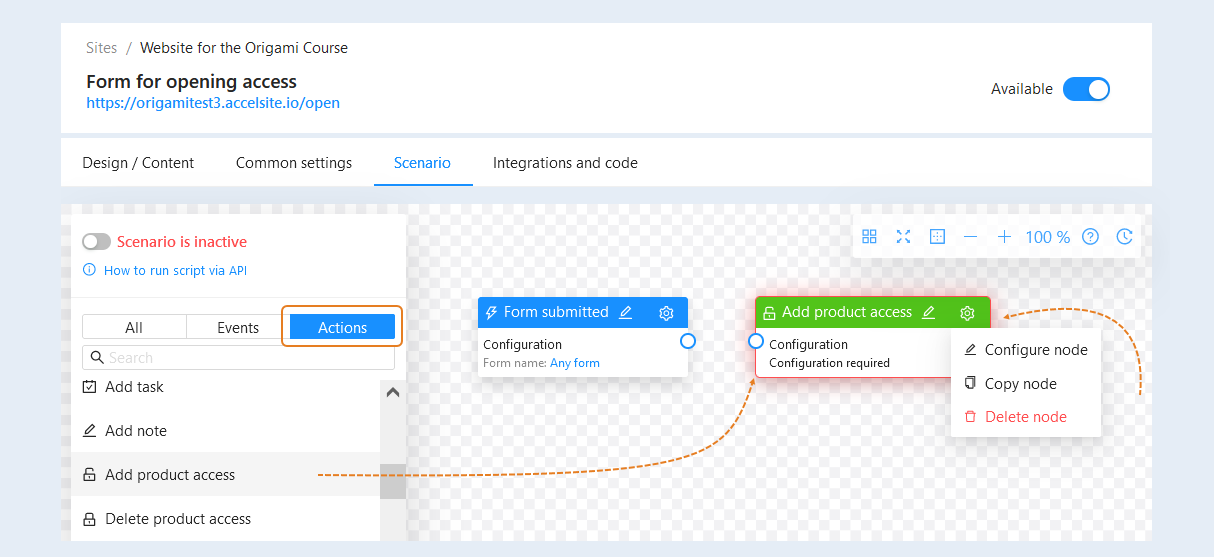
Next, open the "Actions" tab. Select the "Add Product Access" action and drag it to the script field. For the action, you need to perform settings - configuration. Click on the "Settings" button and then the "Configure Node" button.
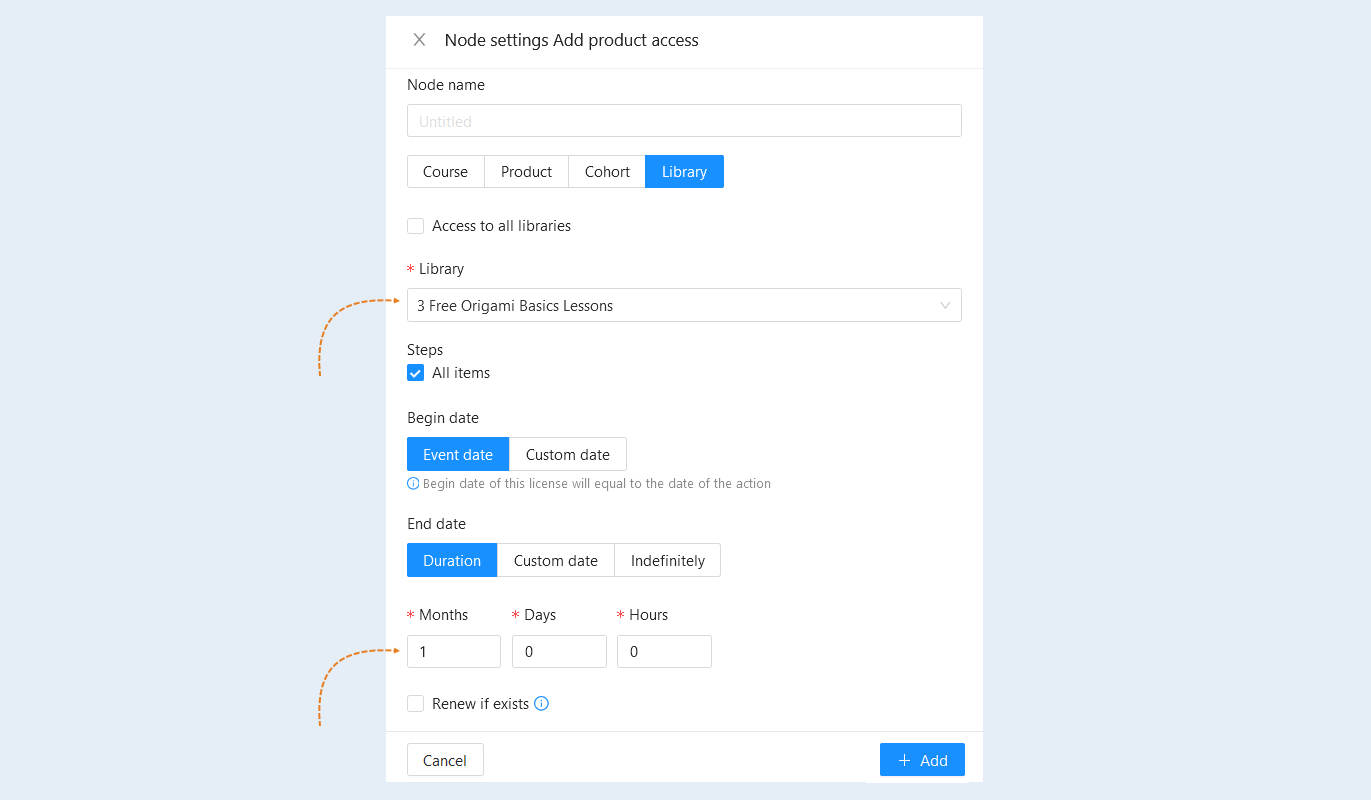
In the "Node Settings" field, specify which product you want to grant access to the users who filled out the form. Specify the period of access to the product.
After completing the settings, click the "Save" button.
Next, connect the event and the action together. Now your site scenario is ready. To activate the scenario, move the "Scenario is active" slider to the active position.
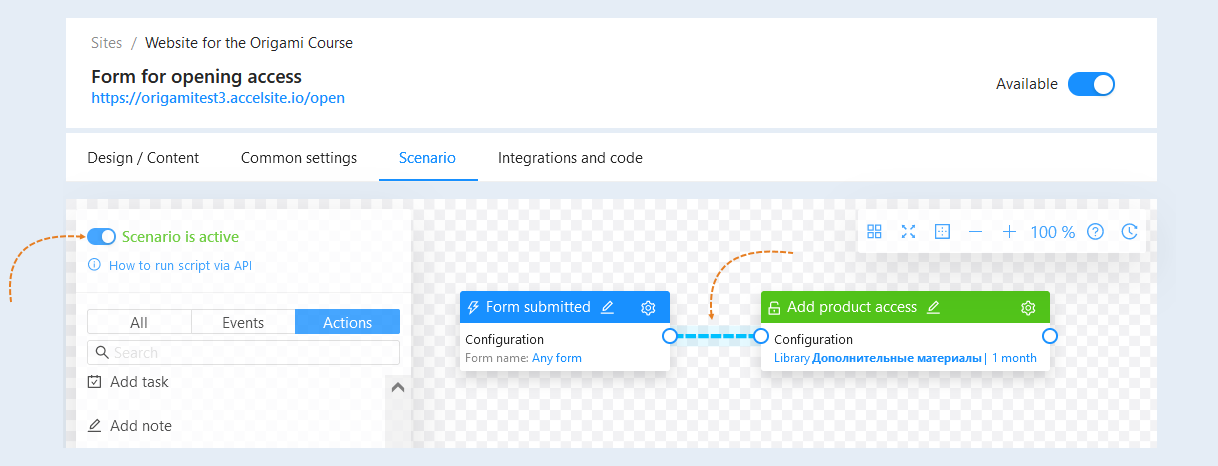
Thus, after successfully submitting the form, the user will have access to free lessons in the membership portal's personal account. And also, after submitting the form, the user will be redirected to the gratitude page with a link to the warm-up chatbot. By clicking on the link to the chatbot, the user will launch the chatbot scenario. Creating a chatbot scenario is described in step №2 of this article.
5
Creating a Thank You page
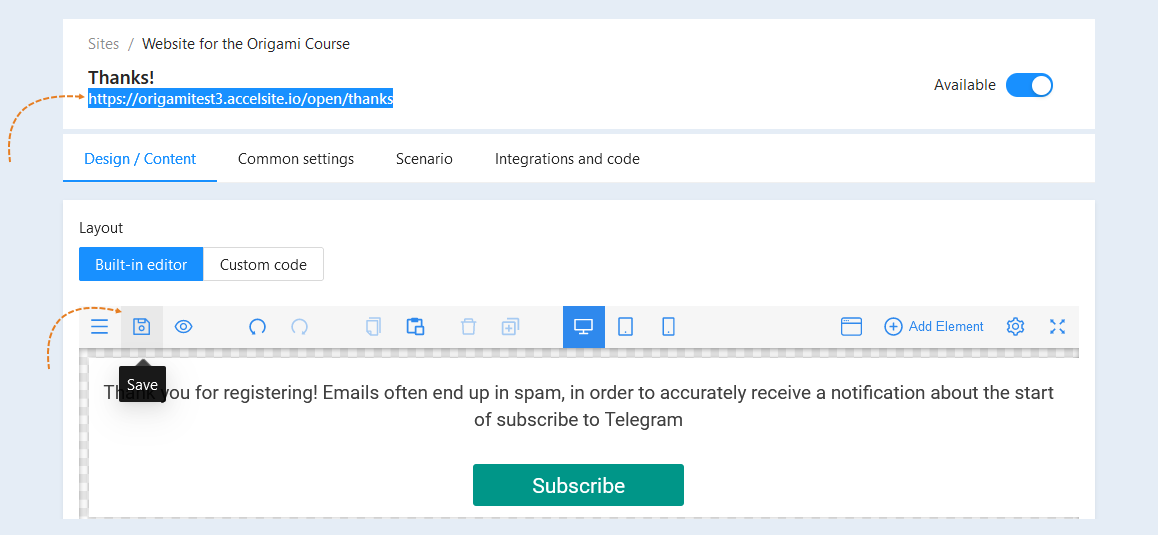
After submitting the form, the user will be shown a thank you page with a button, clicking on which the user will go to the chatbot and launch the chatbot scenario.
Go back to the "Sites" section. Create another page of the site. Click on the page name or the "Edit" button to open it.
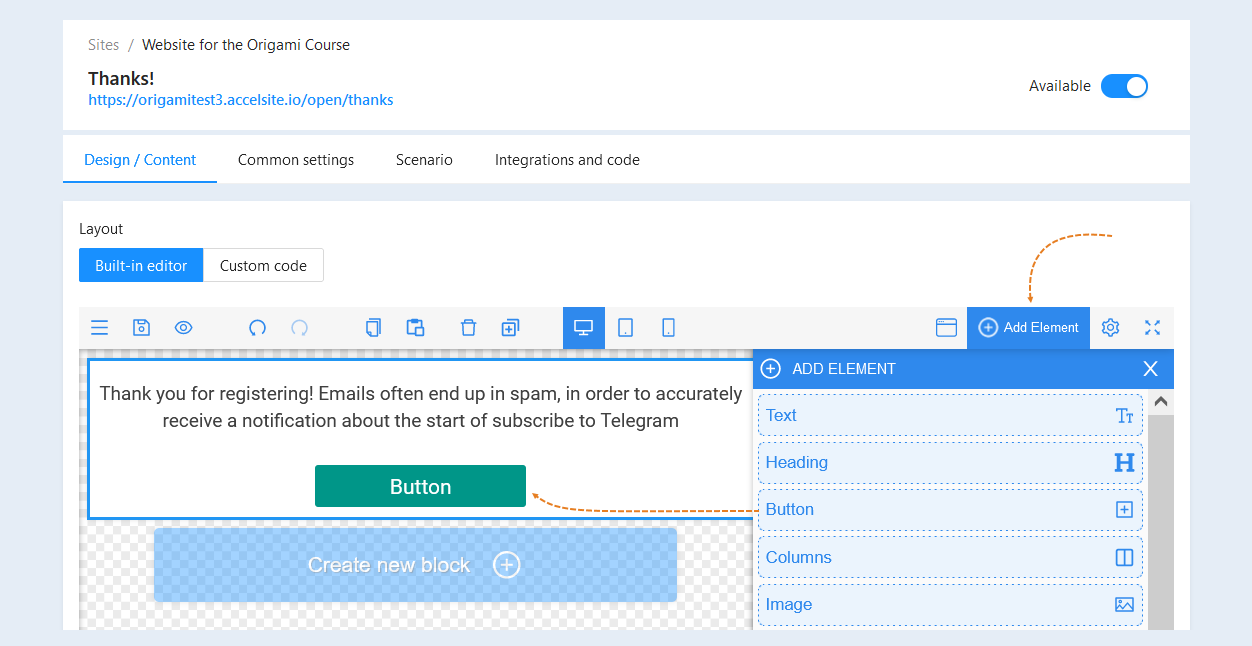
In the editor window of the gratitude page, select "Empty block" and click "Add element". In the list of items, select "Text" and "Button". Drag the elements to the page field.
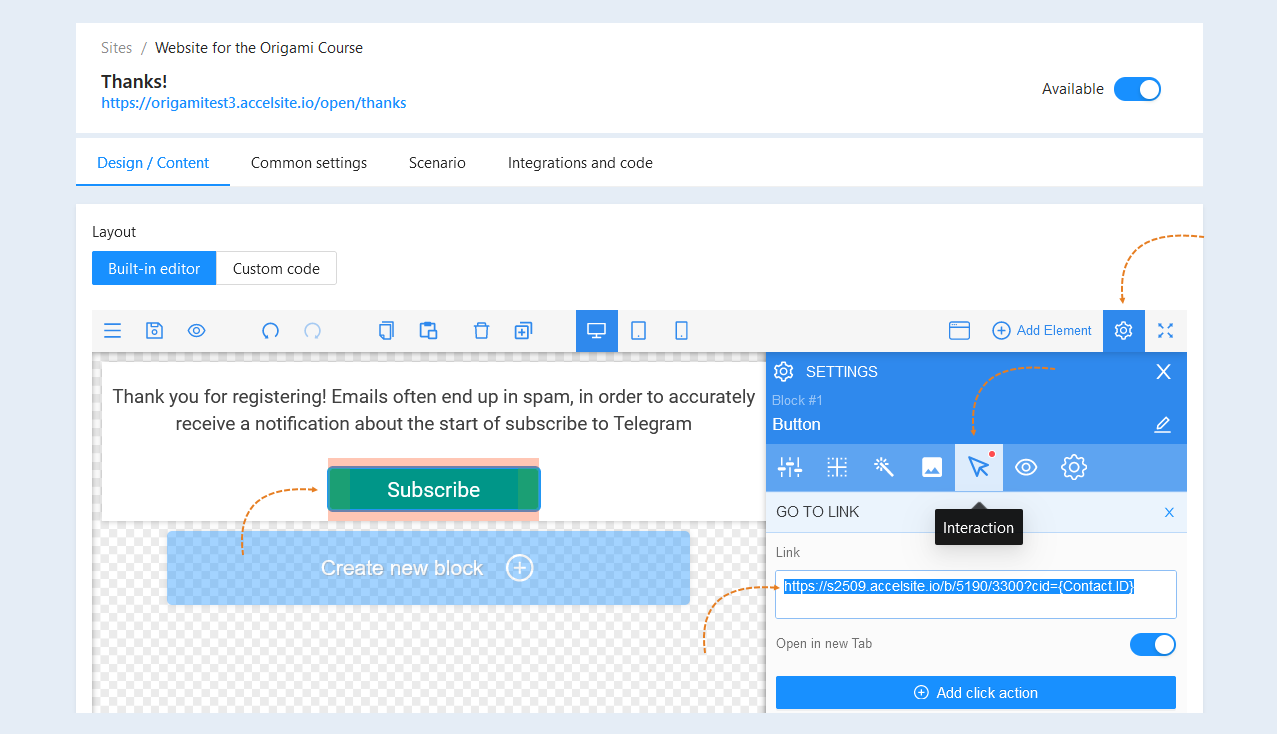
Select the entire button to open the settings for this item. The Settings toolbar opens on the right. In the settings, open the "Interaction" section, select the action by clicking "Go to link". In the "Link" field, insert the link to the chatbot copied in step №1 of this article.
Click the "Save" button and copy the link to the thank you page. A link to the gratitude page is required at step №3 of this article. Paste the link to the thank you page in the "Redirect to URL" field in the form settings.