CRM AXL is a system for collecting data from account users and for working with customer requests.
Tasks are scheduled actions with a client.
In the "CRM" - "Tasks" section, a list of tasks by clients is displayed. Tasks are manually assigned by account administrators to interact with clients.
Click on the desired section of the article to go to its description:
How to create a task
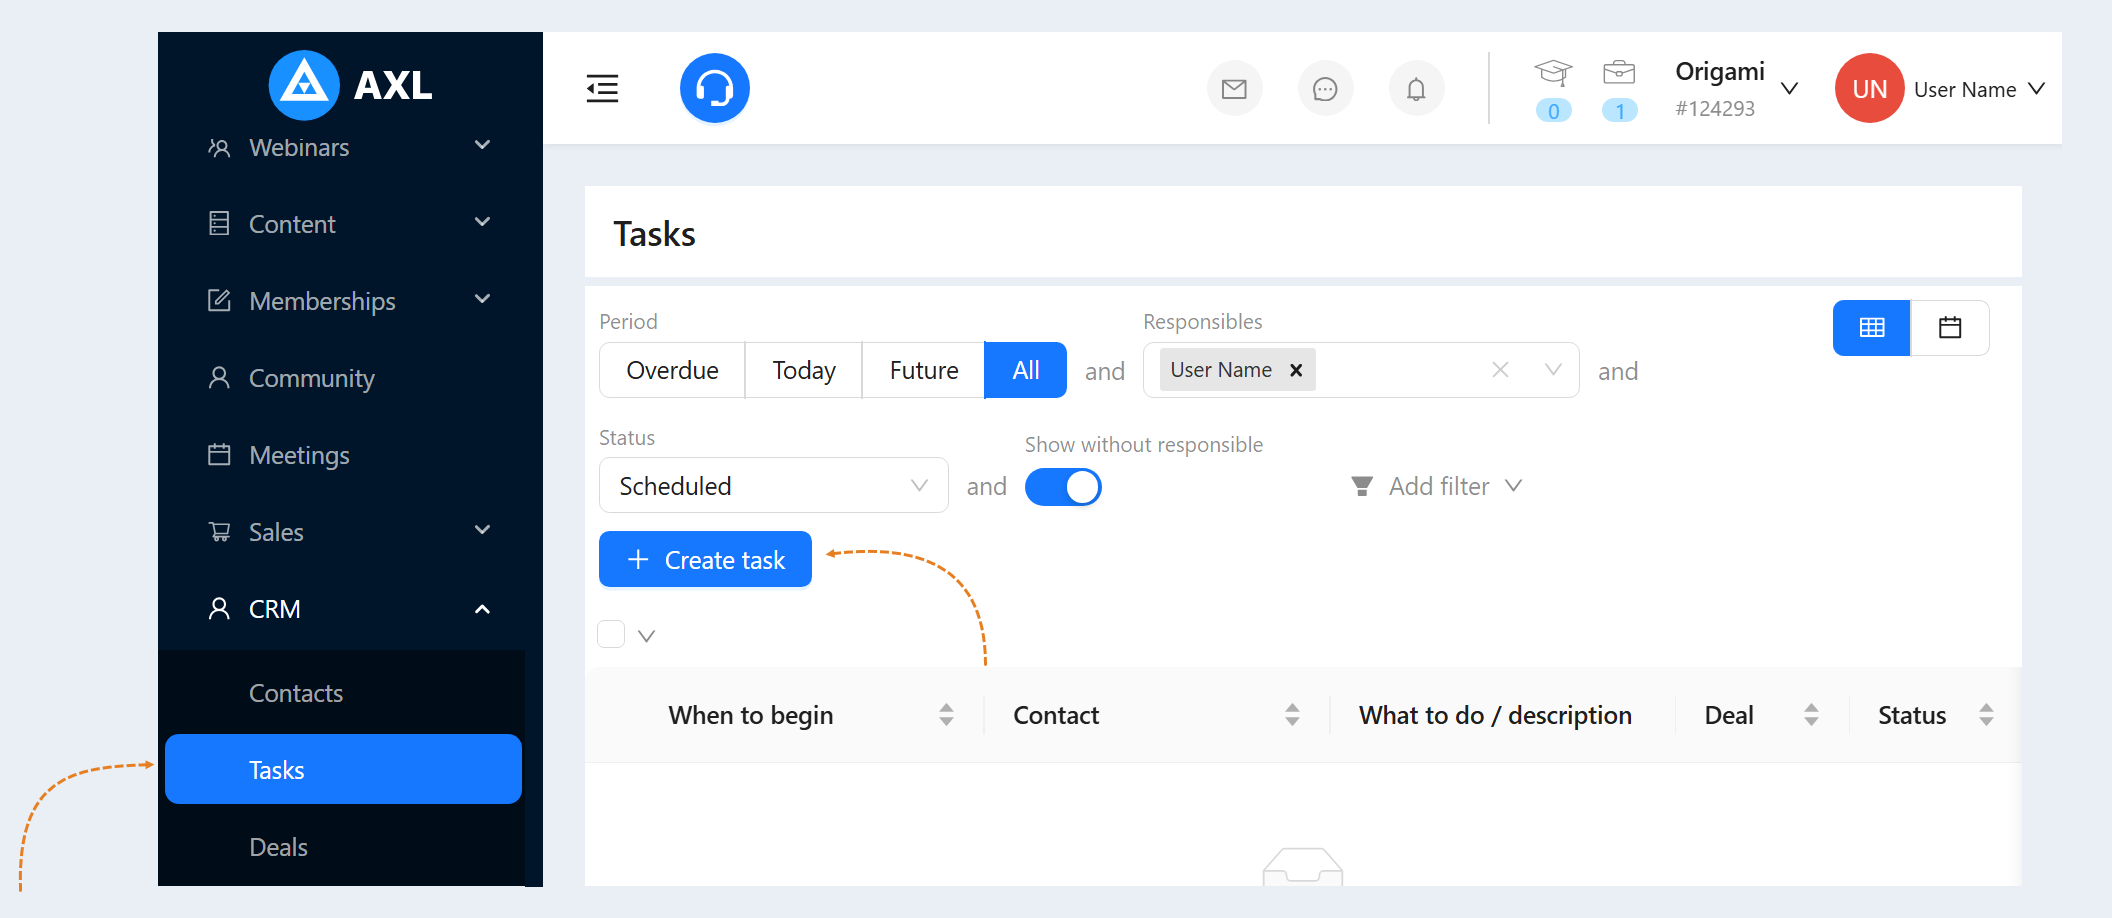
Go to the "CRM" section, the "Tasks" tab. You will see a list of tasks for all clients.
To add tasks, click on the "Create task" button in the upper right corner.
In the field that opens, fill in the fields:
- Contact. Select a customer from the list.
- What to do. Write the action to be taken with the client
- Add a detailed description. Click to add a description to the task.
Deal. The deal can be added to the task from the script.
Performer. Assign a responsible employee to complete this task.
When to begin. Set the time interval for the task. Click "Select in calendar" and use your mouse to select a period of time on the calendar, and then click Apply.
Reminder. Set a reminder period for the task: 5 minutes, 30 minutes, 1 hour before the start or do not remind.
Observer admins. Assign an administrator to monitor the execution of this task.
- Files. Attach files as needed.
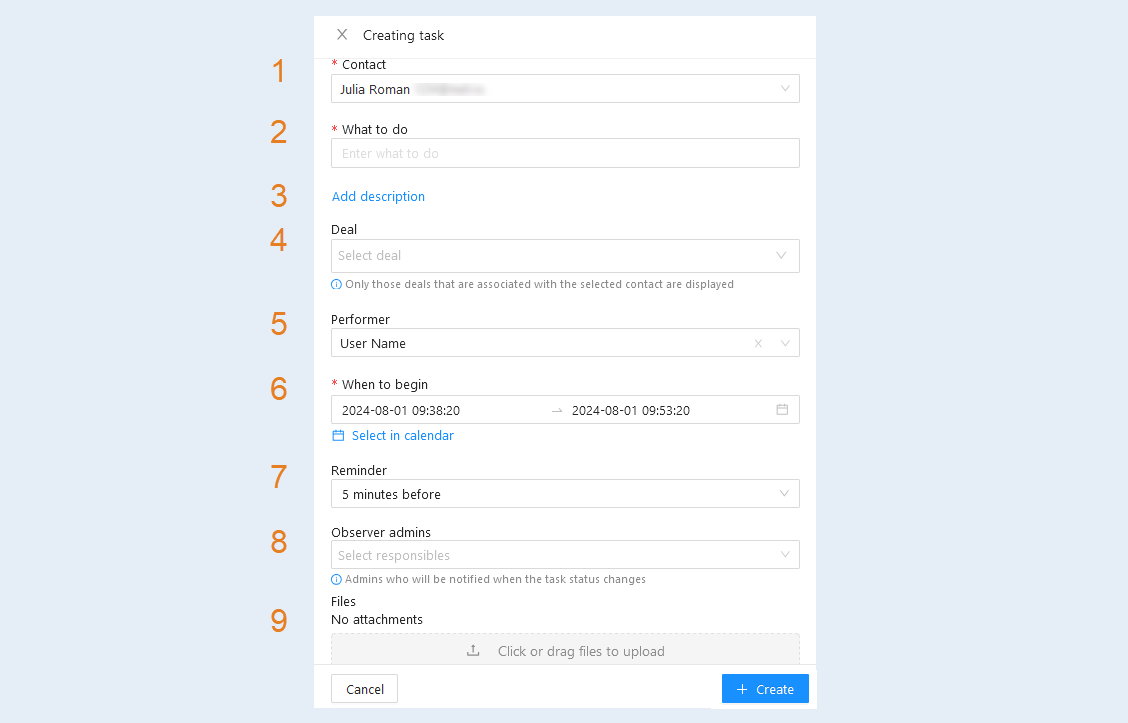
Click the Create button. The added task appears in the list of tasks.
Task management
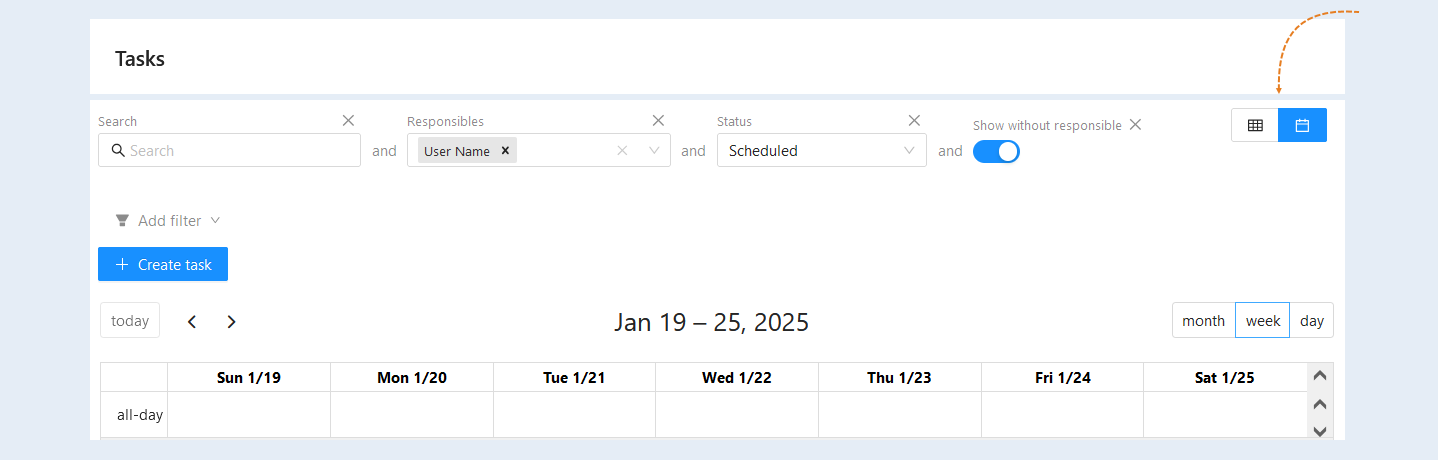
After you created tasks, they appeared in the task list. Search lines are located at the top of the page:
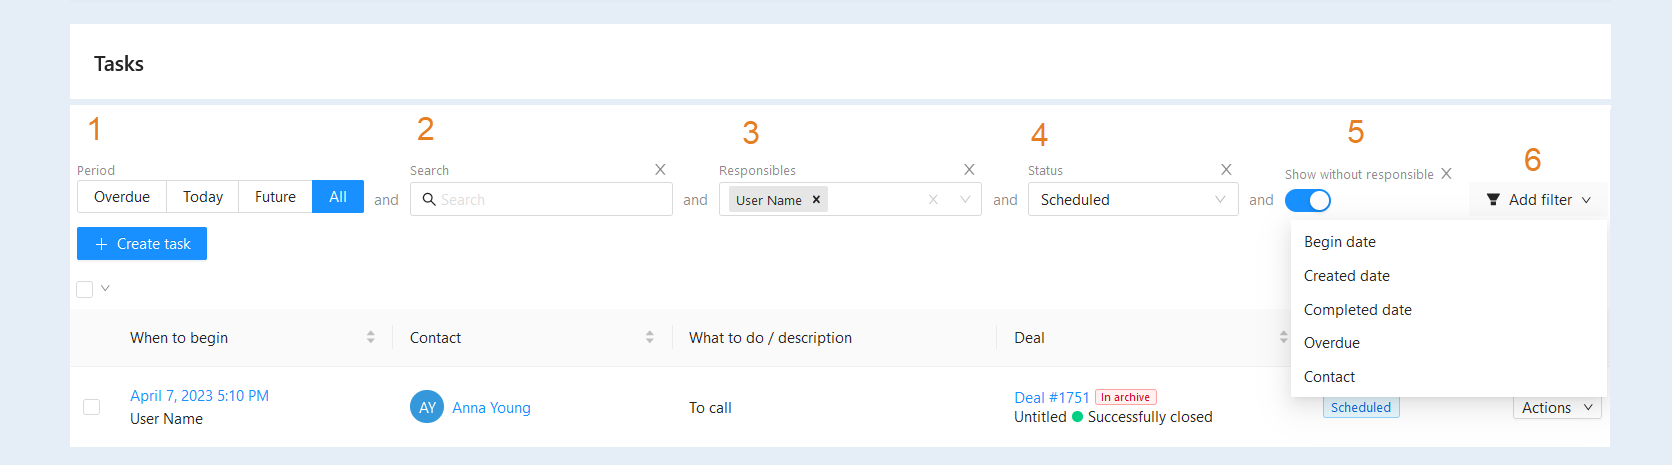
Period. Select the time period to search for tasks: overdue, tasks for today, for the future, or all.
Search. Enter a description or comments for the tasks.
- Responsible. This condition allows you to highlight tasks that are assigned to a certain responsible person or team. Select a specific employee or a group of employees, and after applying the filter, only those tasks that are assigned to the selected persons will be displayed.
Status. This condition allows you to select tasks based on their current status. This column displays the status of the task: active, completed, cannot be completed. The task list opens by default with the Scheduled filter enabled.
Show without responsible. Move the slider to the active position to sort the tasks without an assigned responsible executor.
Add filter. Click the "Add Filter" button and select a filter from the suggested ones:
- Begin date. This condition highlights tasks based on the specified start date of task execution. It only displays tasks whose start date falls within the selected period.
Created date. This condition highlights tasks that were created on specific dates. Please select a date interval.
Completed date. This condition highlights tasks that will be completed on specific dates. Please select a date interval.
Overdue. This condition highlights tasks based on their deadline. A task is considered overdue if the current date exceeds the set deadline for task completion.
Contact. This condition highlights tasks based on their association with a specific contact. Please select a contact from the available list in the filter, and the section will only display tasks that are related to the selected contact.
Extended filter. Select the advanced filter to create different combinations of conditions for selecting a task. You will see an additional window "Filtering and search terms". Here you define the conditions for creating a task list. For more information about the filtering conditions, read the article “Filtering and search terms".
The "View" buttons are available in the upper right part of the page. You can change the section's appearance and set it as a table or calendar. This is a useful feature that helps you adapt the interface to your specific needs and preferences.
- Table. Tasks are displayed in a list, where each row represents a separate task, and the columns contain information. It is convenient for quick review and comparison of tasks, as well as for working with a large amount of data.
Calendar. Tasks are displayed as a calendar, where you can see their distribution by day, week, or month. This is useful for planning and time management when tasks are tied to specific dates.
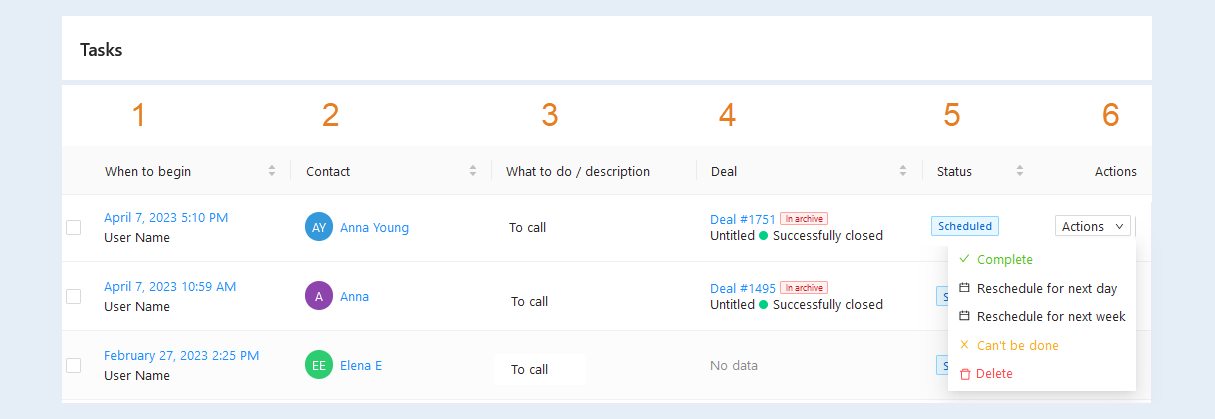
Below is a complete list of tasks:
When to begin. This column indicates the date for the task and the name of the responsible administrator who will perform or has already completed the task.
Contact. Here you see the client's name. Click on the customer's name to open the contact card. A separate tab will open.
What to do/description. This column indicates the task itself, what the administrator needs to do with the client.
Deal. The related transaction and the stage of the transaction are indicated. Click on the transaction number to open the transaction details.
Status. This column displays the status of the task: active, completed, cannot be completed.
Actions. This column marks the completion of the task: completed, cannot be completed or deleted. The task can be removed from the list. You can also move the task to the next day or the next week.
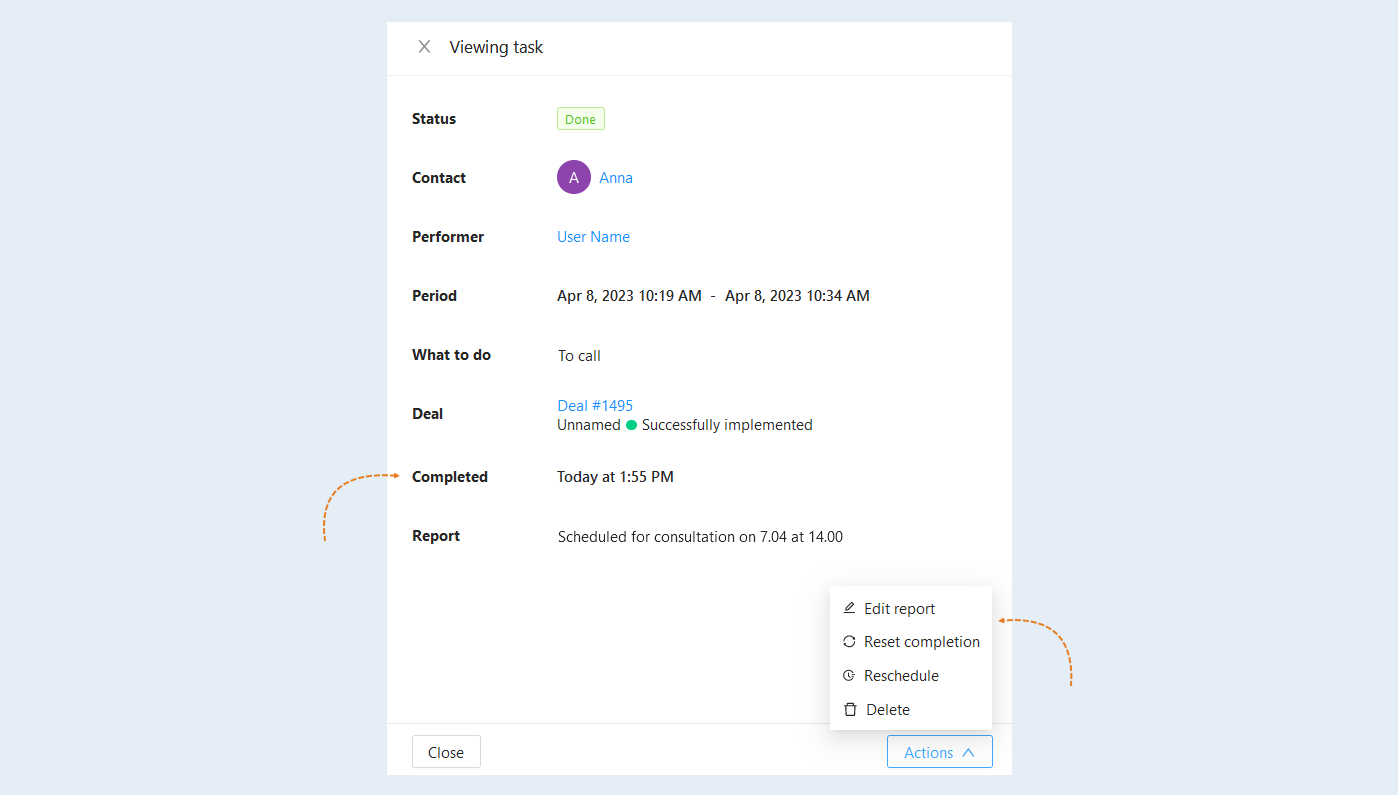
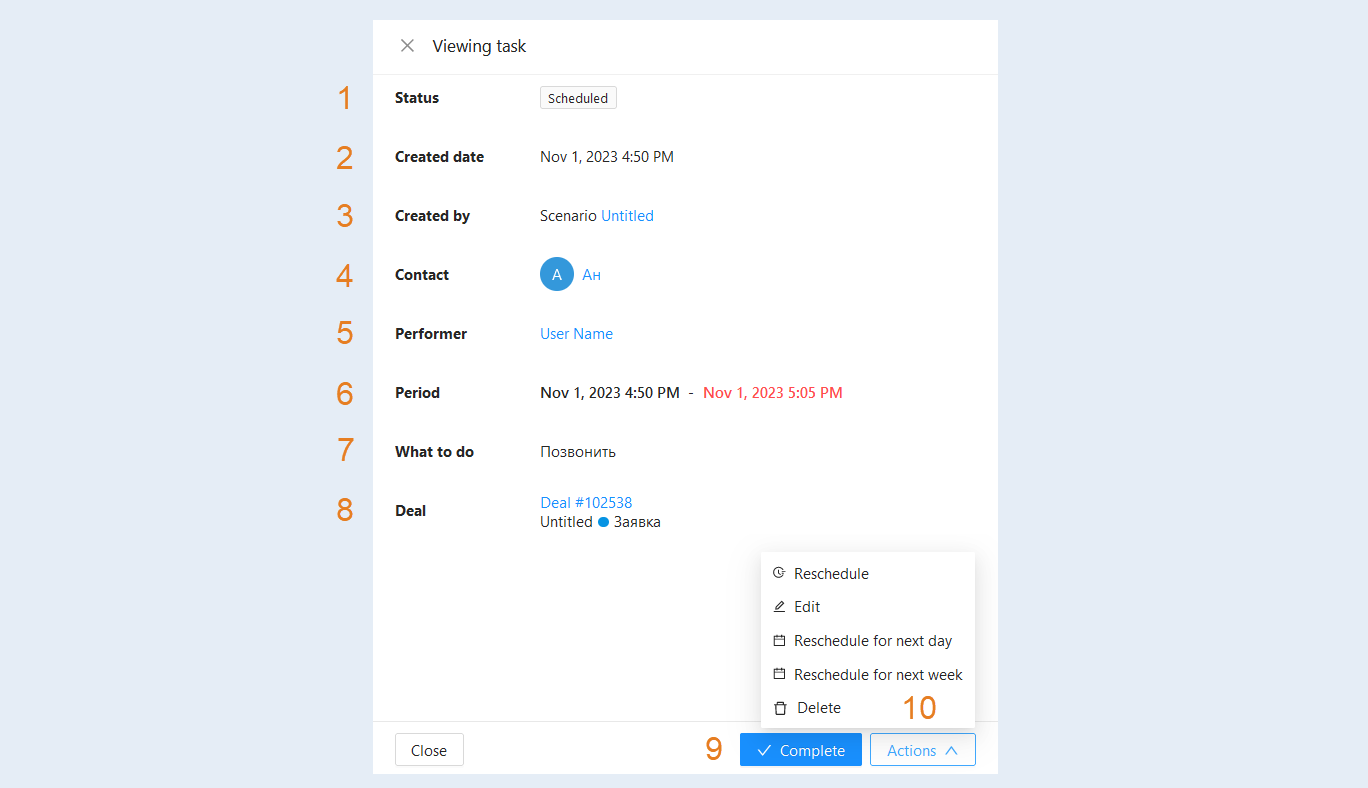
Click on the task name: When to begin. In the window that opens, you can view information on this task, as well as edit it.
- Status. Active, completed, or cannot be completed.
Created date. The date and time of the task creation are specified.
Created by. The employee who created the task is specified.
- Contact. Client name. If you click on the client's name, a separate tab with the client's contact information will open.
Performer. The name of the responsible administrator. If you click on the name, the admin profile will open.
- Period. The time frame to complete the task.
- What to do. Task name.
Deal. The number and stage of the deal are specified.
Complete button. Click to complete the task. If the task has already been completed, this button will not appear.
- Action button. Select the action to be performed from the list provided:
Reschedule. Click to create another task based on the sample of this task.
Edit. Click to make changes to this task.
Reschedule to the next day. Click to reschedule the task to the next day.
Reschedule for next week. Click to reschedule the task for the next week.
Delete. Click to delete the task.
When the task is completed, the line "Completed" will appear in this window, in which the date and time of completion of the task will be indicated, and the line "Report", in which the performer's comment will be indicated. The "Actions" button will have a different set of actions: edit the report, reset completion, repeat (task), delete.