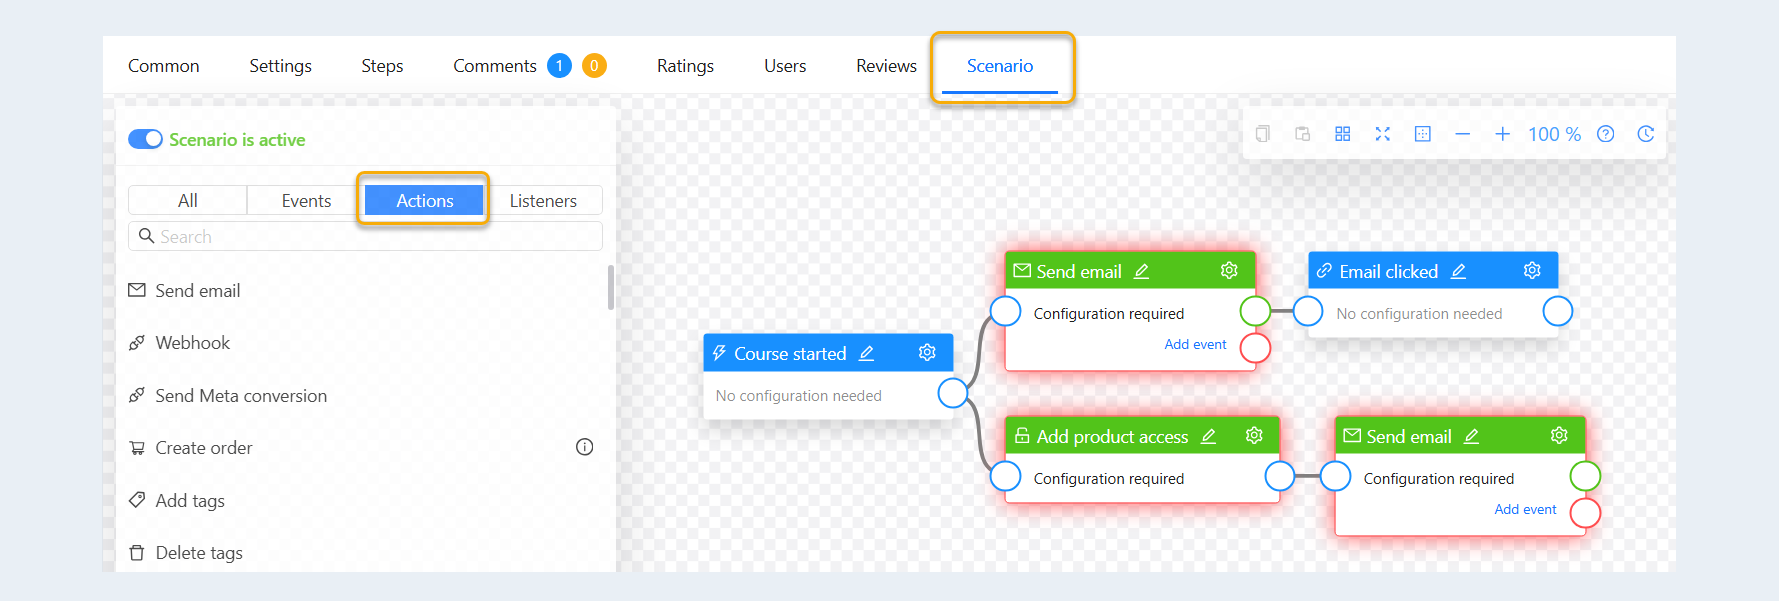
Scenario is a sequence of events and actions within your account on the AXL platform. Essentially, a scenario is a sequence of interactions between the seller (which is you) and the visitors of your websites, through automated processes (such as sending emails).
Actions in the scenario are a sequence of steps (actions) in response to an event initiated by the user when visiting your web pages.
When creating a scenario, you first select an event. Then you need to set the response actions of the scenario: send an email, add a responsible party, etc. By connecting events and actions together, you define the sequence of actions in the scenario.
You can set up a chain of actions that will accompany the customer after purchasing a course, sending them information and reminding them of their training. You can also offer them to purchase new products, inform them about news in your account, etc.
Configuration is the setting of conditions (characteristics) for a step in the scenario.
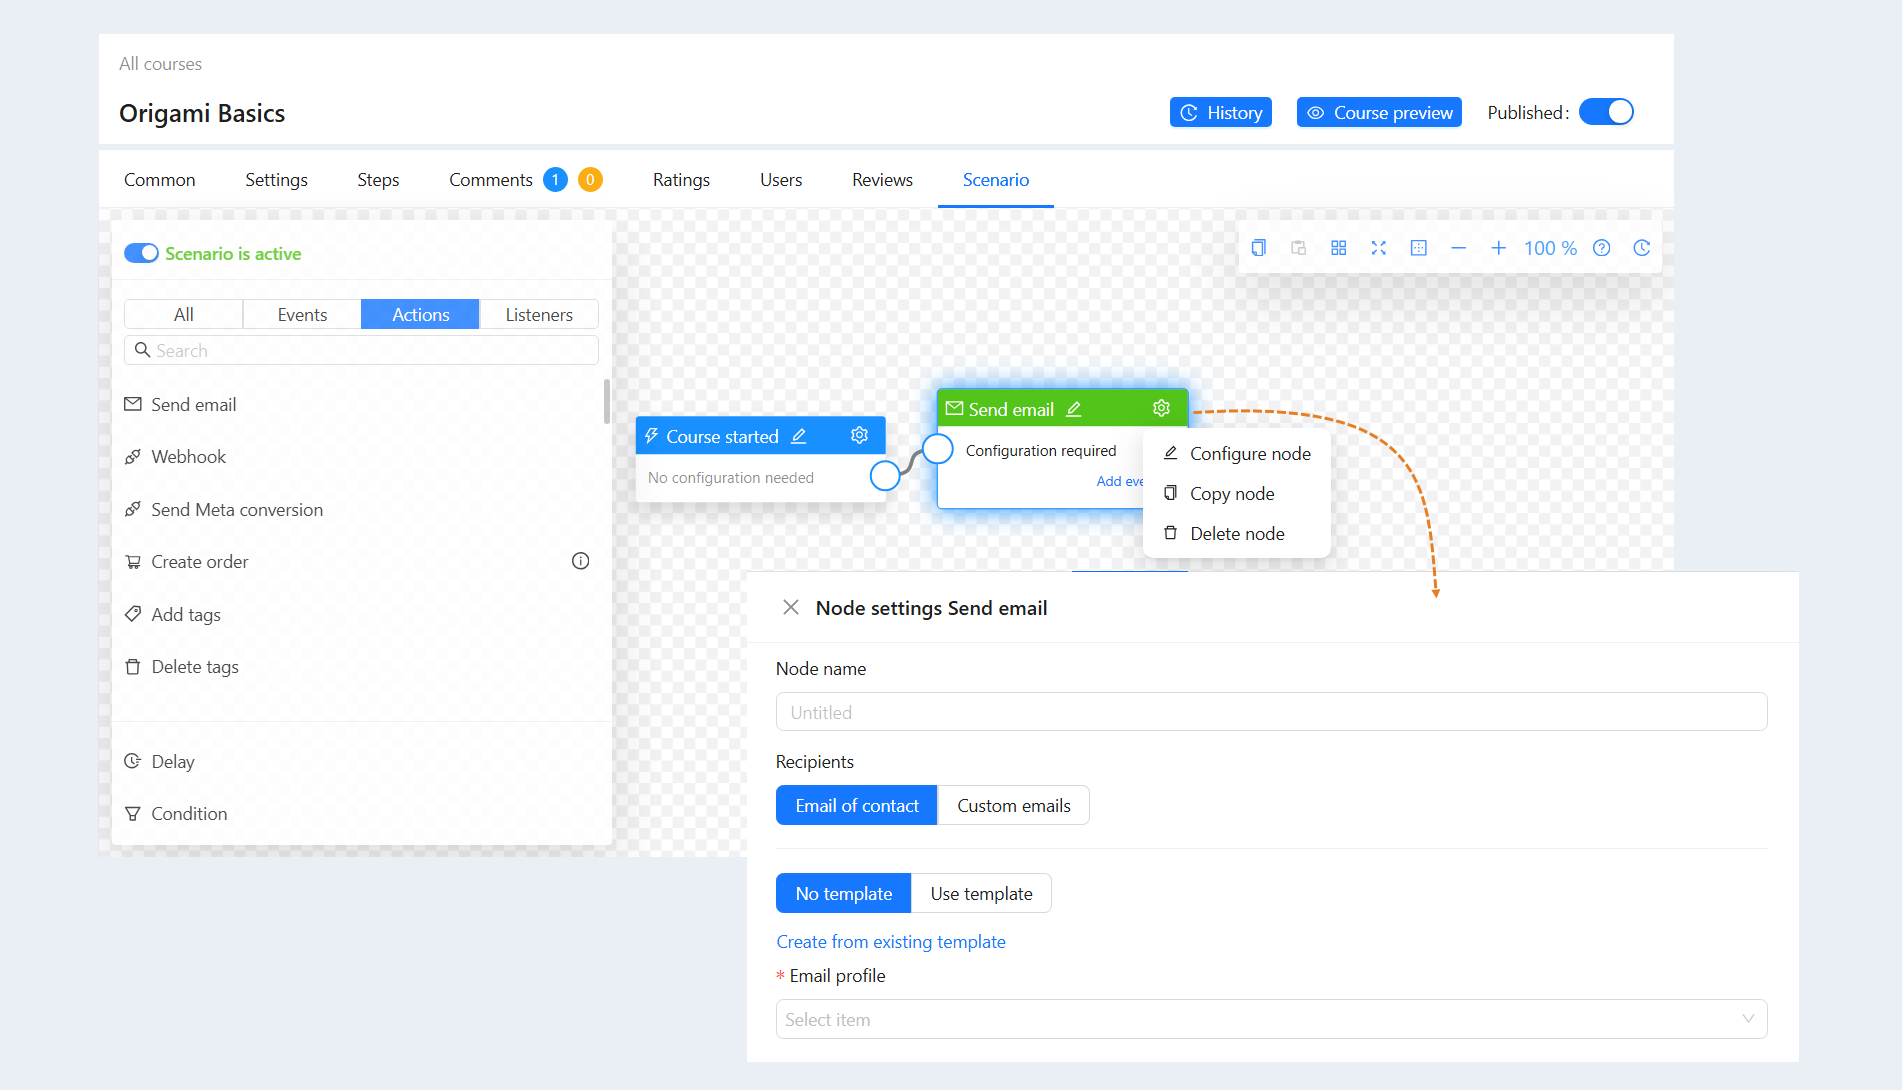
When you add an action card to the scenario, you need to configure the settings for that action. Each action has unique settings. Click the "configure node" button and fill in the fields in the opened window.
Click on the relevant section to go to its description. The article presents the settings for the following scenario actions:
Node settings "Order. Add payment"
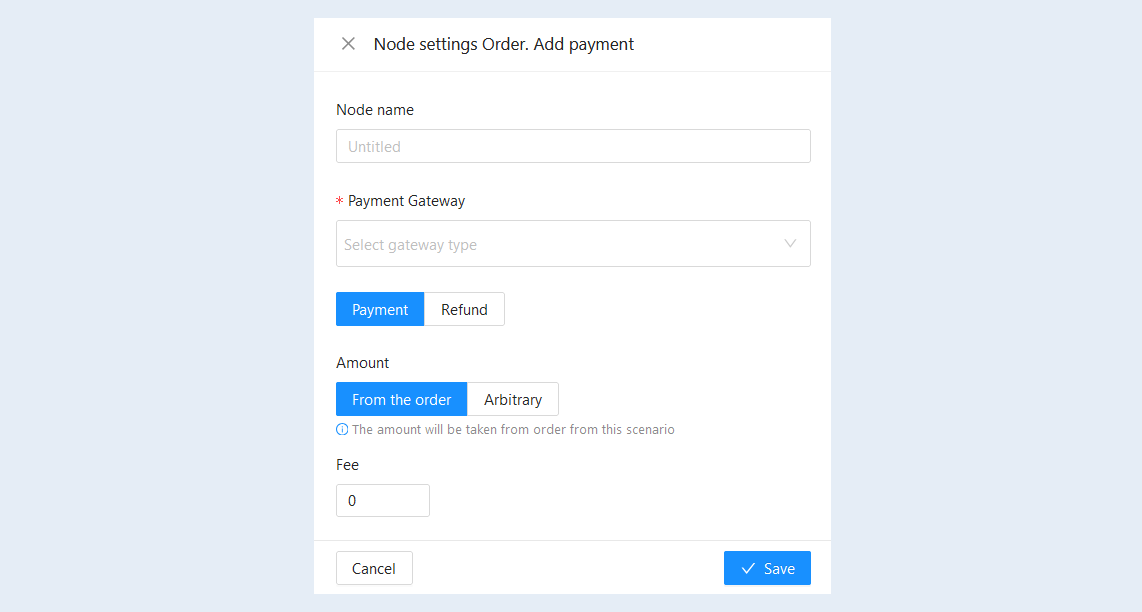
This action allows you to record the receipt of funds from a user for specific services, courses, or materials. With this action, you can confirm that the user has made a payment. In the window that opens for the node settings, fill in the fields:
- Node Name. Specify the node's name; you can name nodes in the scenario at your discretion.
Payment Gateway. Choose a payment system from the provided list. For information on payment integration settings, refer to the article "Payment Settings" .
Transaction Type. Select the type of transaction: Payment or Refund.
Amount. Specify the payment or refund amount.
- From the order. The amount will be taken from the order according to this scenario.
Arbitrary. You can set any arbitrary amount.
- Click "Use Value" and specify the amount in the field below. The account’s currency is used by default. You can change the account's currency in the "Account Settings" section.
Click "Use Variable" and specify the variables in the field below. You can use data from the scenario, for example: #Scenario.Data(points)#. For more information on variables, refer to the article "Variables in the Scenario".
- Click "Use Value" and specify the amount in the field below. The account’s currency is used by default. You can change the account's currency in the "Account Settings" section.
Commission. If necessary, specify the commission amount.
Click the "Save" button.
Node settings "Change order"
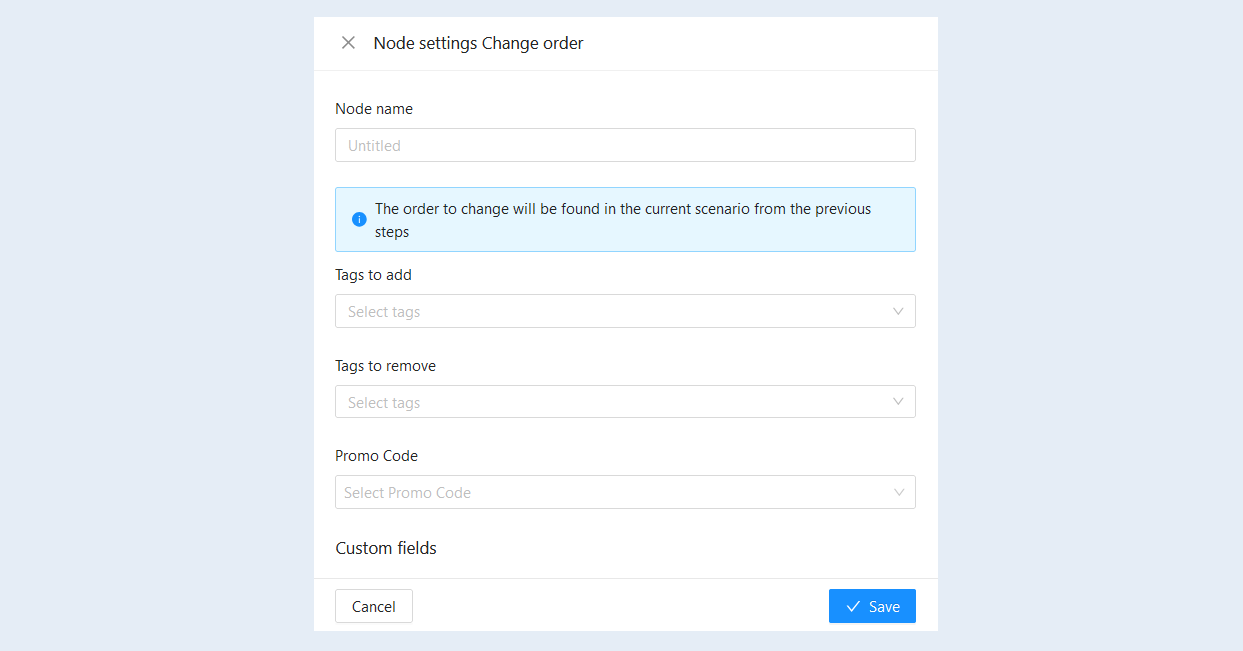
This action is used to modify the current user's order during the interaction process with them. This action allows you to adapt the order according to the changing needs of the user or conditions that may arise throughout the scenario. The order to be modified will be found in the current scenario from previous steps. In the window that opens for the node settings, fill in the fields:
- Node Name. Specify the node's name; you can name nodes in the scenario at your discretion.
Tags to add. You can modify the tags that indicate the status of the order or its characteristics. This can help with further analysis or order management. Select from the list the tags you want to add to the modified order. Click "Manage Tags" to add new tags to the list.
Tags to remove. Select from the list the tags you want to remove from the current order. Click "Manage Tags" to add new tags to the list.
Promo Code. Choose from the list a promo code that will be added to the order. For more information on creating promo codes, refer to the article "Promo Code".
Custom Fields.
Click the "Save" button.
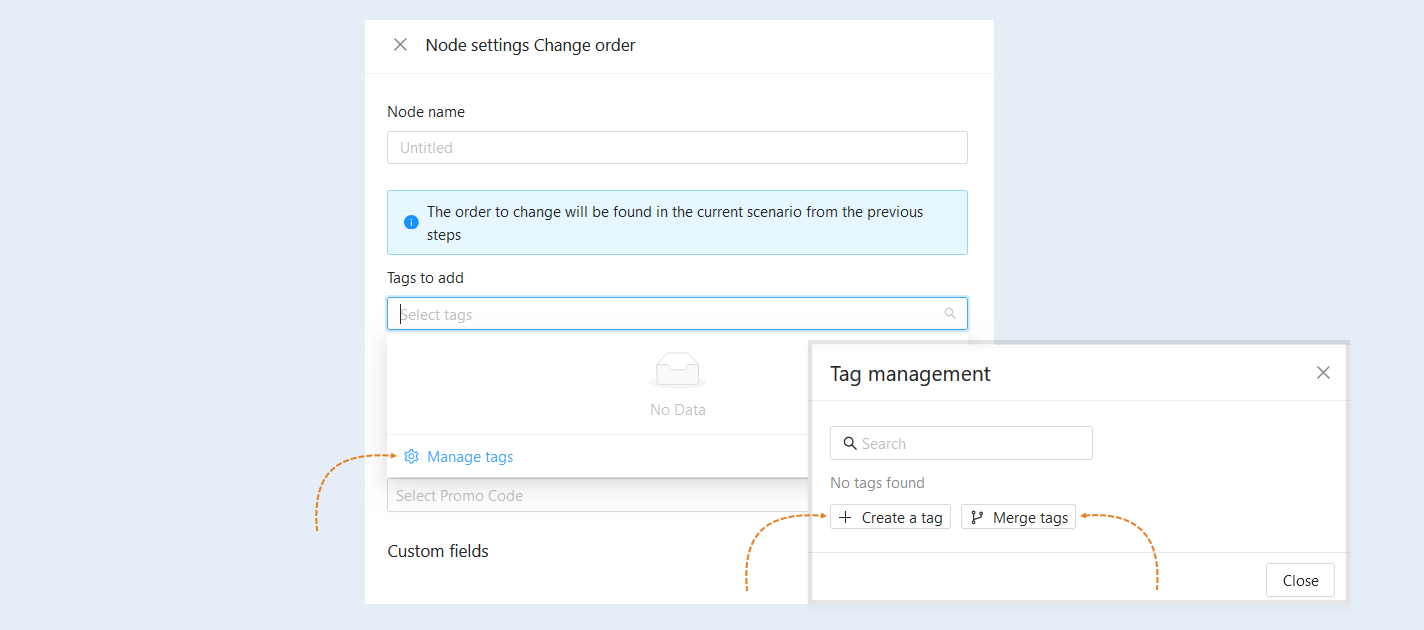
Click "Manage Tags" to add new tags to the list.
In the window that opens, click "Create Tag" and add a new tag by specifying its name and selecting a color for visual highlighting.
The "Merge Tags" action allows you to combine two tags by selecting the source tag and the tag that will be added to it. All data associated with the source tag will be transferred to the new tag. If the system has accumulated many similar or duplicate tags, they can be merged to avoid confusion and simplify management. Please note that this action is irreversible. The tag you choose to merge will be deleted and replaced with the source tag everywhere it is attached.
At the top of the window, you will find a search bar—use it to quickly find the desired tag.
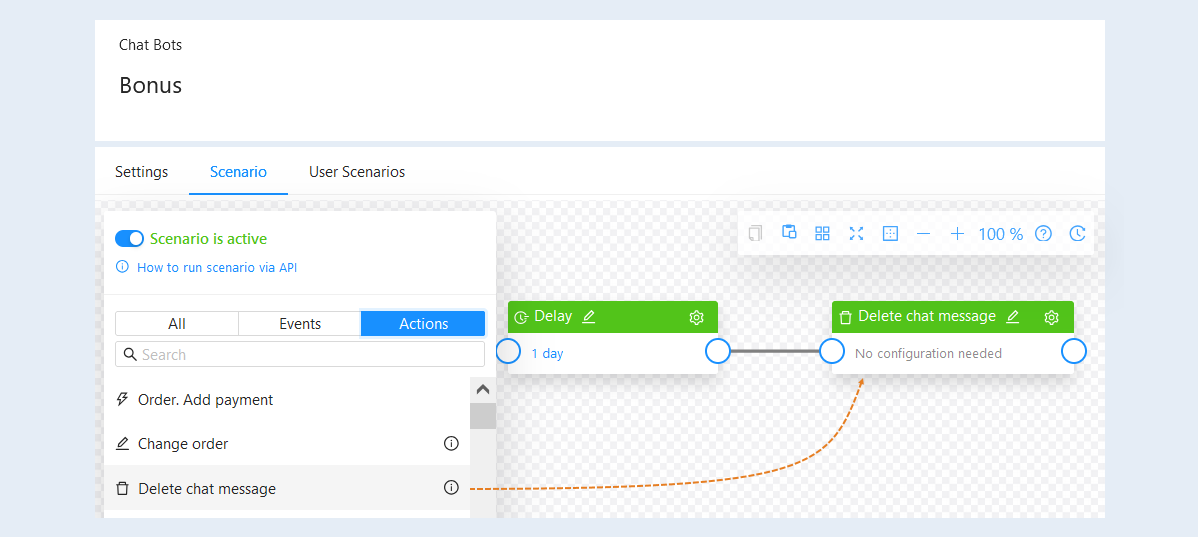
Node settings "Delete chat message"
This action will delete the previous chat message in the scenario chain if supported by the messaging channel used (e.g., WhatsApp, Telegram, etc.). This can be useful for correcting errors, removing inappropriate or outdated information.
No additional settings (configuration) are required.
Node settings "Send Email"
This action sends an email to a registered contact at their specified address. For the email to be sent, the user must have provided their email address in a form field. If the user did not provide their email or provided an incorrect address, the email will not be sent or delivered.
Example scenario with email sending: The system automatically sends a welcome email with information about the platform's capabilities after a user successfully registers on the platform. A few days after registration, the system sends an email offering a brief introductory course for beginners. If the user completes the introductory course, the system sends a congratulatory email expressing gratitude and offering more advanced courses.
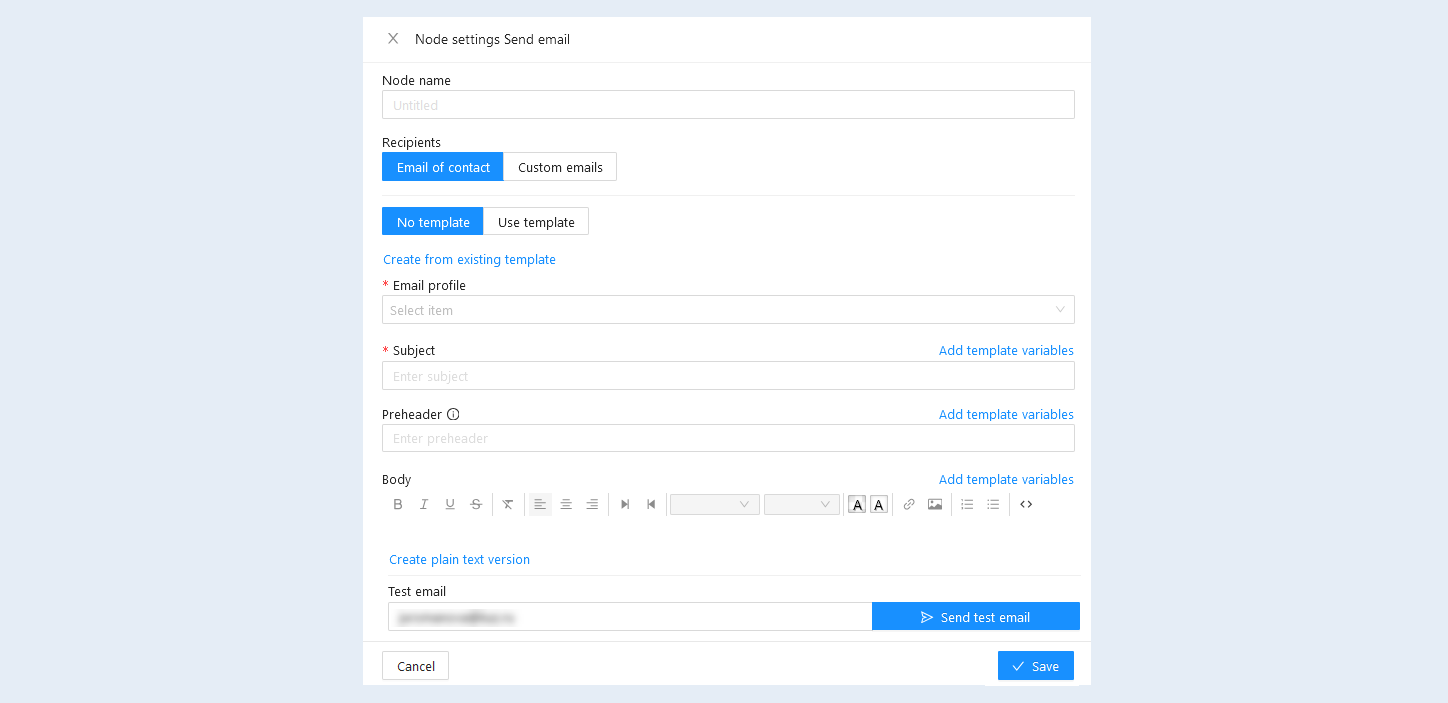
In the opened node settings window, fill in the fields:
Name node. Specify the name of the node, you can name the nodes in the script as you wish.
Recipients. Select the recipient of this action. Contact's e-mail - the email will be sent to the user (contact) who left an e-mail (registered on the website/course). Manual list - the letter will be sent to the e-mail you specified.
Template. Choose: "No template" to create a new email or "Use template" to use an existing template.
The "Create from an existing template" button. Click to create an email based on an existing template.
Email profile. Select the tool from the list with which the email will be sent. It can be a built-in or integrated tool. Read more in the article "Mail Settings".
Name. Enter the name of the letter.
Subject. Write the subject of the letter.
Preheder. A fragment of text that is displayed in the mailbox immediately after the sender's name and the subject of the message.
Body. Write the text of the letter.
The "Create Text version" button. The text version of the letter is necessary for better delivery. If you don't create it, it will be created automatically.
Test email. Specify an Email and send a test email to your email.
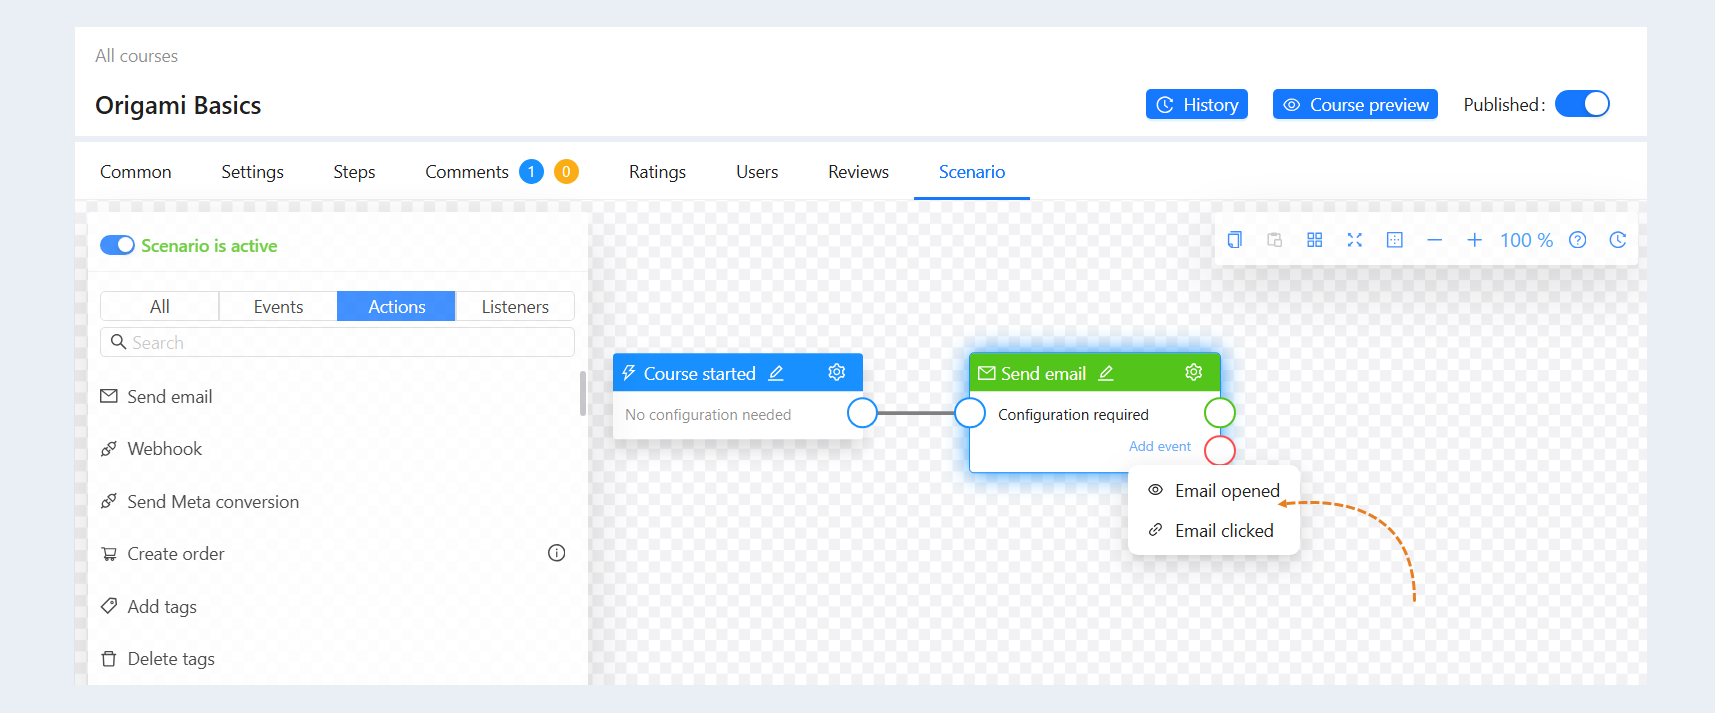
For this action, you can set up an additional event: email opened and email clicked. Click the “Add Event" button and select the event.
Template variables. In the configuration settings, you can add template variables in the subject, subtitle and text of the letter.
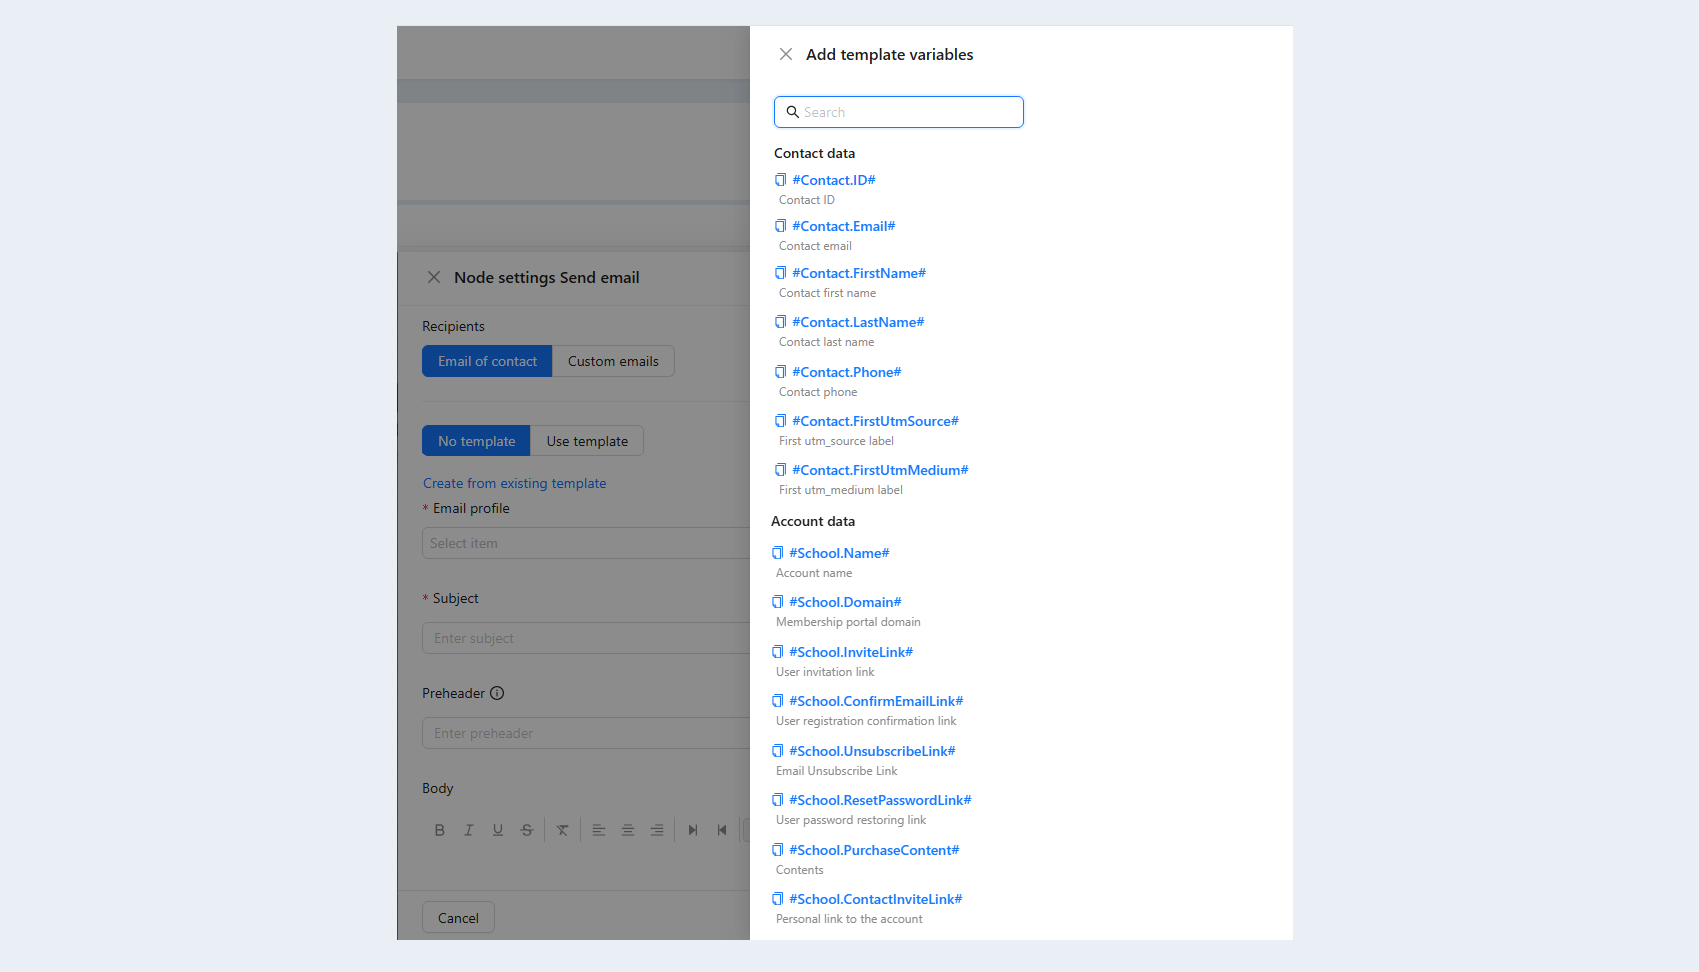
A template variable is a value to be automatically replaced with the data you selected. This can be the contact's name, email, account name, order number, etc. Variables will automatically replace the data in the email. Specify the variable “Contact first name" and when sending an email, this variable is replaced with the recipient's name.
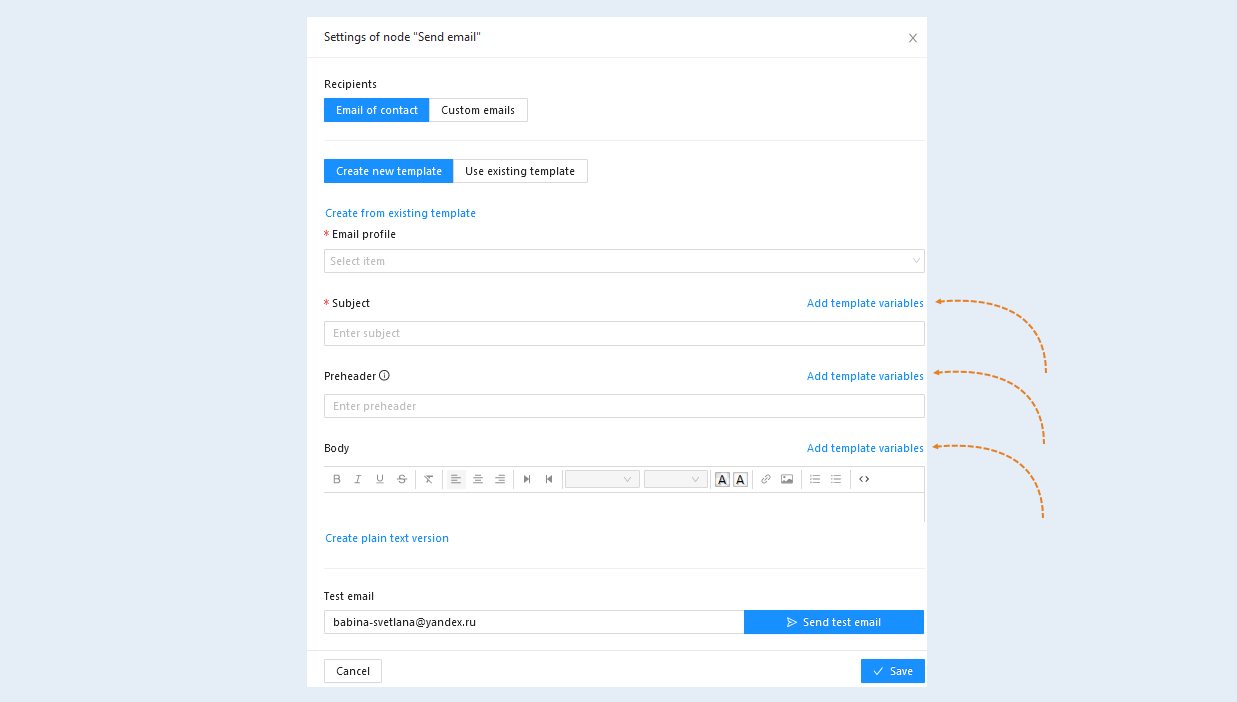
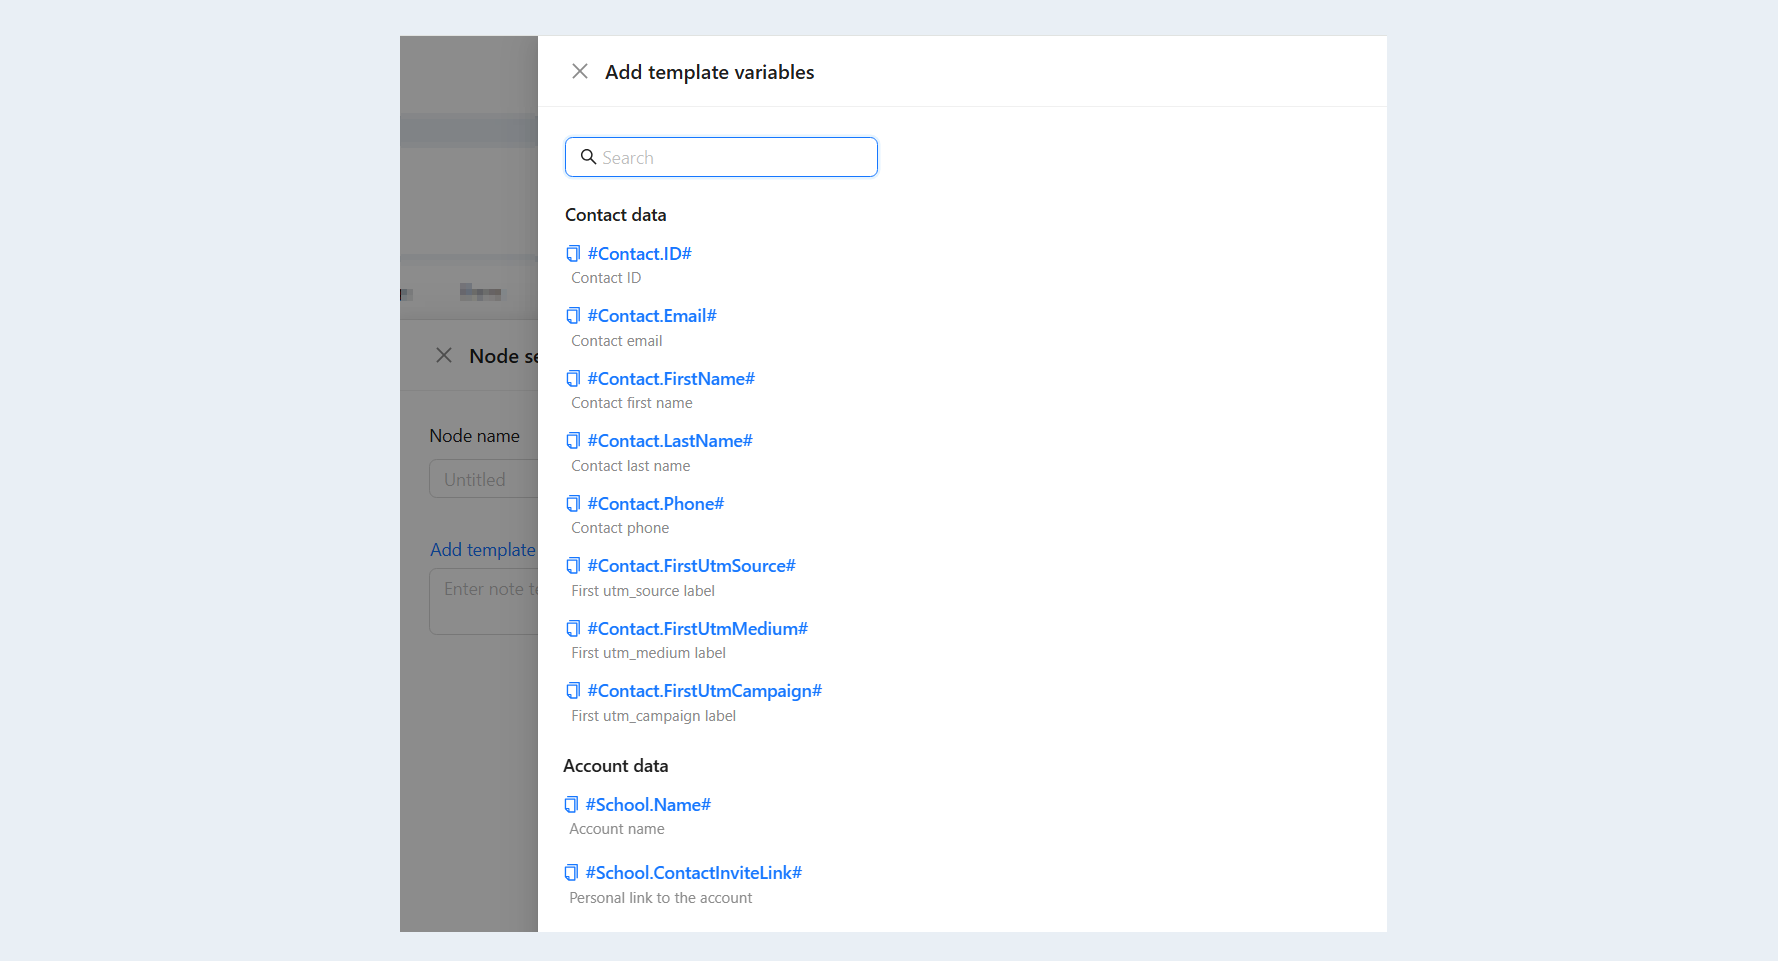
Click the "Add template variables" button next to the corresponding section. A list of variables will open on the right. Select the necessary variables from the list.
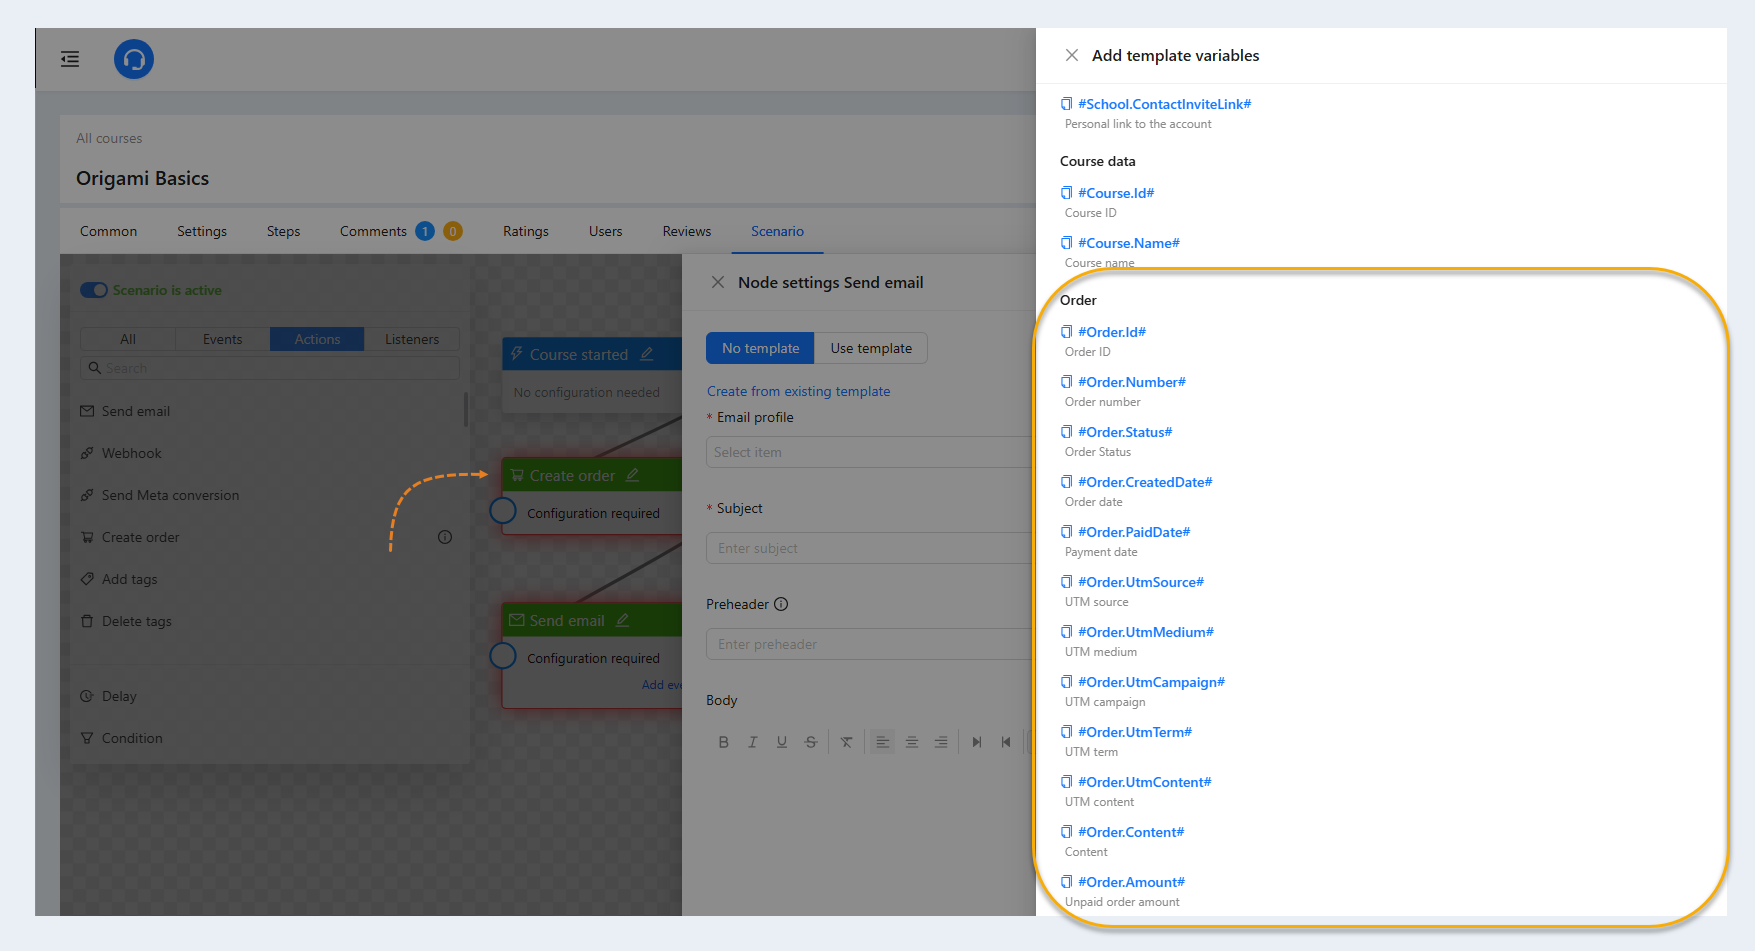
If the "Create order" action was added in the scenario at the previous step, then data about the user's order will appear in the list of template variables.
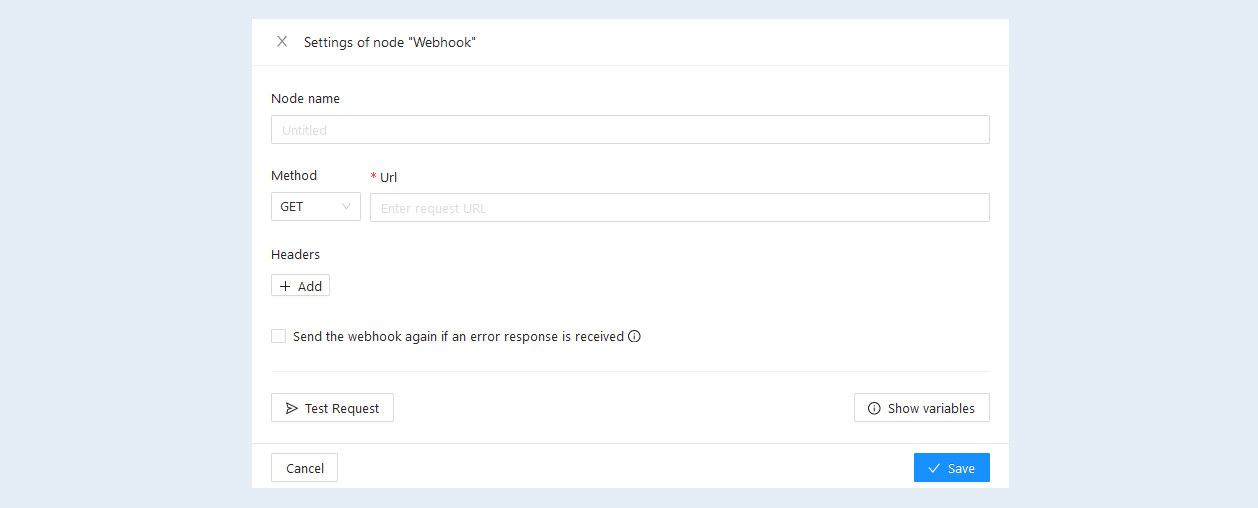
Node settings "Webhook"
A webhook is a mechanism that allows the platform to send automatic HTTP requests when certain events or actions occur. It is used to transfer data or notifications from one application to another based on specific rules. Webhooks help automate data exchange between different systems and integrate the functionality of the platform with other applications, increasing the efficiency and convenience of using the online learning platform.
The platform can use webhooks to integrate with email and messaging applications to send notifications and reminders to users about deadlines, new materials, or changes in courses. An example scenario using the "webhook" action is described in the article "Integration with SMS services via webhook".
In the opened node settings window, fill in the fields:
- Method. Select the method for sending the webhook from the list provided.
- URL. Write url.
- Headings. Write a title on the "Key" line. Add data to the Value line as needed. Click the Remove button if you do not want the title.
Send the webhook again if an error response is received. If the response is not 20x, then the webhook will be resent after 1 minute and then with 10 more attempts within 24 hours at increasing intervals.
- Test Request button. Submit a test request to verify the settings.
- Show Variables button. Specify the variables.
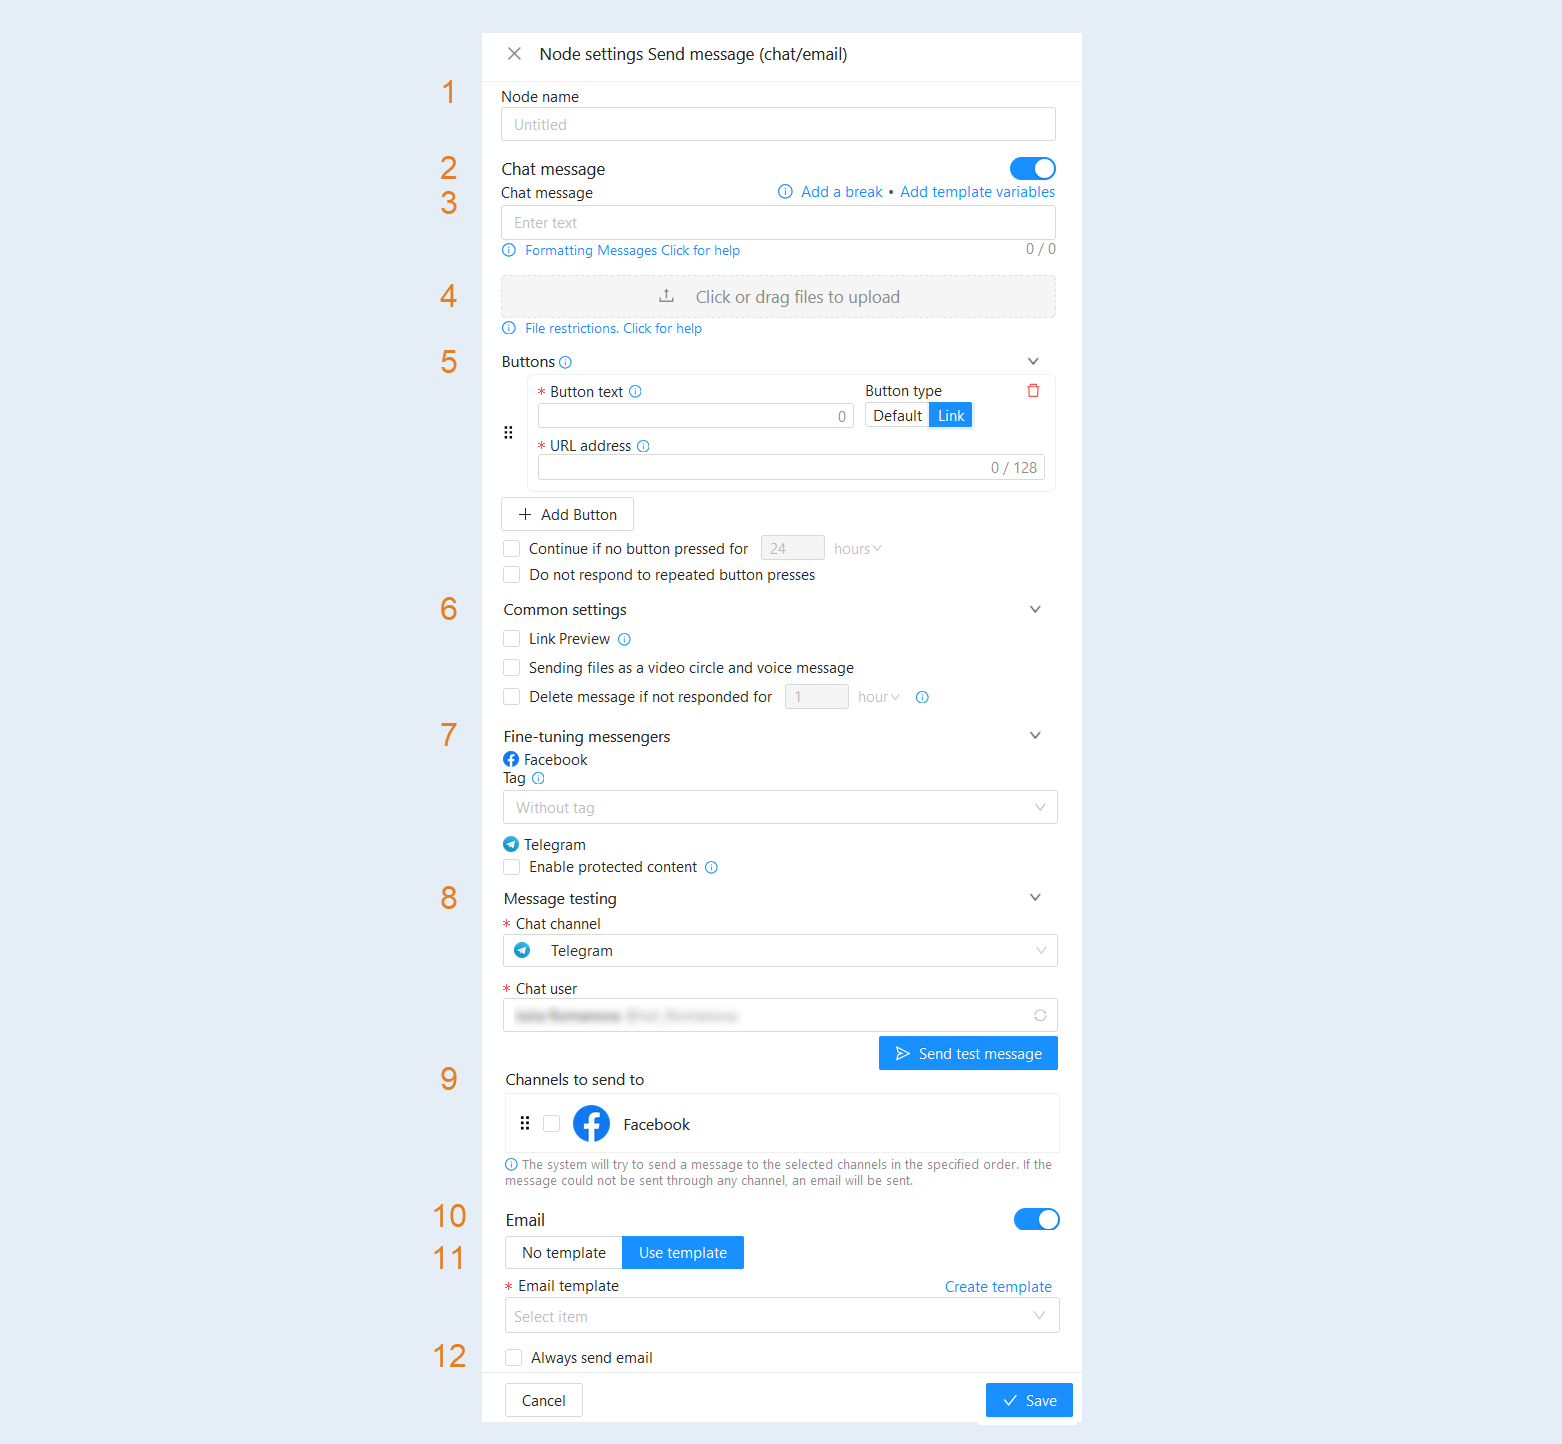
Node settings "Send message (chat/email)"
This action sends a message to the user through a channel configured in the system. If no channels are specified, an email will be sent to the user. For more information about channels, read the article "Chat channels."
You can add buttons to the messages sent through different chat channels. This system works universally for each chat channel. You can also configure the sending of files in the form of video clips, voice messages, and audio files.
In the opened node settings window, fill in the fields:
Name node. Specify the name of the node, you can name the nodes in the script as you wish.
Chat message. Move the slider to the active position to set up sending messages.
Chat message. Enter the text of the message. Chatbots support message formatting. Despite the individual formatting features of various messengers, formatting is preserved (provided that this function is supported by the messenger) and is applied universally. Now you don't need to create a separate message for each channel — you can use one message for all chat channels. Click on the "Info" icon under the message text to open the chatbot message markup table.
- Add a break. This option allows you to manually specify where the message should be divided into parts. This is useful if you want to control how the text is split into individual messages, especially if the automatic character separation does not meet your requirements. If your message exceeds the maximum number of characters allowed per message, it is automatically split into parts. However, automatic splitting may not always be optimal, for example, if it breaks a sentence or paragraph. Using the "Add break" button, you can independently specify exactly where the separation should take place in order to preserve the logical structure of the text.
Add template variables. This option allows you to insert special variables into the text of the message, which will be automatically replaced with the corresponding data when sending. For example, you can add a variable for the recipient's name, date, or other personal information. Using variables makes your messages more personalized and adaptive. This is especially useful for mass mailing, where each message must be addressed to a specific person or contain unique data.
Formatting messages. Click on the informational message to open the table for marking chatbot messages. In this table, you will see which chatbots support the necessary message markup (bold, italic, underline, strikethrough, link, spoiler, code).
Click or drag files to download. Attach video or audio files.
Buttons. In this section you can add buttons to messages. Click the "add button" button to open the settings.
- Button text. Specify the button text that users will see. The maximum length of the button text for different channels: Telegram - 4096 characters, Viber - 7000 characters, Vkontakte - 4000 characters, Facebook - 2000 characters, WhatsApp - 4096 characters, Instagram - 1000 characters, Line: 5000 characters. If the text turns out to be longer than allowed, it will be cut off.
Button type. Select the button type:
- Default.
Link.
URL address. This field will be available if the link button type is selected. The maximum link length is 128 characters. Links support variables, as in the message text.
Restrictions for WhatsApp - navigation by direct links is not supported, the link to go will be sent in the next message when you click on the button.Click "Add Button" to add another button. The maximum number of buttons for Viber is 7 in one message (buttons cannot be divided into several messages, since when sending a second message with buttons, the first buttons disappear). There are no restrictions on the number of buttons for other messengers.
Continue if no button is pressed. If the user does not press any of the buttons, then after the specified time, the script will continue and the next action in the chatbot script will work. Check the box and set the time interval. The time interval can be selected in days, hours or minutes.
Do not respond to repeated button presses. Check the box so that the user can click the button only once.
Common settings.
- Link preview. This feature allows you to preview the content of links before opening them in full format. For example, if you receive a link to a website, the messenger will automatically show you a preview of this content, including the title, image, and a brief description. This can be useful for quickly determining the safety of links before opening them.
Sending files as a video circle and voice message. This setting allows you to change the format of the files you send. Instead of sending files in their original format (e.g., photos in JPEG format), you can choose to send files as a video loop or a voice message. Files can also be automatically converted into the appropriate format to reduce their size and save space on your device or simplify their playback. This can be handy for quickly sending and playing files on mobile devices or adding a special effect to regular messages. These settings are described below in the article.
Delete message if not responded for. The message will be deleted if the user does not click on the button or does not respond within the specified time. Please note that this function works in: Telegram and Internal Chat.
Fine-tuning messengers. Messenger settings allow you to set up privacy and security, such as content protection, link preview, etc. These settings allow you to protect your data and adapt the messenger to your needs and preferences.
- Facebook. A message without a tag will not be sent if more than 24 hours have passed since the last message. A tag is needed if you want to bypass the 24-hour rule. If your messages do not match the selected tag, the account may be blocked.
Select a tag for the Facebook channel:- ACCOUNT_UPDATE - non-periodic update of the user's account. Cannot be used for advertising.
CONFIRMED_EVENT_UPDATE - reminder of an upcoming event or update on an event in progress, for which the client is registered. Cannot be used after the event has passed, or for sales and surveys.
CUSTOMER_FEEDBACK - customer feedback survey. Messages requesting feedback from the customer must be sent within 7 days of the customer's last message.
POST_PURCHASE_UPDATE - notification of order payment. Cannot be used for sales.
Telegram. Enable protected content. The “Content Protection” function in Telegram helps prevent forwarding, copying and unauthorized access to text and multimedia.
- Facebook. A message without a tag will not be sent if more than 24 hours have passed since the last message. A tag is needed if you want to bypass the 24-hour rule. If your messages do not match the selected tag, the account may be blocked.
Message testing. This function allows you to select the desired channel and user, and the system will send him a test message. For the convenience of subsequent testing, the selected user is saved in the system.
- Chat channel. Select a chat channel from the list.
Chat user. Select a user from the list.
Send test message. Click the "Send test message" button.
Channels to send to. Below is a list of channels for sending messages. The system will try to send a message through the selected channels in the specified order. If it is not possible to send a message through any channel, an email will be sent. For more information about channel settings, see the article "Chat Channels".
Email. Move the slider to the active position to set up Email sending.
Template. Choose: "No template" to create a new email or "Use template" to use an existing template. For more information about Email settings, see the "Node settings Send Email" section of this article.
Always send email. Check the box to send an email message, even if sending via chat channels was successful.
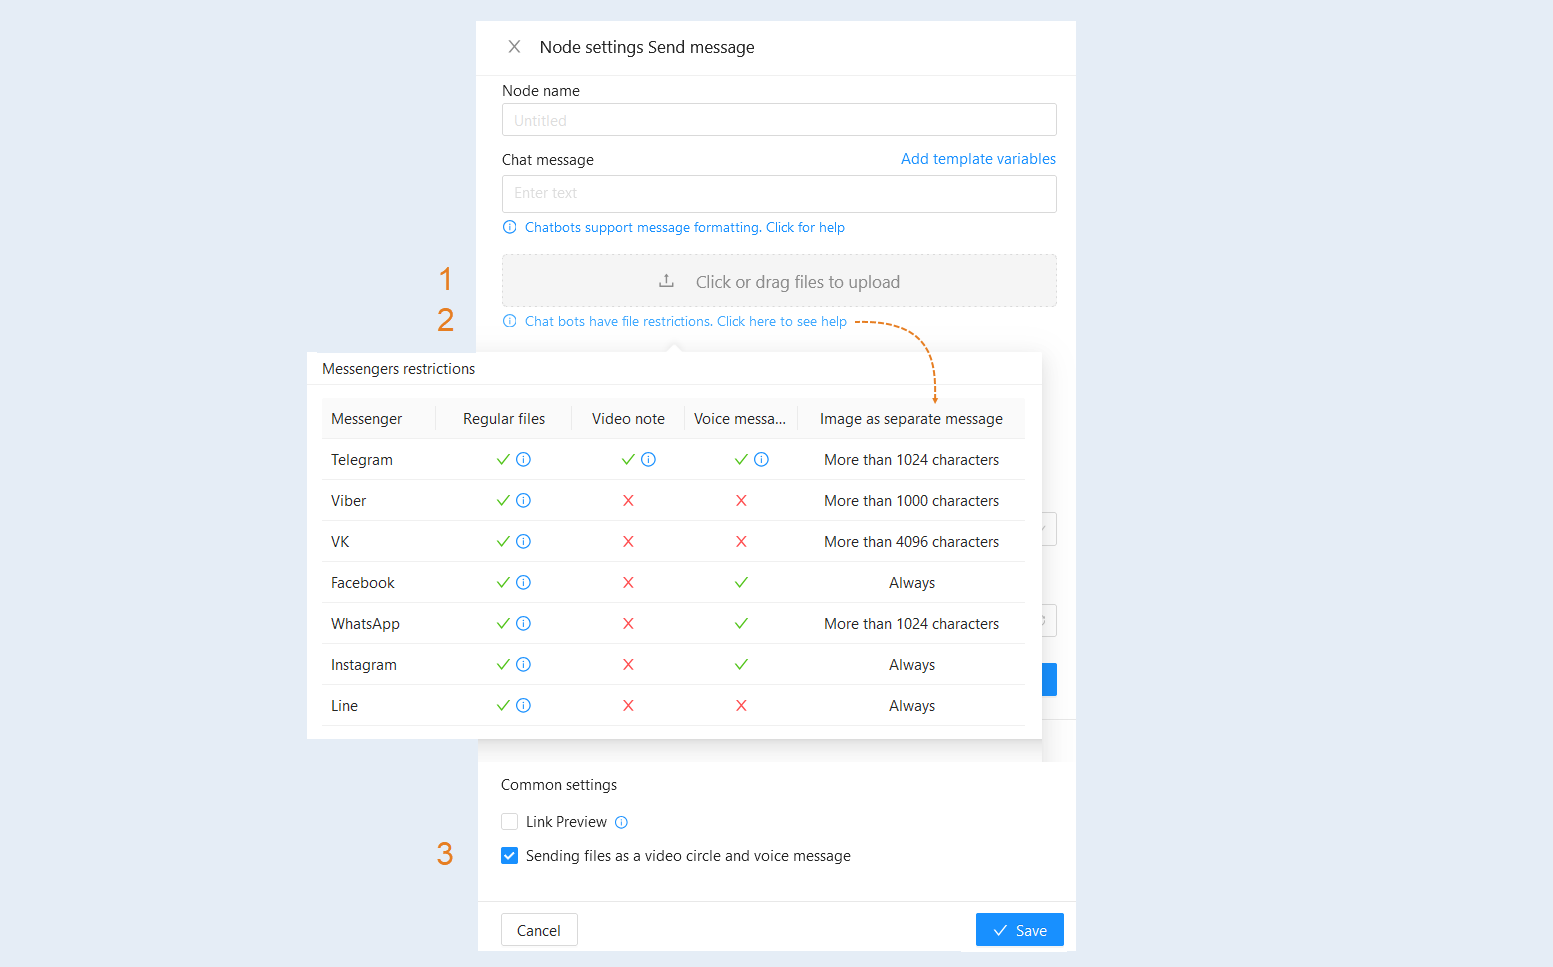
You can set up sending files in the form of a video circle and a voice message.
- Click or drag files to upload. Attach video or audio files.
Messenger restrictions. Click to open the table of parameters and restrictions for various messengers. Sending a message in the form of a video circle is available for Telegram. Instagram Facebook, WhatsApp, and Telegram voice messages can be sent.
Check the box "Send files as video note and voice". The video must be of equal width and height (square) up to 639px, an mp4 file and no longer than 1 minute in length for it to become a video circle. For a voice message, the file must be in ogg format, up to 50 MB.
Please note that if you record a voice message on the microphone and attach this file in the “Send Message node Settings”, then in some cases Telegram may not recognize the file as a video circle and a voice message.
If you want a message in the form of a video circle and a voice message to always be sent correctly, then you should first talk and send a video circle or a voice message to yourself (or a friend) in Telegram. Then save the video circle from Telegram to your computer and only after that attach this file in the “Send Message node Settings".
The file recorded and saved from Telegram will always be sent correctly and in the right format.
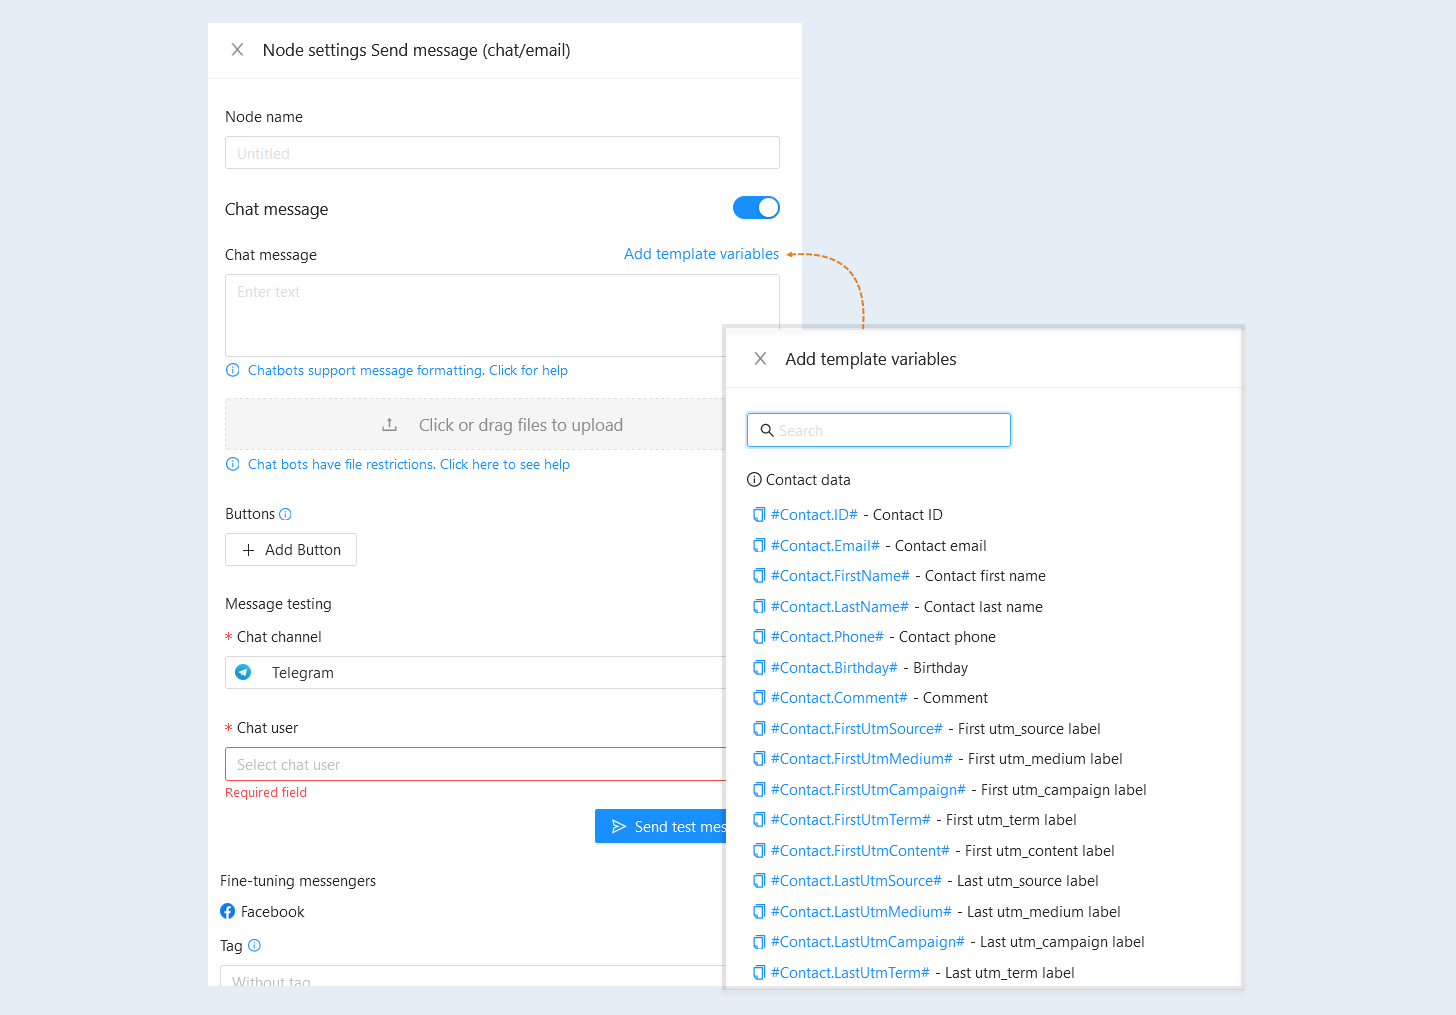
You can add template variables in the message. Click the "Add template variables" button next to the corresponding section. A list of variables will open on the right. Select the necessary variables from the list.
Node settings "Update Contact Attribute Value"
This action involves making changes to the contact information of a user. A contact attribute is a characteristic or data related to the user, such as name, surname, email address, phone number, etc. Changing a contact attribute allows you to update or make changes to this data.
Example scenario: A user fills out a form on the website, indicating their preferences as a future client. The system automatically processes the information from the form and changes the contact attribute "comment" in the user's profile. Based on this information, the system starts sending personalized emails containing offers that match the user's interests.
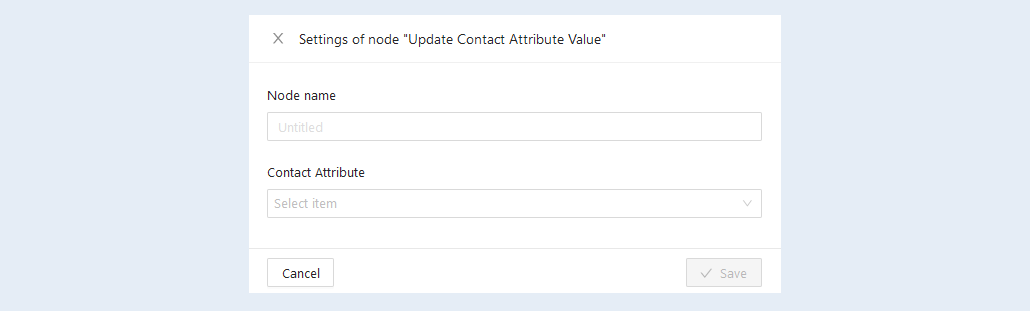
In the opened node settings window, fill in the fields:
- Name node. Specify the name of the node, you can name the nodes in the scenario as you wish.
Contact Attribute. In the field, select the contact attribute from the list (first name, last name, patronymic, phone, city, country, comment, date of birth, gender). Click the “Save" button. The selected contact attribute will change the values at the time of recording.
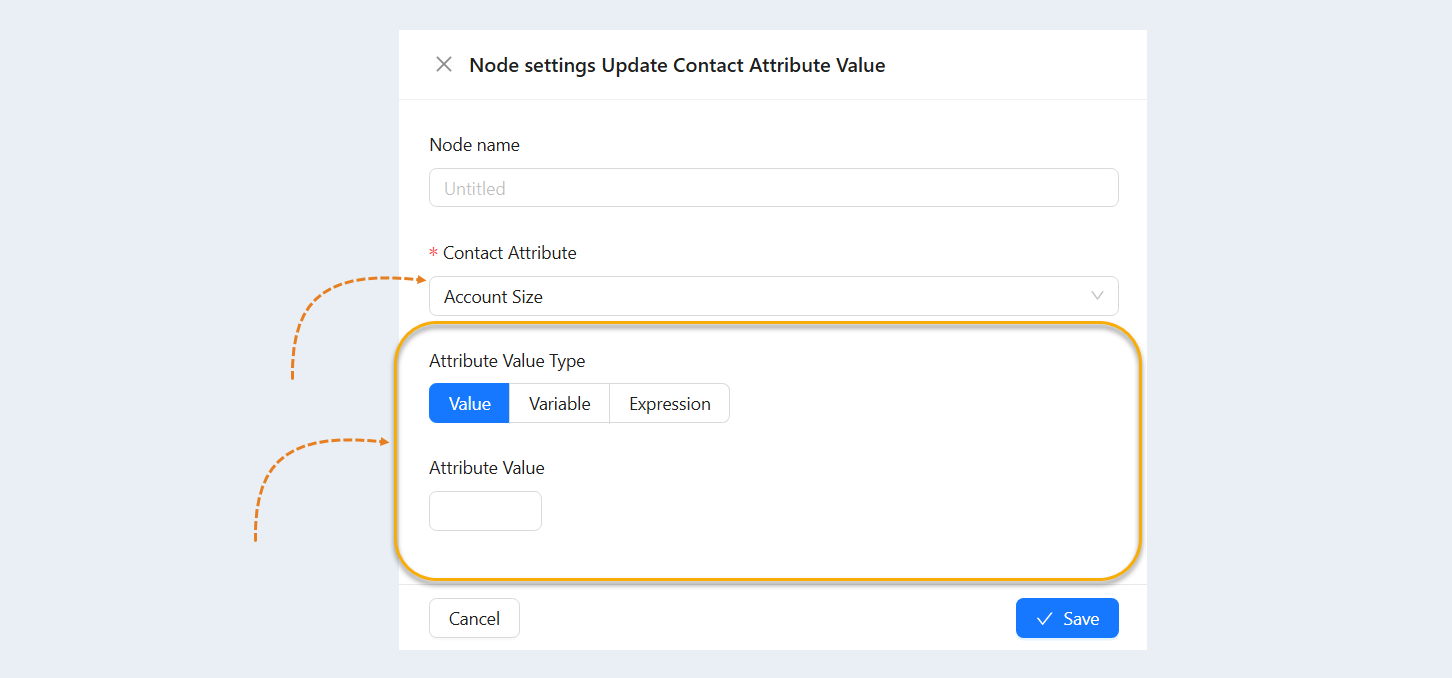
If you choose a numerical value for the contact attribute, you will have the option to select a contact attribute value or add a mathematical expression that will be calculated to obtain the contact attribute value.
Values and mathematical expressions help automate and simplify the handling of numerical data in scenarios.
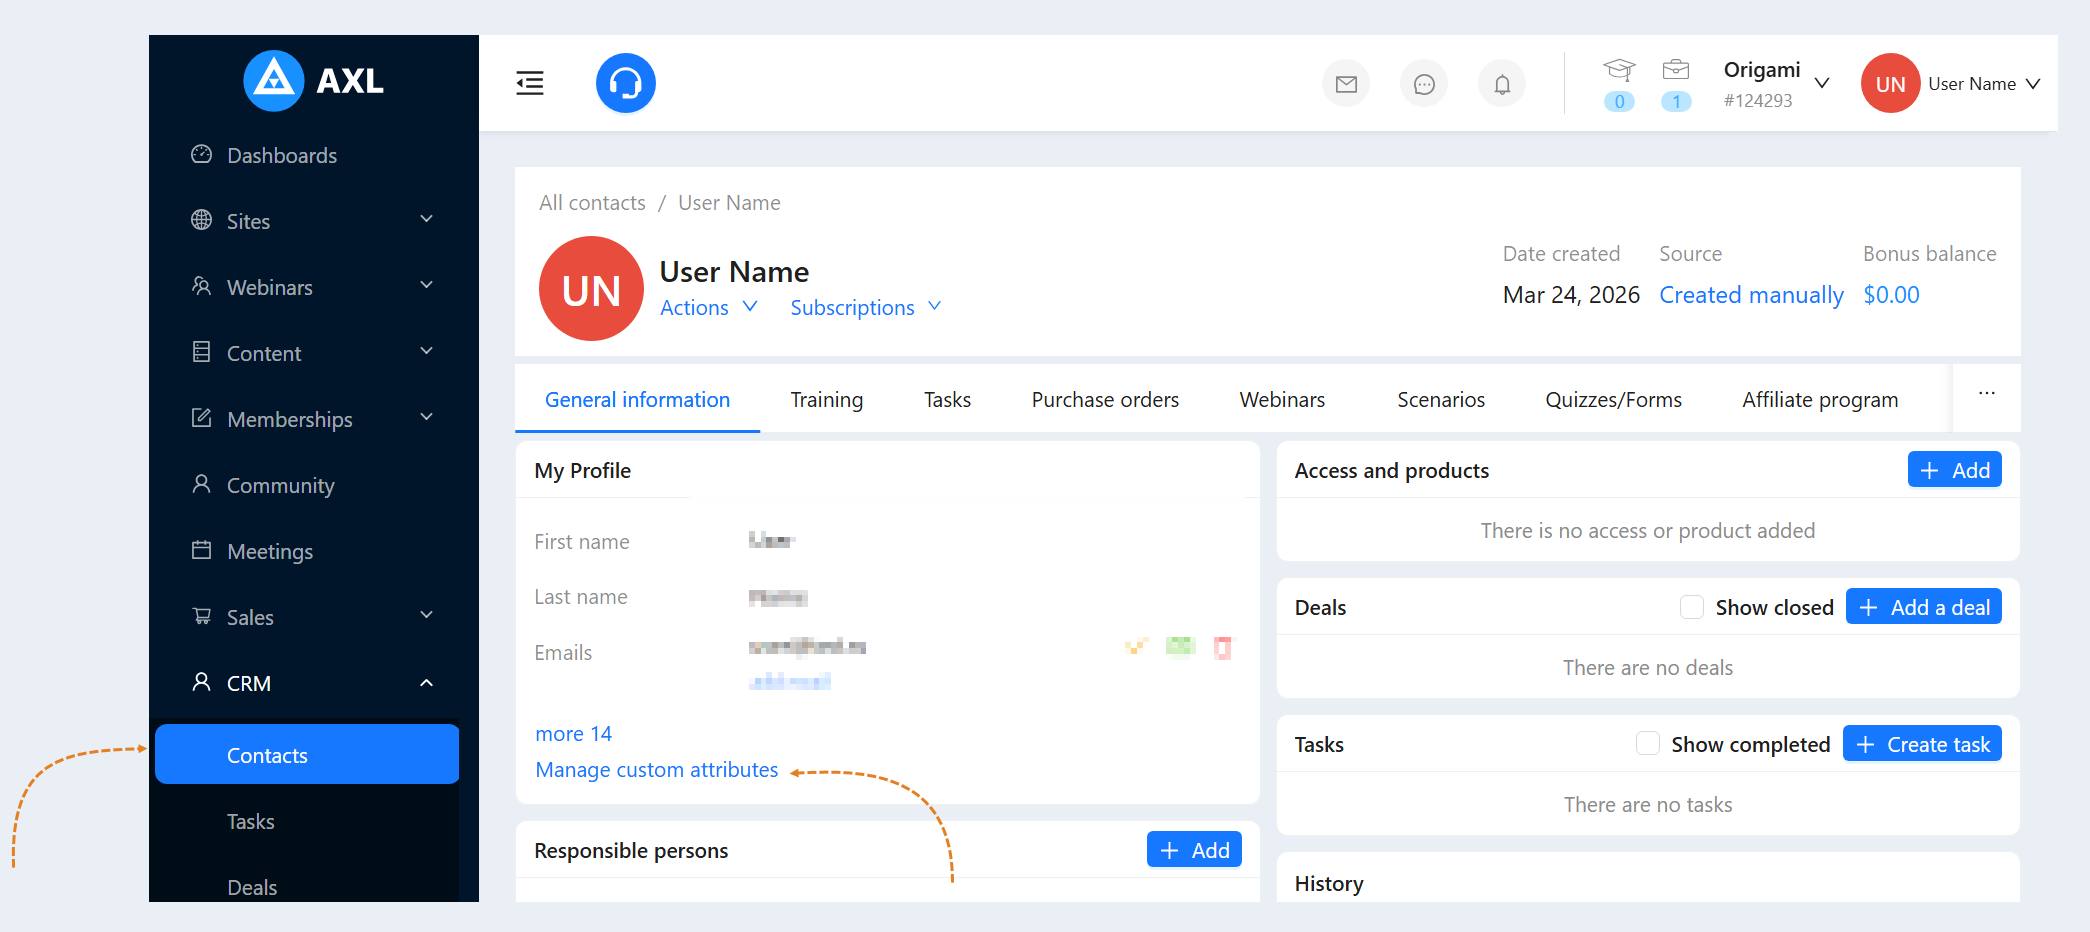
How to create a numeric attribute of a contact.
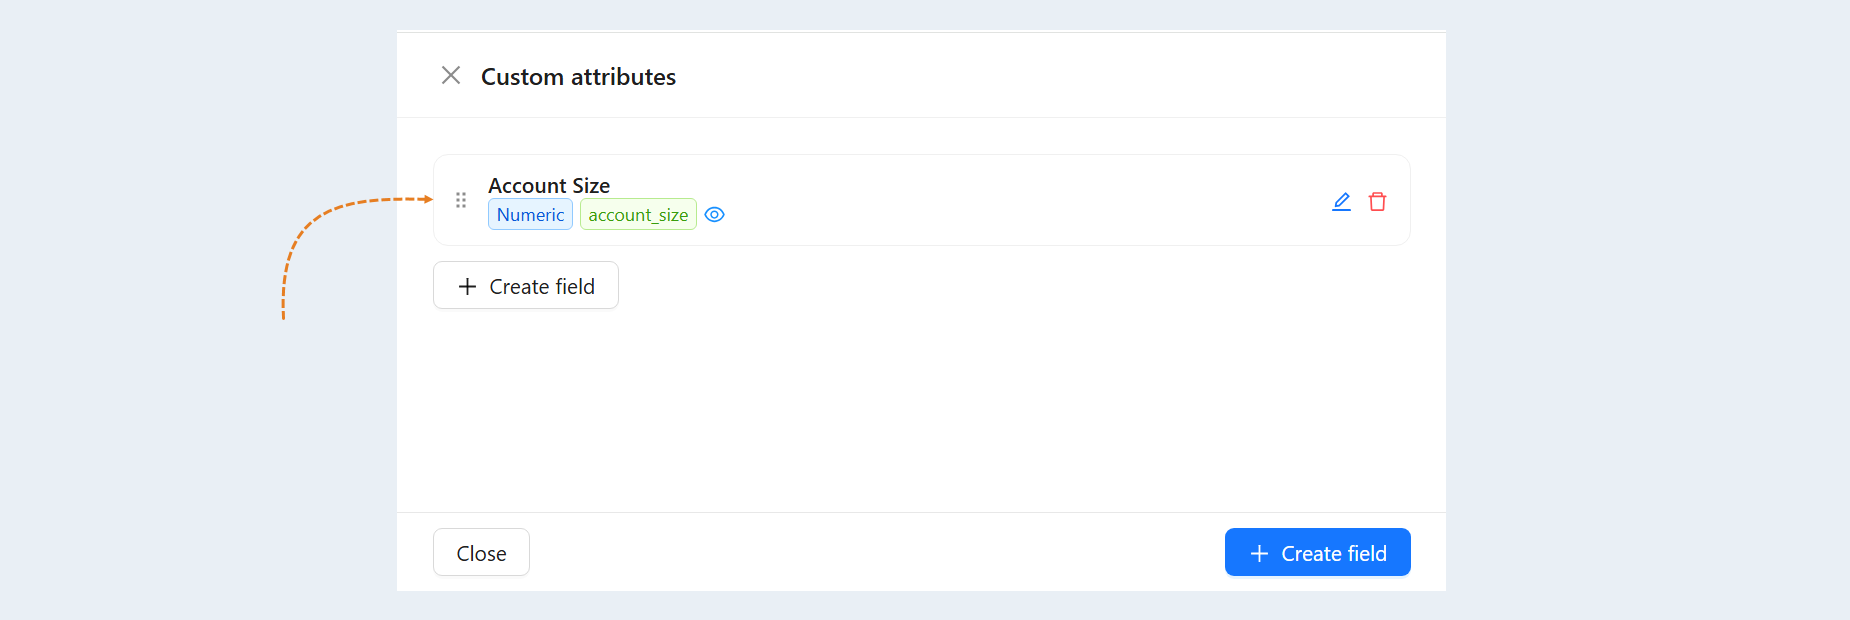
To create a numeric attribute for a contact, go to the "CRM" section, the "Contacts" tab. Click on the user's name to open the contact's profile. Next, click the "Manage custom Attributes" button.
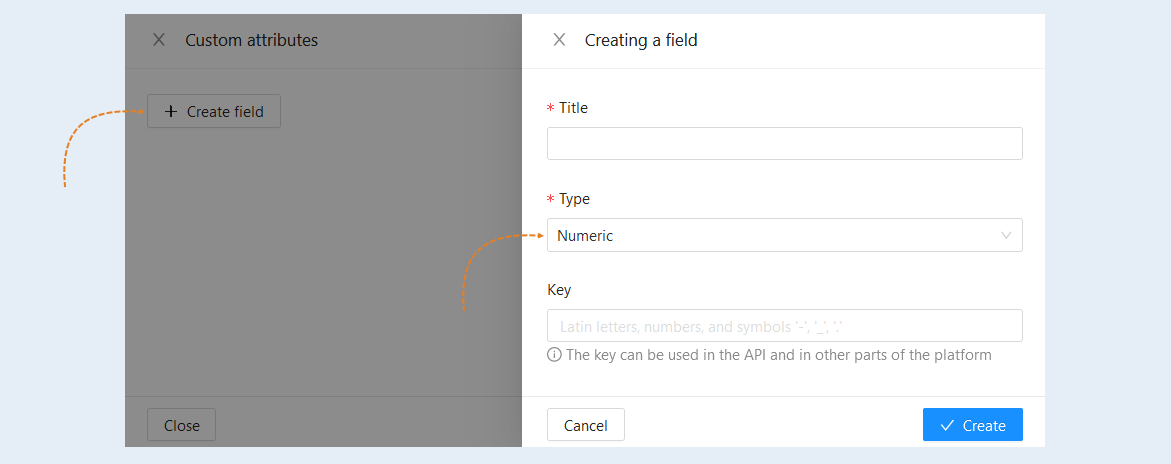
To create a new attribute, click on the "create field" button. In the opened window, fill in the fields:
- Name. Specify the attribute name.
Type. Select the type - numeric. A number attribute allows input of numerical values such as the user's age, number of completed tasks, etc.
Key. This is a unique identifier used to identify each attribute in the system. Add a key using Latin letters, numbers, and symbols. The key can be used in the API and other parts of the platform.
After completing the settings, click the "create" button.
The new attribute will appear in the list. In this example, a numerical contact attribute - account size - was created.
For more information on creating different contact attributes, read the "Сontact profile" article.
Node Settings Change the contact attribute.
Go back to the scenario, to the settings of the "Change contact attribute" node. Select the created numeric attribute of the contact. Additional fields will be available to you below:
- Attribute value type. Select the contact attribute value type.
- Value. The value represents a specific contact attribute value and is presented as a number. For example, the value type "number" can contain numerical values such as contact age or account size.
Expression. It represents a mathematical expression that is calculated to obtain the contact attribute value. It can consist of mathematical operations, logical conditions, and other operators to obtain a value based on other contact attributes or data. Mathematical expressions are useful for automating and simplifying operations with numerical contact attributes. They can be used, for example, to increase or decrease the attribute value depending on certain conditions or to perform complex mathematical calculations based on available values.
- Value. The value represents a specific contact attribute value and is presented as a number. For example, the value type "number" can contain numerical values such as contact age or account size.
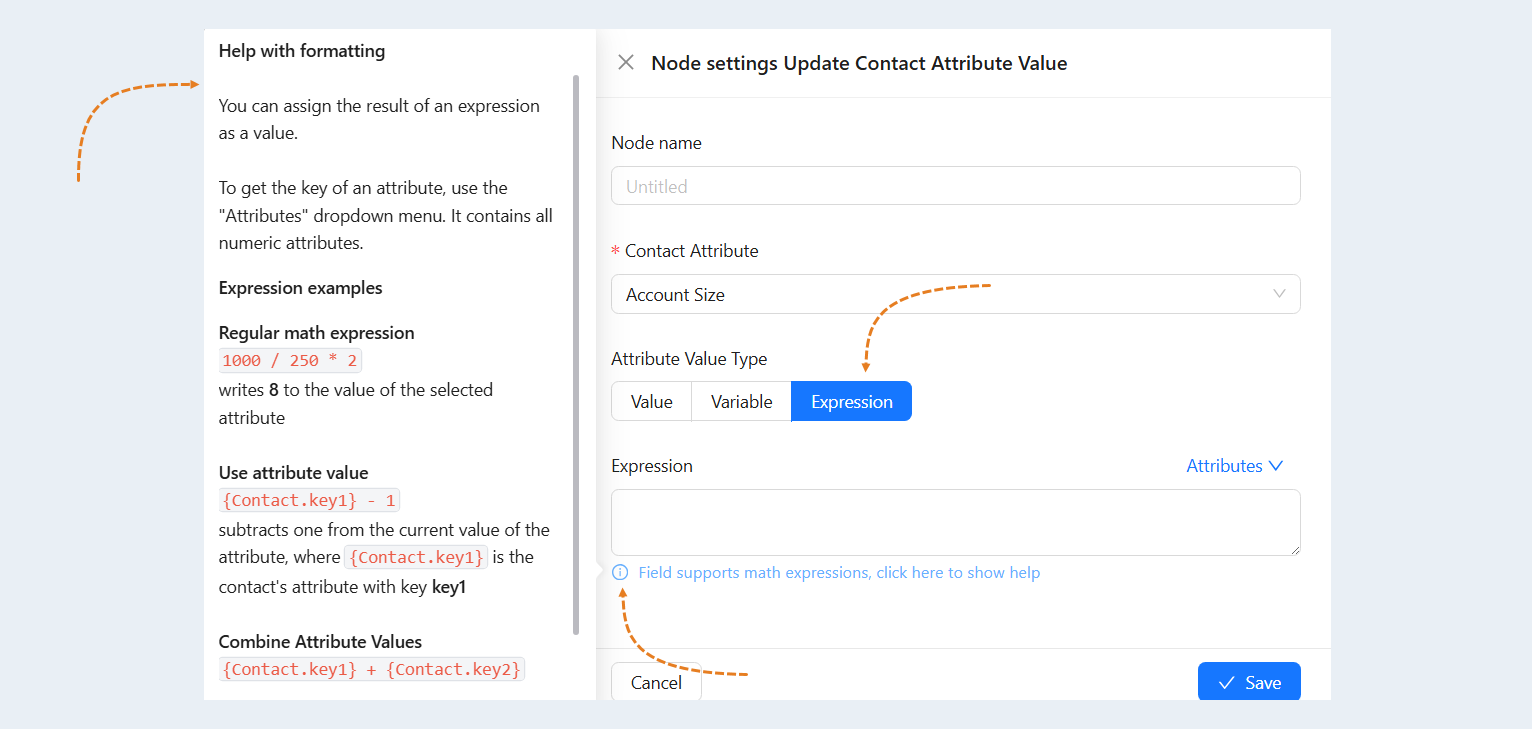
Attribute value/Expression. Specify a numerical attribute value or a mathematical expression.
A mathematical expression is a formula that uses numerical attribute values to perform mathematical operations. For example, a mathematical expression can be written as "{contact.key1} + 10", where "{contact.key1}" represents the current value of the contact attribute with the key key1, "10" is the number to add to the current value.
Click the "Information" icon to get formatting tips and see examples of mathematical expressions.
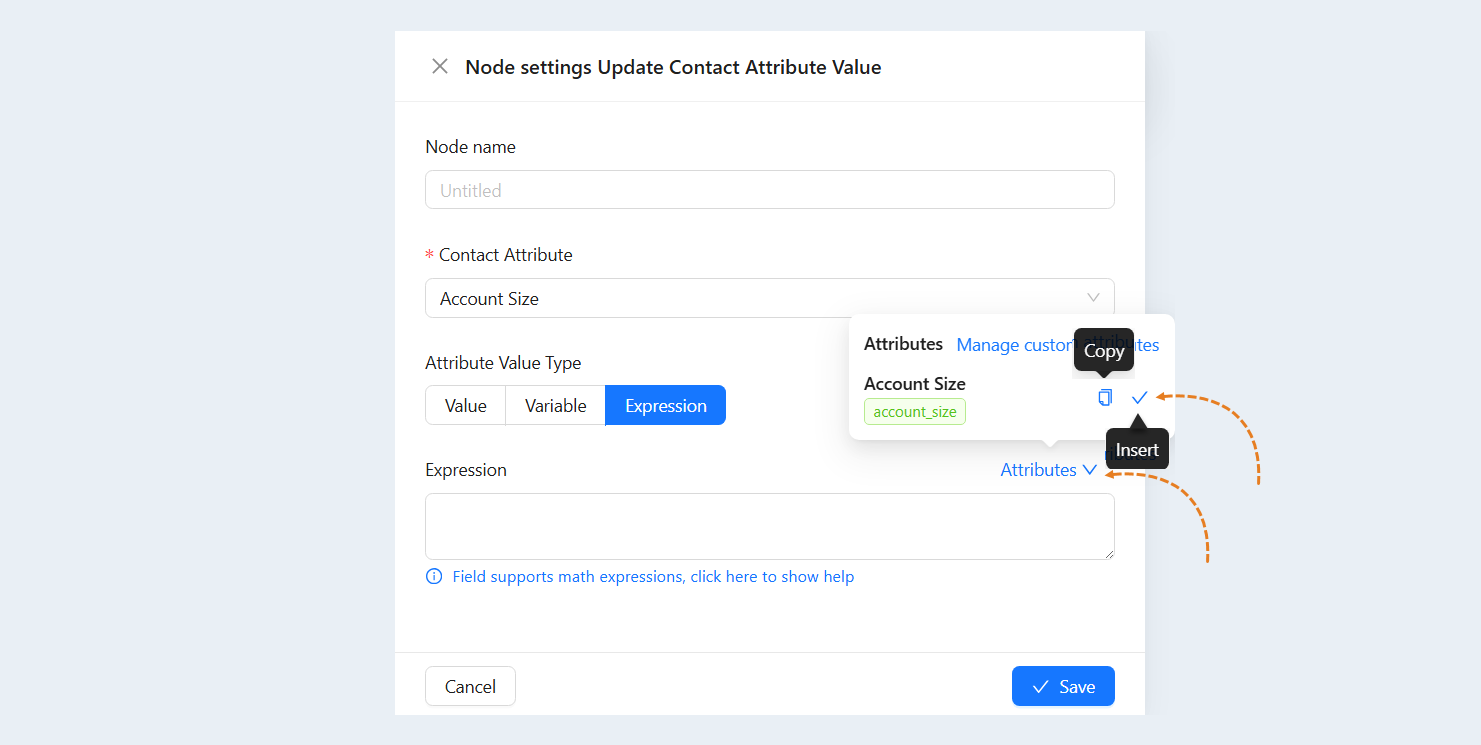
To obtain an attribute key, use the "Attributes" dropdown menu. It lists all numerical attributes. Click the "Insert" icon next to the desired attribute to add the attribute key to the expression.
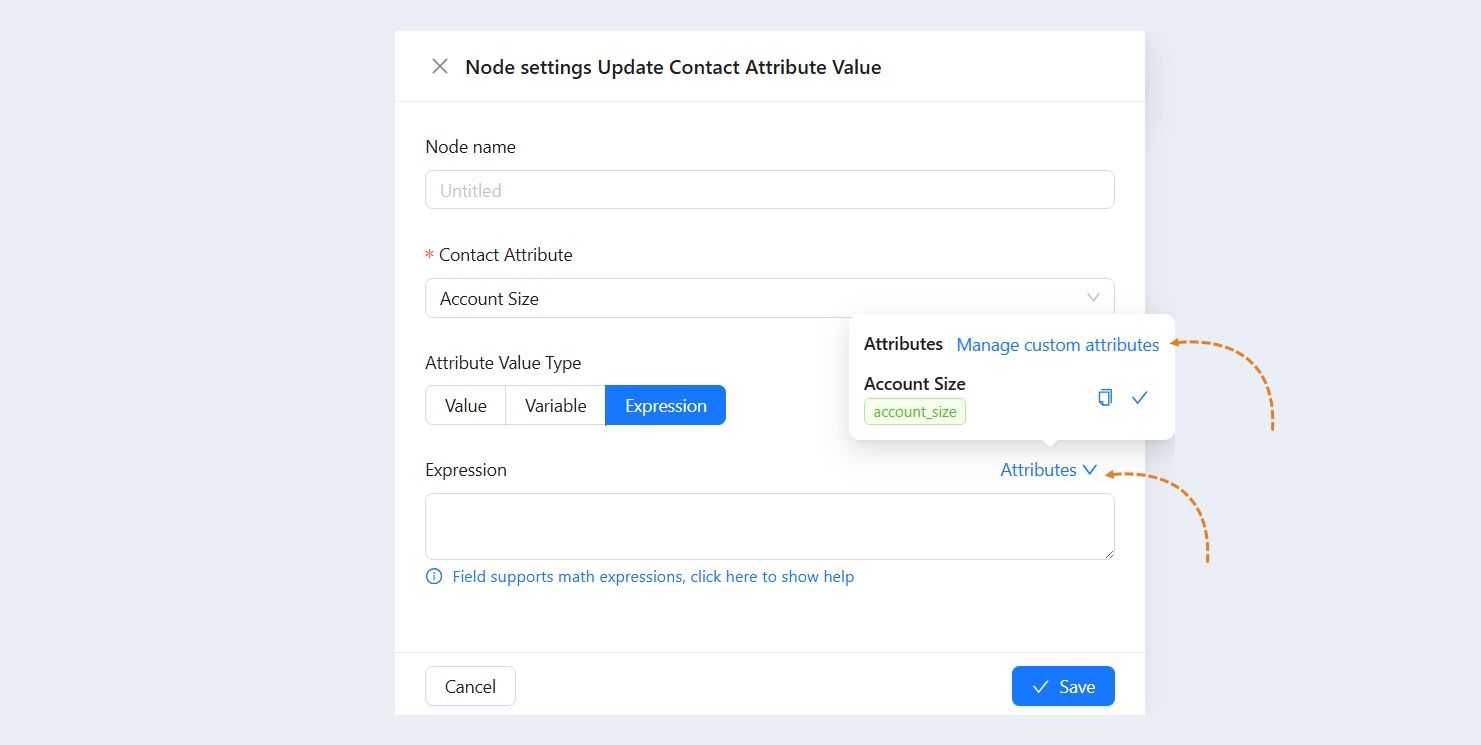
Click the "Manage custom attributes" button to create a new attribute in the contact card.
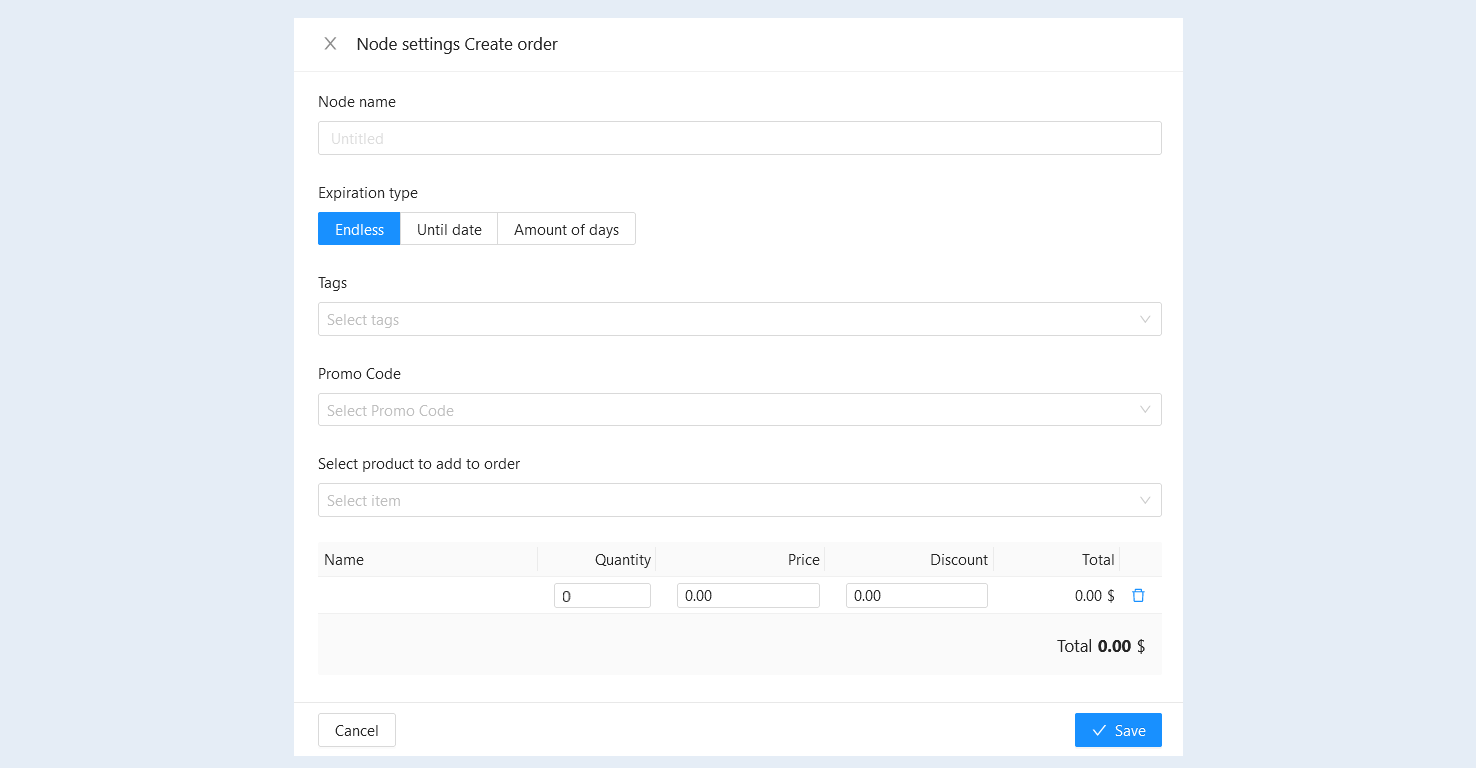
Node settings "Create order"
This action creates an order for the selected product.
Examples of scenarios using the "Create order" action: When placing an order, the system creates a new order and automatically sends an email confirmation with order and delivery information. When the order is delivered, the system updates the order status and sends an email confirmation of delivery, requesting feedback. If the user provides feedback, the system automatically marks the order as completed and sends a thank you email for the feedback.
In the opened node settings window, fill in the fields:
- Name node. Specify the name of the node, you can name the nodes in the script as you wish.
Expiration type. Choose the validity period of the order for its payment: infinite, up to date or number of days.
Tags. Add tags to the order.
Promo code. Select the promo code for the order from the list.
Select the product to add to the order. Add a product to the order by selecting it from the suggested list. The table below shows the details of the order.
A list of selected products. The list of products that were selected in the previous step is shown.
Node settings "Add Tags"
This action adds tags for the user.
Tags are labels or keywords assigned to a specific object for organization and classification of information. Tags simplify the process of searching and sorting data. Using tags allows efficient management and analysis of customer databases, as well as providing personalized offers and recommendations based on each customer's interests and preferences.
For example, tags can be used to mark which products a customer has purchased in the past to take that into account when offering future purchases. Alternatively, a tag like "Sports" can be attached to a customer who shows interest in sports products or services. Additionally, tags like "loyal customer" or "VIP customer" can be added to denote customers with established long-term mutually beneficial partnerships.
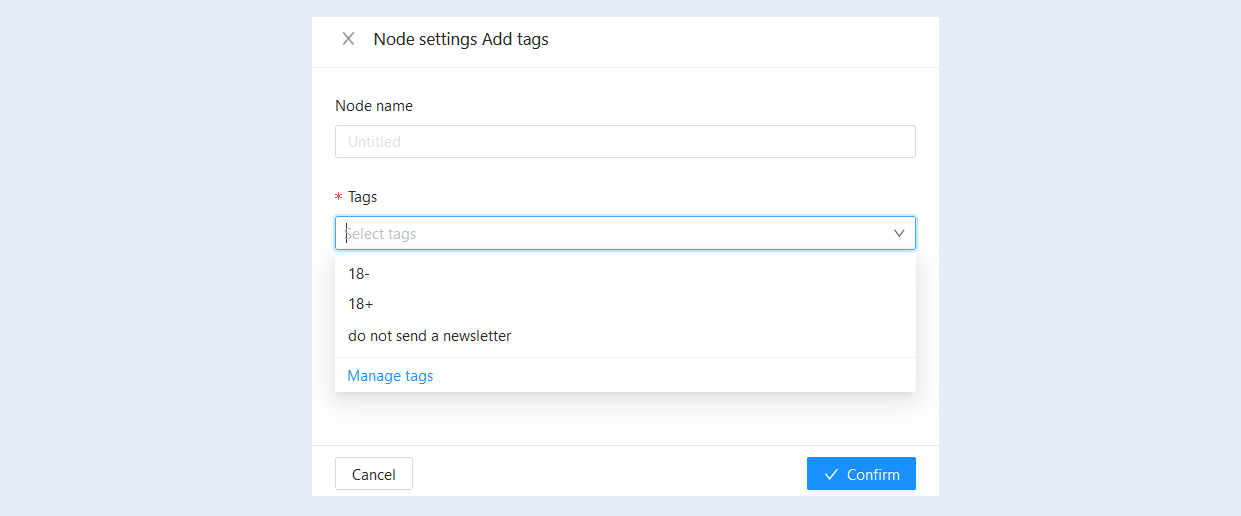
In the opened node settings window, fill in the fields:
- Name node. Specify the name of the node, you can name the nodes in the script as you wish.
Tags. Select tags from the list or write new ones. Click the “Confirm” button.
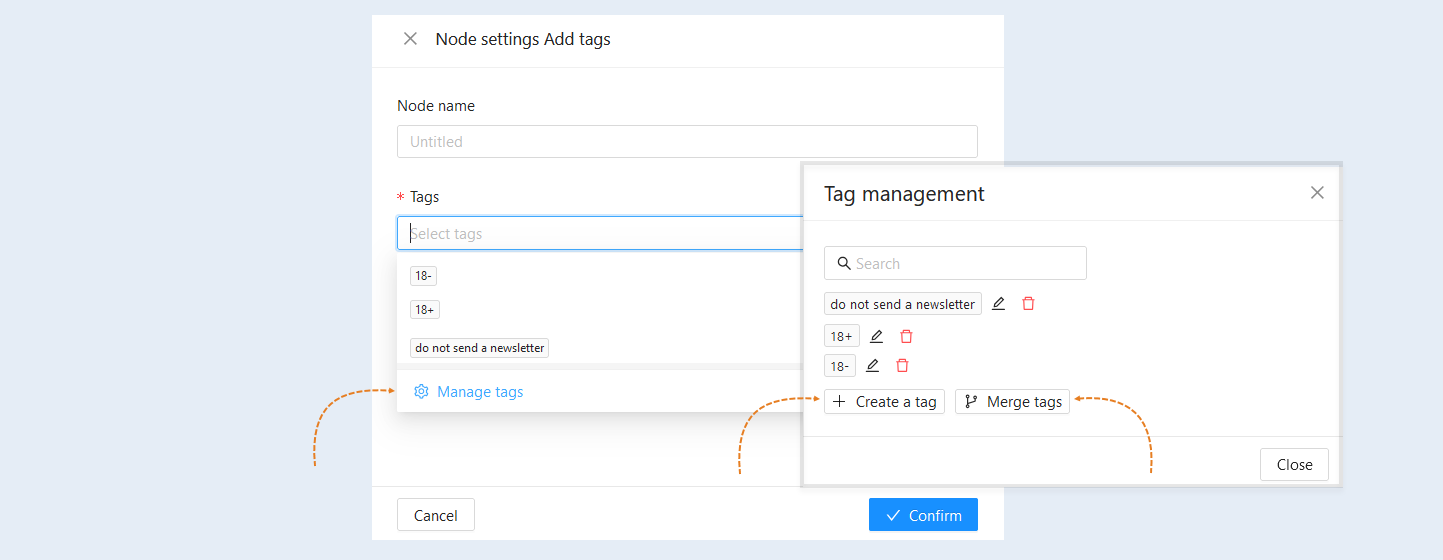
Click "Manage Tags" to add new tags to the list.
In the window that opens, click "Create Tag" and add a new tag by specifying its name and selecting a color for visual highlighting.
The "Merge Tags" action allows you to combine two tags by selecting the source tag and the tag that will be added to it. All data associated with the source tag will be transferred to the new tag. If the system has accumulated many similar or duplicate tags, they can be merged to avoid confusion and simplify management. Please note that this action is irreversible. The tag you choose to merge will be deleted and replaced with the source tag everywhere it is attached.
At the top of the window, you will find a search bar—use it to quickly find the desired tag.
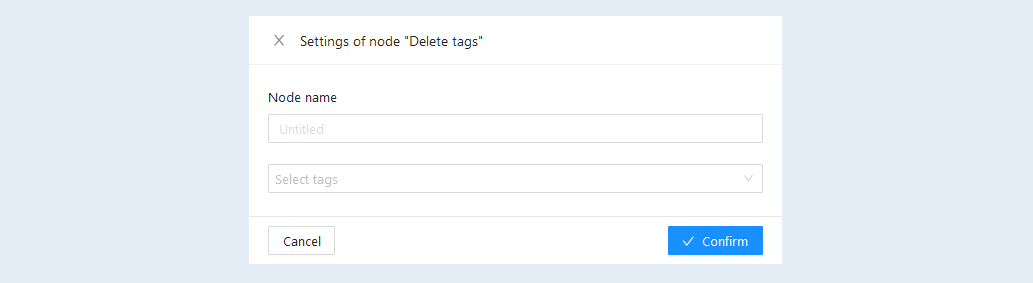
Node settings "Delete Tags"
This action removes tags from the user. You can first add a tag to the user, such as "Do not send newsletters," to temporarily place them in a group. Later, using this action, you can remove the tag and resume sending newsletters.
In the opened node settings window, fill in the fields:
- Name node. Specify the name of the node, you can name the nodes in the script as you wish.
Tags. Select tags from the list or write new ones. Click the “Confirm” button.
Click on "Manage Tags" to add new tags to the list.
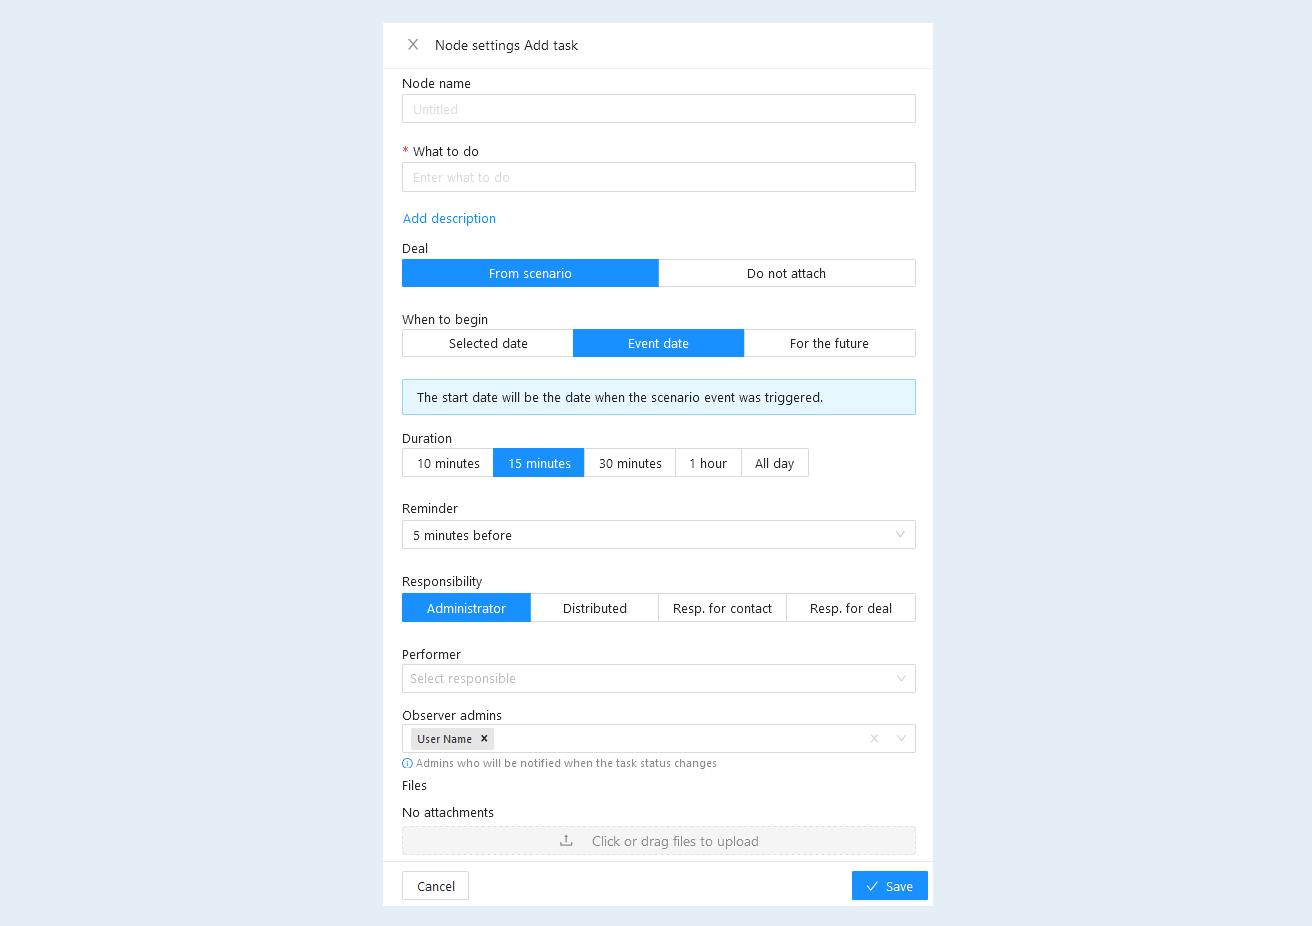
Node settings "Add Task"
In the opened node settings window, fill in the fields:
Name node. Specify the name of the node, you can name the nodes in the script as you wish.
What to do. Specify the action to be performed when the deal hits the selected stage.
Add description. Click on the line to add a description of the task.
Deal. The deal can be added to the task from the scenario.
When to begin. Set the start date of the task:
- Selected date. Select the date on the calendar.
Event date. In this case, the start date will be set as the triggering date of the script event.
For the future. The task will not be set immediately, but after a selected period of time. Set the number of days or hours. The task will be added after the selected time.
For example, you can set a task "Call back in 3 days" if an employee fails to reach the user who submitted a request. In this case, after the user submits a request, they are added to the "Call" stage of the deal. If the employee fails to reach them, the user is moved to the "No response" stage, and according to the script, the employee is tasked with calling back. This task will be assigned to the employee after 3 days.
Duration. Specify the duration of the task.
Reminder. Set a deadline for the task completion reminder.
Responsibility. Assign a responsible person or distribute the task among employees. You can also choose the person responsible for the contact by specifying the name of his position. Or appoint a person responsible for the transaction. In this case, if there is no transaction in this scenario or there is no responsible person in the transaction, then the responsible person will not be appointed.
Performer. Appoint a responsible executor.
Observer admins. Assign an administrator-observer for the execution of this task, he will be notified of the change in the status of the task.
Files. Attach the necessary files to the task.
Node settings "Add Note"
This action adds a note for the contact. A contact note is additional information or a remark that can be added for a specific user. The note may contain details about the user, their interests, preferences, personal circumstances, or any other relevant information that helps teachers or administrators interact effectively with them. If a user has any specific requirements or needs, notes can be used to document them. For example, a note can be added indicating that the user requires additional assistance with assignments and prefers communication via email.
In the opened node settings window, fill in the fields:
- Name node. Specify the name of the node, you can name the nodes in the script as you wish.
Note text. In the Add tnote field, you can write a note and / or attach the necessary files. Click the “Confirm” button.
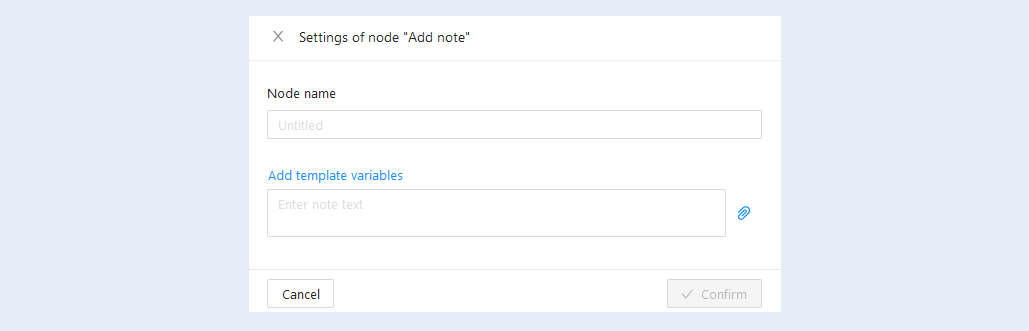
Click the "Add template variables" button. A list of variables will open on the right. Select the necessary variables from the list.
After configuring the node, click the “Confirm" button.
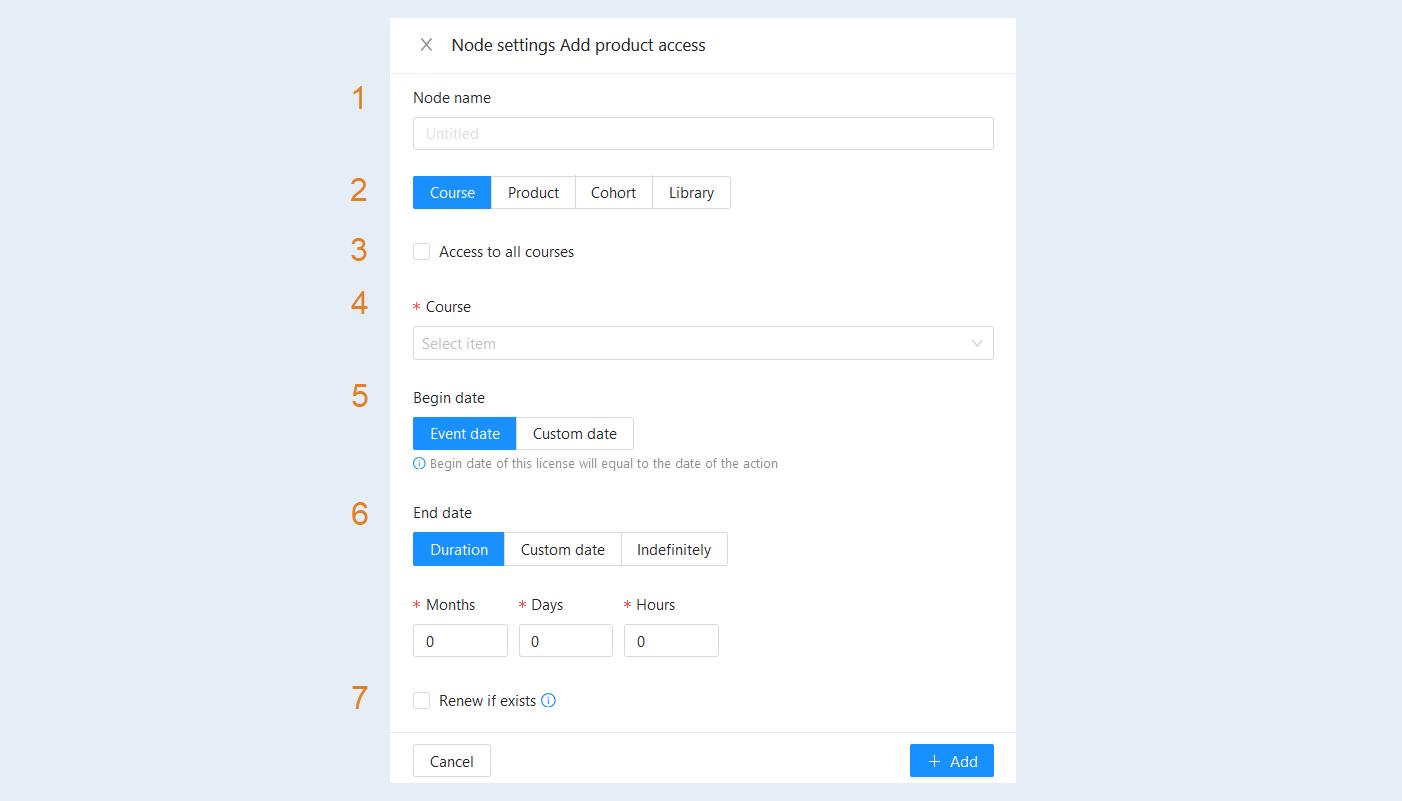
Node settings "Add Product Access"
This action grants the user access to a specific product in your account. It is usually used for free products, as access to paid products is granted immediately after purchase.
In the opened node settings window, fill in the fields:
- Name node. Specify the name of the node, you can name the nodes in the script as you wish.
Type of product. Select a product: course, product, cohort, library.
Access to all courses. Check the box so that access is open to all membership portal courses.
Product. Select from the list: course, product, cohort, library.
Begin date. Access to the product will be granted at the moment this action is executed:
Event date. You can choose the event date, then access to the product will be granted when this script action is triggered.
Specific date. Or you can select a specific start date for the license on the calendar.End date. Access to the product will be revoked at the moment this action is executed:
Duration. Choose to set the duration of the license. A field will open below, where you can set the duration of the license - months, days, hours. After this period, access to the product will be revoked.
Specific date. In the field below, select a date from the calendar when access to the product will be revoked.
Unlimited license. When selecting an unlimited license, access to this product will be granted indefinitely.Renew if exists. The active license of the selected product or, if there are linked products, the active license of the linked product will renewed.
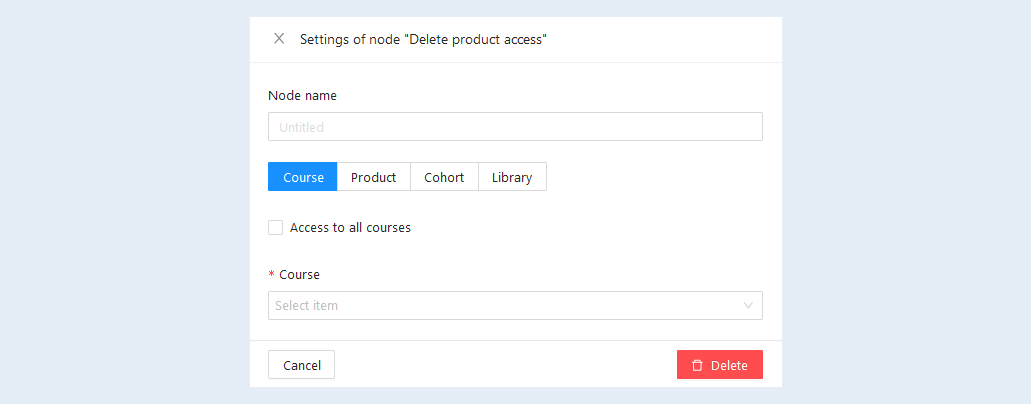
Node settings "Delete Product Access"
An example of access restriction: In some learning platforms, users only have access to certain lessons or courses, depending on their level, test result, or other factors. If such restrictions change or the user does not meet the criteria, access to a particular product may be deleted.
In the opened node settings window, fill in the fields:
Name node. Specify the name of the node, you can name the nodes in the script as you wish.
Type of product. Select a product type from the list: course, product, cohort, library.
- Product. Select from the list: course, product, cohort, library.
- Rate. Select a tariff from the list (in case you have chosen a course).
Node settings "Suspend access"
This action can be used to temporarily block users' access to specific content or functionality. The node performs access control and user regulation functions, ensuring proper and efficient use of resources.
For example, if a user's subscription expires, their access to a specific course may be automatically suspended. Or, for example, a user may be temporarily denied access to certain content for violating platform rules.
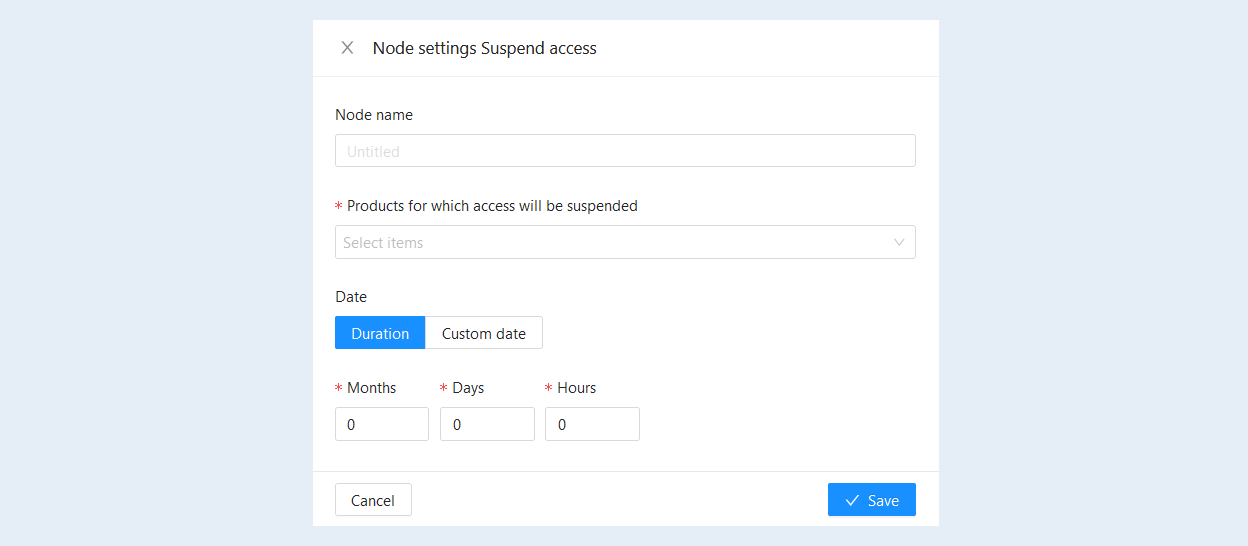
In the settings window that opens, fill in the fields:
- Node name. Specify the name of the node, you can name nodes in the scenario as you see fit.
Products for which access will be suspended. Select from the list of products for which access will be suspended.
Date. In the field below, choose the duration or date of the access suspension.
Duration. Set the period of access restriction in months, days, and hours.
Custom date. Or set a specific date and time when access will be suspended.
Node settings "Add responsible"
This action assigns a responsible administrator to the user. Assigning a responsible person ensures better quality and efficiency of learning. For example, the responsible person can be a teacher or coach who monitors the activity and progress of each user, provides support and assistance throughout the learning process. The responsible person tracks each user's progress, analyzes their achievements and weaknesses, allowing for adjustments in the learning process and providing additional support where needed.
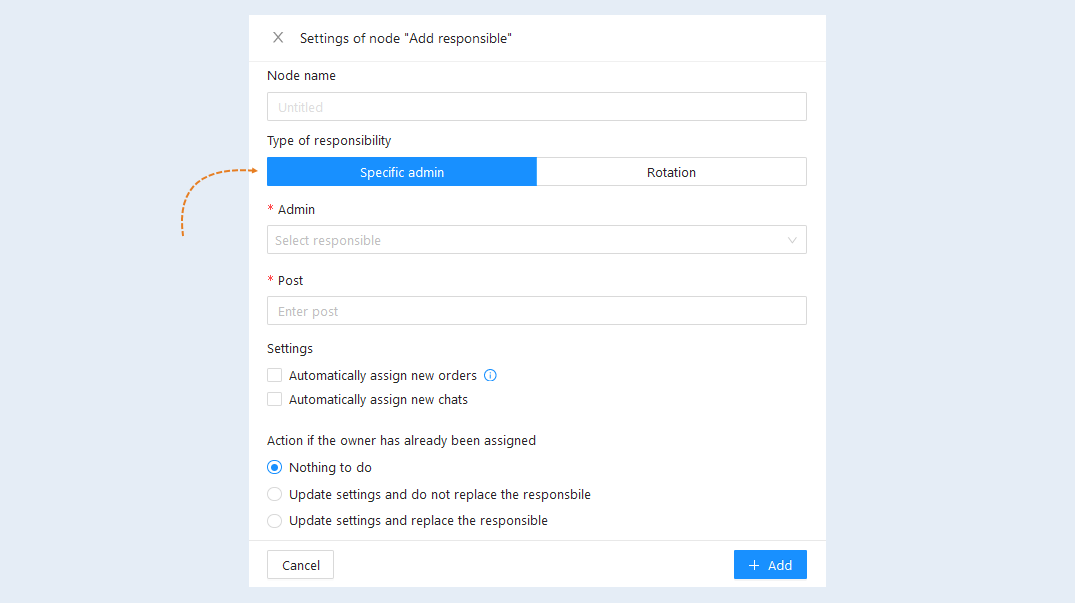
The "Specific admin" tab. In this tab, it is possible to select one responsible person.
Name node. Specify the name of the node, you can name the nodes in the script as you wish.
Admin. Select the responsible admin from the list.
Post. Specify the position of the responsible person. This field is optional.
Ignore if responsible already assigned. If there is already a responsible person for this position, then a new one will not be appointed.
Automatically assign new orders. Check the box so that new orders are added to the responsible person. Tracking of new orders is available only for one responsible person.
Automatically assign new chats. Check the box so that new chats are added to the responsible person.
Click the “Add" button.
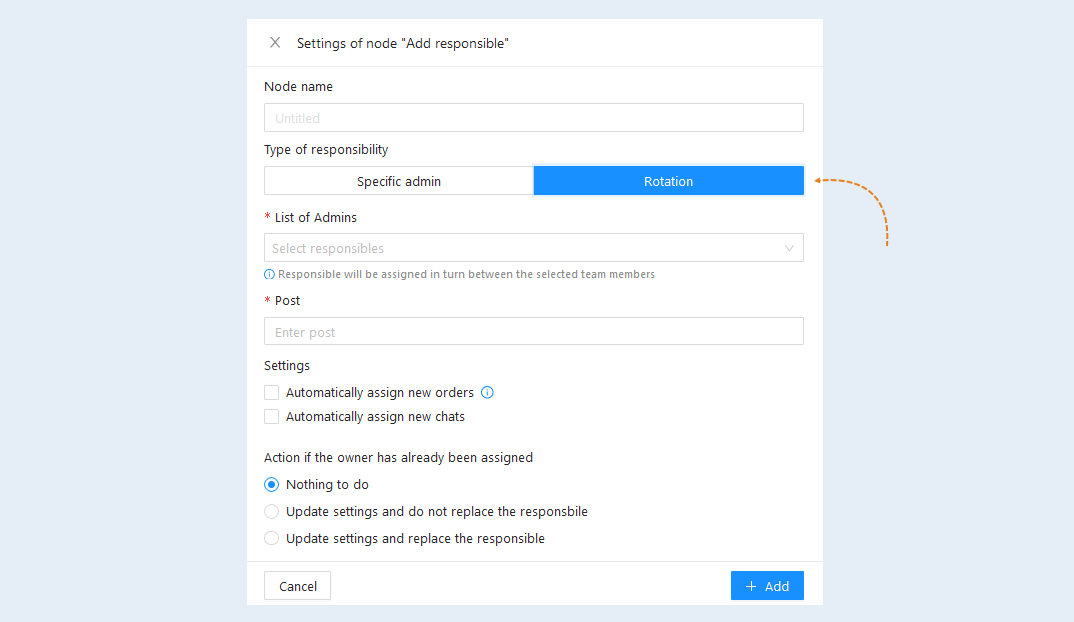
The "Rotation" tab. In this tab, it is possible to select several administrators and distribute the task among the team members.
Name node. Specify the name of the node, you can name the nodes in the script as you wish.
List of Admins. Select several responsible administrators from the list.
Post. Specify the position of the responsible person. This field is optional.
Automatically assign new orders. Tracking of new orders is available only for one responsible person.
Automatically assign new chats. Check the box so that new chats are added to those responsible.
Action if the responsible person has already been appointed. Select one of the actions that will work if the responsible person has already been assigned.
Click the “Add" button.
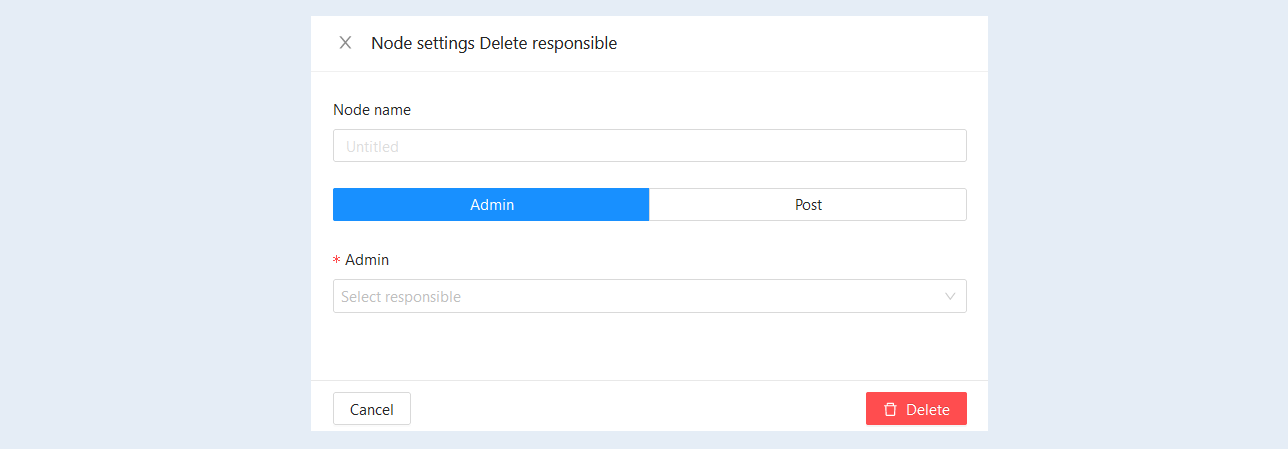
Node settings "Delete responsible"
This action removes the previously assigned responsible administrator from the user.
This action may be necessary in the following cases:
1. If the responsible person is no longer available or is no longer involved in this project. This ensures that information about responsible users is up-to-date for tasks and projects.
2. If you need to reassign the responsible person to another user. Allows you to redistribute responsibility in case of changes in the team or work on projects.
3. If the user has made a mistake or violated the rules of the platform.
4. If the user has completed the training.
In the opened node settings window, fill in the fields:
- Name node. Specify the name of the node, you can name the nodes in the script as you wish.
The type of responsibility. Choose the type of responsibility:
- Administrator. Select the responsible admin you want to delete from the list.
Post. Specify the name of the position you want to delete.
Click the "Delete" button.
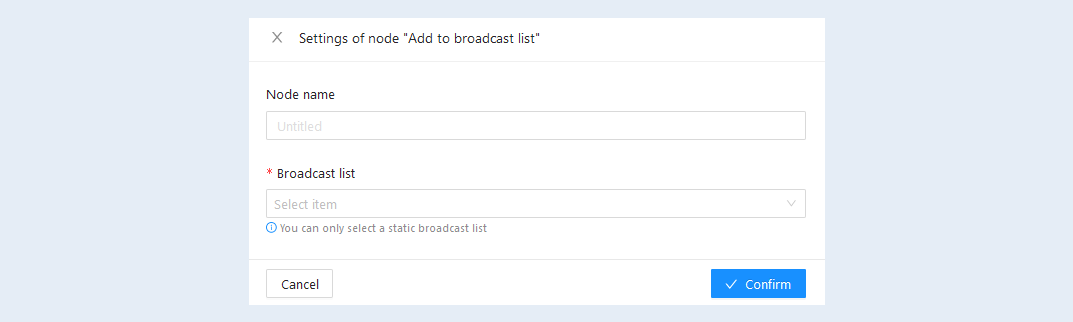
Node settings "Add to broadcast list"
This action adds the contact's received email to the selected mailing list. Mailing is a mechanism through which the platform sends informational messages to subscribers. These messages can contain useful materials, notifications about new courses or promotions, reminders about activities, and other important information. The purpose of mailing is to provide users with relevant and useful information, draw their attention to new materials and updates, and support their motivation for further learning. For more information on how to create and configure mailing lists, refer to the "Broadcast" article.
In the opened node settings window, fill in the fields:
- Name node. Specify the name of the node, you can name the nodes in the script as you wish.
Broadcast list. Select a campaign from the list and click the “Confirm” button.
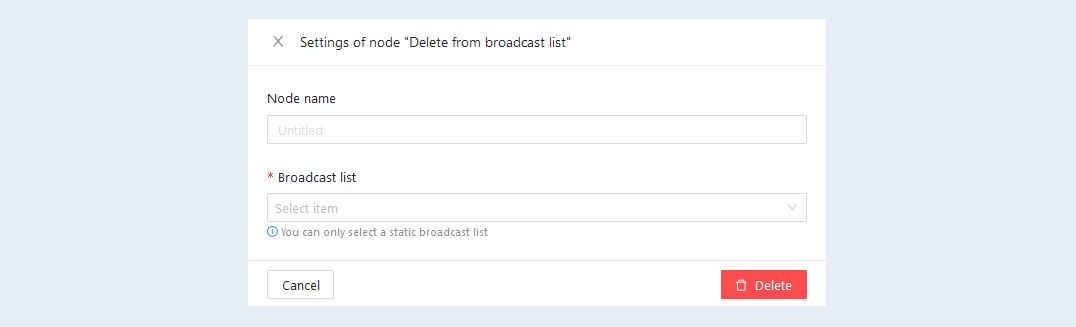
Node settings "Delete from broadcast list"
This action removes the email contact from the selected mailing list, and the messages from this mailing list will no longer be sent to the user.
In the opened node settings window, fill in the fields:
- Name node. Specify the name of the node, you can name the nodes in the script as you wish.
Broadcast list. Select a campaign from the list and click the "Delete" button.
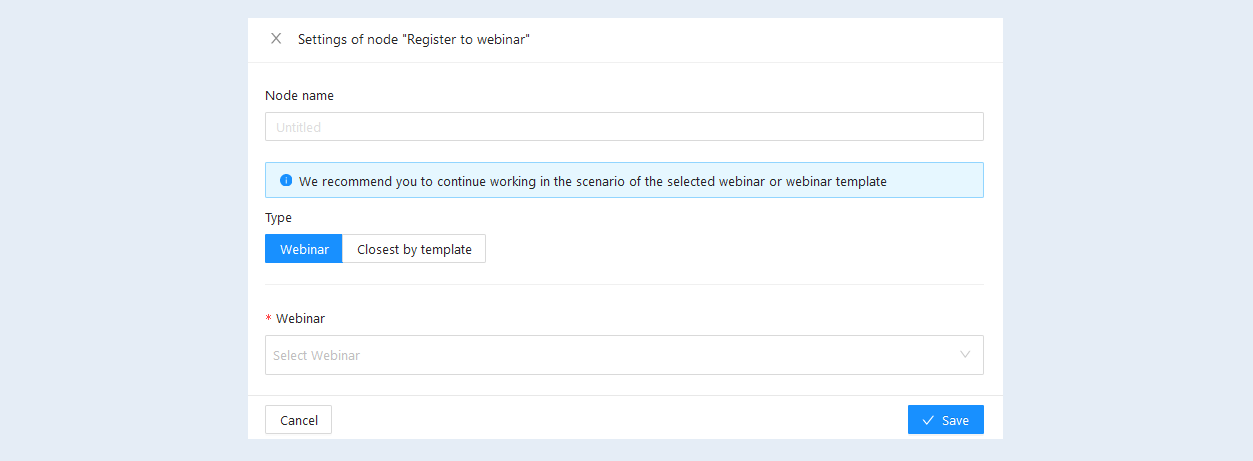
Node settings "Register to webinar"
This action registers the user for the selected webinar or the nearest automated webinar. For more information on how to create and set up a webinar, read the "Webinars" article.
In the opened node settings window, fill in the fields:
- Name node. Specify the name of the node, you can name the nodes in the script as you wish.
- Type. Choose a type: webinar or webinar template.
- Webinar. Select a webinar or webinar template from the list.
Node settings "Data request"
This action is triggered when there is a need to obtain user data. A data request is an operation that allows the platform to obtain information from or about the user. This data can be various, such as name, email, phone number.
A data request is necessary to collect information that can be used for personalizing learning, creating user profiles, analysis and statistics, monitoring learning progress, and improving the platform's functionality.
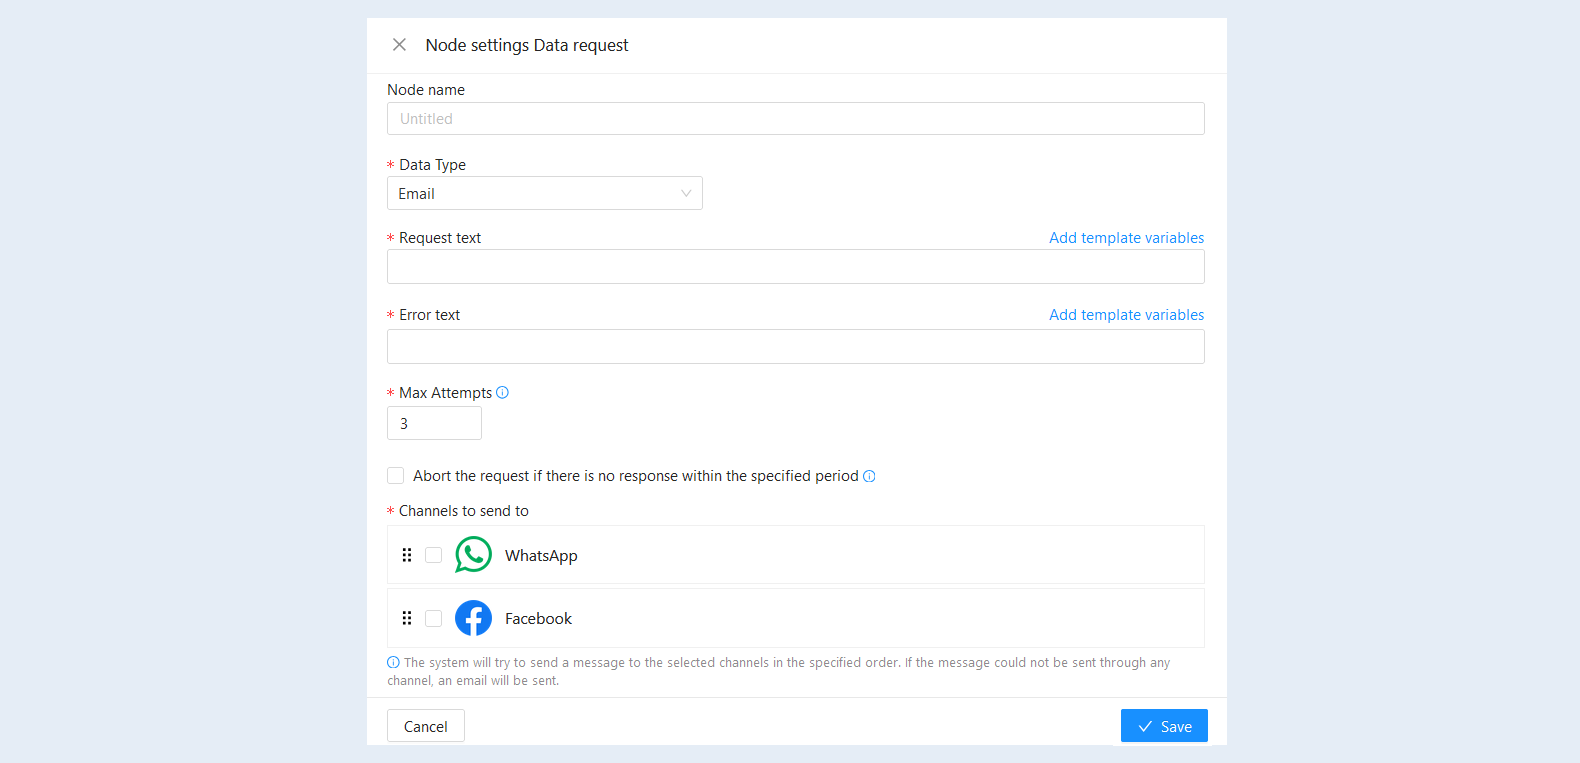
In the opened node settings window, fill in the fields:
- Name node. Specify the name of the node, you can name the nodes in the script as you wish.
- Data type. Select the type of data: email, first name, last name, telephone.
- Request text. Enter your request text. You can use variables in the text.
- Error text. Enter the error text. You can use variables.
- The maximum number of attempts. Set the maximum value for the number of attempts to request data. After this number of attempts, the script will stop requesting data.
Abort the request if there is no response within the specified period. It will work if the action fails.
Channels to send to. The system will try to send a message through the selected channels in the specified order. If it is not possible to send a message through any channel, an email will be sent. For more information about setting up channels, see the article "Chat Channels".
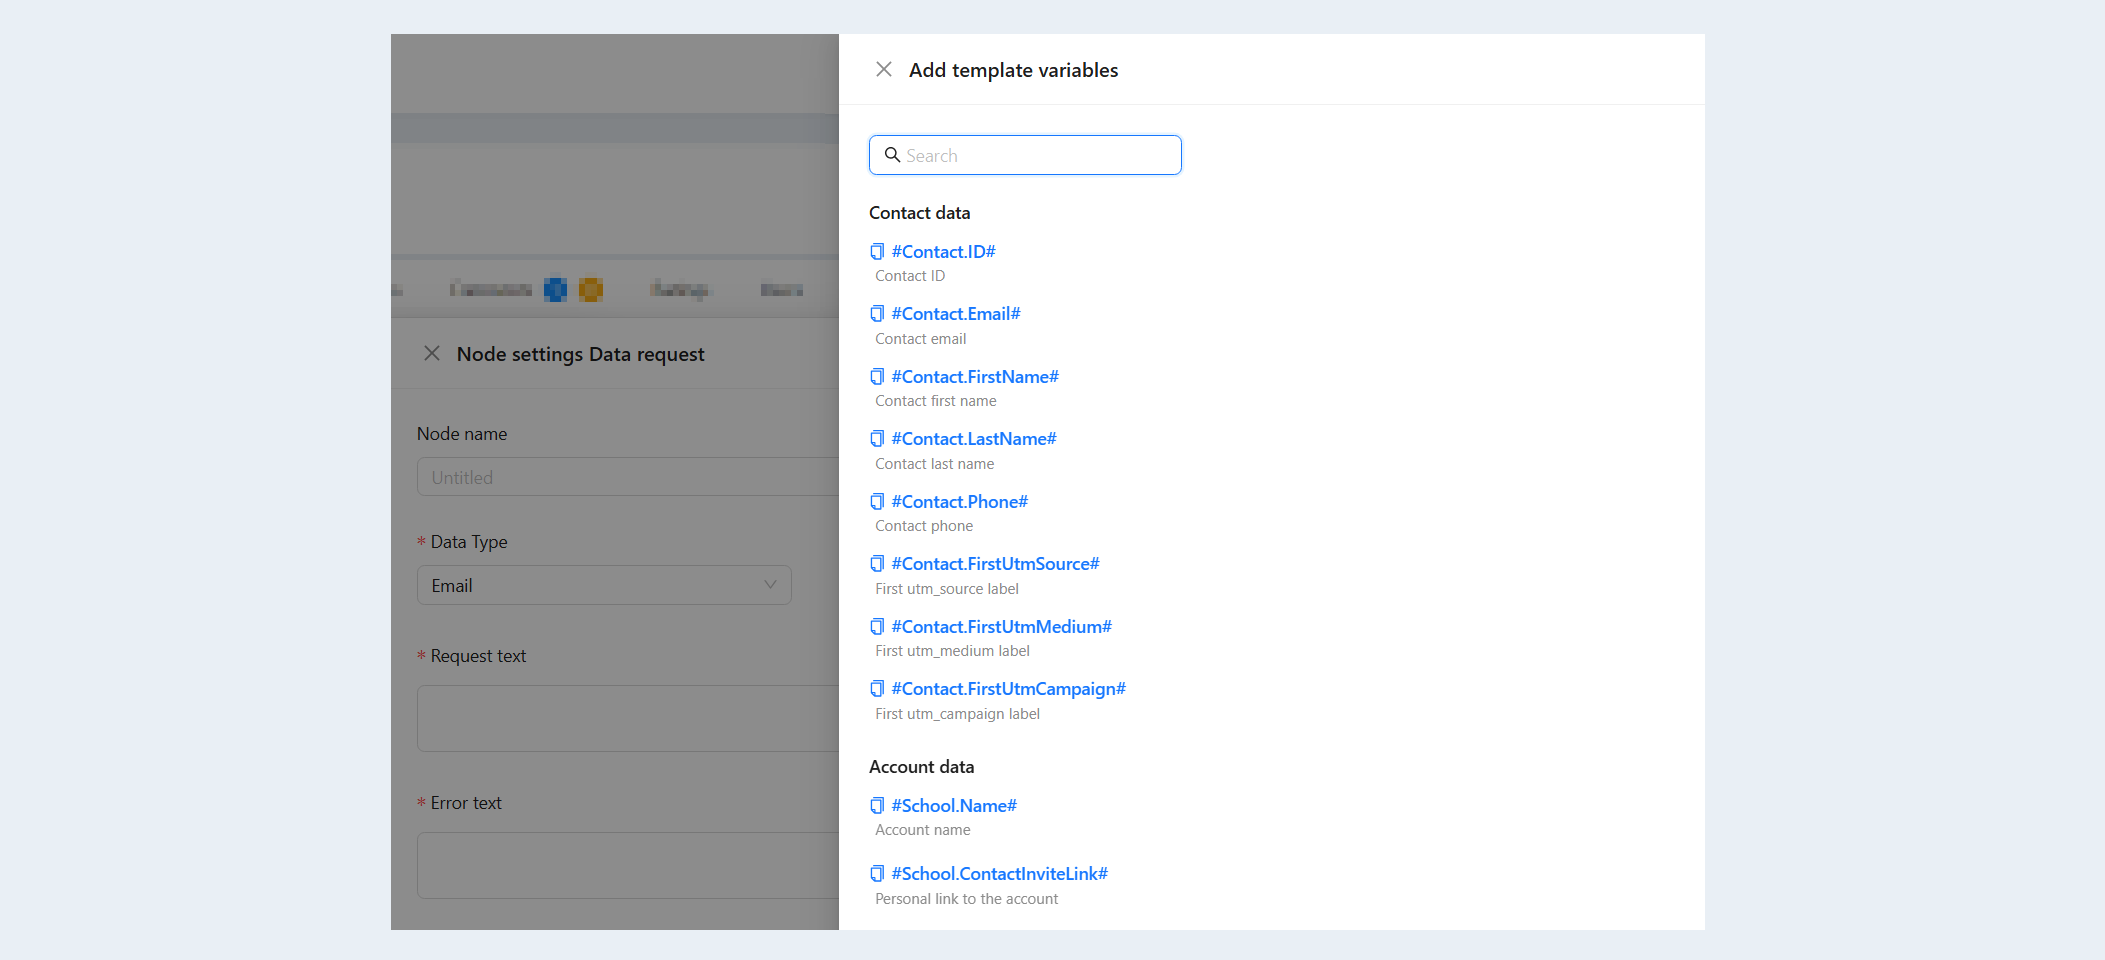
Click the "Add template variables" button next to the corresponding section. A list of variables will open on the right. Select the necessary variables from the list.
Node settings "Run scenario"
This action launches further actions of the configured scenario.
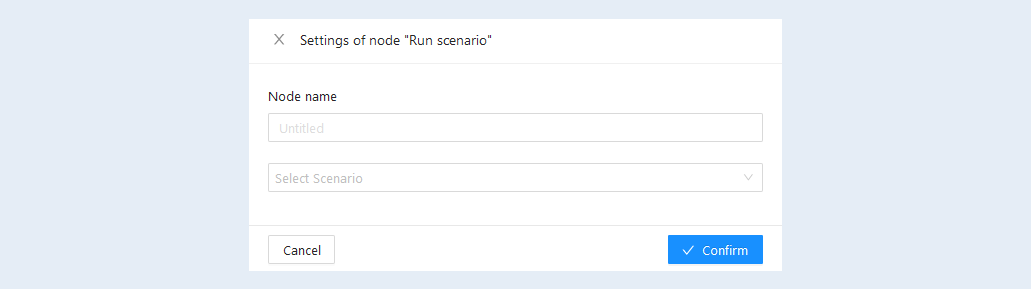
In the opened node settings window, fill in the fields:
- Name node. Specify the name of the node, you can name the nodes in the script as you wish.
Scenario. Select a script to run from the list. Click the “Confirm” button.
Node settings "Add to group"
This action adds a participant to the created user group. This action allows organizing users together to perform further actions with group members or grant them additional access or privileges. For example, showing the affiliate program only to users in a specific group.
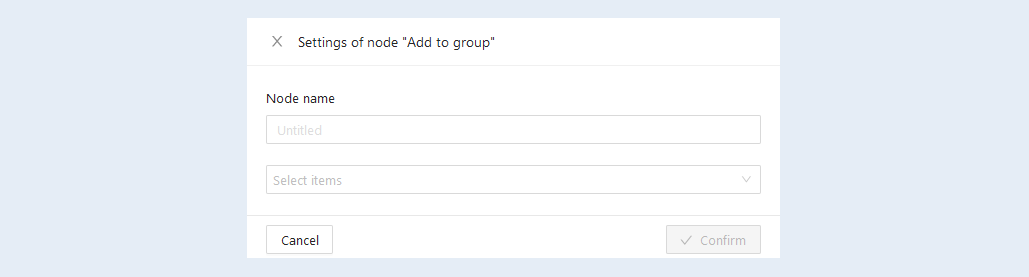
In the opened node settings window, fill in the fields:
- Name node. Specify the name of the node, you can name the nodes in the script as you wish.
Group. Select a group from the list. If there are no groups added, then you can create a new group and add it to the script. Click the “Confirm” button.
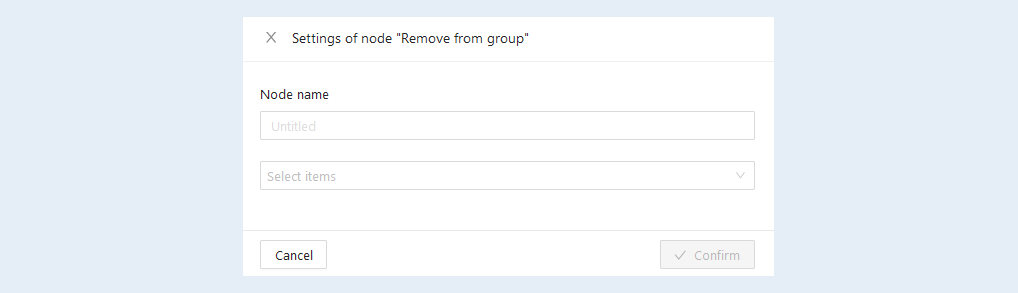
Node settings "Remove from group"
Removal from the group occurs when an administrator wants to exclude a participant from the group for various reasons. For example, if the user violates the group's rules or has completed the training in the course and is no longer required to be in the group. This action helps maintain the relevance and relevance of the group for current participants.
In the opened node settings window, fill in the fields:
- Name node. Specify the name of the node, you can name the nodes in the script as you wish.
Group. Select a group from the list. Click the “Confirm” button.
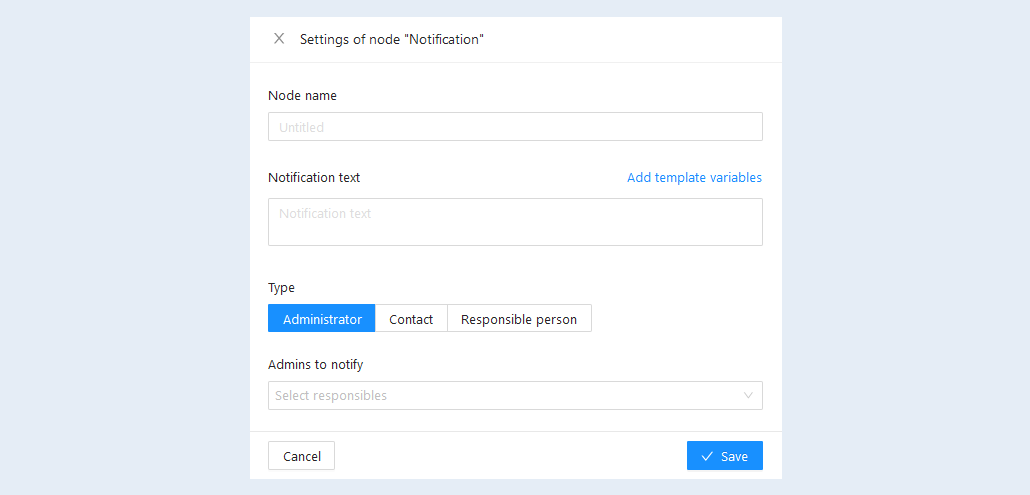
Node settings "Notifications"
This action sends a notification. This process involves sending a message or notification to the administrator or specified contact to inform about any event, action, or request in the system. The main goal of notifications is to ensure timely information and feedback with the administrator or contact. For example, a notification about a new user registration: when a new user registers on the platform, the administrator receives a notification with all the necessary user information. This helps the administrator know about the new user and take additional actions if necessary (e.g., approve their account).
Or, for example, an important update notification: if there is any important update on the platform, the administrator receives a notification with information about it. For example, feature updates, changes in the platform's policy, or the introduction of a new course. Such notifications help the administrator stay aware of all changes and convey this information to users and teachers.
In the opened node settings window, fill in the fields:
- Name node. Specify the name of the node, you can name the nodes in the script as you wish.
Notification text. Write the text of the notification.
Type. Select the type: Team, contact, or contact responsible. If you select "Administrator" - the administrators of the account will receive a notification, select the administrator from the list. If you select "Contact", a registered user in your membership portal will receive a notification. If you select "Responsible for the contact", the responsible person will receive the notification, specify the name of the position of the responsible person.
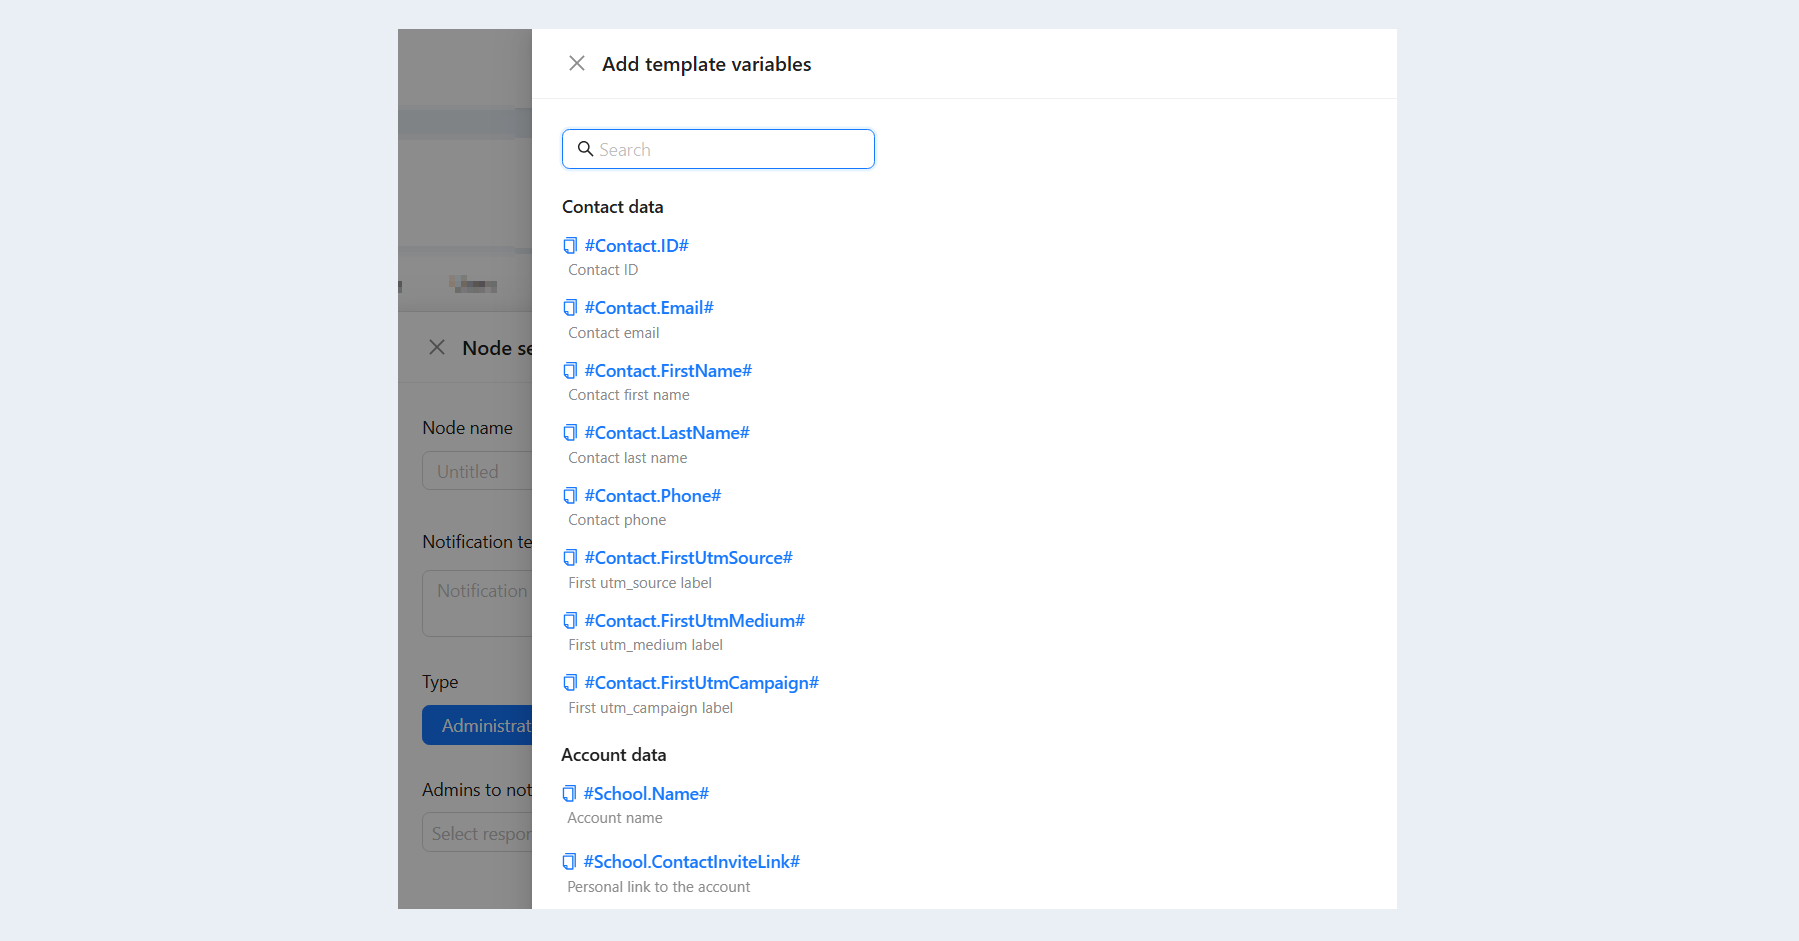
Click the "Add Variables" button. A list of variables will open on the right. Select the necessary variables from the list.
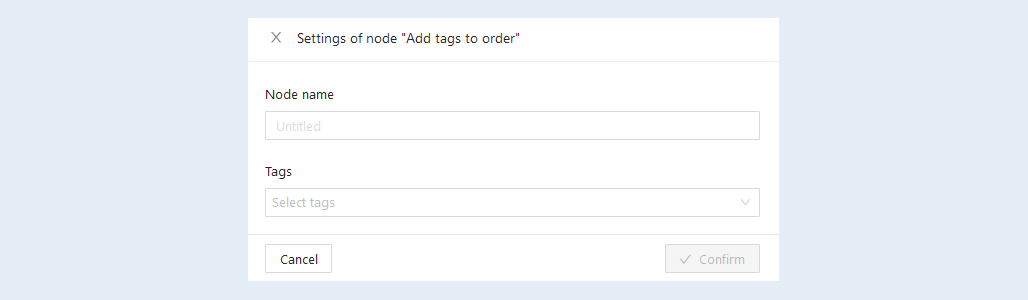
Node settings "Add tags to order"
This action adds tags to the order. Tags will be added if the scenario detects an order. Check for the presence of an order event at the beginning of the scenario.
Tags for orders are a set of labels or keywords that help classify and organize orders by different parameters. They are needed for easier navigation and search on the platform. For example, with the help of tags, an employee can quickly find orders that match their interests or expertise. If an employee is a teacher in a particular subject area, they can filter only orders related to that subject area using the corresponding tag.
In the opened node settings window, fill in the fields:
- Name node. Specify the name of the node, you can name the nodes in the script as you wish.
Tags. In the "Settings" field, select from the list of tags. Click the “Confirm" button.
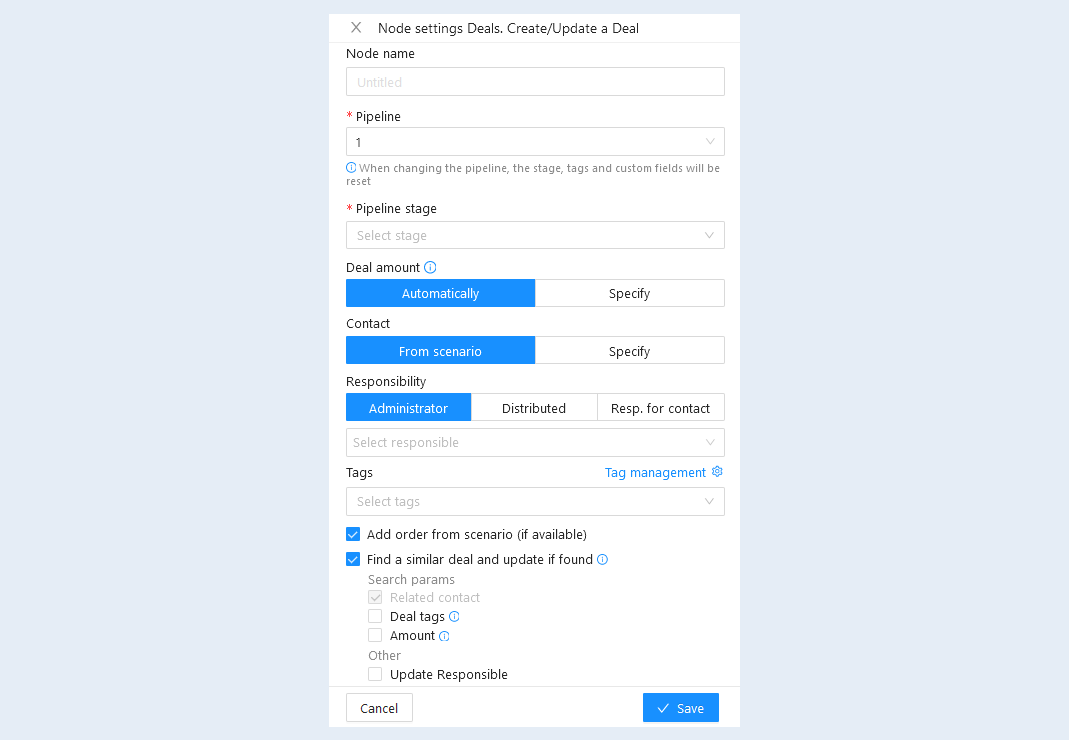
Node settings "Deals. Create/Update a Deal"
This action adds a contact to the selected stage of the transaction or updates a previously created transaction in the sales funnel.
A sales funnel is a graphical representation of the steps a potential customer goes through, starting from the first contact to the conclusion of a deal. The action includes filling in information about a potential customer and helps with assigning sales tasks, determining the stage of sale and predicting the probability of closing a deal. This action allows sales staff to visualize the entire process under control and effectively manage it.
For example, a potential customer fills out a form on a website expressing interest in a product/service. Next, a deal is created in the sales funnel, specifying customer data and assigning tasks for feedback and product demonstration.
For more information on how to create and configure a funnel, read the article "Deals".
In the opened node settings window, fill in the fields:
Name node. Specify the name of the node, you can name the nodes in the script as you wish.
Pipeline. Select the funnel, you will open additional fields.
Pipeline stage. Specify the funnel stage to which the transaction will be added.
Deal amount. Specify the transaction amount or select "Automatically". In this case, the amount will be automatically taken from the order that will be added to this transaction. If there is no order in this scenario, the amount will be 0.
Contact. Specify the contact that will be displayed in the transaction card. The contact can be taken from the script (the data entered when submitting the form) or the associated contact can be selected manually.
Responsibility. Assign a responsible employee to perform this task. You can choose one responsible administrator or distribute tasks among several employees. In this case, the transaction will be assigned in turn between the selected team members. You can also choose the person responsible for the contact by specifying the name of his position.
Tags. Add tags to the transaction. Click the Manage Tags button to find or create new tags.
Check the box "Add an order from the scenario (if available)" so that the order from the script is added to the transaction.
Find a similar deal and update if found. If the system finds the same active deal (not deleted, not at the stages “Successfully implemented” and “Not implemented”) in the specified pipeline, it will update it and move it to the selected stage. The comparison will take place on the selected contact and on the parameters selected below. Set the necessary search parameters:
- Related contact. The system will automatically search for related contacts.
- Deal tags. When selecting the search parameter - deal tags, all selected tags in the deal will be taken into account, the absence of tags will also be compared.
- Amount. When selecting the search parameter - amount, a complete budget match will be taken into account.
- Update Responsible. In order to update the responsible executor in the deal, check the box "Update responsible".
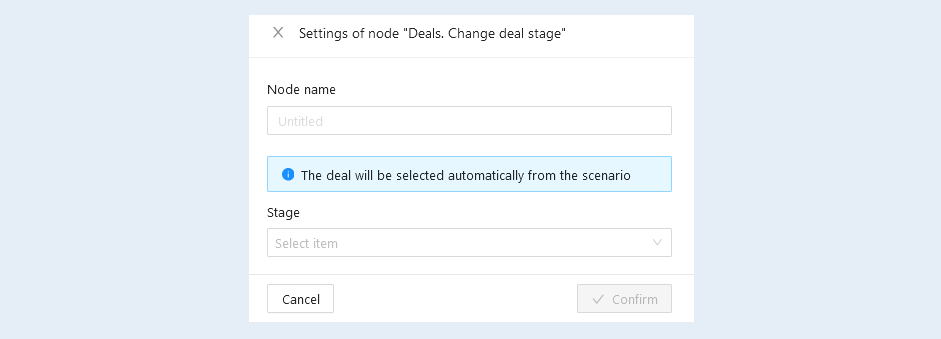
Node settings "Deals. Change deal stage"
This action moves the contact to a new selected stage of the transaction in the sales funnel. This action can help optimize the sales process and increase the success of making deals.
For example, a potential client who is "Interested" at the stage of the transaction undergoes tests to determine his level of knowledge proficiency. After passing the test, the contact will be transferred to the next stage of the transaction, where he receives personal advice on the choice of courses.
Or, for example, a potential customer postpones a purchase decision. The platform moves the transaction to the "Pause" stage in the sales funnel, assigns tasks to resolve emerging problems and a re-contact plan to close the transaction.
In the opened node settings window, fill in the fields:
- Name node. Specify the name of the node, you can name the nodes in the script as you wish.
Stage. In the "Settings" field, select from the list the stage to be changed to. Click the “Confirm" button.
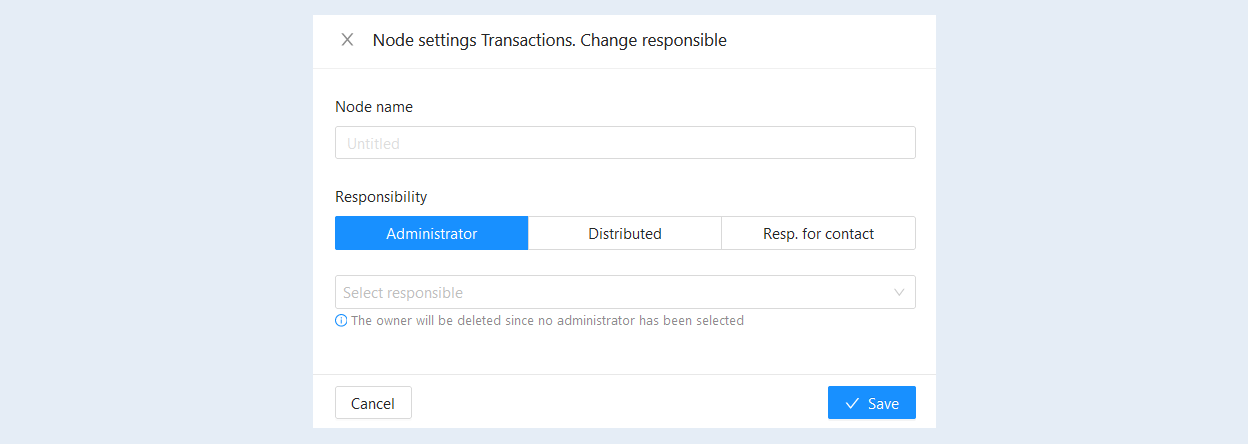
Node settings "Deals. Change responsible"
This action replaces the responsible performer for the selected transaction.
For example, initially a manager, responsible for attracting new clients, was assigned as the responsible person. However, if the client shows interest in a specific product or service during the initial contact stage, the responsibility can be transferred to a specialist who specializes in that specific product or service.
Or, for example, when a client shows interest and is ready to start the demonstration of an online platform, the responsibility can be transferred to an employee responsible for the demonstration.
In the opened node settings window, fill in the fields:
- Node Name. Specify the name of the node. You can name the nodes in the scenario at your discretion.
Responsibility. Change the responsible employee for executing this transaction. Select the type of responsibility:
- Administrator. You can choose one responsible administrator.
Distribution. You can distribute transaction tasks among multiple employees. In this case, the transaction will be assigned in rotation among the selected team members.
Resp. for contact. You can also choose a contact person by specifying their job title. If the responsible person with this position is not found, no responsible person will be assigned.
Click the "Save" button.
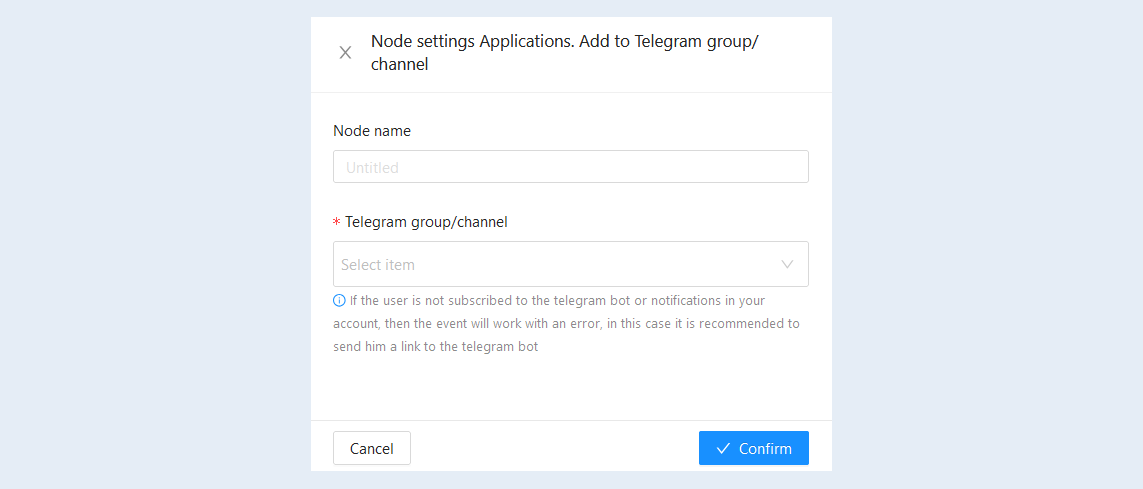
Node settings "Applications. Add to Telegram group/channel"
This action adds the contact to a Telegram group/channel associated with a specific educational course or program. Joining a Telegram group/channel allows for active communication and collaboration with other users and instructors, which contributes to more effective learning and additional support. Being part of the group helps users feel like part of the educational community, stimulating participation in discussions, sharing ideas, and active engagement.
For example, during the course, users are encouraged to actively participate in the Telegram group chat, discussing course material, sharing their thoughts, and asking questions. This way, they can receive feedback from instructors and other participants regarding their ideas and discussions.
Or, for example, after successfully completing the first module of a course, users automatically join a Telegram group where they can access additional content related to the educational program and find out about extra resources for a deeper understanding of the subject.
For more details about Telegram group settings, please read the article "Telegram Group Application".
In the opened node settings window, fill in the fields:
- Name node. Specify the name of the node, you can name the nodes in the script as you wish.
Telegram group/channel. In the "Settings" field, select from the Telegram list the group/channel to which you want to add the user. Click the “Confirm" button.
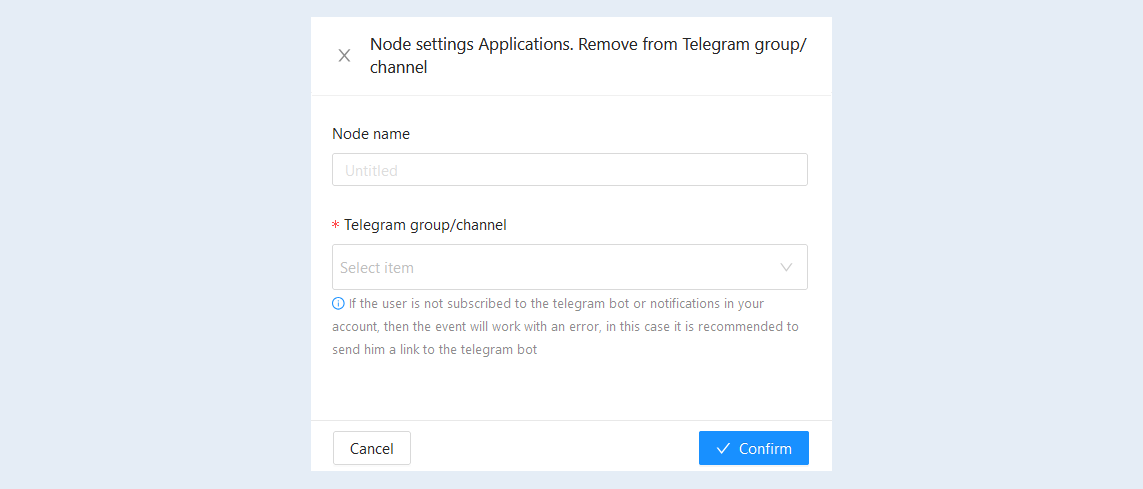
Node settings "Applications. Remove from Telegram group/channel"
This action removes the contact from a Telegram group/channel. Removing members from the group allows teachers and administrators to have control over the participants in the learning process. For instance, if a participant violates platform rules or displays unconstructive behavior, they can be removed from the group to prevent potential conflicts. Additionally, this action can be used to filter out inactive participants or those who do not follow instructions. This allows for focusing on more active participants.
In the opened node settings window, fill in the fields:
- Name node. Specify the name of the node, you can name the nodes in the script as you wish.
Telegram group/channel. In the "Settings" field, select from the Telegram list the group/channel from which you want to remove the user. Click the “Confirm" button.
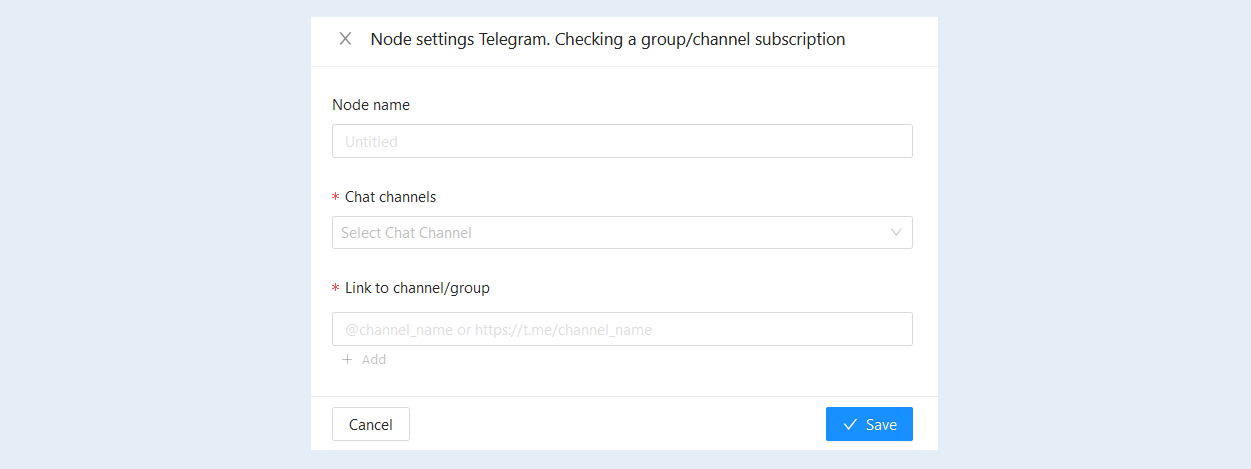
Node settings "Telegram. Checking a group/channel subscription"
This action allows you to make sure that the user is really subscribed to a certain channel or group in Telegram, which can serve as proof of his participation in certain activities or receiving information.
You can use a subscription to a channel or group as a condition for access to exclusive content, such as lessons, webinars, or additional materials. Checking your subscription may be a condition for continuing your studies or obtaining additional resources.
By keeping in touch via Telegram, you can increase user engagement by providing up-to-date information, updates, or reminders about upcoming events.
In the node settings window that opens, fill in the fields:
Node name. Specify the name of the node, you can name the nodes in the script as you wish.
Chat channels. Select a Telegram channel from the list.
Link to the channel/group. Insert a link to a Telegram channel or group in the @channel_name format or https://t.me/channel_name.|
To add multiple links, click the "Add" button.
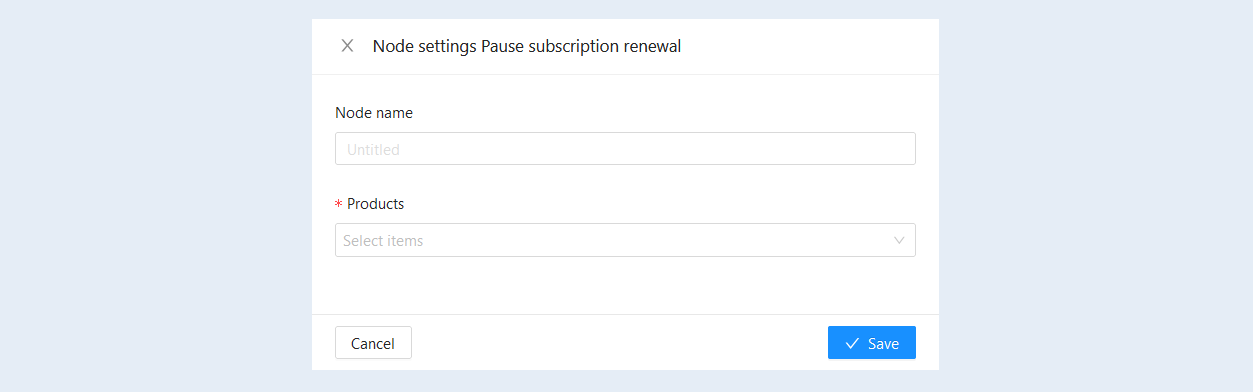
Node settings "Pause subscription renewal"
This action allows temporarily pausing payments and user access to the platform's content. This action helps users manage their finances, time, and the content they receive from the online learning platform.
For example, during a vacation or break, a user may have plans to pause or take a break from using the platform. In this case, they can temporarily pause their subscription to avoid paying for an inactive period.
Or, in the case of saving money, if a user decides to reduce expenses temporarily, pausing the subscription helps to avoid payments during that period.
In the opened node settings window, fill in the fields:
Node name. Specify the name of the node, you can name the nodes in the script as you wish.
Products. Select the subscription from the suggested list, access to which will be suspended. Click the “Save" button.
Node settings "Bonus balance. Add transaction"
This action creates a transaction to either add bonus points to a user's bonus account or deduct bonus points from the account. The bonus account is represented by bonus points displayed in the user's profile, and they can use them to purchase products, obtain certain privileges, or access specific services. Bonus credits cannot be withdrawn.
Adding a transaction to replenish a user's bonus account means allocating a specific amount of bonus points to their account. A transaction to deduct from the bonus account means reducing the balance of bonus points on the user's account. This functionality helps to incentivize users to actively participate in the educational process, encourage task completion, achievement of specific results, or participation in promotional activities.
For example, earning bonuses for task completion. When a user completes a specific task or receives a good grade for their work, the system automatically credits bonus points to their bonus account, which can be used to pay for the next course or receive discounts on other platform services.
Or, for example, earning bonuses as part of a promotion such as "Get double bonuses for inviting a friend." In this case, when a user successfully invites a friend to the platform, they receive a transaction on their bonus account.
Another example is adding bonuses to the bonus account as a refund. In some cases, you may offer users a choice between a cash refund or adding the refunded amount to their bonus account. If the user chooses to add it to their bonus account, a corresponding transaction is added, increasing their bonus balance.
Read more about the user's bonus account in the article "Bonus balance".
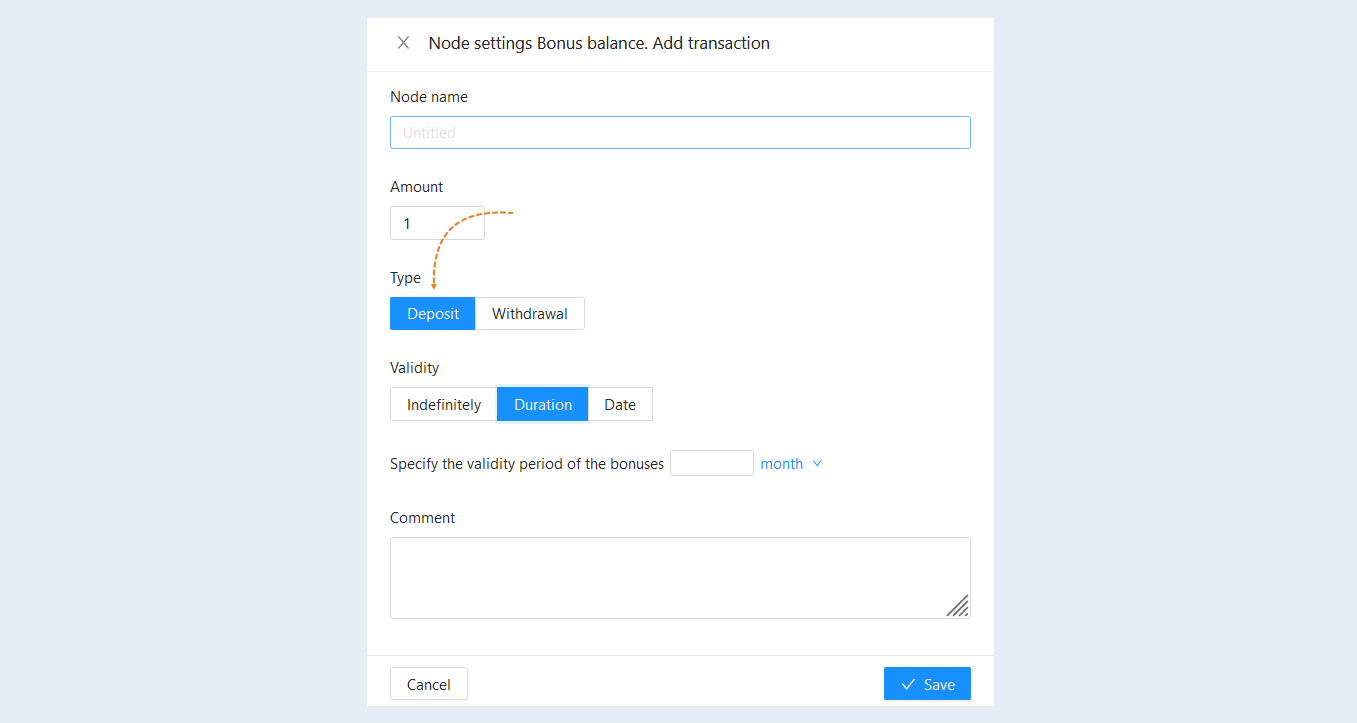
When choosing the type of transaction - Deposit. In the opened node settings window, fill in the fields:
Name node. Specify the name of the node, you can name the nodes in the script as you wish.
Amount. Specify the amount of deposit or withdrawal. The amount is indicated in the currency of the account.
Type. Select the commission type: deposit or withdrawal.
- Deposit is a transaction for crediting bonus credits to a user's bonus account.
- Deposit is a transaction for crediting bonus credits to a user's bonus account.
Validity. Set the validity period of the accrued bonuses.
- Indefinitely. The validity period of bonuses is unlimited.
Duration. The bonuses will be active for the selected amount of time. In the field below, set the validity period of bonuses in days or months.
Date. The bonuses will be active until the selected date. In the field below, select the date when the accrued bonuses will be burned.
Comment. Add a comment to the transaction.
Click the “Save" button.
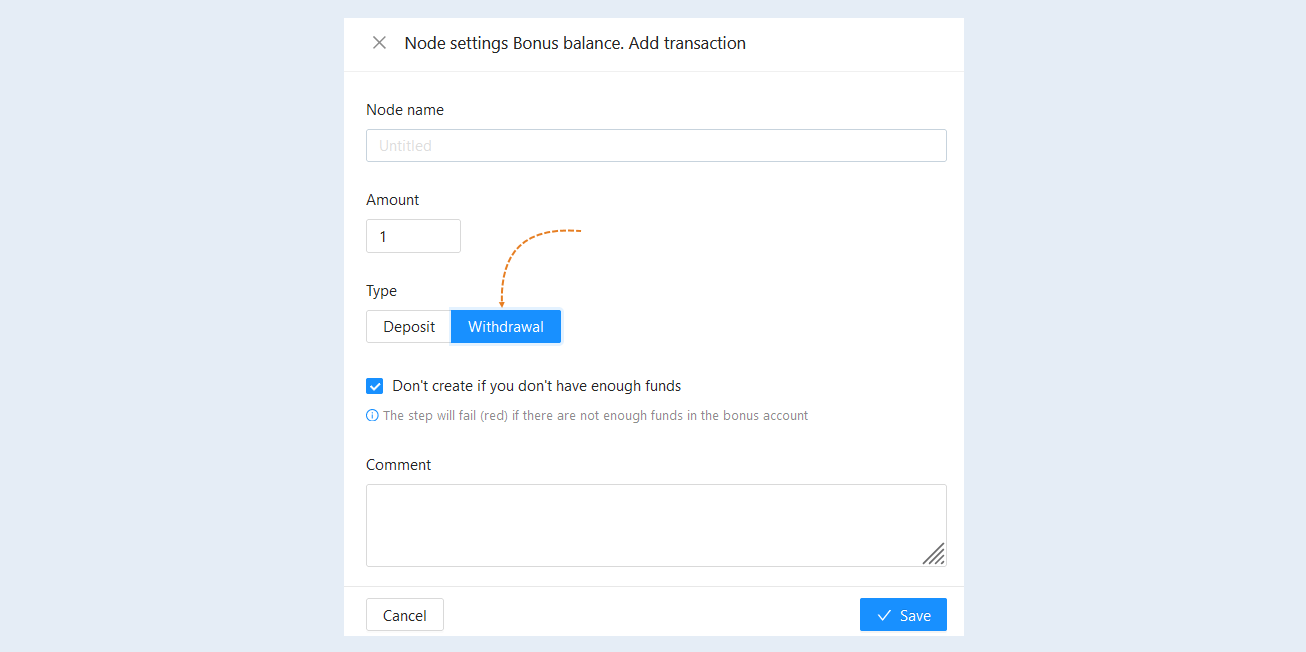
When choosing the type of transaction - Withdrawal. In the opened node settings window, fill in the fields:
Name node. Specify the name of the node, you can name the nodes in the script as you wish.
Amount. Specify the amount of deposit or withdrawal. The amount is indicated in the currency of the account.
Type. Select the commission type: deposit or withdrawal.
Withdrawal is a transaction for debiting bonus credits from a user's bonus account.
Don't create if you don't have enough funds. This option is available when you select the type of transaction - debit. Check the box so that the transaction is not carried out if there are not enough funds in the bonus account. In this case, the step will fail and the script will continue along the red line.
Comment. Add a comment to the transaction.
Click the “Save" button.
Node settings "Affiliate program. Add transaction"
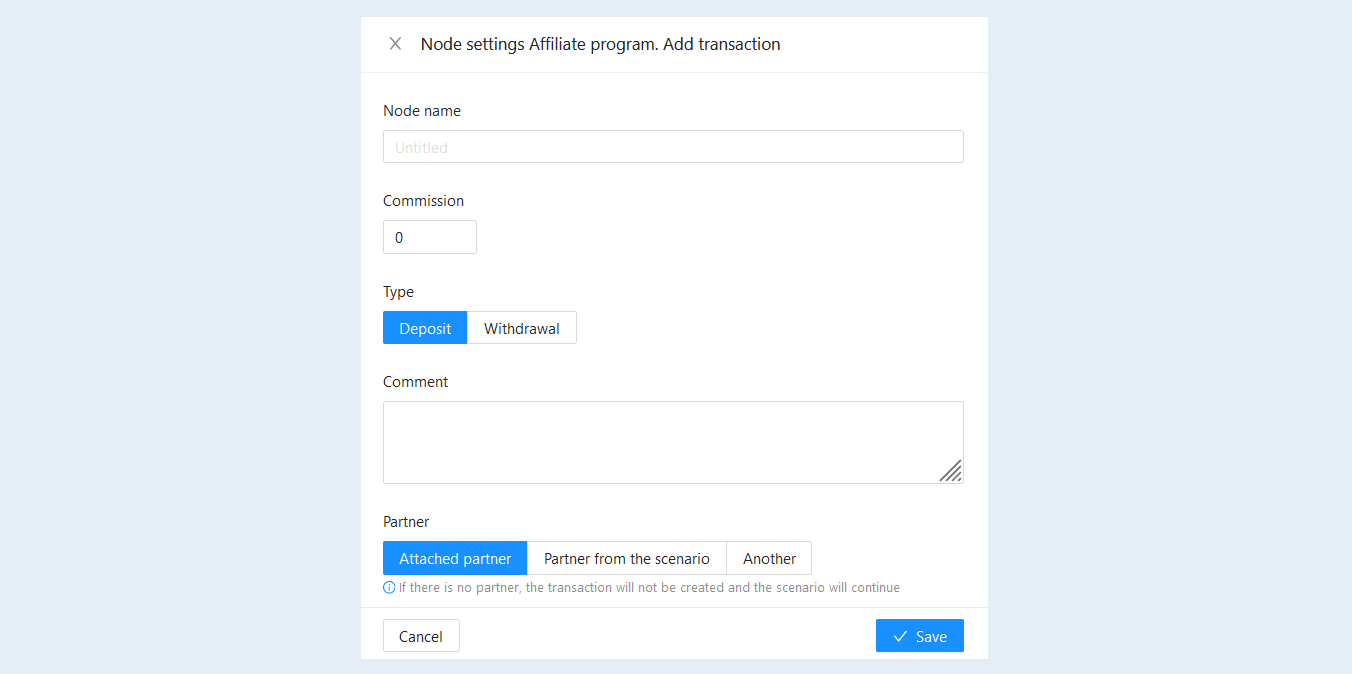
This action creates a transaction for depositing or deducting a commission for participating in the affiliate program. The affiliate program allows attracting new customers through partners who receive rewards for each referred user or for sales of platform products. Transactions within the affiliate program are necessary for tracking and accounting for partner rewards. For example, successful completion of a specific stage of training. The partner receives a reward when users referred by them to the platform successfully complete a specific stage of training, such as completing a certain module or achieving a certain level. Or, for example, successful sale. The partner is credited with a certain reward when a user referred by the partner makes a purchase on the platform. This helps to develop the partner network and increase the number of new users on the platform. These transactions will be reflected in the "Affiliate program" section in the "Charges and payments" tab. For more information about the affiliate program, read the article "Affiliate program".
In the opened node settings window, fill in the fields:
Name node. Specify the name of the node, you can name the nodes in the script as you wish.
Commission. Specify the amount of replenishment or debiting. The amount is indicated in the currency of the account.
Type. Select the commission type: deposit or withdrawal.
Deposit is a transaction for crediting a commission for the implementation of an affiliate program.
Withdrawal is a transaction to write off the commission for the implementation of the affiliate program.
These transactions will be reflected in the "Charges and payments" tab of the affiliate program.Comment. Add a comment to the transaction.
Partner. Select a partner to whom the commission will be credited to the partner's account:
- Attached partner. The commission will be credited to the partner attached to the user. If the user does not have an attached partner, no transaction will be created, and the scenario will continue without commission.- Partner from the scenario. The partner will be automatically selected from the scenario. If there is no partner in the scenario, no transaction will be created, and the scenario will continue.
- Another. Choose a partner from the contact list to whom the commission will be credited.
Click the “Save" button.
Node settings "Affiliate program. Change partner"
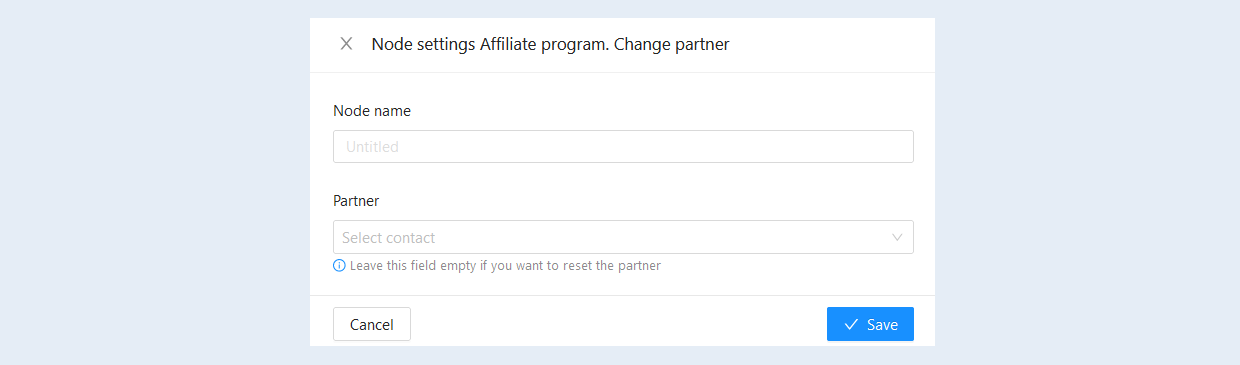
This action allows replacing the partner for a contact or resetting the partner. When an invited guest clicks on an affiliate link, registers, or makes a purchase, they are associated with the partner who invited them. This allows tracking which partner attracted a specific guest or user and awarding a commission to the partner.
In the opened node settings window, fill in the fields:
Name node. Specify the name of the node, you can name the nodes in the script as you wish.
Partner. Select from the suggested list the partner you want to attach to the contact. If you want to reset the partner, leave the field empty.
Click the “Save" button.
Node settings "Switch"
The switch allows creating multiple branches on a scenario. Each branch will be responsible for its own sequence of events and actions. You can set a minimum of 2 ports and a maximum of 10, and set the sequence of switching ports: sequentially from the first to the last or switching in random order.
Below are two examples of scenarios that can be implemented using the switch:
1. The switch can be used to create ports with different bonus-related events. For example, when creating a wheel of fortune or a lottery, a switch with 10 ports, each with its own chain of events and actions, is added to the scenario after a user event. The selection is set to a random order. After the user launches the scenario, it chooses a random port on the switch, activating the corresponding chain of events. The chain of events may have conditions, for example, for the user to win, they need to answer questions or complete certain tasks. In case of victory, the user is awarded bonus points or other rewards predefined in the chain of events.
2. Load balancing scenario between sellers. For example, 4 ports are created on the switch, and sequential switching is set. Each port corresponds to a specific seller and has its own chain of actions. When a user sends a request, the scenario sequentially selects a seller using the switch and assigns tasks for making a sale. Alternatively, a ratio can be established where 1 port distributes tasks to the first seller, and the remaining 3 ports distribute tasks to the second seller. This way, the task volume ratio between sellers will be 1:3. Thus, the switch ensures equal distribution of workload between sellers, improving the overall efficiency of the sales process.
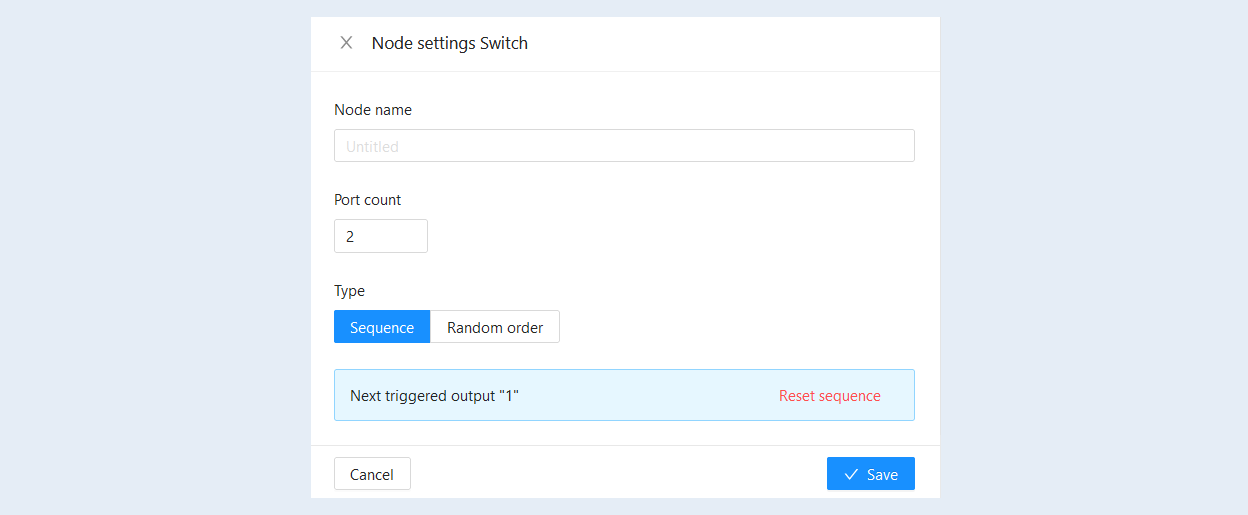
In the opened node settings window, fill in the fields:
Node name. Specify the name of the node, you can name the nodes in the script as you see fit.
Port count. The switch allows you to create multiple outputs in the script branch. Each port will be responsible for its own sequence of events and actions. You can set from 2 to 10 outputs.
Type. Select the type of port switching: sequentially from the first to the last or switching in random order. The next triggered port will be displayed below. You can reset the switching sequence to start the sequence again.
Click the "Save" button.
Node settings "Issue certificate"
Issuing a certificate means creating and providing a certificate to a user, which confirms their successful completion of a specific course or learning program. The anticipation of receiving a certificate can be a powerful motivational factor for participants. The desire to receive recognition for their efforts and level of achievements, as well as the desire to have documented evidence of their skills, can contribute to greater activity. Excellent certificates and diplomas can serve as an enticing tool for attracting new participants and advertising your account. Issuing certificates helps establish a reputation, build trust among participants, and increase motivation for learning. Additionally, certificates can also be presented to external parties, such as potential employers or educational institutions, for evaluating a user's qualification.
For example, after successfully completing a course, a participant receives a certificate confirming their participation and level of achievement in the studied subject.
Or, for instance, participants joining a webinar or training session can receive a participation certificate, which confirms their attendance and active involvement in the event.
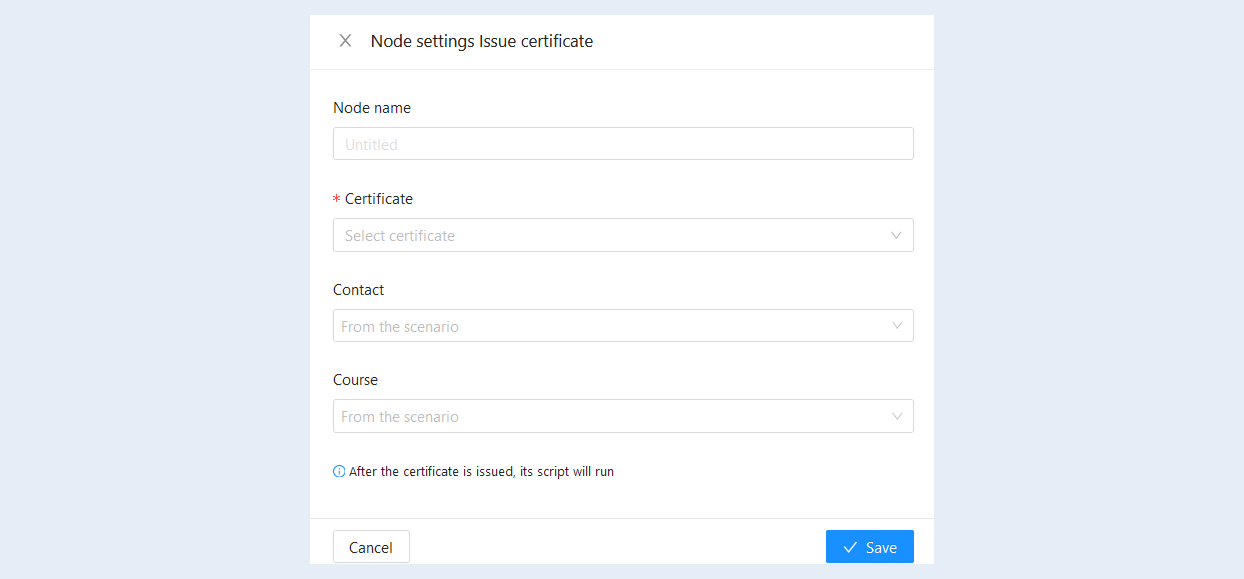
In the settings window that appears, fill in the fields:
- Node name. Specify the name of the node. You can name nodes in the scenario as you see fit.
Certificate. Choose a certificate from the list of options provided. For more information on certificate settings, refer to the "Certificates" article.
Contact. This field is not mandatory to fill in. By default, a contact from the scenario will be selected. You can also configure individual issuance by selecting a contact from the list for whom the certificate will be issued.
Course. This field is not mandatory to fill in. By default, a course from the scenario will be selected. Alternatively, choose the name of the course from the list to be indicated on the certificate.
Click "Save" button. After issuing the certificate, its scenario will be activated.
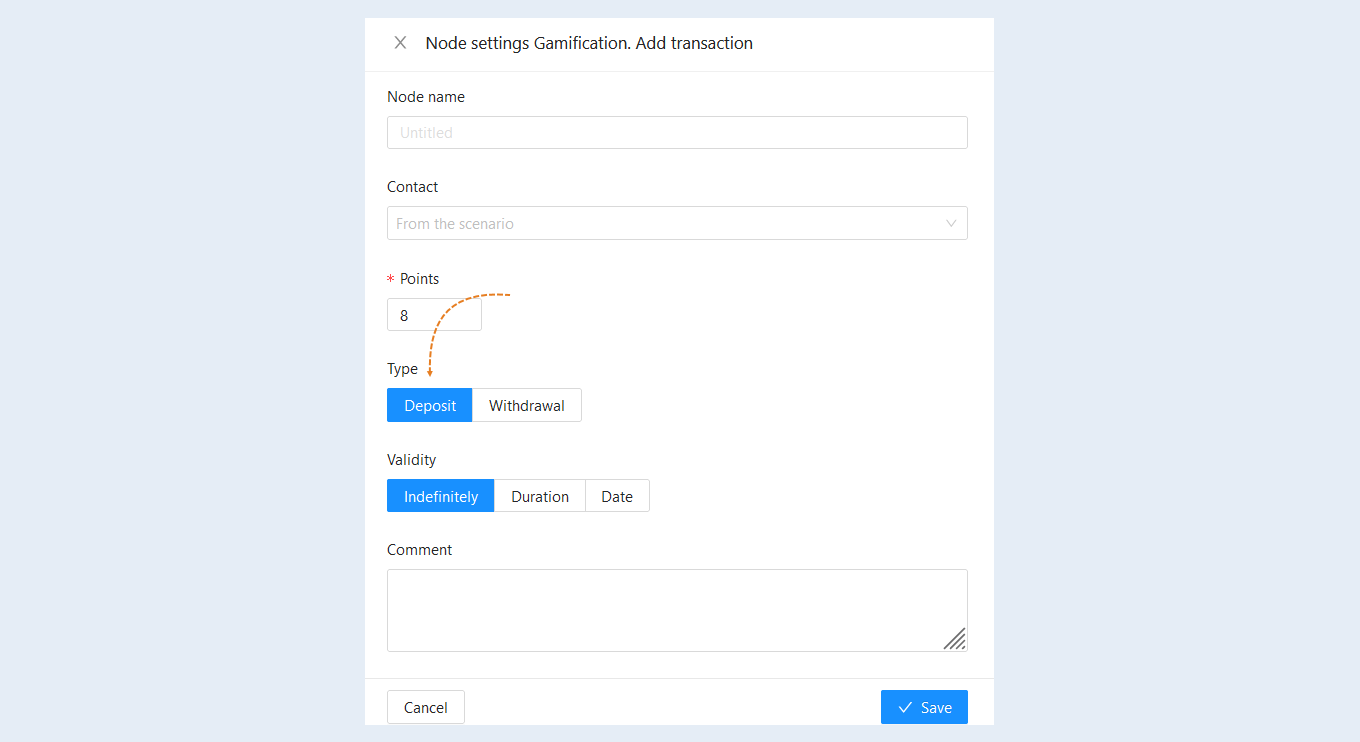
Node settings "Gamification. Add transaction"
This action creates a transaction for adding or deducting points from the achievements account in the "Gamification" section.
Achievement points represent a system of rewards and user progress measurements. Points are credited to the achievements account, which is reflected in the user's personal account. Users can use these points to purchase products or obtain specific privileges or services in the "Points Store". Points cannot be withdrawn.
A transaction for adding to the achievements account means crediting a certain amount of points to the account. For example, points can be rewarded for successful completion of tasks, passing tests, participation in additional activities, and achieving specific goals.
A transaction for deducting from the achievements account means reducing the amount of points in the user's account. Points can be deducted for poor activity in a group project, late submission of homework by 1 day, or violation of platform rules.
This functionality allows for stimulating users to actively participate in the educational process, encourage task completion, achievement of specific results, or participation in promotional activities.
For more information about user points, please refer to the "Gamification" article.
When selecting a transaction type - Deposit, in the opened node settings window, fill in the fields:
- Node name. Specify a name for the node, you can name nodes in the scenario as you wish.
Contact. This field is not mandatory. By default, the contact from the scenario will be selected. You can also configure an individual scenario by selecting a contact from the list for whom the transaction will be made.
Points. Specify the number of points for replenishment or deduction.
Type. Select the commission type: replenishment or deduction.
Deposit - a transaction for adding bonuses.
Validity. Set the validity period for the credited bonuses.
- Indefinitely - the validity period of the bonuses is not limited.
Duration - the bonuses will be active for the selected amount of time. Set the validity period of the bonuses in days or months.
Date - the bonuses will be valid until the selected date. Select the expiration date for the credited bonuses.
Comment. Add a comment to the transaction.
Click the "Save" button.
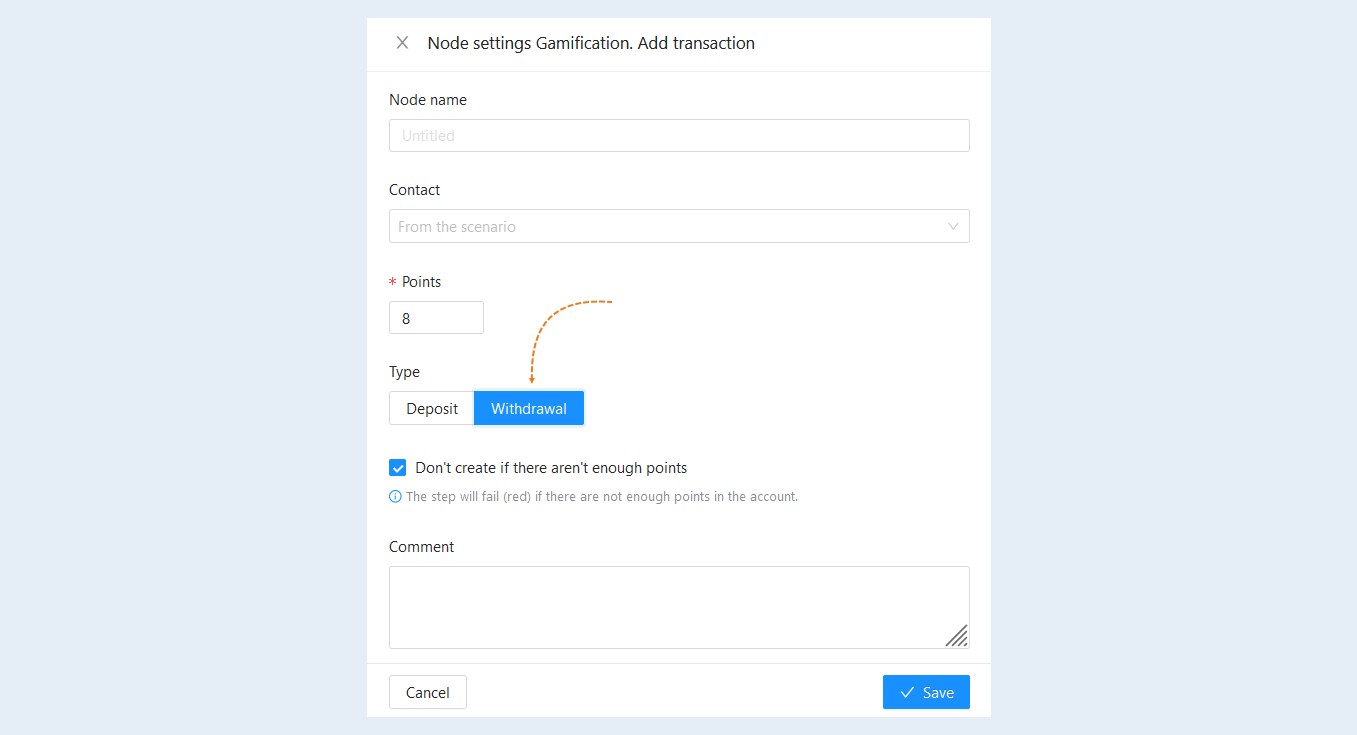
When selecting a transaction type - Withdrawal, in the opened node settings window, fill in the fields:
- Node name. Specify a name for the node, you can name nodes in the scenario as you wish.
Сontact. This field is not mandatory. By default, the contact from the scenario will be selected. You can also configure an individual scenario by selecting a contact from the list for whom the transaction will be made.
Points. Specify the number of points for replenishment or deduction.
Type. Select the commission type: replenishment or deduction.
Withdrawal - a transaction for deducting bonuses.
Don't create if there aren't enough points. This option is available when selecting a deduction transaction type. Check the box to cancel the transaction if the user's account does not have enough points. In this case, the step will fail and the scenario will continue along the red line.
Comment. Add a comment to the transaction.
Click the "Save" button.
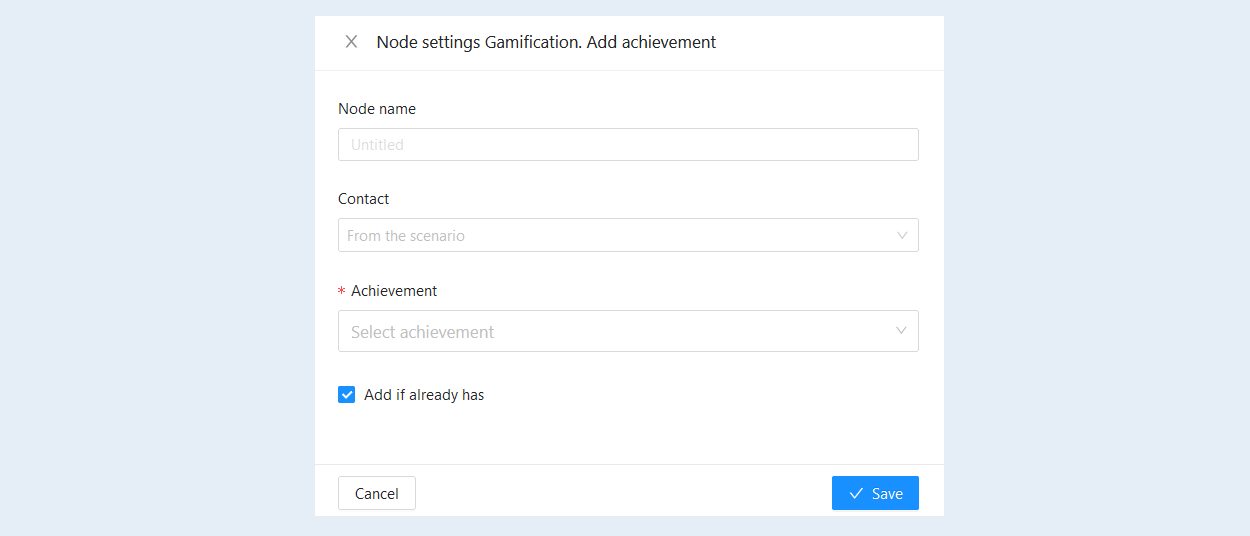
Node settings "Gamification. Add achievement"
The action "Add achievement" allows assigning a specific achievement or reward to a user for completing certain goals, tasks, or learning stages. This action functions as a user encouragement tool, motivating them to achieve better results and progress in their education.
When an achievement is completed, points are credited to the achievements account. Crediting points to users can also be used as a tool for assessing their achievements and progress in learning. For more information about achievements, please refer to the "Gamification" article.
In the opened node settings window, fill in the fields:
- Node name. Specify a name for the node, you can name nodes in the scenario as you wish.
Contact. This field is not mandatory. By default, the contact from the scenario will be selected. You can also configure an individual scenario by selecting a contact from the list for whom the achievement will be added.
Achievement. Select an achievement from the proposed list. You can add and configure a new achievement in the "Gamification" section.
Add if already has. Check this box to add the achievement regardless of whether it has been added before.
Click the "Save" button.
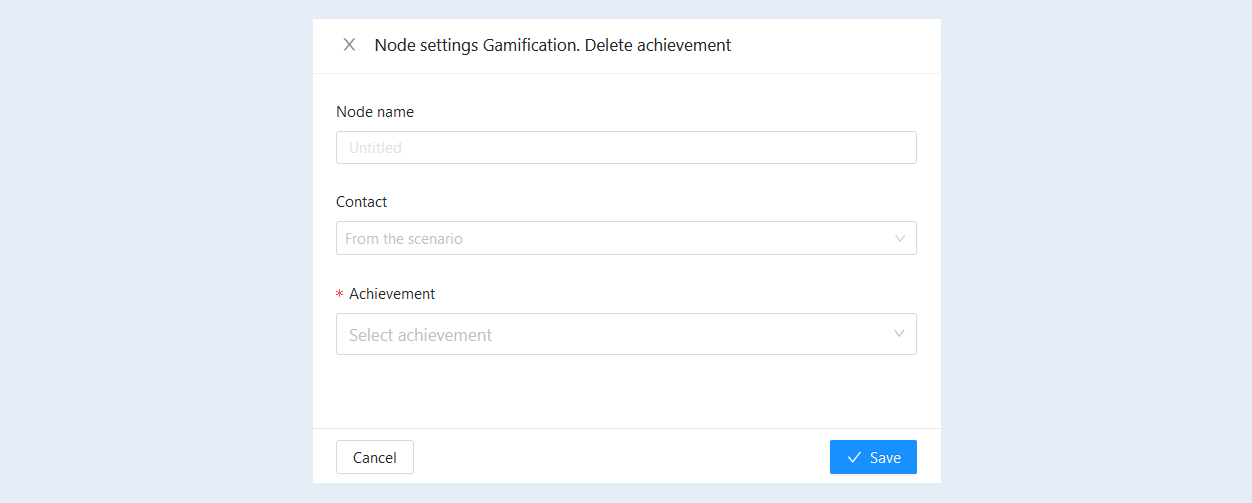
Node settings "Gamification. Delete achievement"
The "Delete Achievement" action removes a specific achievement from the user's achievement list. This action performs the function of stimulating the user, motivating him to achieve better results and progress in learning.
In the opened node settings window, fill in the fields:
- Node name. Specify a name for the node, you can name nodes in the scenario as you wish.
Contact. This field is not mandatory. By default, the contact from the scenario will be selected. You can also configure an individual scenario by selecting a contact from the list for whom the achievement will be added.
Achievement. Select an achievement from the proposed list. You can add and configure a new achievement in the "Gamification" section.
Click the "Save" button.
Node settings "Reach Yandex Metrica goal"
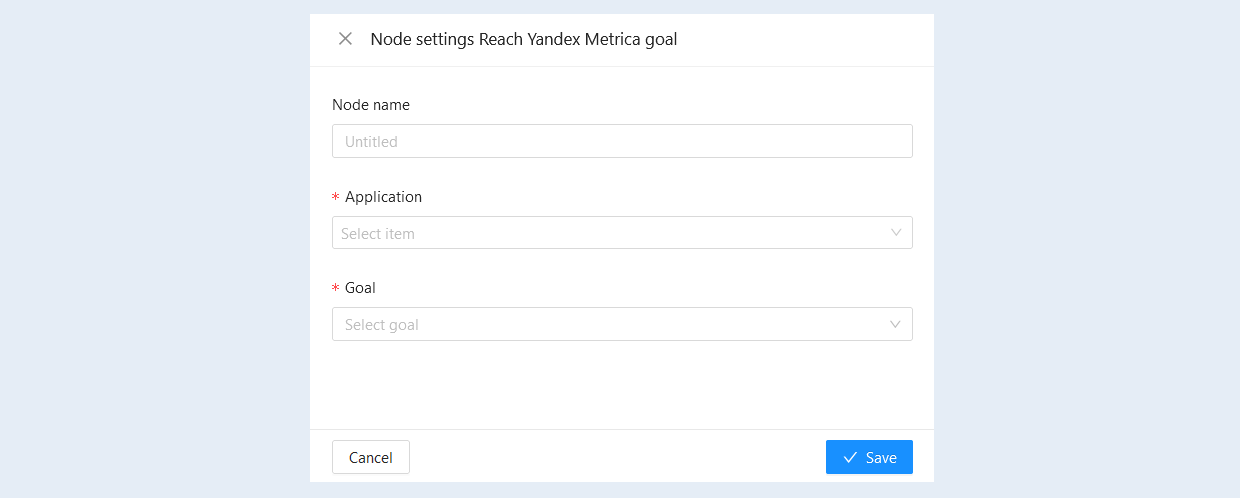
The "Reach Yandex Metrica Goal" action is intended for measuring and tracking specific events and user activities on the site. This action automates the process of tracking goal achievements, allowing for the avoidance of manual data collection and providing more accurate and faster statistics.
Yandex Metrica Conversions are a web analytics tool that provides visual reports, records visitor actions, tracks traffic sources, and helps assess the effectiveness of both online and offline advertising. With its help, you can collect data on user interactions with your website, allowing you to better understand which content elements attract your target audience.
Please note that this action will be available for selection only after you connect the Yandex Metrica Conversions app. For information on how to connect the app, see the article "Application Yandex Metrica Conversions".
In the opened node settings window, fill in the fields:
- Node name. Specify the name of the node; you can name nodes in the scenario at your discretion.
Application. Select the Yandex Metrica Application.
Goal. Choose a goal from the proposed list of metrics. You can add and configure goals on the Yandex Metrica website. Note that only goals with the "JavaScript event" type and the "matches" condition are displayed in the goals list.
Click the "Save" button.
Node settings "Delay"
The "Wait" step adds a temporary delay between an event (or action) and the next action. This can be a delay before displaying new content, responding to a question, displaying results, etc. Waiting allows the user to have time to process the previous information and prepare for the next step. Waiting is included in the scenario to ensure smooth flow and provide time for performing specific tasks. It can be used for various purposes:
1. Providing the user with time for reflection and understanding of the information received in the previous step of the scenario. For example, after watching a training video on learning a new language, the user is given 5 minutes to apply the acquired knowledge in exercises.
2. Delaying the display of new information blocks to prevent information overload. For example, after completing a new block, the next page with new materials will only be available to the user after 10-15 seconds.
3. Supporting user concentration and focus on upcoming material or task.
4. Creating a sense of comfort and control over the flow of the scenario or learning process.
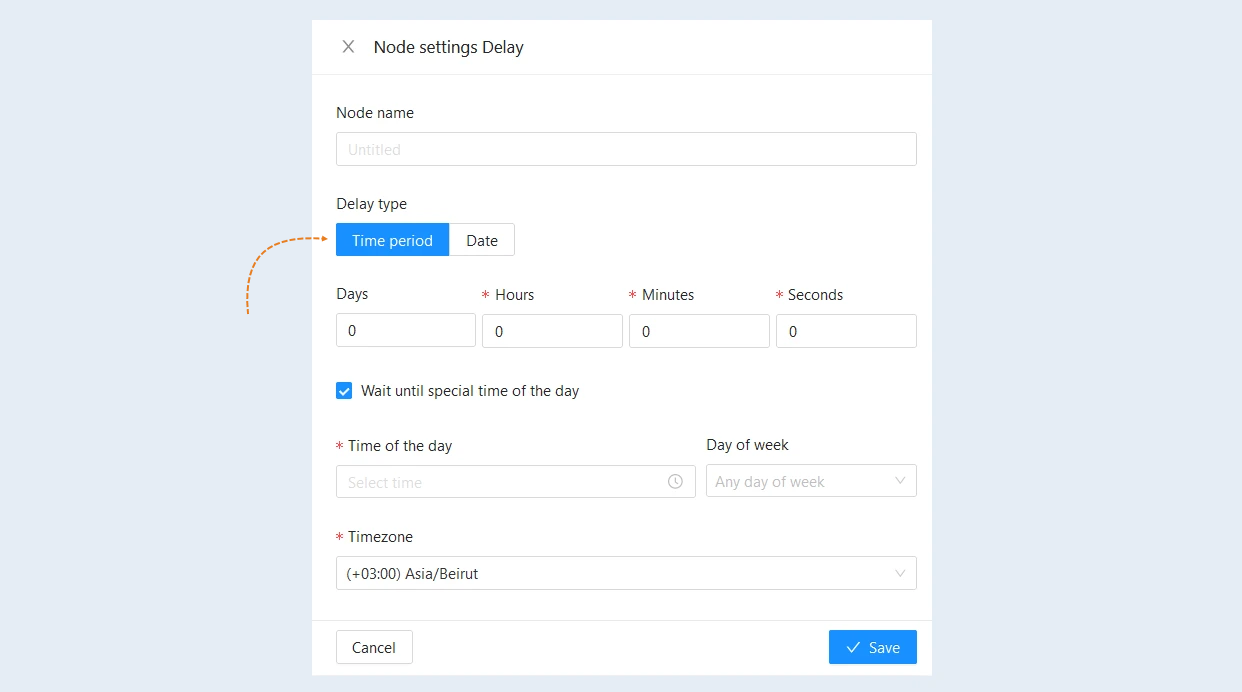
A variant of the node settings with a delay type is "Time period". In the opened node settings window, fill in the fields:
Name node. Specify the name of the node, you can name the nodes in the script as you wish.
Delay type. Select a time period or date.
The time period is the delay between an event and an action that you define yourself.Duration. Set the delay period: months, days, hours, seconds. Or set the exact date.
Wait until special time of the day. You can check the box “Wait until special time of the day” so that the next action is triggered by the scenario at a specific time of day and/or day of the week.
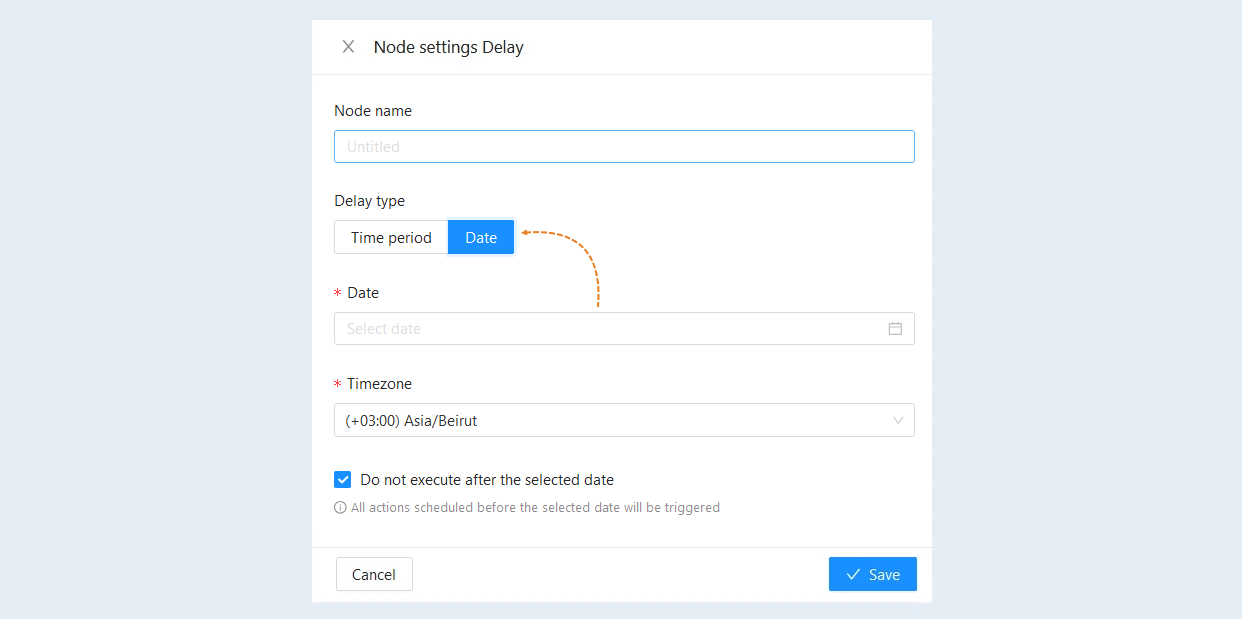
A variant of the node settings with the delay type is "Date". In the node settings window that opens, fill in the fields:
Node name. Specify the name of the node, you can name the nodes in the script as you wish.
Delay type. Select the type of delay: time period or date.
A date is the delay between an event and an action until a certain date that you set in the settings.Date. Select a date and time in the calendar.
Time zone. Select from the list the time zone in which.
You can check the box “Do not execute after the selected date” so that the actions are not performed after the above date. All actions scheduled before the selected date will be triggered.
Click the “Save" button.
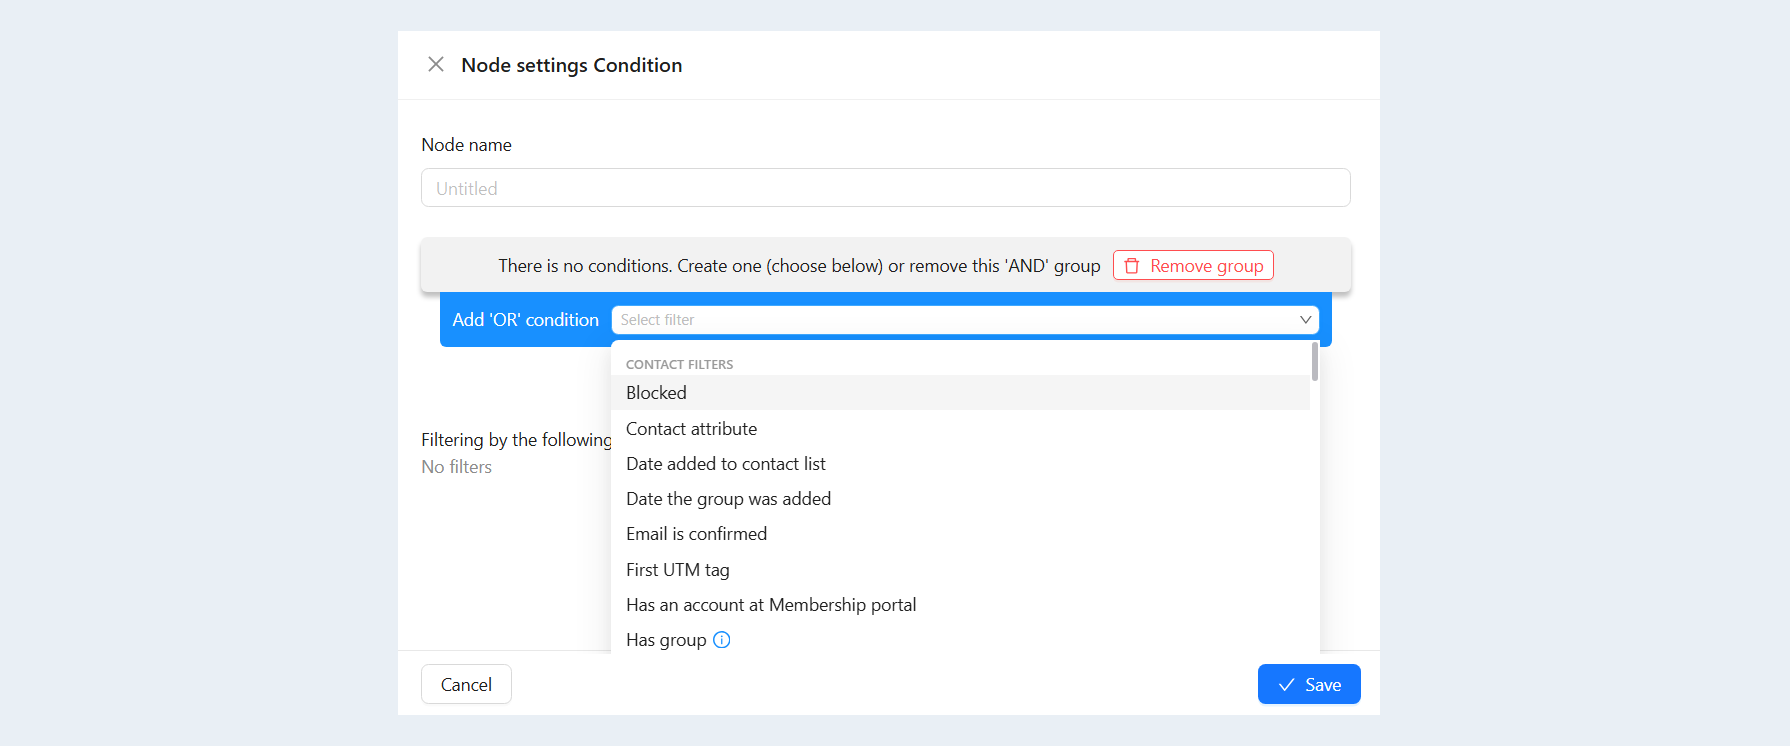
Node settings "Condition"
Condition is a step or section of a script that sets specific conditions for executing the next step of the script. The condition is used to control the flow of the script and allows customization based on previous results.
Some tasks that the action in the script with the addition of the condition step helps to solve are:
1. Personalized learning: It allows adapting the next learning step based on user results. For example, if the user answered the previous question correctly, they move on to the next level of difficulty.
2. Scenario path selection: It allows the user to choose which path they prefer to take in the learning process. For example, the user may be given the option to choose between two different topics to study.
3. Progress monitoring: It allows tracking progress and dividing users into different groups. For example, after a certain number of completed tasks, the user may receive additional materials or the opportunity to communicate with other users at the corresponding level.
In the opened node settings window, fill in the fields:
- Name node. Specify the name of the node, you can name the nodes in the script as you wish.
Condition. Select a condition from the list and click the "Save" button. For a detailed description of the conditions, see the article "Conditions in the scenario".