In this article, we will consider in detail how to create a webinar and set up registration for it with reminders via a chatbot. Click on the desired section to go to its description:
1
Creating a webinar and its settings
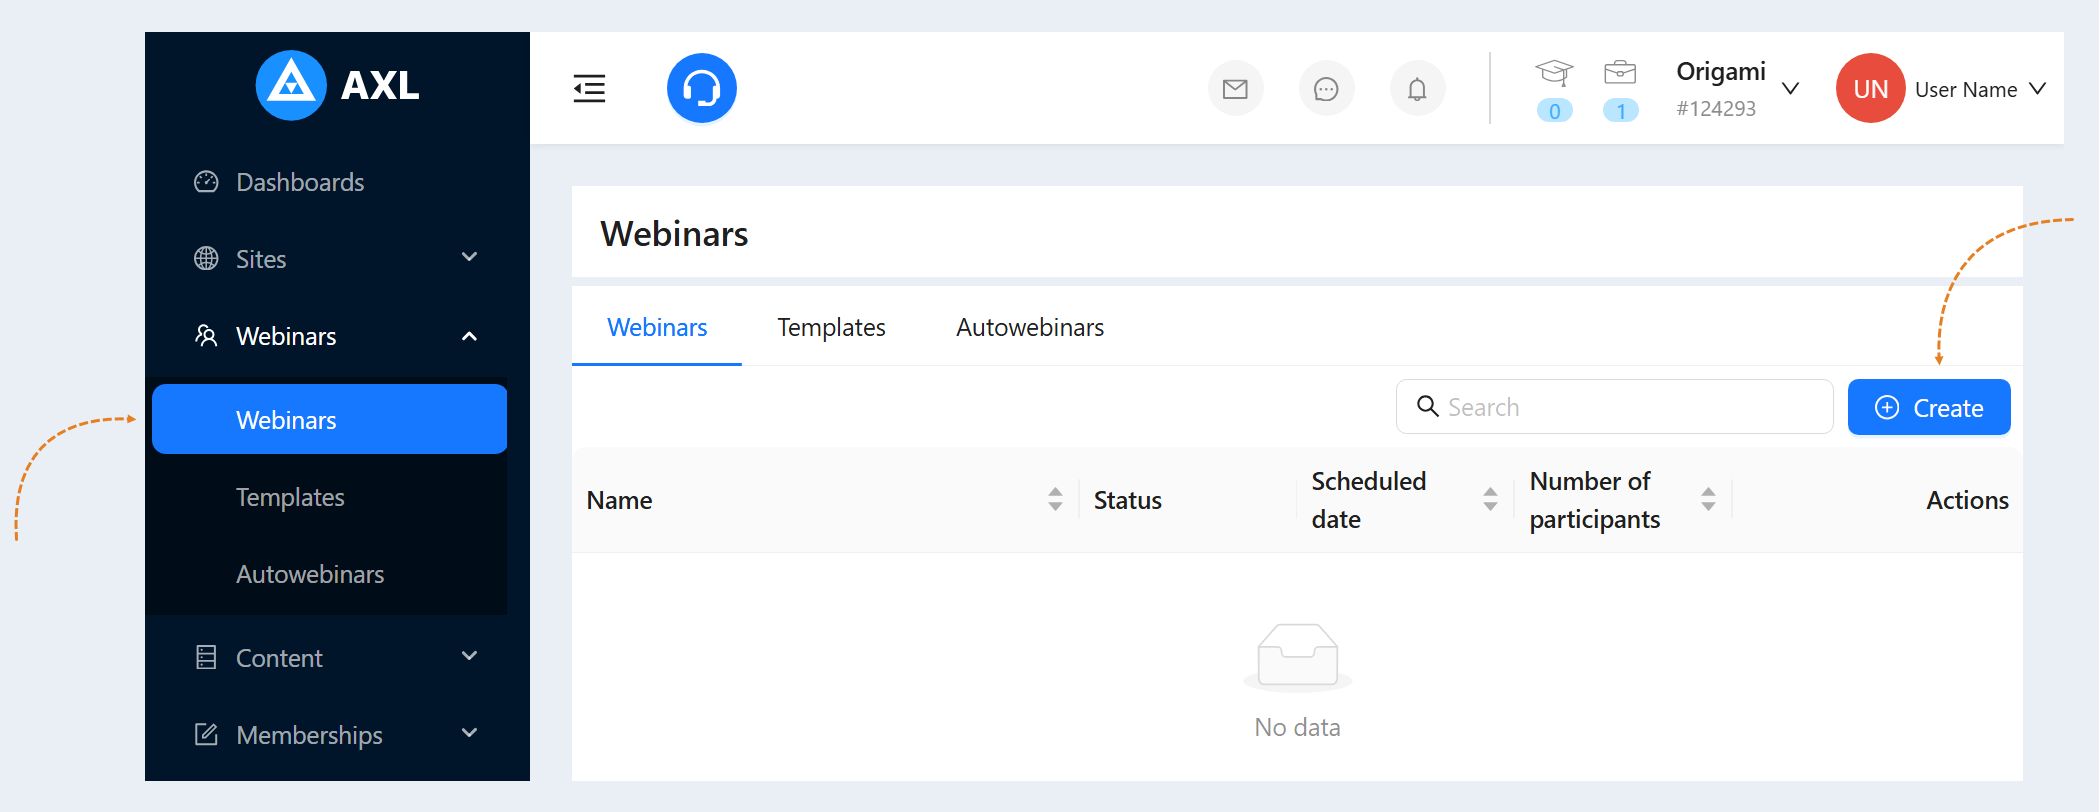
Go to the "Webinars" section. Click the "Create" button.
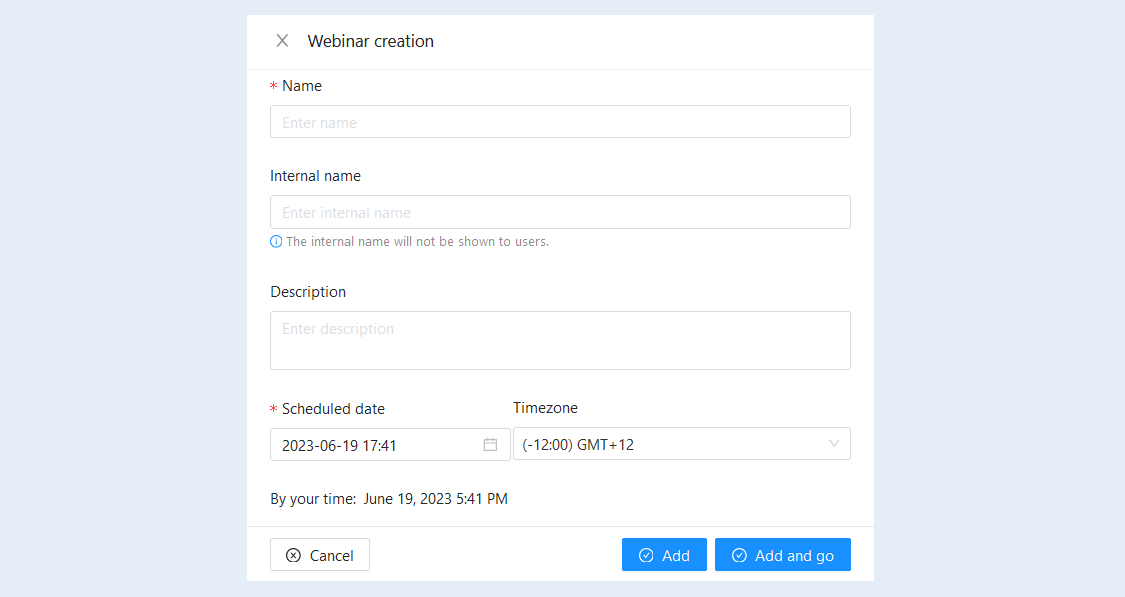
In the "Webinar creation" window that opens, fill in the fields. Specify the name of the webinar, the participants of the webinar will see this name. Set the date of the webinar and the time zone. Click the "Add and Go" button. Now you can go to the settings.
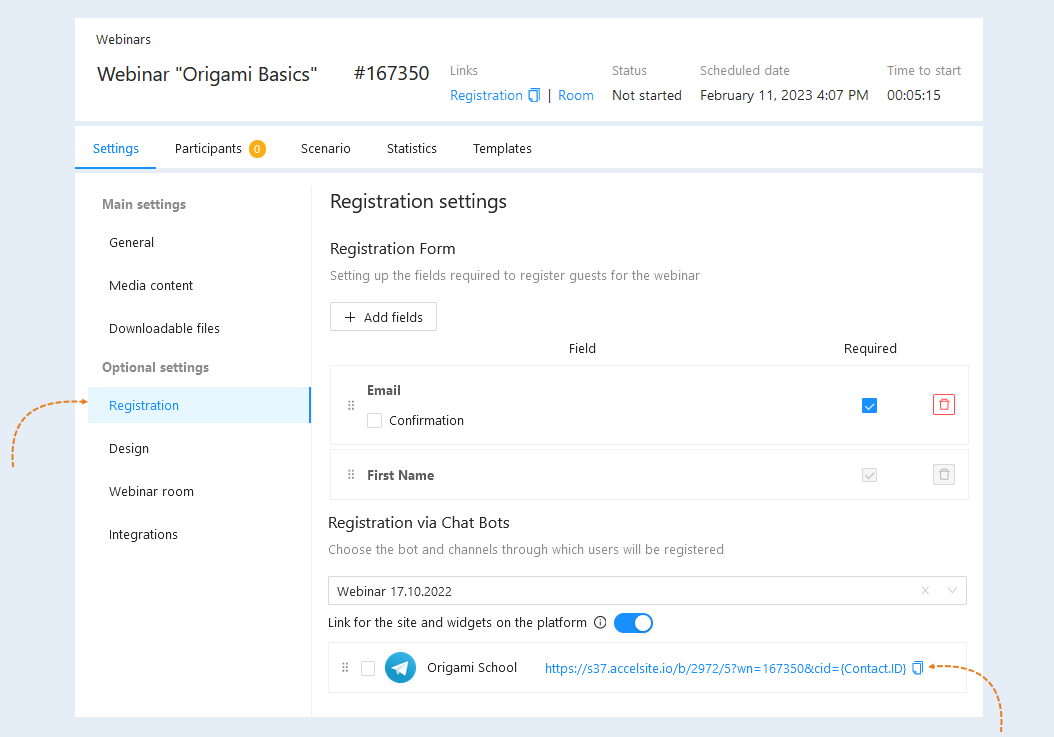
In the webinar settings, go to the "Registration" tab, the "Registration via chat bot" section. Select the chatbot and chat channels through which users will register. For more information on how to create chat channels and a chatbot, read the articles "Chat Channels" and "Chat Bots".
For more information on how to set up and run a webinar, read the article "How to conduct a webinar? Brief instructions".
2
Creating a webinar scenario
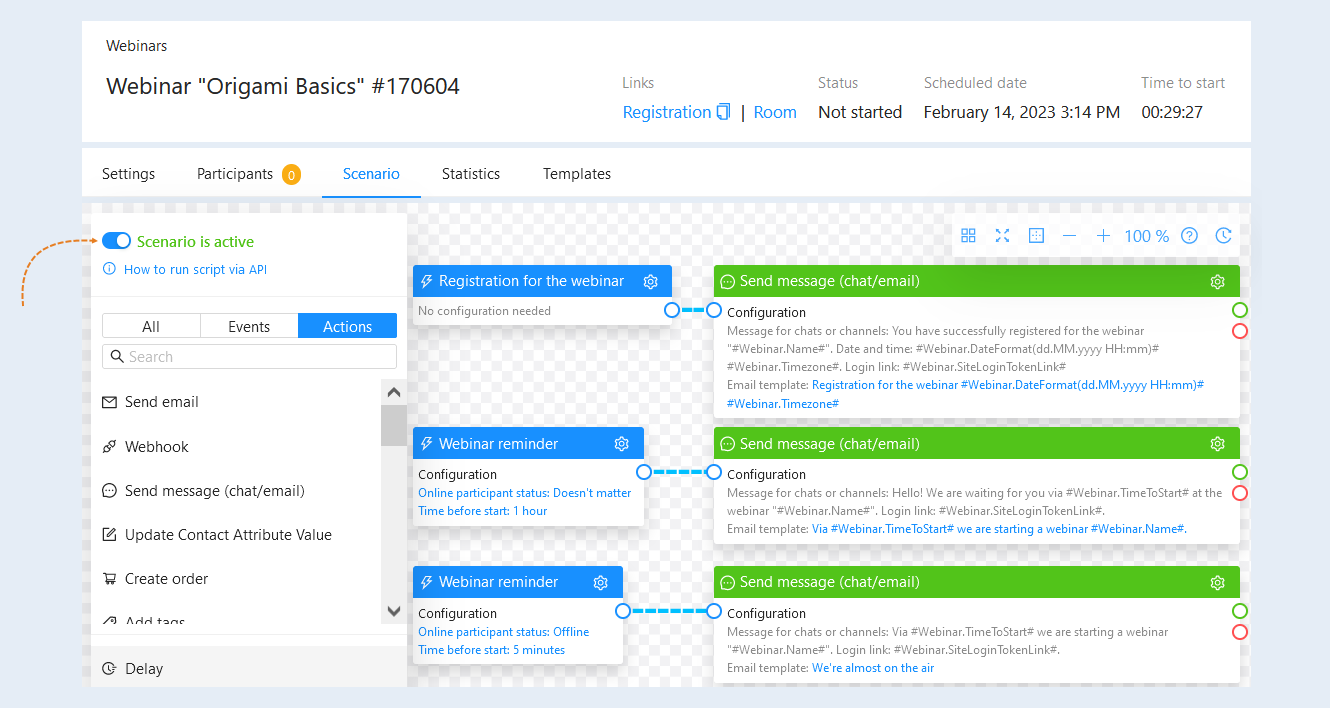
In the webinar, go to the "Scenario" tab. There is already a webinar scenario here by default. It is automatically created when you create a webinar. You can use an existing template and add your own scenario. Select an event from the list and drag it to the scenario field.
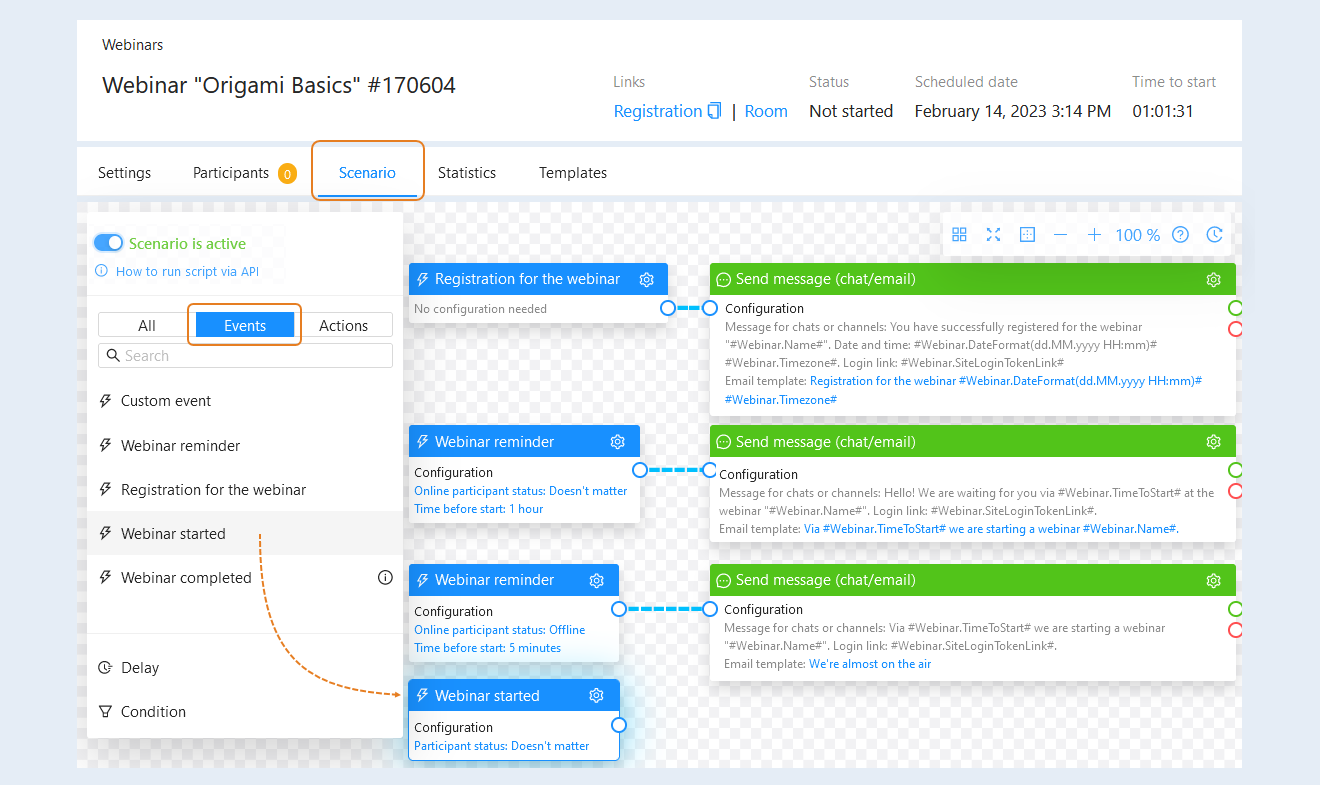
Next, add an action to the scenario and connect the event and action together. You can create one or more links between events and actions.
Read more about the actions in the article “Types of actions in the scenario and their configurations".
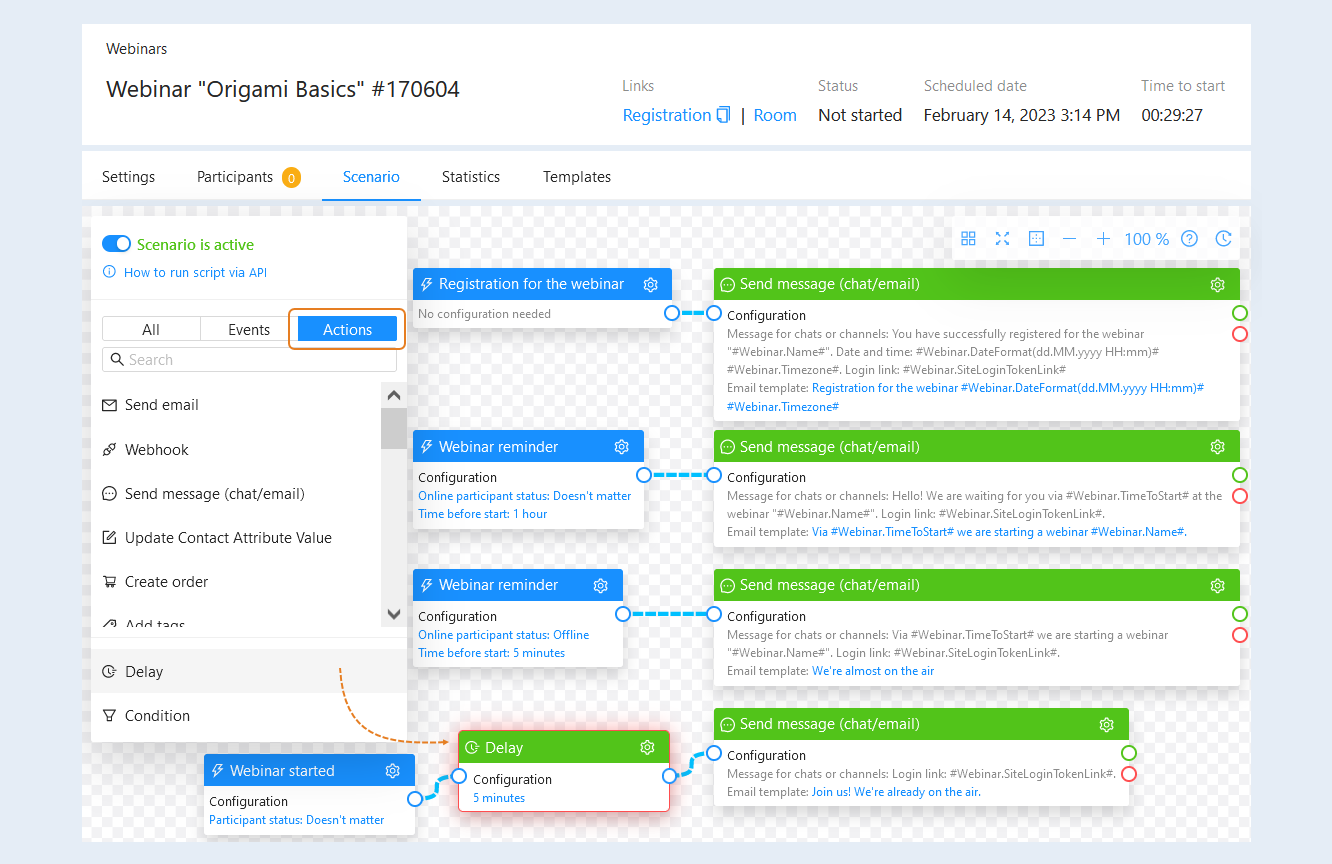
For each action, you need to perform settings - configuration. Click on the "Settings" button in the upper right corner of the event, then open the node settings.
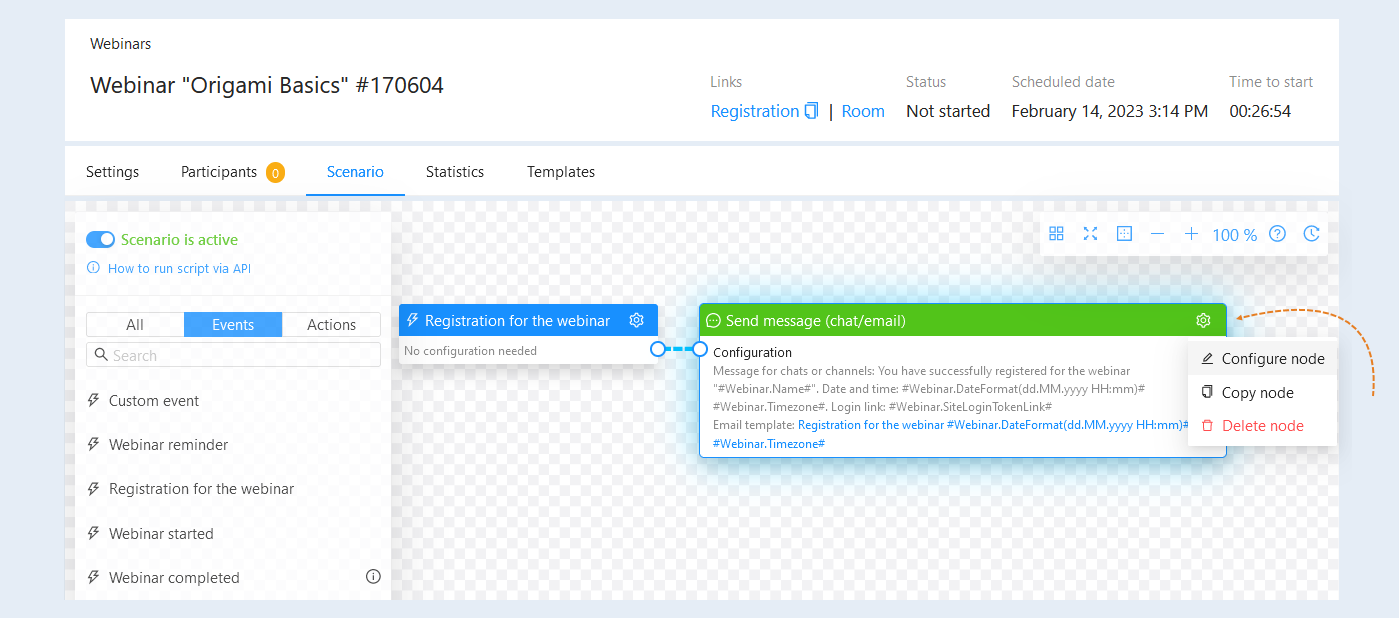
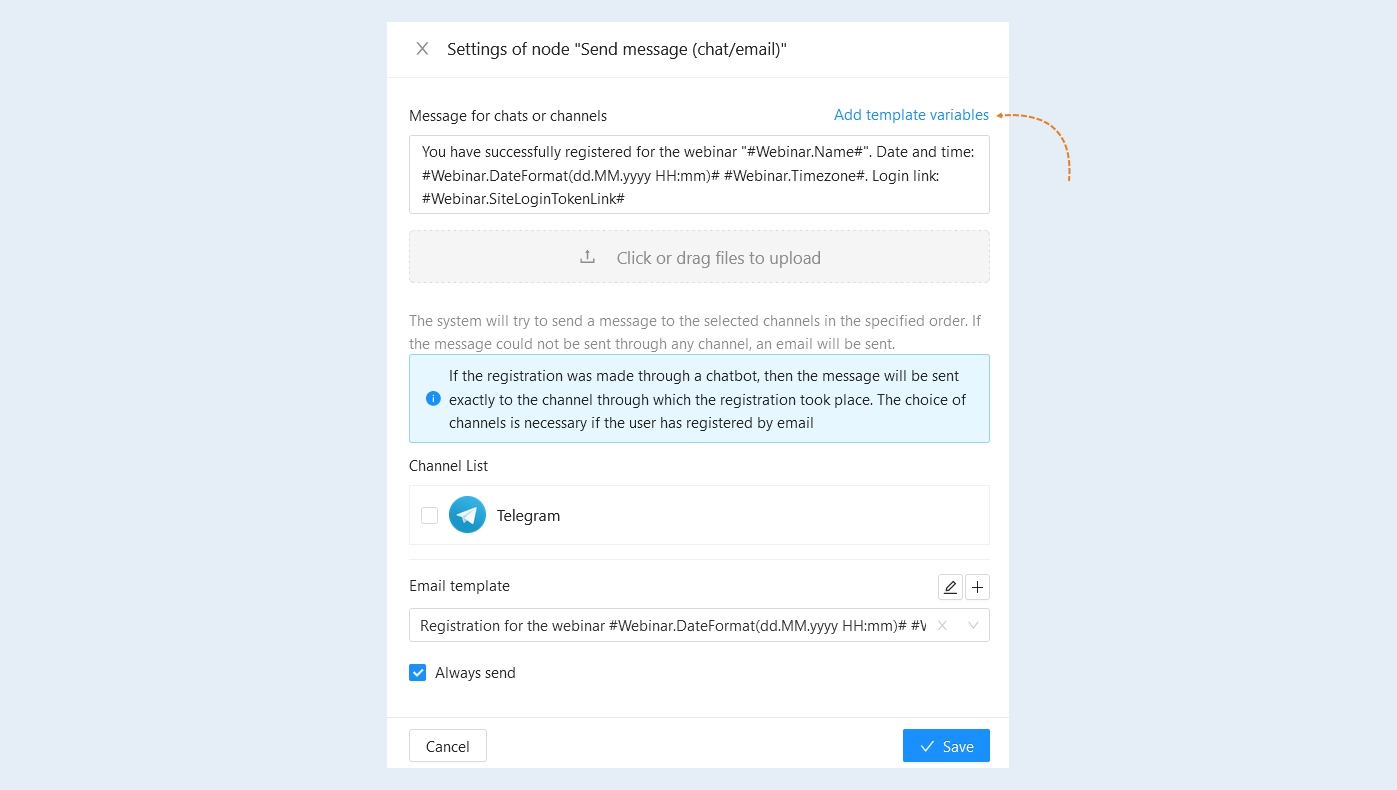
In the configuration settings of the "Send massage" action, you can add variables.
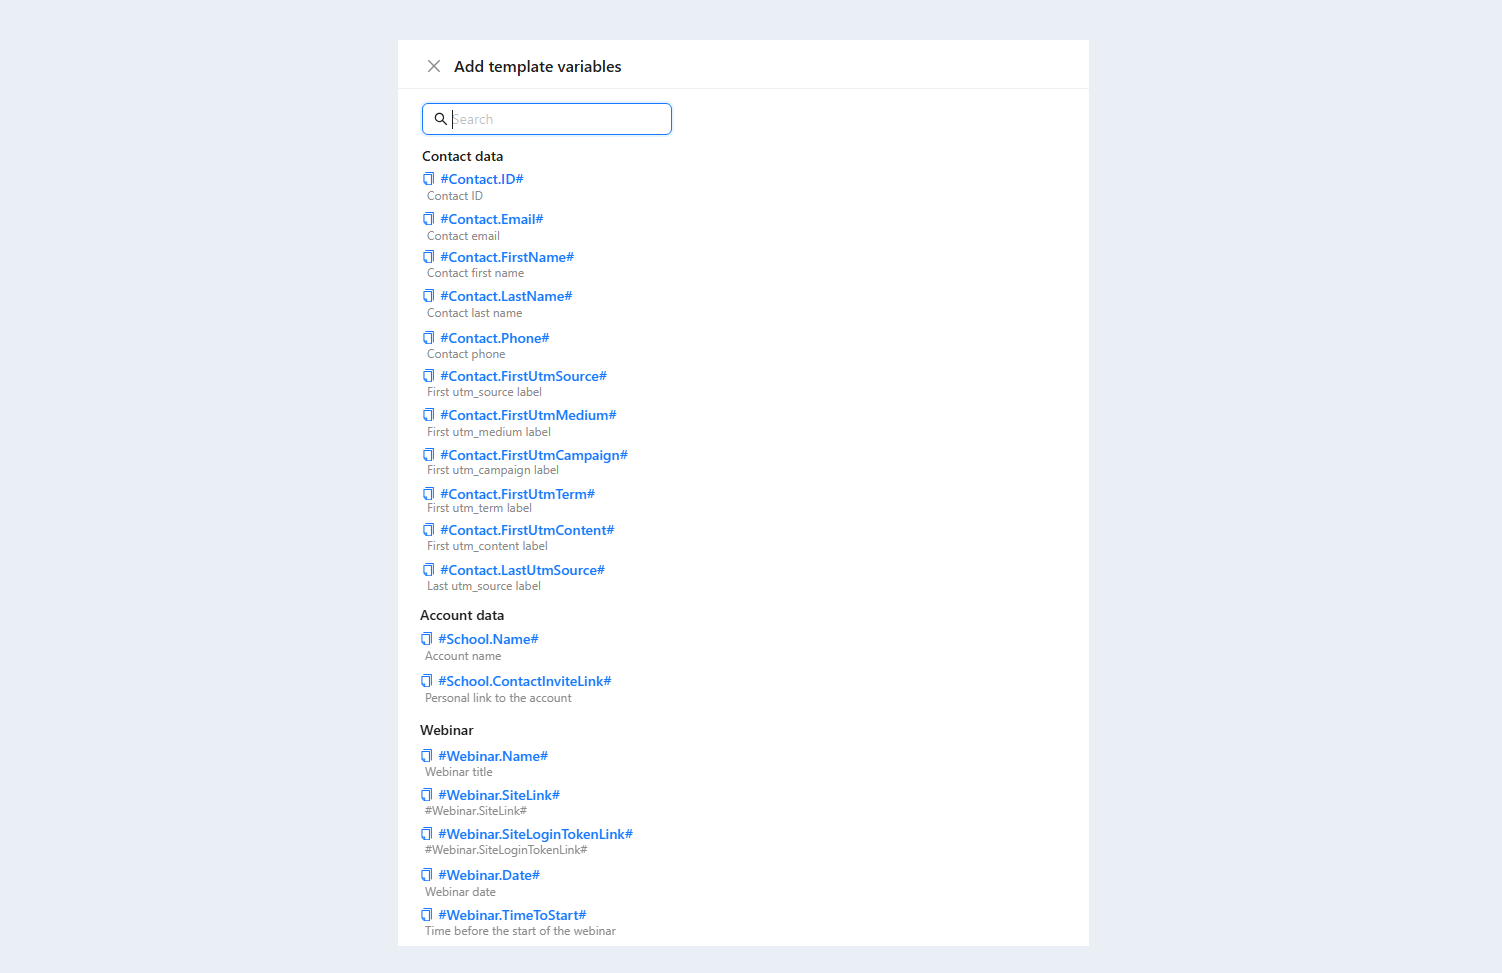
A variable is a value to be automatically replaced with the data you selected. This can be the name of the contact, the name of the webinar, a link to log in to the webinar, etc. Variables will automatically replace the data in the email. Specify the variable “Webinar login link” and when sending an email, this variable is replaced with a link that the user can follow.
Click the "Add Template Variables" button. A list of variables will open on the right. Select the necessary variables from the list.
After completing the settings of the webinar scenario, make sure that the "Scenario is active" slider is moved to the active position.
3
Creating a website page with a registration form
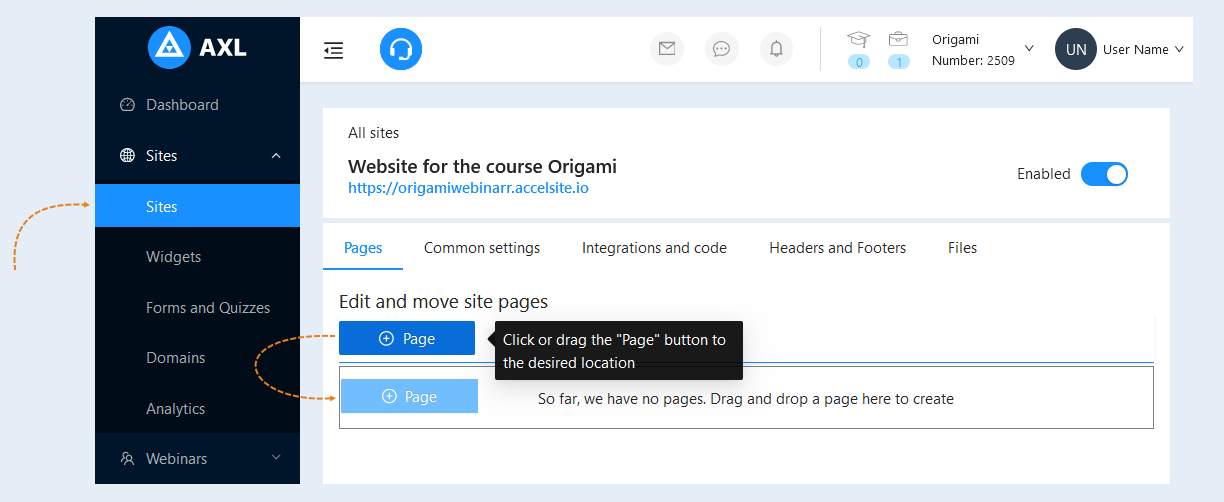
Go to the "Sites" section, open a previously created site or create a new one. Read more about how to create a website in the article "How to create a website".
Next, open the "Pages" tab. Drag the Pages button into the field to create a website page.
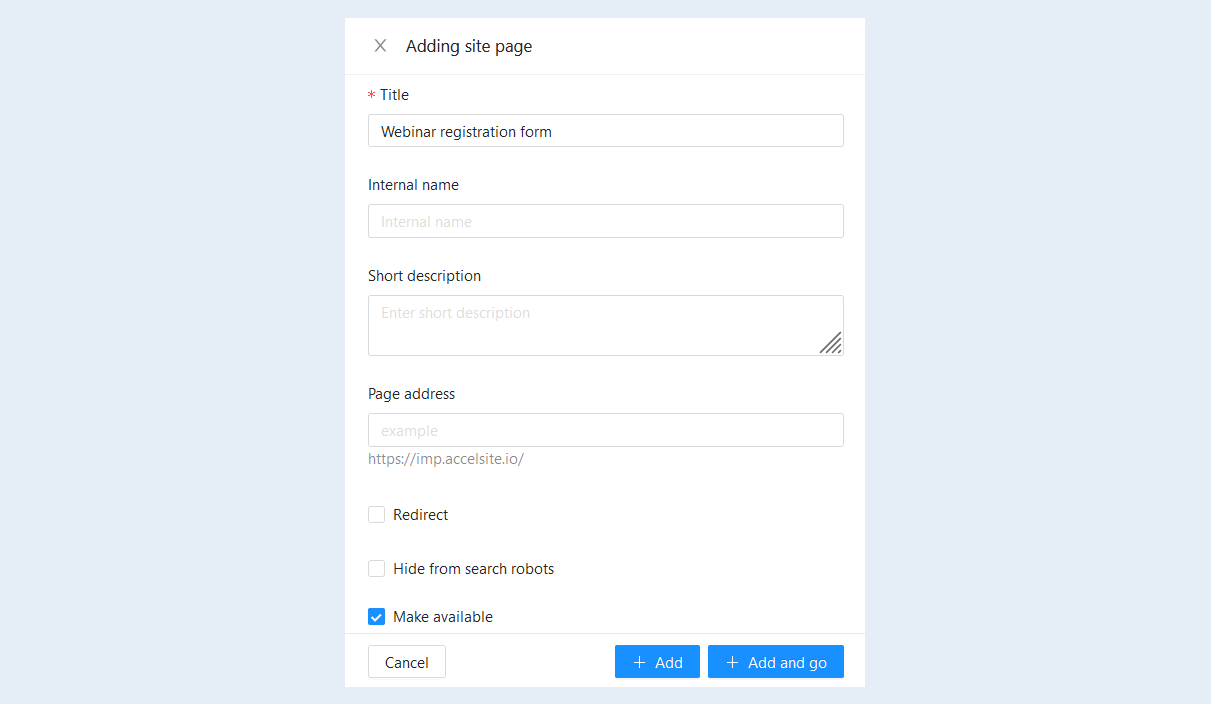
An additional window will open. Fill in the fields. Specify the name of the page, add a short description and specify the address of the page in Latin. Click the "Add and Go" button.
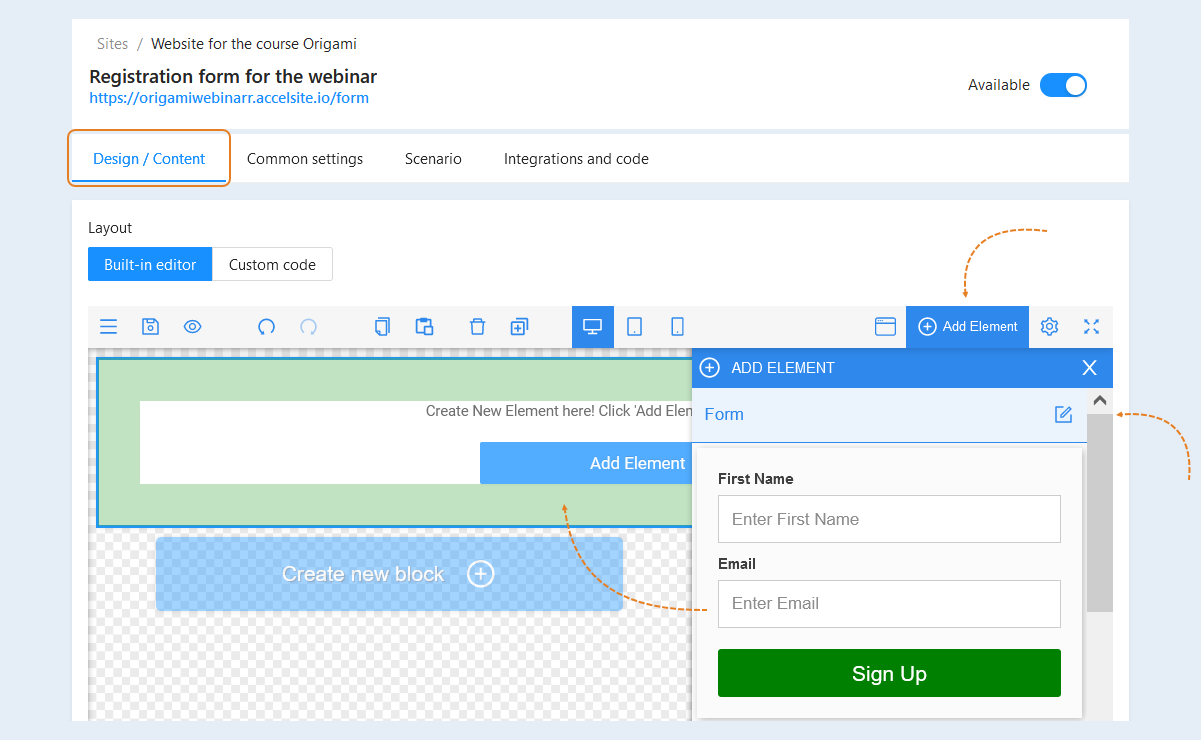
In the opened window of the site page, click the "Add element" button. Add the "Form" element, drag the selected form into the page field.
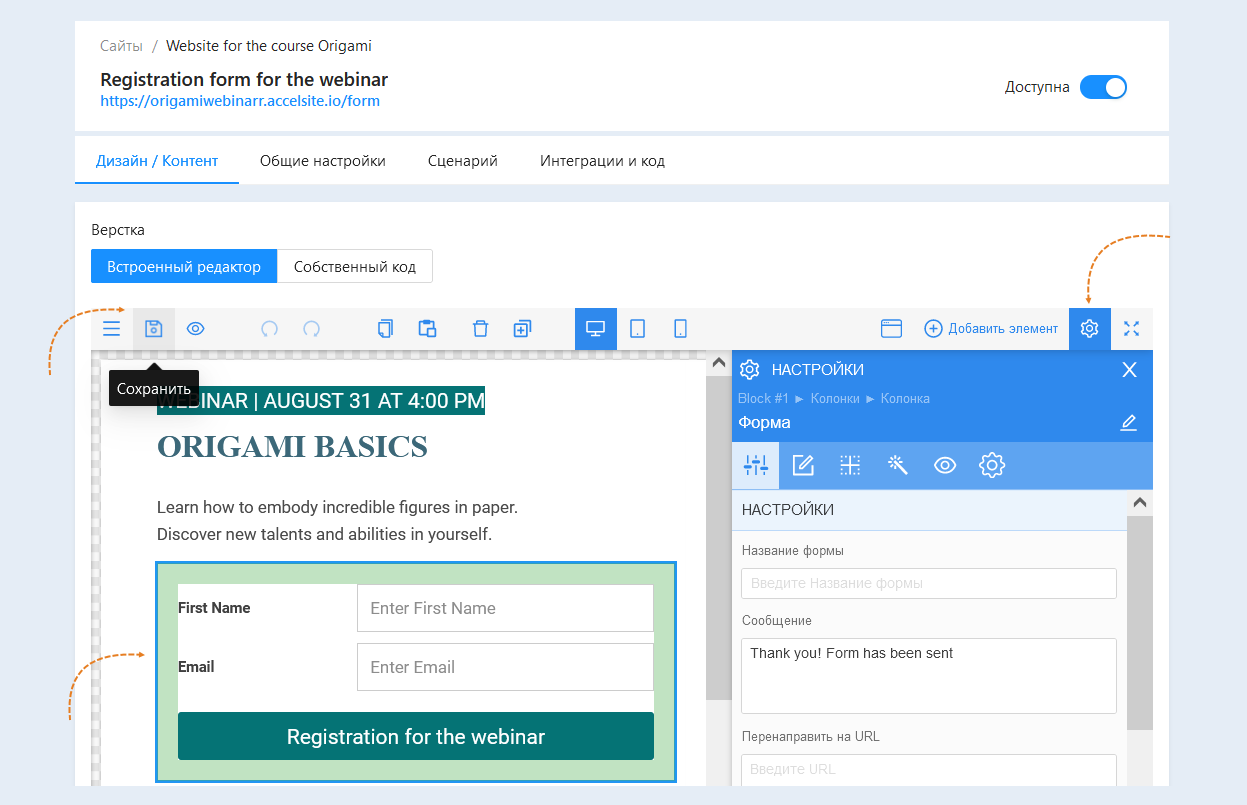
Select the entire form, the "Settings" panel of the element opens on the right. Make the necessary settings in the form.
You can also add other elements to the form: picture, text, video and others. For more information on how to add elements to a site page, read the article "Elements".
After completing the site page settings, click the "Save" button.
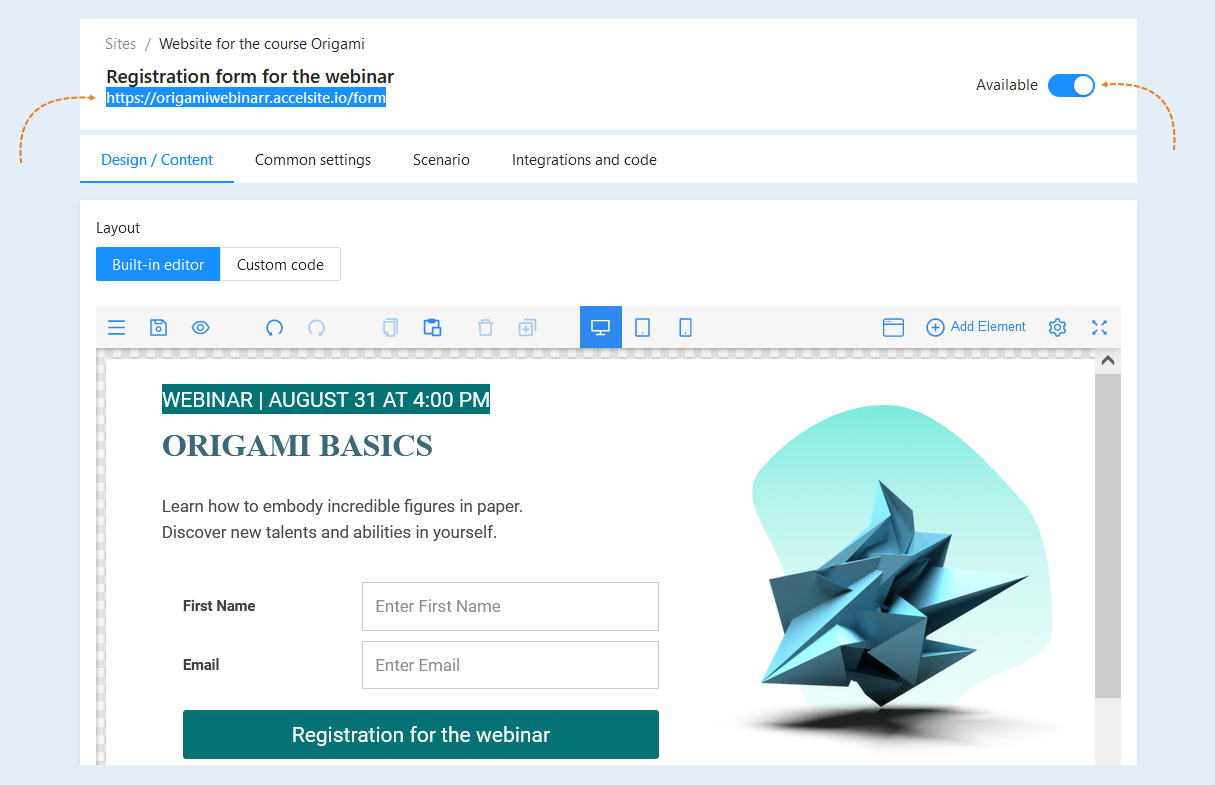
To make the site page available to users, move the "Available" slider to the active position. Copy the link to the site page in the upper left corner. You can send this link to the webinar registration form to users.
Creating a form scenario
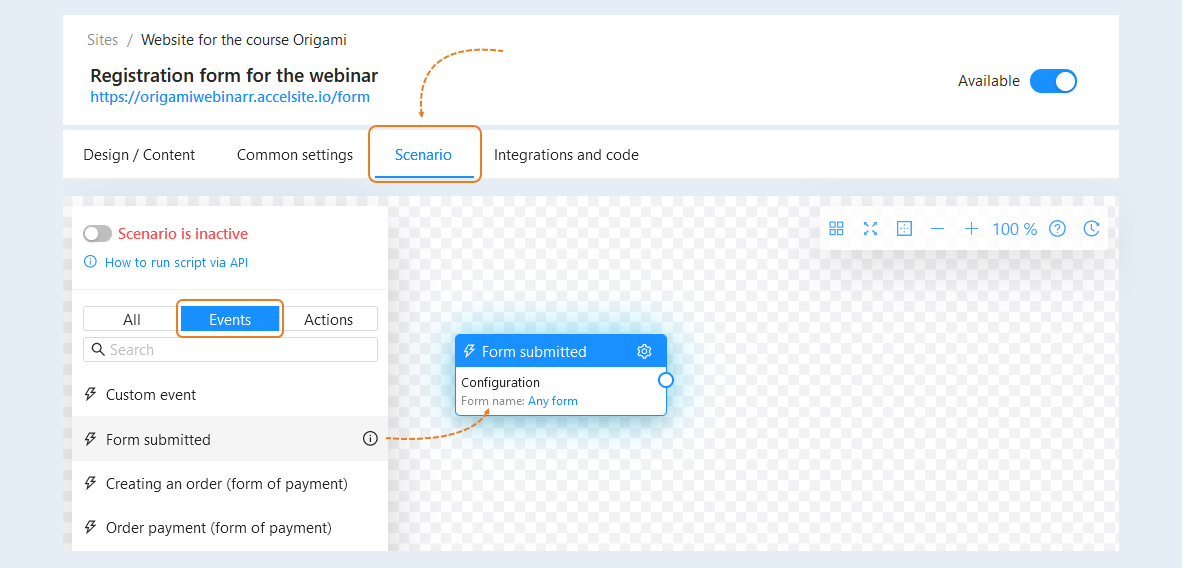
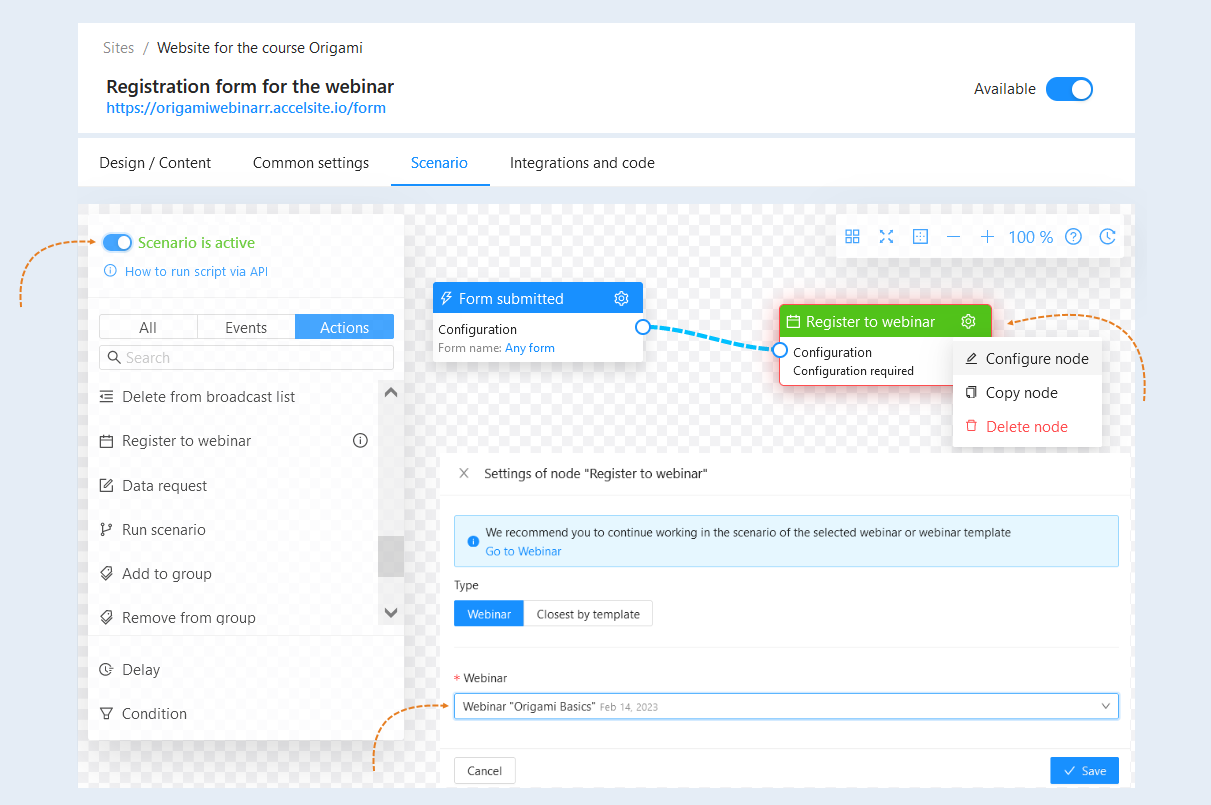
In the form for registration for the webinar, go to the "Scenario" tab. To create a site page scenario, select the “Form submitted" event and drag it into the field. This event is triggered when the user has filled out and submitted the form.
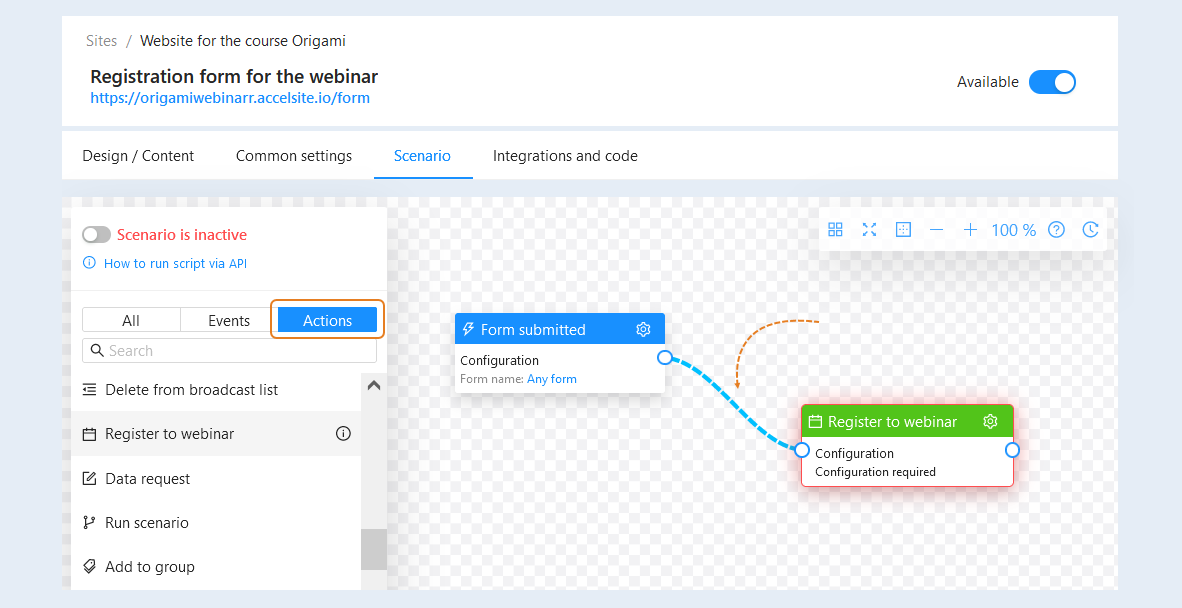
Add the "Register for Webinar" action to the script. Next, you need to connect the event and the action together.
For the action, you need to perform settings - configuration. Click the "Configure Node" button. In the node settings window that opens, add a webinar by selecting it from the list and click "Save".
After completing the settings of the form scenario, make sure that the "Scenario is active" slider is moved to the active position.
Creating a Thank You page
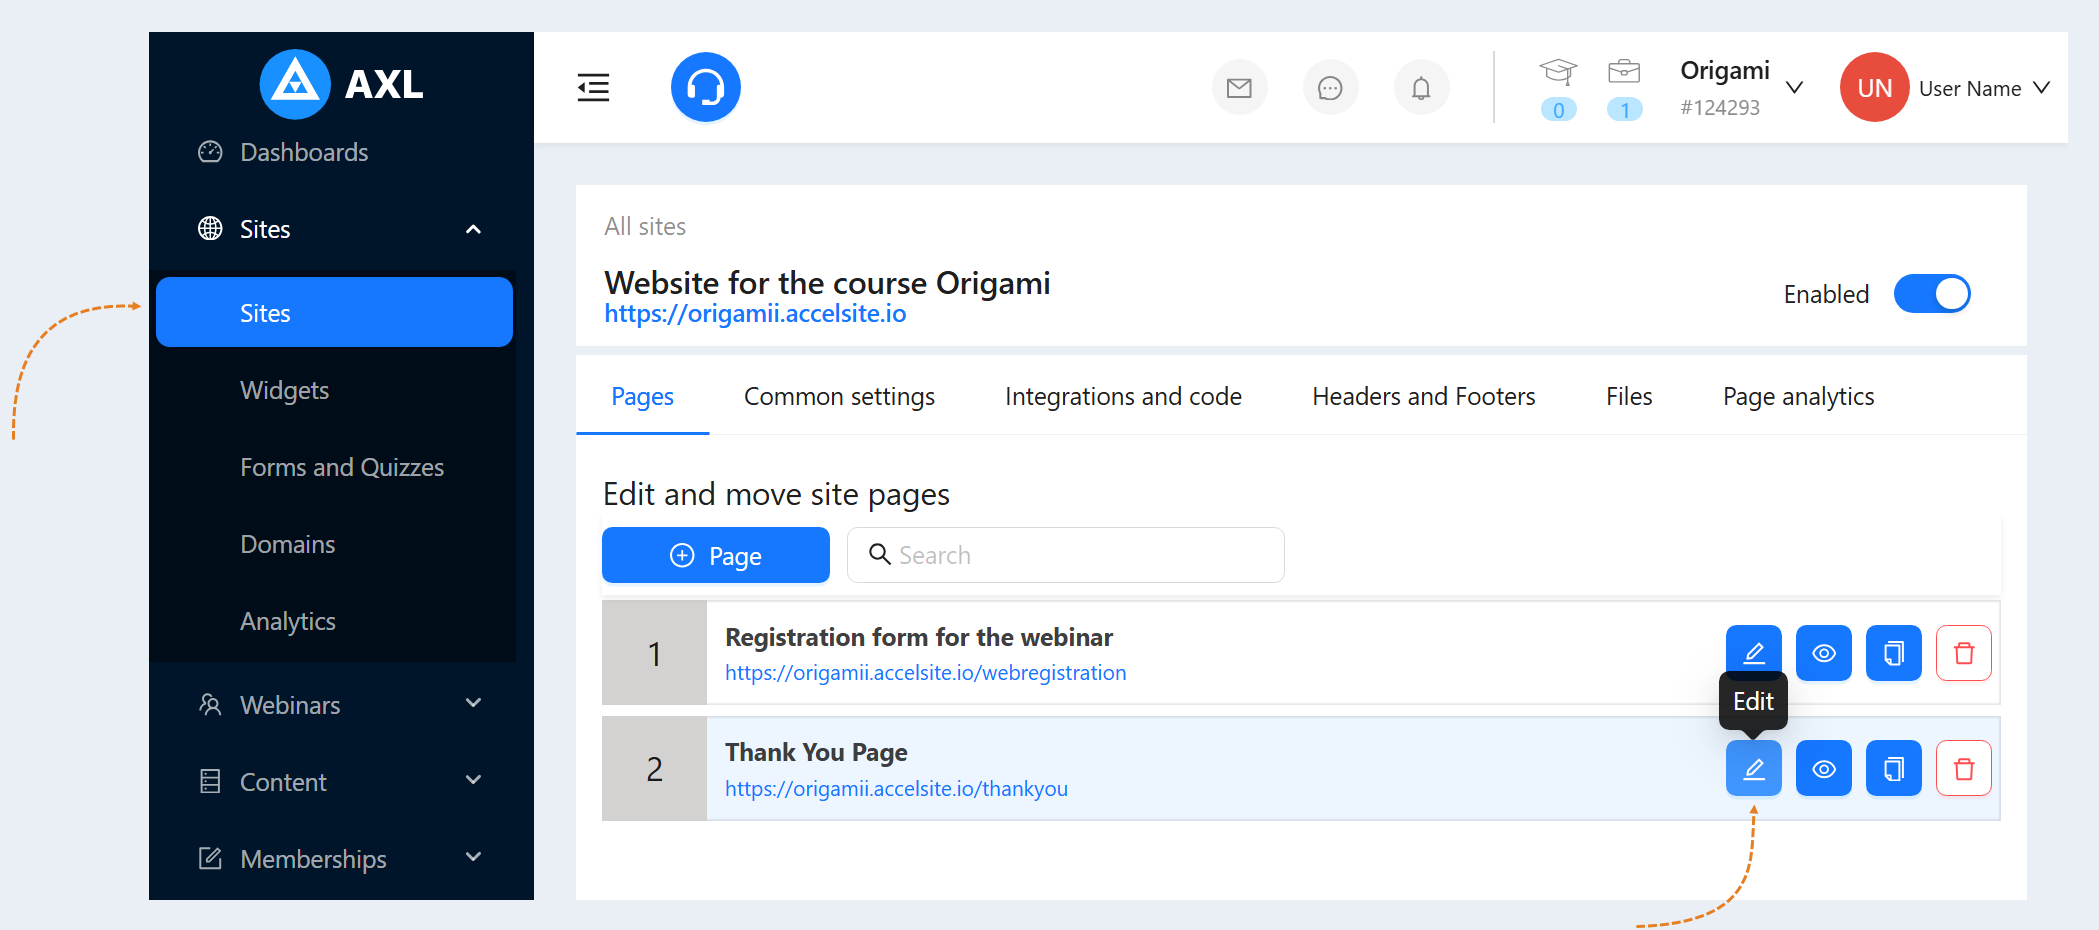
Create another page of the site, following the instructions of the previous section of the article. To open the page, click the "Edit" button.
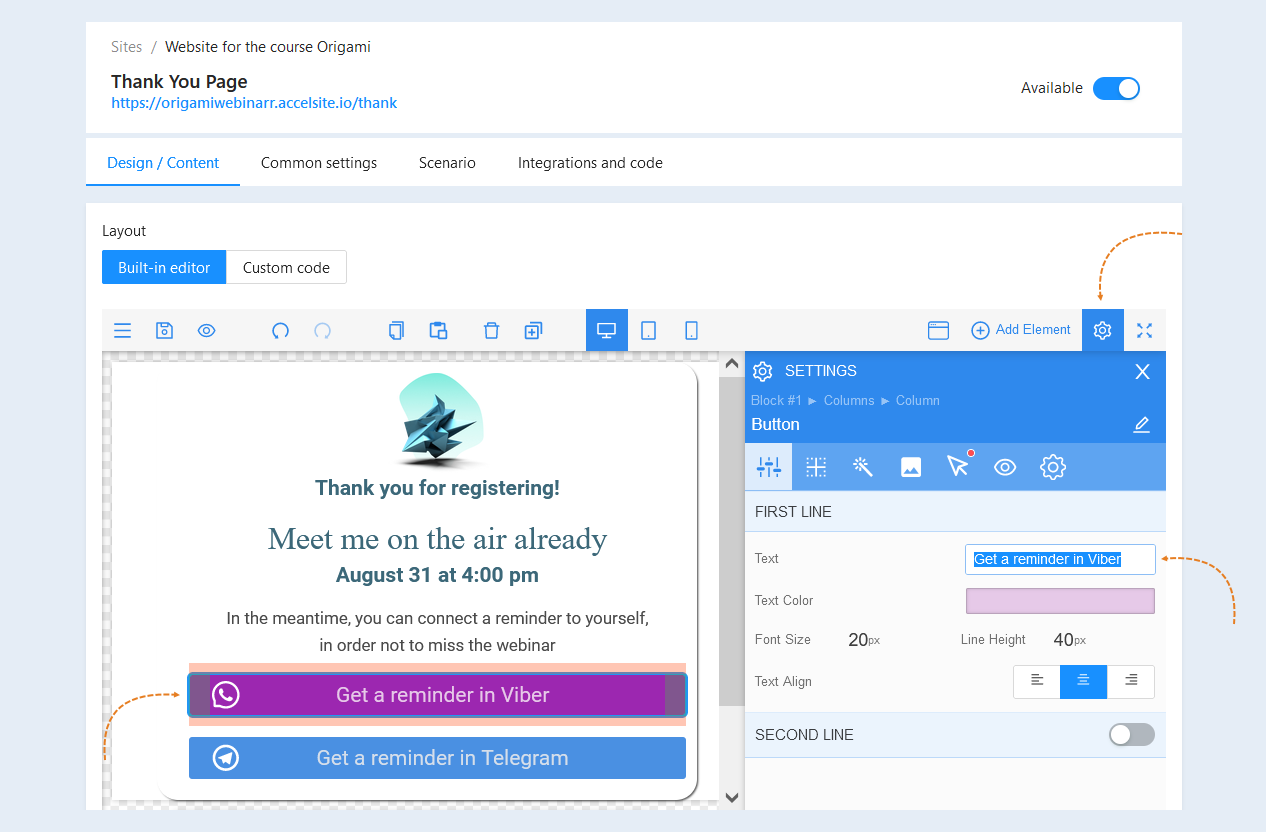
In the opened window of the site page, click the "Add element" button. Create a thank you page by adding elements: text, pictures, columns, etc. For more information on how to add elements to a site page, read the article "Elements".
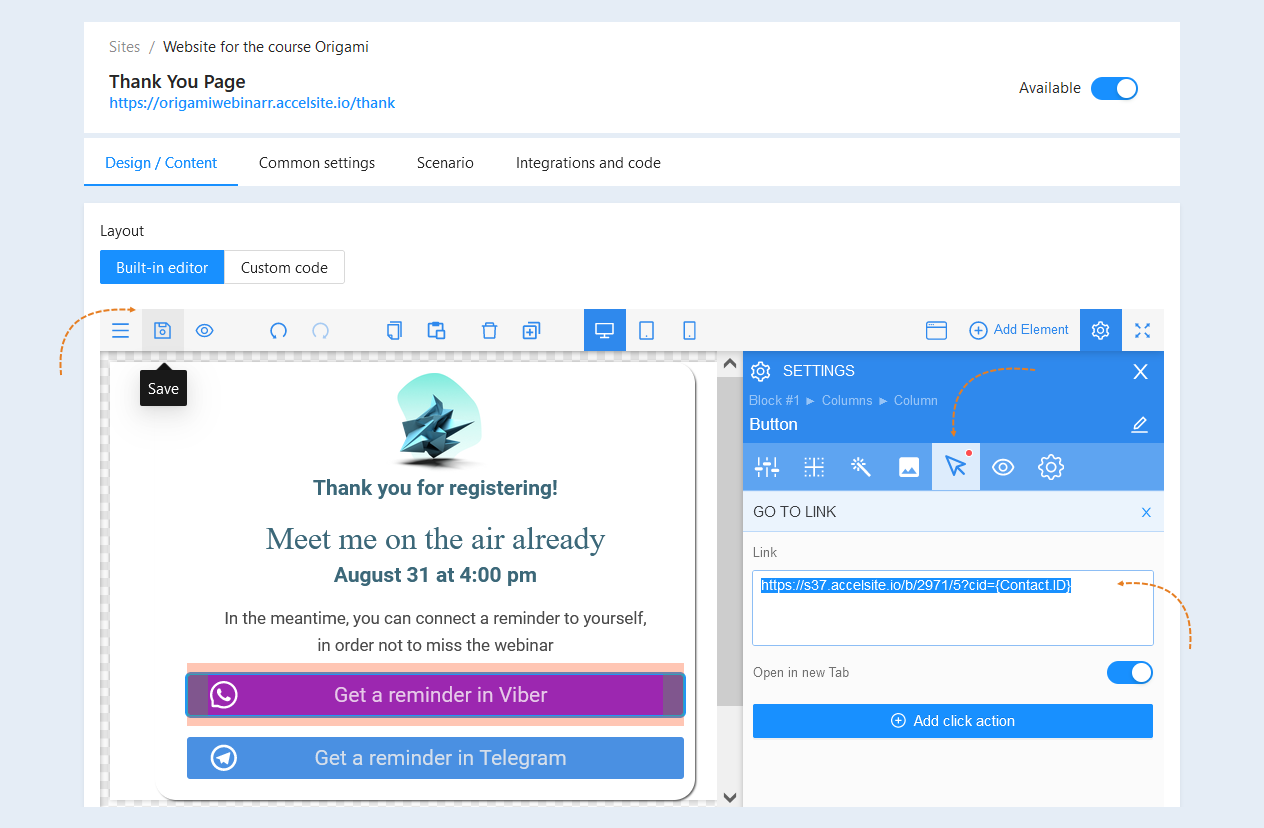
Next, add the "Button" element. Select the entire button, the "Settings" panel of the element will open on the right. Change the button text and set the necessary button settings (size, color, add an icon, etc.).
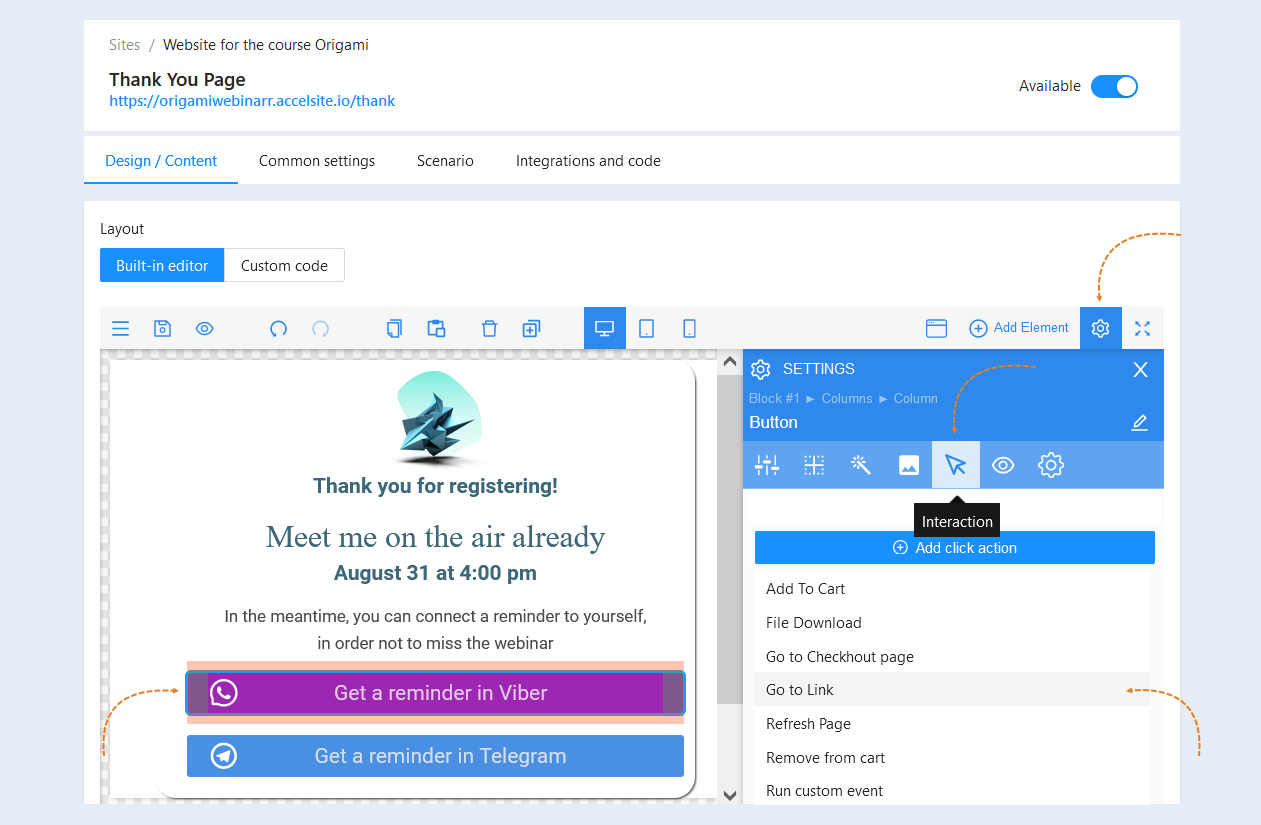
In the button settings, open the "Interaction" tab and add an action by clicking "Go to link".
Go back to the "Webinars" tab, open the previously created webinar. In the webinar settings, in the section "Registration via chat bots", copy the link to the webinar chatbot.
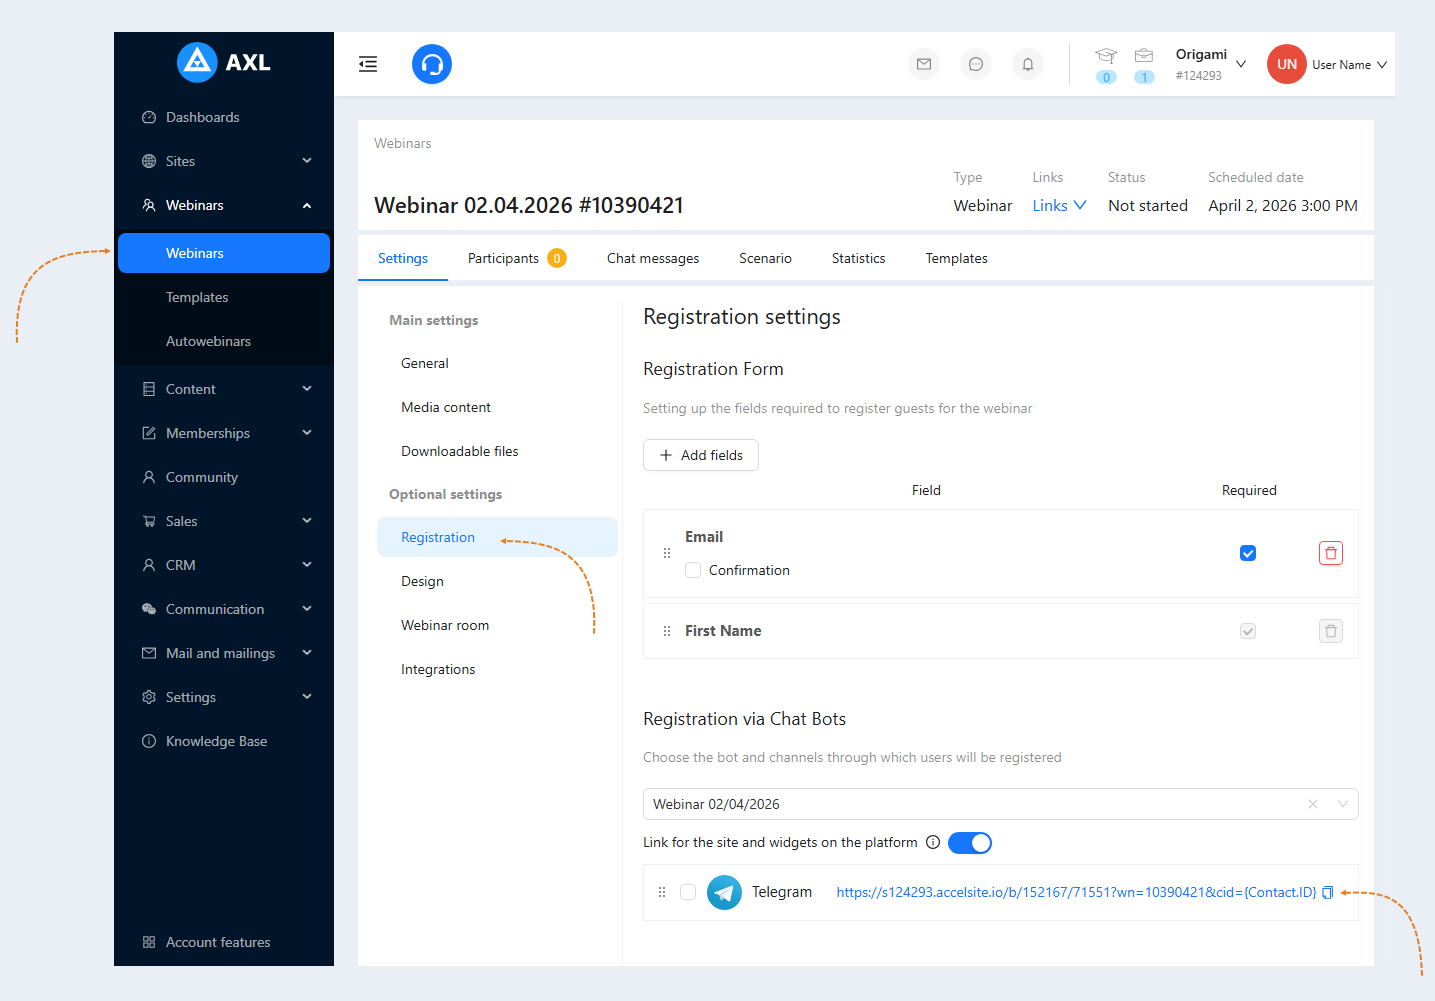
Paste the copied link into the "Go to link" field in the button settings. Configure the other buttons in the same way. After completing the settings of the gratitude page, click the "Save" button.
Thus, on the gratitude page, when the user clicks on the button, he will be sent by the link to open the webinar chatbot.
Adding a thank you page to the form
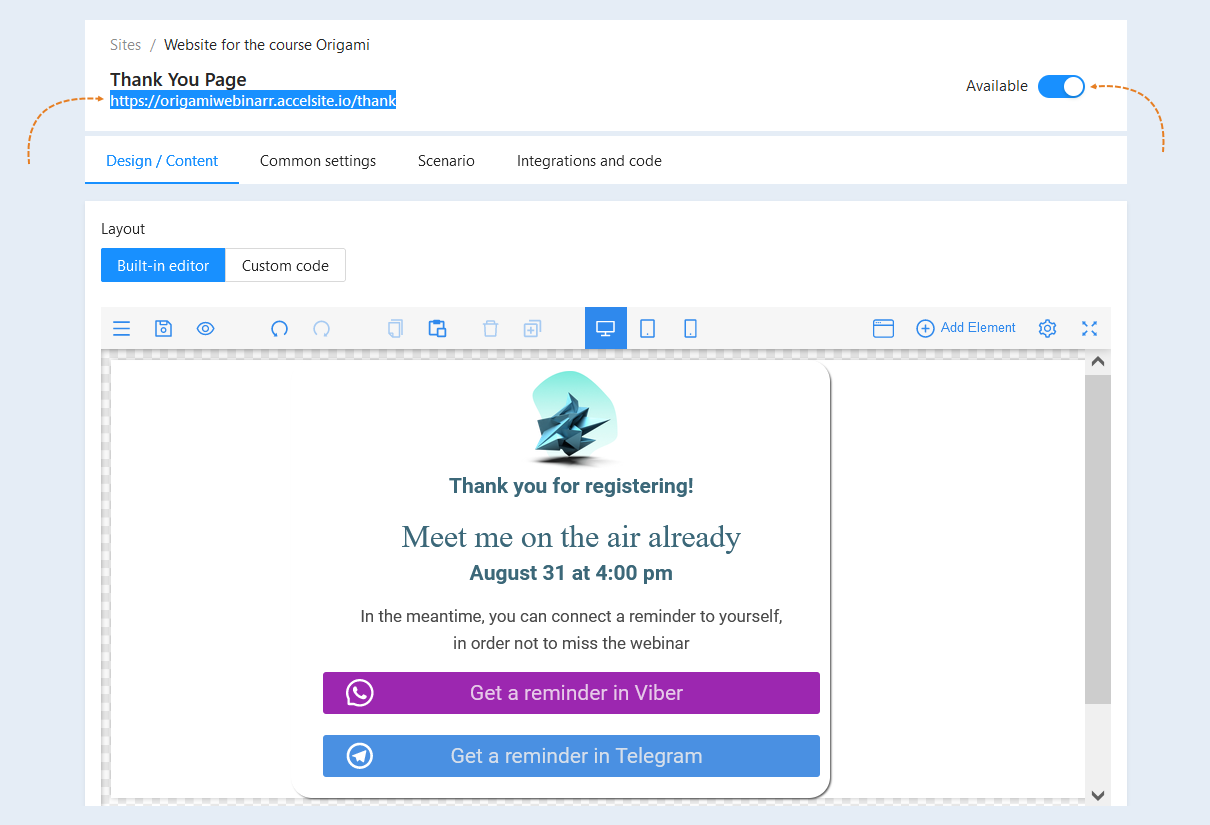
In order for the gratitude page to be available to users, move the "Available" slider to the active position. Copy the link to the thank you page in the upper left corner of the page.
Go back to the "Registration Form for the webinar" page of the website. Select the entire form, the "Settings" panel of the element opens on the right. Move the "Redirect to URL" slider to the active position. Paste the copied link to the thank you page into the "Redirect to URL" field in the form settings.
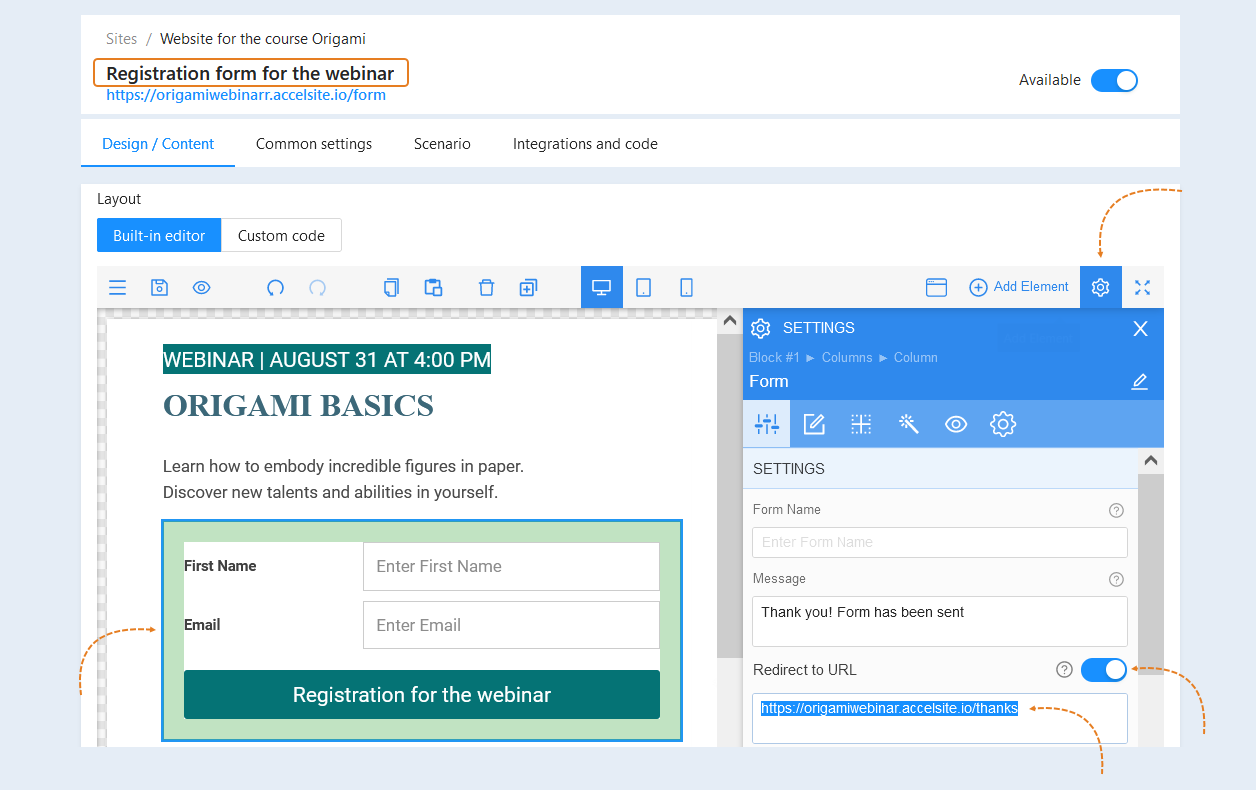
After completing the settings of the webinar registration form, click the "Save" button.
Thus, when a user submits a form to register for a webinar, he will be redirected to the gratitude page with an offer to connect a reminder about the webinar in the chatbot (Viber, Telegram, etc.). Next, when you click the "Get a reminder in Viber" or "Get a reminder in Telegram" buttons, the user will be sent to the page of the selected messenger in the chatbot.
In the selected chatbot, the user will receive reminders about the webinar with a specified frequency (per day, per hour, per 5 minutes), according to the configured scenario in the webinar.