A webinar template is a sample webinar in which you create events and settings for a future webinar. Once you have created a webinar template, you can run it in an automated mode - an automated webinar. Read more in the article "Autowebinars".
The webinar template will help you create an automated webinar from scratch without the need for a prior live webinar. You record a video and add events. After that, you can launch the automated webinar.
To create a webinar template, choose events from a ready-made list and create your own sequence of events for the future webinar. Events are meant to manage interactions between webinar participants and to improve control over the content and structure of the event itself.
Click on the relevant section of the article to go to its description:
Adding Events to the Webinar Template
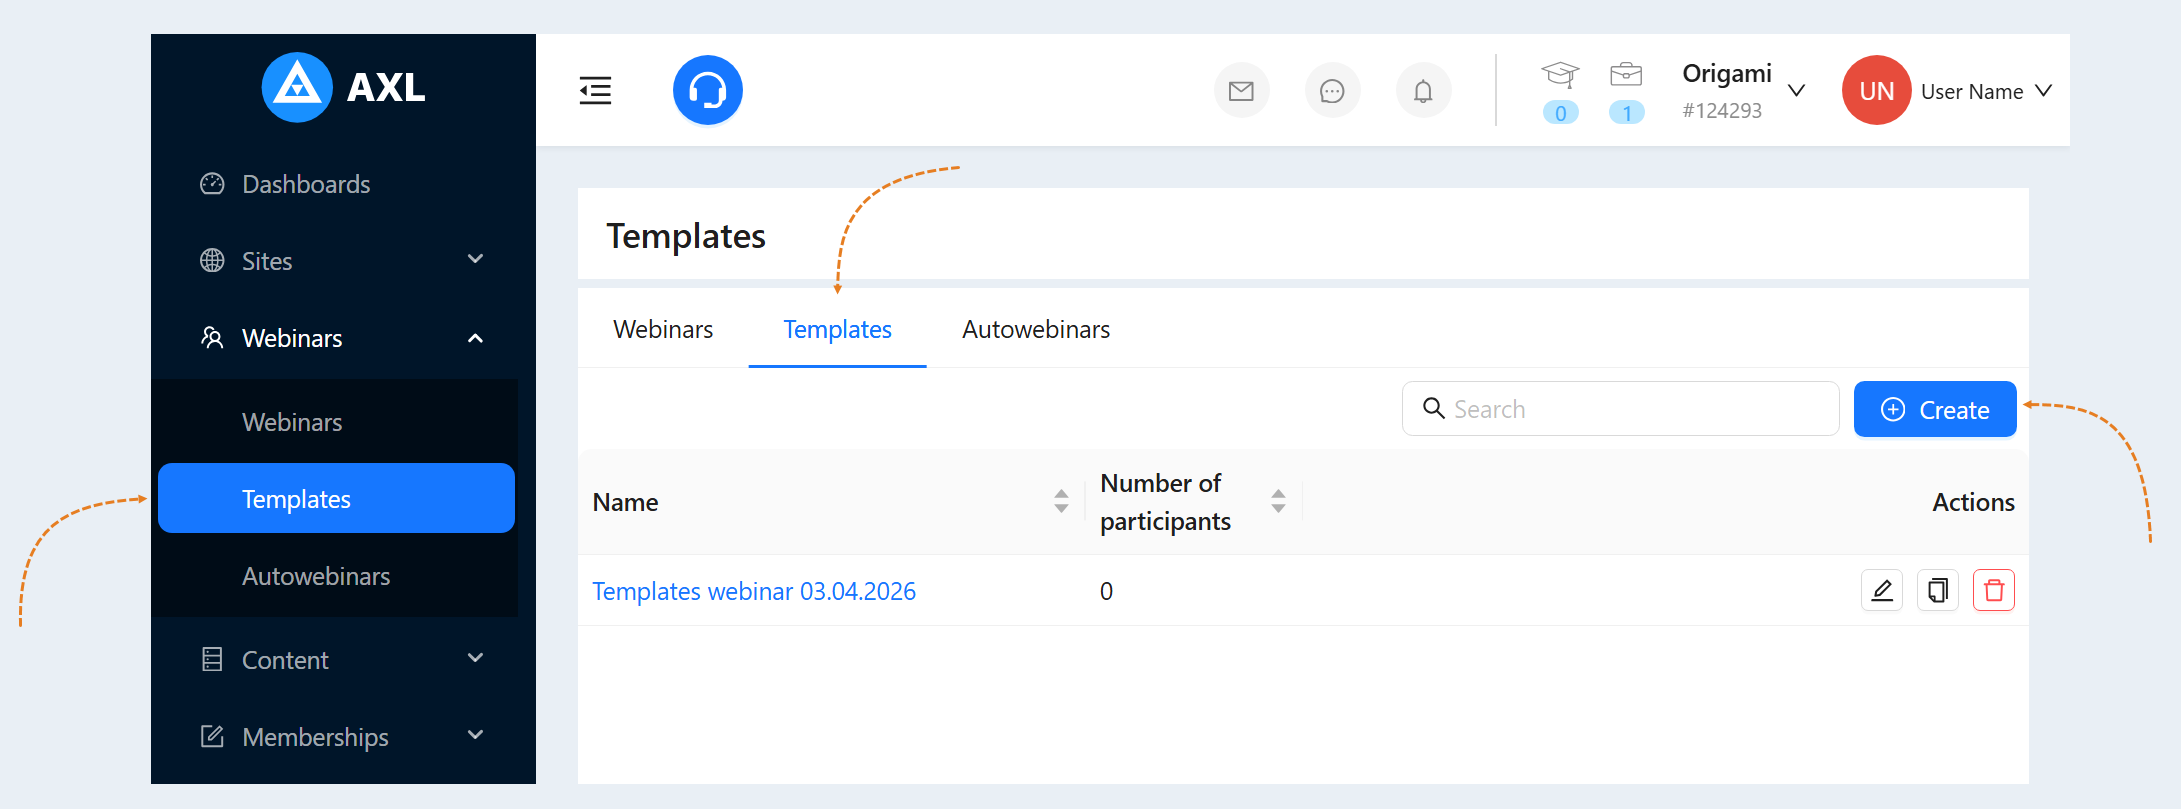
Go to the "Webinars" section, open the "Templates" tab. Open a previously created webinar template or create a new one. For more information on how to create a template, refer to the article "Webinar Template".
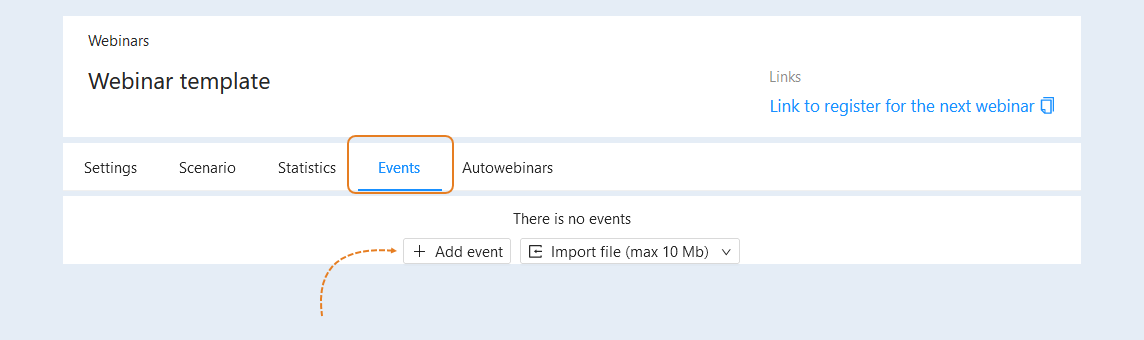
Open the "Events" tab. Click the "Add Event" button.
Select an event from the list and click on it. The event will appear in the list of template events. Now you need to configure this event.
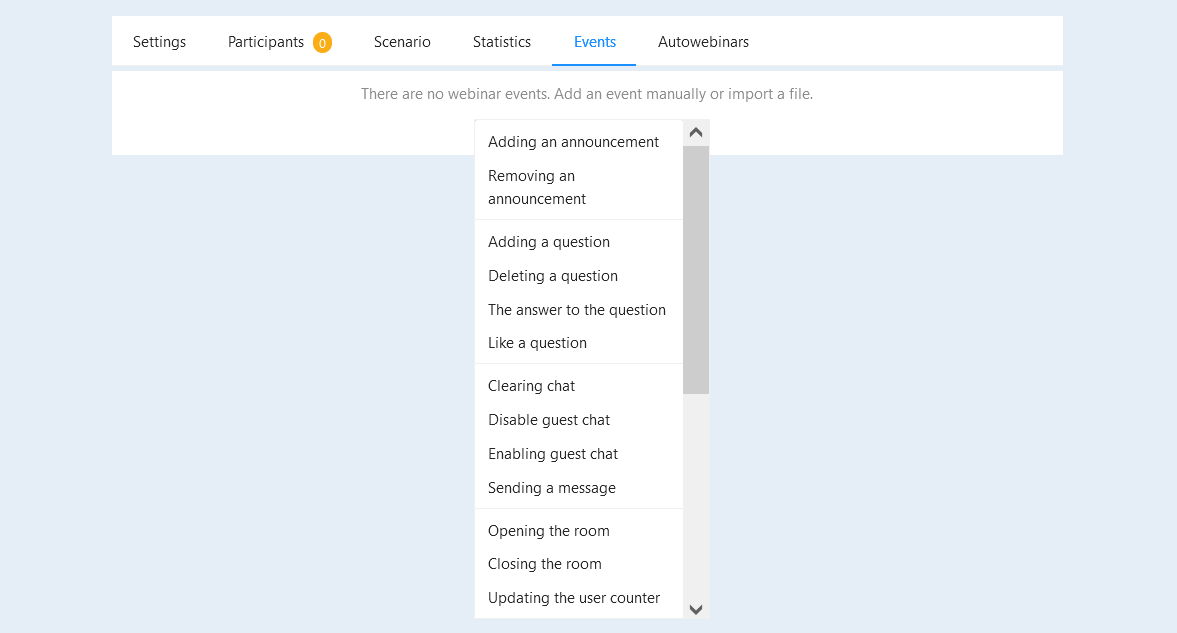
Let’s take a closer look at each event in the list.
Types of Events in the Webinar Template
Adding an announcement
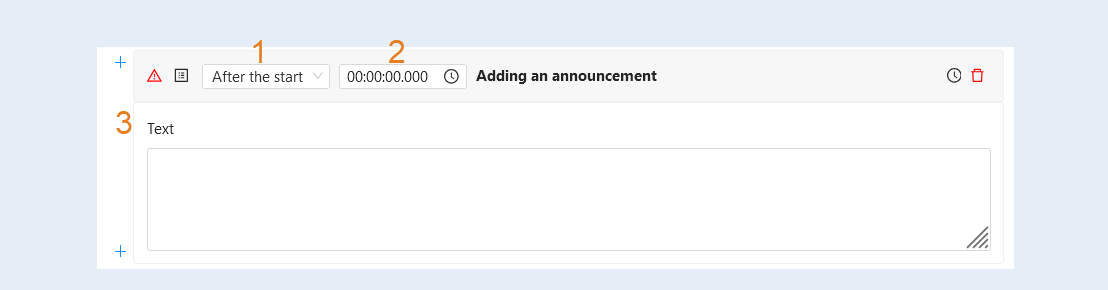
This event allows you to add an announcement or message that will be displayed to participants during the webinar. It can be used to inform participants of important moments, such as the start of a Q&A session, information about discounts, or announcements of future events.
In the event settings:
- Choose the event start sequence: before or after the webinar starts.
Set the time for this event. You can set the time in hours, minutes, seconds, and milliseconds.
Text. Write the announcement text in the text box.
Removing an announcement
This event removes a previously made announcement in the broadcast chat at the specified time. For example, in case the announcement information is no longer relevant.
In the event settings:
- Choose the event start sequence: before or after the webinar starts.
Set the time for this event. You can set the time in hours, minutes, seconds, and milliseconds.

Adding a question
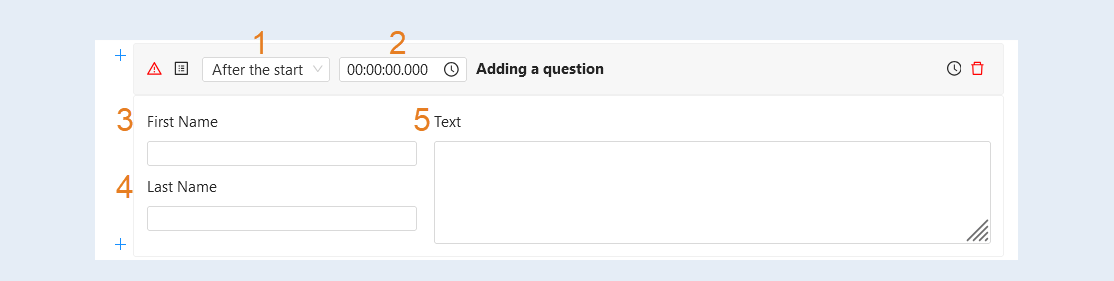
This event adds a question from a broadcast participant to the chat. Questions make the webinar more interactive, engaging participants in active participation. Periodic questions help maintain audience concentration.
In the event settings:
- Choose the event start sequence: before or after the webinar starts.
Set the time for this event. You can set the time in hours, minutes, seconds, and milliseconds.
First Name. Specify the first name of the participant who will be the author of this question.
Last Name. Specify the participant's surname. This field is not mandatory; the first name is sufficient.
Text. Write the text of the question in the field.
Deleting a question
This event removes a question from the broadcast chat. The event allows you to delete questions that were asked earlier. For example, if they are outdated or have already been answered.
In the event settings:
- Choose the event start sequence: before or after the webinar starts.
Set the time for this event. You can set the time in hours, minutes, seconds, and milliseconds.
Question. Select a question from the list of questions. All previously added questions will be reflected in the list. If the question list is empty, check if a question was previously added.

The answer to the question
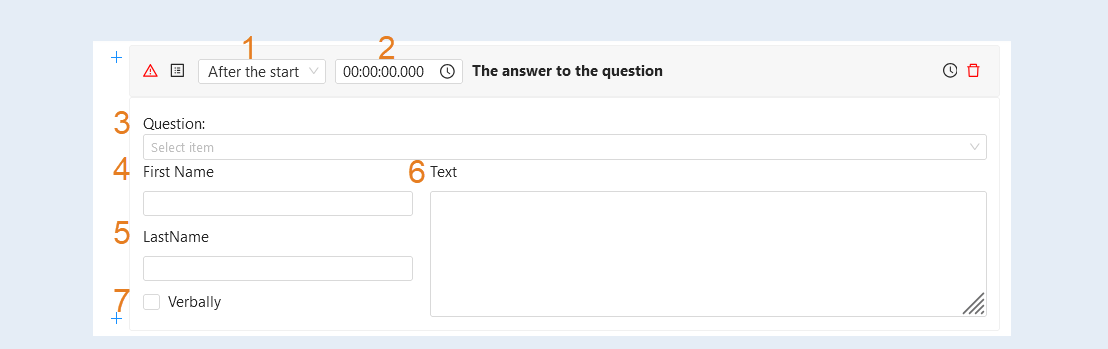
This event adds an answer to a previously asked question in the broadcast chat. This event helps maintain active participation and openness in communication.
In the event settings:
- Choose the event start sequence: before or after the webinar starts.
Set the time for this event. You can set the time in hours, minutes, seconds, and milliseconds.
Question. Select a question from the list of questions. All previously added questions will be reflected in the list. If the question list is empty, check if a question was previously added.
First Name. Specify the first name of the participant who will write the answer to the question.
Last Name. Specify the participant's surname. This field is not mandatory; the first name is sufficient.
Text. Write the text of the answer in the field.
Verbally. You can check the "Verbally" option and answer the question verbally in the broadcast.
Like question
his event adds a reaction to a participant's question in the chat during the broadcast in the form of an emoji. This helps to highlight the questions that are of the most interest to the audience or that have been useful.
In the event settings:
- Choose the sequence for starting the event: before or after the webinar begins.
Set the time for this event. You can set the time in hours, minutes, seconds, and milliseconds.
Question. Select a question from the list of questions. All previously added questions for events will be reflected in the list. If the question list is empty, check whether any questions have been added previously.

Clearing chat
This event clears the chat of all messages in the broadcast. This can be useful for creating a clean space before a new session begins or after the webinar ends.
In the event settings:
- Choose the sequence for starting the event: before or after the webinar begins.
Set the time for this event. You can set the time in hours, minutes, seconds, and milliseconds.

Disable guest chat
This event disables the chat for broadcast participants. The event limits the ability to send messages in the chat for guests to avoid chaos during the event.
In the event settings:
- Choose the sequence for starting the event: before or after the webinar begins.
Set the time for this event. You can set the time in hours, minutes, seconds, and milliseconds.

Enabling guest chat
This event enables the chat for broadcast participants. It restores the ability to participate in the chat for users who had it disabled. Enabling chat promotes more active interaction among participants and with the host, allows for questions, and increases engagement.
In the event settings:
- Choose the sequence for starting the event: before or after the webinar begins.
Set the time for this event. You can set the time in hours, minutes, seconds, and milliseconds.

Sending a message
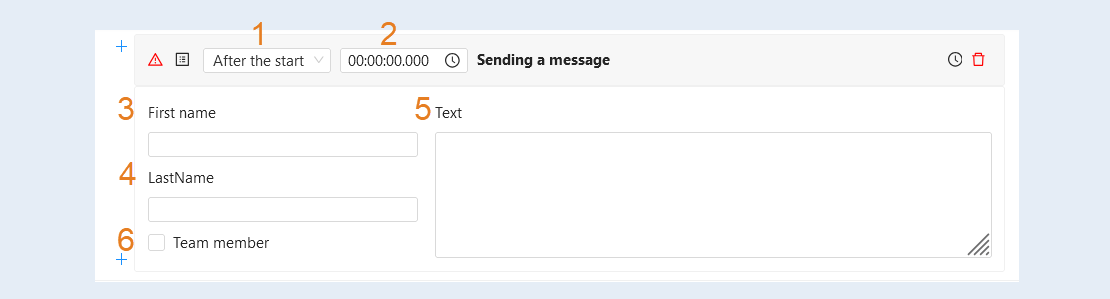
This event sends a message in the chat to participants. Messages can be used for reminders, instructions, obtaining participants' feedback, or important information during the webinar.
In the event settings:
- Choose the sequence for starting the event: before or after the webinar begins.
Set the time for this event. You can set the time in hours, minutes, seconds, and milliseconds.
First name. Provide the name of the participant sending the message.
Last Name. Provide the surname of the participant. This field is optional; the name is sufficient.
Text. Write the message text in the field.
Team Member. You can check "Team Member" if you want to send the message on behalf of your team.
Opening a room
This event opens the webinar room at the time specified by you for all participants. Opening the room informs participants that the webinar has started and that they can join for viewing and discussion. You can set the room opening time, for example, 10 minutes before the main session begins, so that participants can connect and check their connection.
In the event settings:
- Choose the sequence for starting the event: before or after the webinar begins.
Set the time for this event. You can set the time in hours, minutes, seconds, and milliseconds.

Closing the room
This event closes the webinar room for all participants at the specified time. Closing the room can be done after the webinar ends or if there's a need to completely stop access to it. You can choose a closing time, for example, immediately after the last slide or after a specified time has elapsed.
In the event settings:
- Choose the sequence for starting the event: before or after the webinar begins.
Set the time for this event. You can set the time in hours, minutes, seconds, and milliseconds.

Updating the user counter
This event changes the number of participants at the specified time. The user counter helps track attendance, which can be useful for analysis.
The counter in the webinar sums the numbers for subsequent "Update User Count" events. Thus, to increase the user count, specify a positive number in subsequent "Update User Count" events to indicate how many participants you want to add. For example, if there are 50 guests at the start of the webinar, and after 15 minutes you want to increase the number by 20, then set the time and number of guests to 20 in the next "Update User Count" event. As a result, at the specified time, the counter will reflect 70 guests.
If you want the number of participants to decrease, you should specify a negative number (with a minus sign) in subsequent events. This way, the number of participants will decrease by the amount you specified.
You can gradually increase and then decrease the number of webinar participants during the broadcast.
In the event settings:
- Select the event start sequence: before the start or after the start of the webinar.
Set the time for this event. You can set the time in hours, minutes, seconds, and milliseconds.
Specify the number of hosts, moderators, and the number of guests participating in the webinar. Use a positive number to increase the number of participants compared to the previous event "Update user counter." Or use a negative number to decrease the number of participants compared to the previous event.

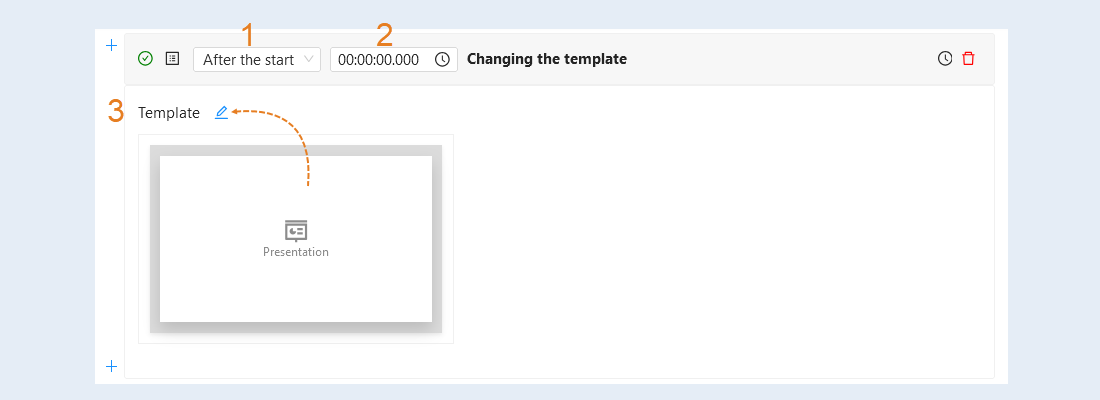
Changing the template
This event changes the visual appearance of the template at the time you specify. Template changes can be used to update the design, adapt to new themes, or conduct different segments of the webinar with varying visual styles.
For example, at the beginning of your webinar, you use a template view with a single stream, meaning one element in the template. Then, after 10 minutes, you change the stream template view and add two elements to your template - stream and presentation. After an hour of the webinar, you change the template view and set three elements in the template - stream, presentation, and widget - registration form for your paid product. Similarly, you can decrease the number of elements in the template.
In the event settings:
- Select the event start sequence: before the start or after the start of the webinar.
Set the time for this event. You can set the time in hours, minutes, seconds, and milliseconds.
Template. Choose the template view that should launch at this time. Click the "Edit" icon and select a template from the provided list.
Adding a presentation
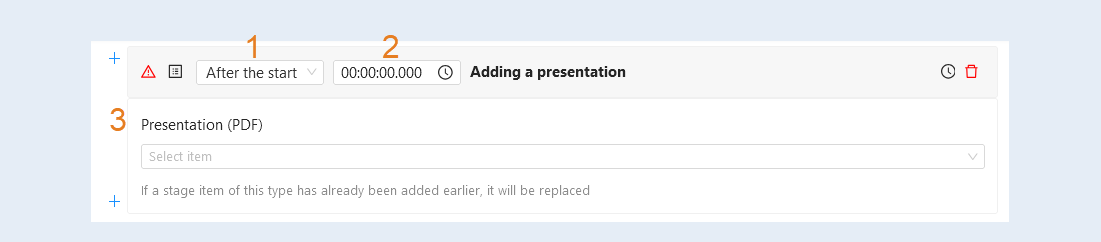
This event adds a presentation (PDF) to your stream at the specified time. The presentation helps visually support your speech and convey information to the participants more effectively. When this event triggers, the selected presentation appears on the screen for the participants at the time you specify.
If an element of this type has already been added before, it will be replaced. This means that if a presentation has already been added previously, this action will replace it with the current one.
Please note that the element will not be visible to participants if it is not included in the template scene. To fix this, add a "Template Change" before this event and select a scene template that includes the presentation element.
In the event settings:
- Select the event start sequence: before the start or after the start of the webinar.
Set the time for this event. You can set the time in hours, minutes, seconds, and milliseconds.
Presentation. Choose a presentation from the provided list. To have the presentation appear in the list, upload your presentation in the webinar settings under "Content and Presentations". After that, refresh the list, and the presentation will be available for selection. For more information on adding a presentation, refer to the article "Webinar settings".
Adding a broadcast (recording)
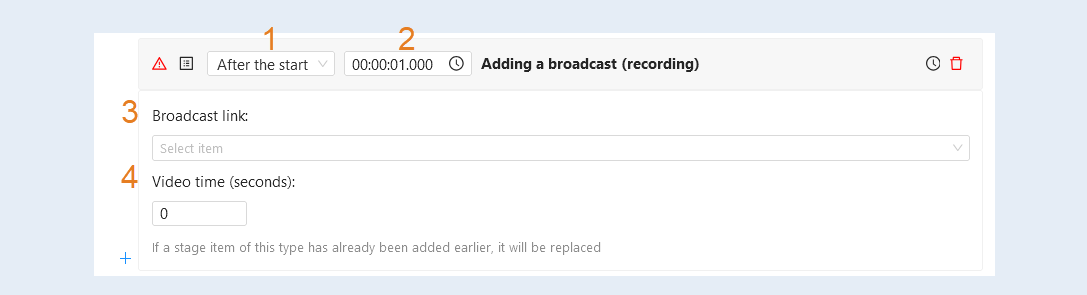
This event adds a video recording to your stream. The recording will start at the moment specified in the settings. Participants will see a video stream with pre-recorded information.
If an element of this type has already been added before, it will be replaced. This means that if a broadcast has been added previously, this action will replace it with the current one.
Please note that the element will not be visible to participants if it is not included in the template scene. To fix this, add a "Template Change" before this event and select a scene template that includes the broadcast element.
In the event settings:
- Select the event start sequence: before the start or after the start of the webinar.
Set the time for this event. You can set the time in hours, minutes, seconds, and milliseconds.
Broadcast link. Choose a broadcast from the provided list. To have the broadcast appear in the list, upload your broadcast in the webinar settings under "Content and Presentations." After that, refresh the list, and the broadcast will be available for selection. For more information on adding a broadcast, refer to the article "Webinar settings".
Video time (seconds). Set the video time in seconds from which playback will begin. This parameter allows you to start showing the broadcast from a specific part of the video, skipping unnecessary sections.
For example, in a video broadcast that lasts 10 minutes, if you want the show to start exactly from 2 minutes and 30 seconds to focus on the relevant material, you can set the "Video Time" parameter to 150 seconds (which corresponds to 2:30), and when the video starts, it will play from that point.
Adding video
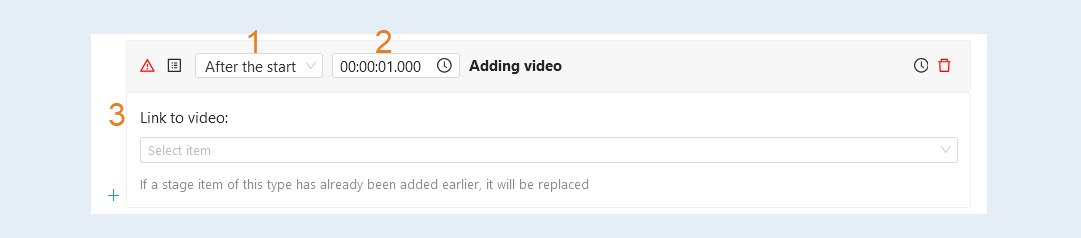
This event adds a video to your broadcast at a specified time. The video can serve as an additional source of information or illustration for the webinar topic. To set the time in seconds for when the video will start and stop playing, use the "Start Video Playback" and "Stop Video Playback" events. These events are described in the article below.
If a scene element of this type has already been added previously, it will be replaced. That is, if a video has already been added earlier, this action will replace it with the current version.
Please note that the element will not be visible to participants if it is not in the scene template. To fix this, add the "Change Template" event before this event and select a scene template with the video element.
In the event settings:
- Choose the event start sequence: before the start or after the start of the webinar.
Set the time for this event. You can specify the time in hours, minutes, seconds, and milliseconds.
Video link. Select a video from the suggested list. To have the video appear in the list, upload it in the webinar settings under "Content and Presentations." After that, refresh the list, and the video will be available for selection. For more details on how to add a video, refer to the article "Webinar settings".
Add widget
This event adds a widget to your broadcast at a specified time. This allows for integrating various interactive elements (such as polls, chat, feedback forms) into the webinar. Widgets help maintain interaction between the host and participants, leading to deeper engagement.
For more on creating a widget, refer to the article "Widgets".
If a scene element of this type has already been added previously, it will be replaced. That is, if a widget has already been added earlier, this action will replace it with the current one.
Please note that the element will not be visible to participants if it is not in the scene template. To fix this, add the "Change Template" event before this event and select a scene template with the widget element.
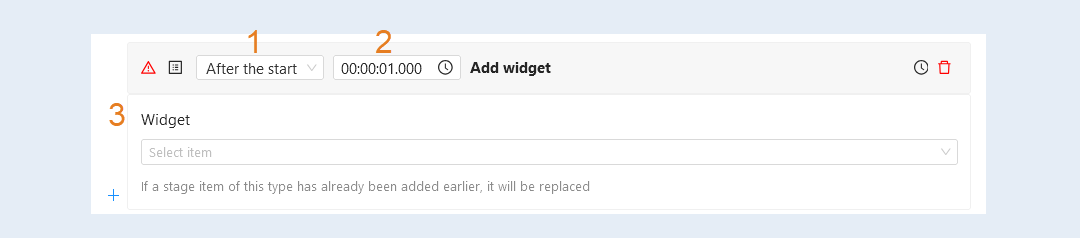
In the event settings:
- Choose the event start sequence: before the start or after the start of the webinar.
Set the time for this event. You can specify the time in hours, minutes, seconds, and milliseconds.
Widget. Select a widget from the suggested list. To have the widget appear in the list, upload it in the webinar settings under "Content and Presentations." After that, refresh the list, and the widget will be available for selection. For more details on how to add a widget, refer to the article "Webinar settings".
Deleting a scene element
This event removes a specific element from the scene: presentation, broadcast, video, or widget. Removing elements helps avoid confusion and cleans the screen of unnecessary content when it is no longer relevant. When this event is triggered, the selected element disappears from the screen for participants.
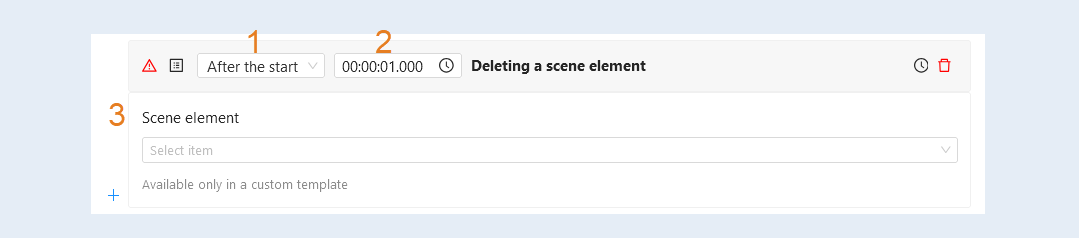
In the event settings:
- Choose the event start sequence: before the start or after the start of the webinar.
Set the time for this event. You can specify the time in hours, minutes, seconds, and milliseconds.
Scene element. Select the element from the suggested list that will be removed.
Content cleaning
This event clears all content (all scene elements: presentation, broadcast, video, widget) displayed on the screen. Clearing content is relevant before moving on to the next section of the webinar to avoid unnecessary clutter of information. When this event is activated, all floating scene elements disappear, freeing the screen for new content.
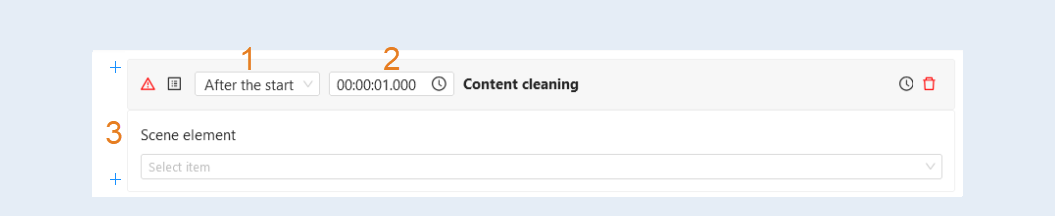
In the event settings:
- Choose the event start sequence: before the start or after the start of the webinar.
Set the time for this event. You can specify the time in hours, minutes, seconds, and milliseconds.
Scene element. Select the element from the suggested list that will be cleared.
Add buttons
This event allows you to place one or more buttons on the screen at a specific moment during the webinar. The buttons can link to pages with additional information, registration forms, purchases, or other resources. The event provides participants with the opportunity to interact with the content. For example, they can purchase a product or subscribe to newsletters.
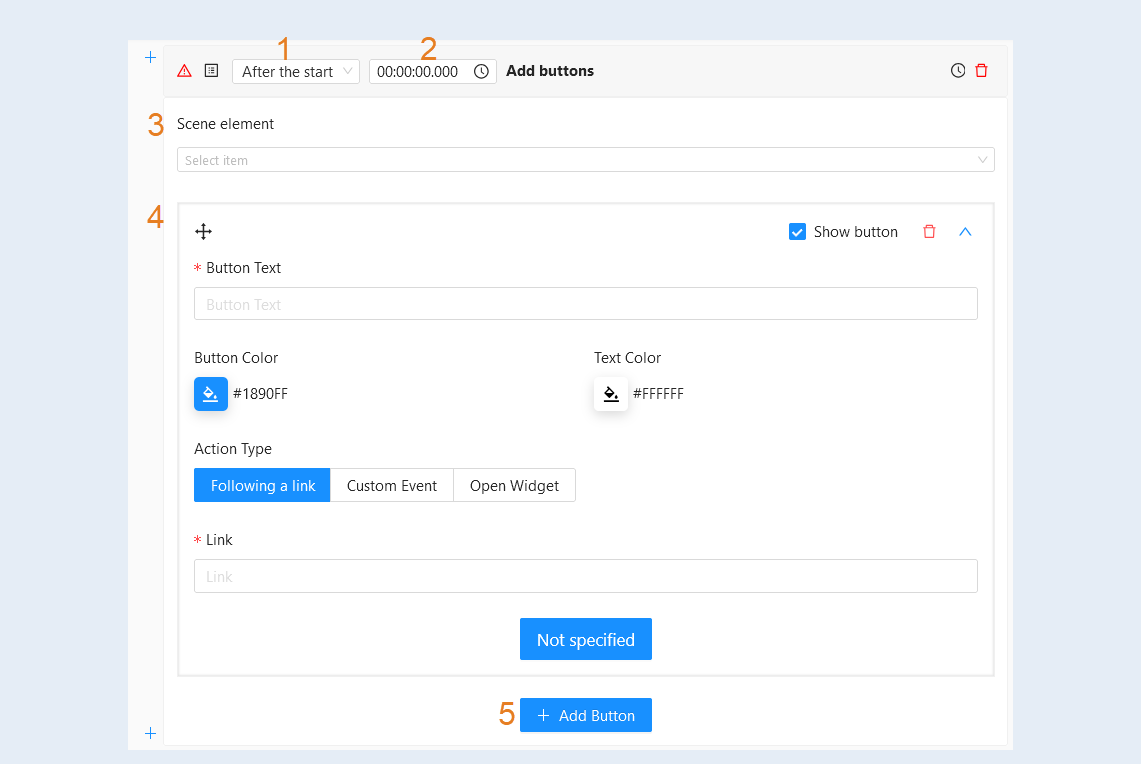
In the event settings:
- Choose the sequence to start the event: before or after the webinar begins.
Set the time for this event. You can set the time in hours, minutes, seconds, and milliseconds.
Scene element. Choose a scene element from the provided list: broadcast or video.
Button settings. For more details on button settings, read the article "Buttons, widgets and custom events in the webinar".
Set the required button settings:
- Show button. Check the box to make the button available to users.
Button text. Specify the button text that users will see.
Button color/Text color. You can change the color of the button itself or the text inside the button.
Action type. Choose the type of action when the button is clicked:
- Link redirect. When the button is clicked, the user will be sent to the specified link. Below in the "Website Link" field, enter the link to which the user will be redirected when clicking the button. You can create a site on the AXL platform or use a link to an external site.
Custom event. A custom event is an event that will trigger when a webinar participant clicks the button. You can create any event that will launch a script. For more details on custom event settings, read the article "Buttons, widgets and custom events in the webinar". The event will only trigger if the contact is registered in the CRM (i.e., has an email address).
Open widget. When the button is clicked, a widget will open in a modal window in the center of the screen. The widget can be selected from the list of added widgets. To have a widget appear in the list, upload it in the webinar settings under "Content and Presentations." After that, refresh the list, and the widget will be available for selection. For more information on how to add a widget, read the article "Webinar settings".
Click "Add Button" to add another button. Below, an additional settings window for the new button will open.
Delete buttons
This event removes all buttons at the specified time. For example, if the button has become outdated or the time allocated for clicking it has expired.
In the event settings:
- Choose the sequence to start the event: before or after the webinar begins.
Set the time for this event. You can set the time in hours, minutes, seconds, and milliseconds.
Scene element. Choose from the provided list the scene element from which the buttons will be removed.

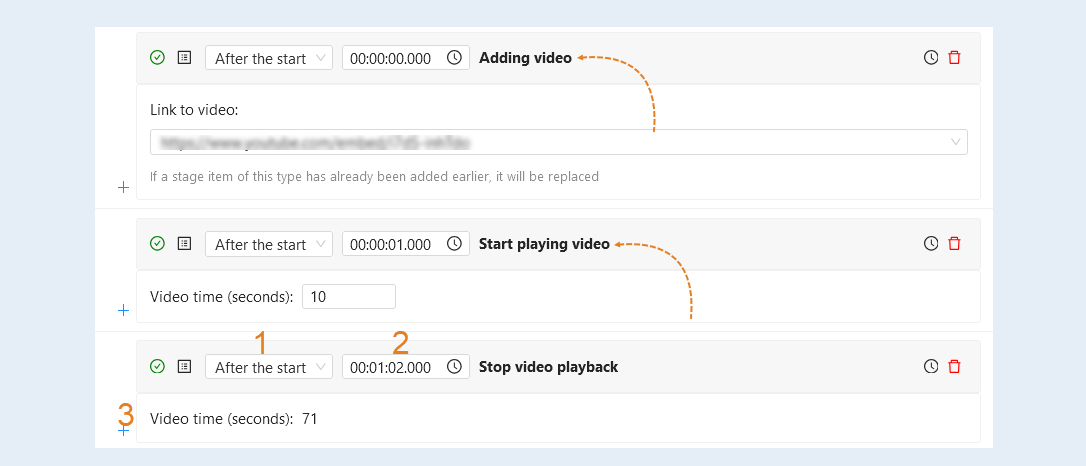
Stop video playback
This event stops the video recording at the specified time. Stopping the video may be required to emphasize a certain topic, to provide comments, or to answer participants' questions.
To activate this event, in the previous step, add the "Adding video" and "Start playing video" events. This video will be stopped at the selected second. The settings for the "Adding video" and "Start playing video" events are described in this article.
In the event settings:
- Choose the sequence to start the event: before or after the webinar begins.
Set the time for this event. Set the time in hours, minutes, seconds, and milliseconds.
Video time (seconds). This field shows at which second the video playback will stop.
Start playing video
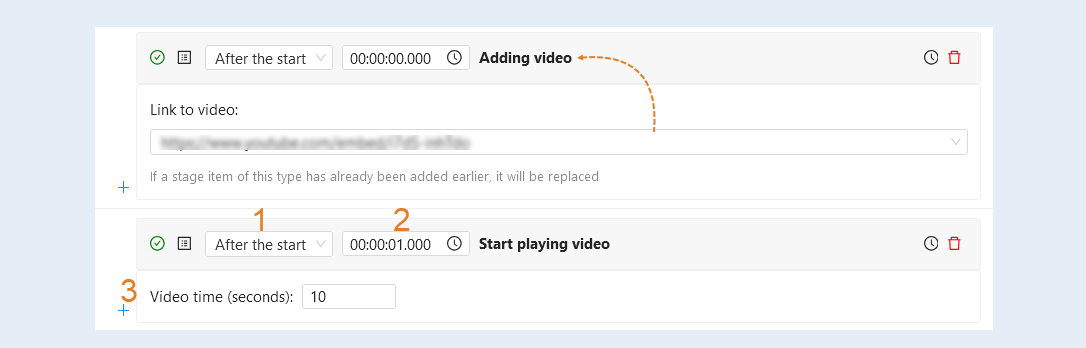
This event starts the playback of the video recording. Starting video playback is intended for synchronizing the video with other elements of the webinar, such as slides, text blocks, animations, buttons, etc.
To activate this event, in the previous step, add the "Adding video" event. This video will start playing from the selected second. The settings for the "Adding video" event are described earlier in this article.
In the event settings:
- Choose the sequence to start the event: before or after the webinar begins.
Set the time for this event. You can set the time in hours, minutes, seconds, and milliseconds.
Video time (seconds). Set the video time in seconds from which the video will start playing. This parameter allows you to start showing the video from a specific segment, skipping unnecessary parts.
For example, in a video broadcast with a duration of 10 minutes, you want the show to start exactly from 2 minutes and 30 seconds to focus on the relevant material. In this case, you can set the "Video Time" parameter to 150 seconds (which corresponds to 2:30), and when the video starts, it will begin playing from that moment.
Change presentation slide
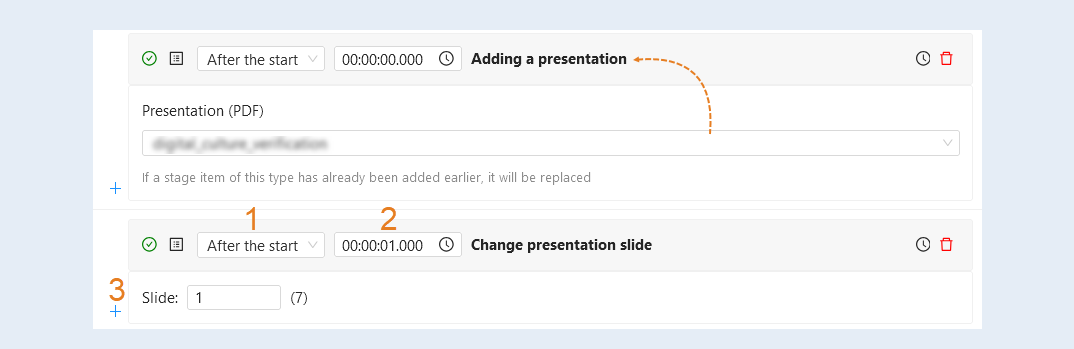
This event allows switching slides during the webinar. Changing slides is essential for presenting new information or visualizing important content for participants.
To activate this event, add the "Adding a presentation" event in the previous step. The slides of this presentation will change at the set time. Settings for the "Adding a presentation" event are described above in this article.
In the event settings:
- Select the sequence for starting the event: before or after the webinar starts.
Set the time for this event. You can specify the time in hours, minutes, seconds, and milliseconds.
Slide. Specify the slide number that will be displayed at the designated time. The total number of slides in the presentation is shown in parentheses.
General Event Settings
For each event, set the general settings:
- Event addition button. Click the "+" button to add the next or previous event. A window with a list of events will open. Select the event. The top "+" button will add an event above the current one in the list. The bottom "+" button will add an event below the current one in the list. To change the order of events in the list, alter the time. Then the event will move up or down in the list.
Information. A green checkmark means that the event has been added and configured. If you see a red exclamation mark, it means the event is not set up. Check whether the event data is filled in correctly, and add settings or check if the event is correctly positioned relative to other events. Click on the red exclamation mark to see system hints.
List of settings for this event. Click to view general information about the webinar.
Event sequence. Choose when to execute the event: before or after the webinar starts.
Time. Set the launch time for the event, in hours, minutes, seconds, and milliseconds.
Event name. The name of the event is specified here.
Change time. Click to change the time for this and all subsequent events. All events in the list will be moved forward or backward by the chosen time.
"Delete" button. Click to remove the event from the list.

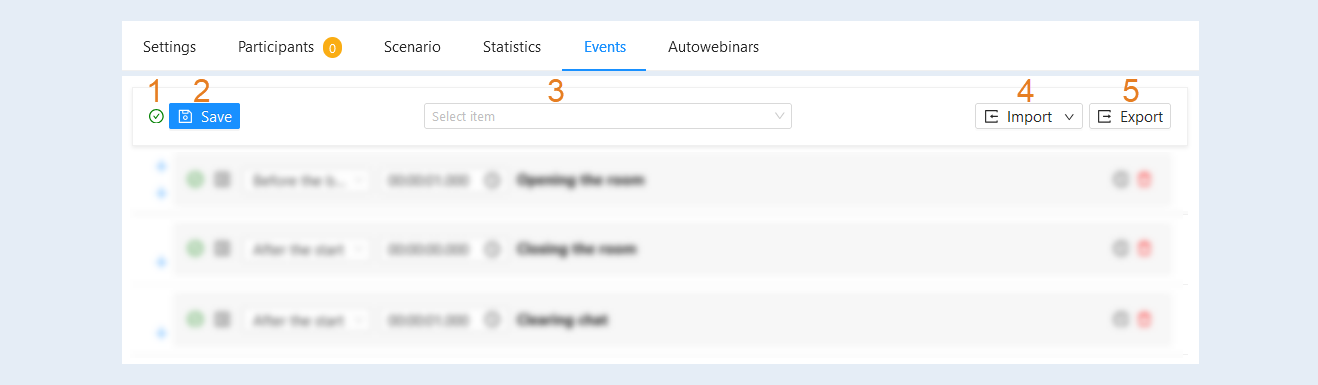
At the top of the webinar event list, you have access to:
- Information. A green checkmark indicates that events have been added and configured correctly. If you see a red exclamation mark, it means that some event is not set up or is incorrectly positioned relative to other events, or that the "Room Opening" and "Room Closing" events have not been added. Click on the red exclamation mark to see system hints.
Save. After you have added and configured all the events of the webinar, click the save button. This button will be active if all events are configured correctly.
List of all added events. Select the desired event from the list to go to its settings. This option is convenient when there are many events.
Import. This is the transfer of webinar events into your acoount's system on the AXL platform. You can upload a list of events from your device (computer, laptop, tablet) in one file (in json or CSV format). This way, you can quickly transfer a large number of events to your online acoount's webinar. Note that all current events will be deleted after the import. The maximum import file size is 10 MB. Import is possible from BIZON, GetCourse, and AXL.
Export. The "Export" function allows you to export all webinar events in json format. Export is the offloading of the event list from your account to another account. Click the "Export" button and download the file to your device (computer, laptop, tablet) as a single file.