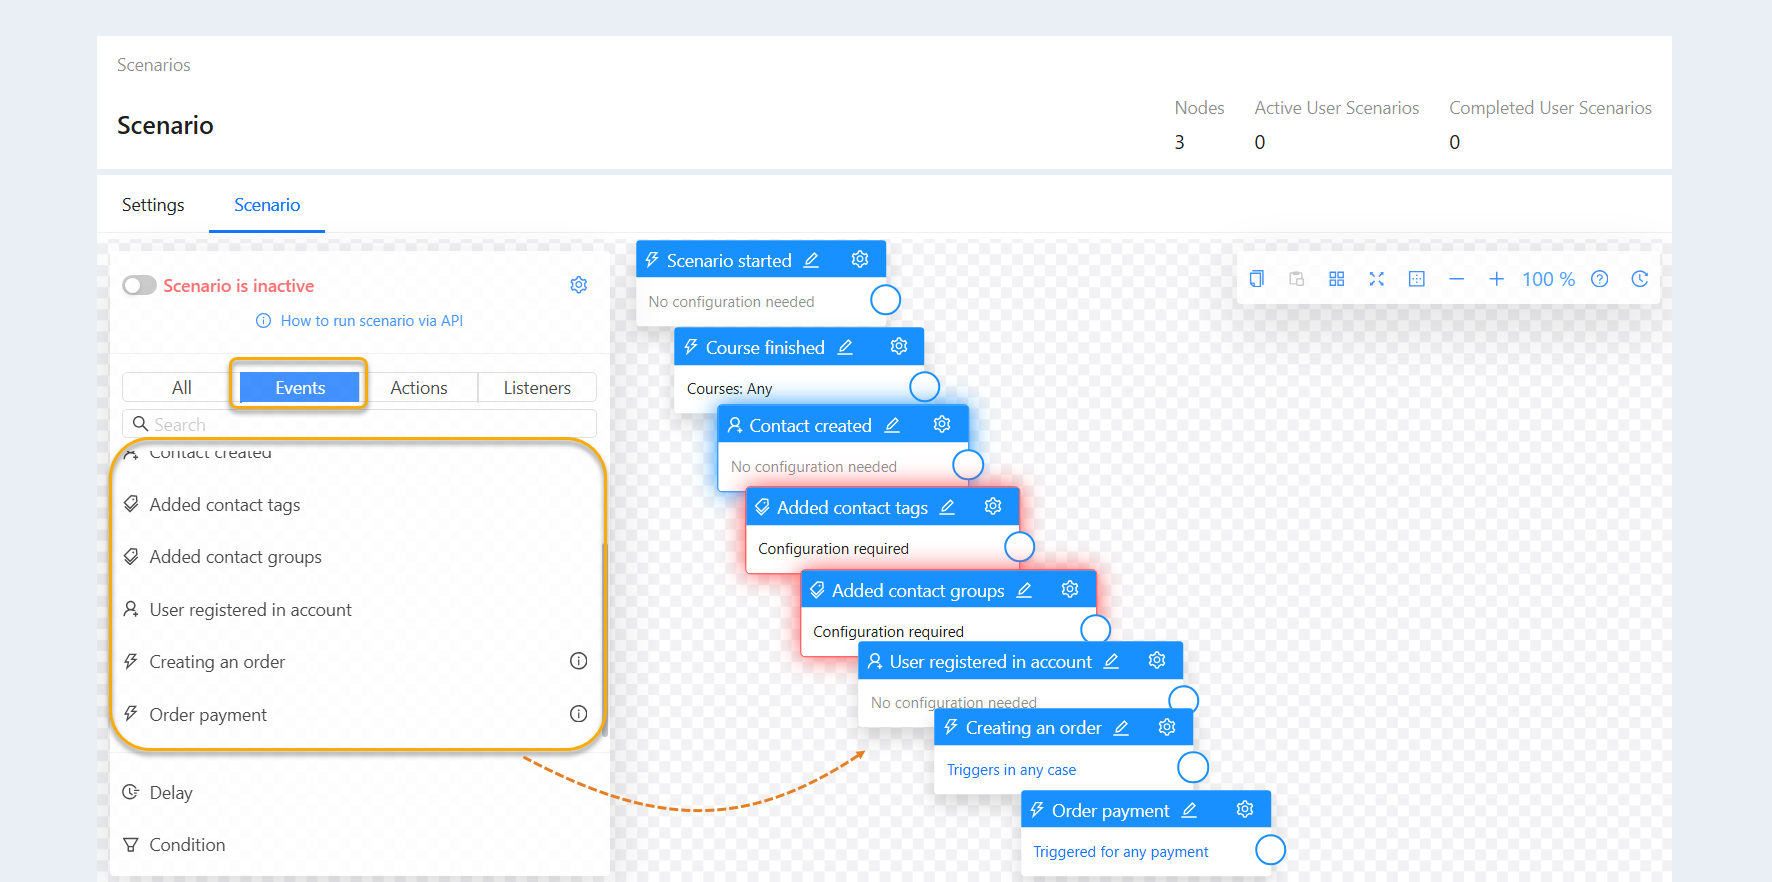
A scenario is a sequence of events and actions within your account on the AXL platform. Basically, a scenario is a sequence of interactions between a merchant (that is, you) and visitors to your sites, through automated processes (for example, sending emails).
When you create a Scenario, you first select an event triggered by the user when visiting your web pages. Next, you need to set the response actions of the scenario: send a letter, add a responsible person, etc. By linking events and actions together, you define the sequence of actions in the scenario.
An event is a specific user choice when interacting with your account. Click on the desired section to go to its description:
1
Types of events for the Site scenario
Go to the "Sites" tab. Open your site.
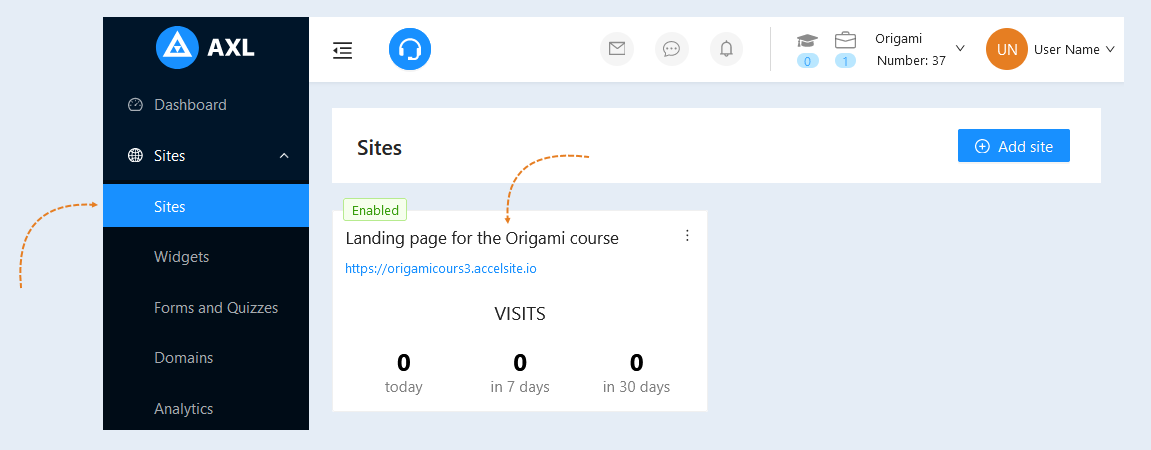
Next, go to the "Pages" tab. Select a page from the list of your pages. Go to the "Scenario" bookmarks of the site.
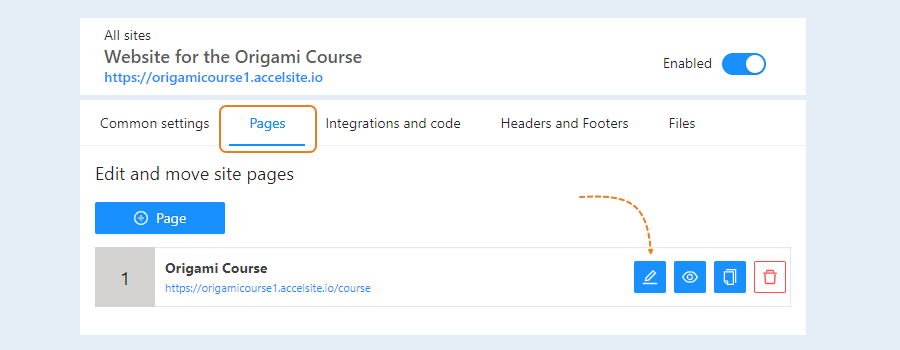
To create a website scenario, select an event from the list and drag it into the scenario field. There are 4 event options for the website scenario:
Order payment (form of payment). The order payment is a step in the scenario when the user confirms their order and makes a payment for the purchased course or other educational material. The user selects a course or educational material on the website. They then proceed to the order checkout in the payment form. After successful payment, the event will trigger, and further actions in the scenario will commence. For example, the user receives an email confirming their order and a link to their user dashboard.
Configure the settings for this event by clicking the "Configure Node" button. In the opened window, fill in the fields:
- Node Name. Specify the name of the node; you can name the nodes in the scenario at your discretion.
Triggers even in case of partial payment. Check the box so that the scenario triggers even if the order is partially paid. After finishing the settings, click the "Save" button.
Triggered if the order is created by the administrator. Choose the required option:
- Yes. If you select this option, the event will only trigger if the order was created manually by the administrator. This means that if the payment was initiated by the user on the website, the event will not trigger. This is useful in situations where it's necessary to link manual order processing with subsequent actions in the scenario.
No. If you select this option, the event will only trigger if the order was generated by the user on the website. In this case, if the order was created manually by the administrator, the event will remain inactive. This setting can be helpful when you want to track and respond only to automated applications generated by users through the online platform.
Doesn't matter. Selecting this option means that the event will trigger regardless of whether the order was created manually by the administrator or by the user through the website.
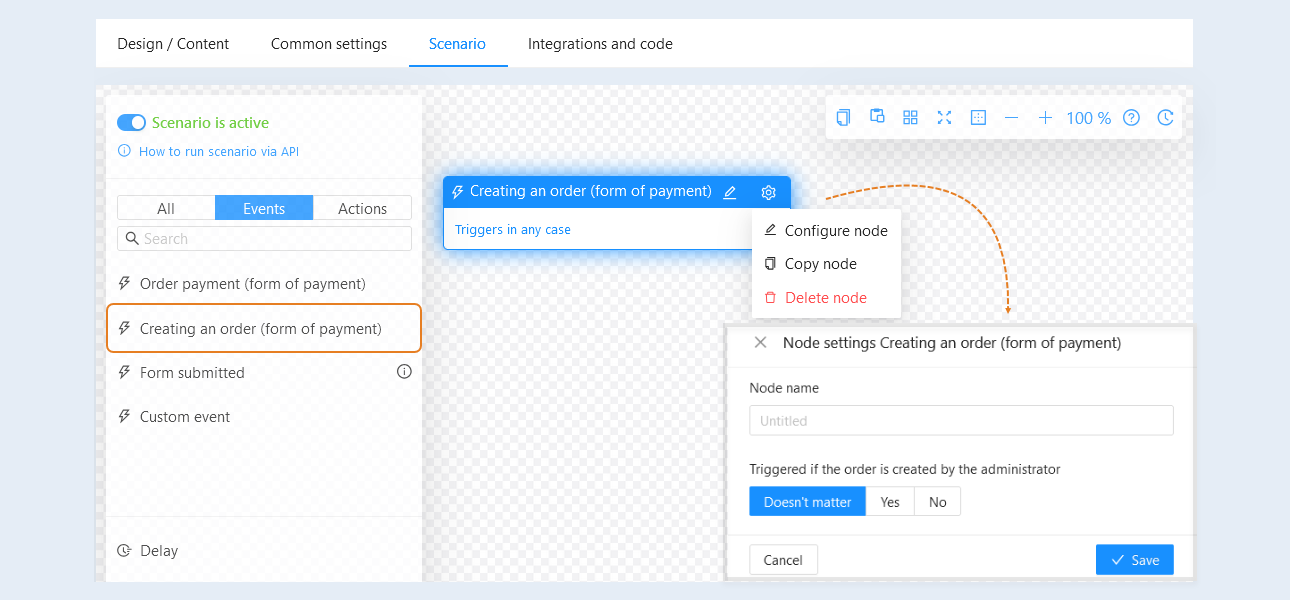
Creating an order (form of payment). The event triggers when a visitor creates an order in the payment form.
After the user creates an order in the payment form but does not complete the payment, the event will trigger, and further actions in the scenario will commence. For example, the user will receive an email reminder that the order payment has not been completed. The email may offer a promo code for an additional discount if the payment is completed within the next 12 hours or access to an exclusive webinar, which will help encourage the user to complete the payment.
Configure the settings for this event by clicking the "Configure Node" button. In the opened window, fill in the fields:
- Node Name. Specify the node's name; you can name the nodes in the scenario at your discretion.
Triggered if the order is created by the administrator. Choose the required option:
- Yes. If you select this option, the event will only trigger if the order was created manually by the administrator. This means that if the payment was initiated by the user on the website, the event will not trigger. This is helpful in situations requiring a link between manual order processing and subsequent scenario actions.
No. If you select this option, the event will only trigger if the order was created by the user on the website. In this case, if the order was created manually by the administrator, the event will remain inactive. This setting may be useful if you want to track and respond only to automated requests generated by users through the online platform.
Doesn't matter. Choosing this option means the event will trigger regardless of whether the order was created by the administrator manually or by the user through the website.
Without selecting this option, the event will trigger by default in any case.
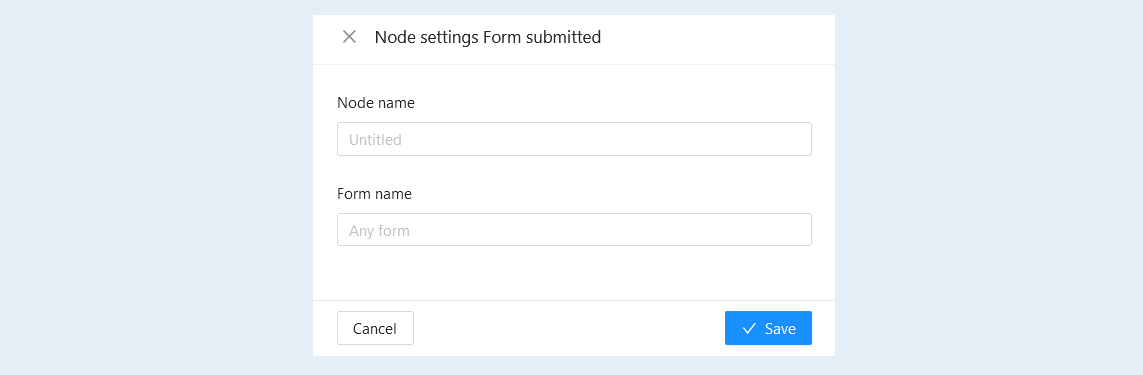
Form submitted. The event triggers when a visitor fills out and submits a form on any web page of your account.
Configure the settings for this event:
- Node Name. Specify the name of the node; you can name the nodes in the scenario at your discretion.
Form Name. Select the form's name from the list. Read more on how to create a form in the article "Form Element." Once you finish the configurations, click the "Save" button.
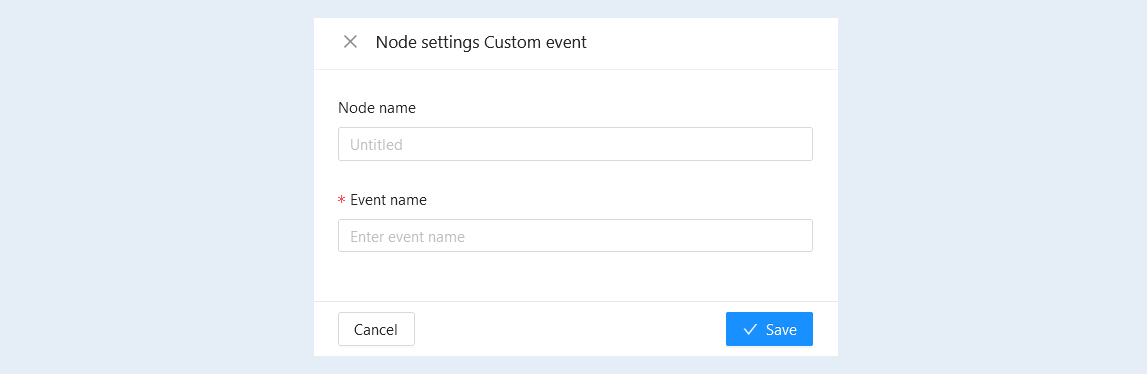
Custom Event. You can create any event that will trigger the scenario.
A custom event is a step that can be added to the scenario to document some user interaction with the platform. It can be used for various tasks, such as monitoring and analyzing user activity, personalizing learning, assessing course effectiveness, etc.
Configure the settings for this event:
- Node Name. Specify the name of the node; you can name the nodes in the scenario at your discretion.
Event Name. Write the name of the event. Click the "Save" button.
2
Types of events for the Form and Quiz scenario
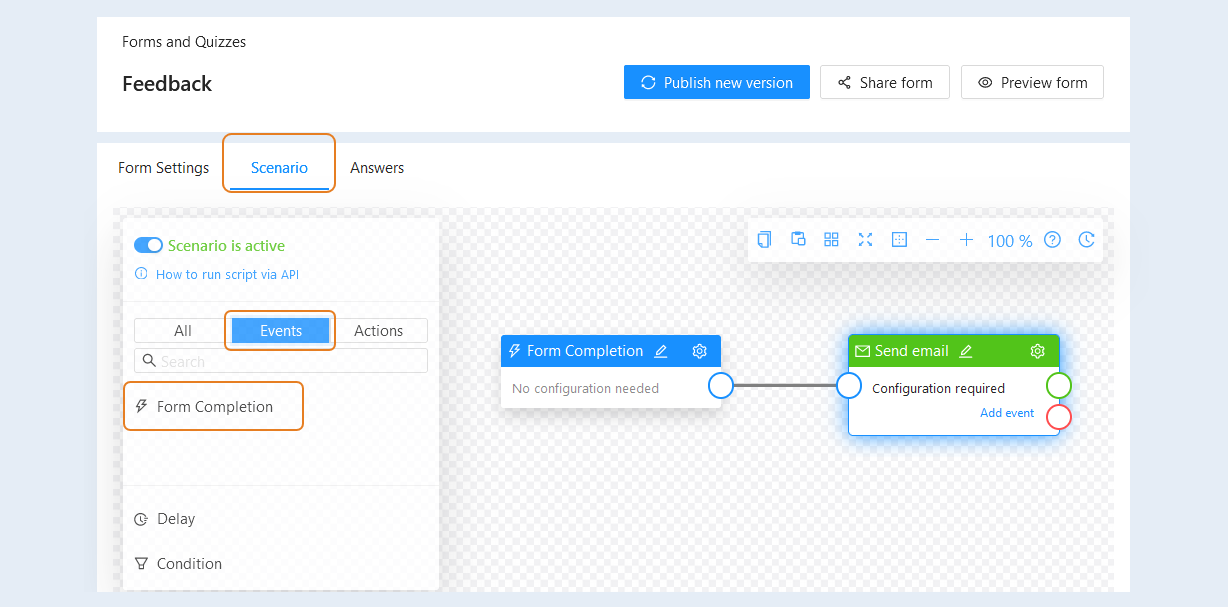
Go to the "Forms and Quizzes" tab. Select the form and click the "Edit" button.
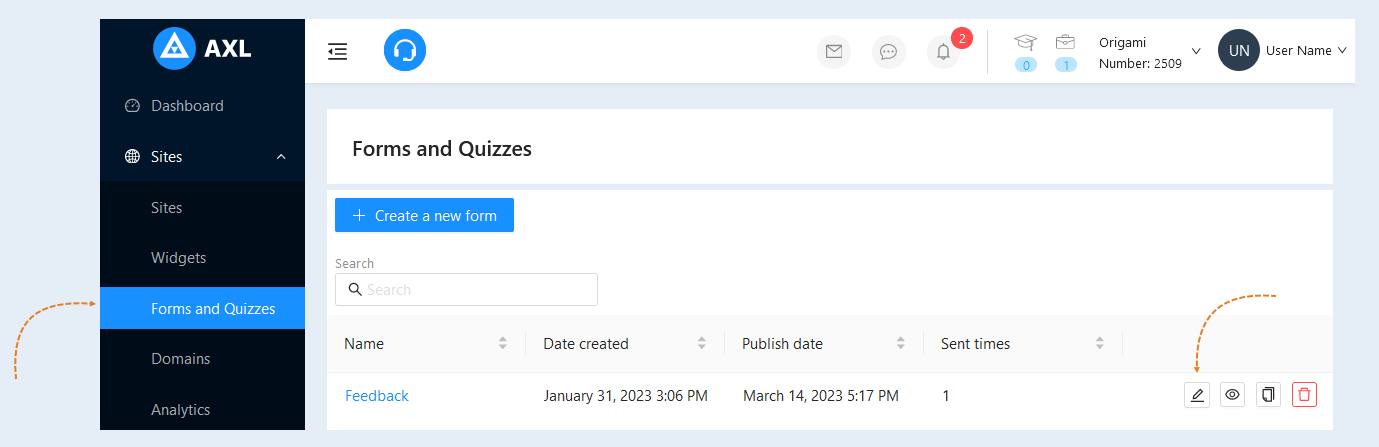
Next, go to the "Scenario" tab. An event is available for the form and the quiz that triggers the scenario - Form Completion. The event is triggered when the user has successfully filled in all the required fields of the form and clicked on the "Submit" button.
3
Types of events for the Course scenario
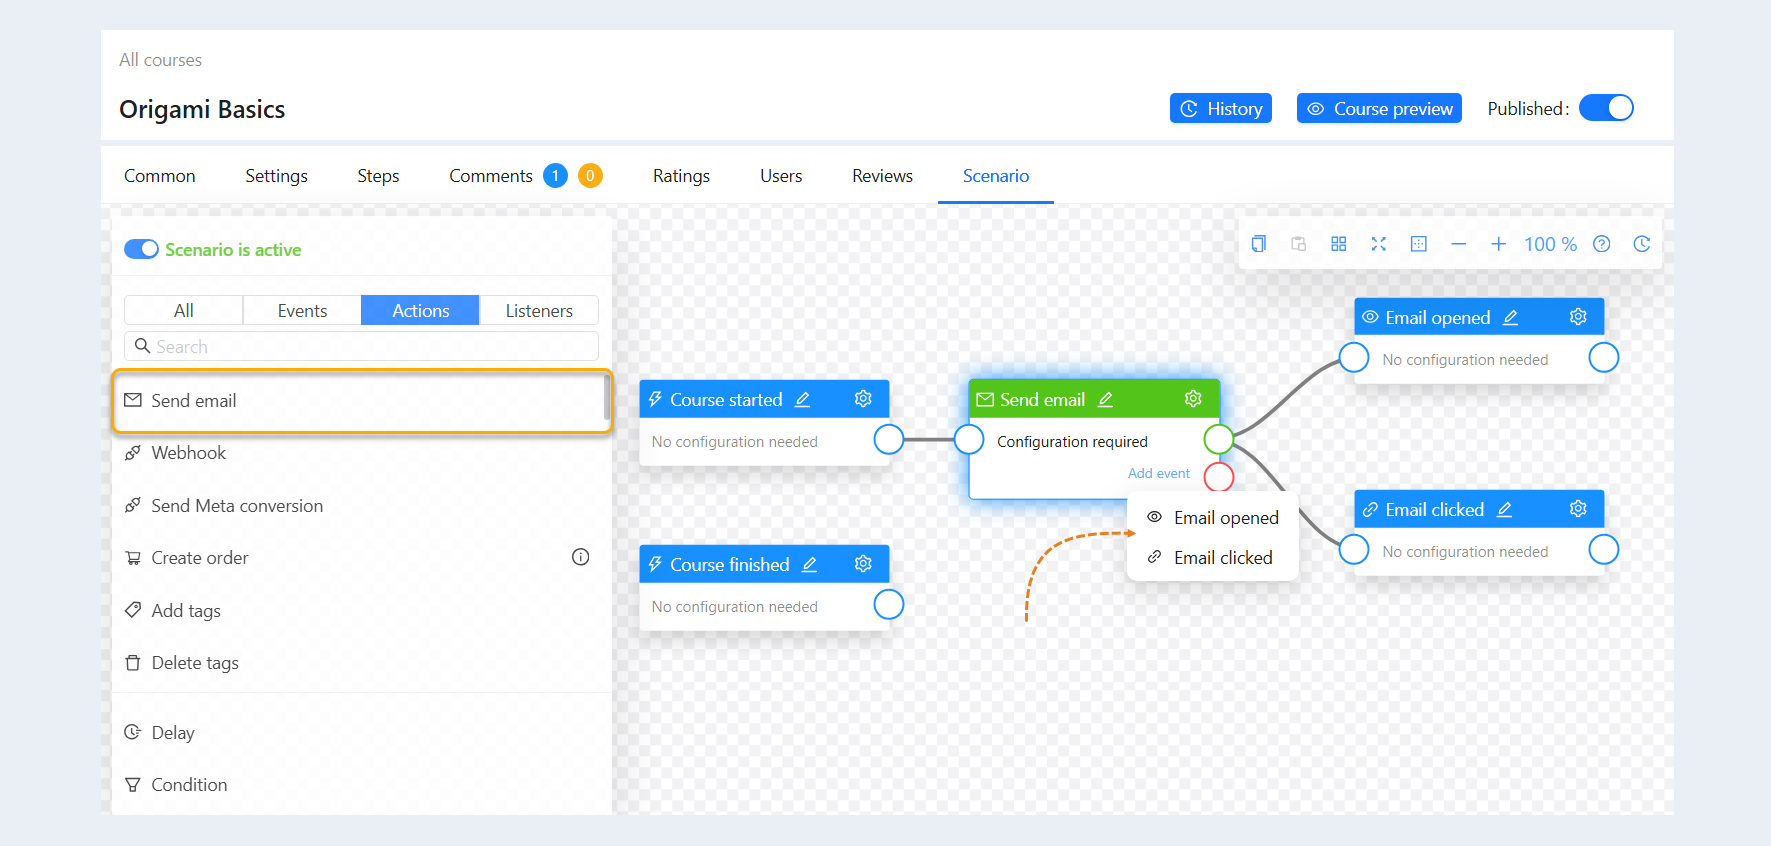
Go to the "Courses" tab. Select a course and click the "Edit" button. Next, go to the "Scenario" tab. Types of events are available for courses:
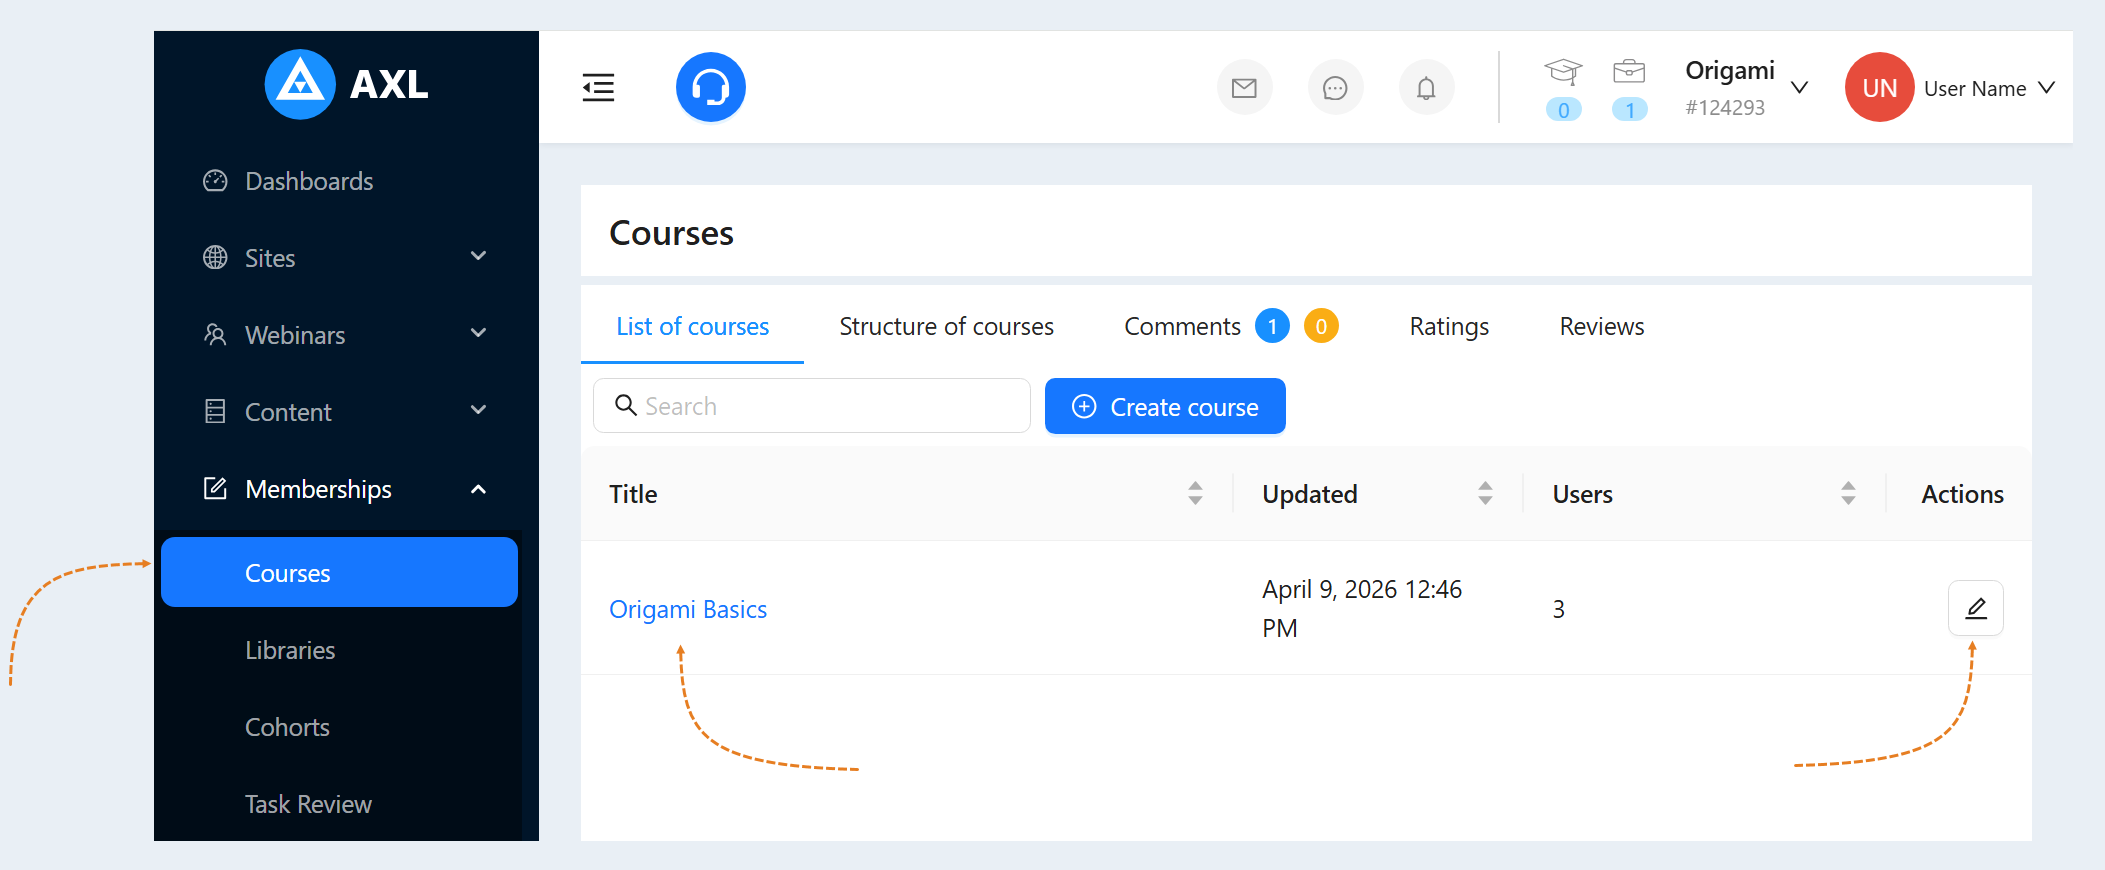
Course started. Occurs when the user starts a tutorial. You can customize this event for each course. Additional settings (configuration) are not required.
Course finished. This event is triggered when a user successfully completes all the required steps of the course and reaches 100% progress. Please note that the user must complete all lessons of the course, including the last one. After completing all the assignments, tests, and other mandatory elements, the last lesson is marked as completed.
If the last step of the course requires the user to submit an assignment, the "Course Completed" event will be triggered when the assignment is approved by the administrator. If the last step of the course requires the user to leave a rating for the course, the "Course Completed" event will be triggered when the user submits the required rating.
You can create this event for each of your courses. No additional settings (configuration) are required.
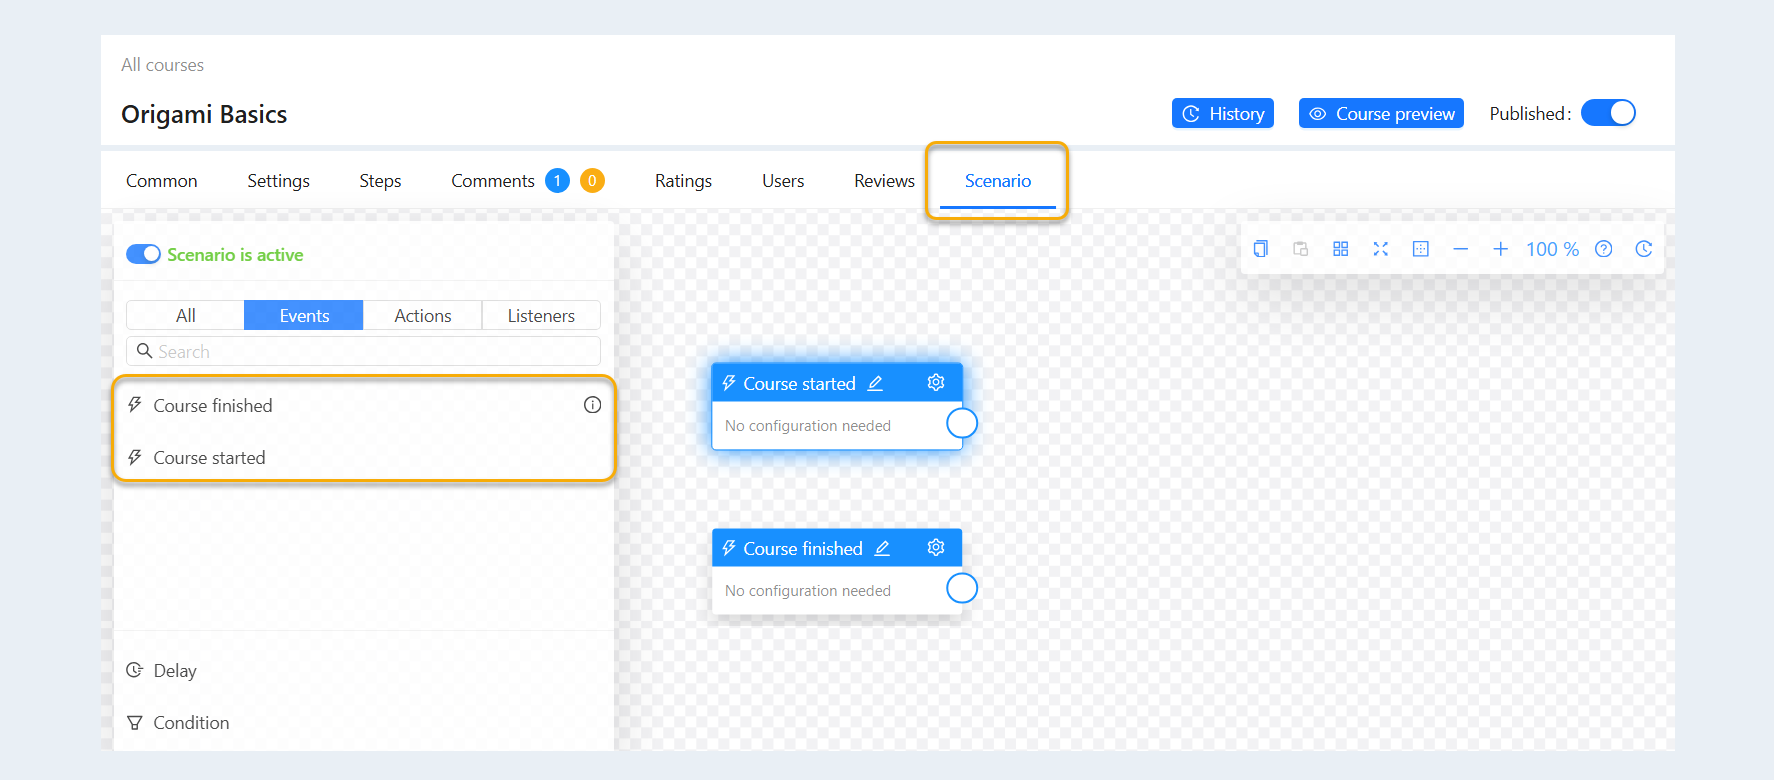
When you select the Send email response Action, you have two more types of events available.
Email opened. The event is fired when the user has opened an email in their email. Doesn't require additional settings.
Email clicked. The event is fired when the user clicks on the link in the email. Doesn't require additional settings.
4
Types of events for the Course Step scenario
Go to the "Courses" tab. Select a course, then open the "Steps" tab. Click the "Edit" button to open the slice step.
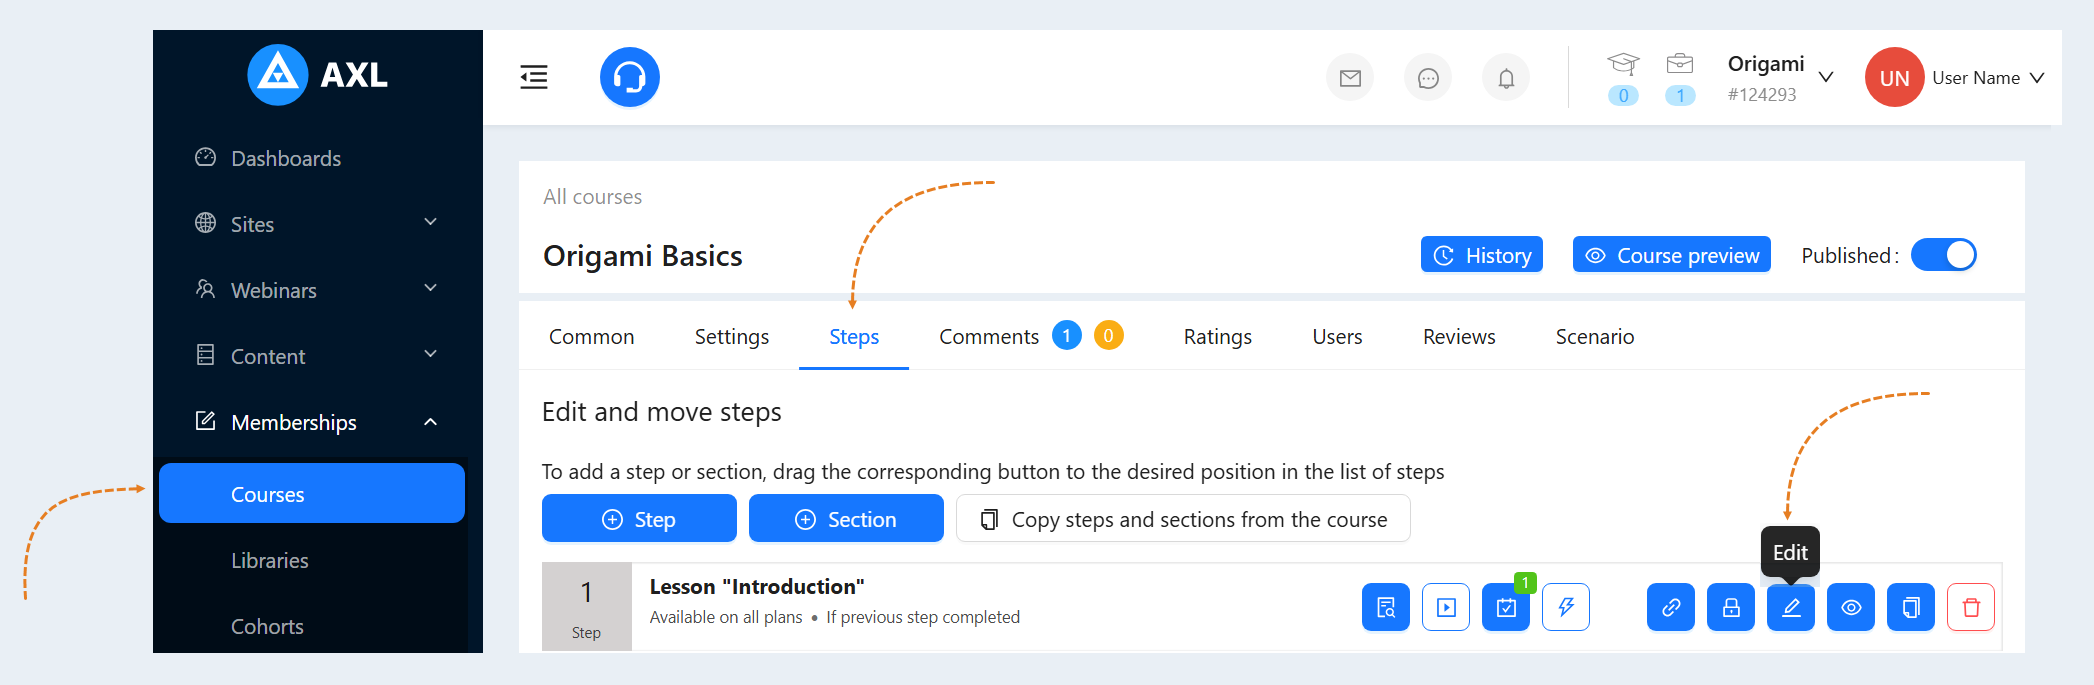
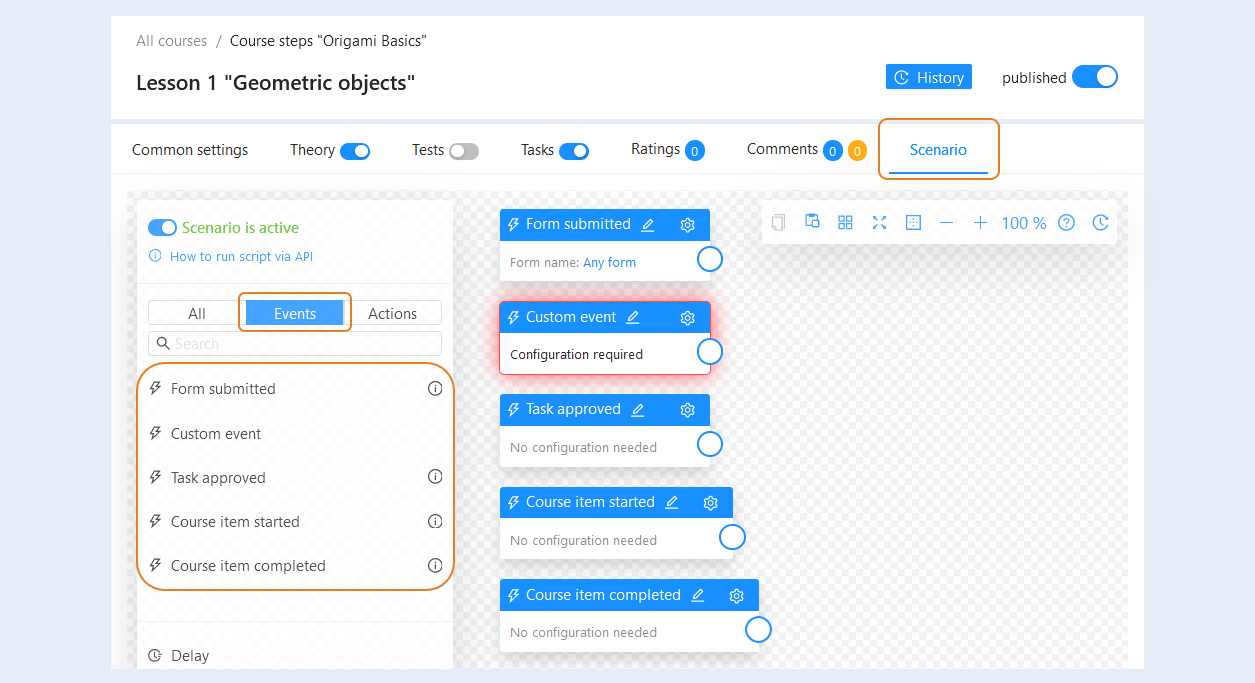
Next, go to the "Scenario" tab. The following types of events are available for a course step:
Form submitted. The event is triggered when a visitor has filled out and submitted a form to any web page of your account.
Custom event. You can create any event that will trigger the scenario.
A user event is a step that can be added to a scenario to capture any user interaction with the platform. It can be used for various tasks such as monitoring and analyzing user activity, personalizing training, evaluating the effectiveness of courses, etc.
Configuration settings must be performed for this event.
Task approved. The event is triggered when the administrator has approved the assignment of a course step. Additional settings (configuration) are not required.
For example: after verification and approval by the administrator of the task of the kusa step, the user gets access to additional materials.
Course item started. Occurs when the user starts a course step. You can set up this event for each step of the course. Additional settings (configuration) are not required.
Course item completed. Triggered when the user completes a step of the course. You can create this event for each step of the course. Additional settings (configuration) are not required.
5
Types of events for the Flow scenario
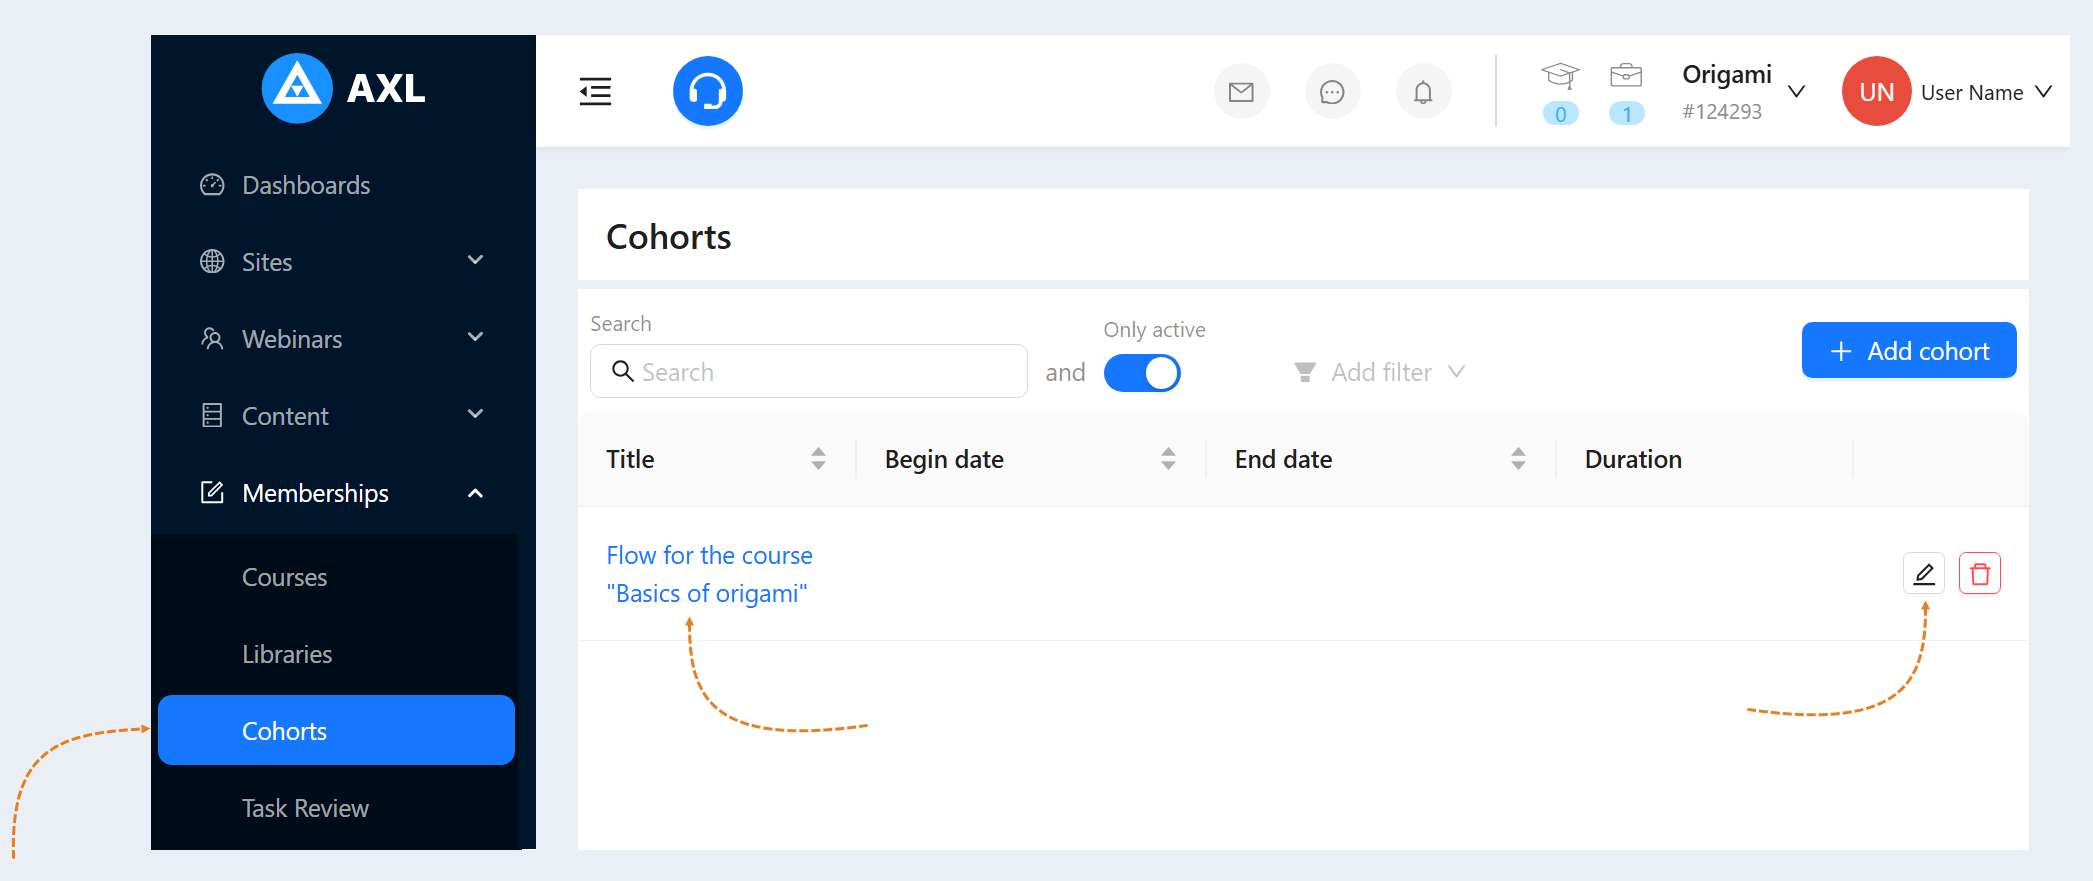
Go to the "Flows" tab. Select a flow and click on the name of the flow. Next, go to the "Scenario" tab.
The following types of events are available for the stream:
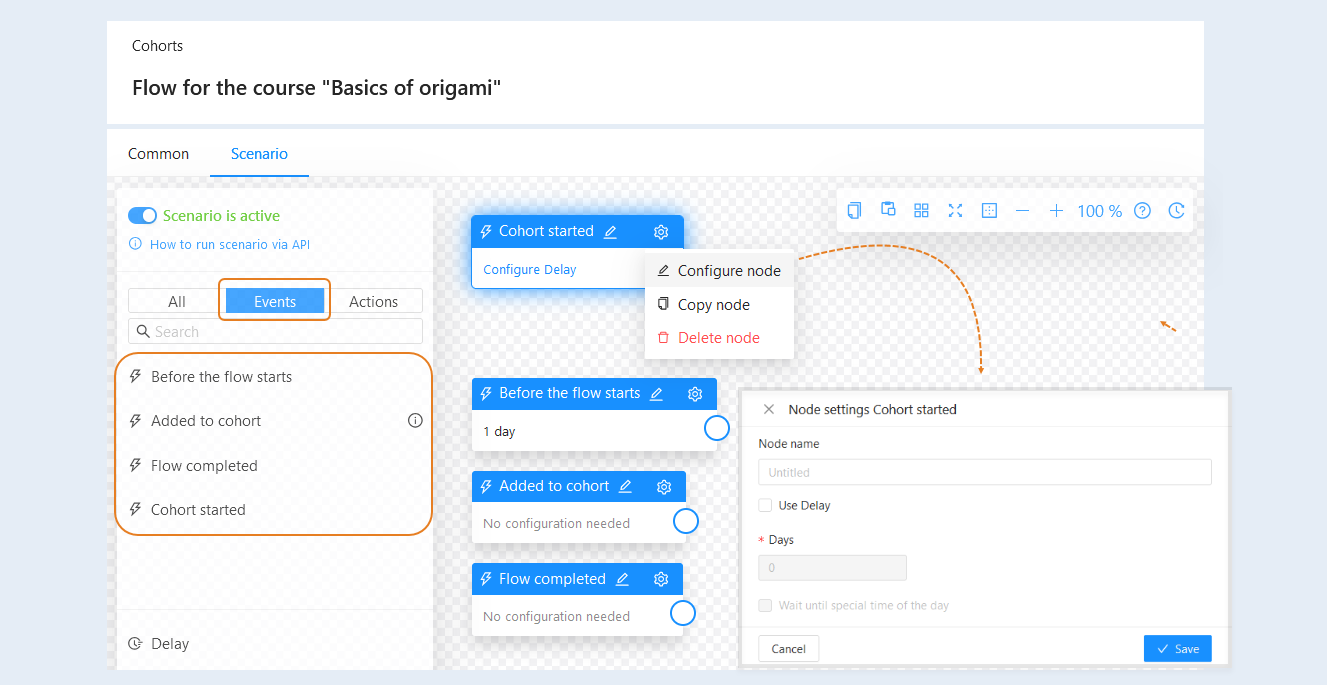
Before the flow starts. The event is triggered one or more days before the start of the stream. In the node settings, specify how many days before the start of the stream you want the event to trigger.
Cohort started. This event will be triggered when the date and time that you set when creating the stream. Here you can set the delay for starting the stream. Press the "Configure delay" button and fill in the fields in the window: specify the number of days to delay the start of the stream. Click the "Save" button.
Flow completed. This event will be stopped when the date and time that you set as the end of the stream arrives.
Added to cohort. The event is triggered when the stream is attached to a person, after the license is sold or added.
6
Types of events for the Webinar scenario
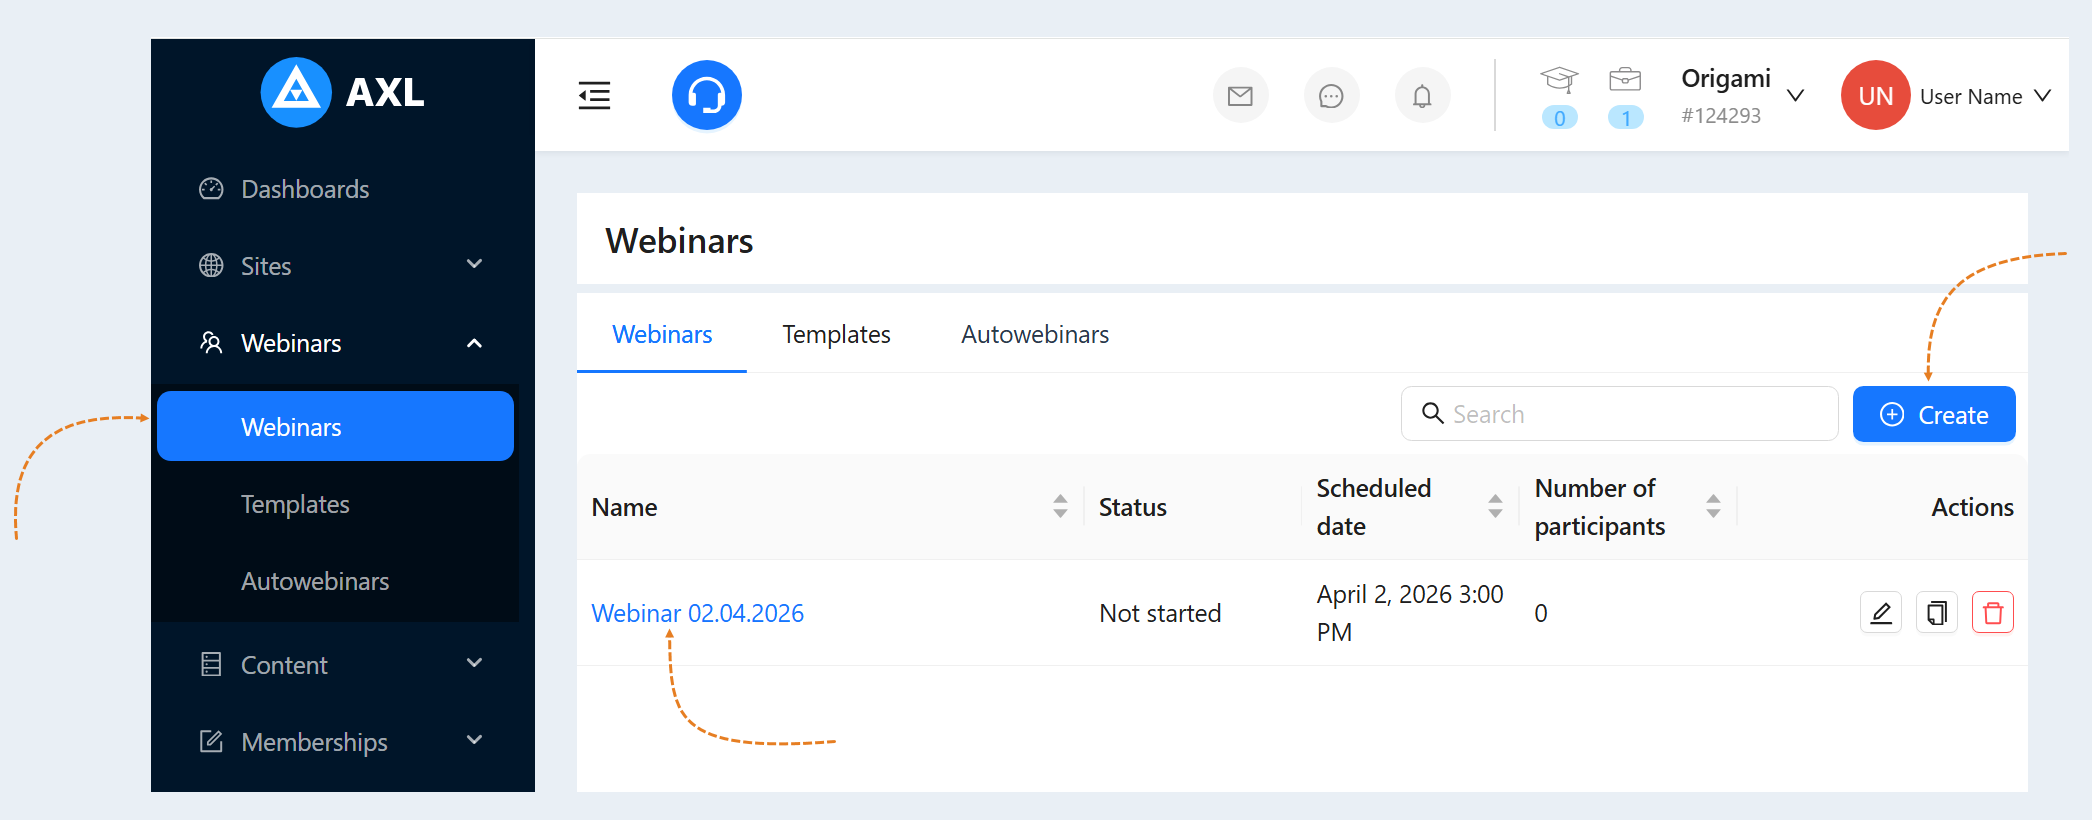
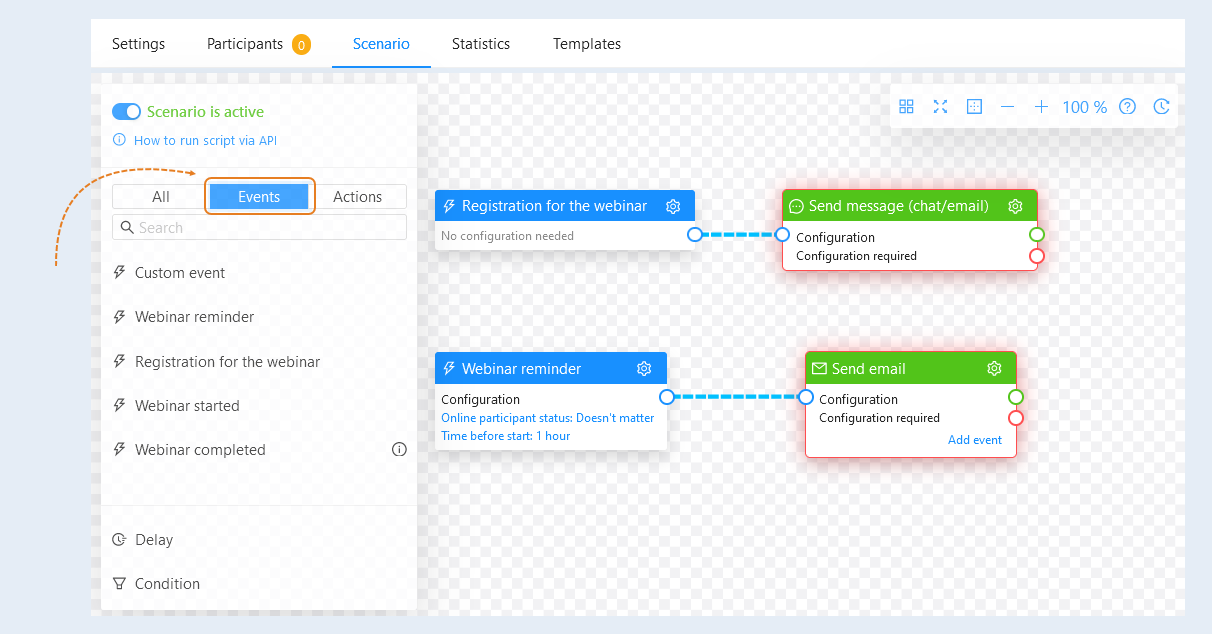
Go to the "Webinars" tab. Select a webinar from the list and click on the name of the webinar. Next, go to the "Script" tab. The following events are available for the webinar:
Custom event. You can create any event that will trigger the script. Configuration settings must be performed for this event. In the configuration settings, write the name of the event. Click the "Save" button.
Webinar reminder. This event is triggered at the specified date and time. Open the event settings and set the status of the webinar participant: online, offline, or it doesn't matter. In the "Scenario Start" section, select when you want to send a reminder: before the start of the webinar or after the start of the webinar. And also set the time when the event will be triggered.
Registration for the webinar. This event is fired when a user has registered for a webinar. No additional settings are required.
Webinar started. This event is triggered when the webinar starts. No additional settings are required.
Webinar comleted. This event is triggered when the webinar is over. No additional settings are required.
7
Types of events for the Product scenario
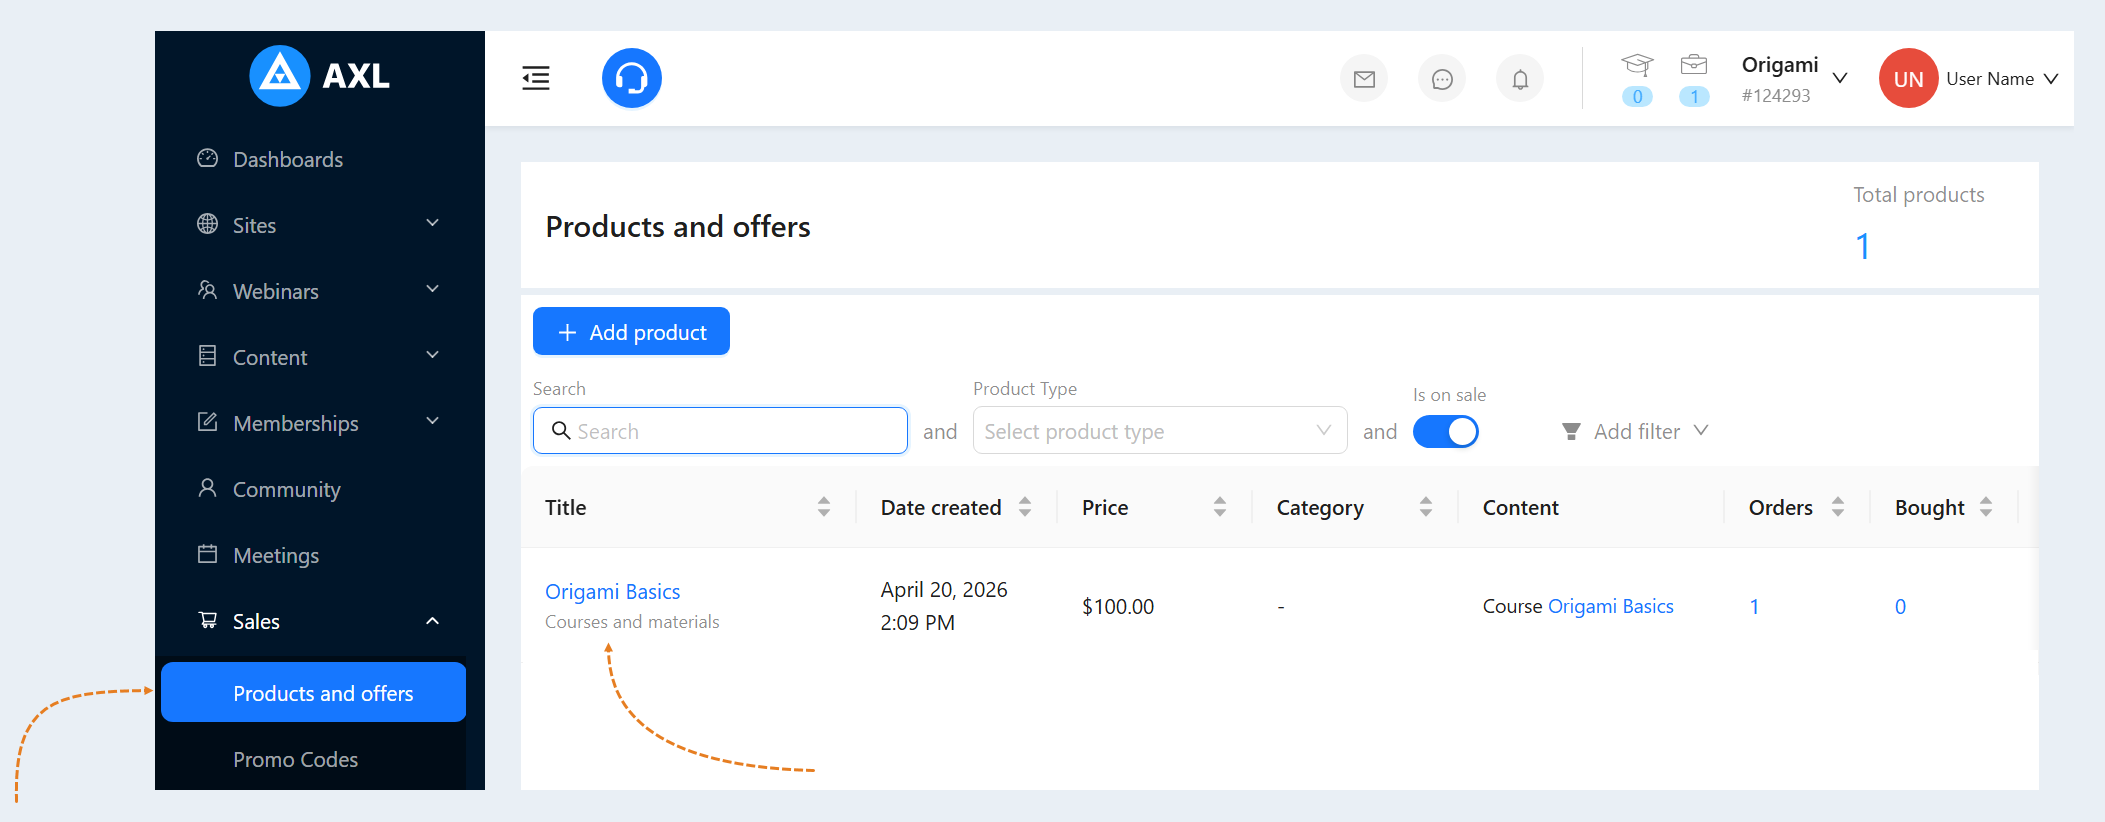
Go to the "Sales" section, to the "Products and Offers" tab. Create a new product or open an existing one. Next, go to the "Scenario" tab.
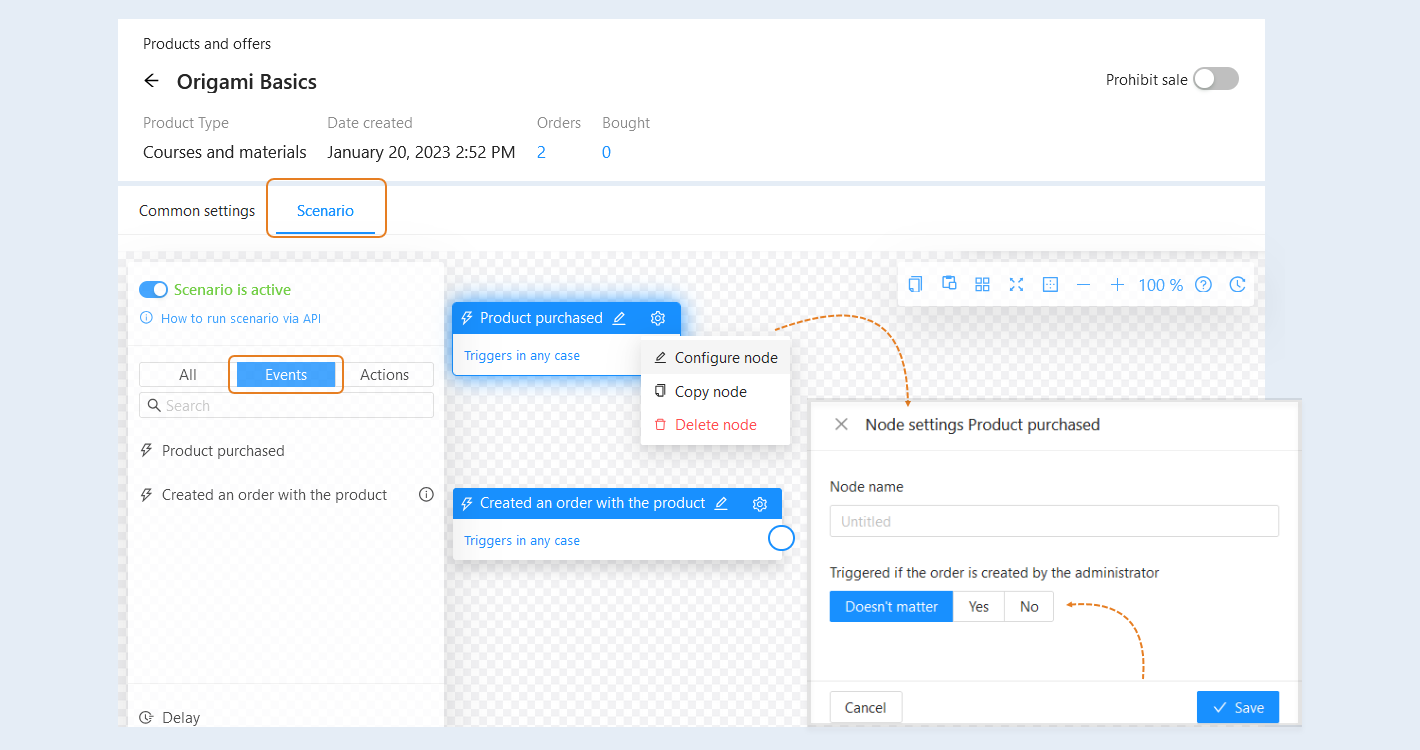
There are two types of events available for products: product purchased and created an order with the product.
Next, go to the "Scenario" tab and select an event to trigger the product scenario. There are two events possible in the product scenario:
Product purchased. This event triggers the scenario when a user completes the payment for the selected product. Click the "Settings" button in the upper right corner of the event, then open "Configure Node." In the node settings, you can choose the necessary option for the “Triggered if the order is created by the administrator”:
Yes. If you choose this option, the event will only trigger in cases where the order was created manually by an administrator. This means that if the payment was initiated by a user on the site, the event will not trigger. This is useful in situations where you need a connection between manual order processing and subsequent actions in the scenario.
No. If you choose this option, the event will only trigger in cases where the order was created by a user on the site. In this case, if the order was created manually by an administrator, the event will remain inactive. This setting can be useful when you want to track and respond only to automatic requests generated by users through the online platform.
Doesn't matter. When selecting this option, the event will trigger regardless of whether the order was created manually by an administrator or by a user through the site.
Without selecting this option, the event will trigger by default in any case.
Created an order with the product. This event triggers the scenario when a user has created an order with a product but has not paid for it. In the node settings, you can choose the necessary option for the “Triggered if the order is created by the administrator”:
Yes. If you choose this option, the event will only trigger in cases where the order was created manually by an administrator. This means that if the payment was initiated by a user on the site, the event will not trigger. This is useful in situations where you need a connection between manual order processing and subsequent actions in the scenario.
No. If you choose this option, the event will only trigger in cases where the order was created by a user on the site. In this case, if the order was created manually by an administrator, the event will remain inactive. This setting can be useful when you want to track and respond only to automatic requests generated by users through the online platform.
Doesn't matter. When selecting this option, the event will trigger regardless of whether the order was created manually by an administrator or by a user through the site.
Without selecting this option, the event will trigger by default in any case.
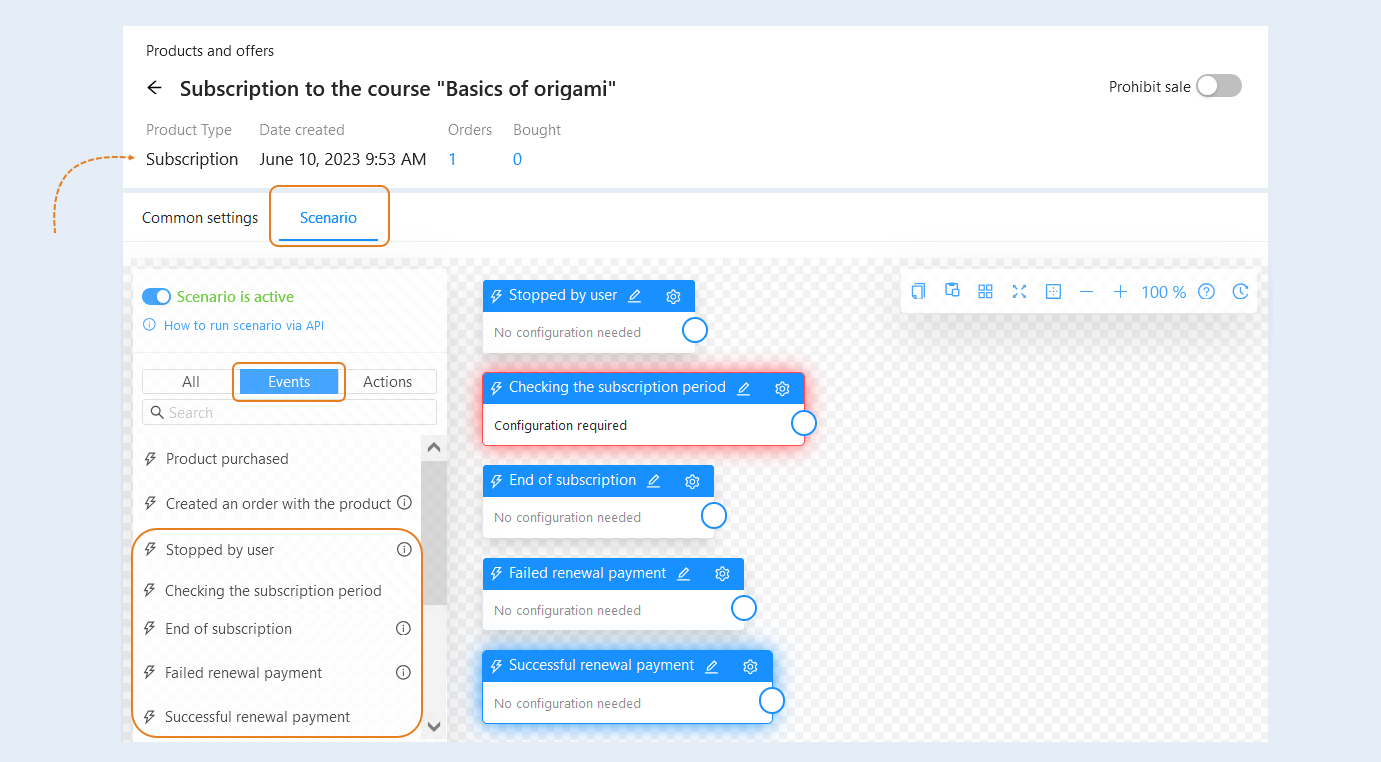
For the "Subscription" product, there are an additional 5 types of events:
- Stopped by user. This event will trigger when a user independently cancels their subscription renewal. This may occur if the user decides that they no longer need access to the materials or wants to temporarily suspend their subscription. Additional settings for the event are not required.
Checking the subscription period. This event triggers within a certain timeframe before or after the subscription expires. The event can be used to notify users that their subscription is about to end or has already expired. In the case of a scenario with this action, you might, for example, notify the user about the need to renew their subscription 3-7 days before the expiration date. Alternatively, you could inform the user about the impending end of their subscription 5 days after the expiration and offer renewal or other actions.
End of subscription. The event will trigger if the subscription is stopped and access ends after all unsuccessful renewal attempts or simply is not renewed. No additional event settings are required. In this scenario, for example, you can notify the user that their access to the platform has been terminated and offer subscription renewal or a switch to another tariff plan.
Successful Renewal Payment. This event triggers in the case of payment for the next subscription period. No additional event settings are required. After that, you can, for example, set up a scenario to send a welcome message about the renewal, provide access to new courses, etc.
Failed renewal payment. The event will be triggered when all attempts to charge and pay within the specified number of additional days for the renewal are unsuccessful. After that, access to the product will be halted. No additional event settings are required. You can then, for example, notify the user of the failure, offer to change payment details, or provide alternative ways to renew the subscription.
8
Types of events for the Chatbot scenario
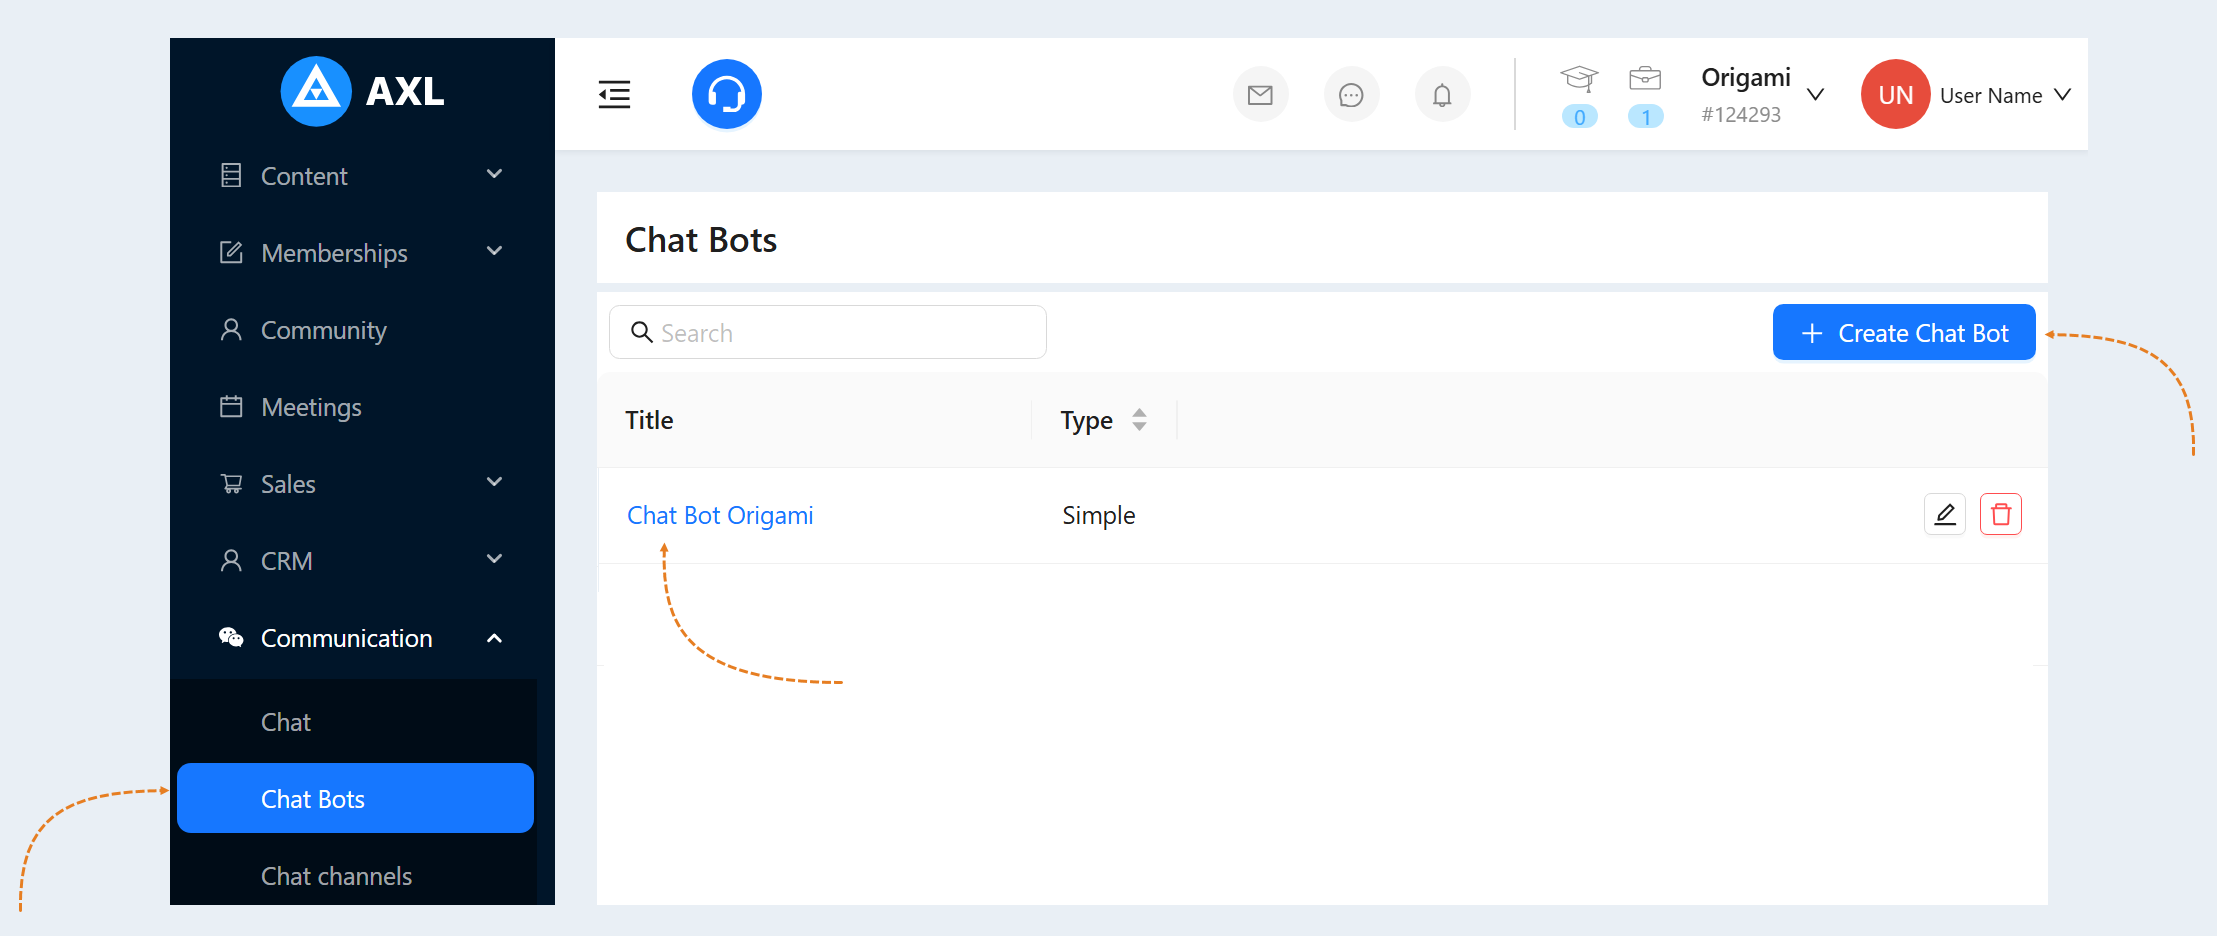
Go to the "Communication" section, to the "Chatbots" tab. Create a new chatbot or open an existing one.
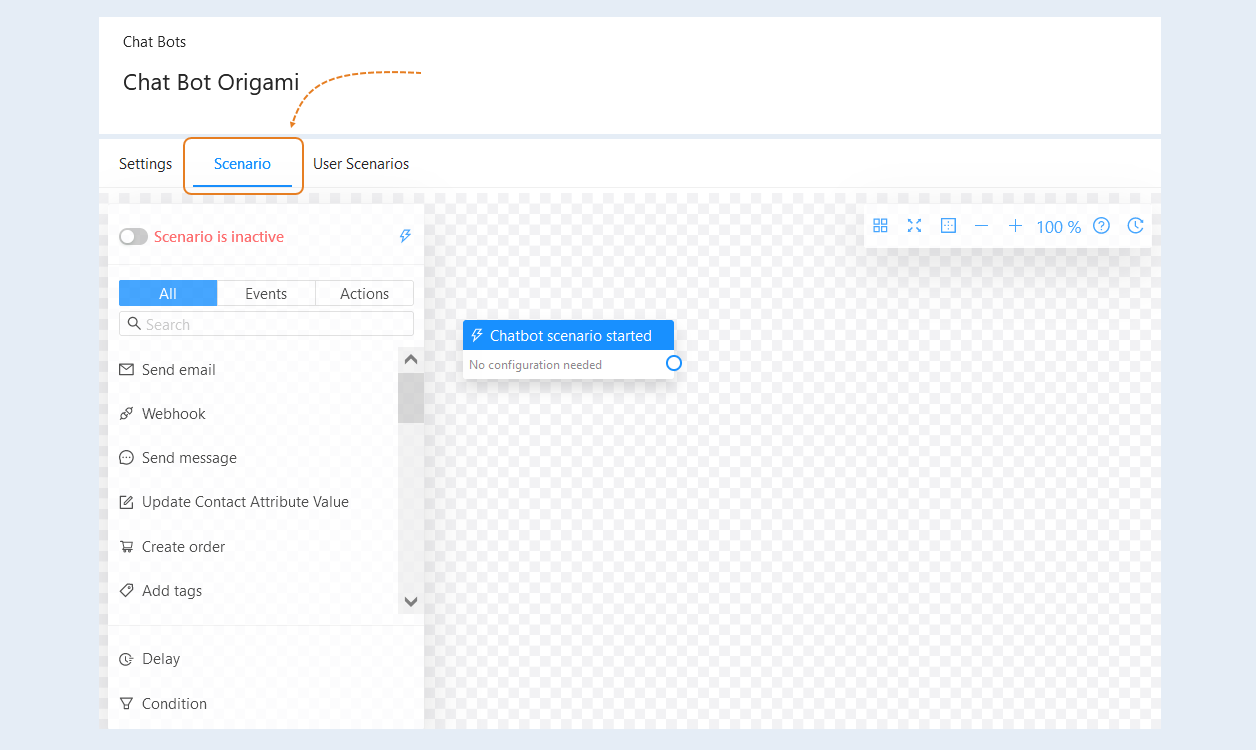
Next, go to the "Scenario" tab. Here, by default, the event triggering the chatbot "Chatbot script started" is already set. It is automatically created when you create a chatbot. No additional settings are required.
9
Types of events for the Chat channels scenario
Go to the "Communication" section, the "Chat Channels" tab. Next, open the desired channel and go to the "Scenario" tab.
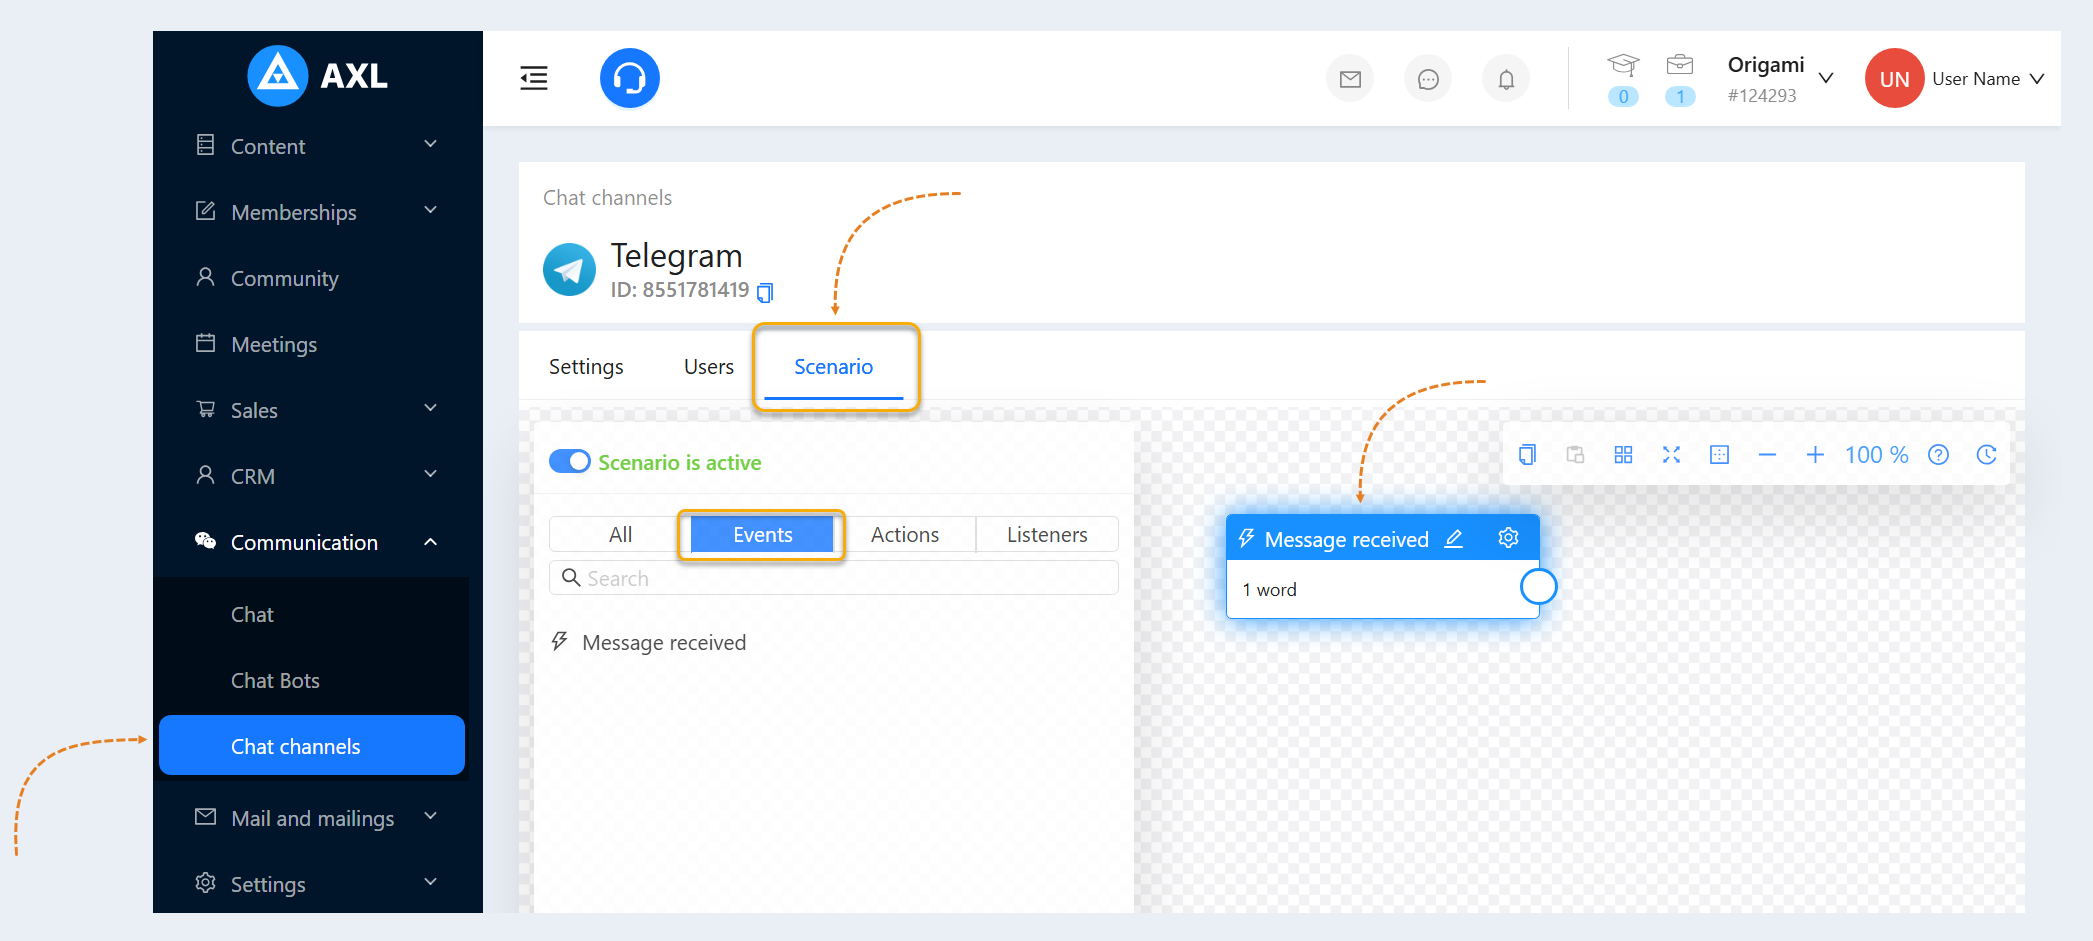
An event is available for chat channels that triggers the scenario - Message received. The event is triggered when the user sends a message to the chat channel. For example, a user sends a message "Start" or "Watch a recording".
The "Message received" event allows for the triggering of various scenarios depending on keywords contained in the user's message. Configuring specific words allows for more personalized automatic responses and helps users quickly receive the information they need.
You can choose one or several keywords in the event, or create multiple events containing different words to set up multiple branches of the scenario.
For example, the word: "help". A user sends a message in the chat channel: "I need help with completing the task". Then, a message with instructions is sent to the user, or a task appears for the responsible administrator to contact the user for personal consultation.
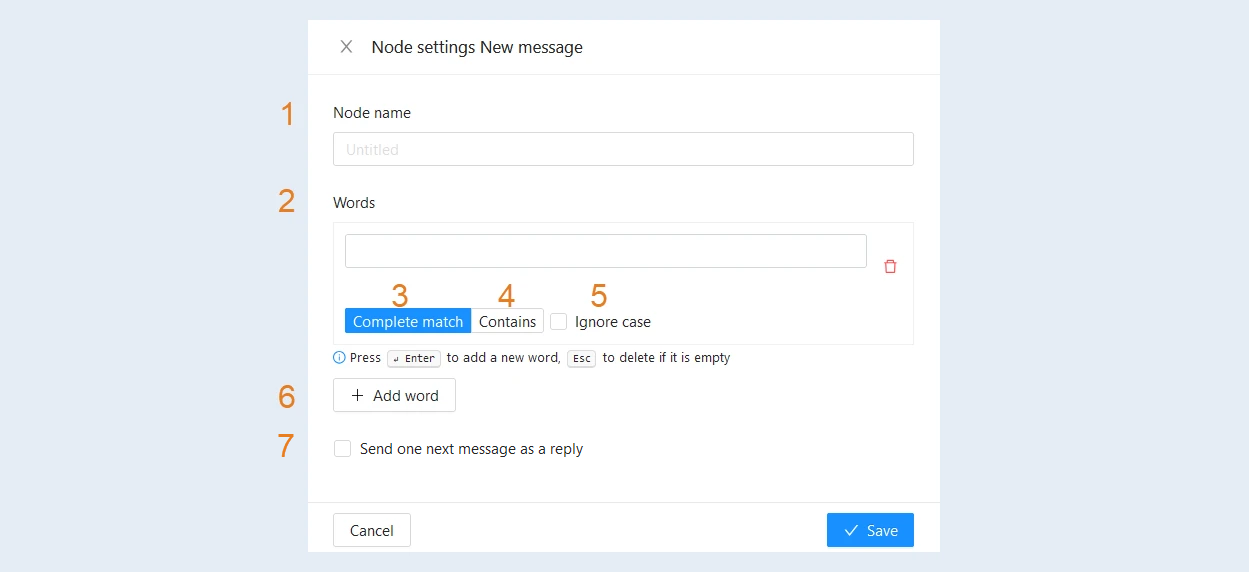
In the node settings window that appears, fill in the fields:
- Node name. Specify the node name, you can name nodes in the scenario as you see fit.
Words. Enter the words in the text field that will launch the scenario.
Complete match means that the event node will be activated only if the message contains an exact match with the specified word or phrase. For example, if the word "hello" is specified, then the event node will be activated only when writing this word, without taking into account other spellings or phrases.
Contains means that the event node will be activated if the specified word or phrase is present in the message, regardless of the location or combinations with other words. For example, if the word "task" is specified, then the event node will be activated with any message containing this word, for example, "there is a task", "homework", "next week's task" and so on.
Ignoring case means that the event node will be activated regardless of how the specified word or phrase is written - in uppercase, lowercase, or mixed. For example, if the word "Hello" is specified, then the event node will be activated when writing as "Hello", "Hello", "HELLO", etc. This is convenient to provide flexibility and ease of use for users, so as not to limit their spelling options.
Add word. Click the "Add Word" button or press the "Enter" key to add a new word. Click the "Trash" icon or the "Esc" key to delete a word if it is empty.
Send one next message as a reply. Check the box so that the next message is sent as a response to the user's message.
10
Types of events for the Deal scenario
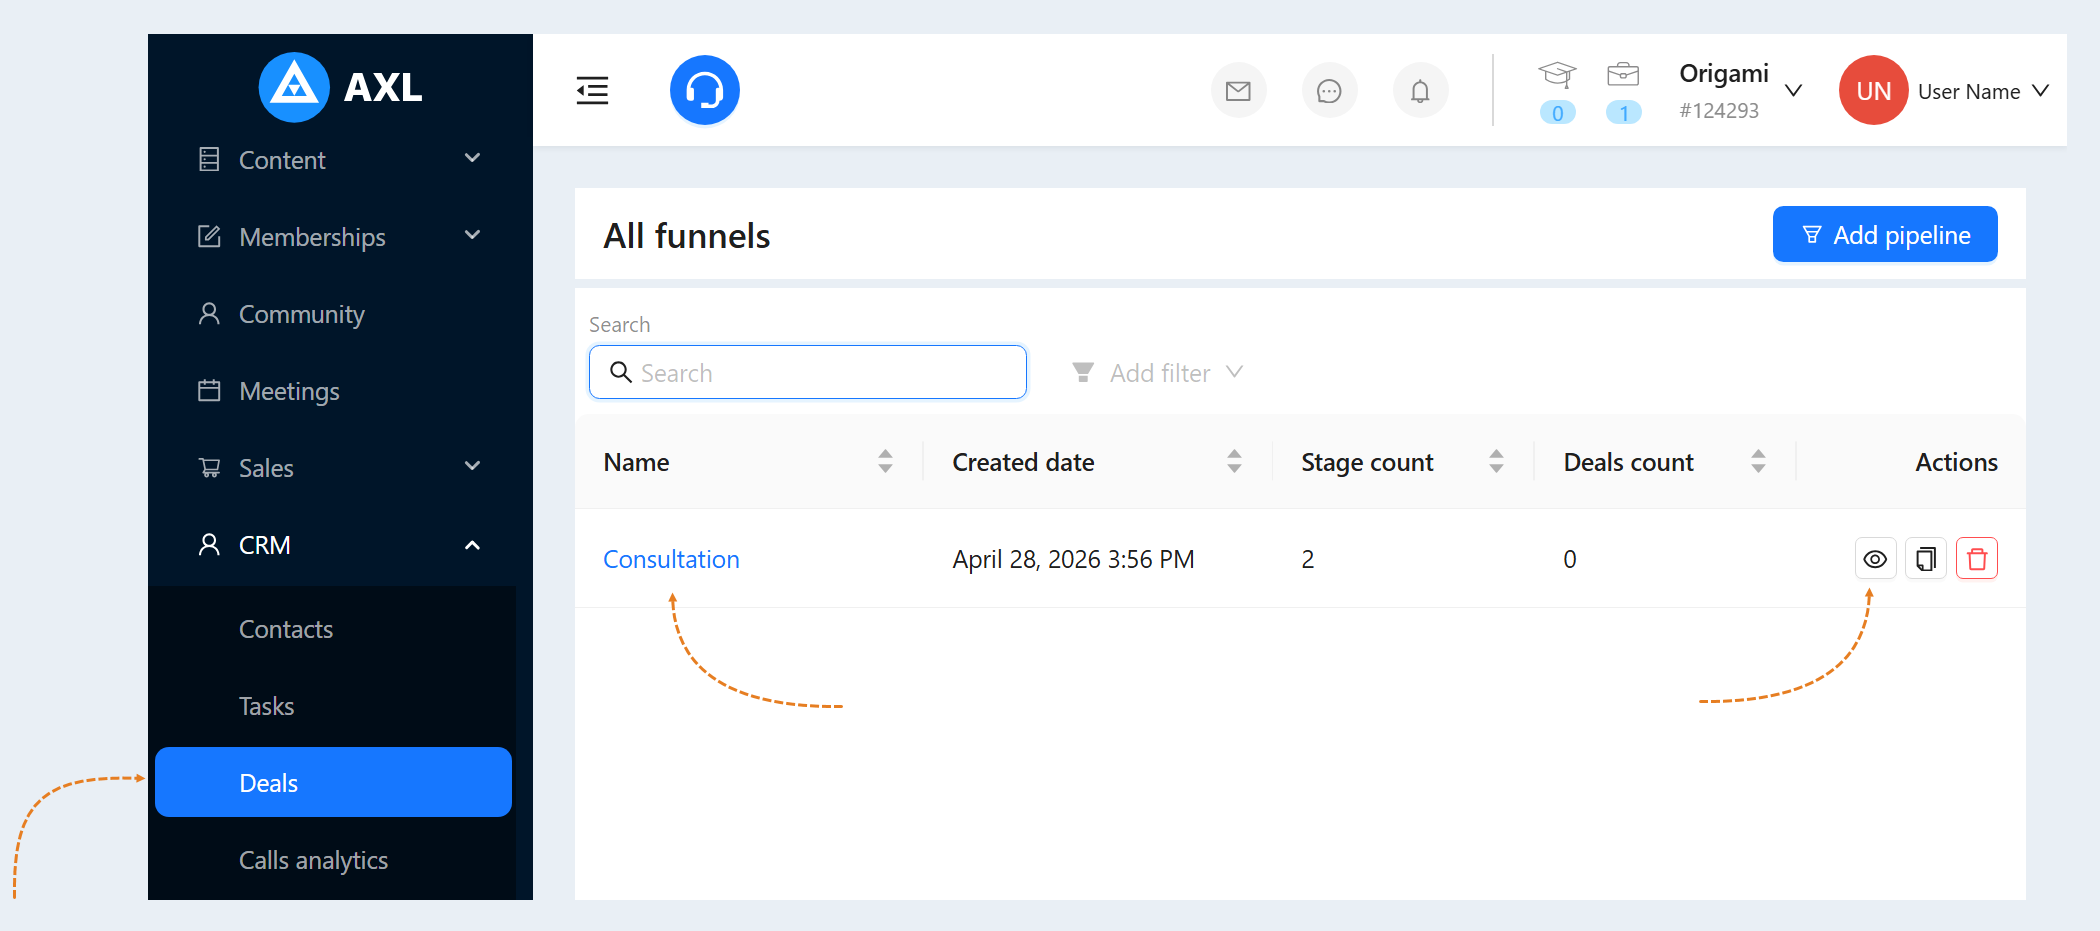
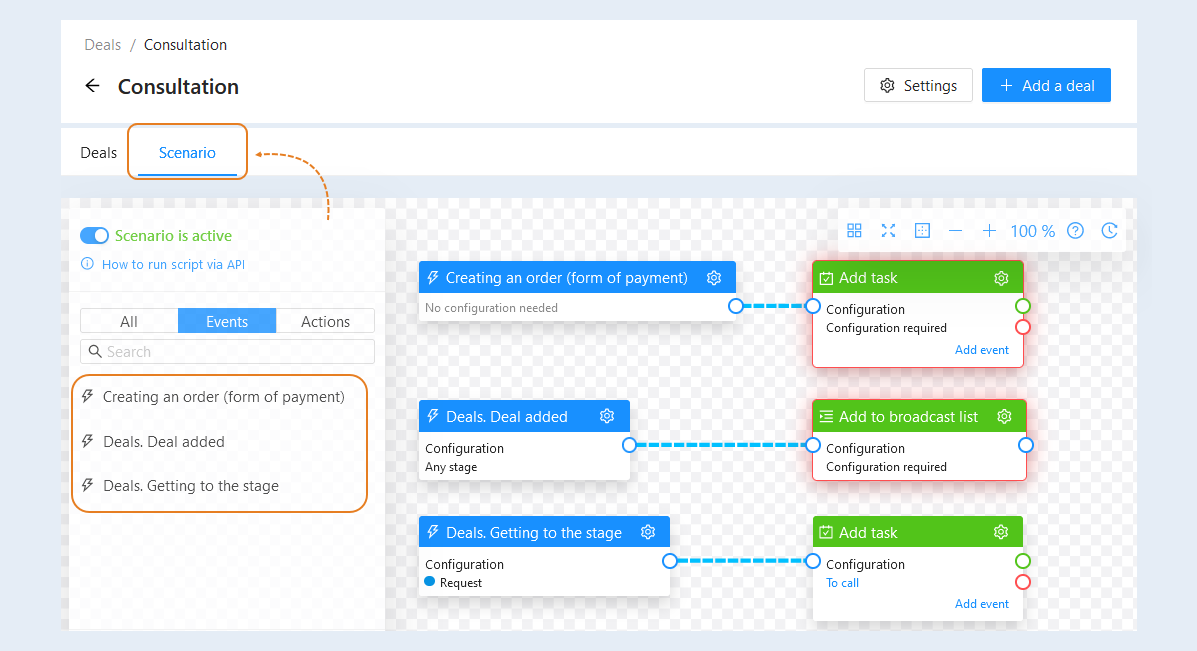
Go to the "CRM" section, to the "Deals" tab. Create a new funnel or open an existing one. Next, go to the "Script" tab.
There are three types of events available for transactions:
Creating an order (payment form). The event is triggered when an order has been created with a product from the payment form. No additional settings are required.
Deal. Deal added. The event is triggered when a deal is added to the selected stage of the funnel. In the configuration settings, select the funnel stage from the list. Click the "Confirm" button.
Deal. Getting to the stage. The event is triggered when the transaction is moved to the selected stage of the funnel. In the configuration settings, select the funnel stage from the list. Click the "Confirm" button.
11
Types of events for the Аffiliate Program scenario
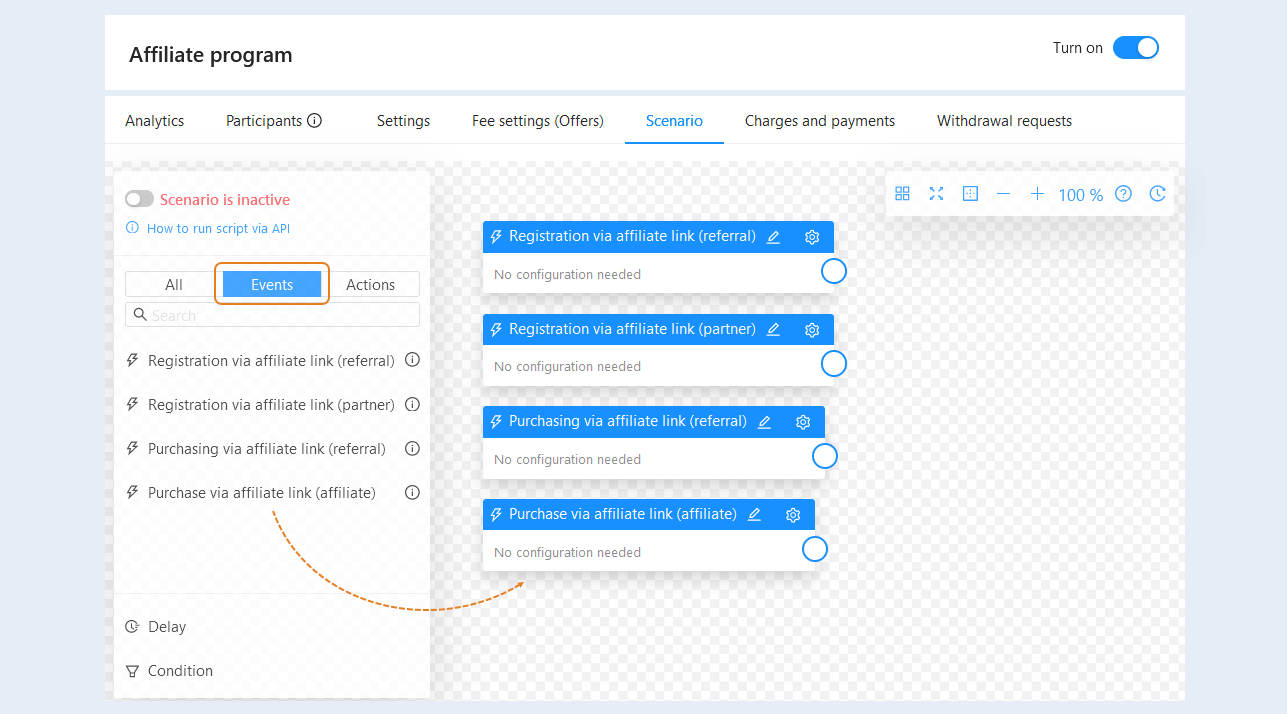
Go to the "Sales" section, the "Affiliate Program" tab. Next, go to the "Scenario" tab.
There are four types of events available for the affiliate program: registration via affiliate link (referral), registration via affiliate link (partner), purchase via affiliate link (referral), purchase via affiliate link (partner).
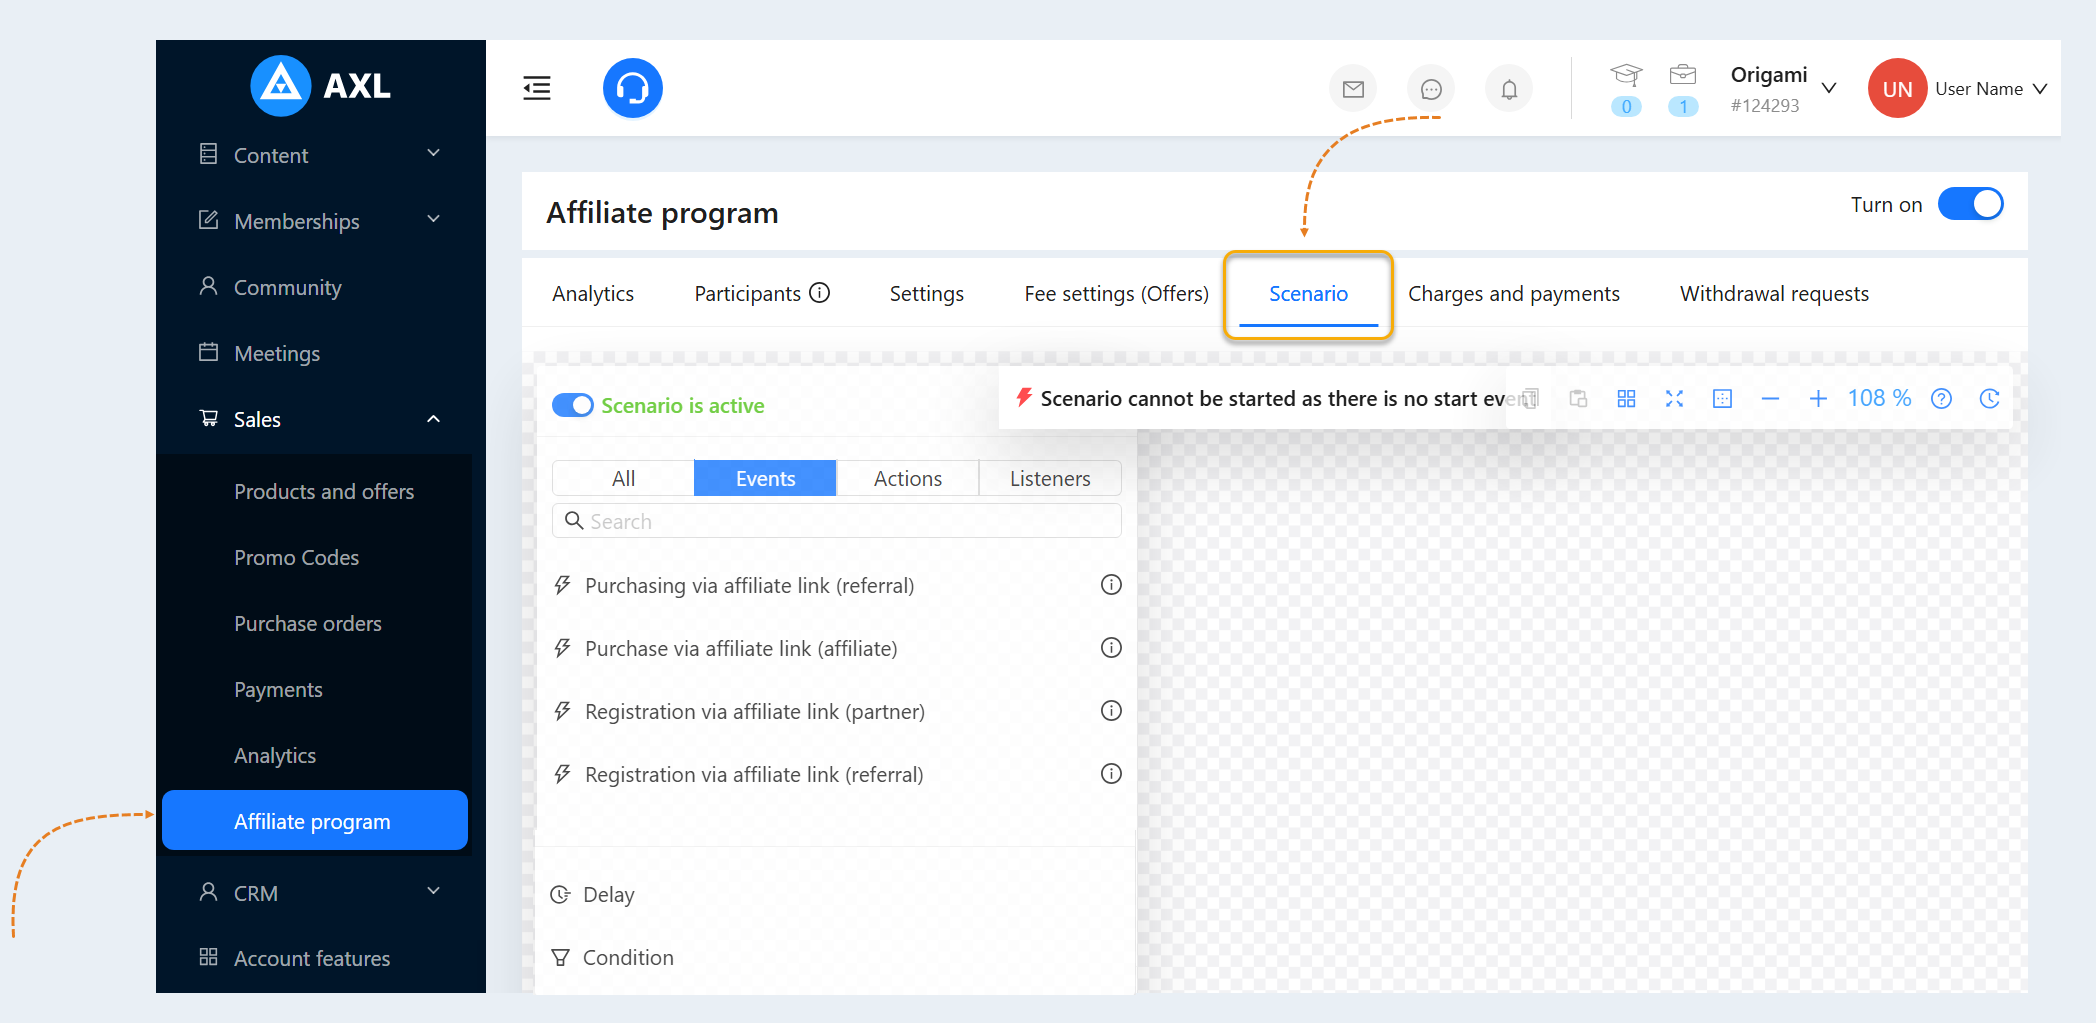
Registration via affiliate link (referral). This event triggers the scenario when the user has registered through the form using the partner link. When selecting this event, further steps of the scenario will be performed with a referral (an invited user who has registered). For example, a registered user will be awarded bonuses. No additional configuration settings are required.
Registration via affiliate link (partner). This event triggers the scenario when the user has registered through the form using the partner link. When selecting this event, the further steps of the scenario will be performed with the partner whose link the registration took place. For example, the inviting user will be awarded bonuses. No additional configuration settings are required.
Purchase via affiliate link (referral). This event triggers the scenario when the user has paid the cost of the product. Further steps of the scenario will be performed with the buyer who bought using the affiliate link. No additional configuration settings are required.
Purchase via affiliate link (partner). This event triggers the scenario when the user has paid the cost of the product. Further steps of the scenario will be performed with the partner whose link was used to make the purchase. No additional configuration settings are required.
After the event is created, you need to set up a sequence of actions in response to this event. Read about how to do this in the article "Types of actions in a scenario".
12
Types of events for the Certificate scenario
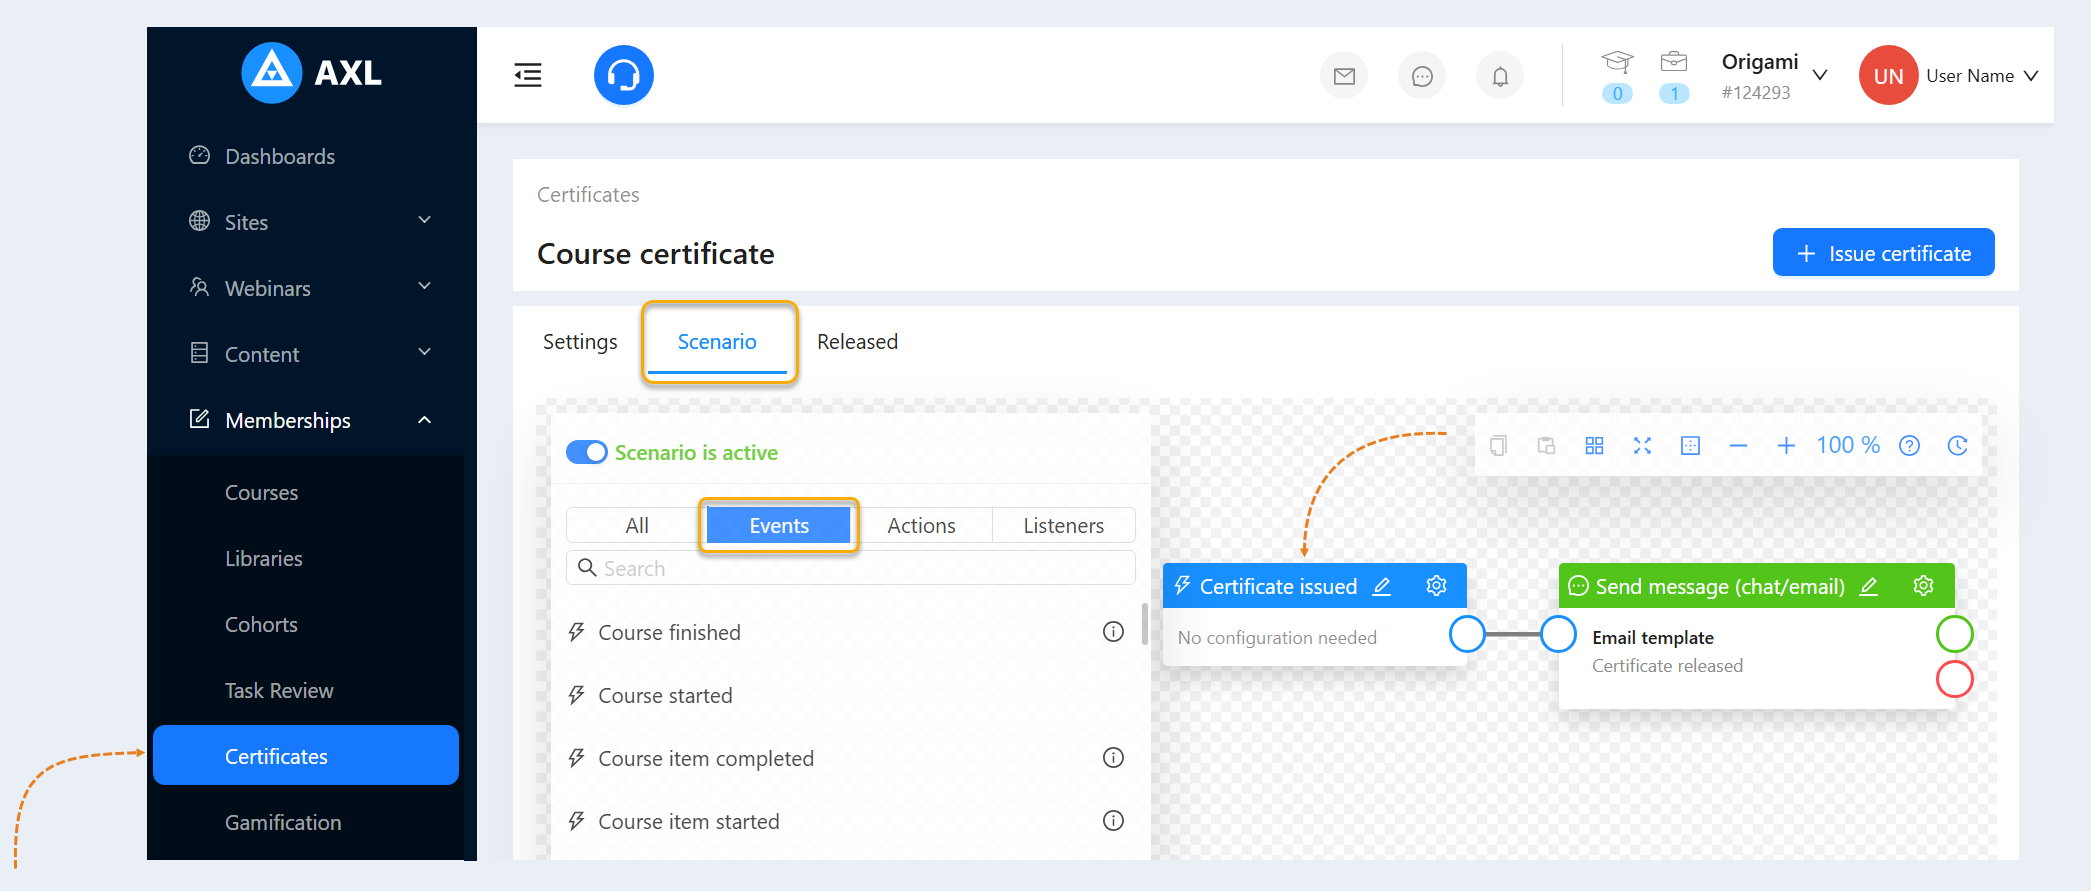
Go to the "Courses and Training" section and select the "Certificates" tab. Then go to the "Scenario" tab.
The default certificate scenario already has an event set up called "Certificate Issued" that triggers the scenario. It is automatically created when you create a new scenario. No additional event settings are required.
This event triggers further actions in the scenario when a certificate is issued. For example, after successfully completing a course, the user will receive an email with a link to the certificate.
13
Types of events for the Gamification scenario
Go to the “Courses and Training” section and select the “Gamification" tab. Next, go to the "Scenario"
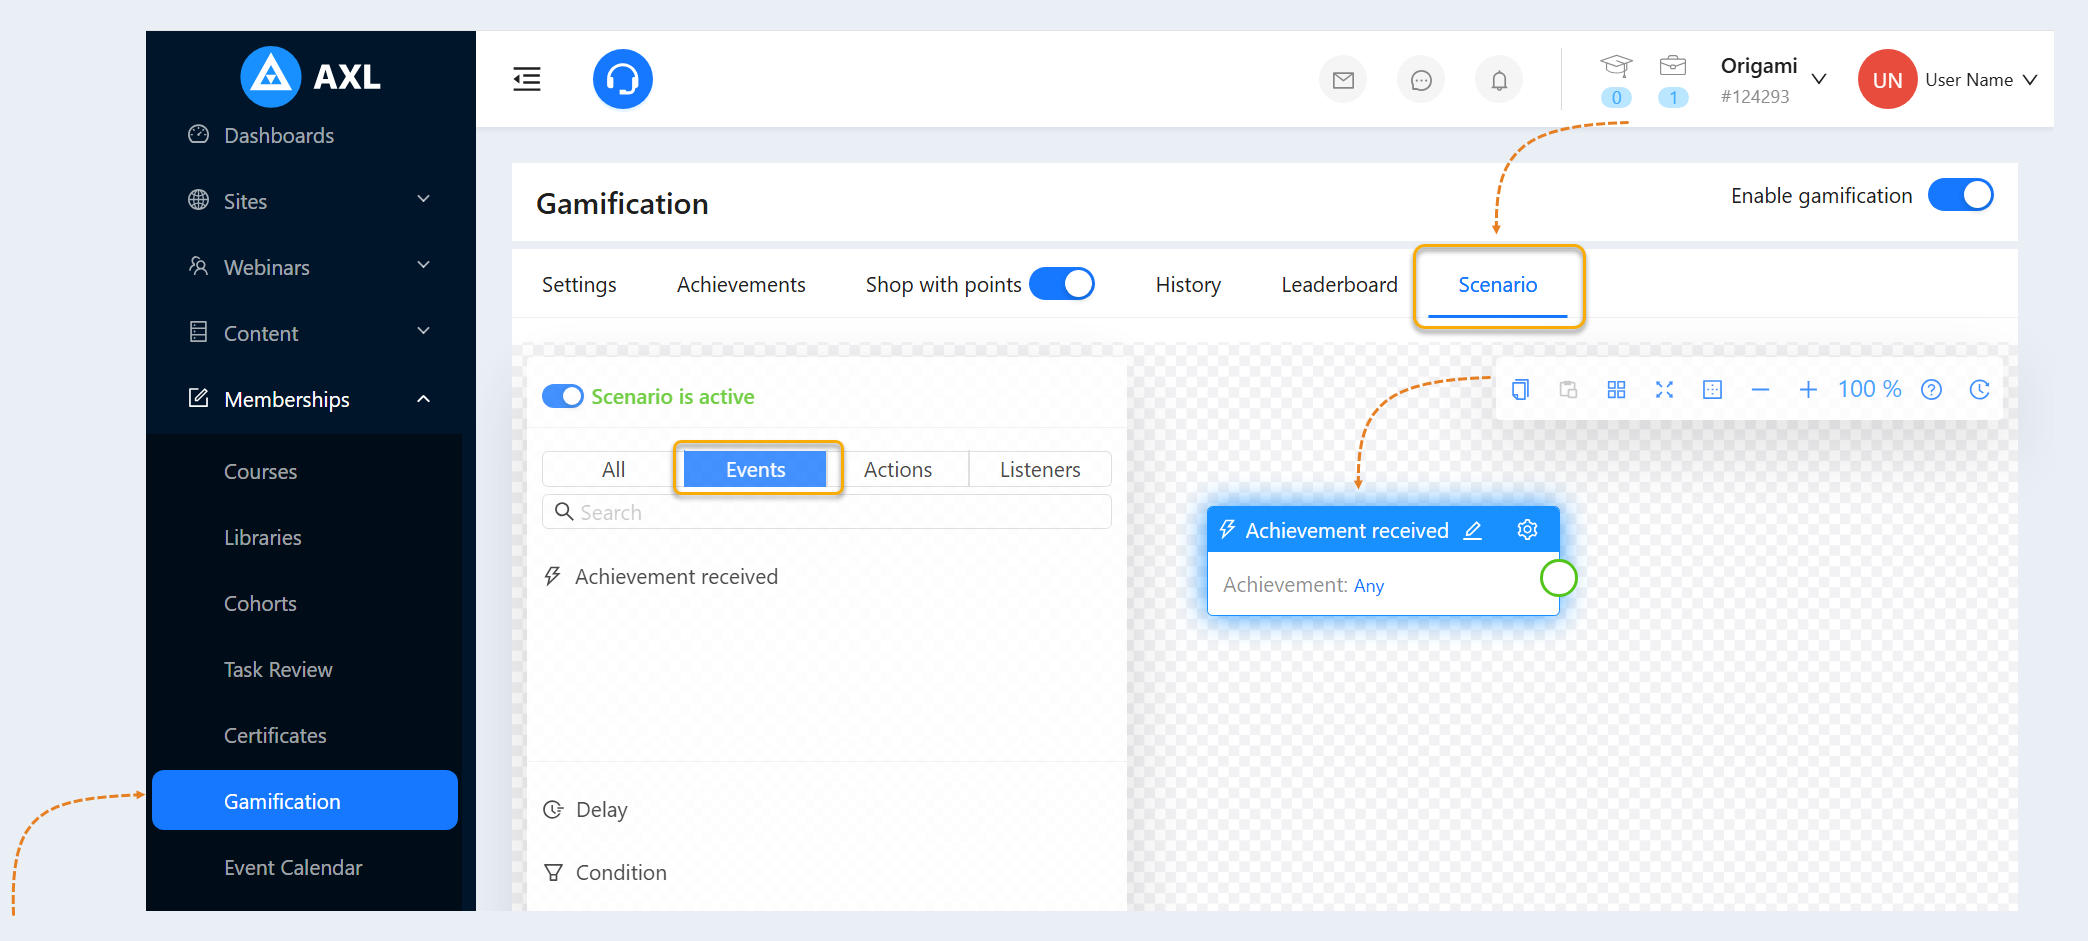
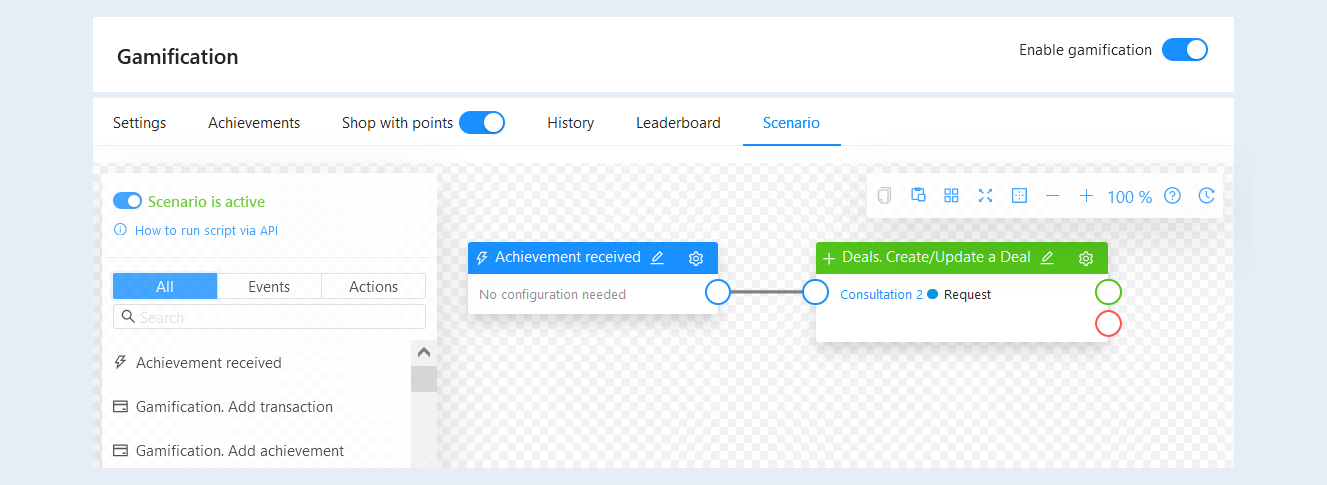
An event is available for gamification that triggers the scenario - Achievement received. The event is triggered when the user has received an achievement for a successfully completed task. For example, after successfully completing three courses on the platform, the user will receive 150 points and a free consultation. No additional event settings are required. In the node settings, you can select a specific achievement from the list or leave any achievement by default.
14
Types of events for the Telegram Group Application scenario
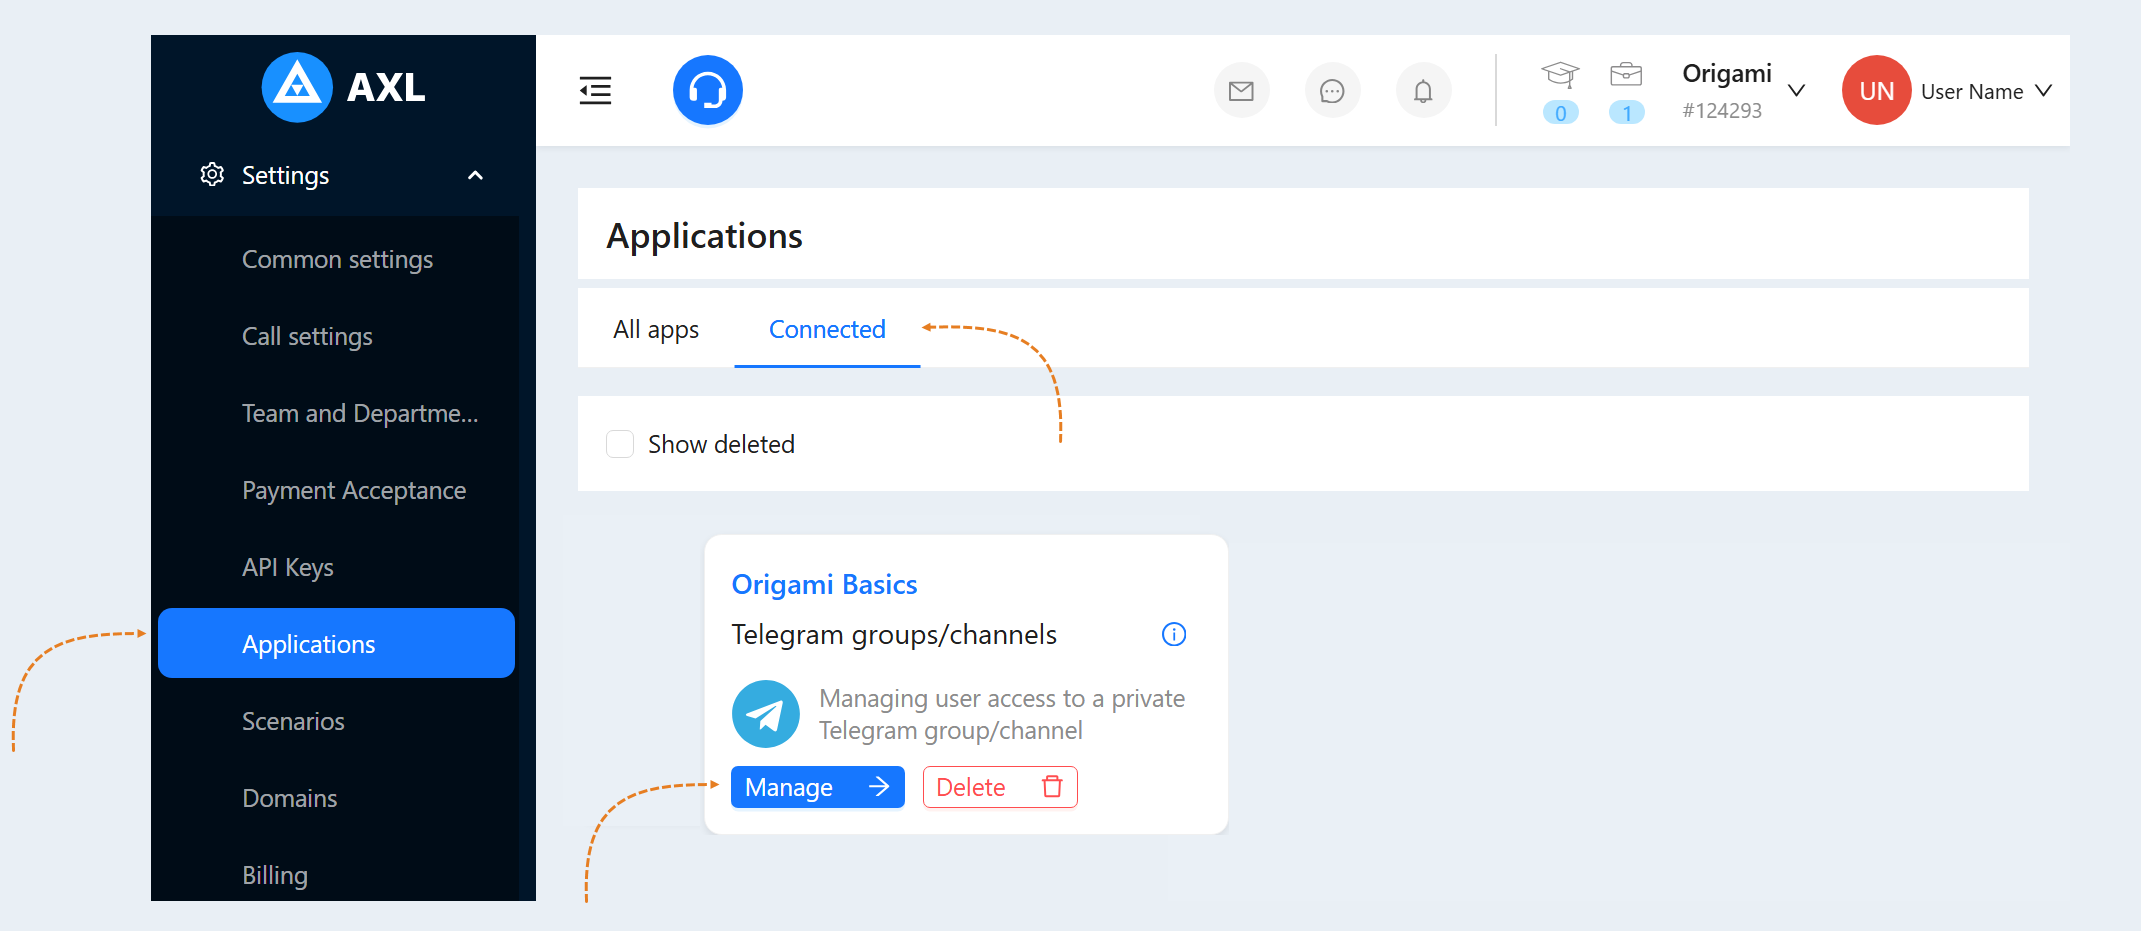
Go to the Settings section and select the Applications tab. The Connected tab will display the connected Telegram group application. To continue the settings, click the Manage button.
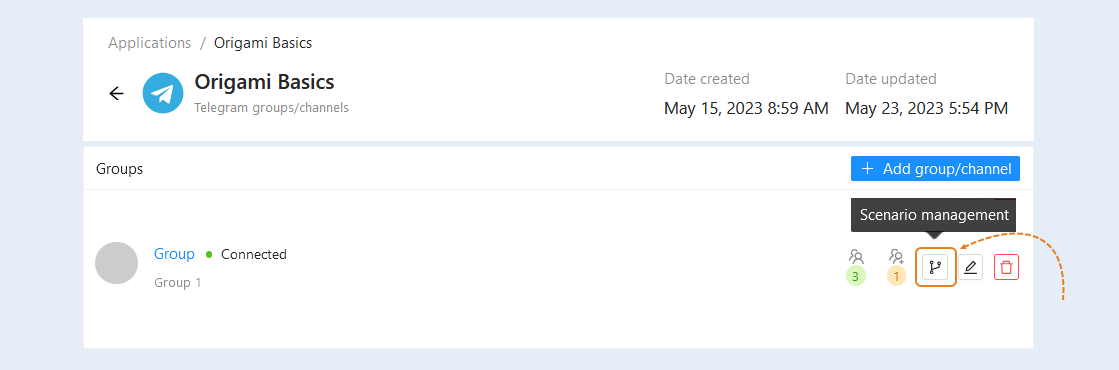
In the list of Telegram groups/channels, you will see a list of all connected groups and channels.
Click the Script Management button next to the group/channel to open and configure the script.
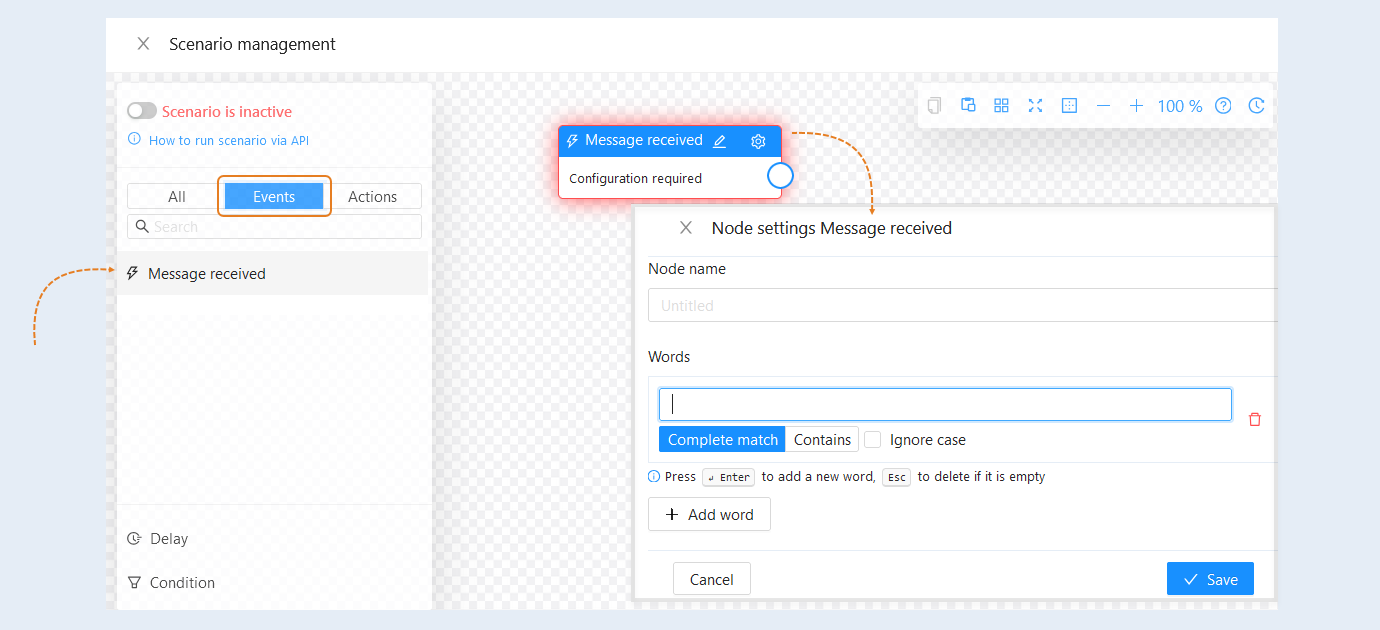
A script is a predefined sequence of actions that are performed automatically in response to certain events, such as sending messages to a group or channel. These actions may include interacting with users, providing information, surveys, notifications, as well as sending training materials and performing other tasks.
An event is available for the Telegram Group Application that triggers the script - A message has been received. The event is triggered when the user sends a message to the group containing certain words.
In the configuration settings, add the words that will run the script. Select settings below:
- Complete match means that the event node will be activated only if the message contains an exact match with the specified word or phrase. For example, if the word "hello" is specified, then the event node will be activated only when writing this word, without taking into account other spellings or phrases.
Contains means that the event node will be activated if the specified word or phrase is present in the message, regardless of the location or combinations with other words. For example, if the word "task" is specified, then the event node will be activated with any message containing this word, for example, "there is a task", "homework", "next week's task" and so on.
Ignoring case means that the event node will be activated regardless of how the specified word or phrase is written - in uppercase, lowercase, or mixed. For example, if the word "Hello" is specified, then the event node will be activated when writing as "Hello", "Hello", "HELLO", etc. This is convenient to provide flexibility and ease of use for users, so as not to limit their spelling options.
15
Types of events for the general scenario
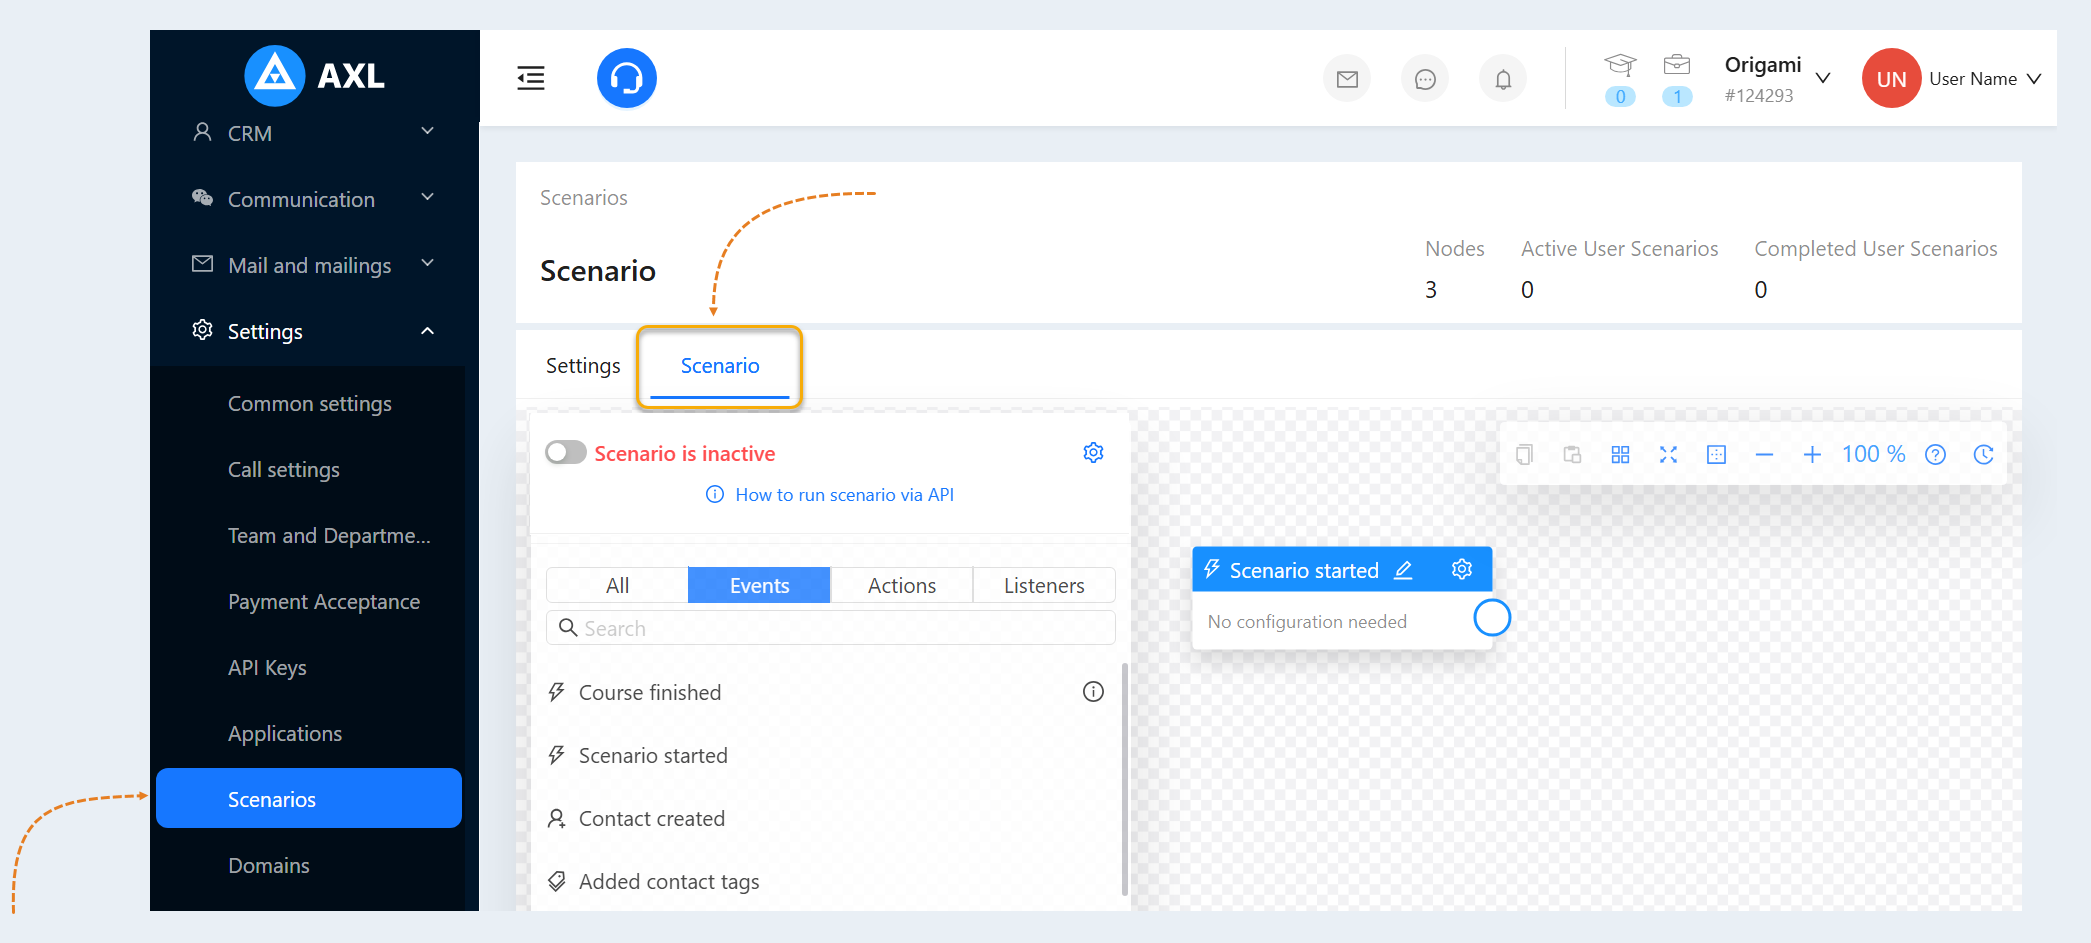
Go to the "Settings" section, "Scenarios" tab. Create a new general scenario or open an existing one.
Then go to the "Scenario" tab. By default, there is already an event called "Scenario Started" that triggers the scenario. It is automatically created when you create a new scenario. No additional settings are required.
For the general scenario, there are 6 additional types of events available:
Order payment. This event triggers when an order payment is successful. In the event settings, check the box "Trigger even with partial payment" to have the event trigger the scenario even with partial order payment.
Creating an order. This event triggers when a visitor creates an order. The event does not require any additional settings.
User registered in membership portal. This event triggers when a new user registers in your membership portal. No additional settings are required.
Added contact groups. This event triggers only for users in the selected group. In the event settings, select a group from the list or create a new group. To do this, click the "Manage Groups" button and add a new group.
Added contact tags. This event triggers only for users with selected contact tags. In the event settings, select tags from the list.
Contact created. This event triggers when a new contact is created.