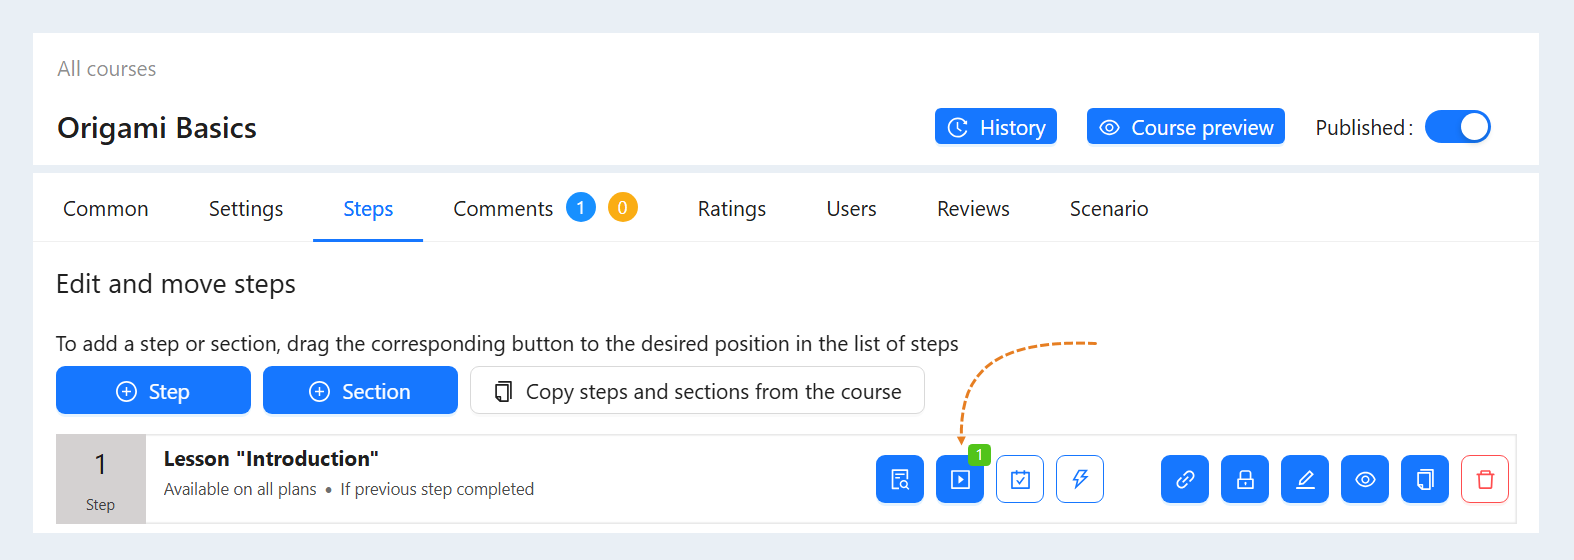
Tests are pre-prepared questions and answers to test users' knowledge in automatic mode.
Tests can be added to each step in the course, or after completing the course, at the end of the course. You can add testing to a theoretical step (lesson) or create a test as a separate course step.
Follow our instructions to create a test.
Click on the desired section of the article to go to its description:
Editing a course
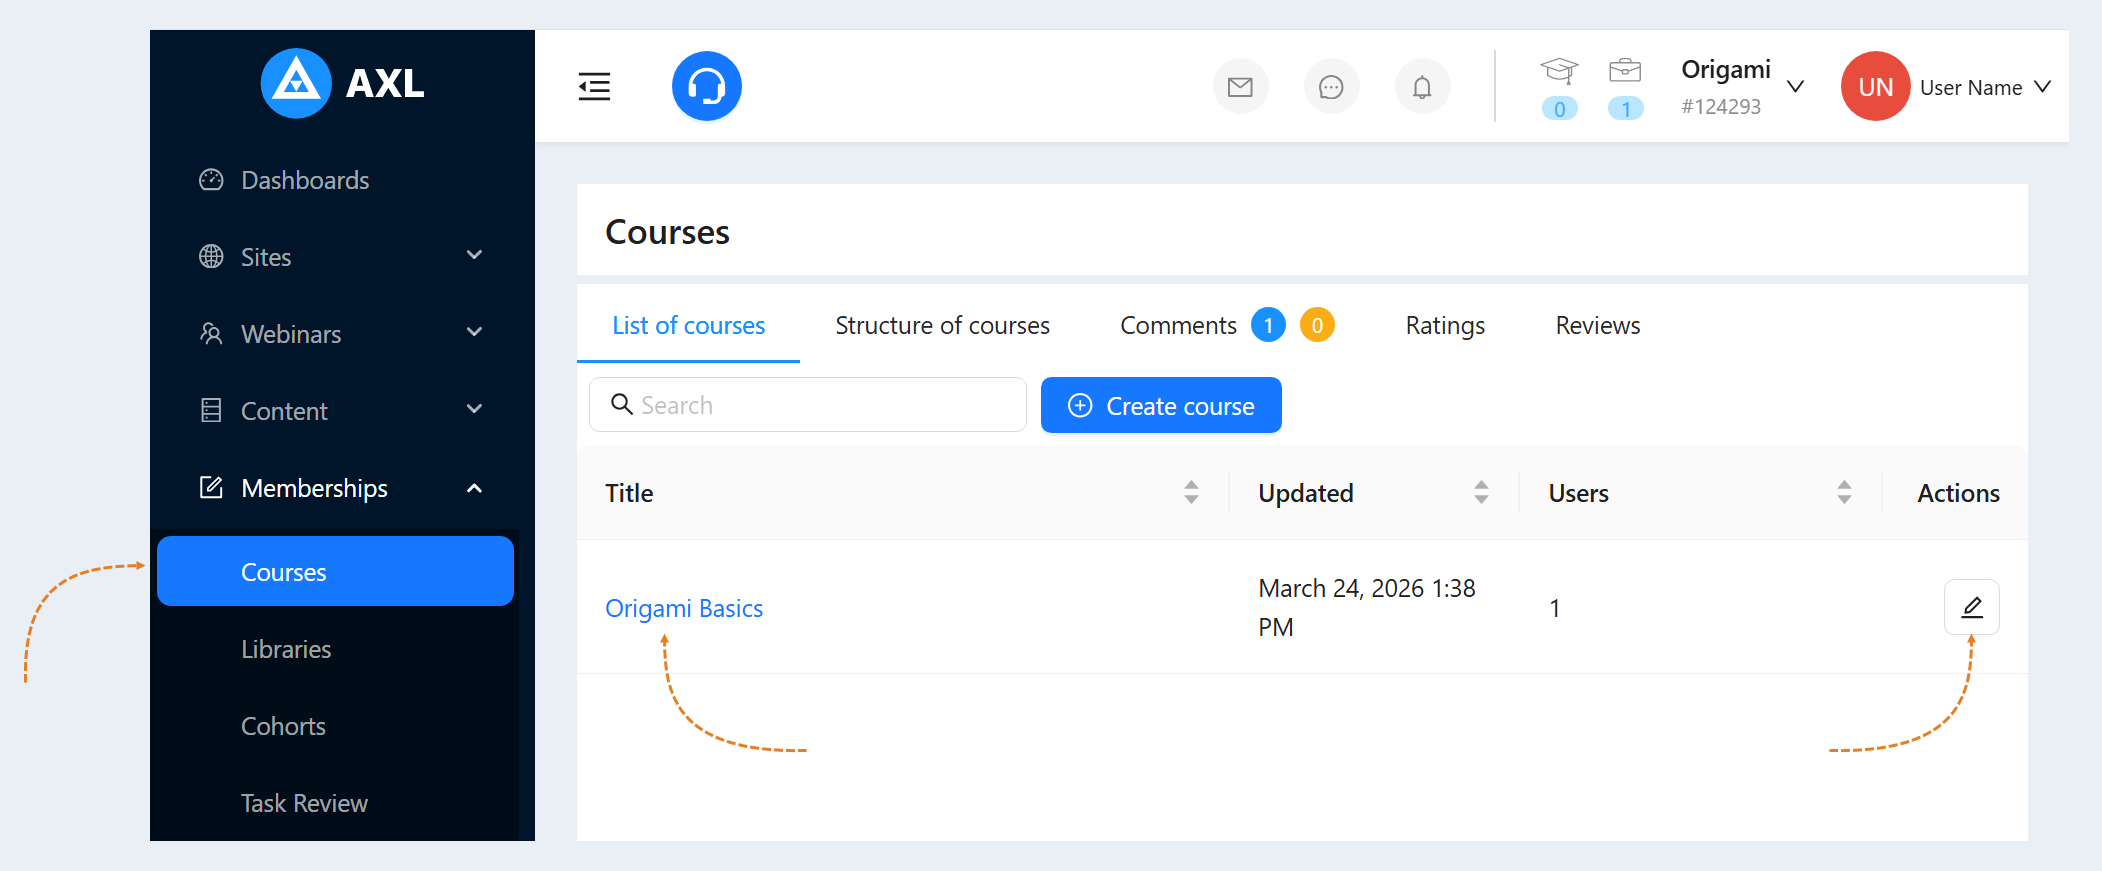
Go to the "Courses" section. Click on the course name or the "Edit" button. This will open a window for editing the course.
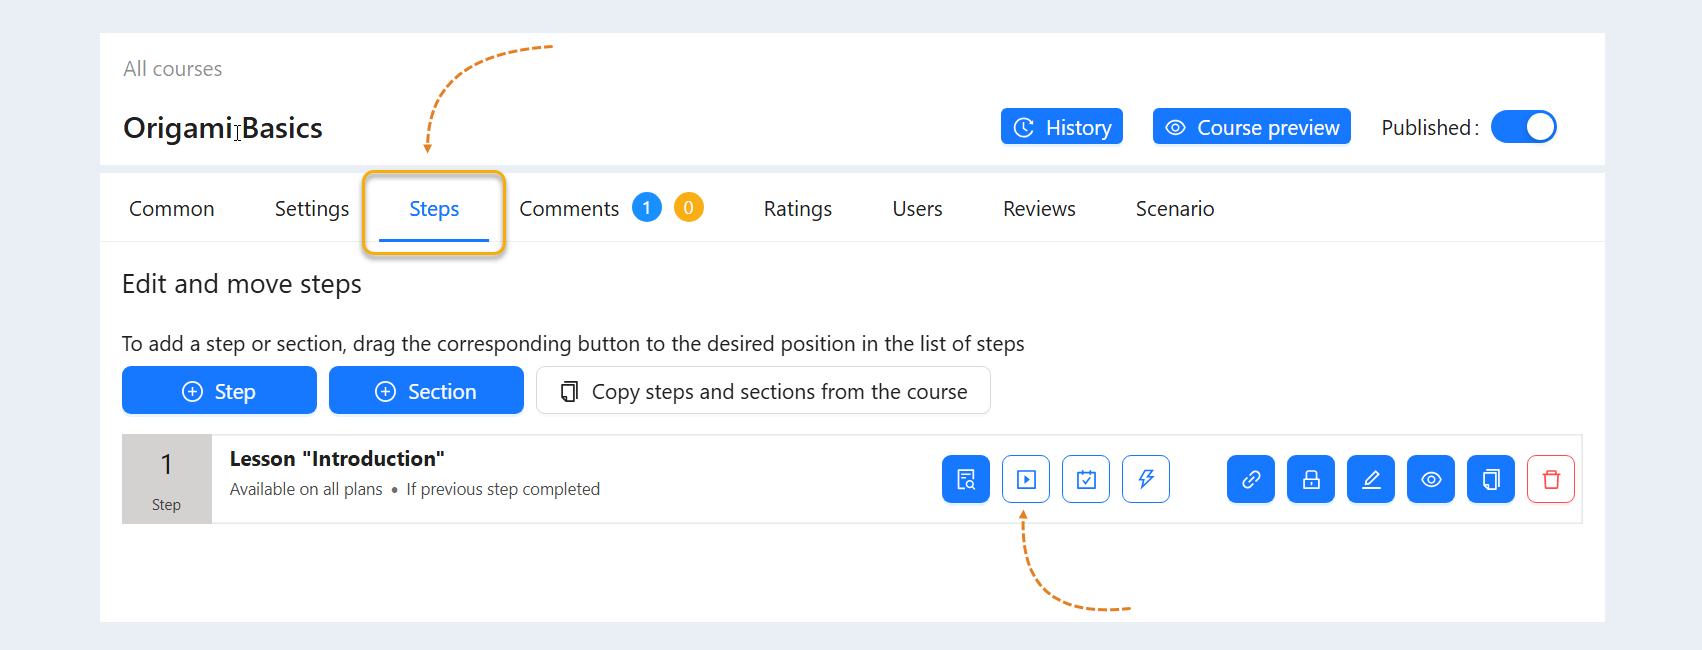
Go to the "Steps" tab.
At each step of the course, you can add theory, tests, assignments. You can add all the elements (theory, test and assignment) to one lesson or divide them into separate steps.
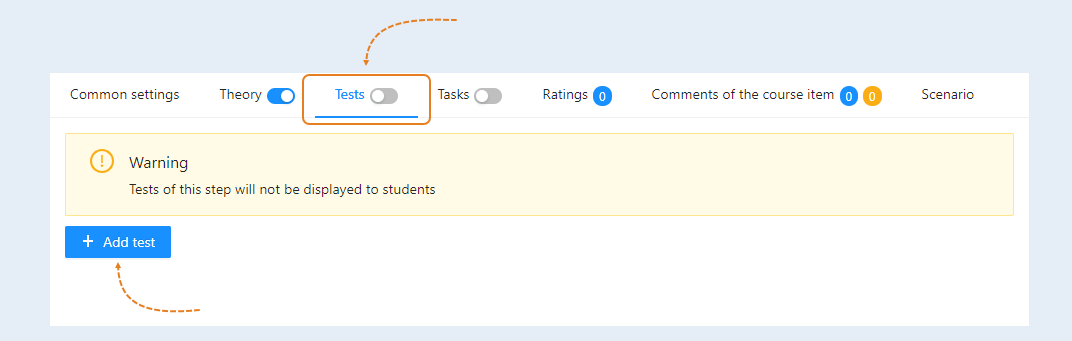
Adding a test
Click the "Tests" button in the corresponding step. The window for editing a step (lesson) will open. Then click the "Add Test" button.
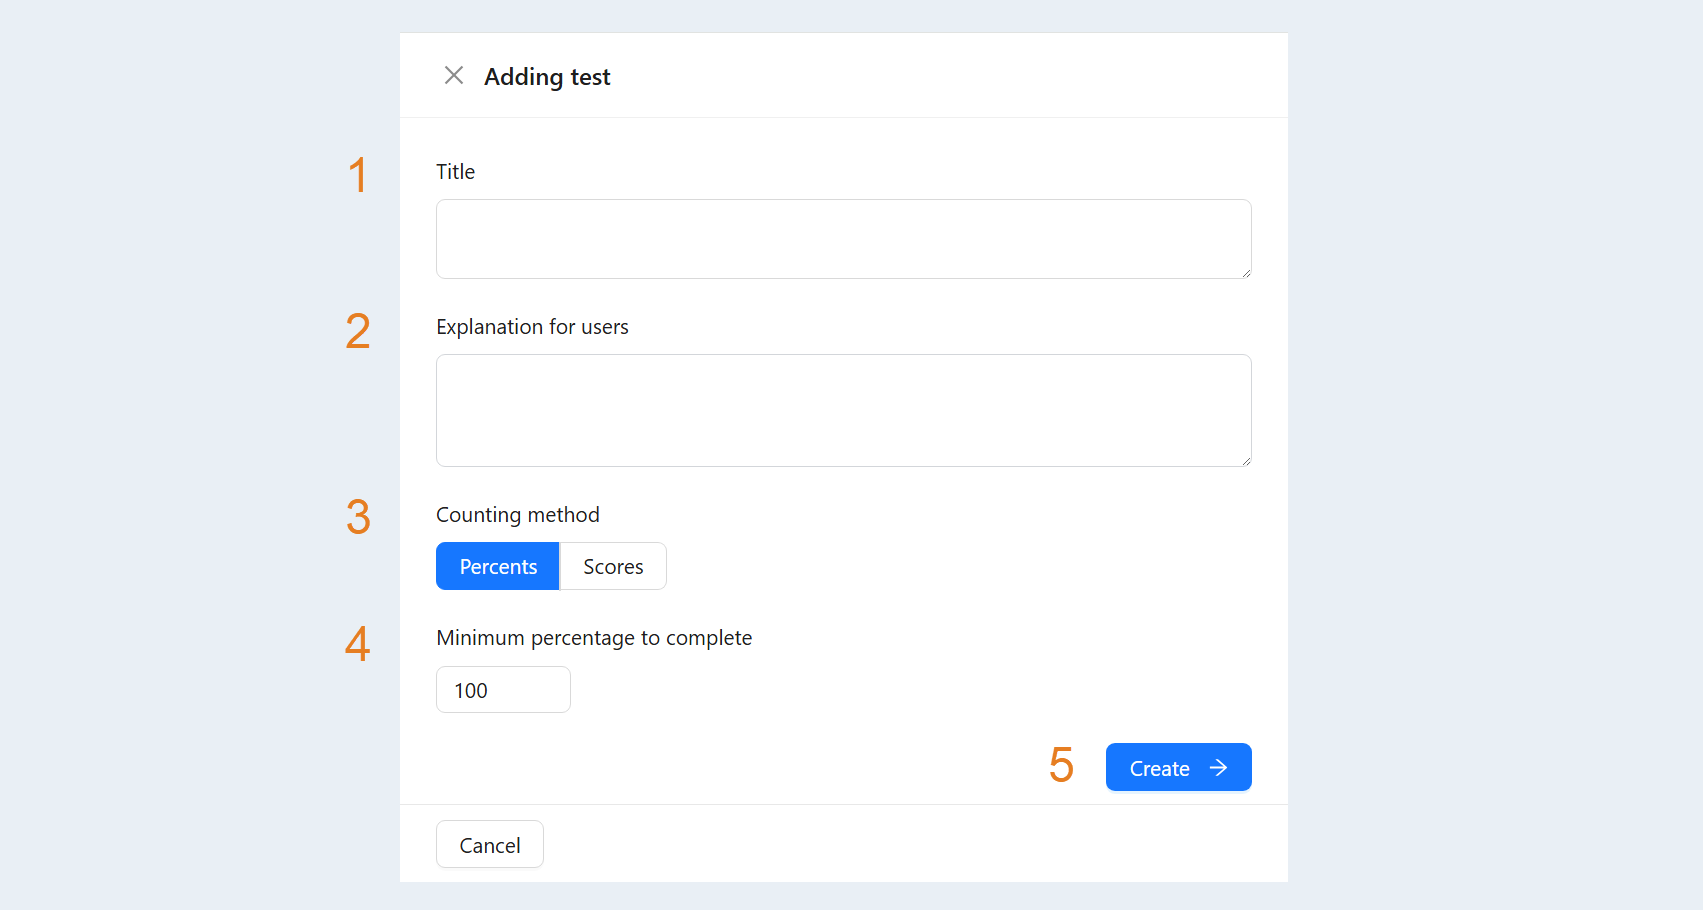
An additional window "Adding test" will open. Fill in the fields:
- Title. Write the name of the test. For example, “The final test for the course “Origami Basics".
Explanation for users. Add a description to the test. This will help users better understand the essence of the test.
Counting method. Select percentages or points.
Minimum percentage to complete. Enter a number from 0 to 100. This is the percentage of correct answers in the test to proceed to the next step. Or set the number of points to complete this test. You determine the number of points yourself, depending on the number of questions in the test.
Click the "Create" button. The test will be added to the list. Next, you can add questions and answers to the test.
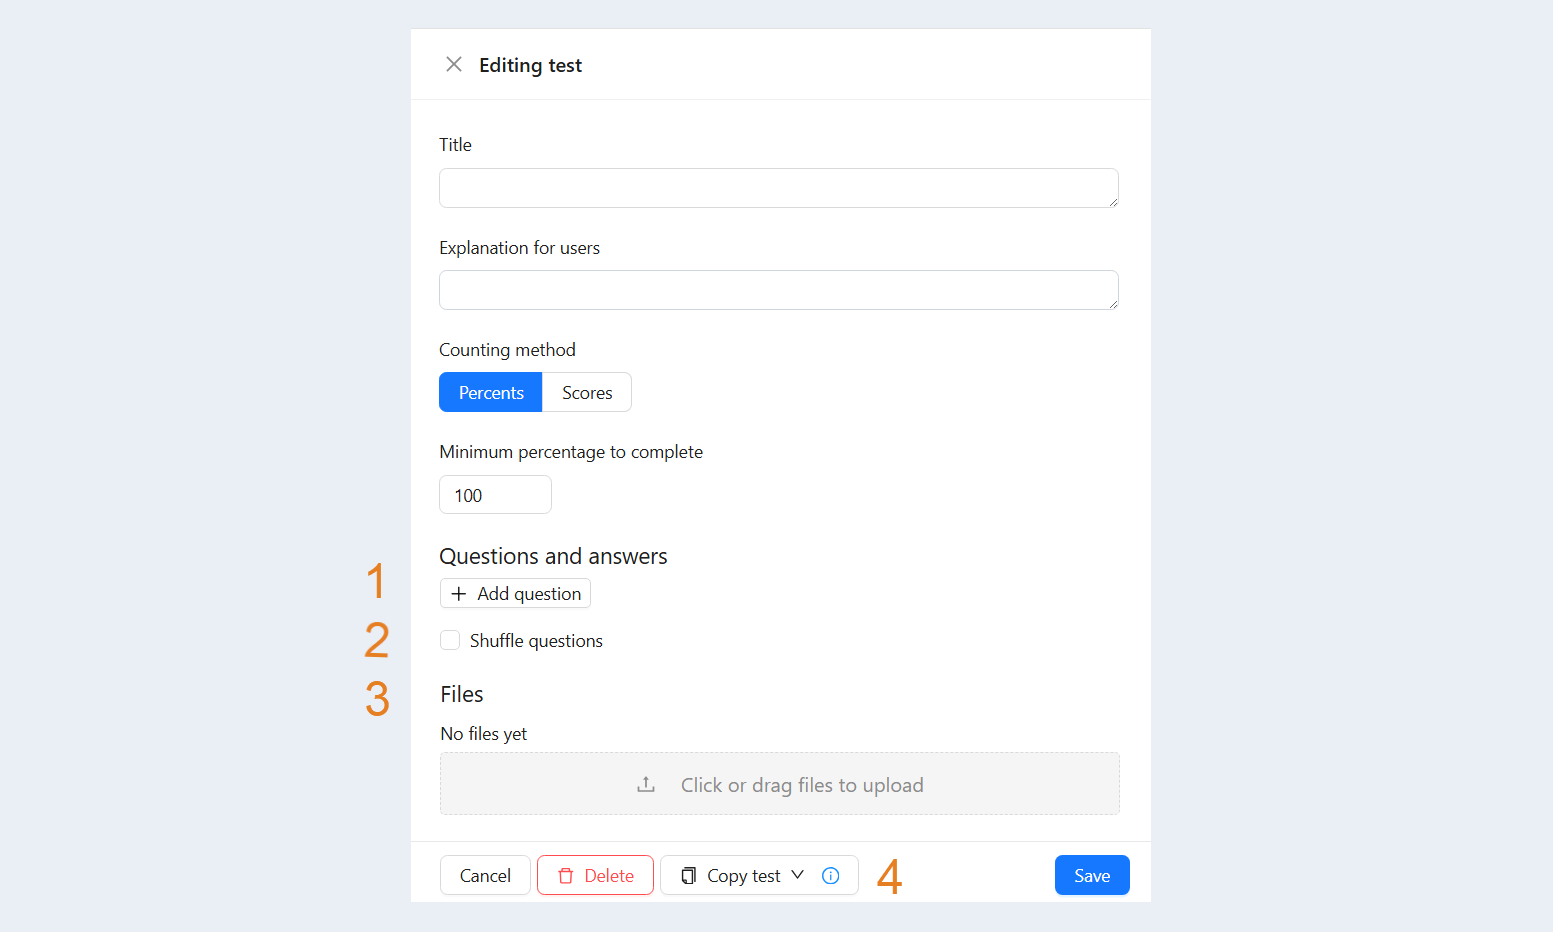
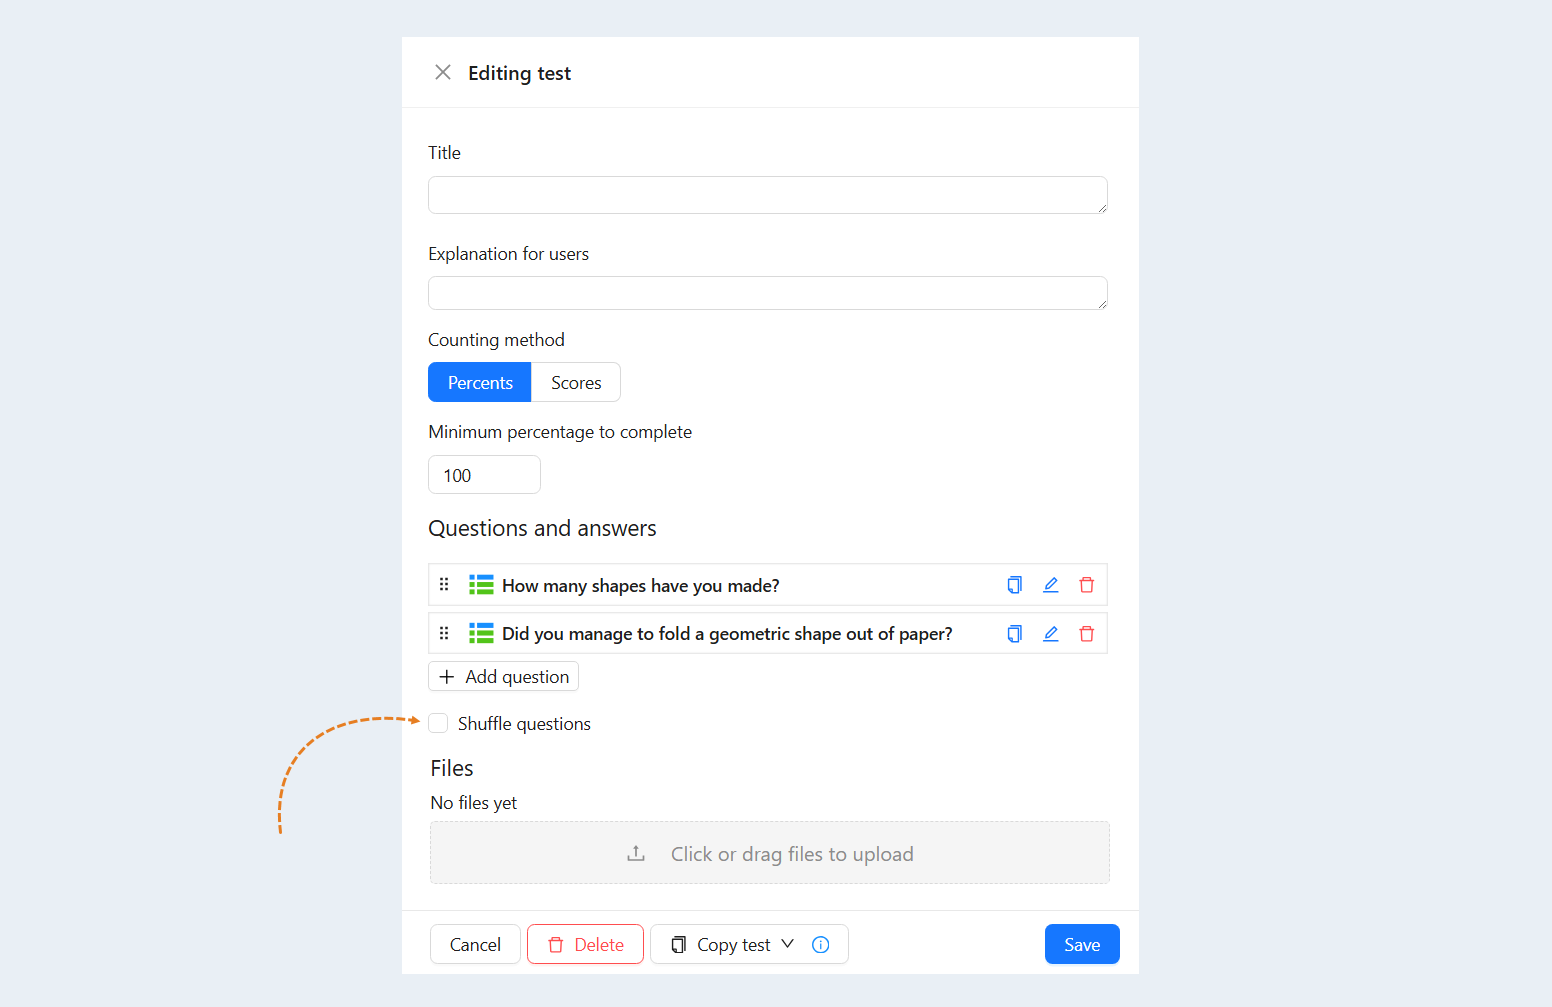
After adding the test, the fields for adding questions and answers will be available to you:
- Questions and answers. Here you add questions and answers to the test. How to add a question and answers, read below in this article.
Shuffle questions. This field will appear if there is more than one question in the test. Mixing increases engagement and active participation, as users must carefully consider each question and, after careful consideration, choose the correct answer. Mixing also helps to prevent cheating and provides an opportunity for a more complete knowledge check.
Files. If necessary, you can add files to download to this test.
The "Copy test" button. Please note that only saved data is copied.
- Copy to current step. This feature allows you to copy an existing test and instantly add it to the lesson you are currently editing. This way, you save time by avoiding the need to re-create the test and can focus on other aspects of the courses.
Copy to another step. This option allows you to select a test from another lesson in your course and copy it to the current lesson. This is especially useful if you want to use the same test for different lessons.
- Copy to current step. This feature allows you to copy an existing test and instantly add it to the lesson you are currently editing. This way, you save time by avoiding the need to re-create the test and can focus on other aspects of the courses.
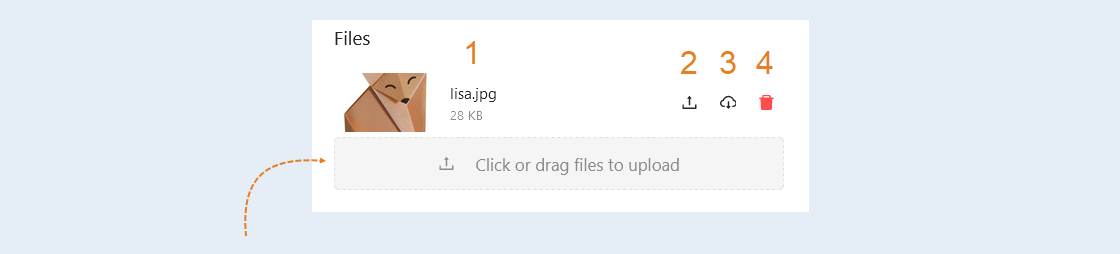
You can attach files to this test (images, text, video). Users can download these files.
Click the button to download the files. After downloading, the buttons will appear on the right:
- The name and size of the file. You can change the file name in this field.
Replace file. Click to upload a new file.
Download. You can download this file.
Remove. This button deletes files.
Adding questions
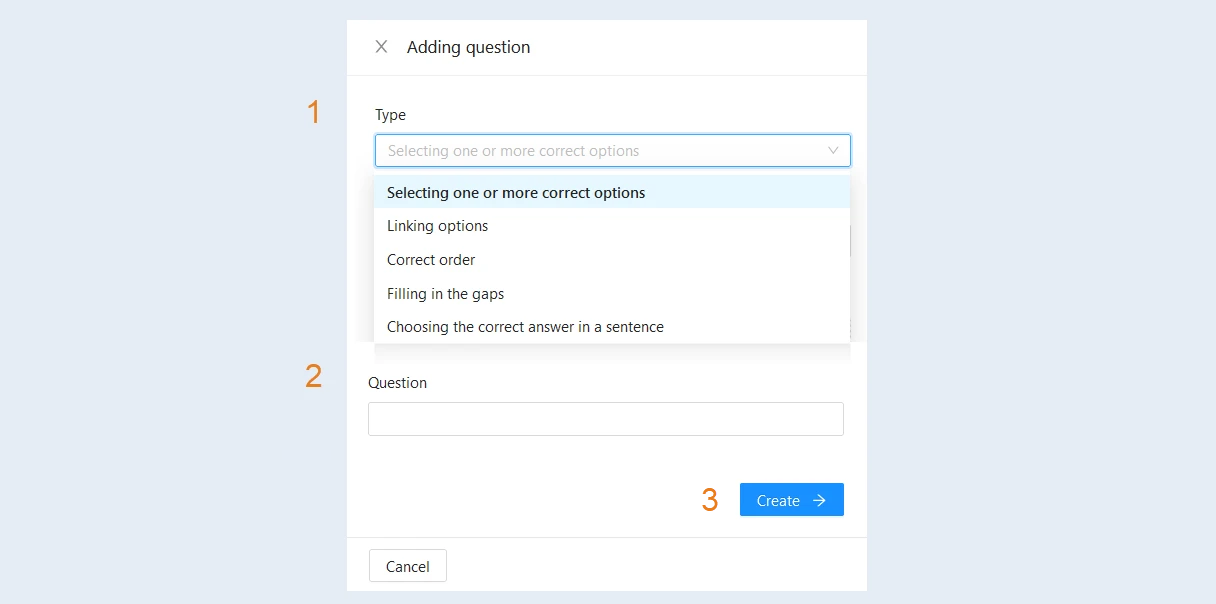
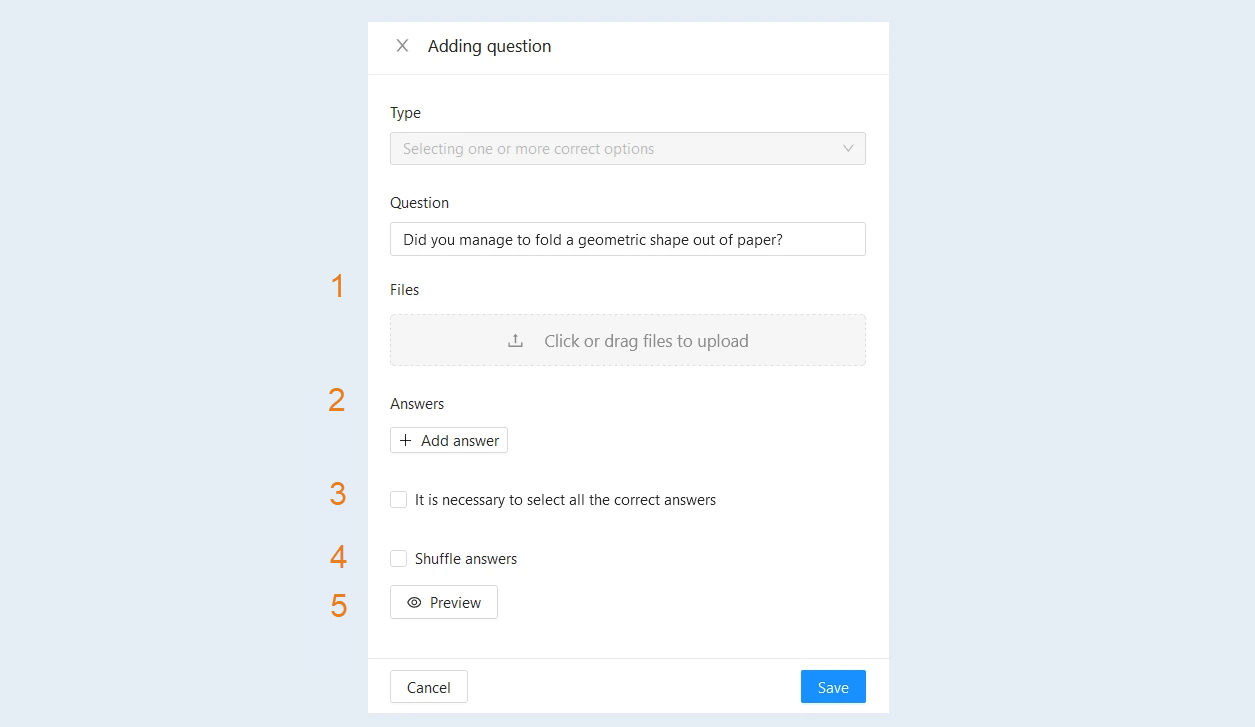
Click the "Add question" button. In the window that opens, fill in the fields:
- Type. Choose the type of question from the suggested list:
Selecting one or more options. When selecting one option, the user sees a question and several possible answers. You need to choose only one correct option. This type of question is often used to test basic knowledge and understanding of specific concepts.
When choosing several options, the user needs to select several correct options from the suggested ones. This allows you to evaluate a deeper understanding of the topic and the ability to distinguish between correct and incorrect answers.Linking options. In this type of question, the user is asked to match elements from two columns, for example, terms and their definitions, or questions and answers. This format helps to test knowledge about the relationship between a concept and its explanation.
Correct order. users need to arrange the items in the correct order. This can be a chronological order of events, process steps, or a sequence of steps. Such questions test the understanding of the structure of the material.
Filling the gaps. The question contains a text with missing words or phrases that the user must fill in. This helps not only to test knowledge, but also to determine how well the user understands the context.
Choosing the correct answer in a sentence. Users are asked to complete the sentence by selecting the appropriate word or phrase from several suggested options. This type of question focuses on grammar, vocabulary, and contextual understanding.
Question. In this field, you need to write a question for the test.
Click the "Create" button. The question will be added to the test. Then you can add answers.
After adding a question, the fields for adding answers will be available to you:
Files. If necessary, you can add files to download to this issue. All images and .gif files appears under test question. Recomended format - horizontal 16:9.
Answers. Next, click the "Add Answers" button. Answers are added one at a time. To the right of the line, check the box “Correct answer“ or ”Incorrect answer". The number of responses is unlimited. The number of correct answers is unlimited.
It is necessary to select all the correct answers. Check the box if the user needs to select several correct answers.
Shuffle answers. Mixing the answers in the tests helps to provide a more honest and objective assessment of knowledge. This makes the test more fair because it will not be easier for participants to memorize or guess the correct answers.
Preview. Click to see what the test will look like for users.
Adding answers
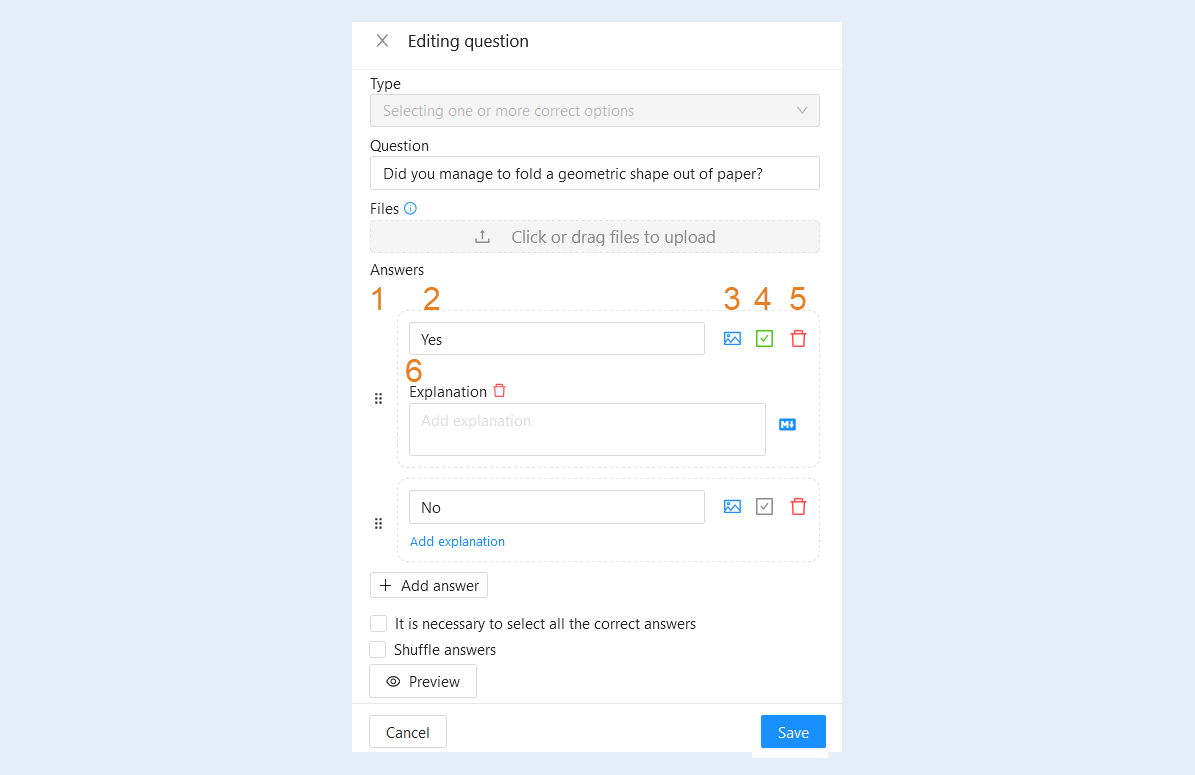
Next, click the "Add answer" button. Write the answers in the field that opens:
- The order of the answers. Grab the field with the cursor by clicking on it with the left mouse button and drag it to the desired location. This way you can change the order of the answers.
Question text. In this field, you need to write an answer.
Select image. Click to select an image and download it from your device (laptop, computer, tablet).
Check the box “Correct answer” or “Incorrect answer”.
Remove. Click the button to delete the answer.
Add explanation. You can add an explanation to each answer. Click the "Add Explanation" button and enter the text in the field. This field supports Markdown. Click the "Markdown" icon on the right to display formatting help. Right-click to preview.
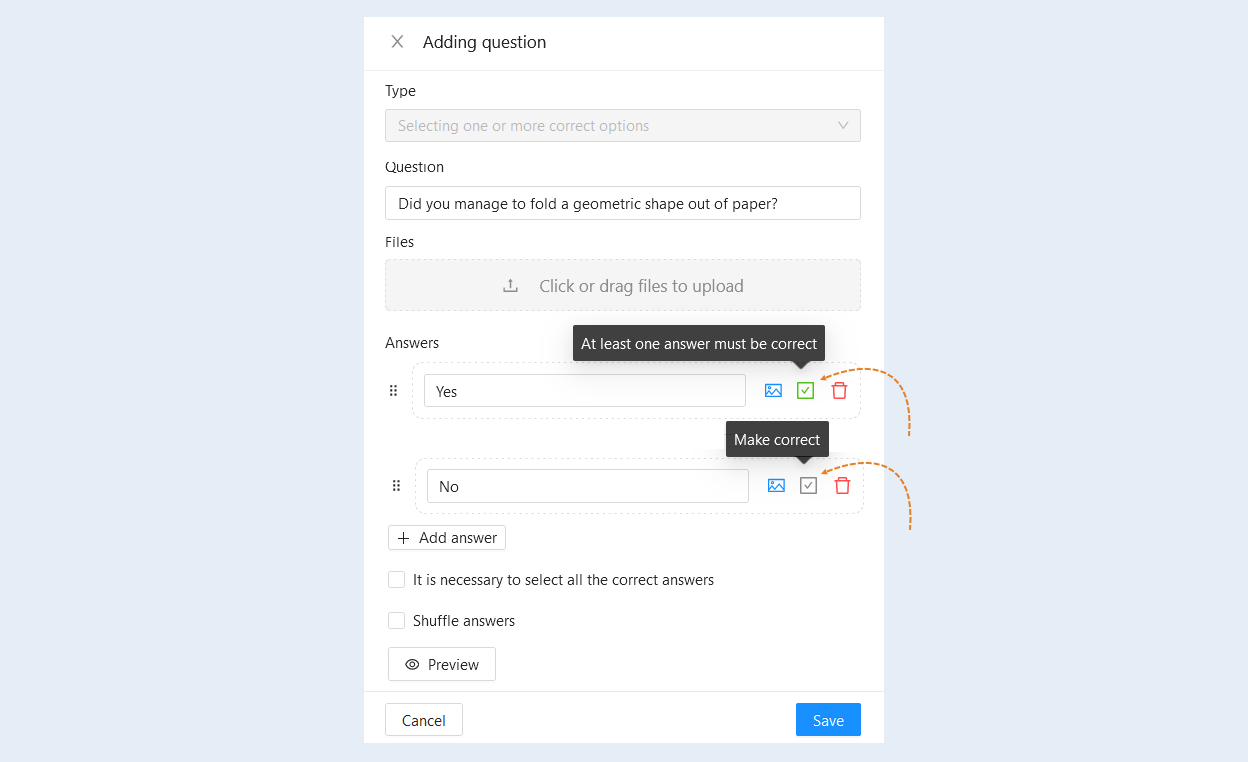
After creating the answers, assign each one true or false. A green check mark means that the answer is correct. A gray check mark means that the answer is incorrect. At least one answer in the question must be correct.
Click the "Save" button. The question will appear in the test. Here you can see the following information:
- The order of the question. Grab the field with the cursor by clicking on it with the left mouse button and drag it to the desired location. This way you can change the order of the questions in the list.
The type of question. Here you can see the question type icon: choosing one or more options, matching options, correct order, filling in gaps, or choosing the correct answer in a sentence.
Question text. This field shows the question.
Copy question. Click the button to create a copy of the question. A copy will appear in the list below.
Edit question. Click the button to make changes to the question.
Remove. Click the button to delete the question.
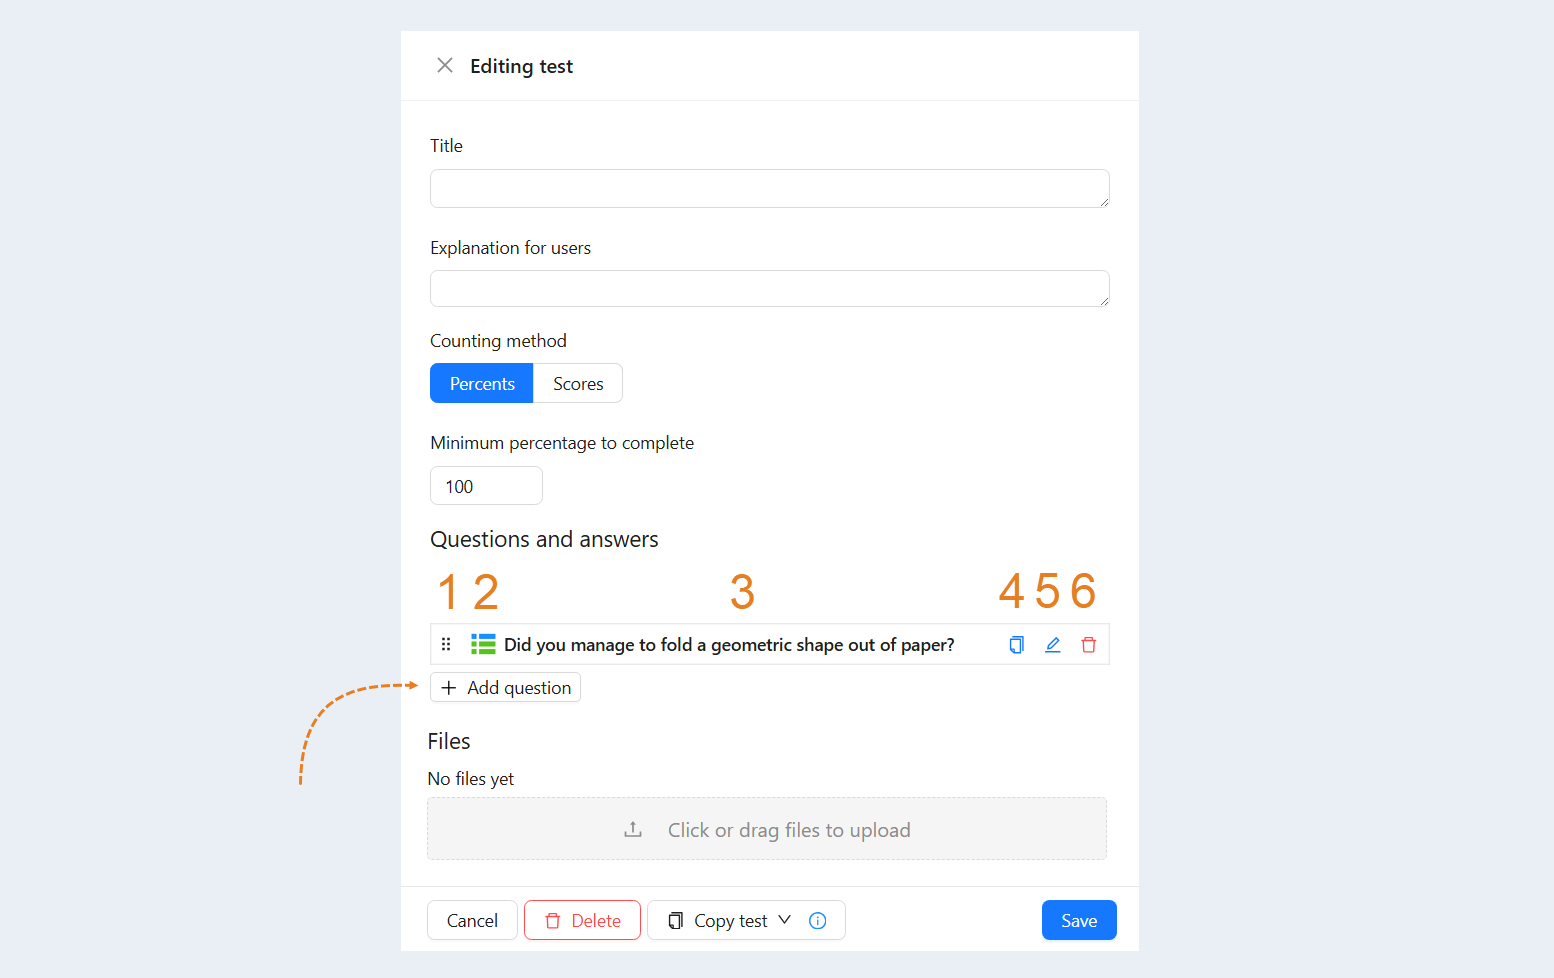
Click the “Add Question" button to add another question to the test.
Check the "Shuffle questions" box. Then the questions will be given to the user in a random order.
After adding the required number of questions, click the "Save" button. The test will be saved.
Instruments
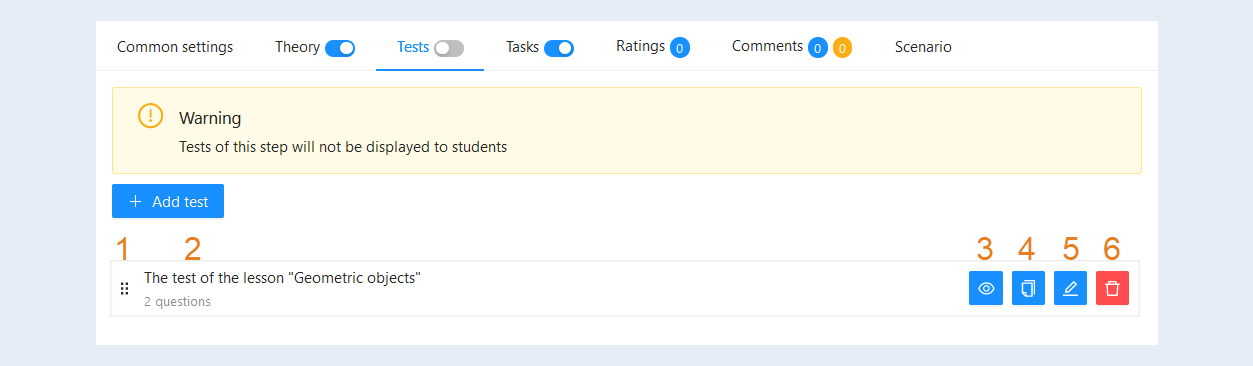
Buttons appeared to the right of the created question:
- The order of the test. Grab the field with the cursor by clicking on it with the left mouse button and drag it to the desired location. This way you can change the order of the tests in the list.
Title. Here you can see the name of the test and the number of questions in it.
Preview. Click to see what the test will look like for users.
Copy test. Click to copy the test step (question and answers to it).
Edit test. Click to change the question and answer options.
Remove. Click to delete this test.
Test visibility
After you have filled in all the fields, save the test.
Move the “Test Visibility” slider to the active position so that users can see this test in the lesson and fill it out.
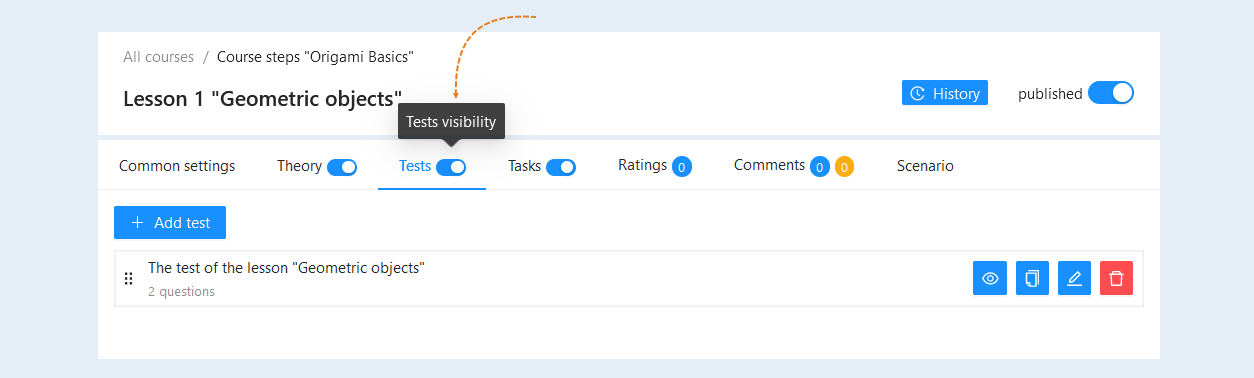
Return to the course page. The test is now available for users to pass.