With AXL, you can connect a phone number, make and receive calls directly in your browser, and send and receive text messages.
Calls support recording, automatic transcription, and post-call summaries. You can also assign a phone number to a specific team member.
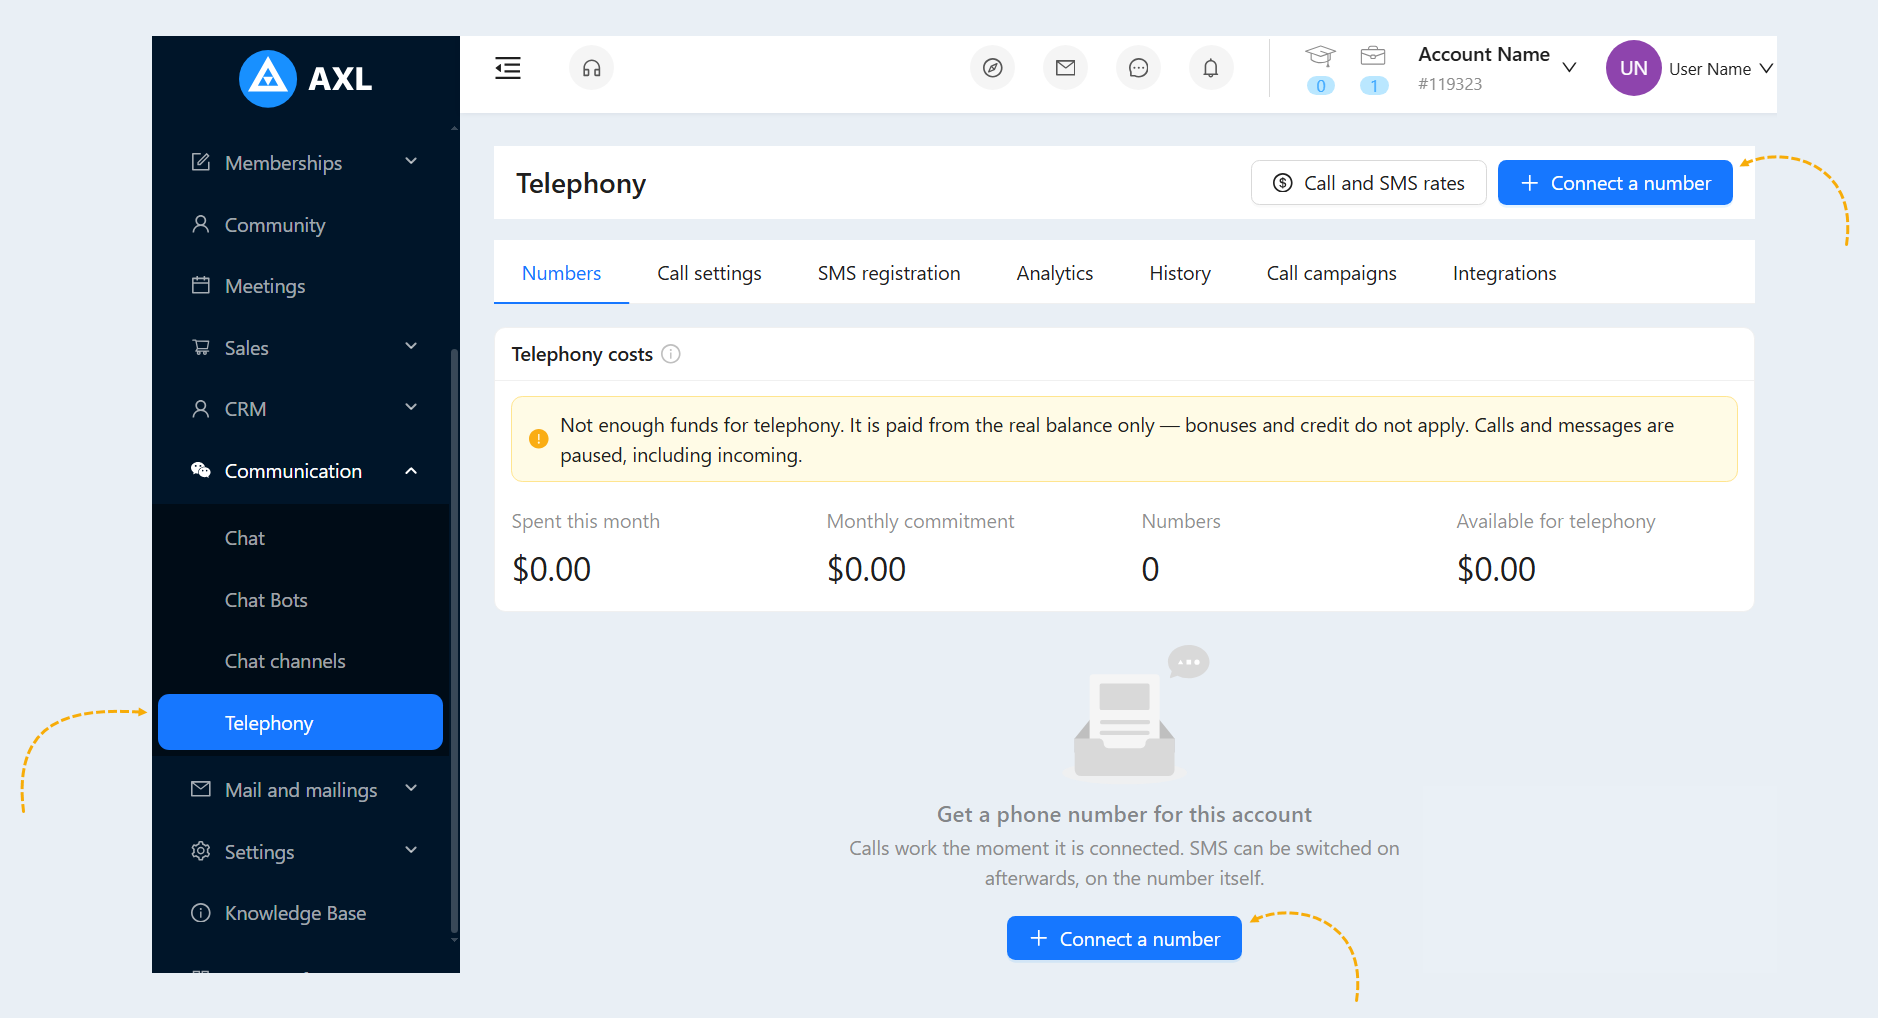
All built-in calling settings are located under Communication → Telephony.
Click a section below to jump to it:
Enabling Telephony
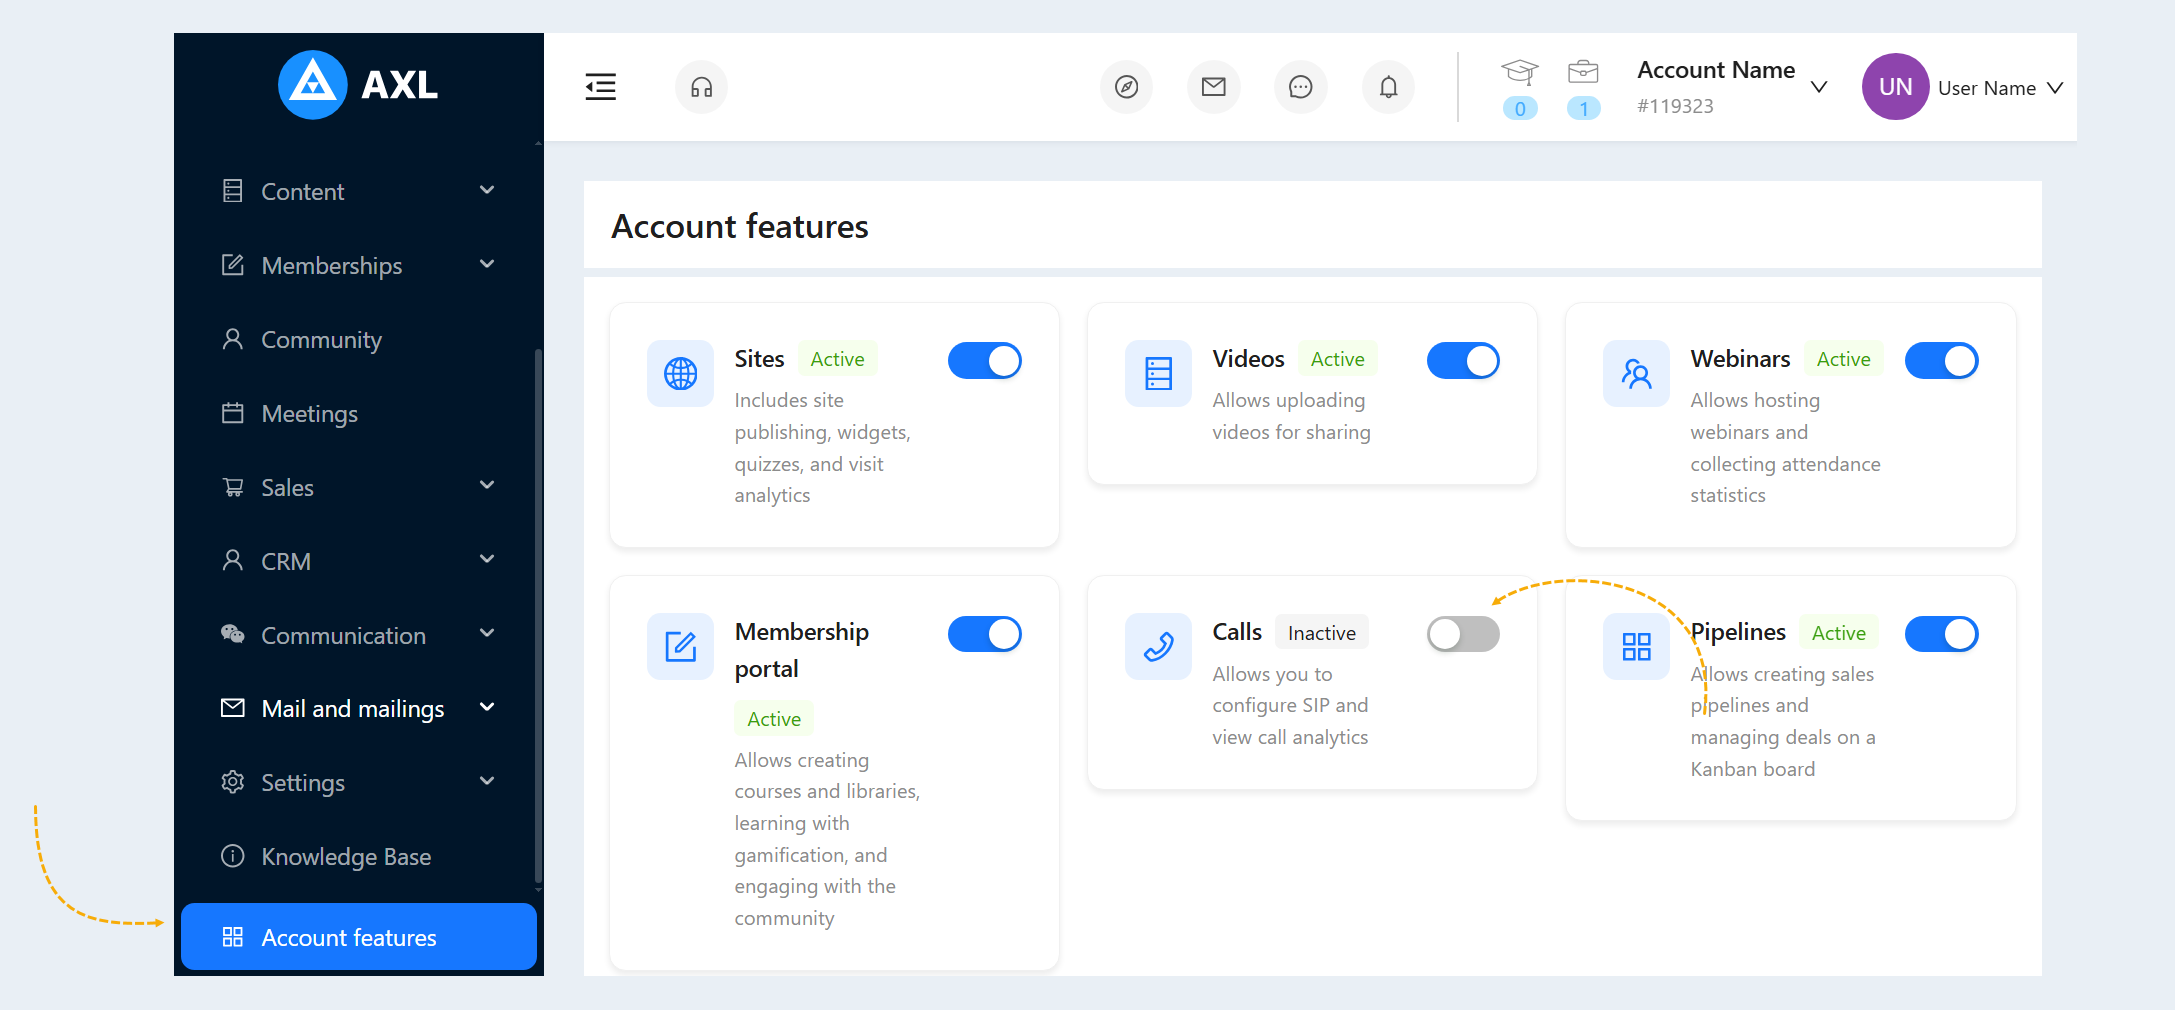
Before you begin, make sure telephony is enabled for your account. Go to Account Features at the bottom of the menu and turn on the telephony feature.
The Telephony tab will then appear under Communication.
Connecting a Number
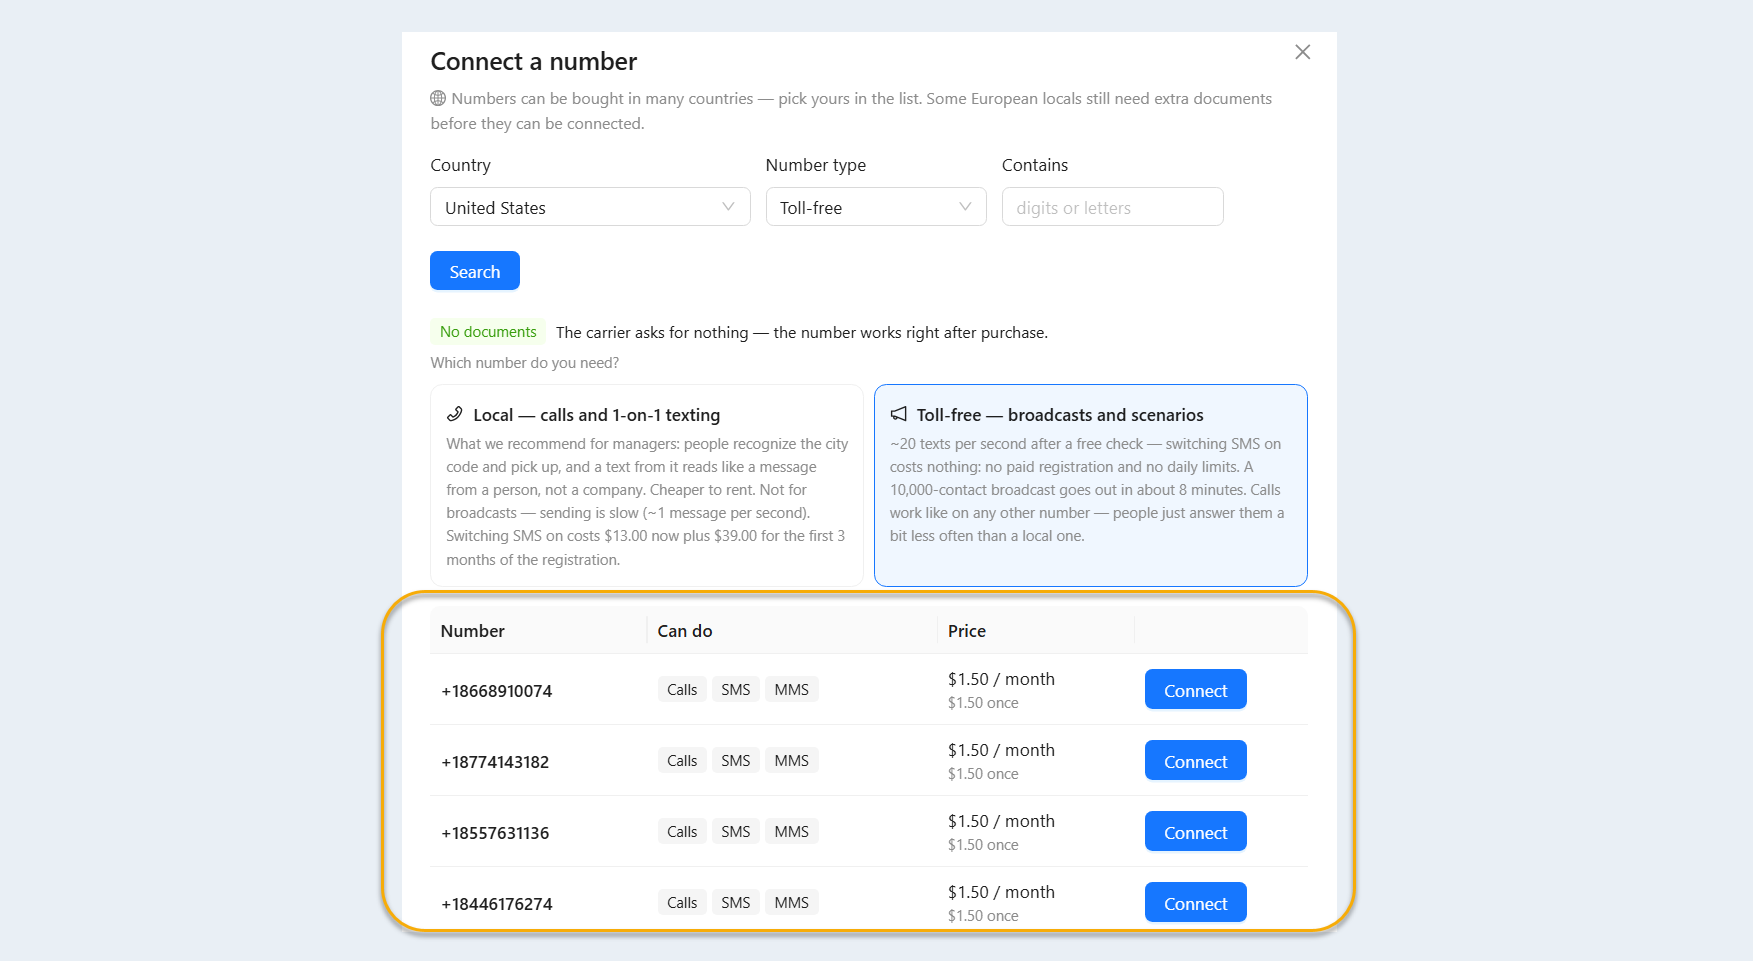
Go to Communication → Telephony. To connect a new phone number, click Connect Number.
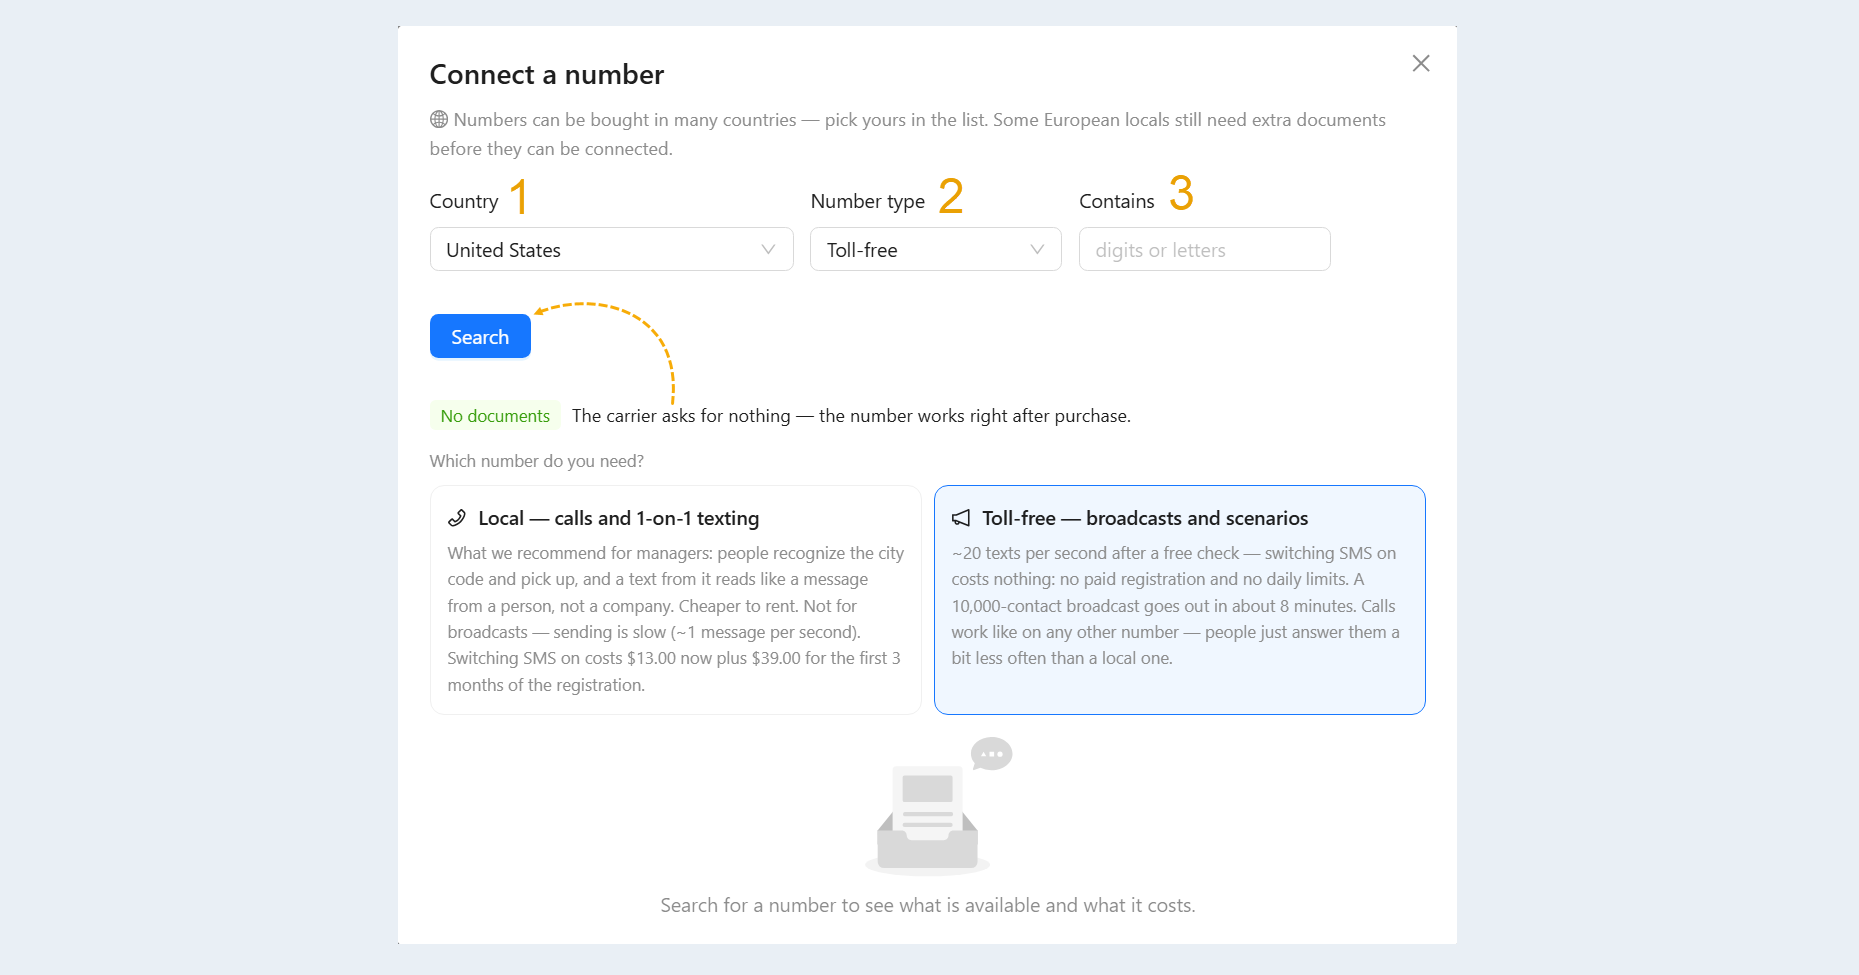
In the window that opens, complete the following fields:
1. Country: The country where you want to purchase a number.
2. Number Type: For example, Local or Toll-Free.
3. Contains: Optionally, enter the digits or letters you want the number to contain.
Click Search.
The platform will display available numbers, their supported features, and their connection fees.
Choose a number and click Connect. Once connected, the number can be used for calls and, after SMS is activated, for text messages.
Phone Number Types
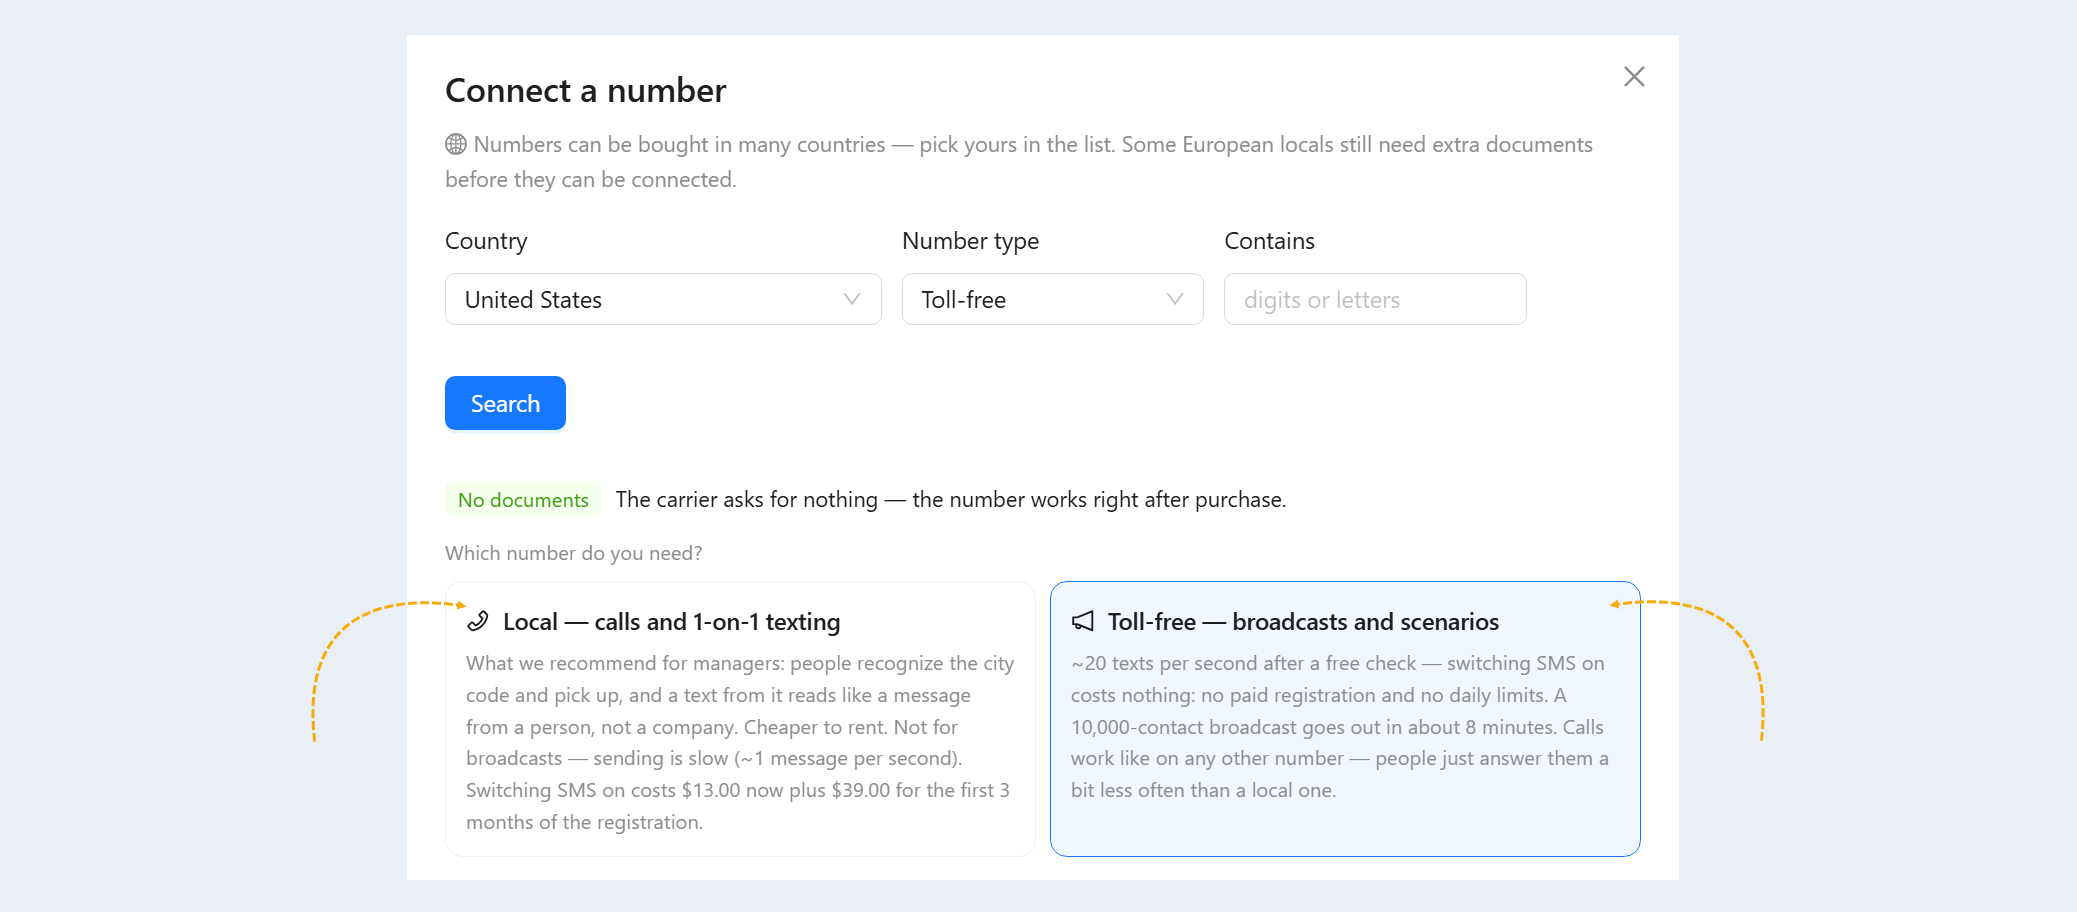
The available number types vary by country.
Local: Recommended for sales reps. People recognize the area code and are more likely to answer, while texts from a local number feel like messages from a person rather than a company. Local numbers also cost less to rent. They are not recommended for bulk messaging because sending is slow—about one message per second. Enabling SMS costs $13.00 upfront, plus $39.00 for the first three months of registration.
Toll-Free: Send approximately 20 text messages per second after free verification. SMS activation is free, with no paid registration or daily limits. A campaign targeting 10,000 contacts takes about eight minutes to send. Calling works just as it does with any other number, although people are slightly less likely to answer than when you call from a local number.
Number availability and connection requirements depend on the selected country.
Number Settings
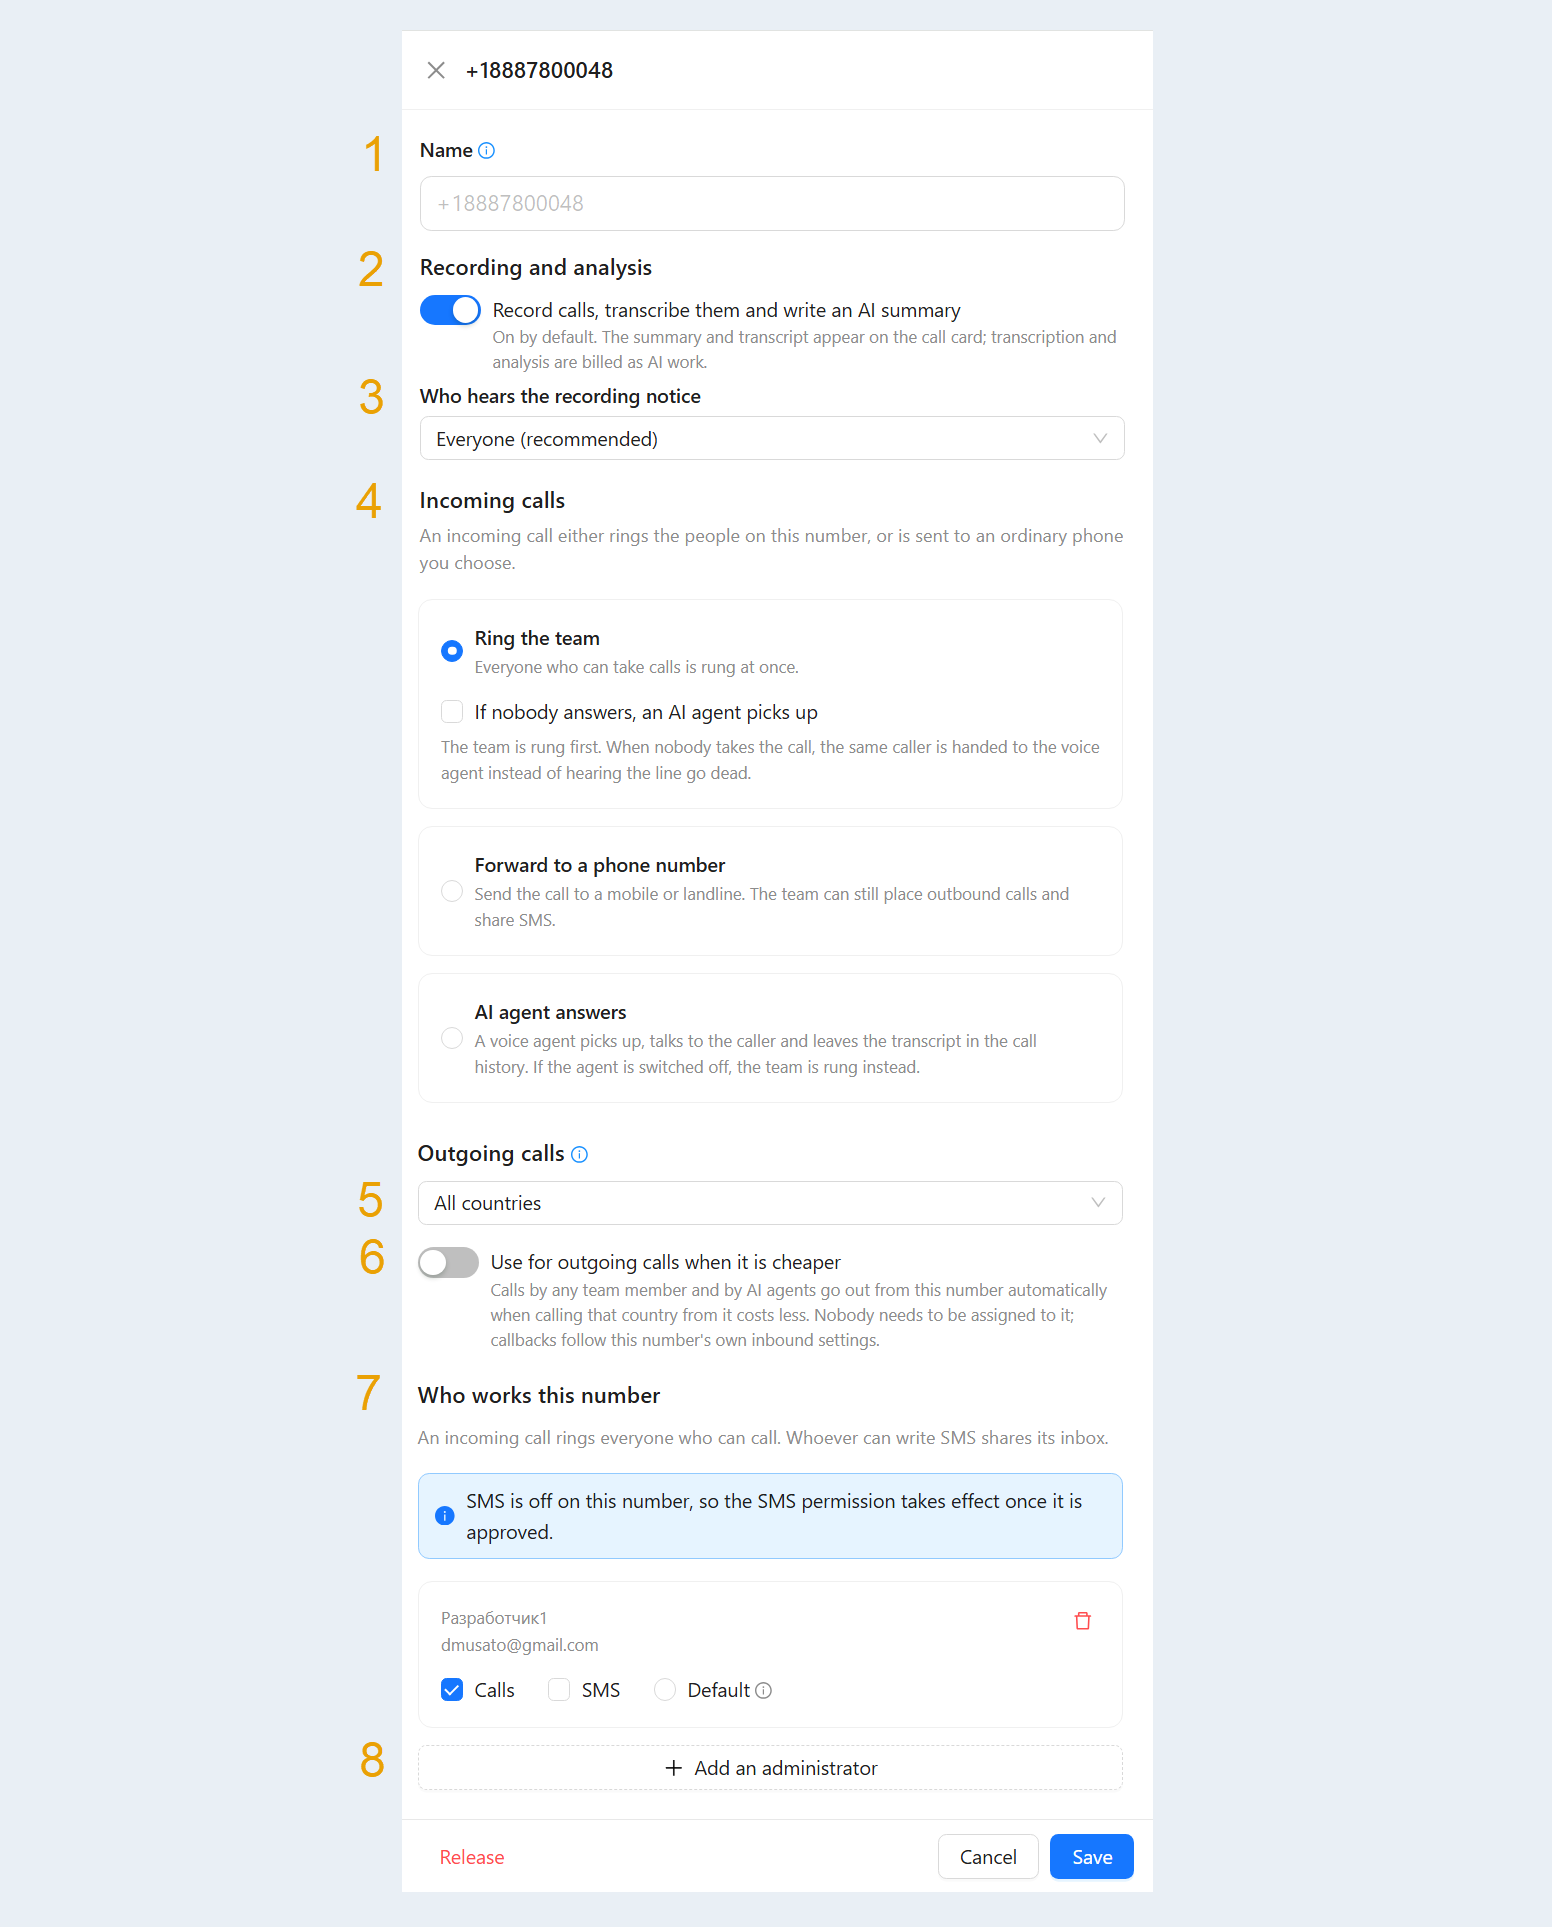
In a phone number’s settings, you can enable call recording and analysis, choose how incoming calls are handled, and manage team member access.
Go to Communication → Telephony, open the Numbers tab, and open the settings for the number you want to configure.
Name: Enter a name to help you distinguish this number from other numbers in your account. This field is optional.
Call Recording and Analysis: Turn on Record Calls, Transcribe, and Generate AI Summaries to save call recordings, convert conversations to text, and receive brief summaries. This setting is enabled by default. Transcripts and summaries appear in the call details. Please note that transcription and analysis are billed as AI usage.
Who Hears the Recording Notice: Choose who hears the call recording notice. The available options are Everyone (Recommended), Smart—Where Required by Law, and Never.
Incoming Calls: Choose how calls to this number are handled:
- Ring the Team: The call rings simultaneously for all team members who have permission to handle calls on this number. You can also enable If No One Answers, Let an AI Agent Take Over. If no team member answers, the voice agent will handle the call.
- Forward to a Number: Incoming calls are forwarded to the mobile or landline number you specify. Your team can still make outgoing calls and use SMS.
- AI Agent Answers: The voice agent answers the call, talks to the customer, and saves a transcript in the call history. If the agent is disabled, the call rings your team.
Outgoing Calls: Specify which countries can be called from this number: all countries, selected countries, or all countries except those selected.
Use for Outgoing Calls When It Costs Less: Enable this option to let the platform automatically use this number for calls made by team members and AI agents when it offers a lower rate for the destination country. Team members do not need to be assigned to the number. If a customer calls back, the call will be handled according to this number’s incoming call settings.
Who Can Use This Number: Select an administrator and configure access for each team member you add:
- Calls: Allow the team member to handle calls on this number. When Ring the Team is selected, incoming calls ring all team members with this permission.
- SMS: Allow the team member to use text messaging. All team members with this permission share the number’s message history. If SMS is not yet enabled for the number, this permission will take effect once registration is approved.
- Default: Set this number as the team member’s primary number.
Add Administrator: Click Add Administrator, select a team member, and configure their permissions. Click Save to apply your changes. To close the window without saving, click Cancel.
To remove a team member from the list of people who can use the number, click the trash icon on their card.
Call Settings
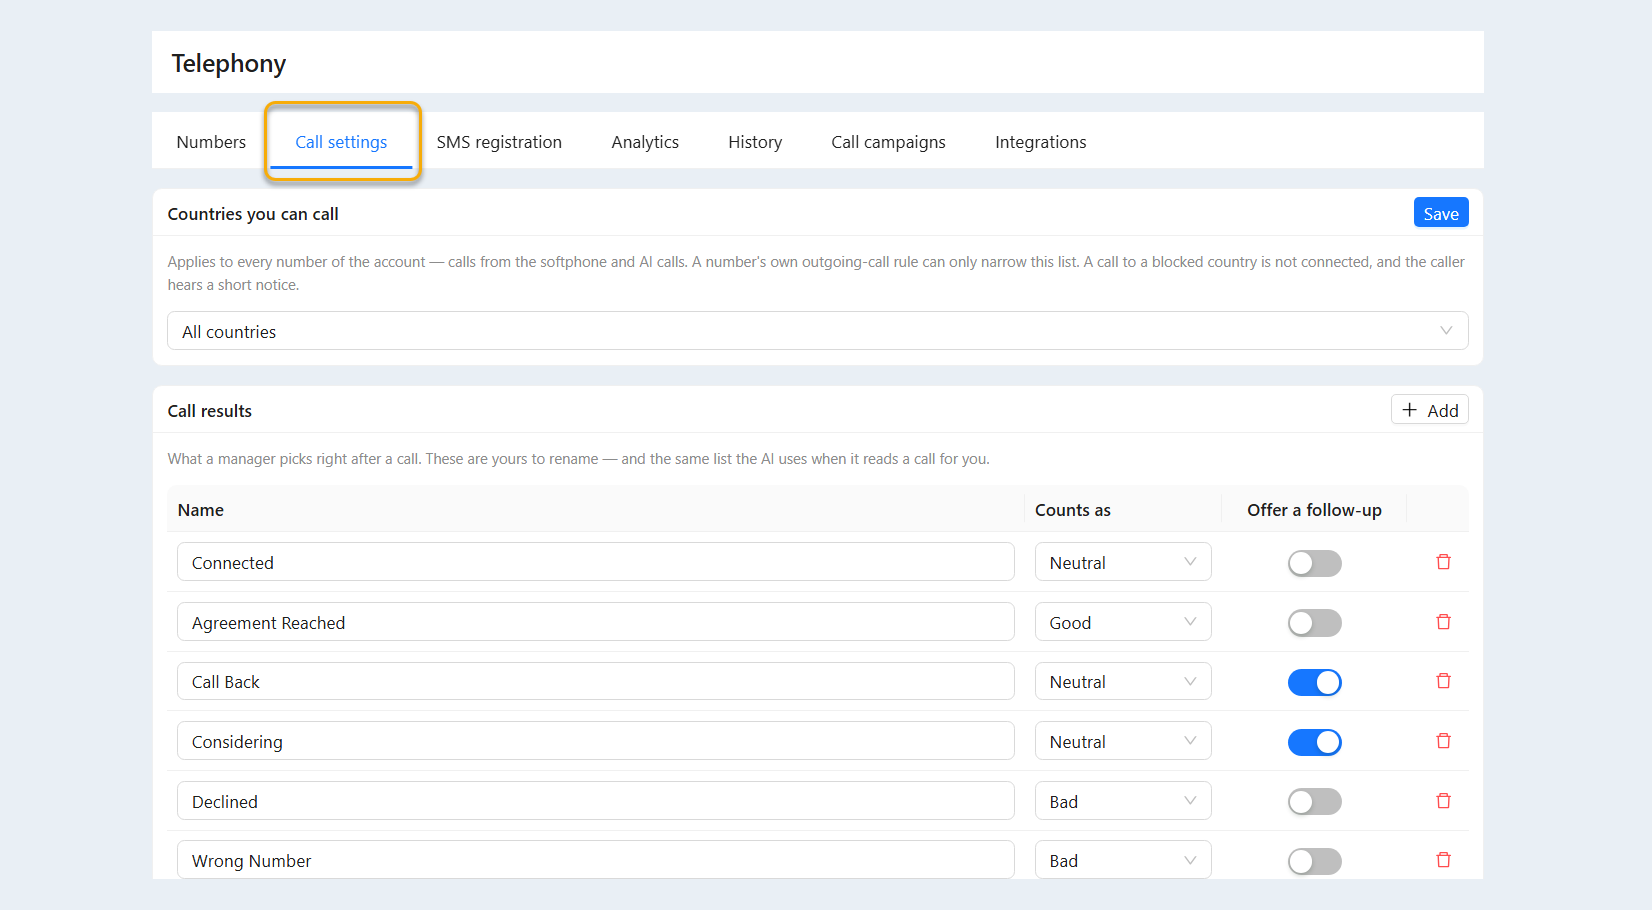
On the Call Settings tab, specify which countries can be called. Choose one of the following options:
All Countries
Selected Countries
All Countries Except Selected
In the Call Outcomes section, you can add new outcomes and edit existing ones. Assign each outcome a rating: Bad, Good, or Neutral. If needed, enable a prompt to create a task when that outcome is selected.
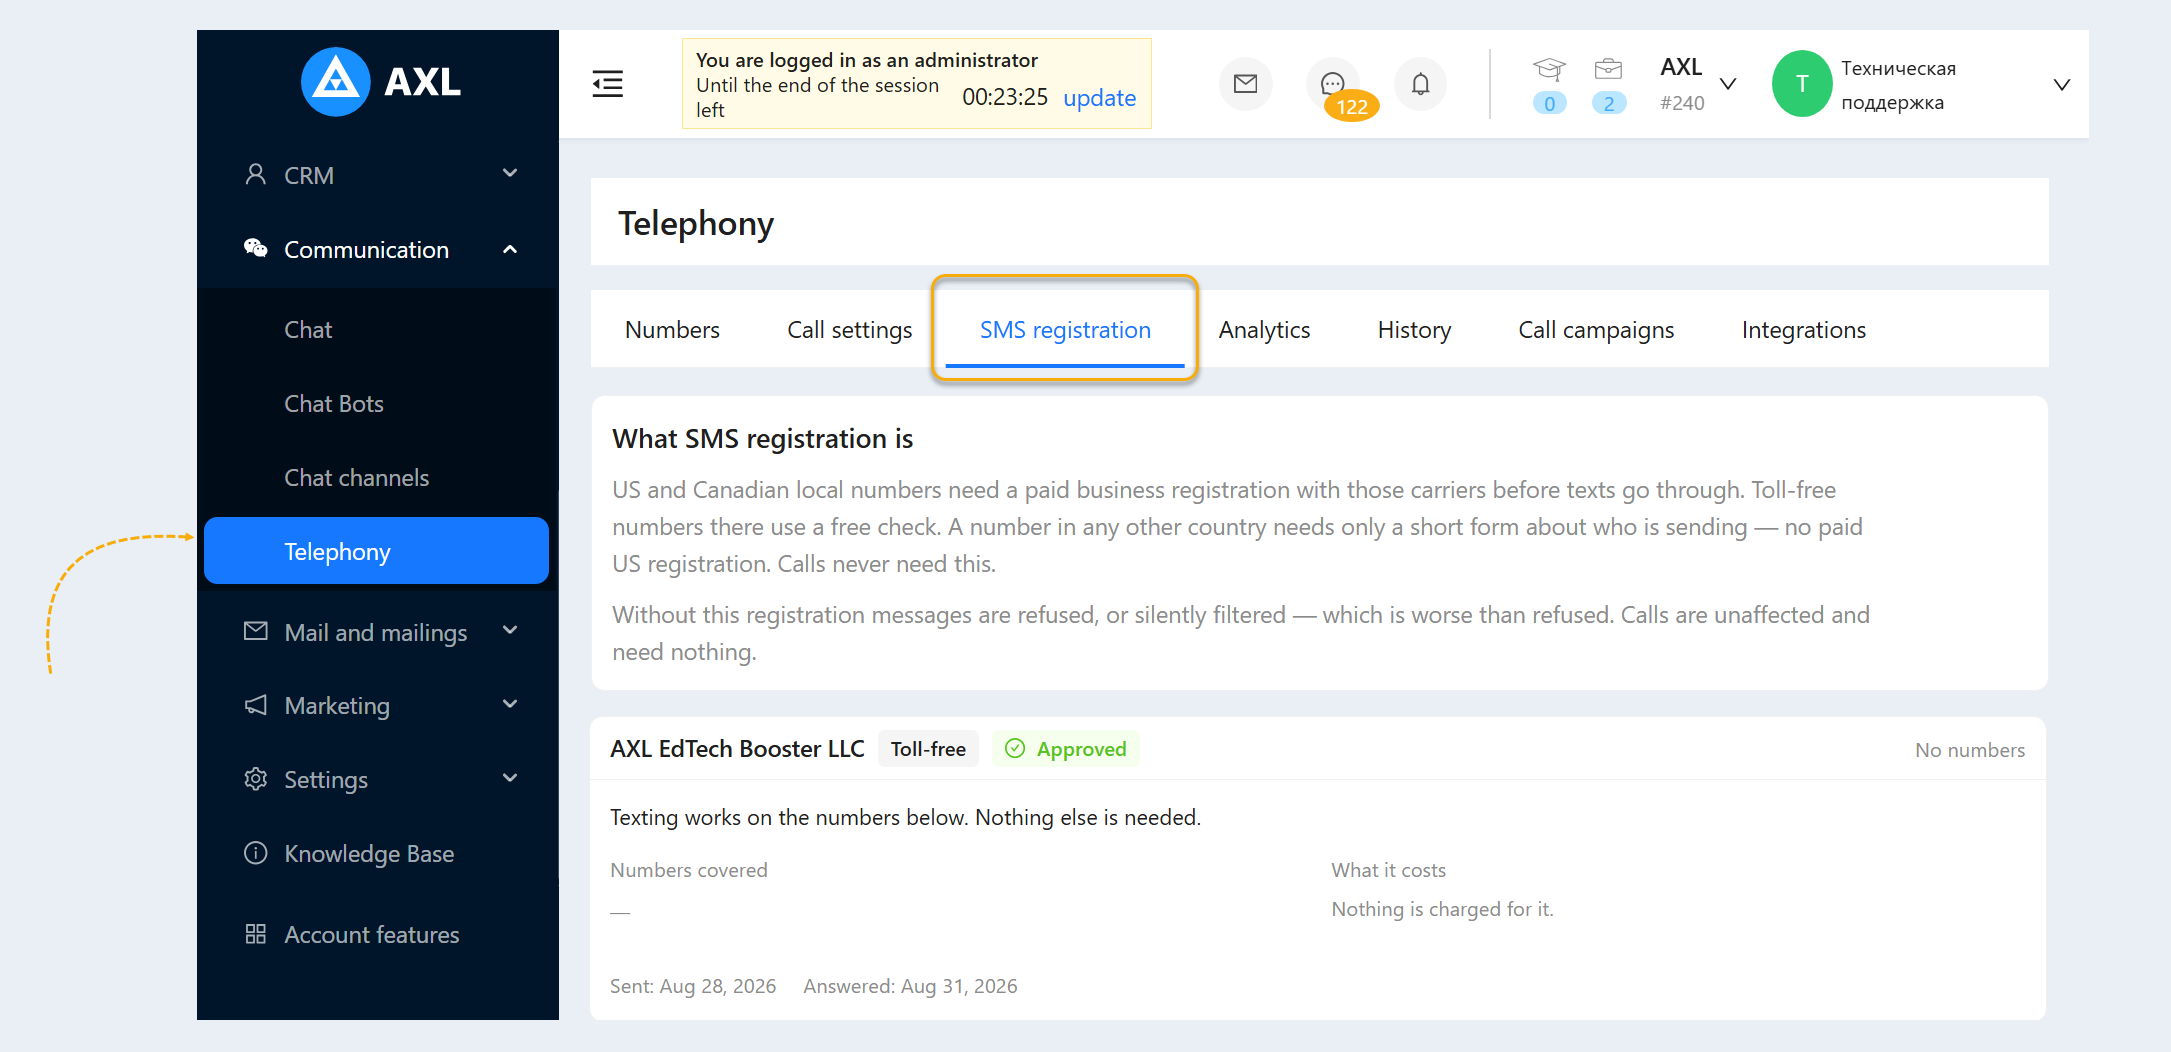
Enabling SMS
To use SMS, you need to connect a phone number and submit an SMS activation request.
Once SMS is enabled, you can send and receive text messages directly in AXL.
Some countries and number types may require additional information or documents to activate SMS.
Browser-Based Calls
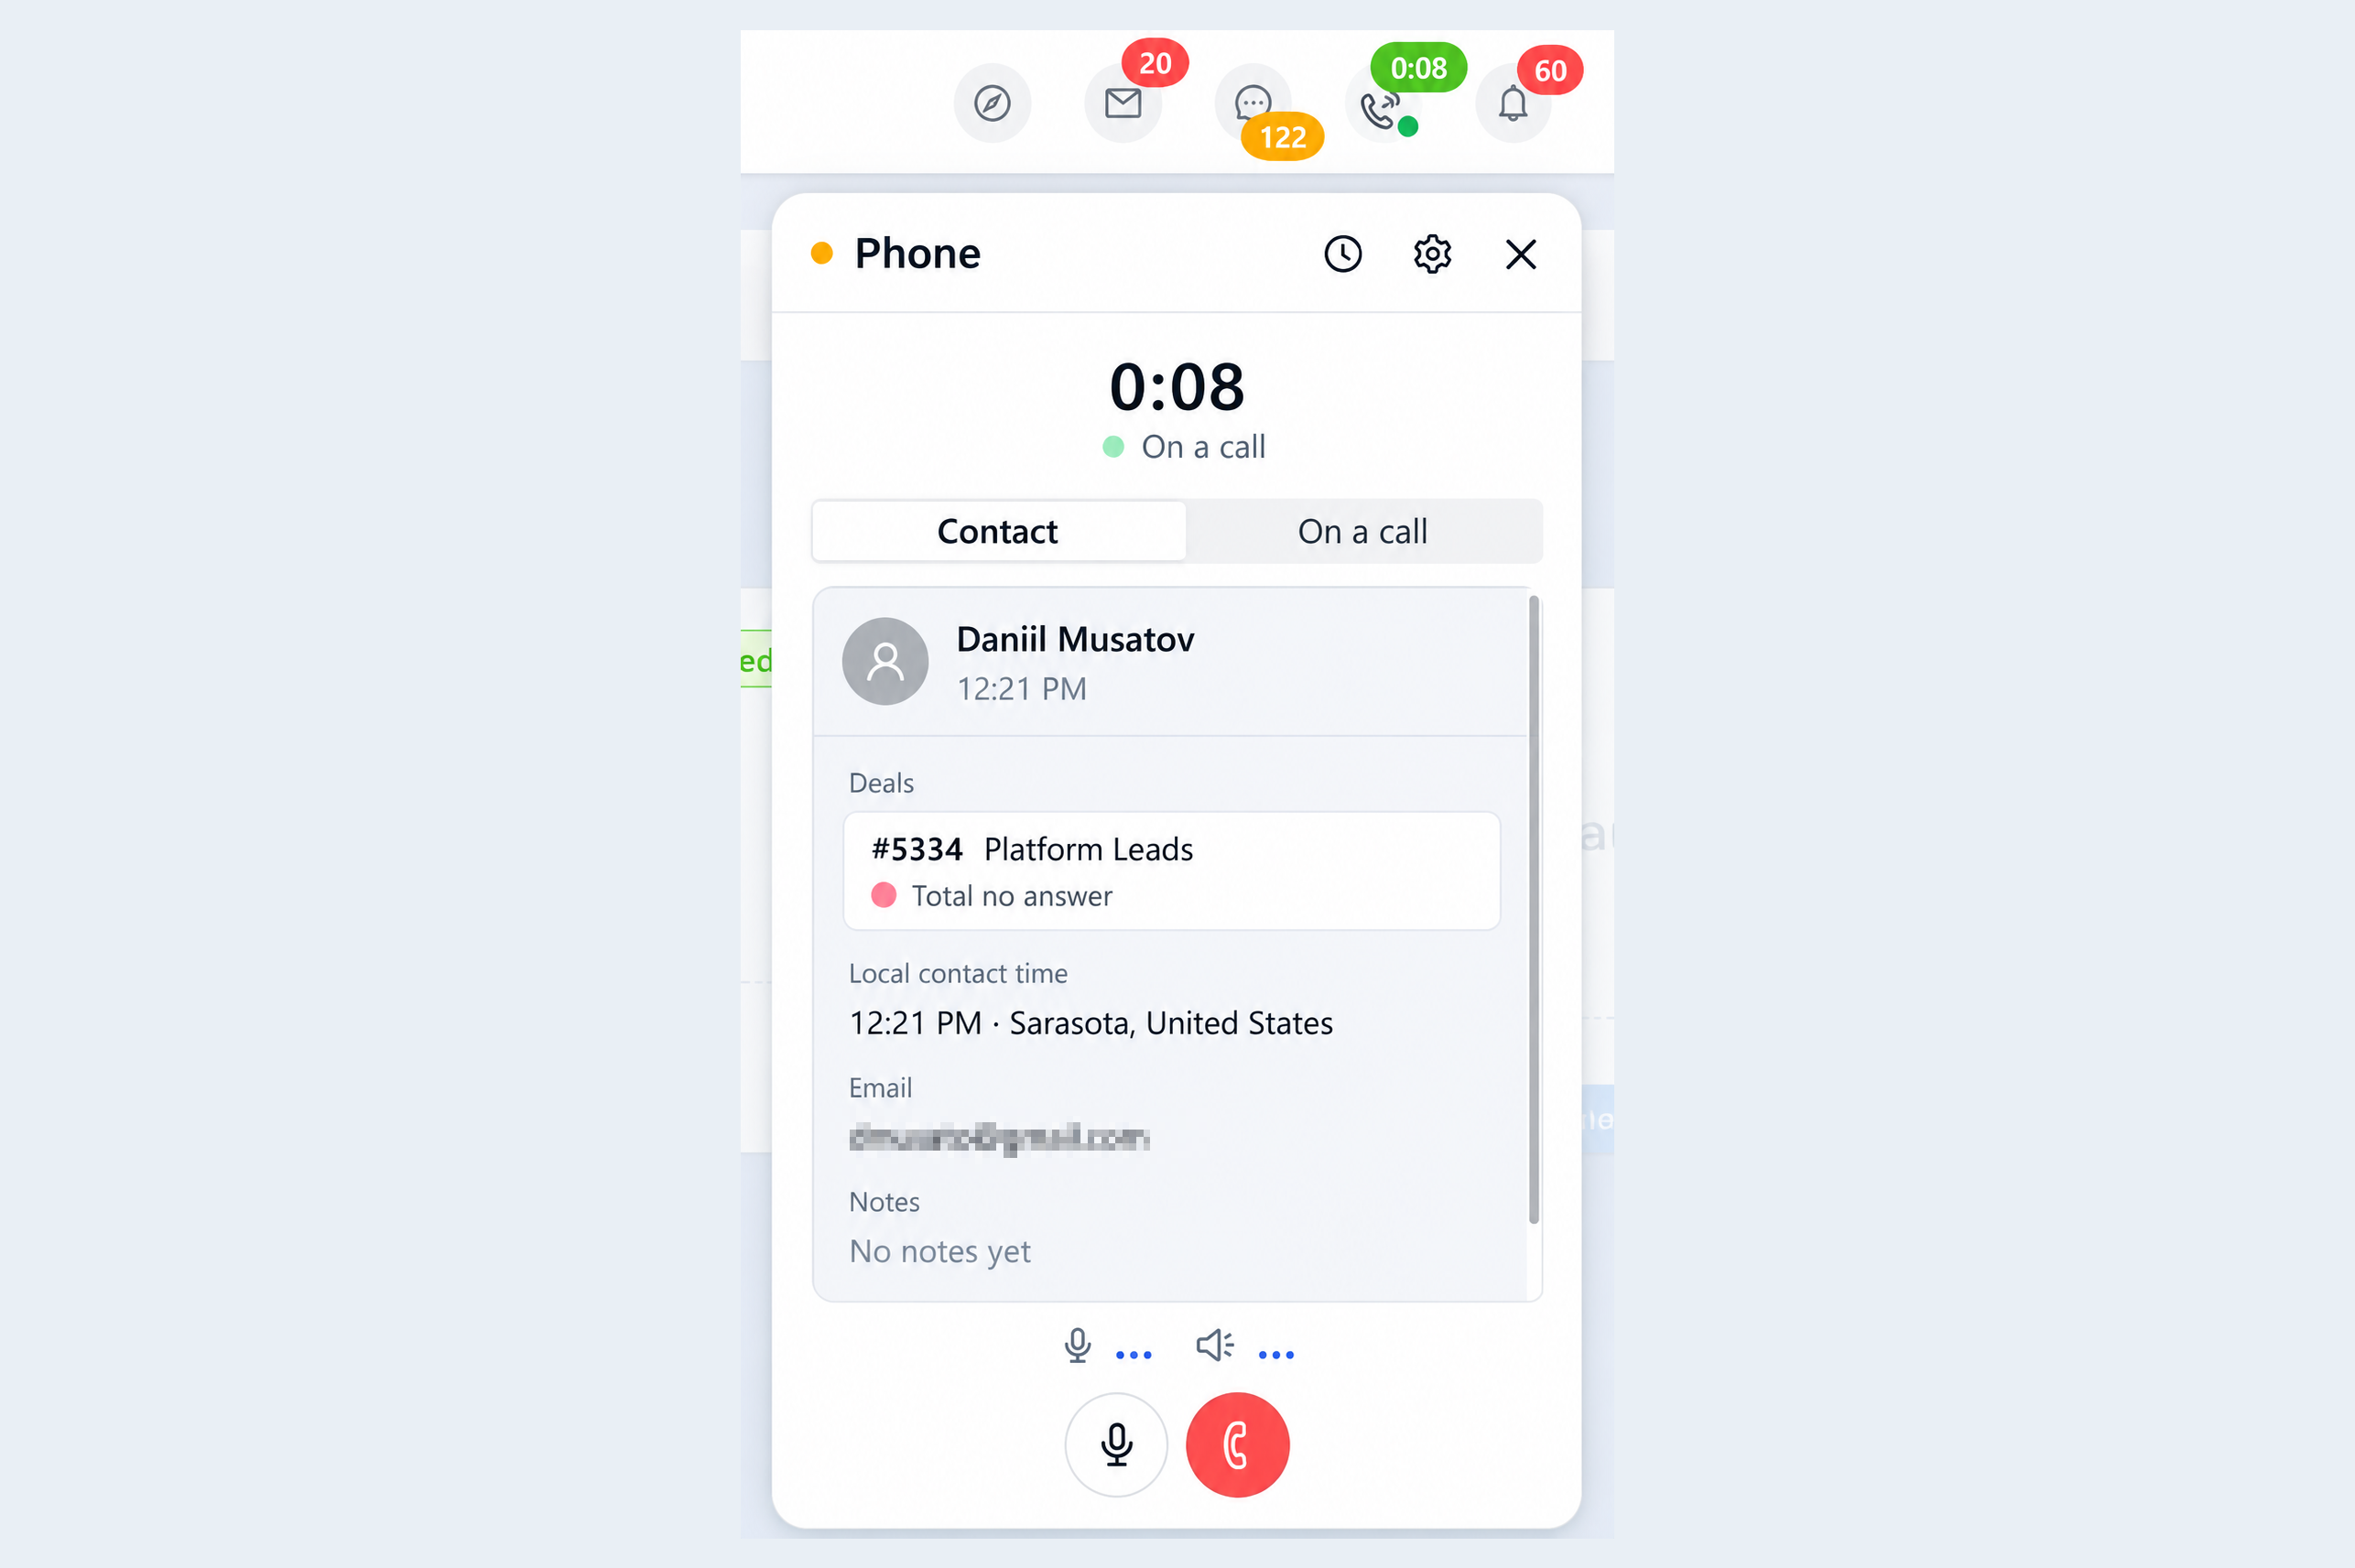
Once a number is connected, team members can make calls directly in their browser without leaving AXL.
During a call, the call window displays with the following information:
- Contact name;
- Phone number;
- Deals associated with the contact;
- Contact’s local time;
- Email address;
- Comments and other available information.
Call controls are located at the bottom of the window, allowing team members to talk to customers while viewing the relevant CRM information.
Call Transcripts and Summaries
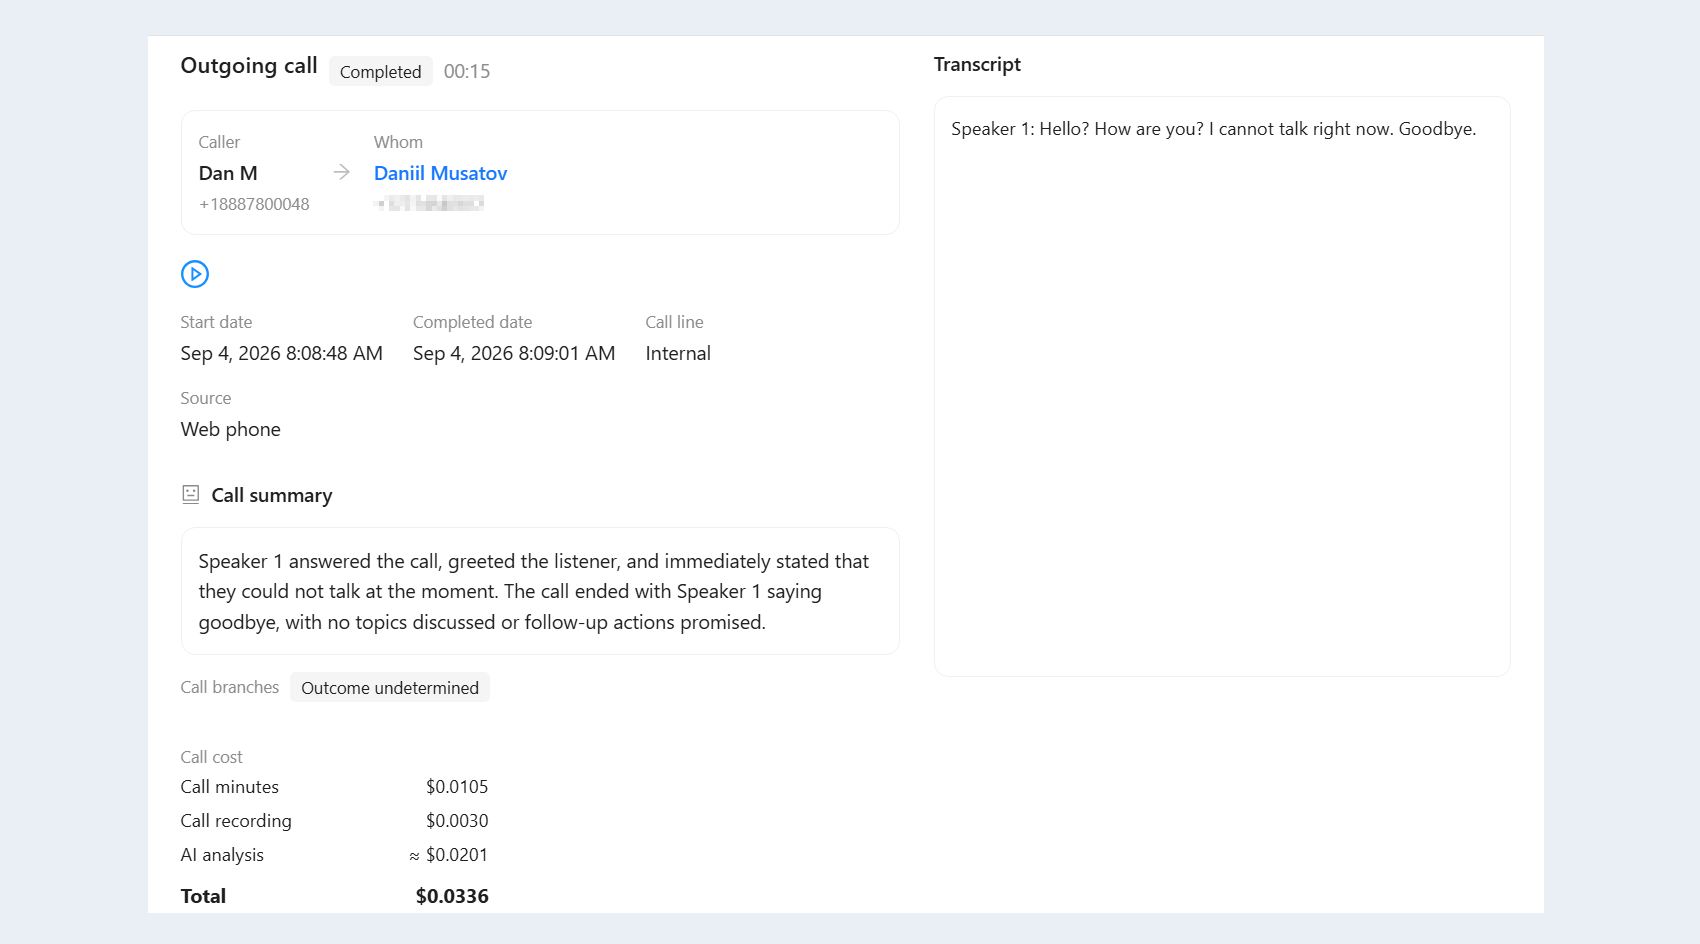
After a call ends, AXL can automatically process the recording.
The following are available for each call:
- Call recording;
- Transcript;
- Automatic conversation summary.
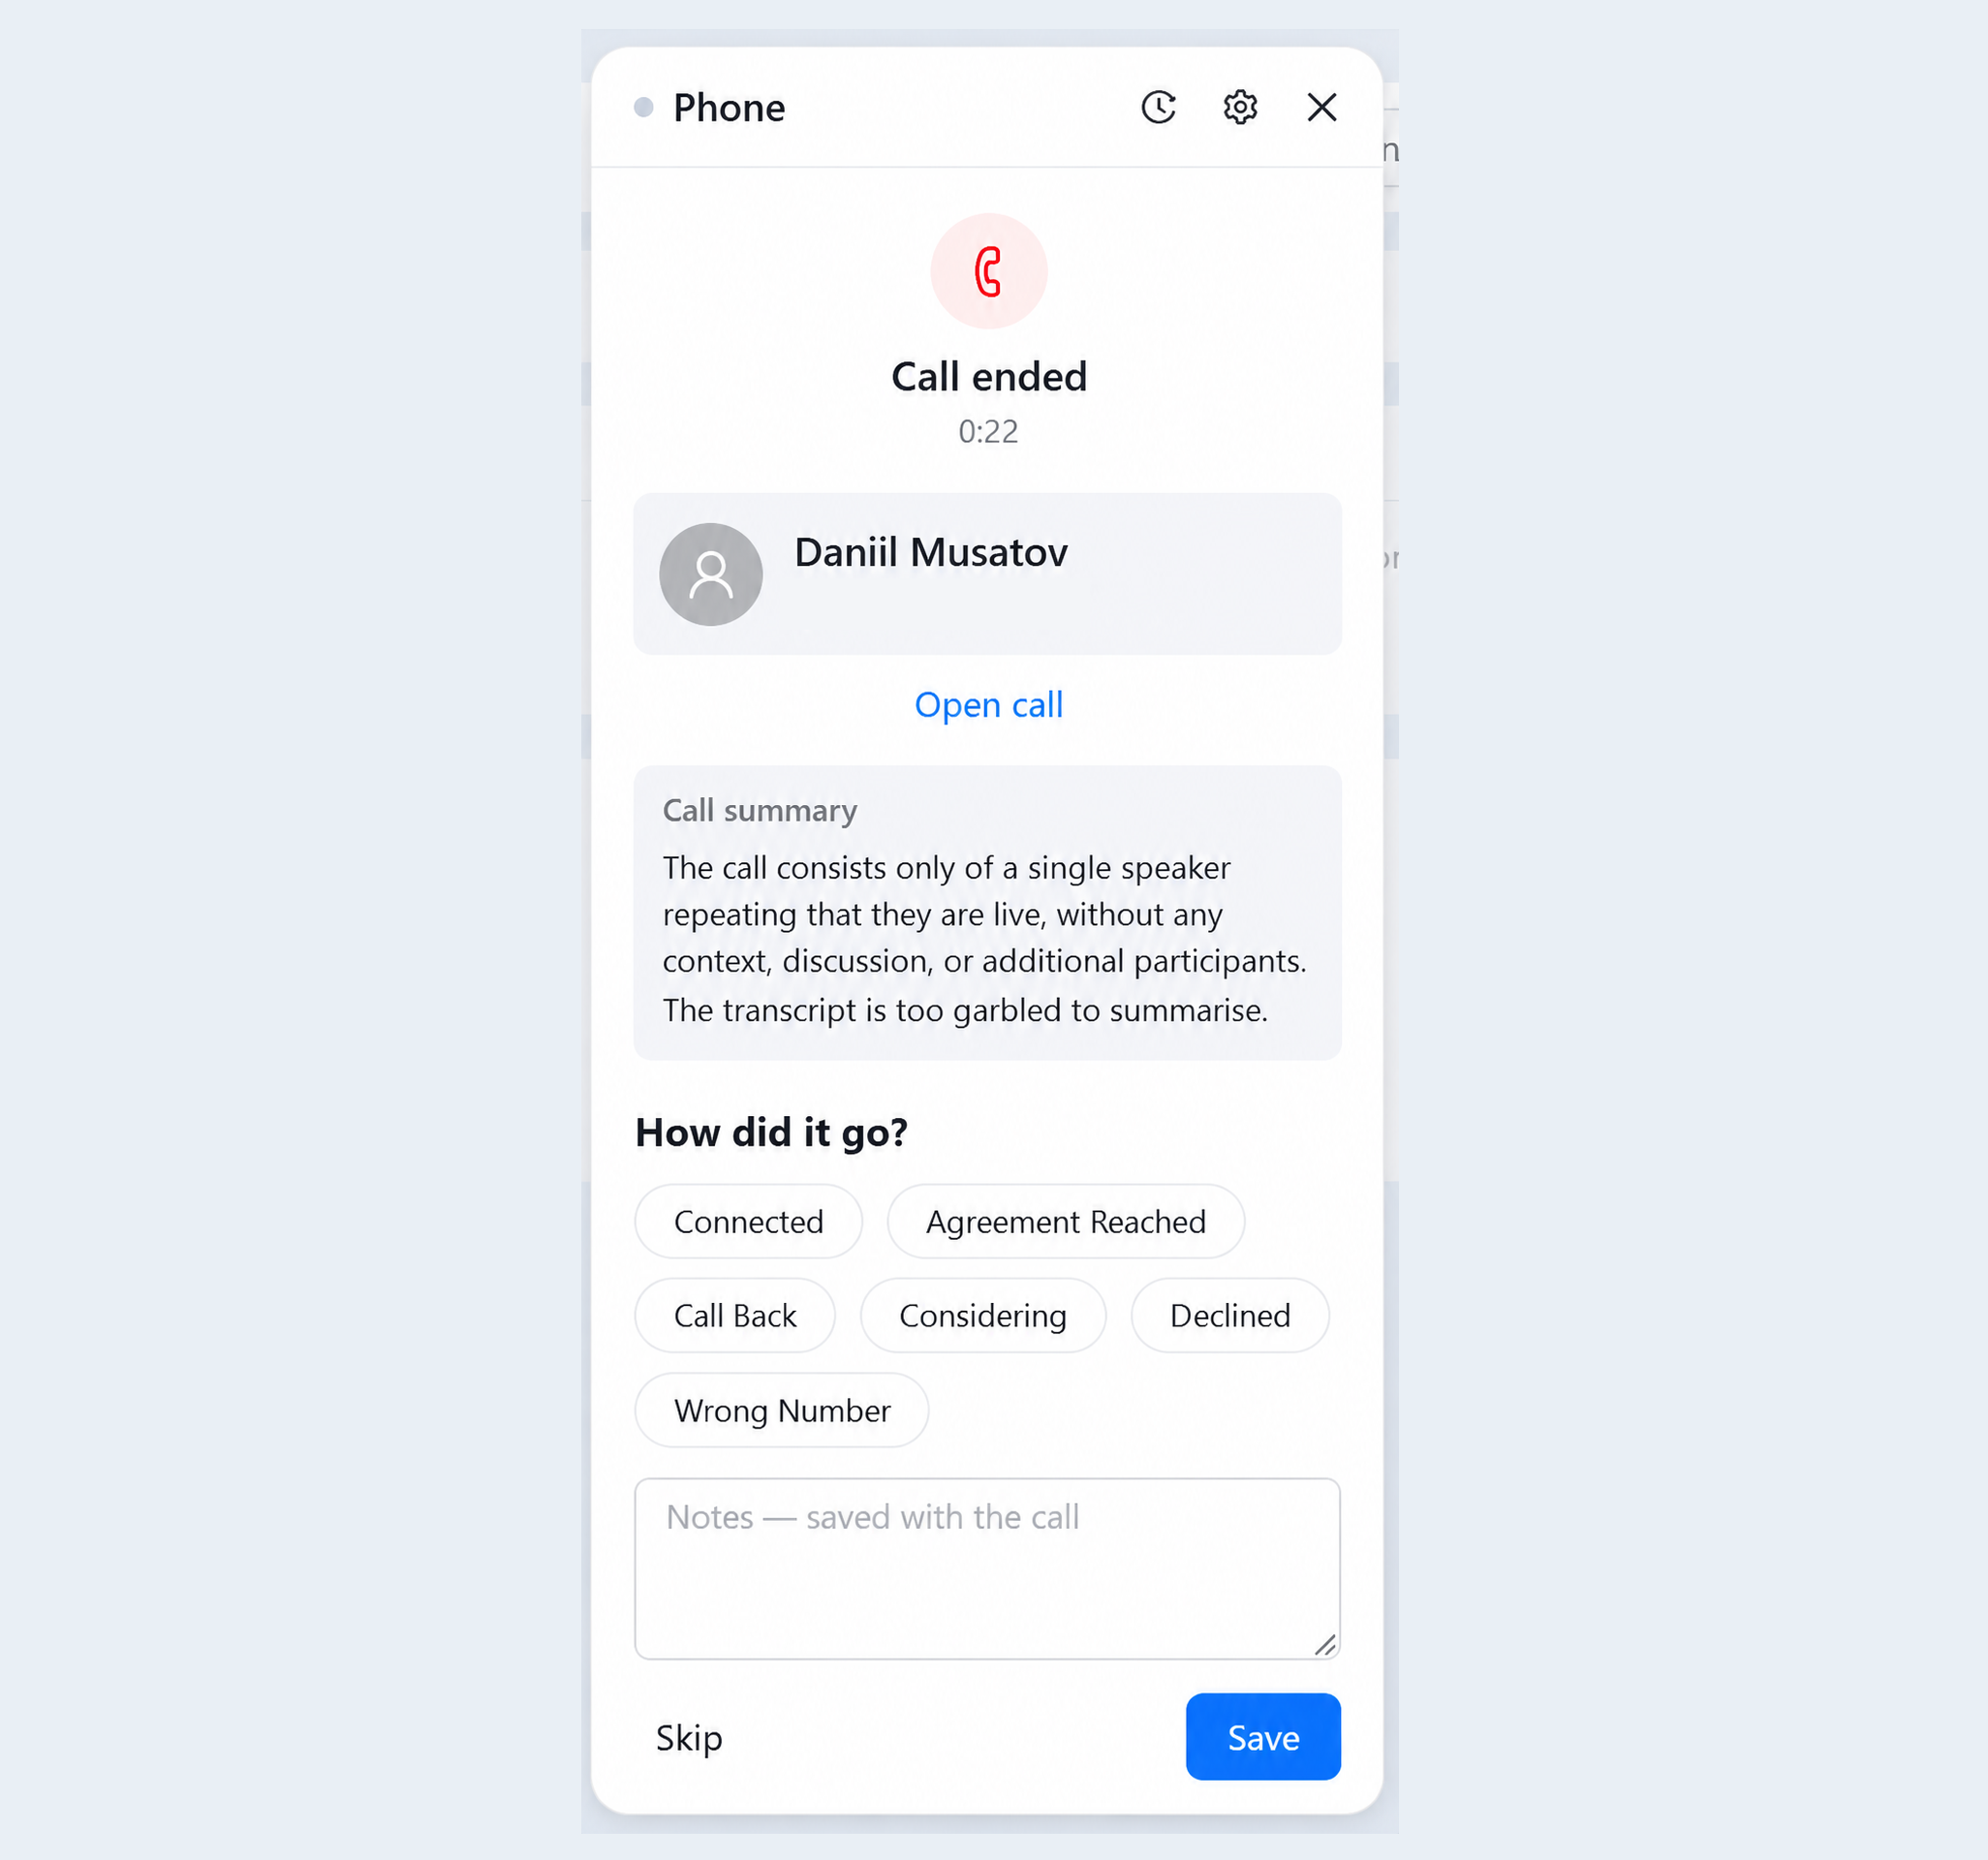
When the call ends, a window opens with the call results. The Call Summary section displays a brief summary of the conversation. If the recording is too short or the audio quality makes the conversation difficult to understand, the summary may be unavailable or include a notice explaining the issue.
Call Outcomes
After a call ends, the team member can select its outcome.
Examples include:
- Reached Contact;
- Agreement Reached;
- Call Back;
- Considering;
- Declined;
- Wrong Number.
You can also add a comment in the Notes field. Click Save to save the information. The outcome and note will be saved with the call.
Analytics
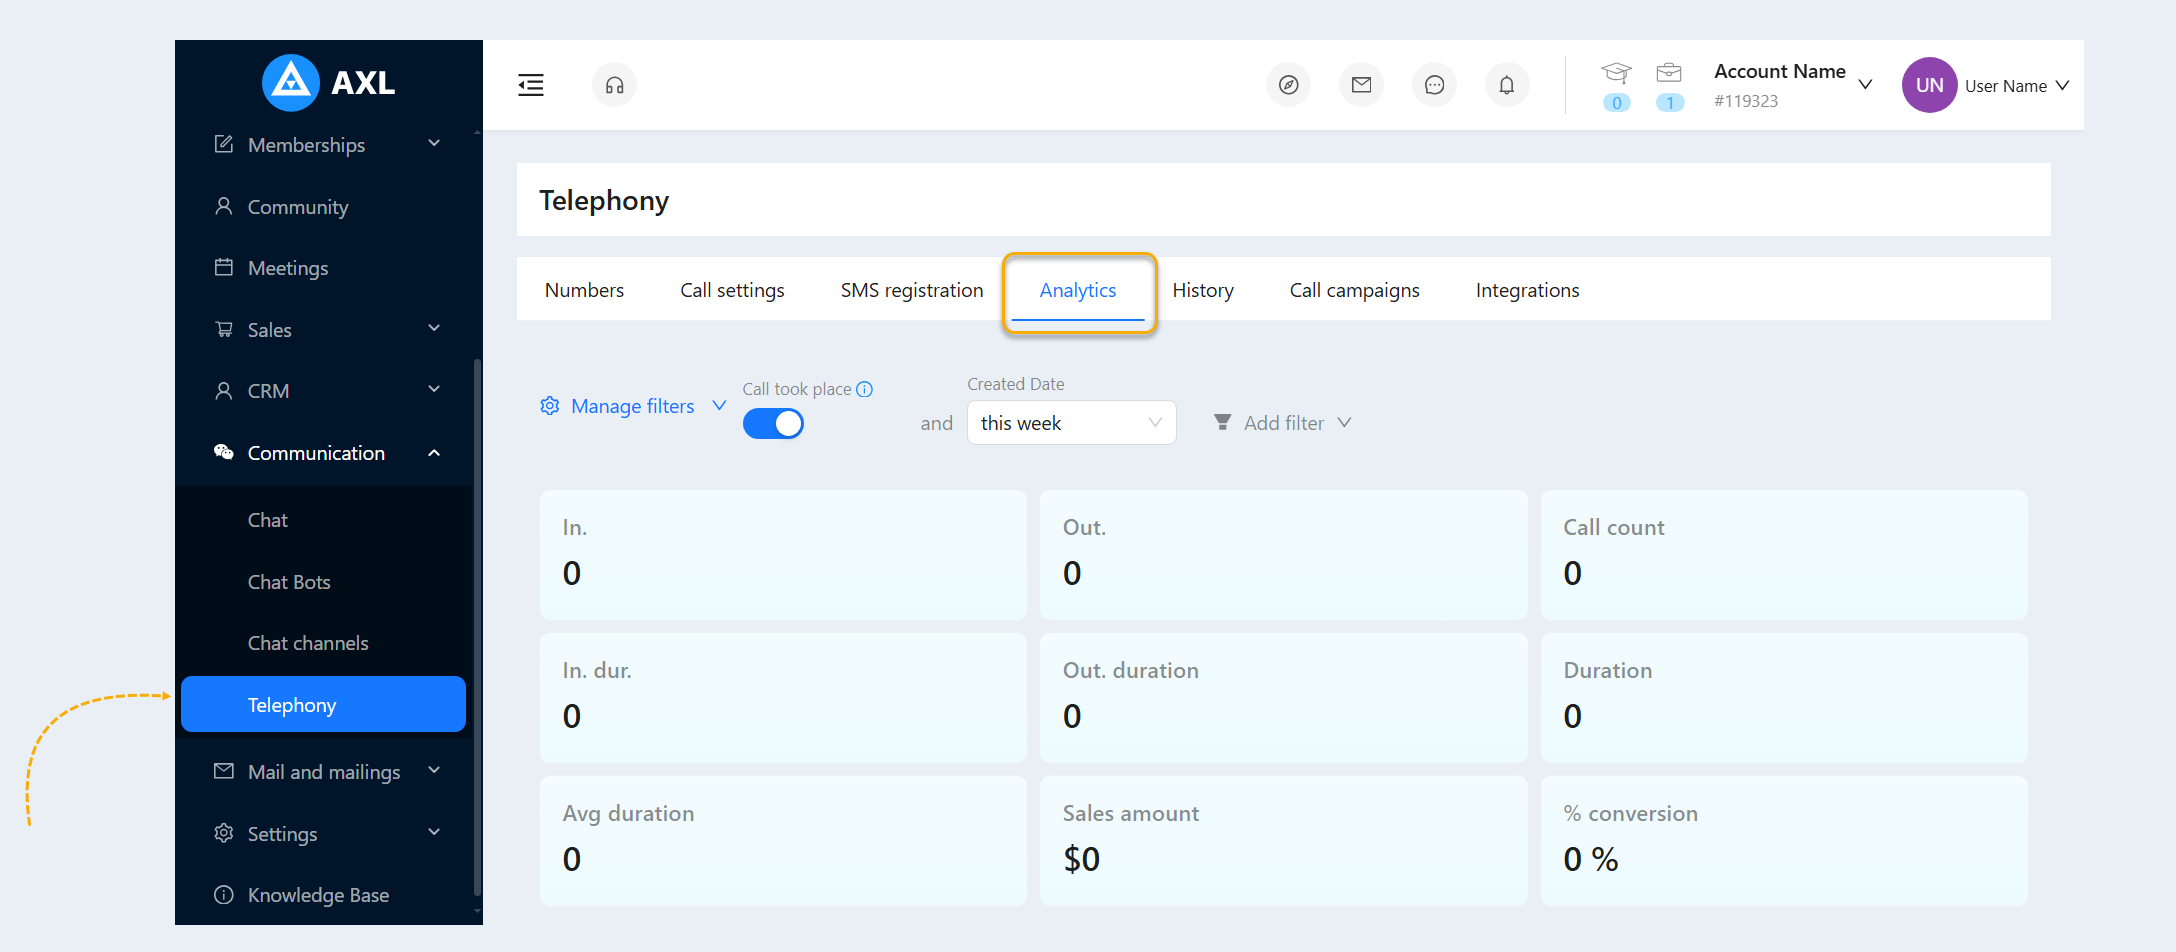
The Analytics section provides call statistics, including the number of incoming and outgoing calls, call duration, sales totals, and conversion rates. These metrics help you evaluate team performance and the results of customer conversations.
Go to Communication → Telephony and open the Analytics tab.
At the top of the page, set your filters:
Date Created: Select the date range you want to view.
Connected Calls: Enable this option to view statistics for calls that connected.
Add Filter: Click to add more filtering criteria.
Use Manage Filters to manage your filter settings.
History
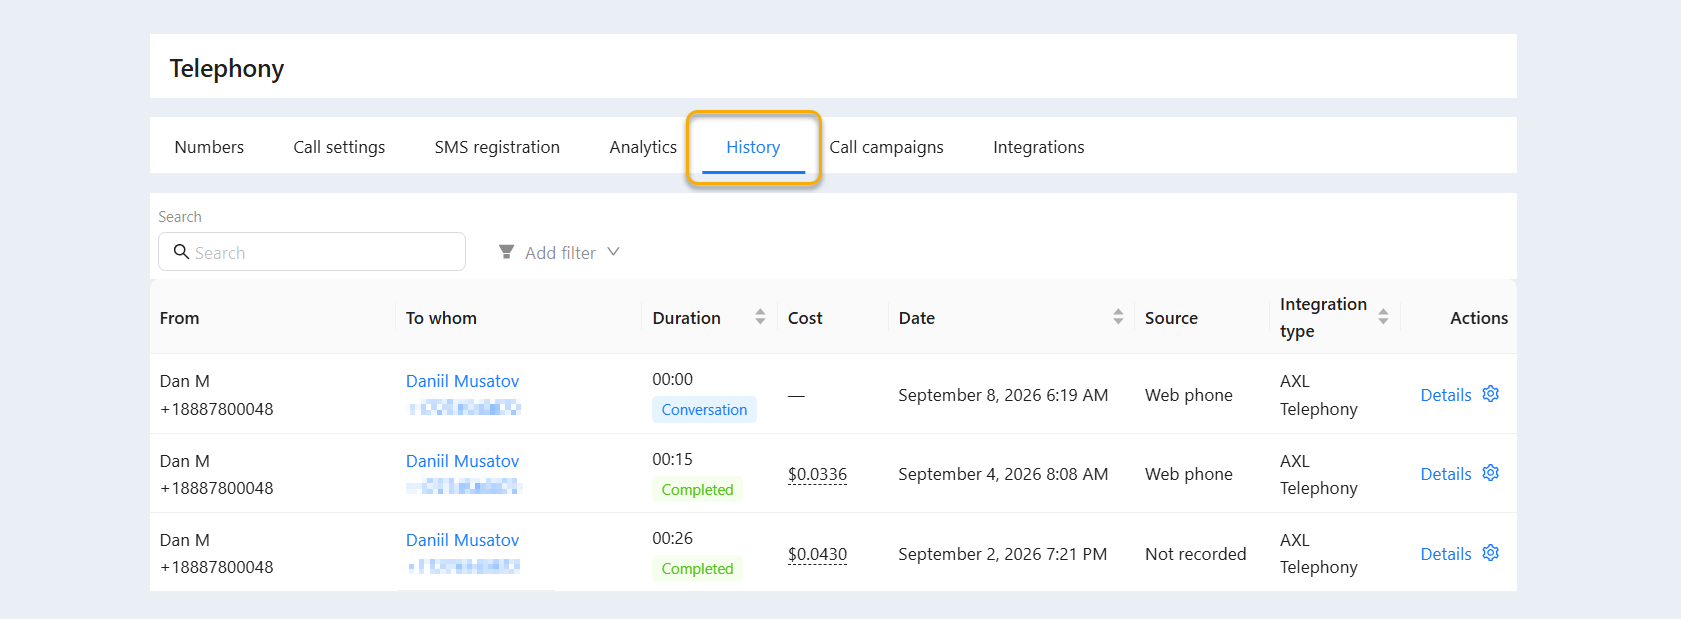
The History section displays a list of calls. Here, you can see who called whom, when each call took place, how long it lasted, and how much it cost.
Go to Communication → Telephony and open the History tab.
Use the Search bar to find calls. To narrow the results, click Add Filter and set your criteria.
The table includes the following information:
From: Information about the caller.
To: Information about the recipient.
Duration: The length of the call.
Cost: The cost of the call.
Date: The date and time of the call.
Source: The source of the call.
Integration Type: The telephony integration used to make the call.
Actions: Available actions for the call.
To change the order of the entries, click a column header with a sort icon. If there are no calls or no calls match your filters, the table displays No Data.
Calling Campaigns
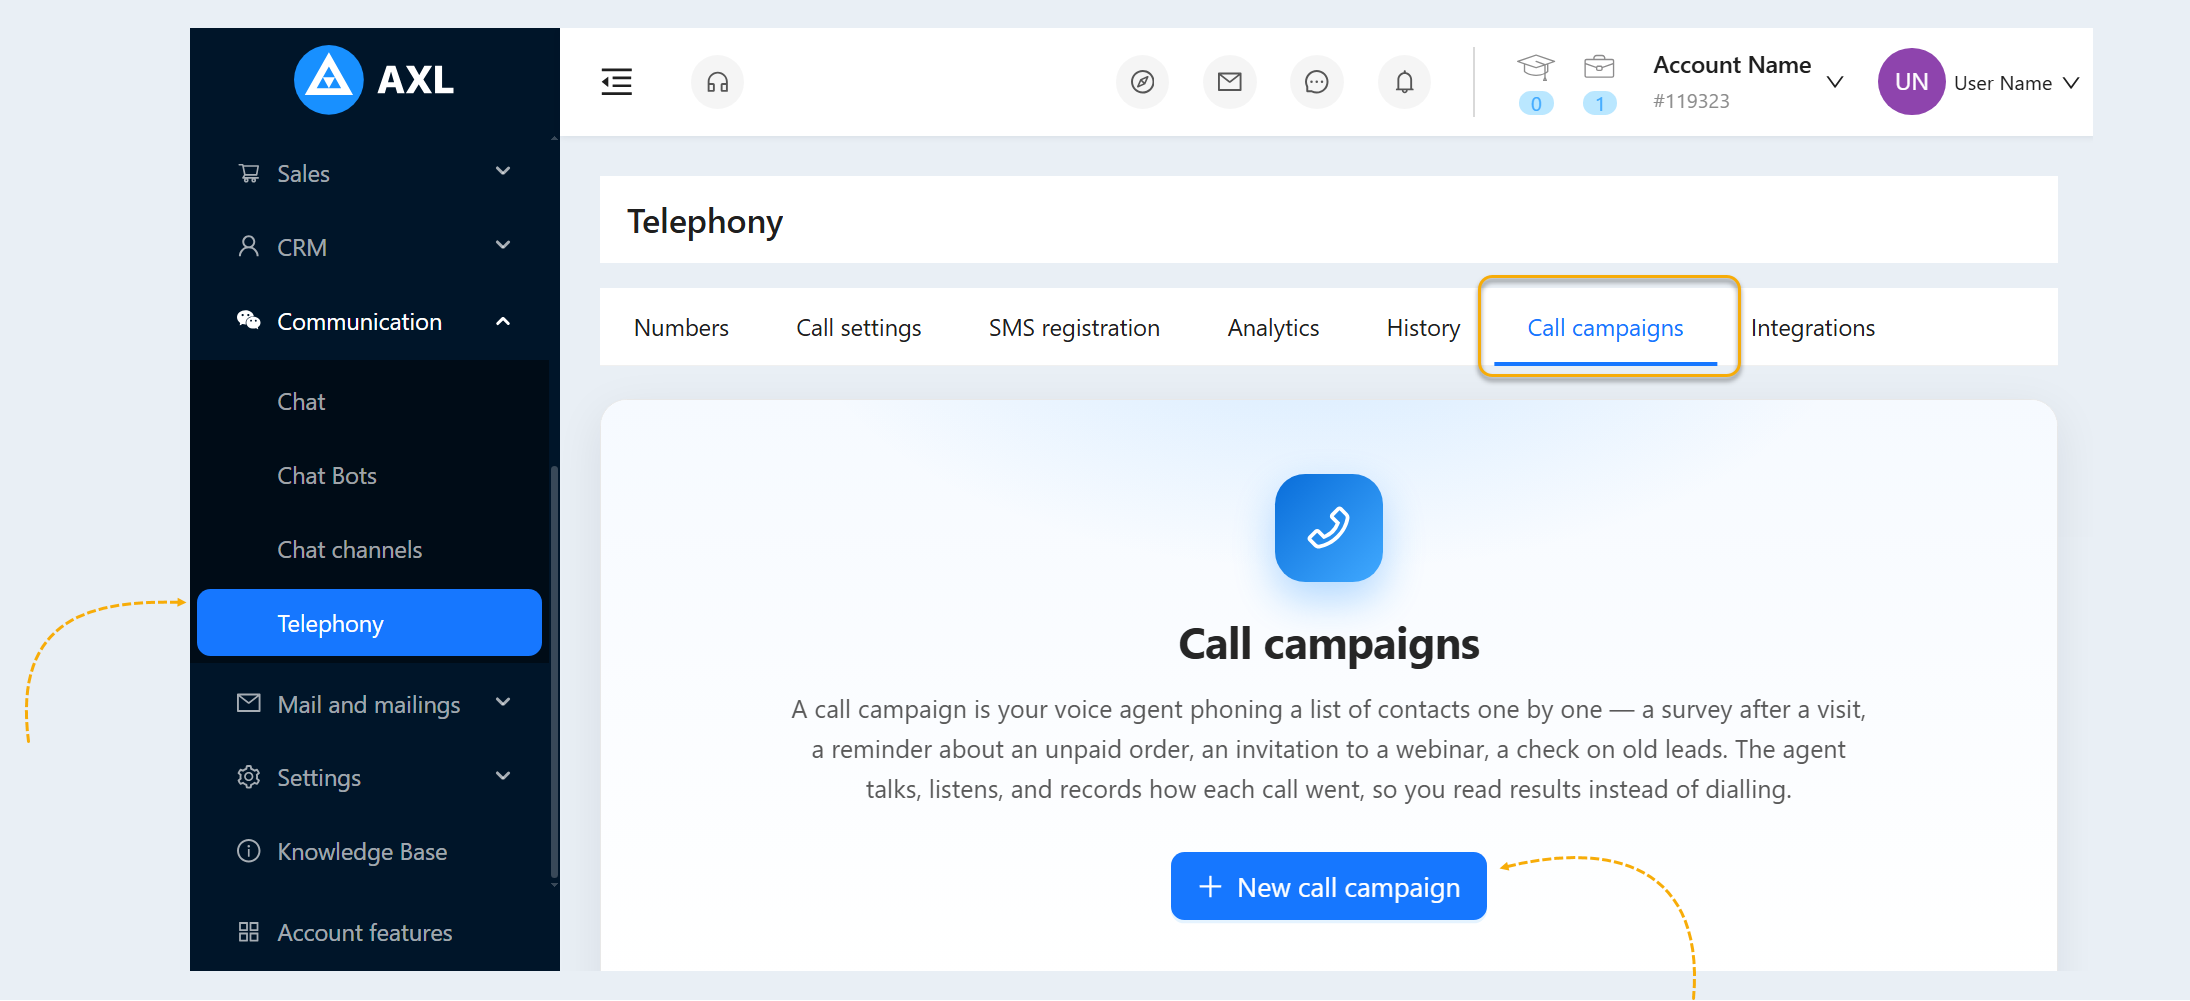
In the Calling Campaigns section, you can set up an AI voice agent to call a list of contacts. For example, you can conduct a post-visit survey, remind customers about unpaid orders, invite them to a webinar, or reconnect with customers who have not contacted you in a while.
The agent calls contacts, conducts conversations, and records the outcomes automatically.
Go to Communication → Telephony, open the Calling Campaigns tab, and click New Calling Campaign.
Basic Settings
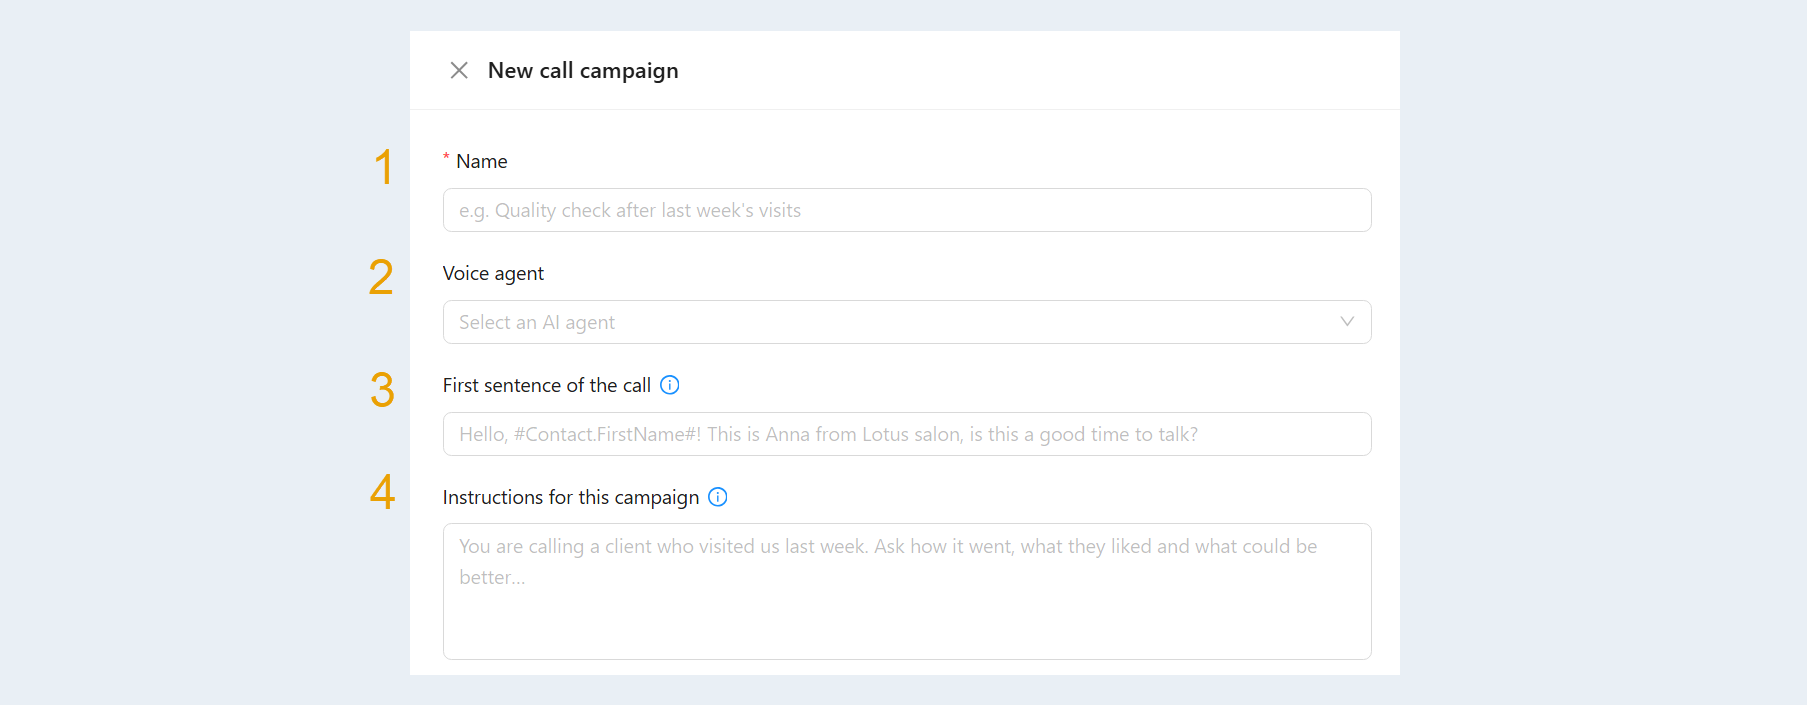
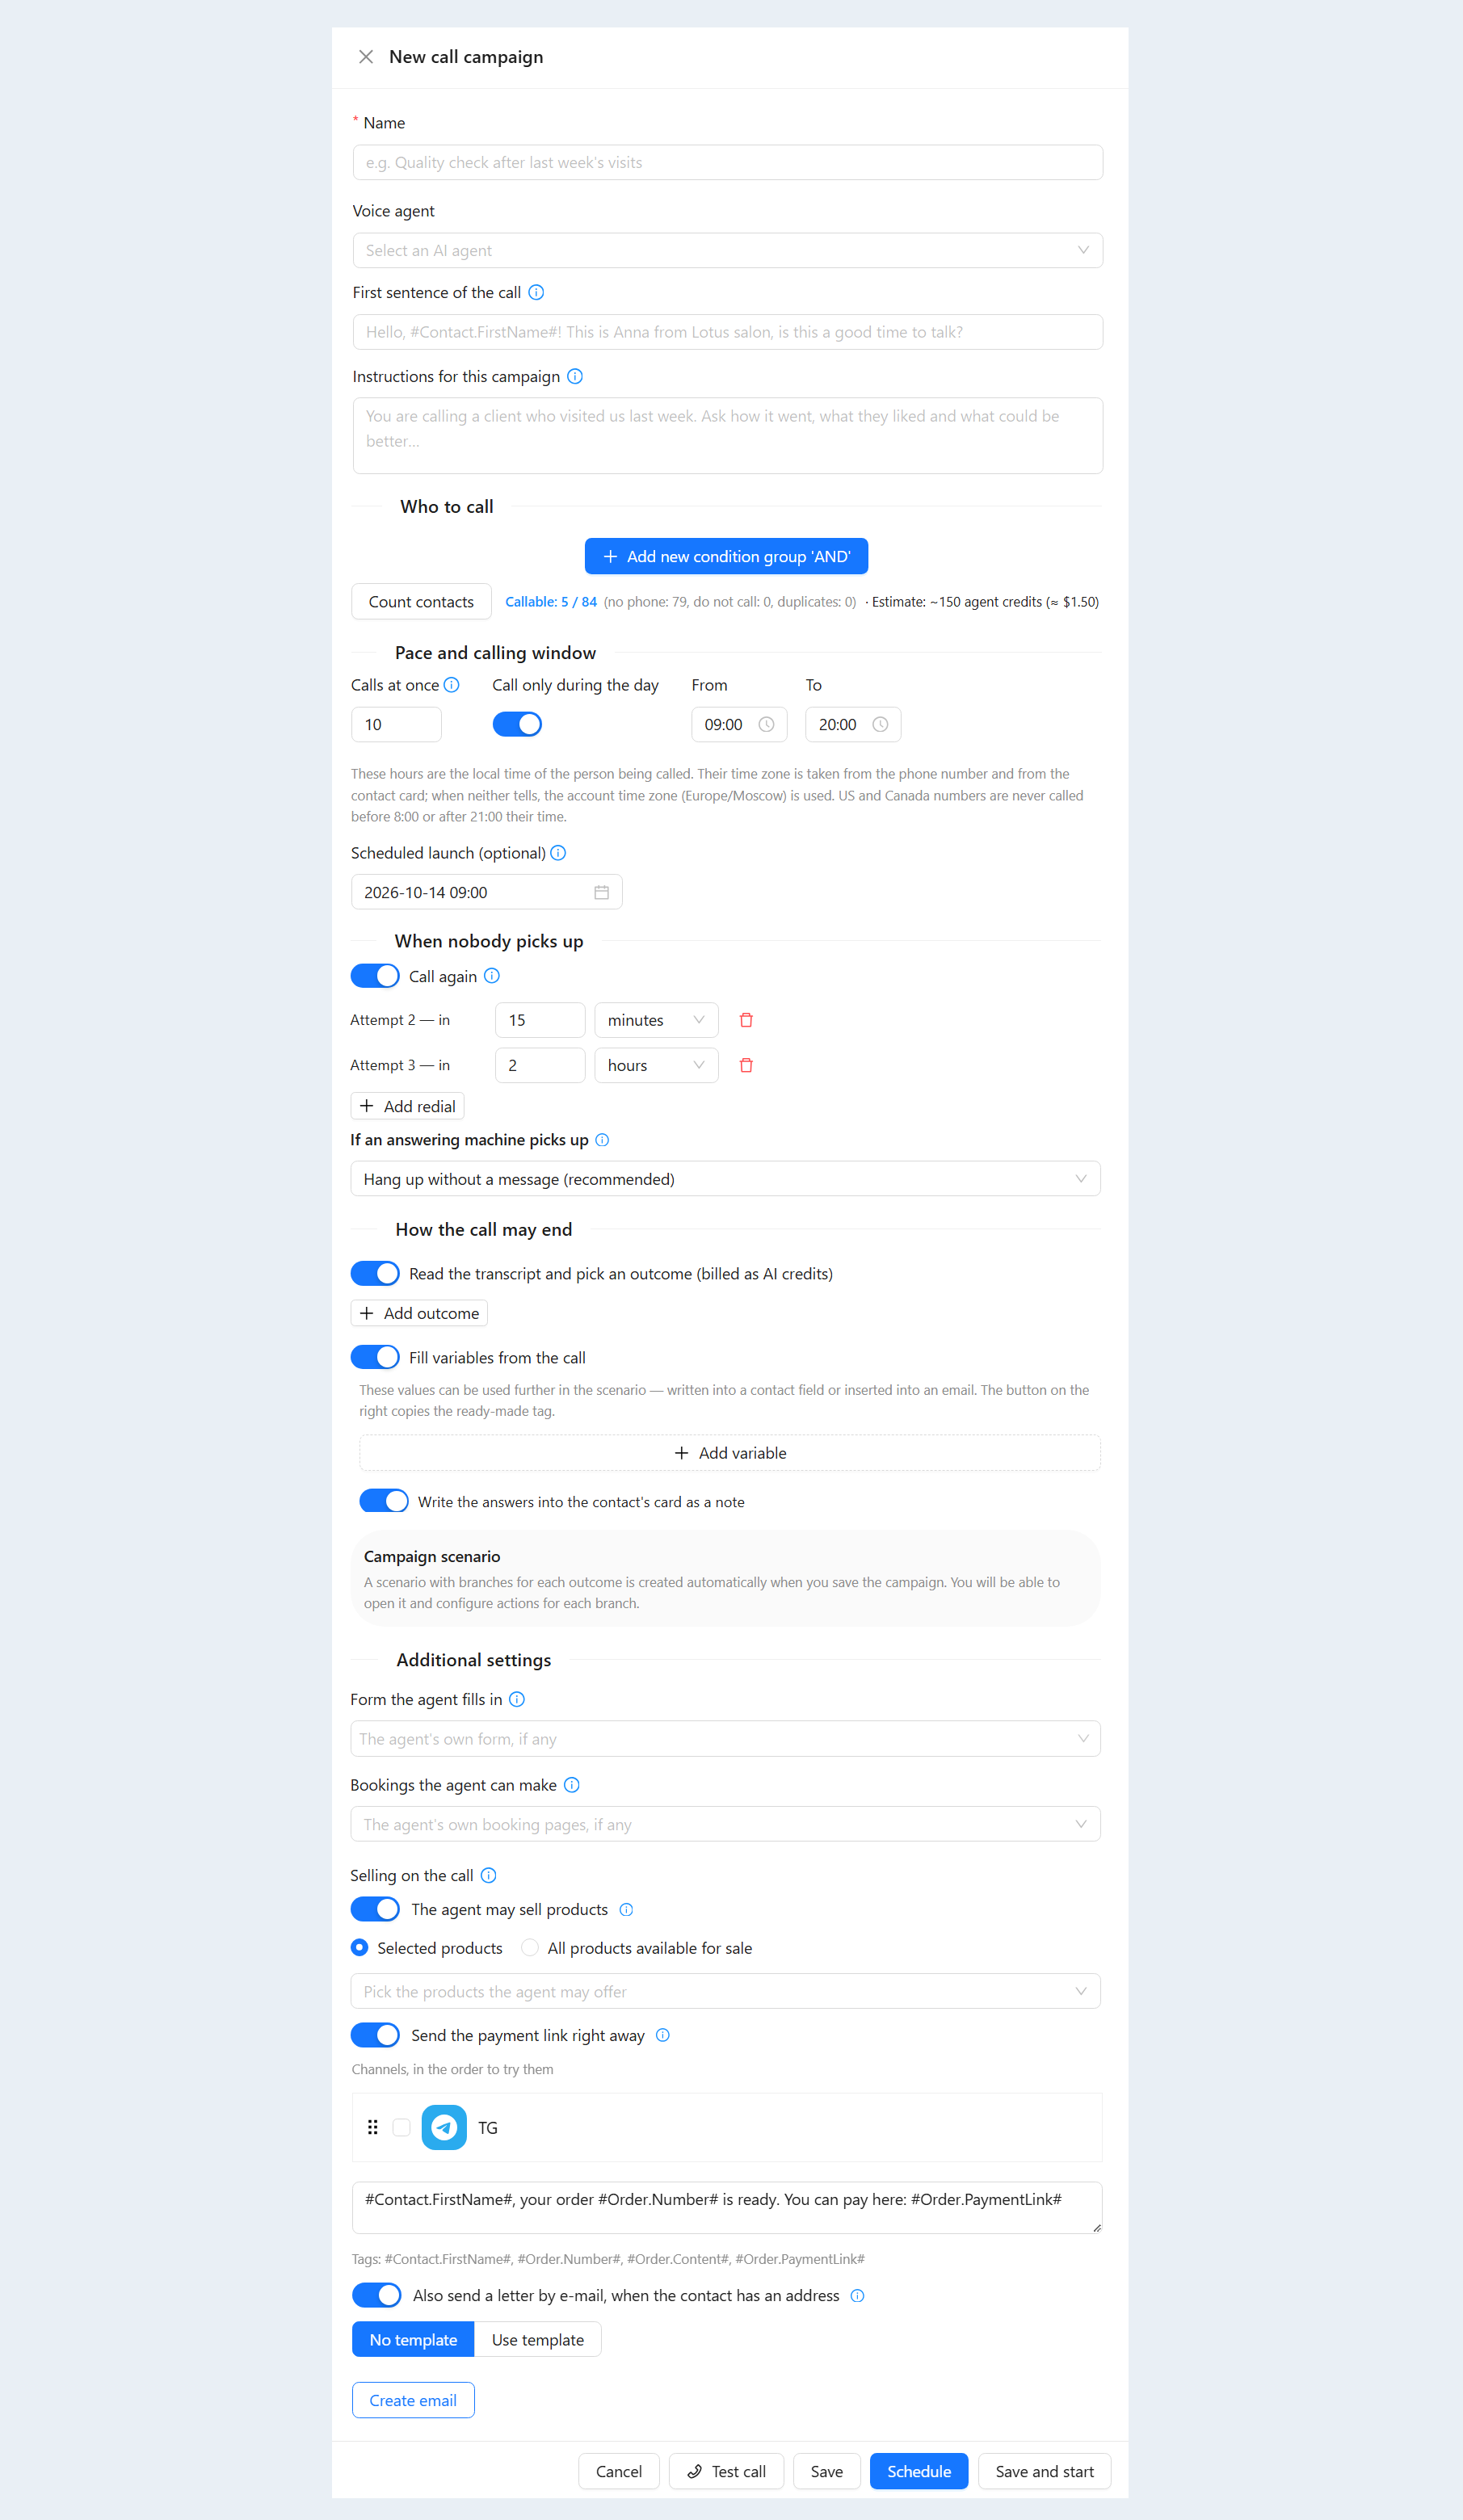
In the window that opens, complete the following fields:
Name: Give the campaign a name so you can easily find it.
Voice Agent: Select the AI agent that will call your contacts.
Opening Line: Enter the greeting the agent will use to start the conversation. It is spoken exactly as written as soon as someone answers, replacing the agent’s default greeting. Include who is calling, which company they represent, and whether it is a good time to talk. Contact tags such as #Contact.FirstName# are replaced with the contact’s information. If this field is left blank, the agent’s default greeting is used.
Instructions for This Campaign: Describe the purpose of the call, the questions to ask, and the actions the agent should take. These instructions supplement the agent’s main instructions on every call in the campaign: why it is calling, what to ask or offer, and how to end the conversation. On each call, the #Contact.FirstName# tag is replaced with that contact’s first name.
Calls are made from the number routed to the selected agent. If no number is routed to that agent, the account’s first voice-enabled number is used.
Who to Call
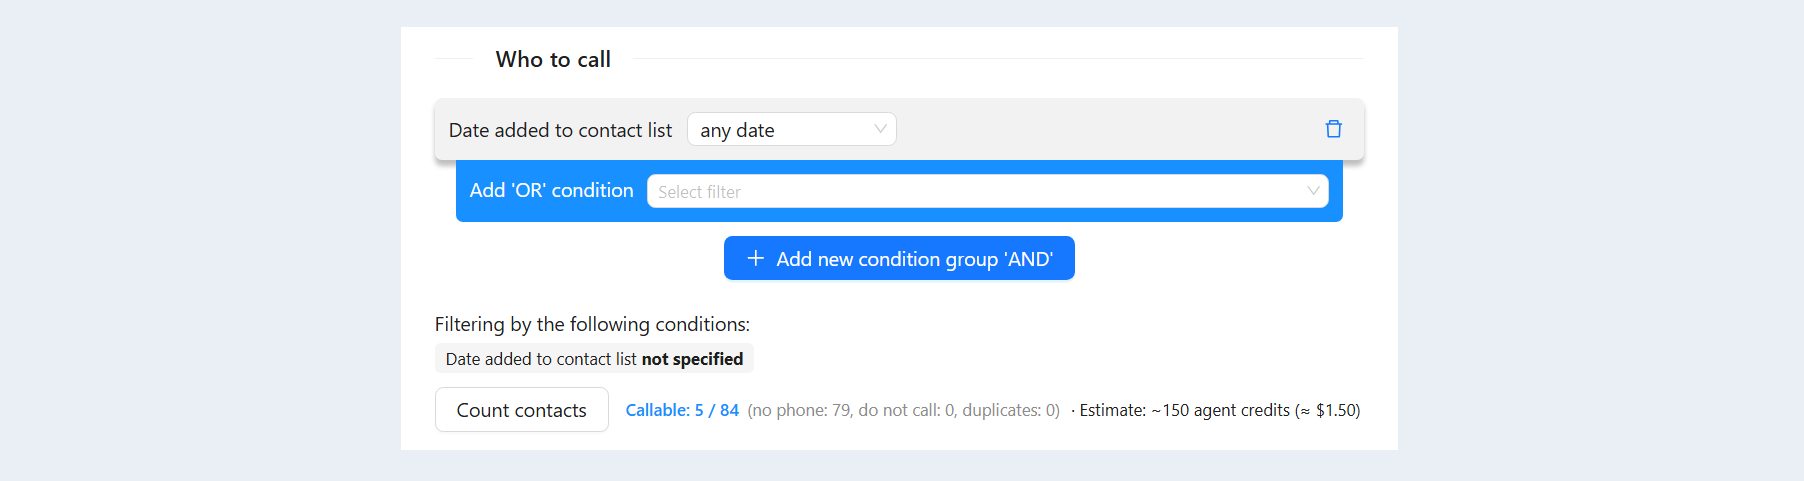
Define your audience using CRM contact filters. You can add OR conditions and AND condition groups. After configuring the filter, click Count Contacts to check the audience size and estimate the campaign cost.
Please note that the contact list is finalized when the campaign starts.
Calling Pace and Time Window
In this section, configure the number of simultaneous calls and the agent’s calling hours.
Simultaneous Calls: Specify how many calls can be made at the same time.
Call Only During Daytime: Enable this option and specify the hours during which contacts may be called.
Schedule Start: Optionally, select a start date and time. If a date and time are set, the campaign will start automatically at the scheduled time instead of starting immediately.
Calling hours are based on the recipient’s time zone. The platform determines the time zone using the phone number and contact record. If it cannot determine the recipient’s time zone, it uses the account’s time zone.
For U.S. and Canadian numbers, the platform limits calls to between 8:00 a.m. and 9:00 p.m. in the recipient’s local time.

If No One Answers
Enable Retry Calls if you want the agent to try again when a call goes unanswered. Set the intervals between attempts.
To add another attempt, click Add Retry. To remove an attempt, click the trash icon next to it.
Under If Voicemail Answers, choose what the agent should do when the call goes to voicemail. The available options are Hang Up Without Leaving a Message and Leave a Message.

Possible Call Outcomes
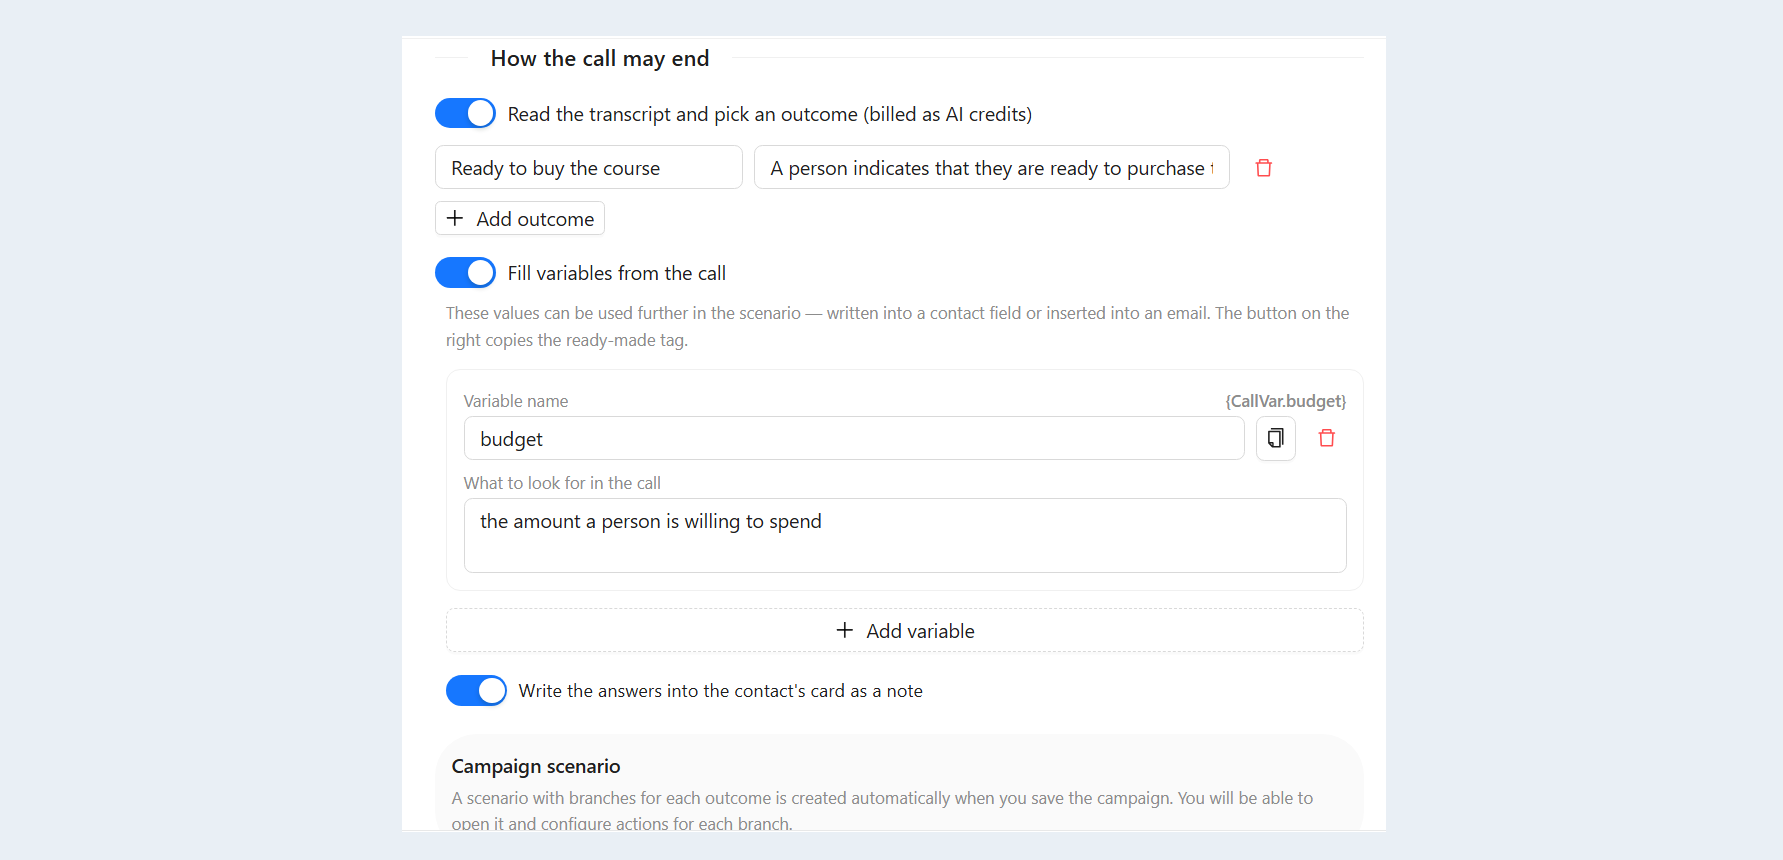
Enable Analyze Transcript and Determine Outcome to have AI analyze each conversation and identify its outcome. Click Add Outcome to configure your own call outcomes. Please note that determining outcomes from transcripts uses AI credits.
If needed, enable Populate Variables from the Call. Enter a variable name and describe the information to extract from the conversation.
When you save the campaign, a workflow is automatically created with outputs for its branches. Open the workflow to configure actions for each outcome.
Additional Settings
If needed, specify the following:
Form for the Agent to Complete: Select a form from Forms and Quizzes to collect information during the conversation.
Meetings the Agent Can Book: Select the meeting the agent can book. If no meetings are selected, the agent’s default meetings are used, if configured.

Selling During Calls
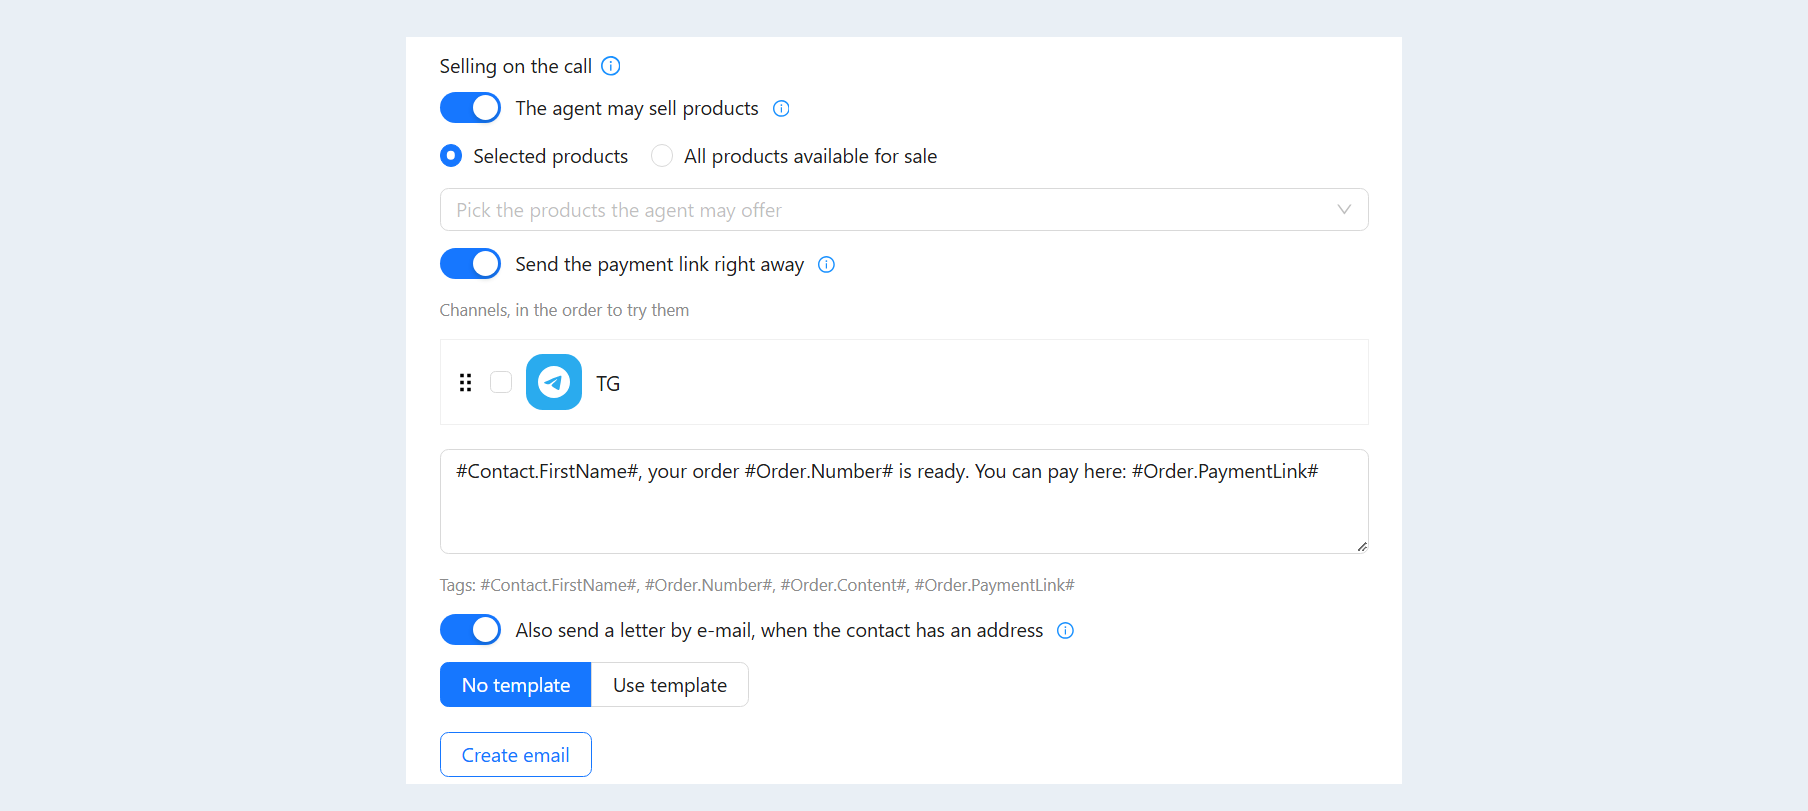
Enable Agent Can Sell Products to allow the agent to create orders during a conversation. Specify which products the agent can offer: selected products or all products available for sale.
To send a payment link, enable Send Payment Link Immediately. The agent will first try to send a text message. If SMS is unavailable, it will use the selected chat channels. The message is sent through the first channel available to the customer in your selected list. Choose the channels, set the order in which they should be tried, and prepare the message text.
The following tags are available:
- #Contact.FirstName# — the contact’s first name;
- #Order.Number# — the order number;
- #Order.Content# — the order contents;
- #Order.PaymentLink# — the payment link.
You can also enable email delivery if the contact has an email address.
If no delivery channel is selected and no email is configured, the agent will create the order and tell the customer that a team member will send the payment link.
Testing and Launching
Before launching the campaign, click Test Call to check how the agent performs.
Click Save to save the campaign settings, or Save and Launch to launch the campaign with the specified settings.
Integrations
In the Integrations section, you can connect your existing telephony provider account to AXL.
Go to Communication → Telephony and open the Integrations tab.
The following integrations are available:
- Zadarma;
- OnlinePBX;
- Novofon;
- Mango Office;
- RingCentral;
- Kcell;
- Twilio.
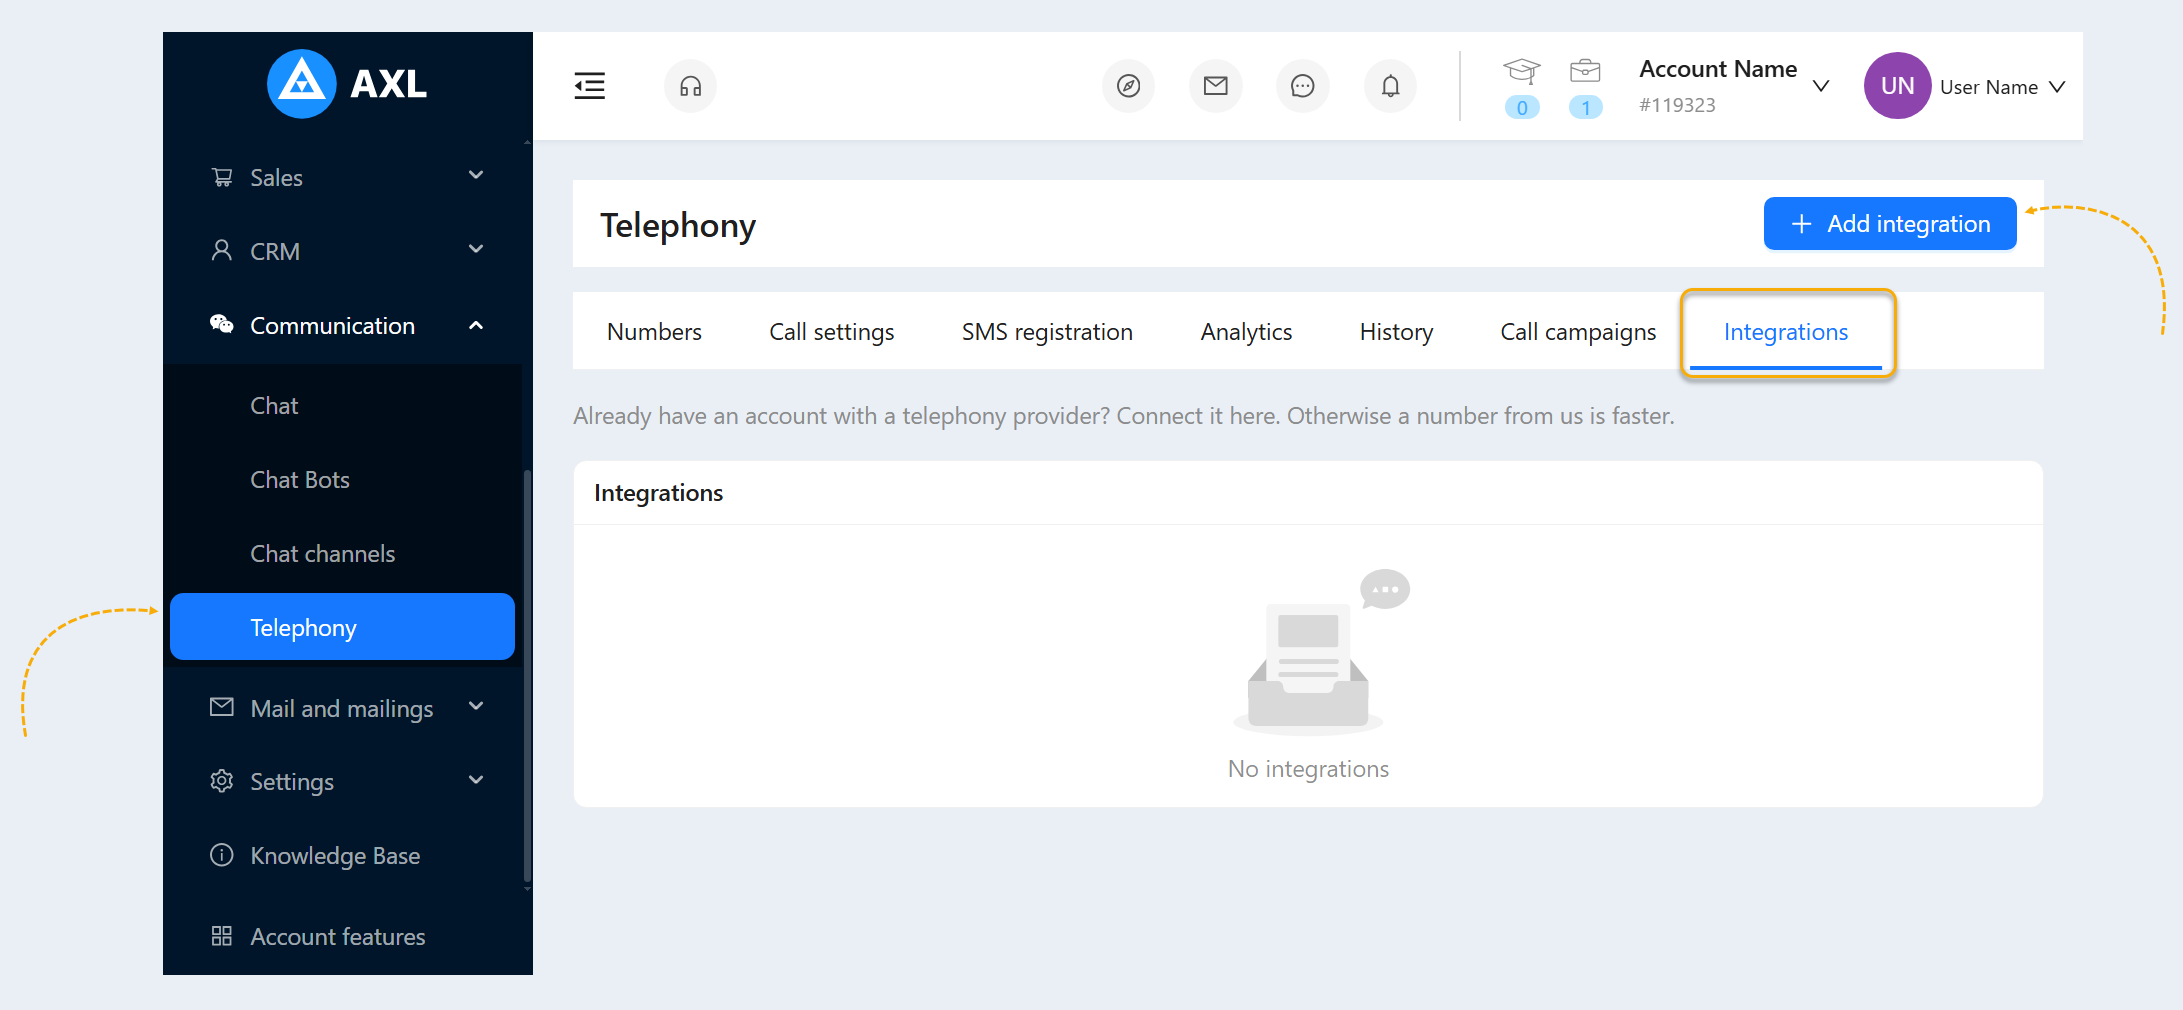
To add an integration:
Click Add Integration.
In the window that opens, select an option in the Integration Type field.
Enter the connection settings for the selected provider.
Click Add.
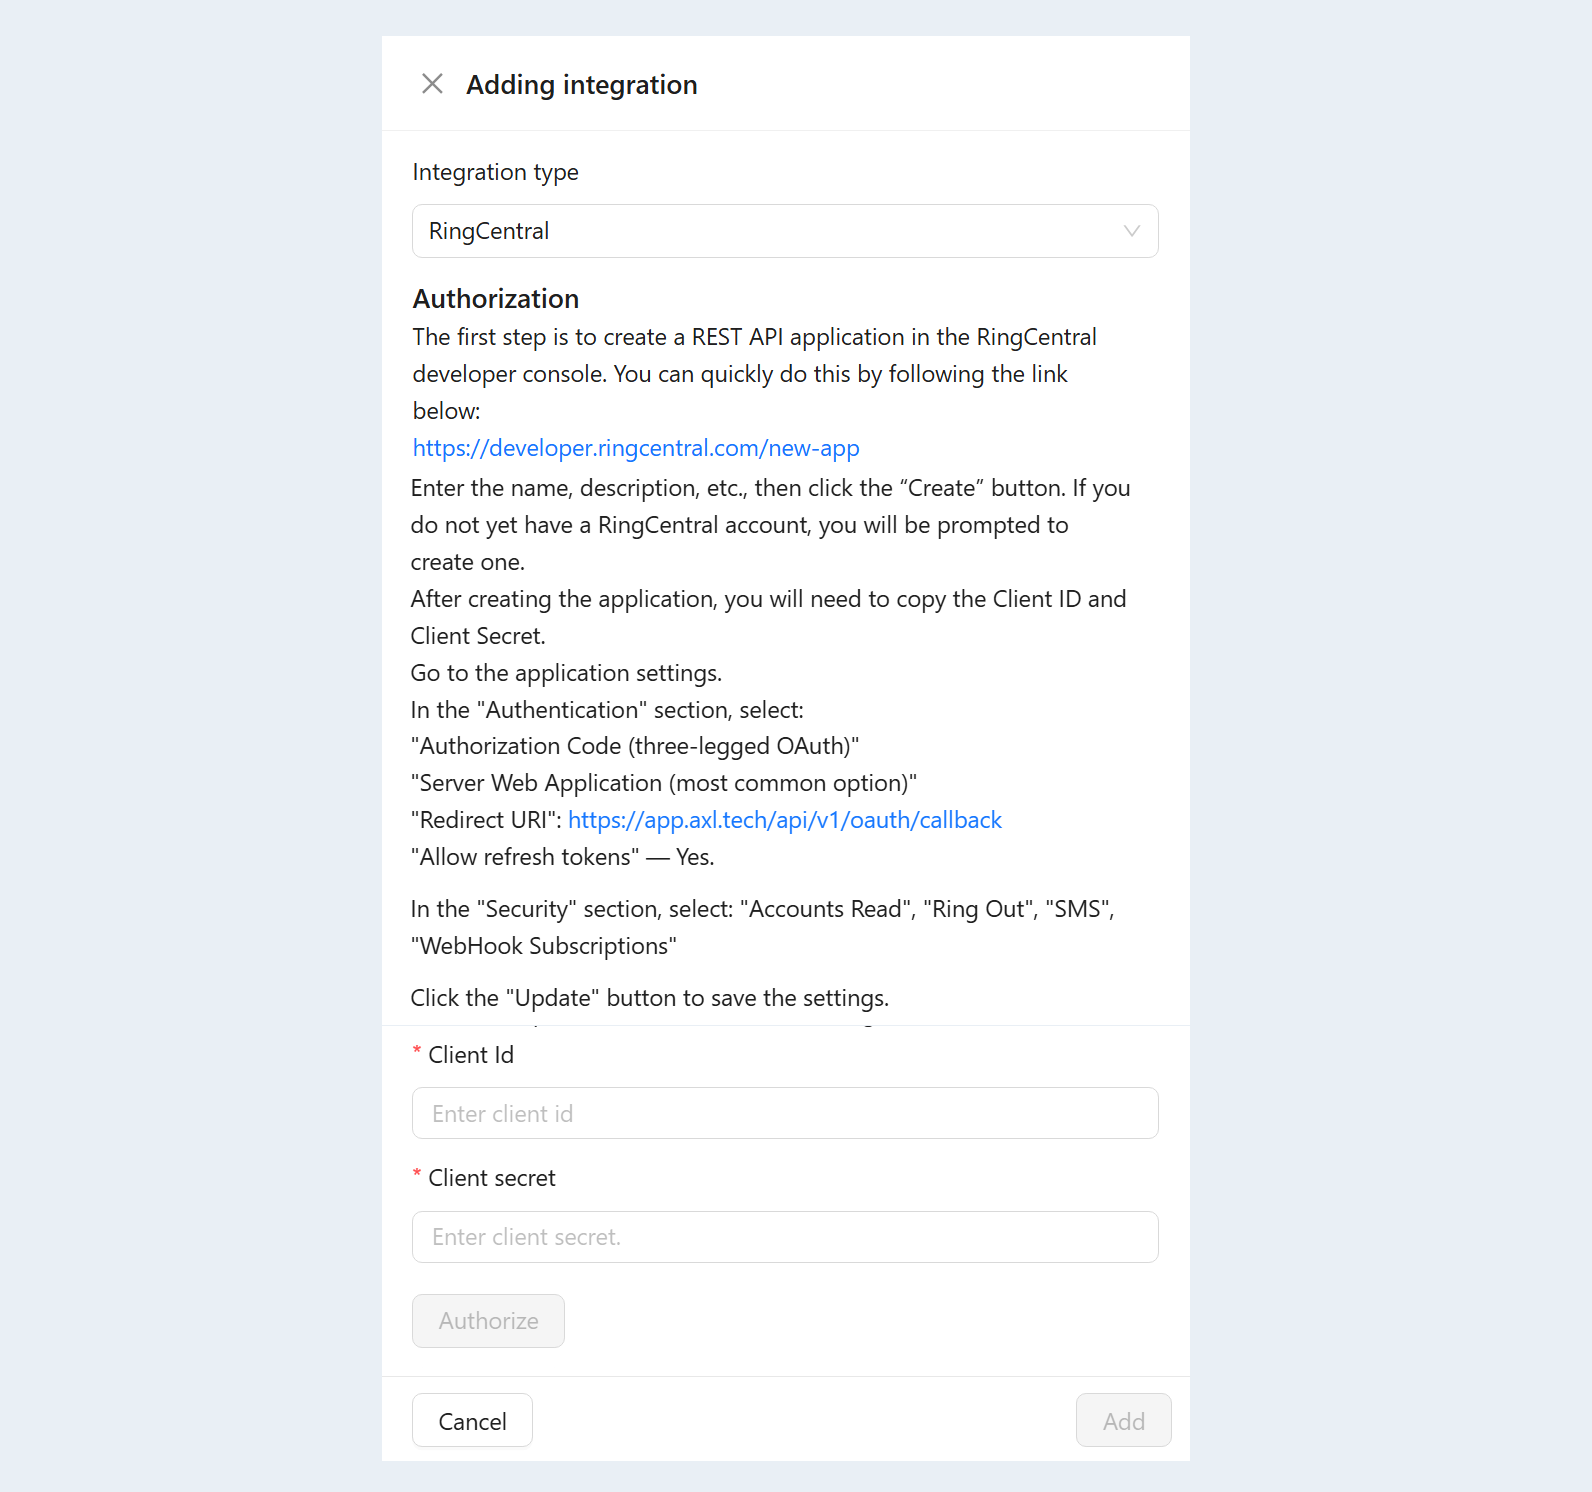
Once connected, the integration will appear in the list.
If you do not have an account with a telephony provider, you can connect a number directly in AXL on the Numbers tab.
Dedicated Numbers for Team Members
You can assign a phone number to a specific team member in your account. This allows different sales reps or departments to use separate numbers, so each team member can handle calls and text messages from a single dedicated number.
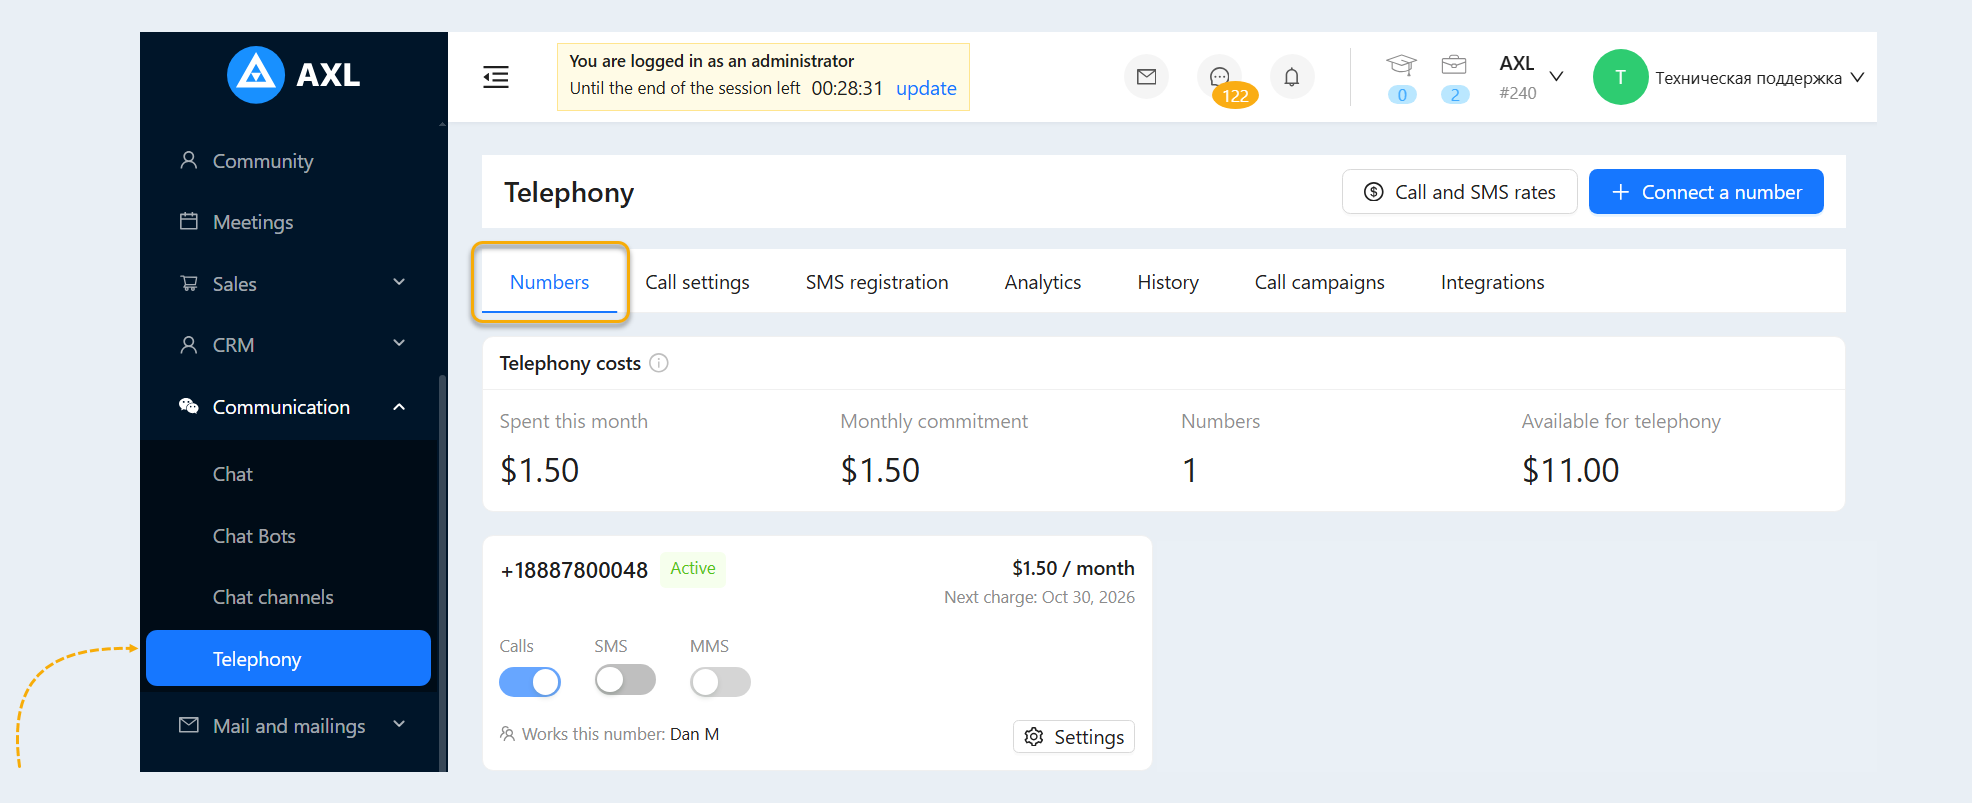
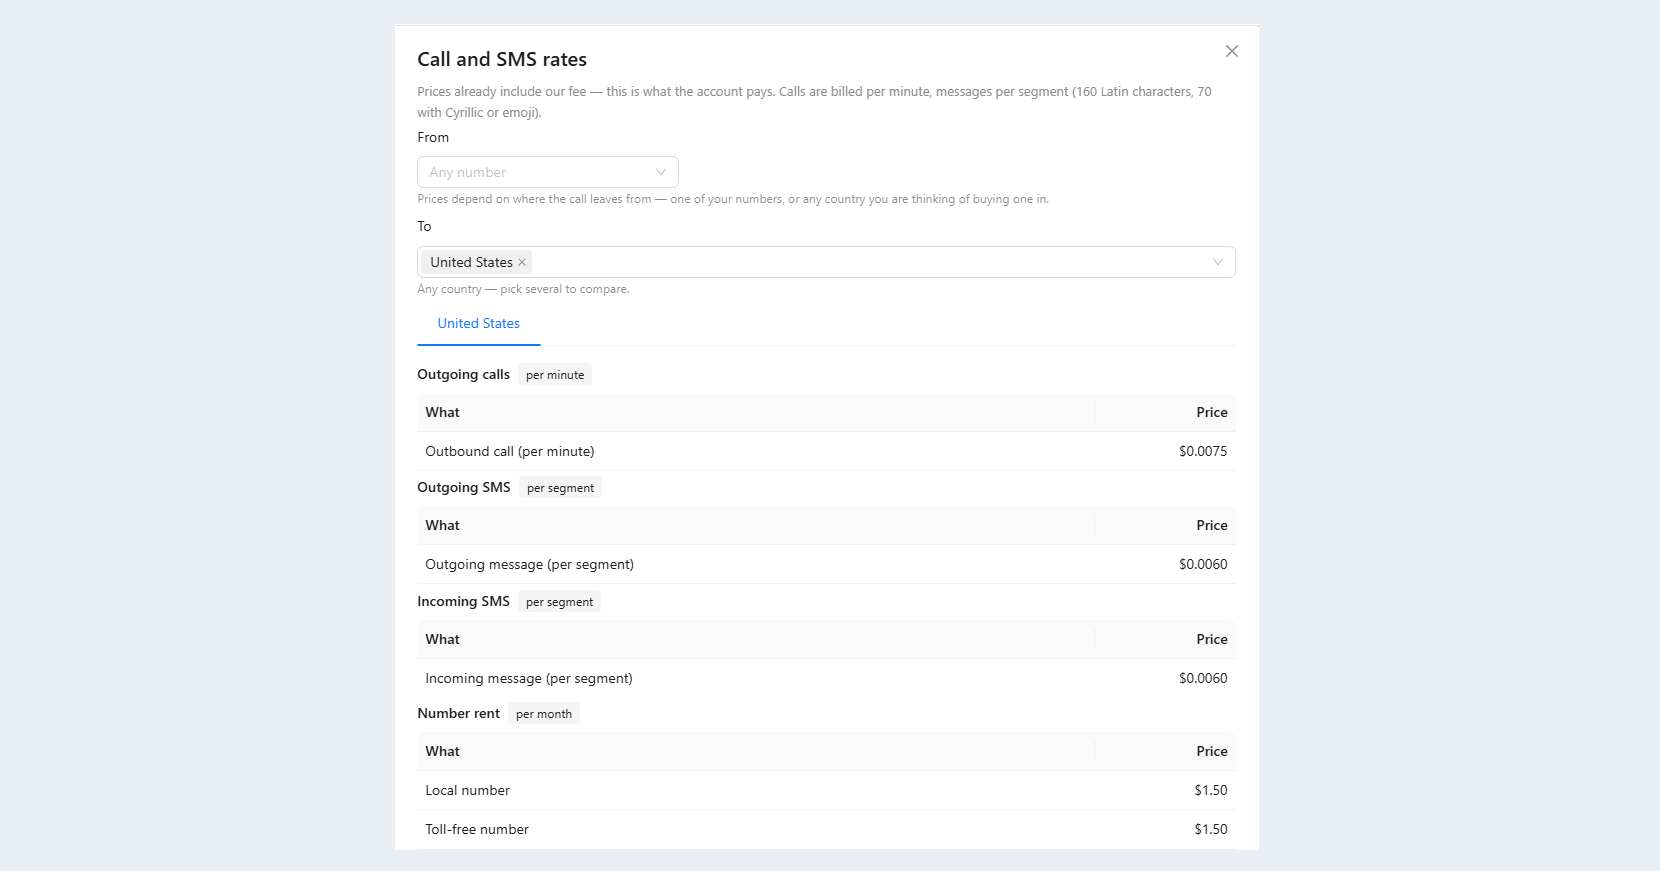
Pricing
The cost of a number is displayed in the connection window. AXL’s built-in telephony rates are, on average, approximately 25% lower than Twilio’s. Pricing depends on the country, number type, and services used.
Before connecting a number, you can review its pricing and available features under Communication → Telephony.